lights TOYOTA 4RUNNER 2019 (in English) Owner's Manual
[x] Cancel search | Manufacturer: TOYOTA, Model Year: 2019, Model line: 4RUNNER, Model: TOYOTA 4RUNNER 2019Pages: 528, PDF Size: 10.58 MB
Page 92 of 528
923-1. Key information
4RUNNER (U)
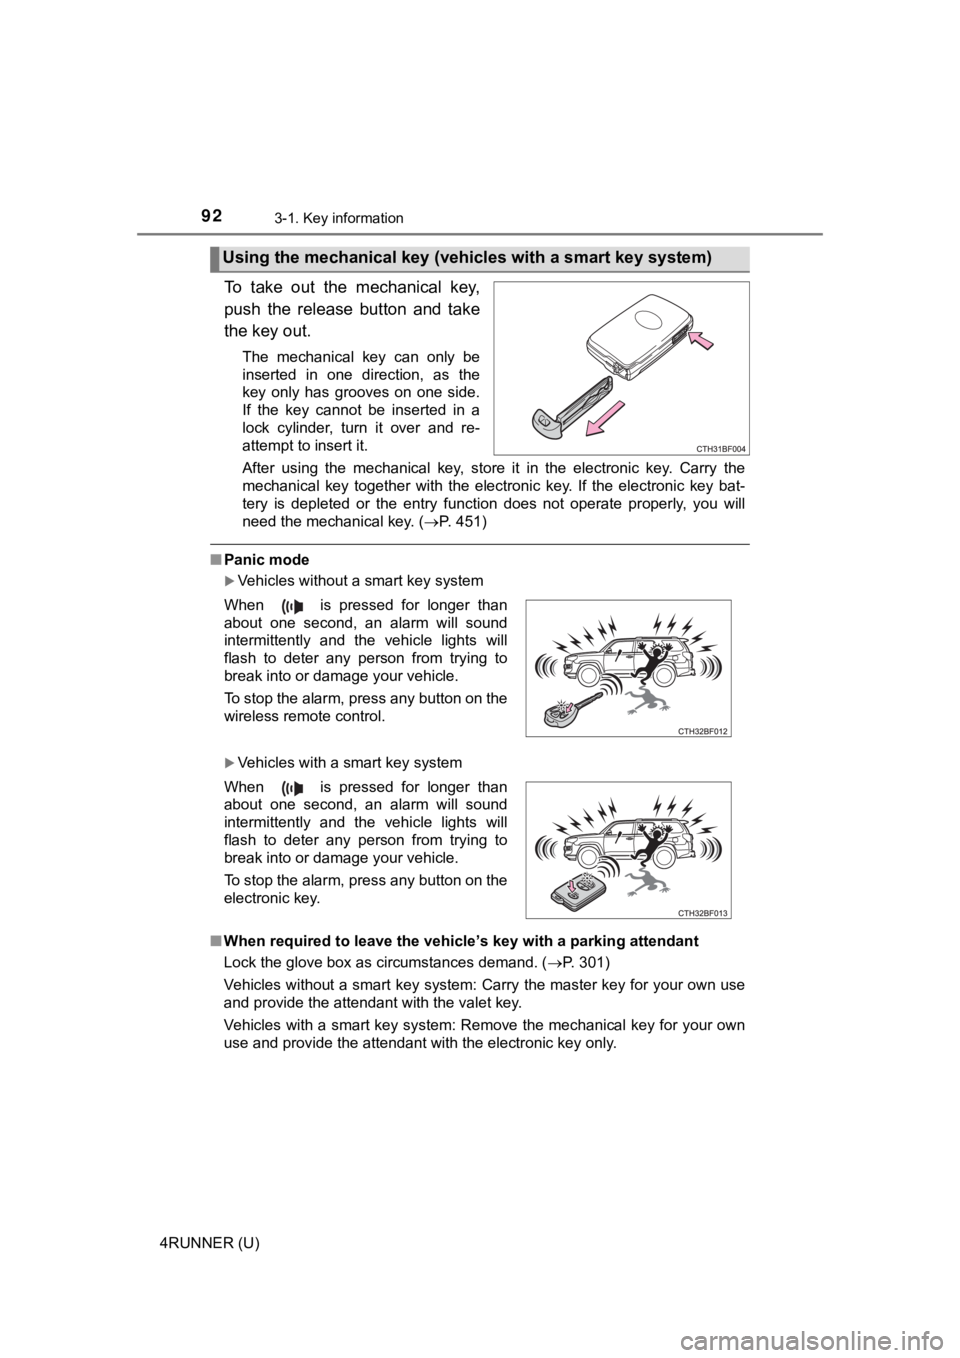
To take out the mechanical key,
push the release button and take
the key out.
The mechanical key can only be
inserted in one direction, as the
key only has grooves on one side.
If the key cannot be inserted in a
lock cylinder, turn it over and re-
attempt to insert it.
After using the mechanical key, store it in the electronic key. Carry the
mechanical key together with the electronic key. If the electro nic key bat-
tery is depleted or the entry function does not operate properl y, you will
need the mechanical key. ( P. 451)
■Panic mode
Vehicles without a smart key system
Vehicles with a smart key system
■ When required to leave the vehicle ’s key with a parking attendant
Lock the glove box as circumstances demand. ( P. 301)
Vehicles without a smart key system: Carry the master key for your own use
and provide the attendant with the valet key.
Vehicles with a smart key system: Remove the mechanical key for your own
use and provide the attendant with the electronic key only.
Using the mechanical key (vehic les with a smart key system)
When is pressed for longer than
about one second, an alarm will sound
intermittently and the vehicle lights will
flash to deter any person from trying to
break into or damage your vehicle.
To stop the alarm, press any button on the
wireless remote control.
When is pressed for longer than
about one second, an alarm will sound
intermittently and the vehicle lights will
flash to deter any person from trying to
break into or damage your vehicle.
To stop the alarm, press any button on the
electronic key.
Page 117 of 528
1173-2. Opening, closing and locking the doors
3
Operation of each component
4RUNNER (U)
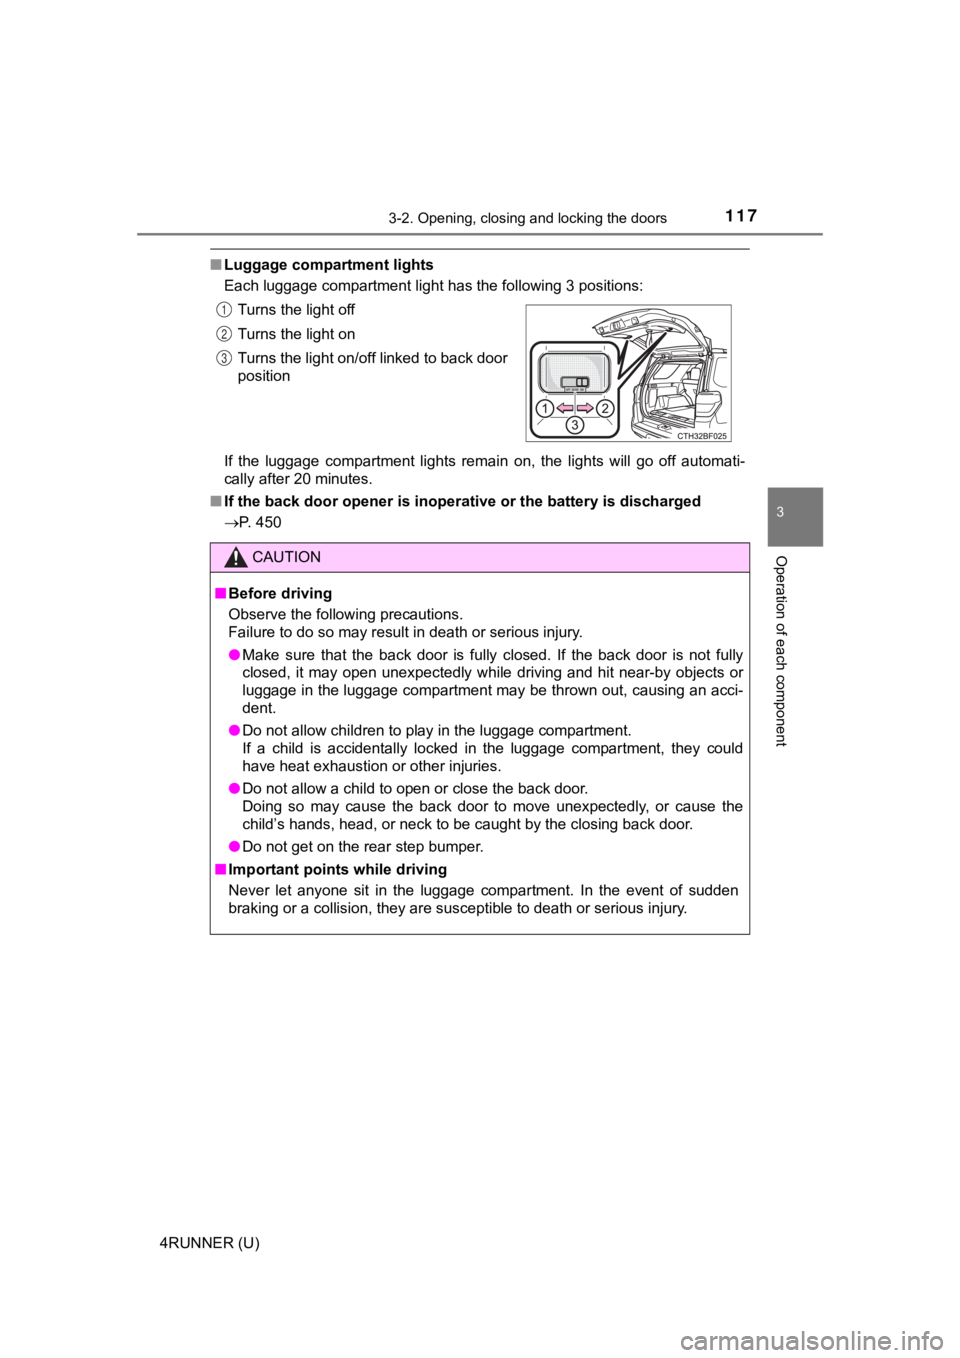
■Luggage compartment lights
Each luggage compartment light has the following 3 positions:
If the luggage compartment lights remain on, the lights will go off automati-
cally after 20 minutes.
■ If the back door opener is inoperative or the battery is discha rged
P. 450 Turns the light off
Turns the light on
Turns the light on/off linked to back door
position
CAUTION
■
Before driving
Observe the following precautions.
Failure to do so may result in death or serious injury.
● Make sure that the back door is fully closed. If the back door is not fully
closed, it may open unexpectedly while driving and hit near-by objects or
luggage in the luggage compartment may be thrown out, causing a n acci-
dent.
● Do not allow children to play in the luggage compartment.
If a child is accidentally locked in the luggage compartment, they could
have heat exhaustion or other injuries.
● Do not allow a child to open or close the back door.
Doing so may cause the back door to move unexpectedly, or cause the
child’s hands, head, or neck to be caught by the closing back d oor.
● Do not get on the rear step bumper.
■ Important points while driving
Never let anyone sit in the luggage compartment. In the event of sudden
braking or a collision, they are susceptible to death or seriou s injury.
1
2
3
Page 143 of 528
1433-4. Adjusting the steering wheel and mirrors
3
Operation of each component
4RUNNER (U)
Auto anti-glare inside rear view mirror
Responding to the level of brightness of the headlights of vehi cles
behind, the reflected light is automatically reduced.
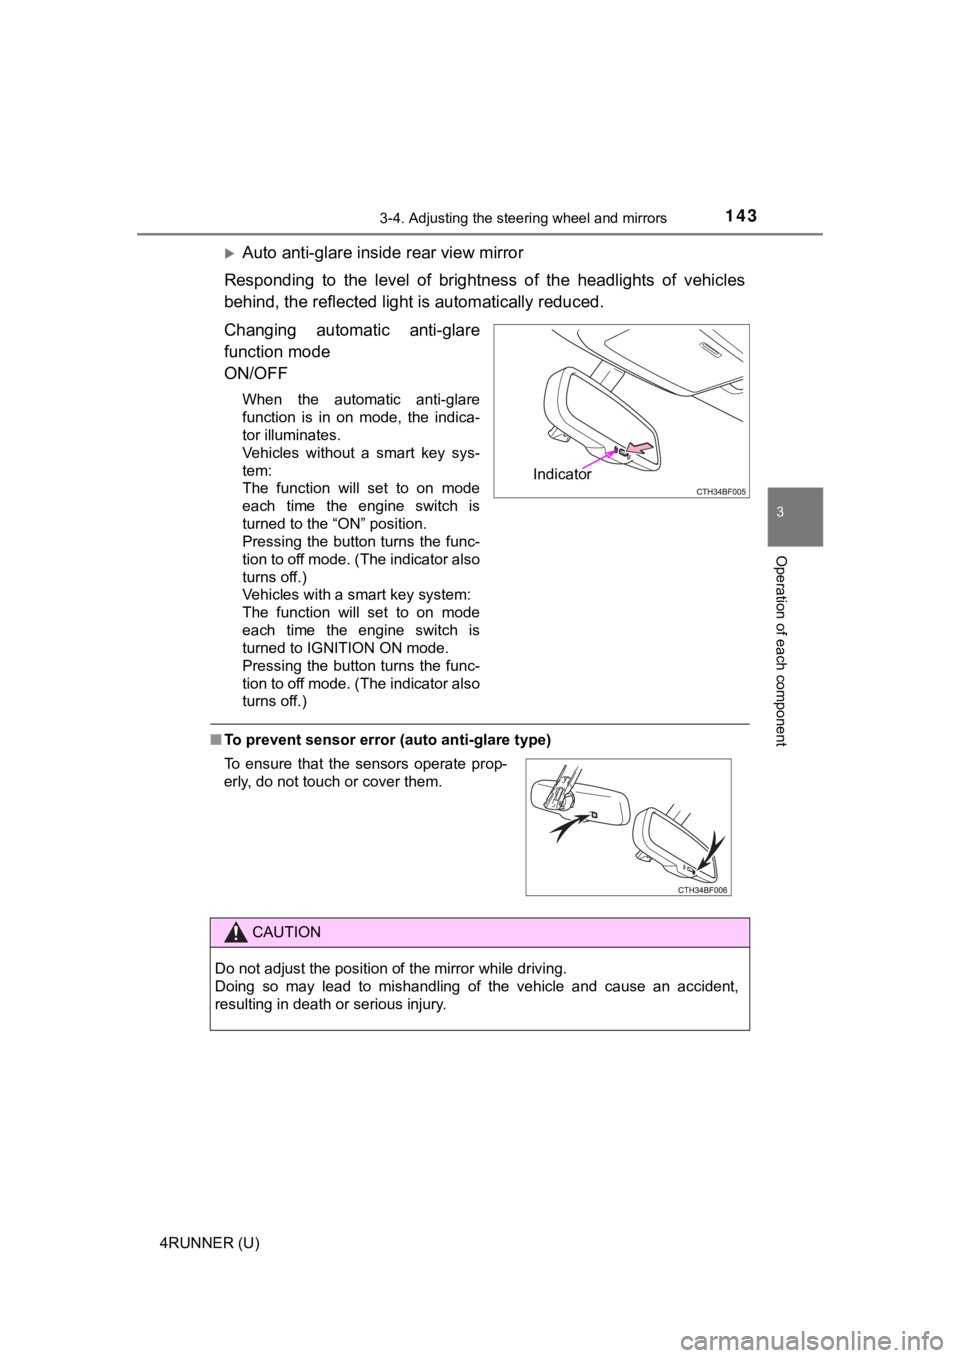
Changing automatic anti-glare
function mode
ON/OFF
When the automatic anti-glare
function is in on mode, the indica-
tor illuminates.
Vehicles without a smart key sys-
tem:
The function will set to on mode
each time the engine switch is
turned to the “ON” position.
Pressing the button turns the func-
tion to off mode. (The indicator also
turns off.)
Vehicles with a smart key system:
The function will set to on mode
each time the engine switch is
turned to IGNITION ON mode.
Pressing the button turns the func-
tion to off mode. (The indicator also
turns off.)
■ To prevent sensor error (auto anti-glare type)
Indicator
To ensure that the sensors operate prop-
erly, do not touch or cover them.
CAUTION
Do not adjust the position of the mirror while driving.
Doing so may lead to mishandling of the vehicle and cause an ac cident,
resulting in death or serious injury.
Page 159 of 528

159
Driving4
4RUNNER (U)4-1. Before driving
Driving the vehicle ............. 160
Cargo and luggage ........... 170
Vehicle load limits ............. 175
Trailer towing..................... 176
Dinghy towing ................... 192
4-2. Driving procedures Engine (ignition) switch (vehicles without a
smart key system) ........... 193
Engine (ignition) switch (vehicles with a
smart key system) ........... 196
Automatic transmission ..... 201
Turn signal lever................ 206
Parking brake .................... 207
4-3. Operating the lights and wipers
Headlight switch ................ 208
Fog light switch ................. 214
Windshield wipers and washer ............................ 216
Rear window wiper and washer ............................ 219 4-4. Refueling
Opening the fuel tank cap .................................. 222
4-5. Using the driving support systems
Cruise control .................... 225
Intuitive parking assist....... 229
Four-wheel drive system (part-time 4WD
models) ........................... 235
Four-wheel drive system (full-time 4WD
models) ........................... 239
Active traction control system ............................ 243
AUTO LSD system............ 245
Rear differential lock system ............................ 247
Downhill assist control system ............................ 250
Crawl Control .................... 253
Multi-terrain Select ............ 256
Driving assist systems ...... 263
4-6. Driving tips Winter driving tips ............. 272
Off-road precautions ......... 276
Page 184 of 528
1844-1. Before driving
4RUNNER (U)
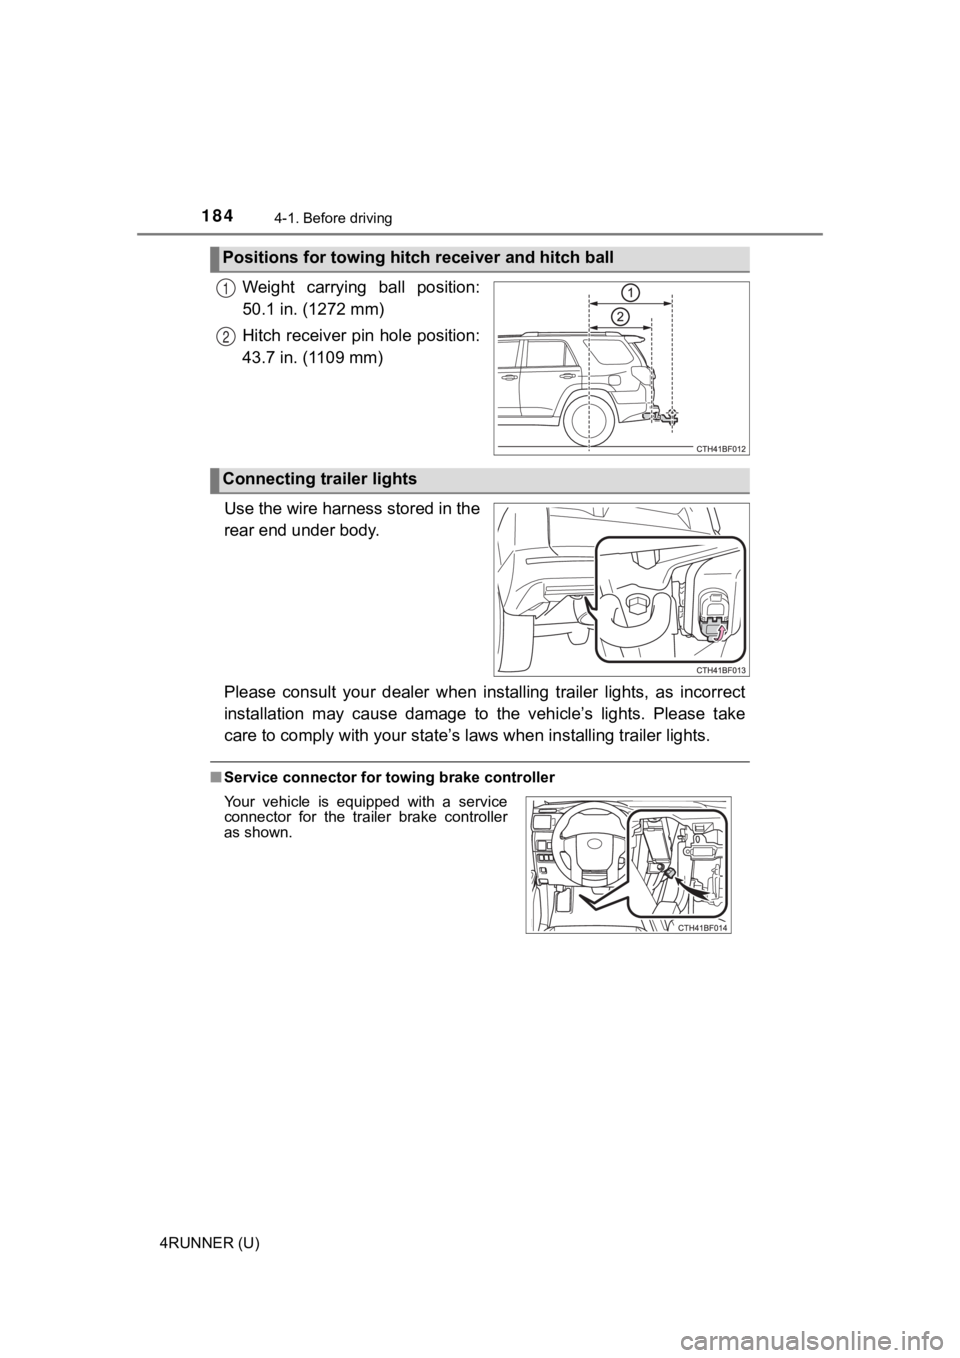
Weight carrying ball position:
50.1 in. (1272 mm)
Hitch receiver pin hole position:
43.7 in. (1109 mm)
Use the wire harness stored in the
rear end under body.
Please consult your dealer when installing trailer lights, as i ncorrect
installation may cause damage to the vehicle’s lights. Please t ake
care to comply with your state’s laws when installing trailer lights.
■Service connector for towing brake controller
Positions for towing hitch receiver and hitch ball
1
2
Connecting trailer lights
Your vehicle is equipped with a service
connector for the trailer brake controller
as shown.
Page 185 of 528

1854-1. Before driving
4
Driving
4RUNNER (U)
Your vehicle will handle differently when towing a trailer. Help to avoid
an accident, death or serious injury, keep the following in min d when
towing:
● Speed limits for towing a trailer vary by state or province. Do not
exceed the posted to wing speed limit.
● Toyota recommends that the vehicl e-trailer speed limit is 65 mph
(104 km/h) on a flat, straight, dry road. Do not exceed this li mit, the
posted towing speed limit or the speed limit for your trailer a s set
forth in your trailer owner’s manu al, whichever is lowest. Instability
of the towing vehicle-trailer combination (trailer sway) increa ses as
speed increases. Exceeding speed limits may cause loss of contr ol.
● Before starting out, check the trailer lights, tires and the vehicle-
trailer connections. Recheck af ter driving a short distance.
● Practice turning, stopping and reversing with the trailer attac hed in
an area away from traffic until you become accustomed to the fe el
of the vehicle-trailer combination.
● Reversing with a trailer attached is difficult and requires pra ctice.
Grip the bottom of the steering wheel and move your hand to the
left to move the trailer to the left. Move your hand to the rig ht to
move the trailer to right. (This is generally opposite to reversing
without a trailer attached.) Avoid sharp or prolonged turning. Have
someone guide you when reversing to reduce the risk of an acci-
dent.
● As stopping distance is increased when towing a trailer, vehicl e-to
vehicle distance should be increased. For each 10 mph (16 km/h)
of speed, allow at least one v ehicle and trailer length.
● Avoid sudden braking as you may skid, resulting in the trailer jack-
knifing and a loss of vehicle control. This is especially true on wet or
slippery surfaces.
Trailer towing tips
Page 188 of 528

1884-1. Before driving
4RUNNER (U)■
Before towing
Check that the following conditions are met:
●Ensure that your vehicle’s tires are properly inflated. ( P. 472)
● Trailer tires are inflated according to the trailer manufacture r’s recommen-
dation.
● All trailer lights work as required by law.
● All lights work each time you connect them.
● The trailer ball is set at the proper height for the coupler on the trailer.
● The trailer is level when it is hitched.
Do not drive if the trailer is not level, and check for imprope r tongue weight,
overloading, worn suspension, or other possible causes.
● The trailer cargo is securely loaded.
● The rear view mirrors conform to all applicable federal, state/provincial or
local regulations. If they do not, install rear view mirrors ap propriate for tow-
ing purposes.
■ Break-in schedule
If your vehicle is new or equipped with any new power train com ponents
(such as an engine, transmission, differential or wheel bearing ), Toyota rec-
ommends that you do not tow a trailer until the vehicle has bee n driven for
over 500 miles (800 km).
After the vehicle has been driven for over 500 miles (800 km), you can start
towing. However, for the next 500 miles (800 km), drive the veh icle at a speed
of less than 45 mph (72 km/h) when towing a trailer, and avoid full throttle
acceleration.
■ Maintenance
●If you tow a trailer, your vehicle will require more frequent m aintenance due
to the additional load. (See “Scheduled Maintenance Guide” or “ Owner’s
Manual Supplement”.)
● Retighten the fixing bolts of the towing ball and bracket after approximately
600 miles (1000 km) of trailer towing.
■ If trailer sway occurs
One or more factors (crosswinds, passing vehicles, rough roads, etc.) can
adversely affect handling of your vehicle and trailer, causing instability.
● If trailer swaying occurs:
• Firmly grip the steering wheel. Steer straight ahead.
Do not try to control trailer swaying by turning the steering w heel.
• Begin releasing the accelerator pedal immediately but very gra dually to
reduce speed.
Do not increase speed. Do not apply vehicle brakes.
If you make no extreme correction with the steering or brakes, your vehicle
and trailer should stabilize. (if enabled, Trailer Sway Control can also help to
stabilize the vehicle and trailer.)
Page 191 of 528

1914-1. Before driving
4
Driving
4RUNNER (U)
NOTICE
■When installing a trailer hitch
Use only the position recommended by your Toyota dealer. Do not install
the trailer hitch on the bumper; this may cause body damage.
■ Do not directly splice trailer lights
Do not directly splice trailer lights. Directly splicing traile r lights may damage
your vehicle’s electrical system and cause a malfunction.
Page 206 of 528
2064-2. Driving procedures
4RUNNER (U)
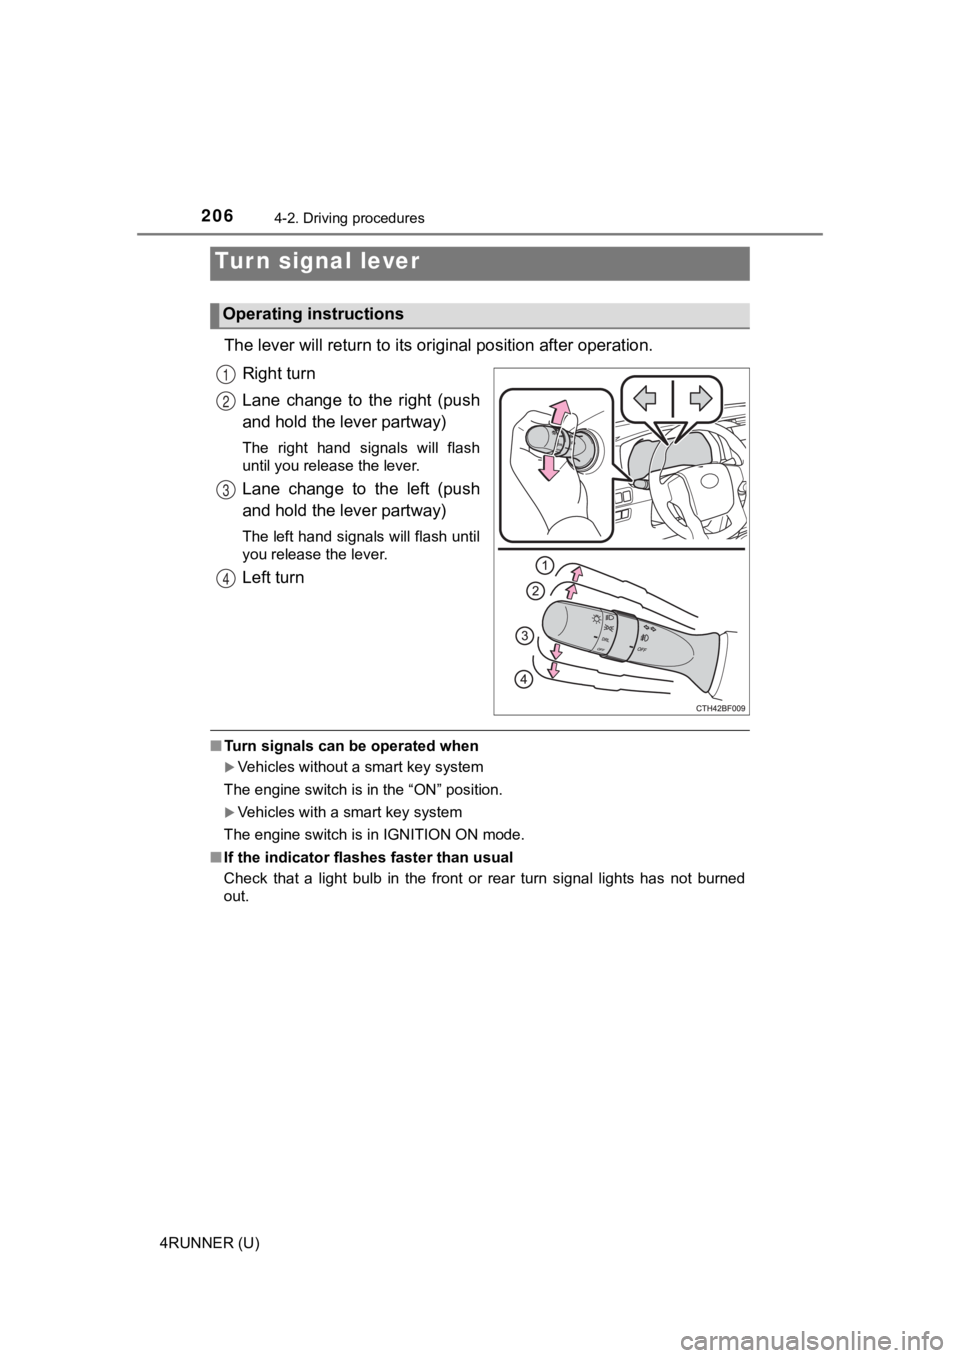
The lever will return to its original position after operation.
Right turn
Lane change to the right (push
and hold the lever partway)
The right hand signals will flash
until you release the lever.
Lane change to the left (push
and hold the lever partway)
The left hand signals will flash until
you release the lever.
Left turn
■ Turn signals can be operated when
Vehicles without a smart key system
The engine switch is in the “ON” position.
Vehicles with a smart key system
The engine switch is in IGNITION ON mode.
■ If the indicator flashes faster than usual
Check that a light bulb in the front or rear turn signal lights has not burned
out.
Turn signal lever
Operating instructions
1
2
3
4
Page 208 of 528
208
4RUNNER (U)
4-3. Operating the lights and wipers
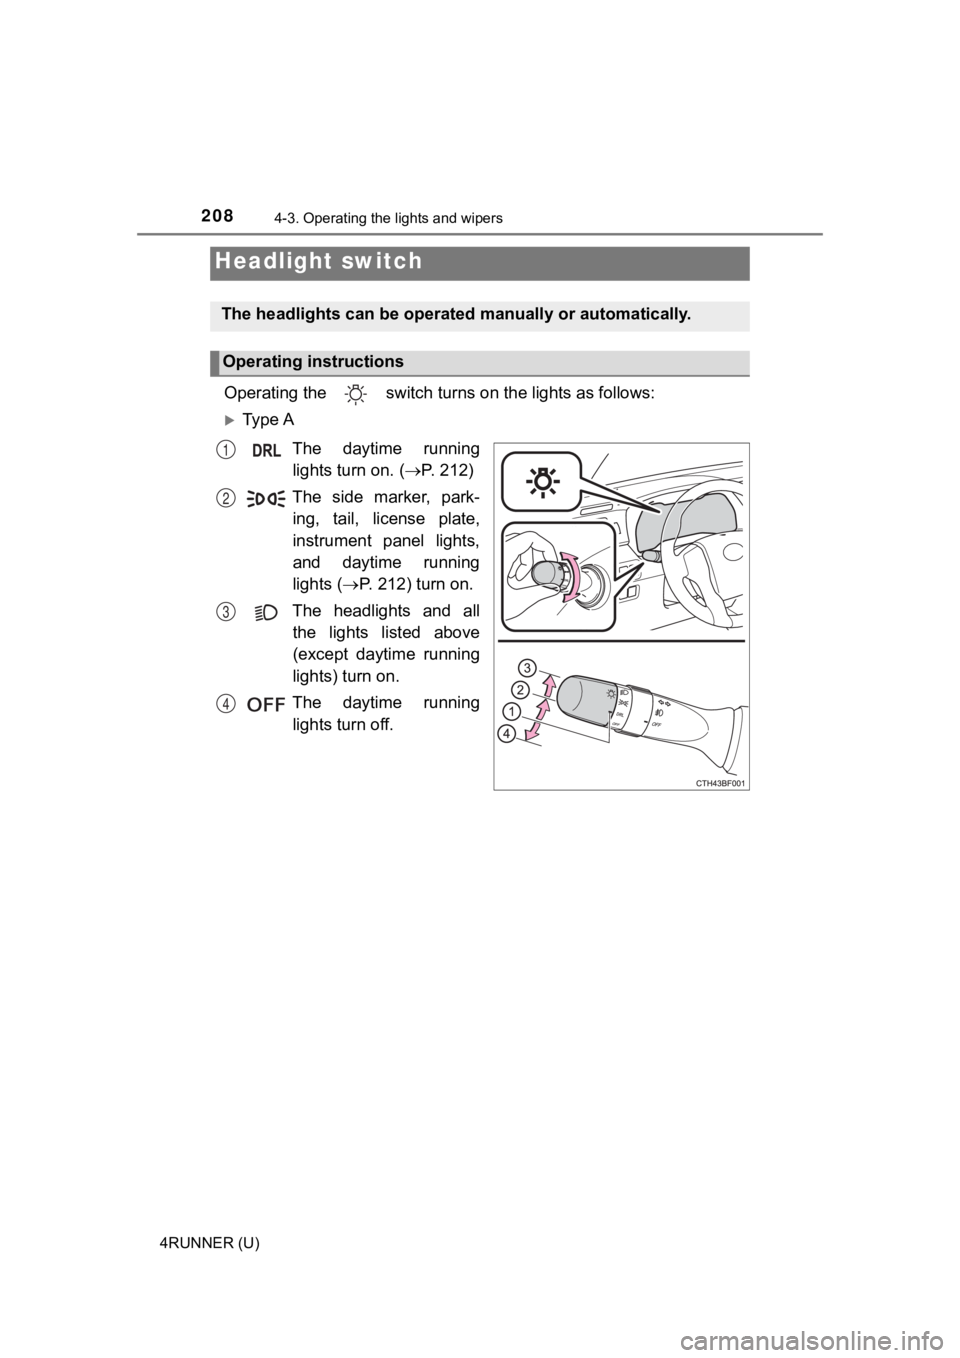
Operating the switch turns on the lights as follows:
Ty p e A
The daytime runninglights turn on. ( P. 212)
The side marker, park- ing, tail, license plate,
instrument panel lights,
and daytime running
lights ( P. 212) turn on.
The headlights and all the lights listed above
(except daytime running
lights) turn on.
The daytime running lights turn off.
Headlight switch
The headlights can be operated manually or automatically.
Operating instructions
1
2
3
4