tire type TOYOTA AURIS 2013 Owners Manual (in English)
[x] Cancel search | Manufacturer: TOYOTA, Model Year: 2013, Model line: AURIS, Model: TOYOTA AURIS 2013Pages: 768, PDF Size: 21.22 MB
Page 15 of 768
15Pictorial index
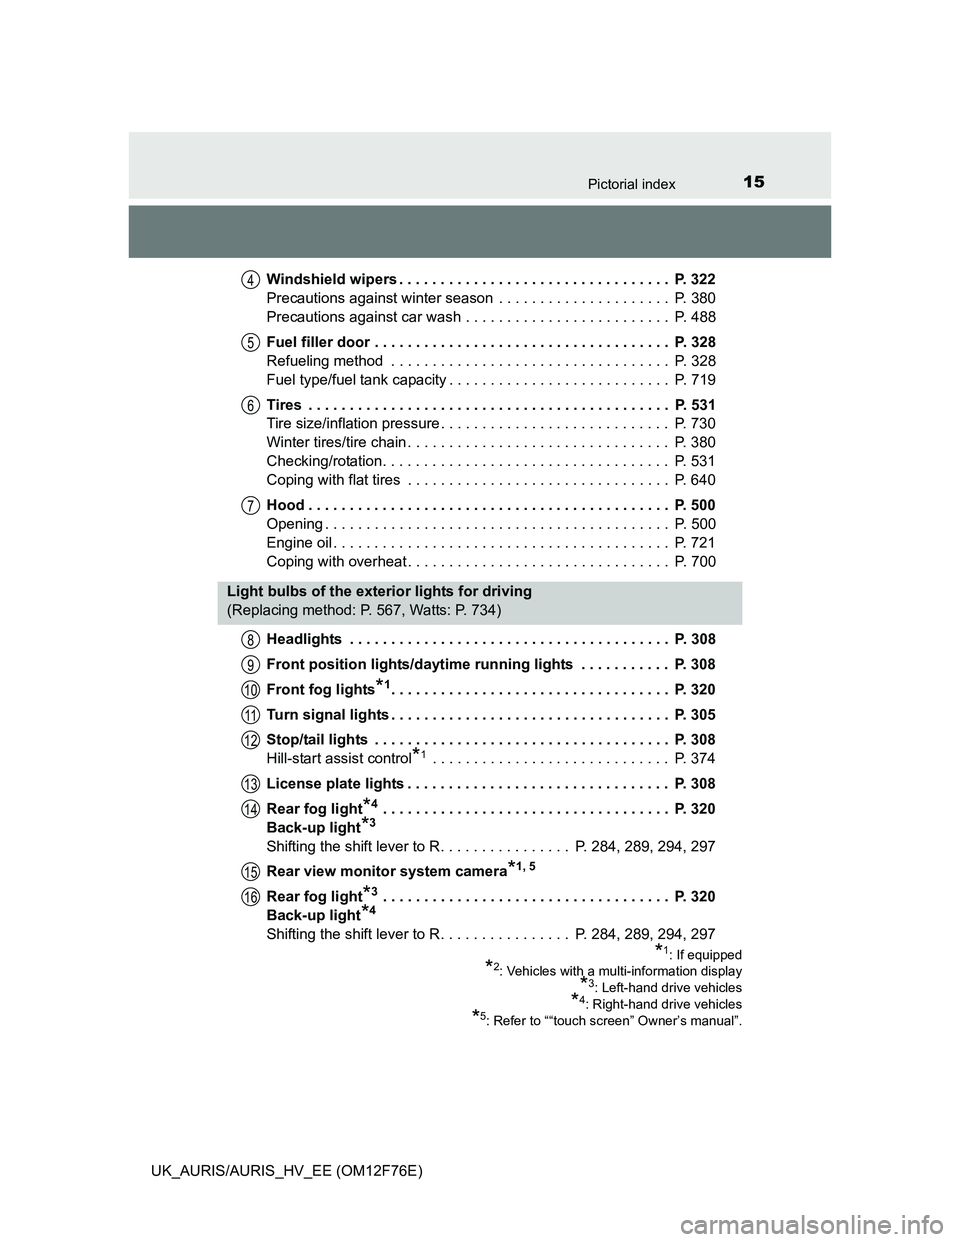
UK_AURIS/AURIS_HV_EE (OM12F76E)Windshield wipers . . . . . . . . . . . . . . . . . . . . . . . . . . . . . . . . . P. 322
Precautions against winter season . . . . . . . . . . . . . . . . . . . . . P. 380
Precautions against car wash . . . . . . . . . . . . . . . . . . . . . . . . . P. 488
Fuel filler door . . . . . . . . . . . . . . . . . . . . . . . . . . . . . . . . . . . . P. 328
Refueling method . . . . . . . . . . . . . . . . . . . . . . . . . . . . . . . . . . P. 328
Fuel type/fuel tank capacity . . . . . . . . . . . . . . . . . . . . . . . . . . . P. 719
Tires . . . . . . . . . . . . . . . . . . . . . . . . . . . . . . . . . . . . . . . . . . . . P. 531
Tire size/inflation pressure . . . . . . . . . . . . . . . . . . . . . . . . . . . . P. 730
Winter tires/tire chain . . . . . . . . . . . . . . . . . . . . . . . . . . . . . . . . P. 380
Checking/rotation. . . . . . . . . . . . . . . . . . . . . . . . . . . . . . . . . . . P. 531
Coping with flat tires . . . . . . . . . . . . . . . . . . . . . . . . . . . . . . . . P. 640
Hood . . . . . . . . . . . . . . . . . . . . . . . . . . . . . . . . . . . . . . . . . . . . P. 500
Opening . . . . . . . . . . . . . . . . . . . . . . . . . . . . . . . . . . . . . . . . . . P. 500
Engine oil . . . . . . . . . . . . . . . . . . . . . . . . . . . . . . . . . . . . . . . . . P. 721
Coping with overheat . . . . . . . . . . . . . . . . . . . . . . . . . . . . . . . . P. 700
Headlights . . . . . . . . . . . . . . . . . . . . . . . . . . . . . . . . . . . . . . . P. 308
Front position lights/daytime running lights . . . . . . . . . . . P. 308
Front fog lights
*1. . . . . . . . . . . . . . . . . . . . . . . . . . . . . . . . . . P. 320
Turn signal lights . . . . . . . . . . . . . . . . . . . . . . . . . . . . . . . . . . P. 305
Stop/tail lights . . . . . . . . . . . . . . . . . . . . . . . . . . . . . . . . . . . . P. 308
Hill-start assist control
*1 . . . . . . . . . . . . . . . . . . . . . . . . . . . . . P. 374
License plate lights . . . . . . . . . . . . . . . . . . . . . . . . . . . . . . . . P. 308
Rear fog light
*4 . . . . . . . . . . . . . . . . . . . . . . . . . . . . . . . . . . . P. 320
Back-up light
*3
Shifting the shift lever to R. . . . . . . . . . . . . . . . P. 284, 289, 294, 297
Rear view monitor system camera
*1, 5
Rear fog light*3 . . . . . . . . . . . . . . . . . . . . . . . . . . . . . . . . . . . P. 320
Back-up light
*4
Shifting the shift lever to R. . . . . . . . . . . . . . . . P. 284, 289, 294, 297
4
5
6
7
Light bulbs of the exterior lights for driving
(Replacing method: P. 567, Watts: P. 734)
*1: If equipped
*2: Vehicles with a multi-information display
*3: Left-hand drive vehicles
*4: Right-hand drive vehicles
*5: Refer to ““touch screen” Owner’s manual”.
8
9
10
11
12
13
14
15
16
Page 382 of 768
3824-6. Driving tips
UK_AURIS/AURIS_HV_EE (OM12F76E)
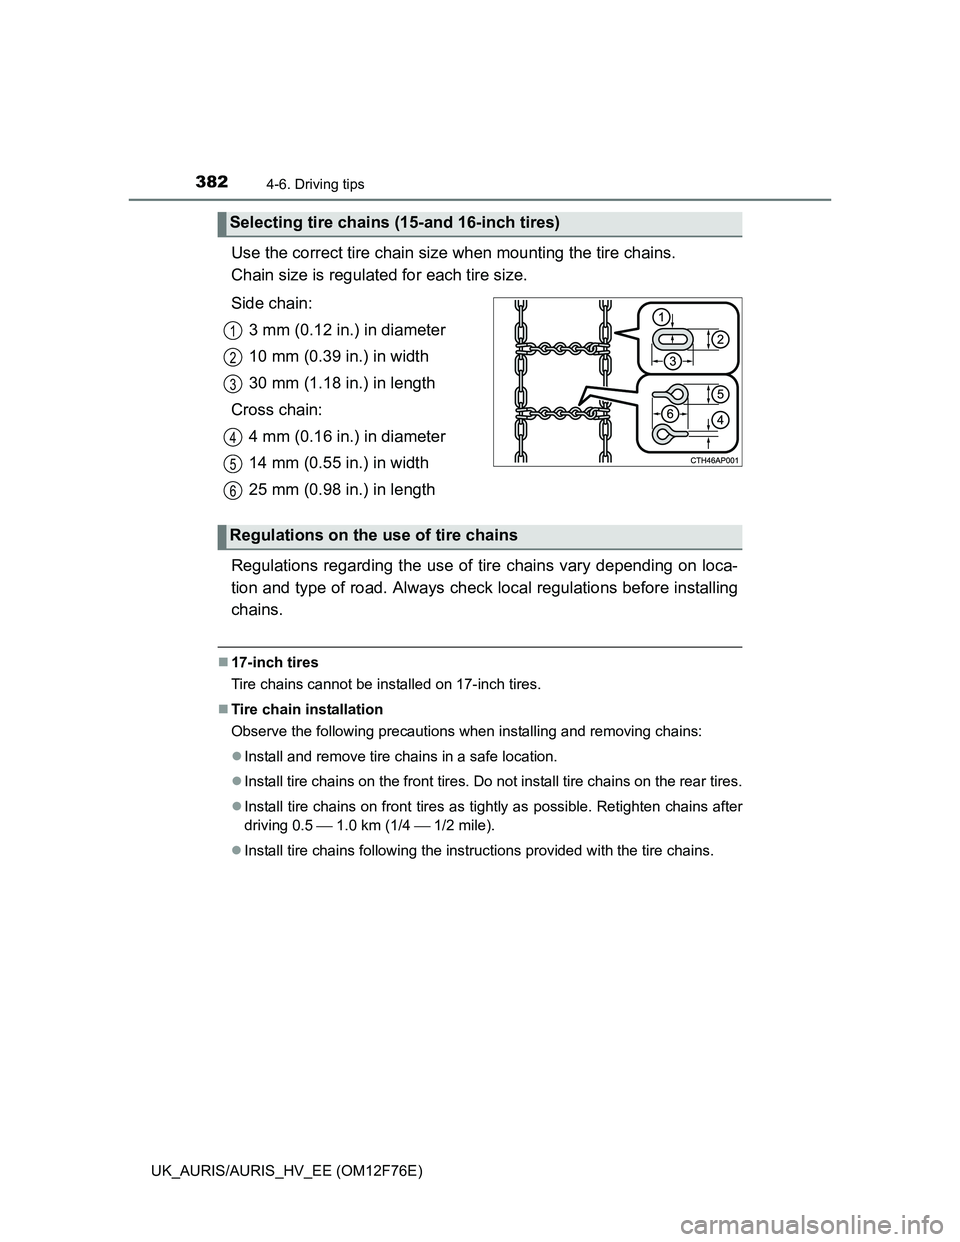
Use the correct tire chain size when mounting the tire chains.
Chain size is regulated for each tire size.
Side chain:
3 mm (0.12 in.) in diameter
10 mm (0.39 in.) in width
30 mm (1.18 in.) in length
Cross chain:
4 mm (0.16 in.) in diameter
14 mm (0.55 in.) in width
25 mm (0.98 in.) in length
Regulations regarding the use of tire chains vary depending on loca-
tion and type of road. Always check local regulations before installing
chains.
17-inch tires
Tire chains cannot be installed on 17-inch tires.
Tire chain installation
Observe the following precautions when installing and removing chains:
Install and remove tire chains in a safe location.
Install tire chains on the front tires. Do not install tire chains on the rear tires.
Install tire chains on front tires as tightly as possible. Retighten chains after
driving 0.5 1.0 km (1/4 1/2 mile).
Install tire chains following the instructions provided with the tire chains.
Selecting tire chains (15-and 16-inch tires)
1
2
3
4
5
6
Regulations on the use of tire chains
Page 532 of 768
5326-3. Do-it-yourself maintenance
UK_AURIS/AURIS_HV_EE (OM12F76E)
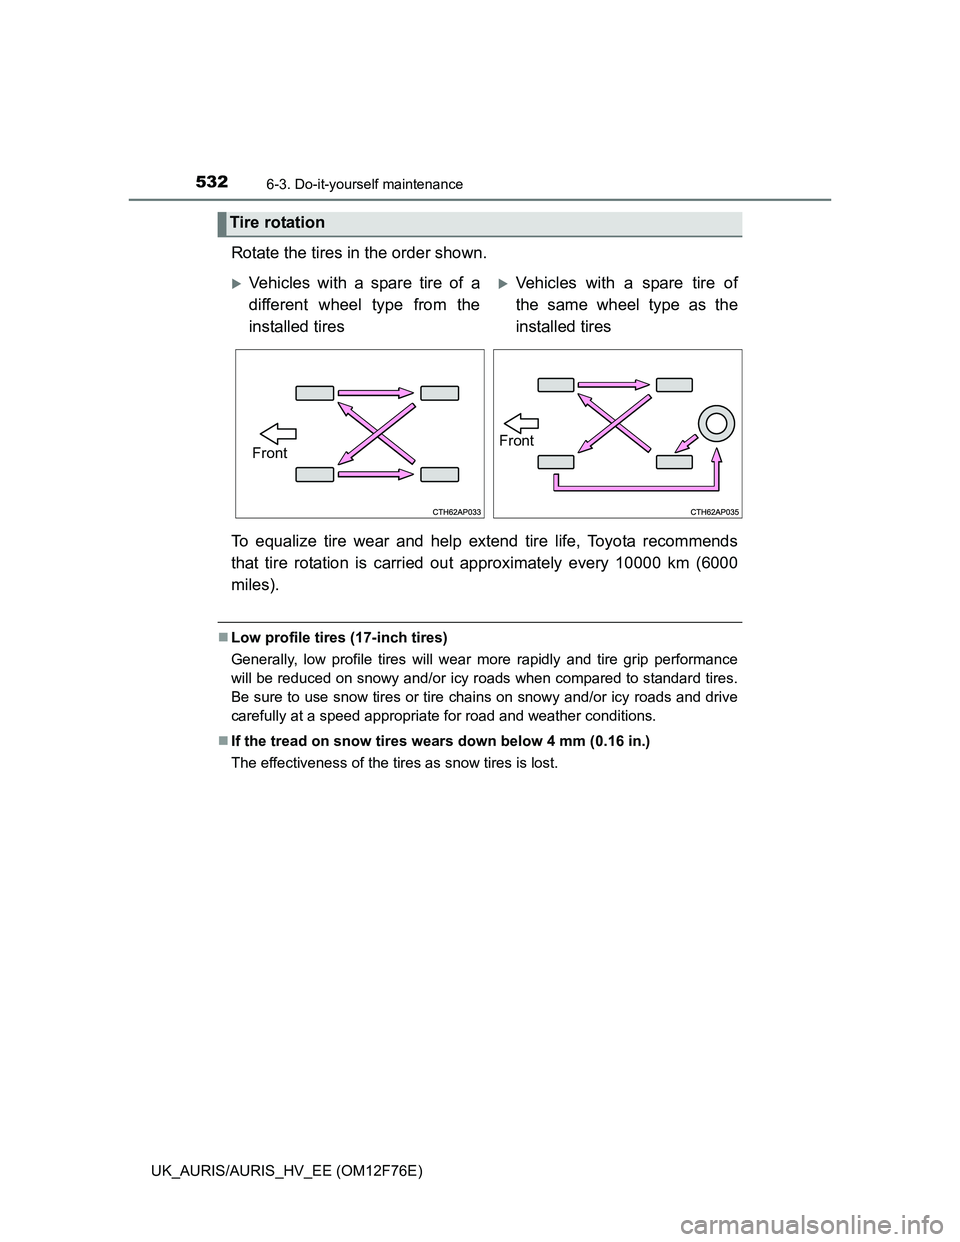
Rotate the tires in the order shown.
To equalize tire wear and help extend tire life, Toyota recommends
that tire rotation is carried out approximately every 10000 km (6000
miles).
Low profile tires (17-inch tires)
Generally, low profile tires will wear more rapidly and tire grip performance
will be reduced on snowy and/or icy roads when compared to standard tires.
Be sure to use snow tires or tire chains on snowy and/or icy roads and drive
carefully at a speed appropriate for road and weather conditions.
If the tread on snow tires wears down below 4 mm (0.16 in.)
The effectiveness of the tires as snow tires is lost.
Tire rotation
Vehicles with a spare tire of a
different wheel type from the
installed tiresVehicles with a spare tire of
the same wheel type as the
installed tires
FrontFront
Page 536 of 768
5366-3. Do-it-yourself maintenance
UK_AURIS/AURIS_HV_EE (OM12F76E)
When replacing wheels, care should be taken to ensure that they are
equivalent to those removed in load capacity, diameter, rim width and
inset
*.
Replacement wheels are available at any authorized Toyota dealer or
repairer, or another duly qualified and equipped professional.
*: Conventionally referred to as “offset”.
Toyota does not recommend using the following:
Wheels of different sizes or types
Used wheels
Bent wheels that have been straightened
Use only Toyota wheel nuts and wrenches designed for use with
your aluminum wheels.
When rotating, repairing or changing your tires, check that the
wheel nuts are still tight after driving 1600 km (1000 miles).
Be careful not to damage the aluminum wheels when using tire
chains.
Use only Toyota genuine balance weights or equivalent and a plas-
tic or rubber hammer when balancing your wheels.
Wheels
If a wheel is bent, cracked or heavily corroded, it should be
replaced. Otherwise, the tire may separate from the wheel or
cause a loss of handling control.
Wheel selection
Aluminum wheel precautions (if equipped)
Page 654 of 768
6547-2. Steps to take in an emergency
UK_AURIS/AURIS_HV_EE (OM12F76E)
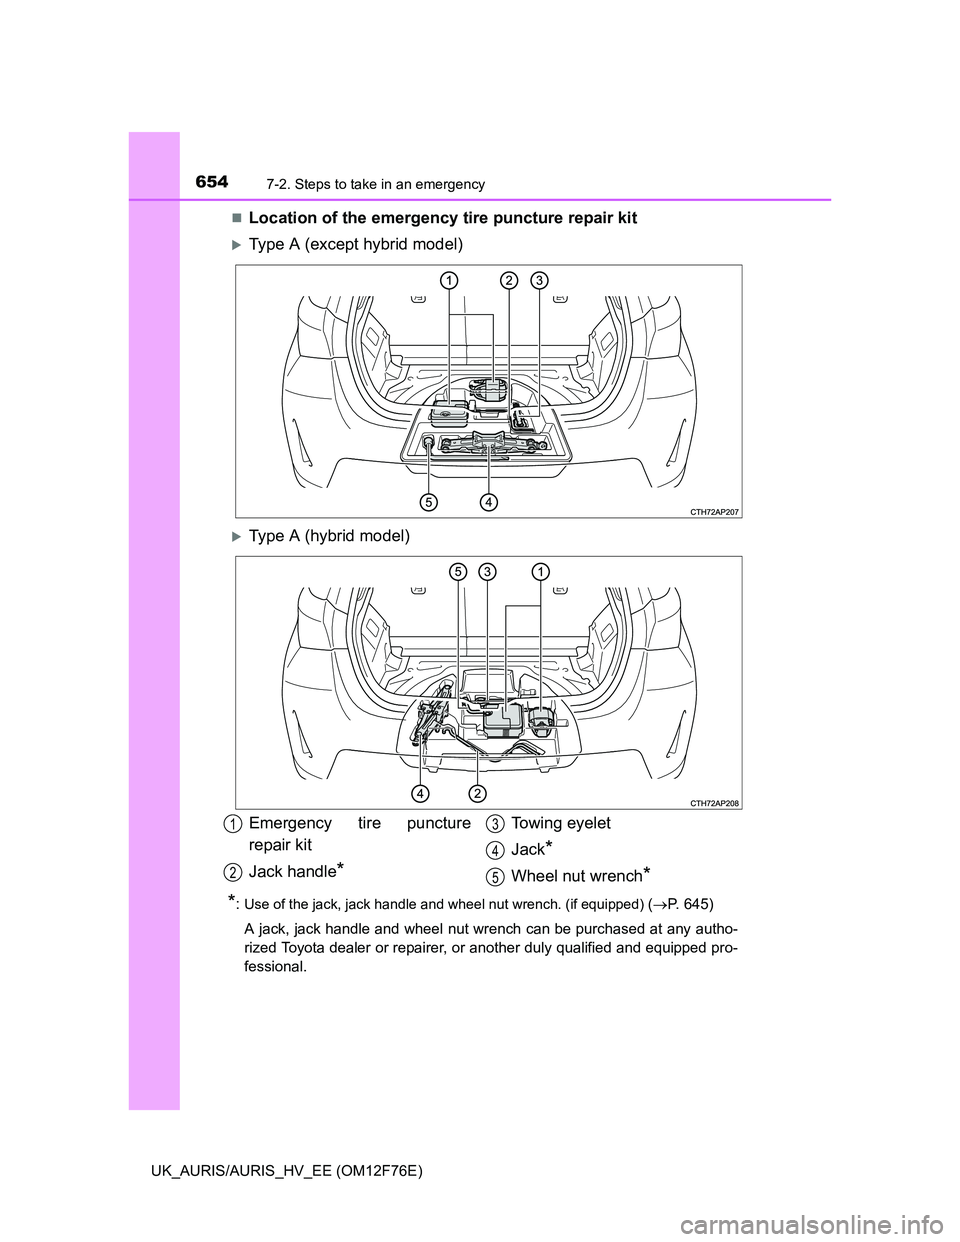
Location of the emergency tire puncture repair kit
Type A (except hybrid model)
Type A (hybrid model)
*:Use of the jack, jack handle and wheel nut wrench. (if equipped) (P. 645)
A jack, jack handle and wheel nut wrench can be purchased at any autho-
rized Toyota dealer or repairer, or another duly qualified and equipped pro-
fessional.
Emergency tire puncture
repair kit
Jack handle
*
Towing eyelet
Jack
*
Wheel nut wrench*
1
2
3
4
5
Page 655 of 768
6557-2. Steps to take in an emergency
UK_AURIS/AURIS_HV_EE (OM12F76E)
7
When trouble arises
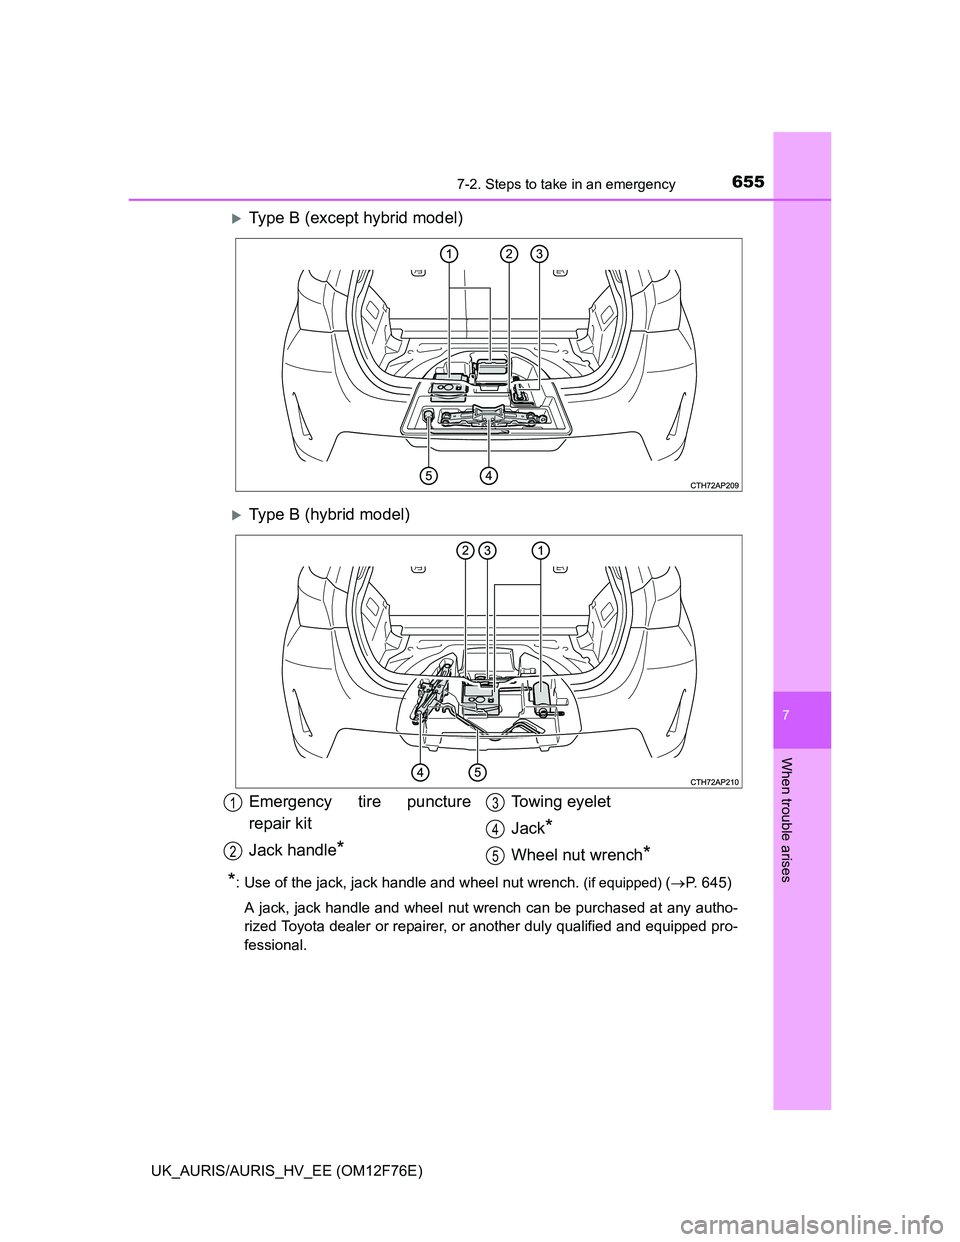
Type B (except hybrid model)
Type B (hybrid model)
*: Use of the jack, jack handle and wheel nut wrench. (if equipped) (P. 645)
A jack, jack handle and wheel nut wrench can be purchased at any autho-
rized Toyota dealer or repairer, or another duly qualified and equipped pro-
fessional.
Emergency tire puncture
repair kit
Jack handle
*
Towing eyelet
Jack
*
Wheel nut wrench*
1
2
3
4
5
Page 658 of 768
6587-2. Steps to take in an emergency
UK_AURIS/AURIS_HV_EE (OM12F76E)
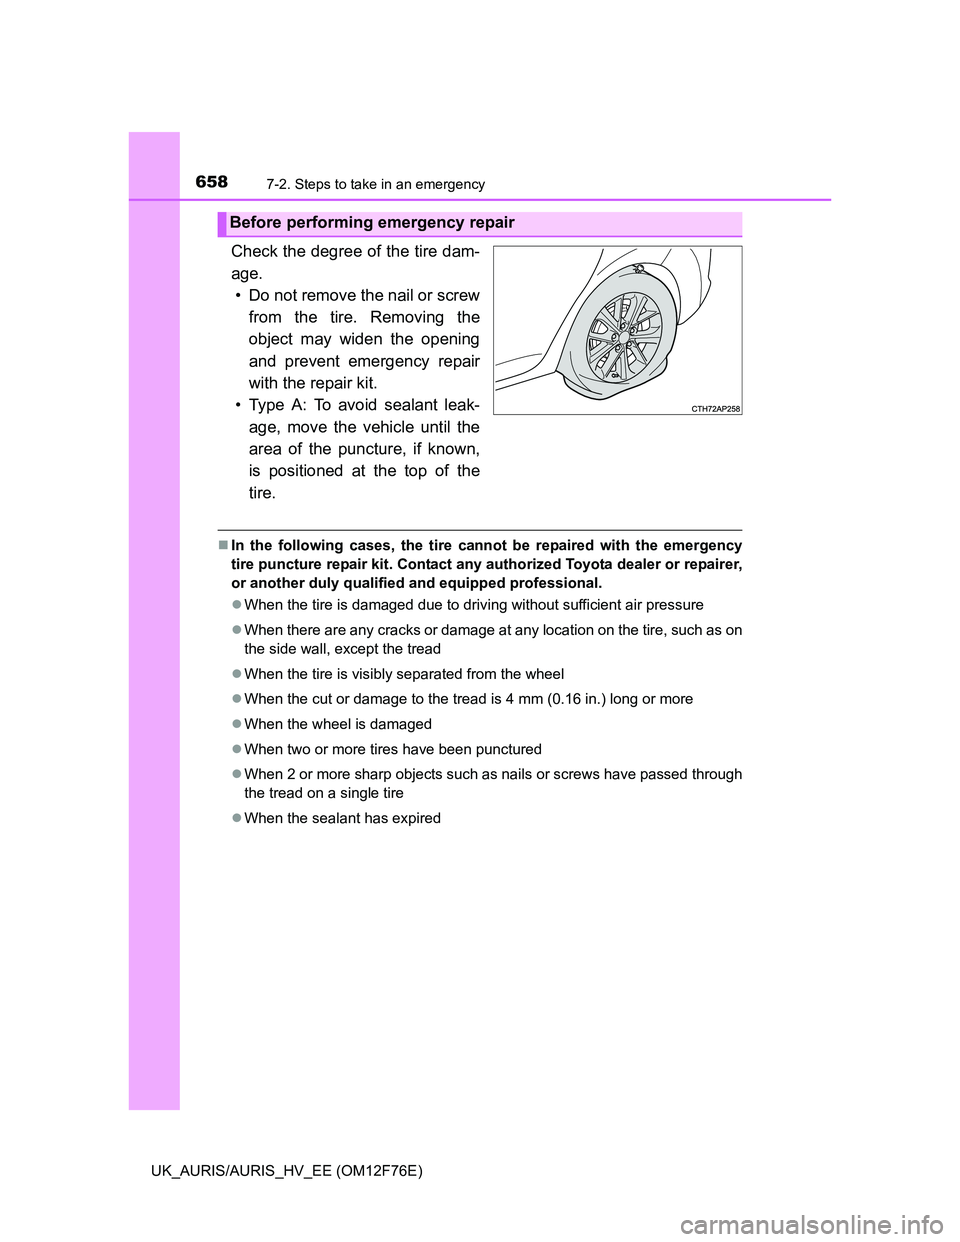
Check the degree of the tire dam-
age.
• Do not remove the nail or screw
from the tire. Removing the
object may widen the opening
and prevent emergency repair
with the repair kit.
• Type A: To avoid sealant leak-
age, move the vehicle until the
area of the puncture, if known,
is positioned at the top of the
tire.
In the following cases, the tire cannot be repaired with the emergency
tire puncture repair kit. Contact any authorized Toyota dealer or repairer,
or another duly qualified and equipped professional.
When the tire is damaged due to driving without sufficient air pressure
When there are any cracks or damage at any location on the tire, such as on
the side wall, except the tread
When the tire is visibly separated from the wheel
When the cut or damage to the tread is 4 mm (0.16 in.) long or more
When the wheel is damaged
When two or more tires have been punctured
When 2 or more sharp objects such as nails or screws have passed through
the tread on a single tire
When the sealant has expired
Before performing emergency repair
Page 659 of 768
6597-2. Steps to take in an emergency
UK_AURIS/AURIS_HV_EE (OM12F76E)
7
When trouble arises
Remove the deck mat. (P. 466)
Take out the emergency tire puncture repair kit. (P. 654)
Take out the repair kit from the tool box.
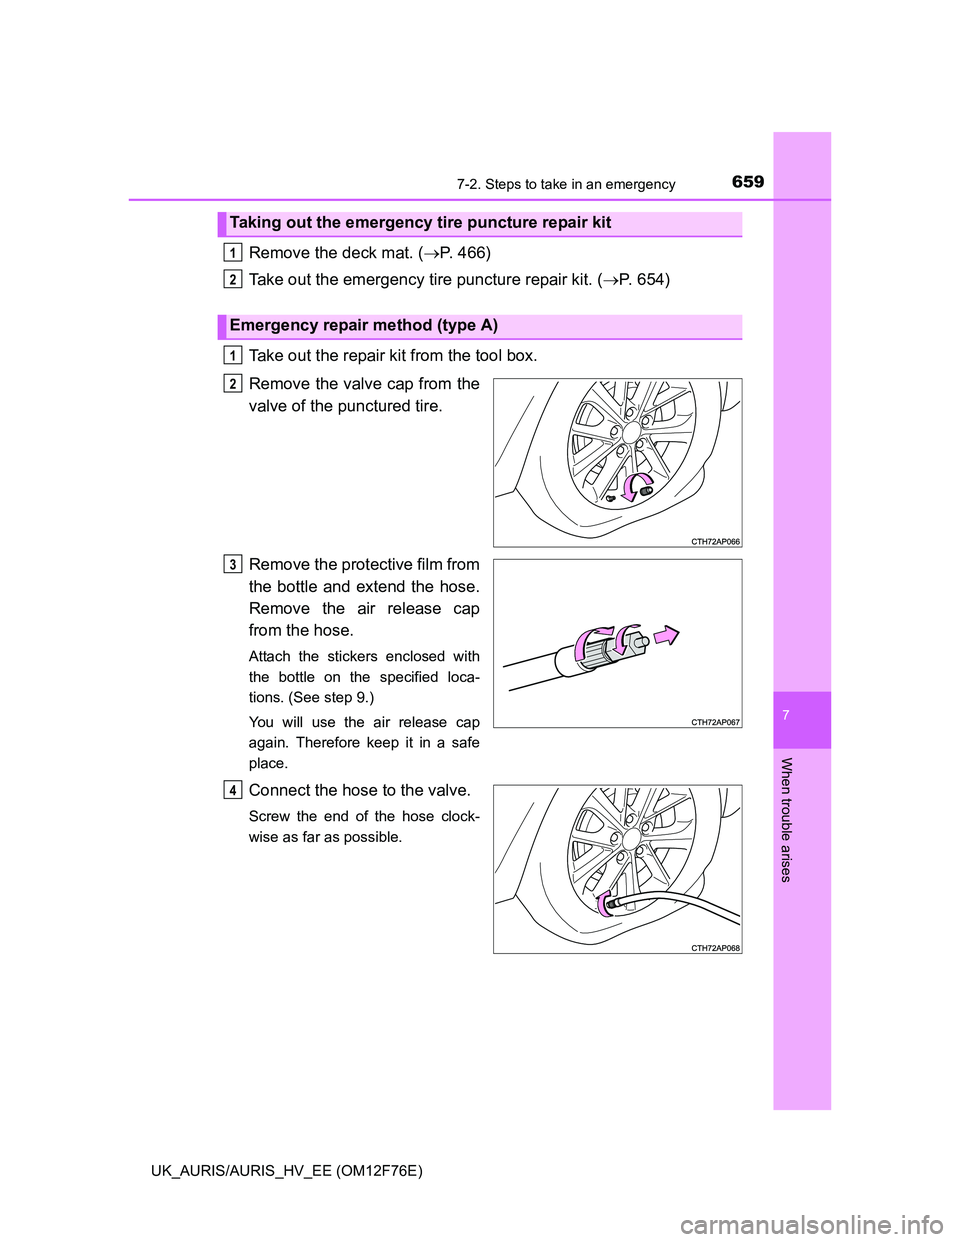
Remove the valve cap from the
valve of the punctured tire.
Remove the protective film from
the bottle and extend the hose.
Remove the air release cap
from the hose.
Attach the stickers enclosed with
the bottle on the specified loca-
tions. (See step 9.)
You will use the air release cap
again. Therefore keep it in a safe
place.
Connect the hose to the valve.
Screw the end of the hose clock-
wise as far as possible.
Taking out the emergency tire puncture repair kit
Emergency repair method (type A)
1
2
1
2
3
4
Page 666 of 768
6667-2. Steps to take in an emergency
UK_AURIS/AURIS_HV_EE (OM12F76E)
Taking precautions to avoid sudden braking, sudden acceleration
and sharp turns, drive carefully at under 80 km/h (50 mph) to the
nearest authorized Toyota dealer or repairer, or another duly quali-
fied and equipped professional for tire repair or replacement.
Take out the repair kit from the tool box.
When taking out the bottle from the original bag, do not tear or discard the
bag.
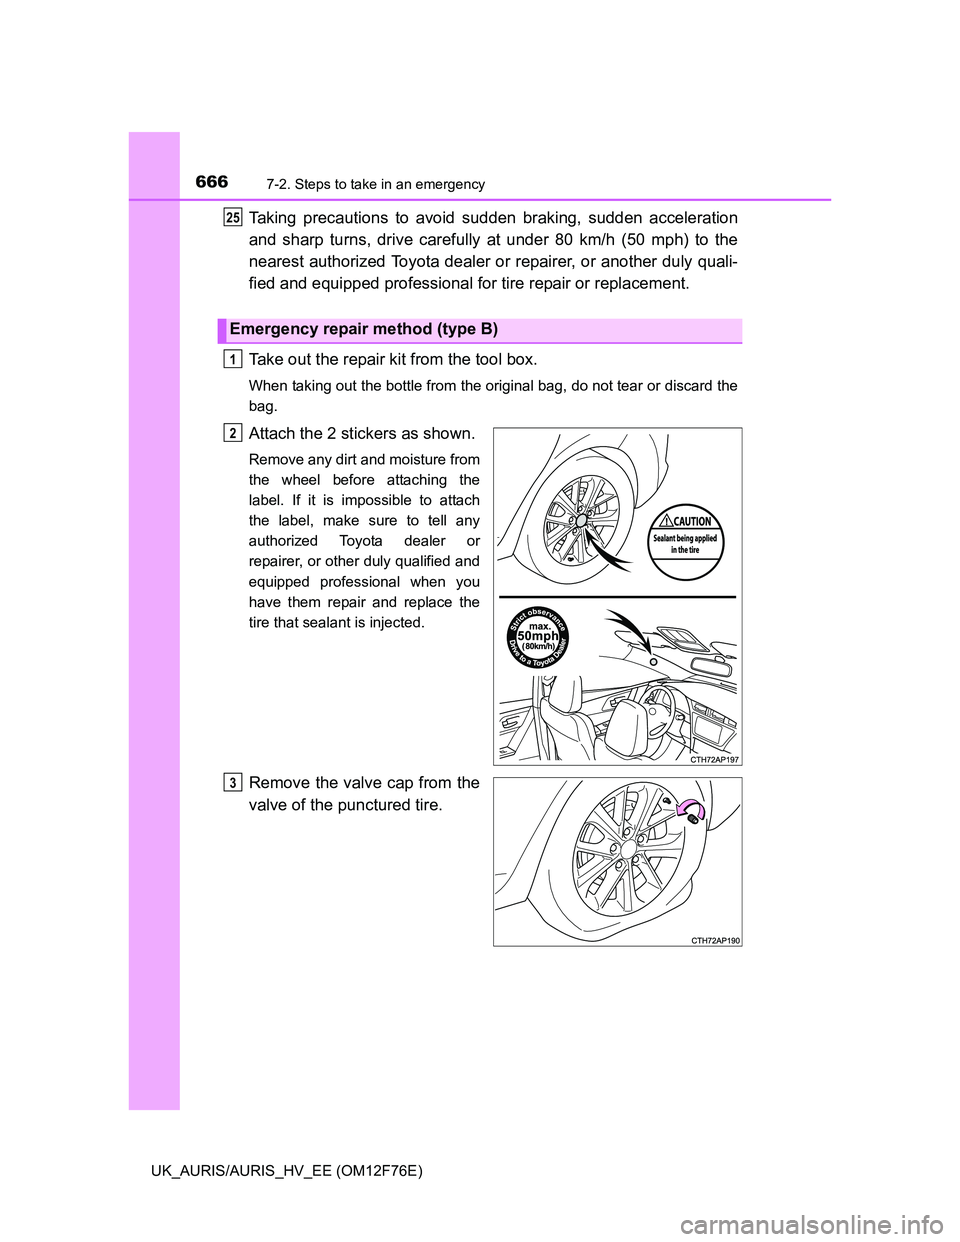
Attach the 2 stickers as shown.
Remove any dirt and moisture from
the wheel before attaching the
label. If it is impossible to attach
the label, make sure to tell any
authorized Toyota dealer or
repairer, or other duly qualified and
equipped professional when you
have them repair and replace the
tire that sealant is injected.
Remove the valve cap from the
valve of the punctured tire.
Emergency repair method (type B)
25
1
2
3
Page 673 of 768
6737-2. Steps to take in an emergency
UK_AURIS/AURIS_HV_EE (OM12F76E)
7
When trouble arises
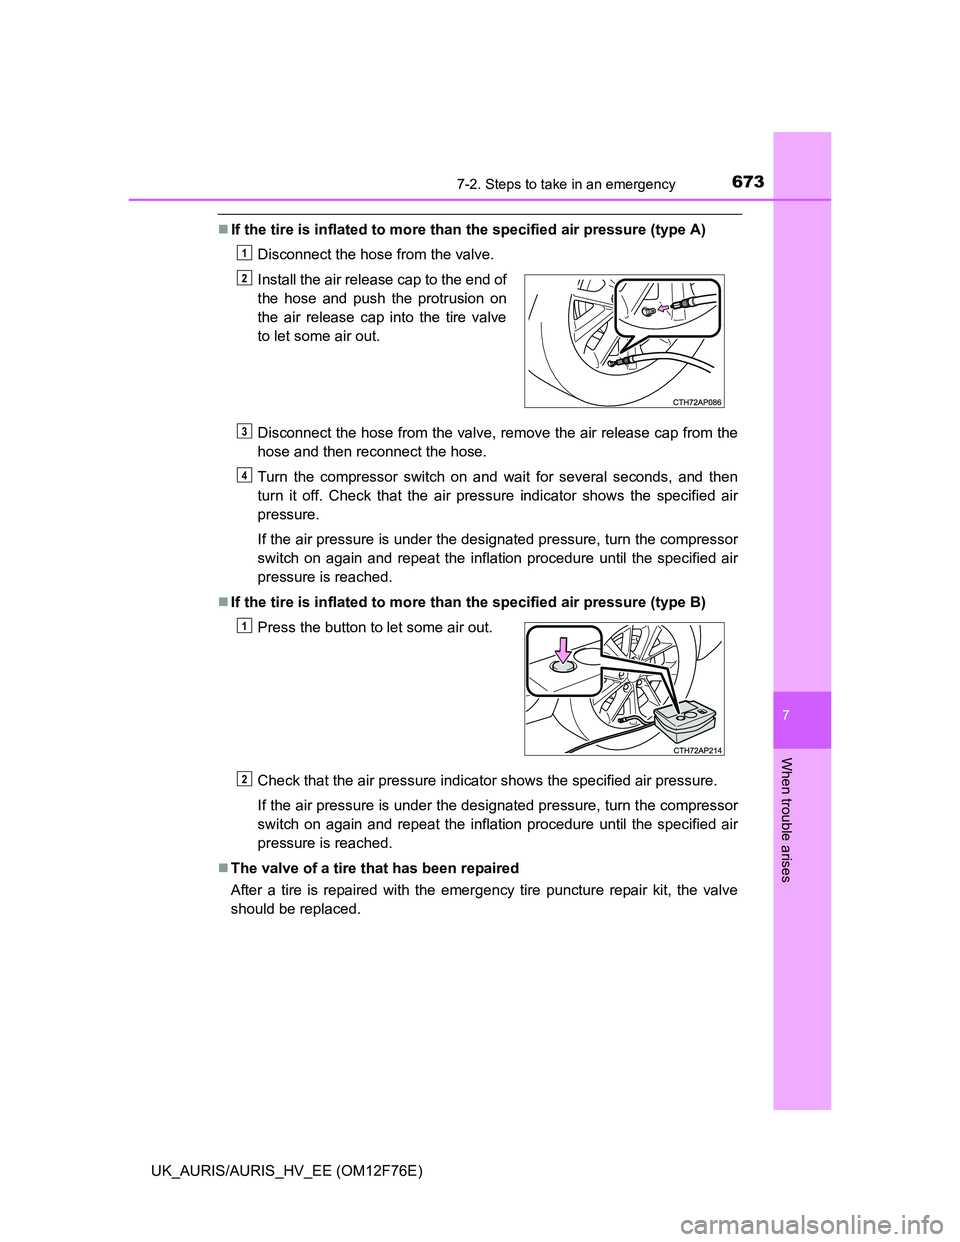
If the tire is inflated to more than the specified air pressure (type A)
Disconnect the hose from the valve.
Disconnect the hose from the valve, remove the air release cap from the
hose and then reconnect the hose.
Turn the compressor switch on and wait for several seconds, and then
turn it off. Check that the air pressure indicator shows the specified air
pressure.
If the air pressure is under the designated pressure, turn the compressor
switch on again and repeat the inflation procedure until the specified air
pressure is reached.
If the tire is inflated to more than the specified air pressure (type B)
Check that the air pressure indicator shows the specified air pressure.
If the air pressure is under the designated pressure, turn the compressor
switch on again and repeat the inflation procedure until the specified air
pressure is reached.
The valve of a tire that has been repaired
After a tire is repaired with the emergency tire puncture repair kit, the valve
should be replaced.Install the air release cap to the end of
the hose and push the protrusion on
the air release cap into the tire valve
to let some air out.
Press the button to let some air out.
1
2
3
4
1
2