bulb TOYOTA AURIS 2017 (in English) User Guide
[x] Cancel search | Manufacturer: TOYOTA, Model Year: 2017, Model line: AURIS, Model: TOYOTA AURIS 2017Pages: 661, PDF Size: 26.83 MB
Page 520 of 661
5207-3. Do-it-yourself maintenance
UK AURIS_HB_EE (OM12K97E)
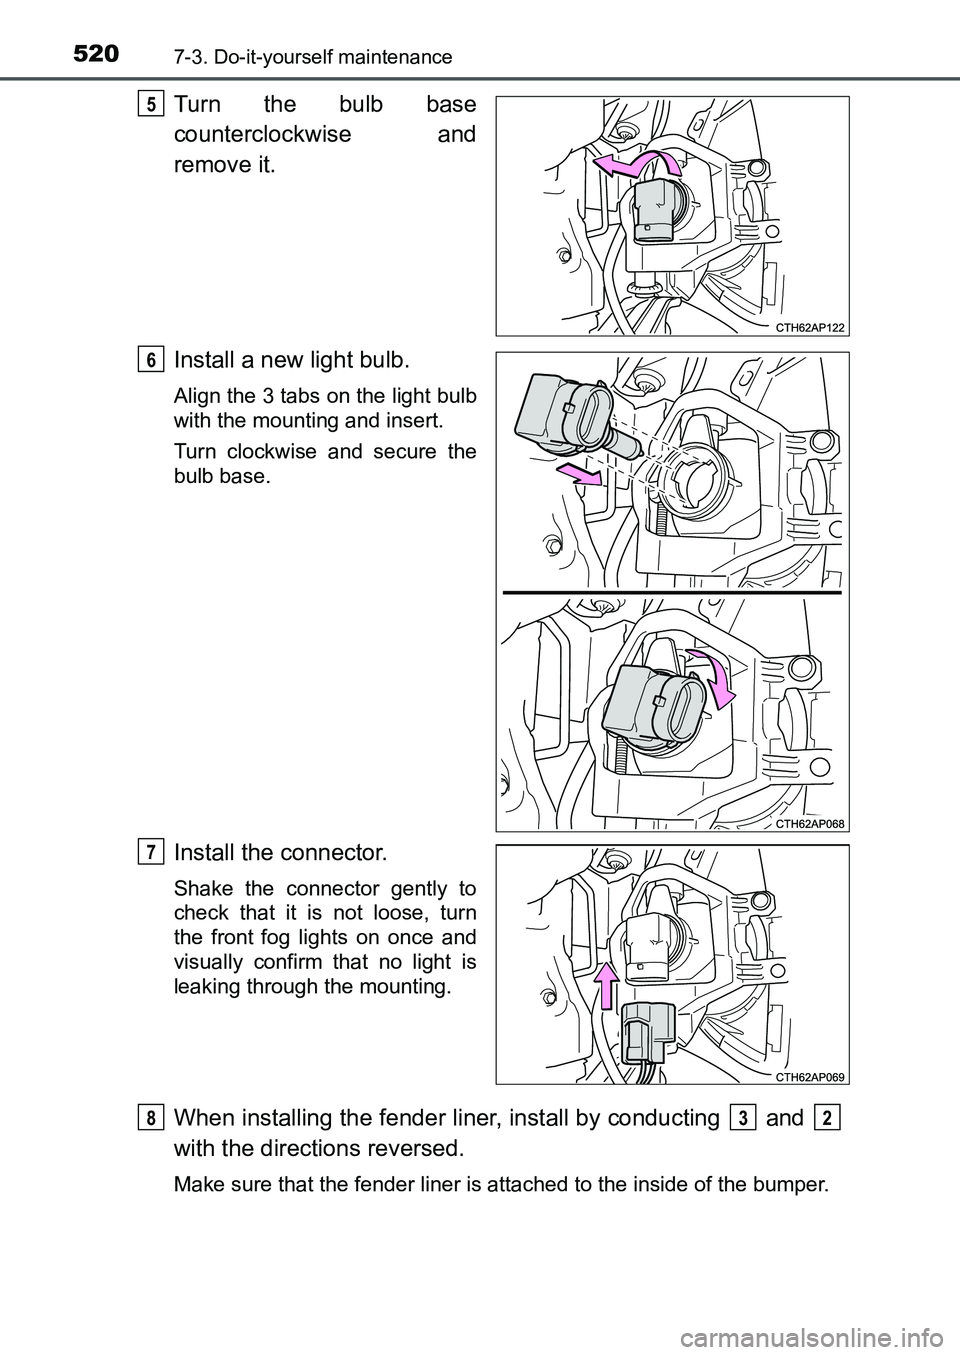
Turn the bulb base
counterclockwise and
remove it.
Install a new light bulb.
Align the 3 tabs on the light bulb
with the mounting and insert.
Turn clockwise and secure the
bulb base.
Install the connector.
Shake the connector gently to
check that it is not loose, turn
the front fog lights on once and
visually confirm that no light is
leaking through the mounting.
When installing the fender liner, install by conducting and
with the directions reversed.
Make sure that the fender liner is attached to the inside of the bumper.
5
6
7
832
UK AURIS_HB_OM_Europe_OM12K97E.book 520 ページ 2016年6月27日 月曜日 午後5時42分
Page 521 of 661
5217-3. Do-it-yourself maintenance
UK AURIS_HB_EE (OM12K97E)
7
Maintenance and care
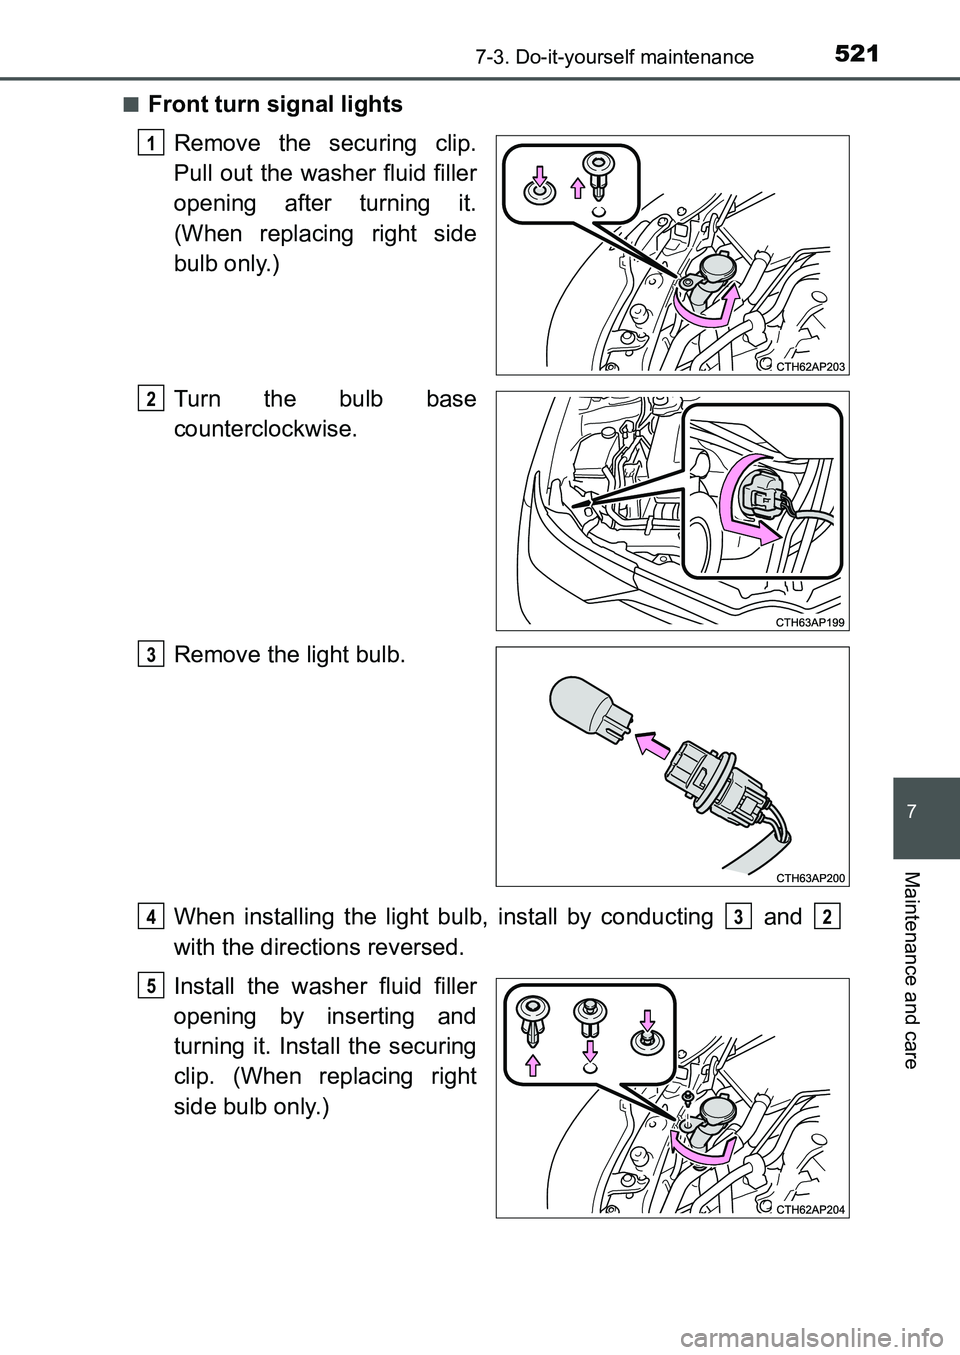
■Front turn signal lights
Remove the securing clip.
Pull out the washer fluid filler
opening after turning it.
(When replacing right side
bulb only.)
Turn the bulb base
counterclockwise.
Remove the light bulb.
When installing the light bulb, install by conducting and
with the directions reversed.
Install the washer fluid filler
opening by inserting and
turning it. Install the securing
clip. (When replacing right
side bulb only.)
1
2
3
432
5
UK AURIS_HB_OM_Europe_OM12K97E.book 521 ページ 2016年6月27日 月曜日 午後5時42分
Page 522 of 661
5227-3. Do-it-yourself maintenance
UK AURIS_HB_EE (OM12K97E)■
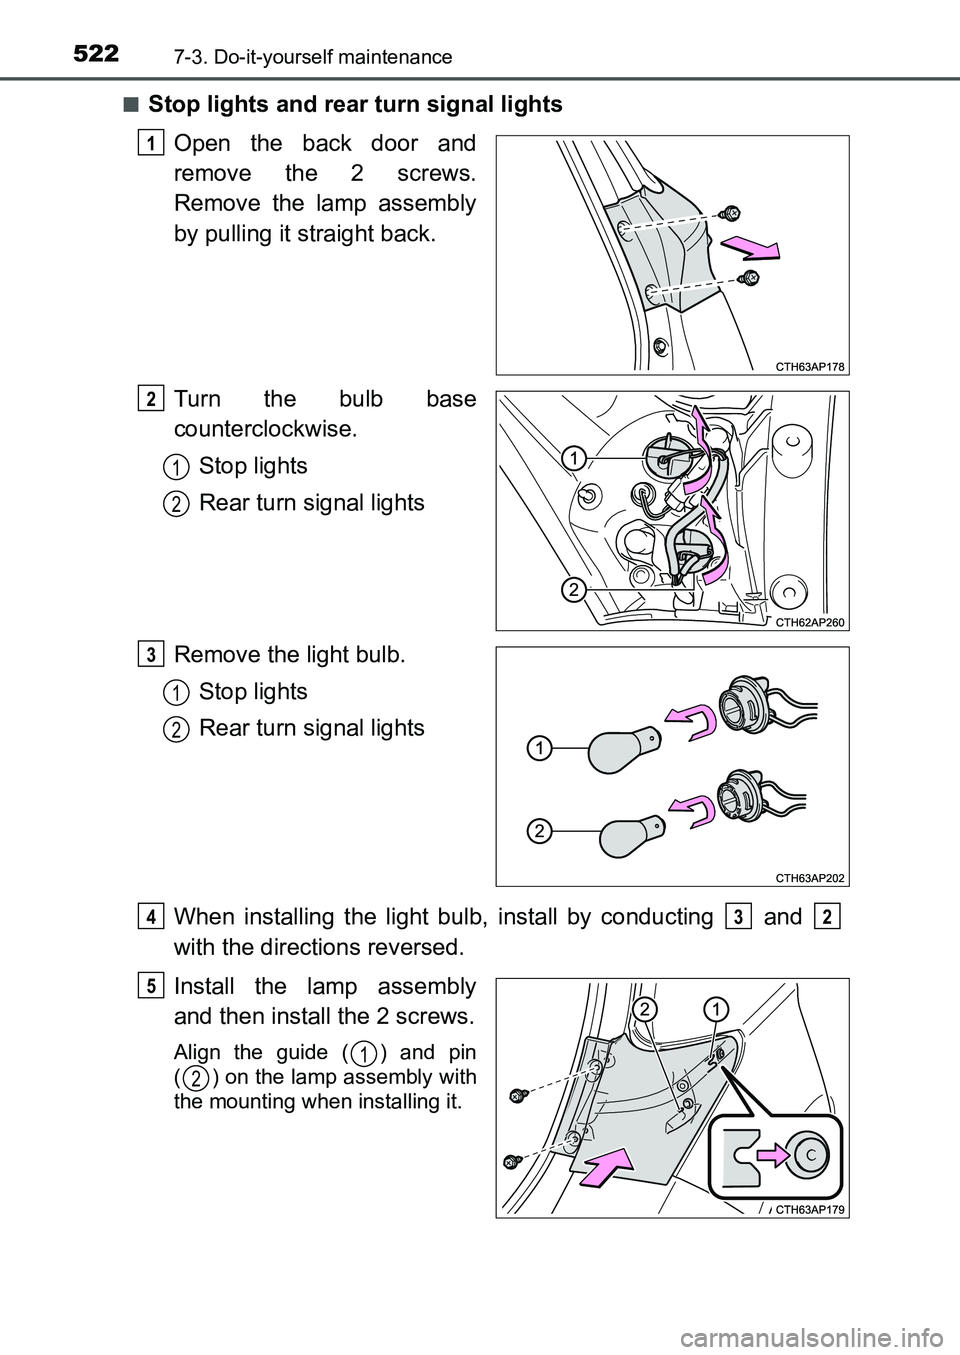
Stop lights and rear turn signal lights
Open the back door and
remove the 2 screws.
Remove the lamp assembly
by pulling it straight back.
Turn the bulb base
counterclockwise.
Stop lights
Rear turn signal lights
Remove the light bulb.
Stop lights
Rear turn signal lights
When installing the light bulb, install by conducting and
with the directions reversed.
Install the lamp assembly
and then install the 2 screws.
Align the guide ( ) and pin
( ) on the lamp assembly with
the mounting when installing it.
1
2
1
2
3
1
2
432
5
1
2
UK AURIS_HB_OM_Europe_OM12K97E.book 522 ページ 2016年6月27日 月曜日 午後5時42分
Page 523 of 661
5237-3. Do-it-yourself maintenance
UK AURIS_HB_EE (OM12K97E)
7
Maintenance and care
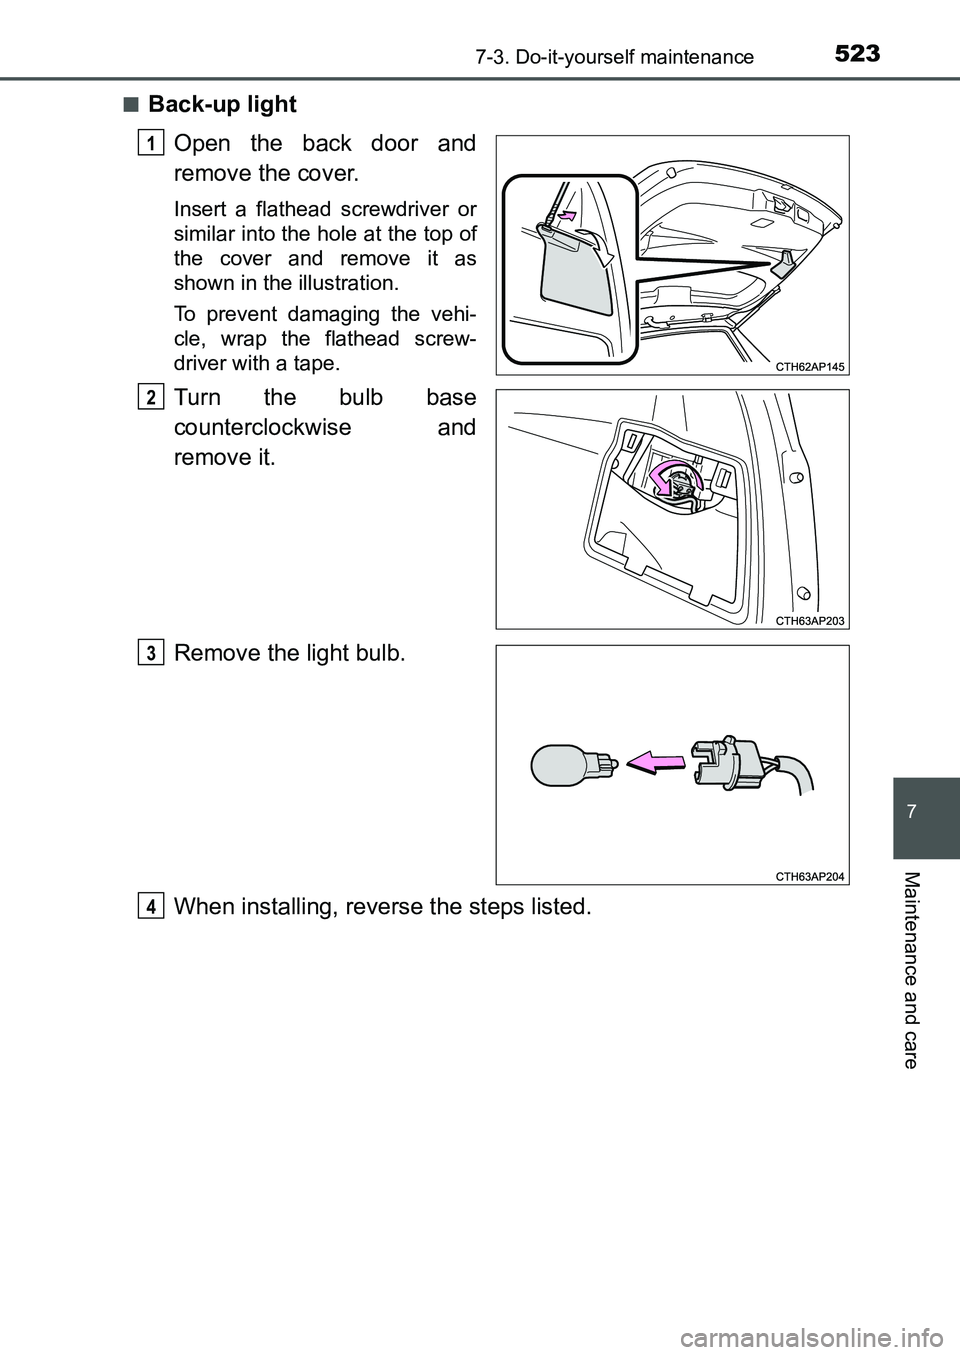
■Back-up light
Open the back door and
remove the cover.
Insert a flathead screwdriver or
similar into the hole at the top of
the cover and remove it as
shown in the illustration.
To prevent damaging the vehi-
cle, wrap the flathead screw-
driver with a tape.
Turn the bulb base
counterclockwise and
remove it.
Remove the light bulb.
When installing, reverse the steps listed.
1
2
3
4
UK AURIS_HB_OM_Europe_OM12K97E.book 523 ページ 2016年6月27日 月曜日 午後5時42分
Page 524 of 661
5247-3. Do-it-yourself maintenance
UK AURIS_HB_EE (OM12K97E)■
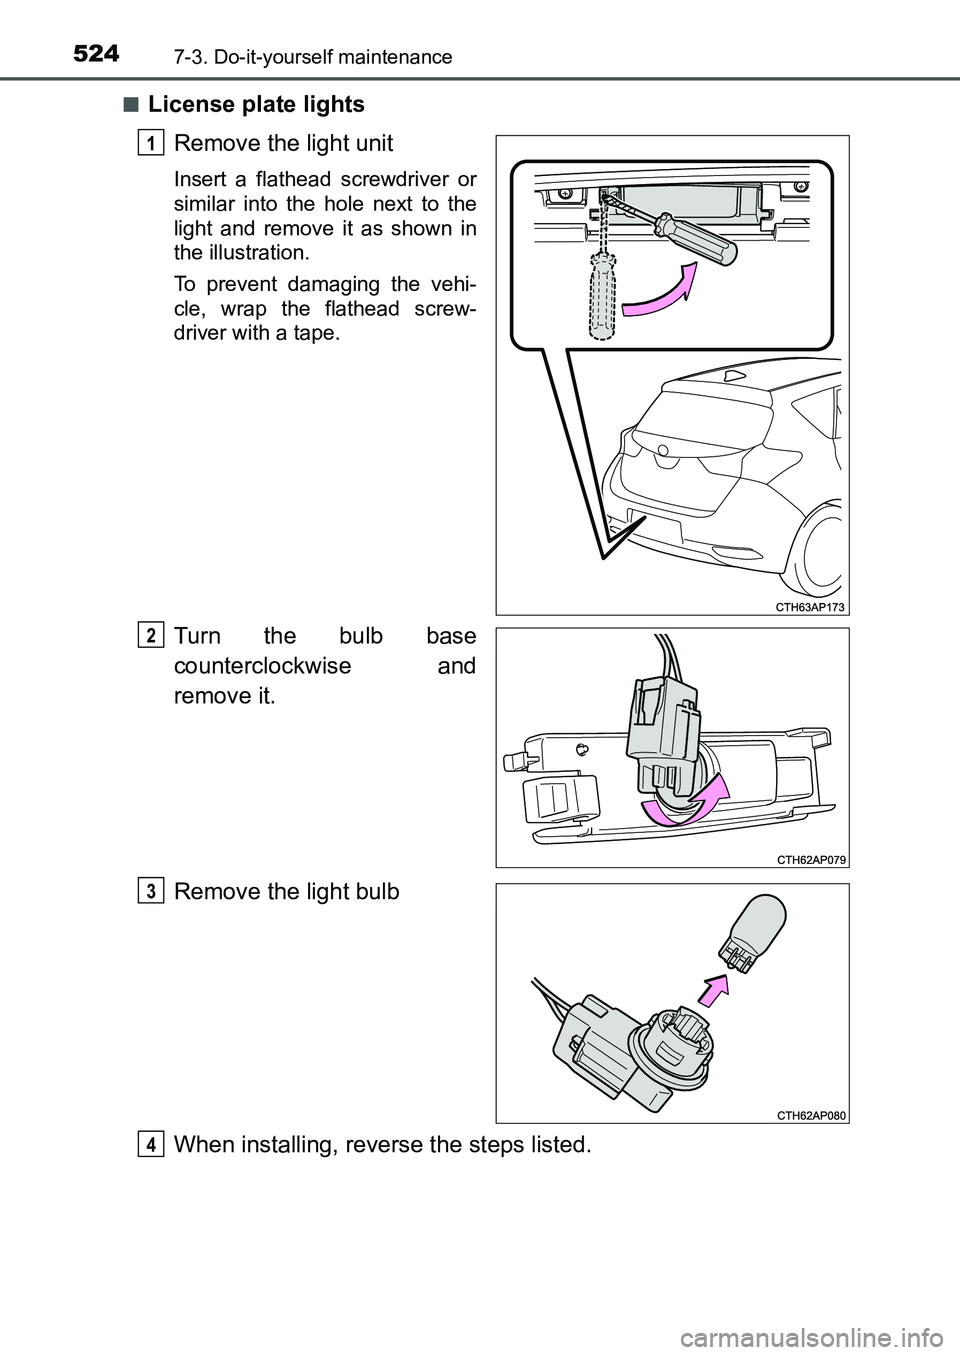
License plate lights
Remove the light unit
Insert a flathead screwdriver or
similar into the hole next to the
light and remove it as shown in
the illustration.
To prevent damaging the vehi-
cle, wrap the flathead screw-
driver with a tape.
Turn the bulb base
counterclockwise and
remove it.
Remove the light bulb
When installing, reverse the steps listed.
1
2
3
4
UK AURIS_HB_OM_Europe_OM12K97E.book 524 ページ 2016年6月27日 月曜日 午後5時42分
Page 525 of 661
5257-3. Do-it-yourself maintenance
UK AURIS_HB_EE (OM12K97E)
7
Maintenance and care
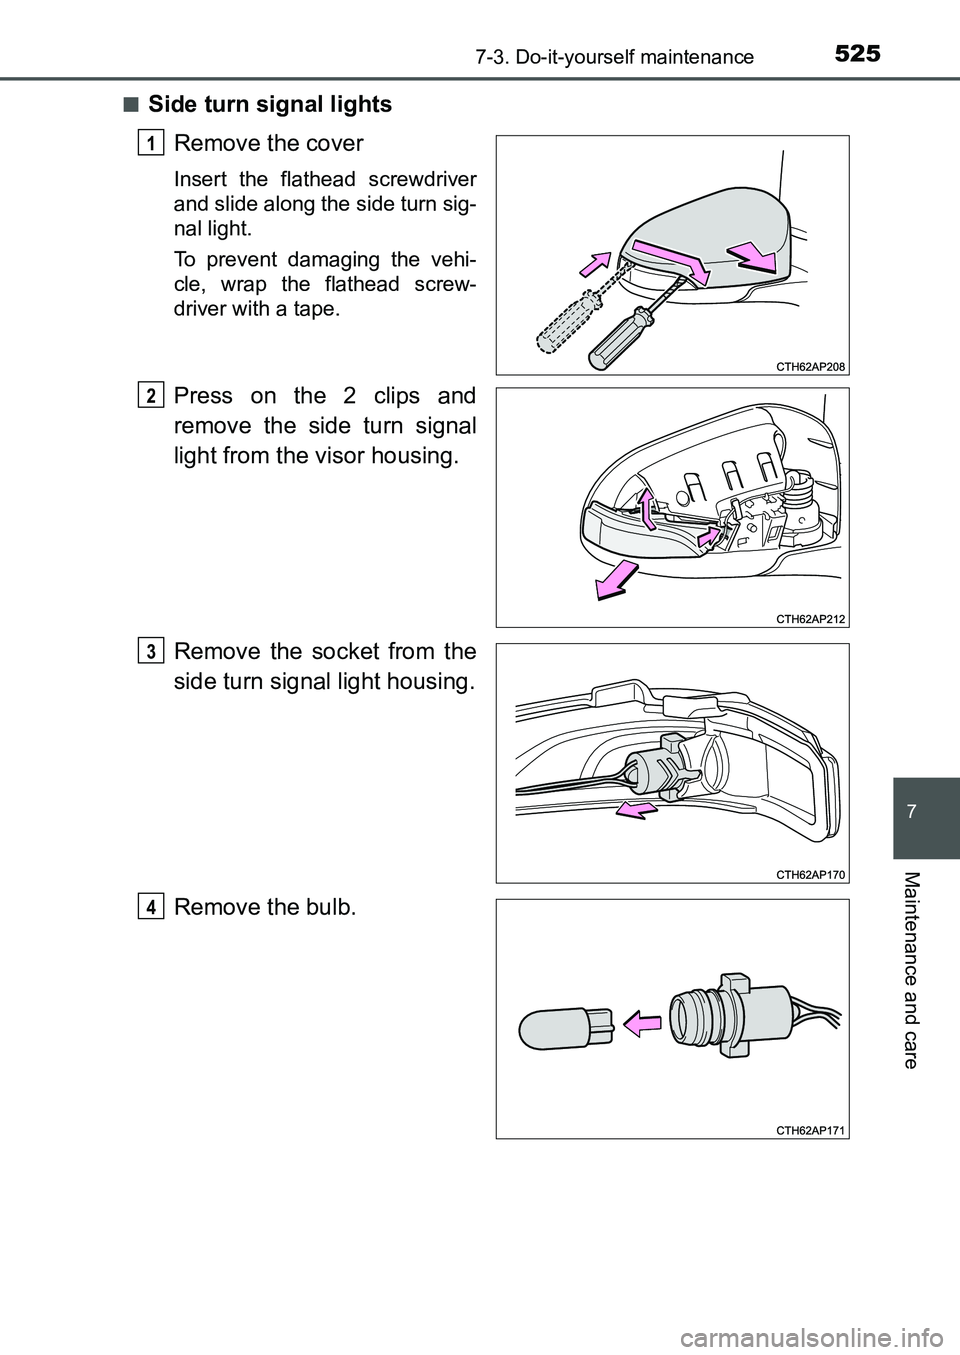
■Side turn signal lights
Remove the cover
Insert the flathead screwdriver
and slide along the side turn sig-
nal light.
To prevent damaging the vehi-
cle, wrap the flathead screw-
driver with a tape.
Press on the 2 clips and
remove the side turn signal
light from the visor housing.
Remove the socket from the
side turn signal light housing.
Remove the bulb.
1
2
3
4
UK AURIS_HB_OM_Europe_OM12K97E.book 525 ページ 2016年6月27日 月曜日 午後5時42分
Page 526 of 661
5267-3. Do-it-yourself maintenance
UK AURIS_HB_EE (OM12K97E)
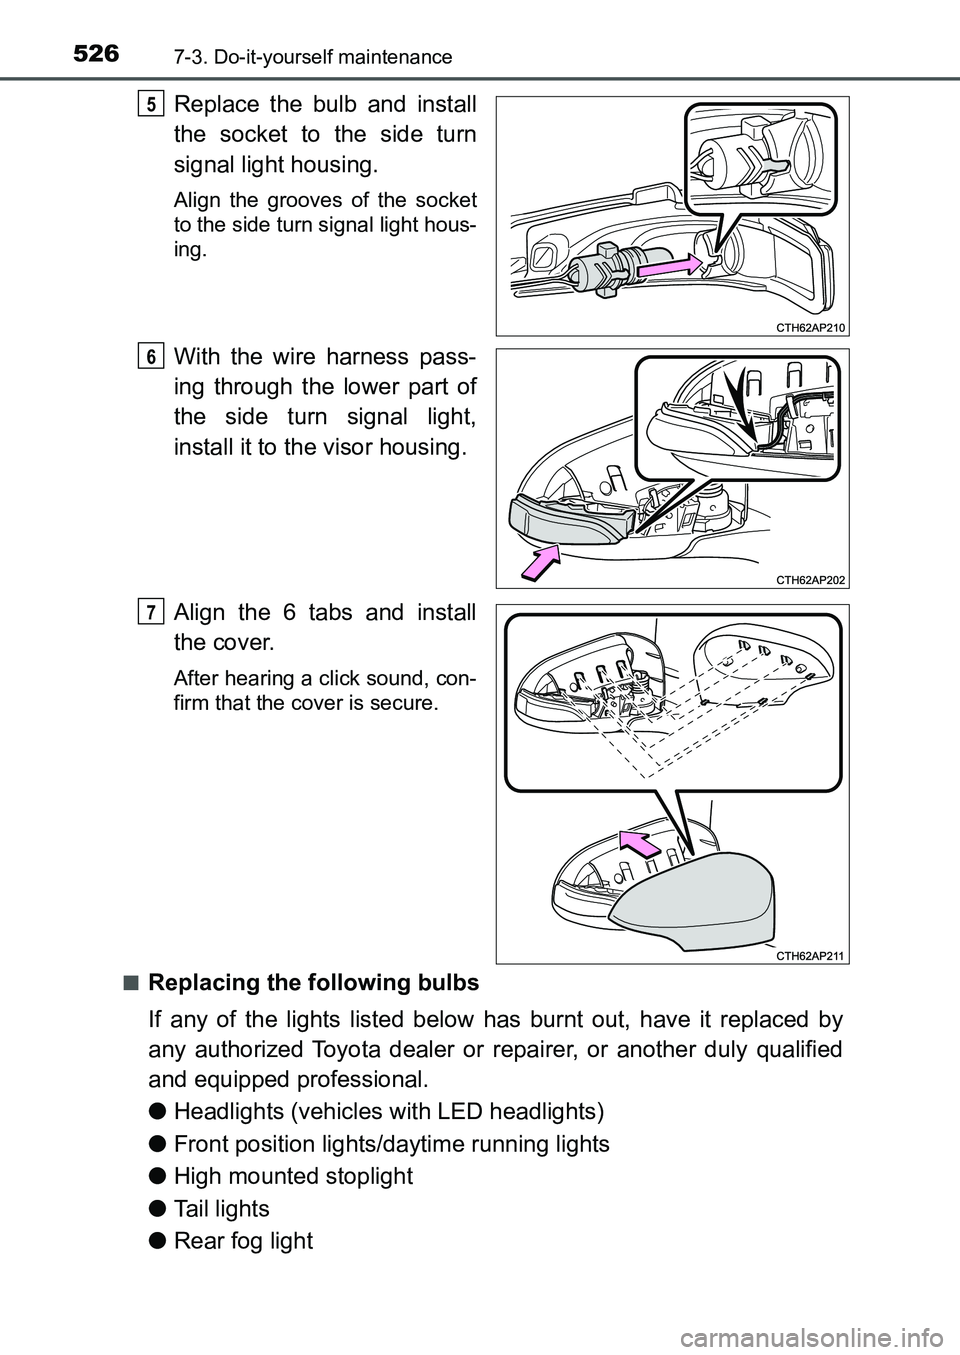
Replace the bulb and install
the socket to the side turn
signal light housing.
Align the grooves of the socket
to the side turn signal light hous-
ing.
With the wire harness pass-
ing through the lower part of
the side turn signal light,
install it to the visor housing.
Align the 6 tabs and install
the cover.
After hearing a click sound, con-
firm that the cover is secure.
■
Replacing the following bulbs
If any of the lights listed below has burnt out, have it replaced by
any authorized Toyota dealer or repairer, or another duly qualified
and equipped professional.
●Headlights (vehicles with LED headlights)
●Front position lights/daytime running lights
●High mounted stoplight
●Tail lights
●Rear fog light
5
6
7
UK AURIS_HB_OM_Europe_OM12K97E.book 526 ページ 2016年6月27日 月曜日 午後5時42分
Page 527 of 661
5277-3. Do-it-yourself maintenance
UK AURIS_HB_EE (OM12K97E)
7
Maintenance and care
■LED light bulbs
The headlights (vehicles with LED headlights), rear fog light, high mounted
stoplight, front position lights/daytime running lights and tail lights consist of a
number of LEDs. If any of the LEDs burn out, take your vehicle to any autho-
rized Toyota dealer or repairer, or another duly qualified and equipped profes-
sional to have the light replaced.
■Condensation build-up on the inside of the lens
Temporary condensation build-up on the inside of the headlight lens does not
indicate a malfunction.
Contact any authorized Toyota dealer or repairer, or another duly qualified
and equipped professional for more information in the following situations:
●Large drops of water have built up on the inside of the lens.
●Water has built up inside the headlight.
■When replacing light bulbs
P. 513
WARNING
■Replacing light bulbs
●Turn off the lights. Do not attempt to replace the bulb immediately after
turning off the lights.
The bulbs become very hot and may cause burns.
●Do not touch the glass portion of the light bulb with bare hands. When it is
unavoidable to hold the glass portion, use and hold with a clean dry cloth
to avoid getting moisture and oils on the bulb.
Also, if the bulb is scratched or dropped, it may blow out or crack.
●Fully install light bulbs and any parts used to secure them. Failure to do so
may result in heat damage, fire, or water entering the headlight unit. This
may damage the headlights or cause condensation to build up on the lens.
■To prevent damage or fire
Make sure bulbs are fully seated and locked.
UK AURIS_HB_OM_Europe_OM12K97E.book 527 ページ 2016年6月27日 月曜日 午後5時42分
Page 627 of 661
6279-1. Specifications
UK AURIS_HB_EE (OM12K97E)
9
Vehicle specifications
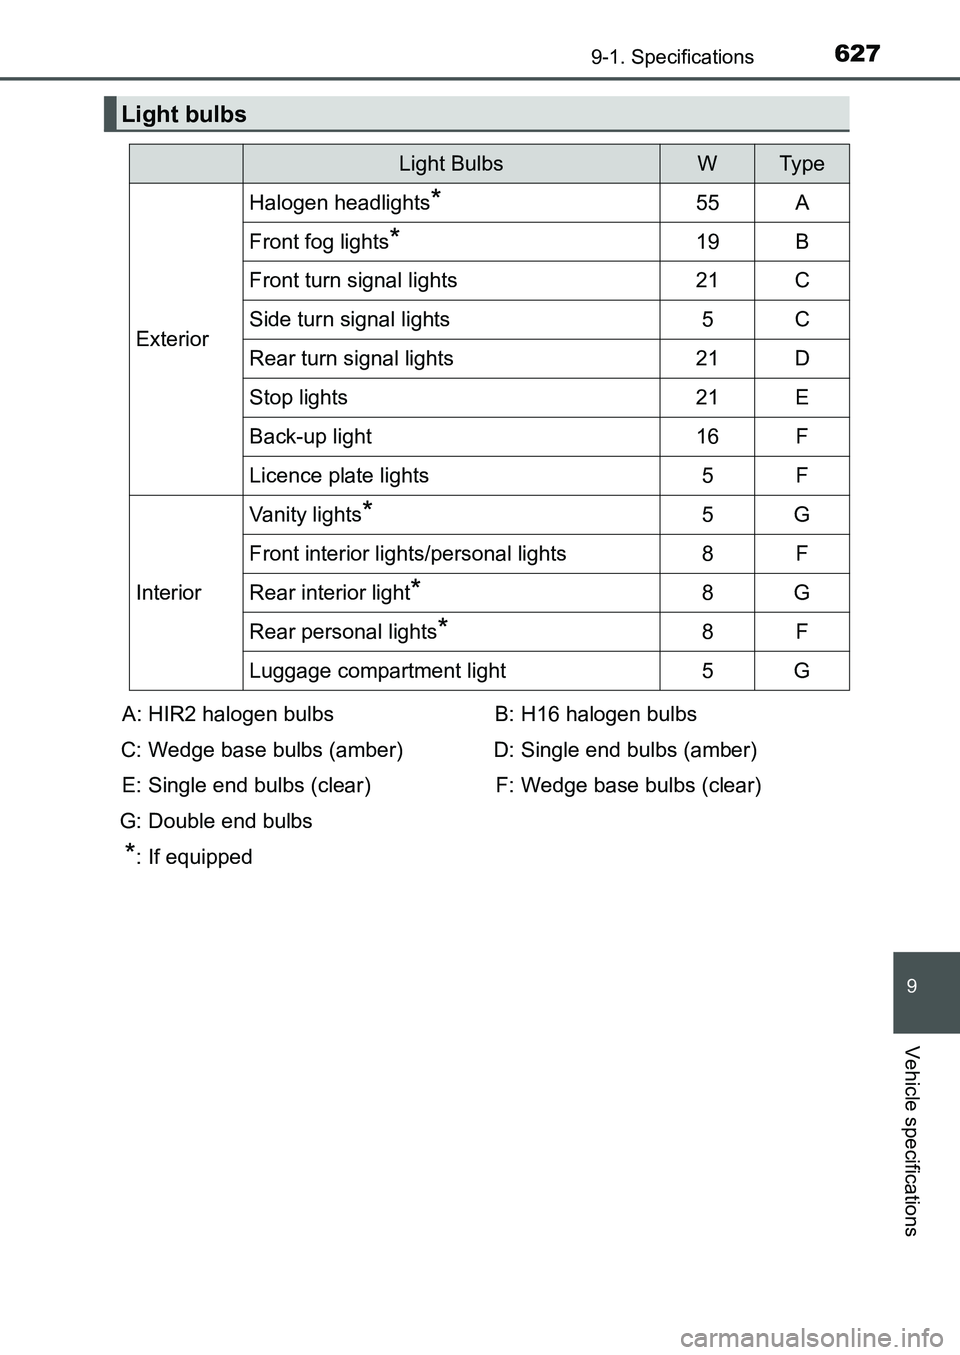
Light bulbs
Light BulbsWTy p e
Exterior
Halogen headlights*55A
Front fog lights*19B
Front turn signal lights21C
Side turn signal lights5C
Rear turn signal lights21D
Stop lights21E
Back-up light16F
Licence plate lights5F
Interior
Vanity lights*5G
Front interior lights/personal lights8F
Rear interior light*8G
Rear personal lights*8F
Luggage compartment light5G
A: HIR2 halogen bulbs
C: Wedge base bulbs (amber)
E: Single end bulbs (clear)
G: Double end bulbs
*: If equippedB: H16 halogen bulbs
D: Single end bulbs (amber)
F: Wedge base bulbs (clear)
UK AURIS_HB_OM_Europe_OM12K97E.book 627 ページ 2016年6月27日 月曜日 午後5時42分
Page 646 of 661
646Alphabetical index
UK AURIS_HB_EE (OM12K97E)
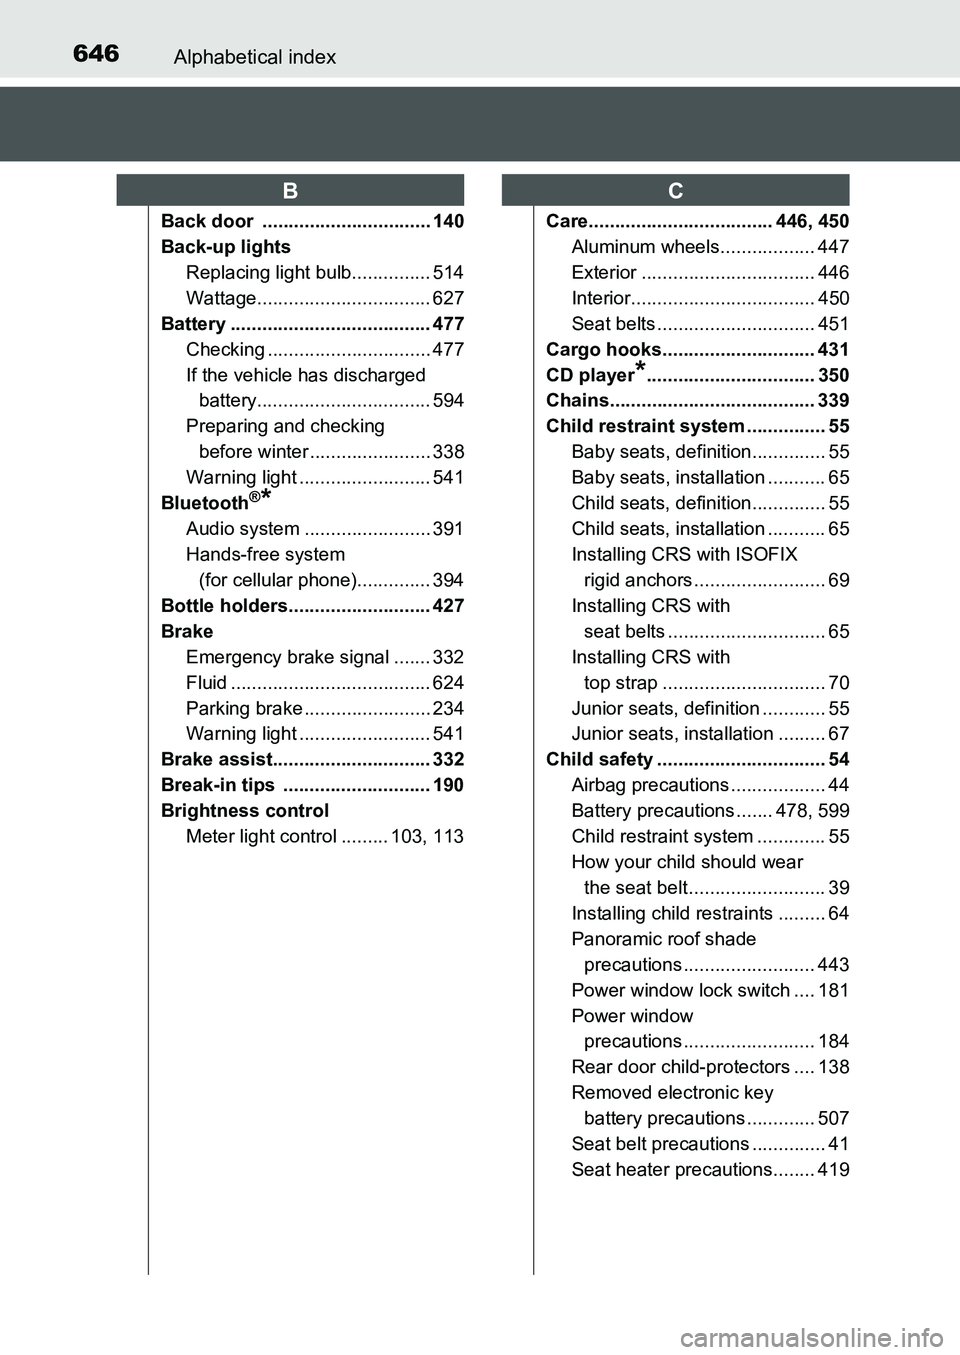
Back door ................................ 140
Back-up lights
Replacing light bulb............... 514
Wattage................................. 627
Battery ...................................... 477
Checking ............................... 477
If the vehicle has discharged
battery................................. 594
Preparing and checking
before winter ....................... 338
Warning light ......................... 541
Bluetooth
®*
Audio system ........................ 391
Hands-free system
(for cellular phone).............. 394
Bottle holders........................... 427
Brake
Emergency brake signal ....... 332
Fluid ...................................... 624
Parking brake ........................ 234
Warning light ......................... 541
Brake assist.............................. 332
Break-in tips ............................ 190
Brightness control
Meter light control ......... 103, 113Care................................... 446, 450
Aluminum wheels.................. 447
Exterior ................................. 446
Interior................................... 450
Seat belts .............................. 451
Cargo hooks............................. 431
CD player
*................................ 350
Chains....................................... 339
Child restraint system ............... 55
Baby seats, definition.............. 55
Baby seats, installation ........... 65
Child seats, definition.............. 55
Child seats, installation ........... 65
Installing CRS with ISOFIX
rigid anchors ......................... 69
Installing CRS with
seat belts .............................. 65
Installing CRS with
top strap ............................... 70
Junior seats, definition ............ 55
Junior seats, installation ......... 67
Child safety ................................ 54
Airbag precautions .................. 44
Battery precautions ....... 478, 599
Child restraint system ............. 55
How your child should wear
the seat belt .......................... 39
Installing child restraints ......... 64
Panoramic roof shade
precautions ......................... 443
Power window lock switch .... 181
Power window
precautions ......................... 184
Rear door child-protectors .... 138
Removed electronic key
battery precautions ............. 507
Seat belt precautions .............. 41
Seat heater precautions........ 419
BC
UK AURIS_HB_OM_Europe_OM12K97E.book 646 ページ 2016年6月27日 月曜日 午後5時42分