TOYOTA AURIS TOURING SPORTS 2017 Repair Manual
AURIS TOURING SPORTS 2017
TOYOTA
TOYOTA
https://www.carmanualsonline.info/img/14/59583/w960_59583-0.png
TOYOTA AURIS TOURING SPORTS 2017 Repair Manual
Page 520 of 664
5207-3. Do-it-yourself maintenance
AURIS Touring Sports_EE (12L13E)
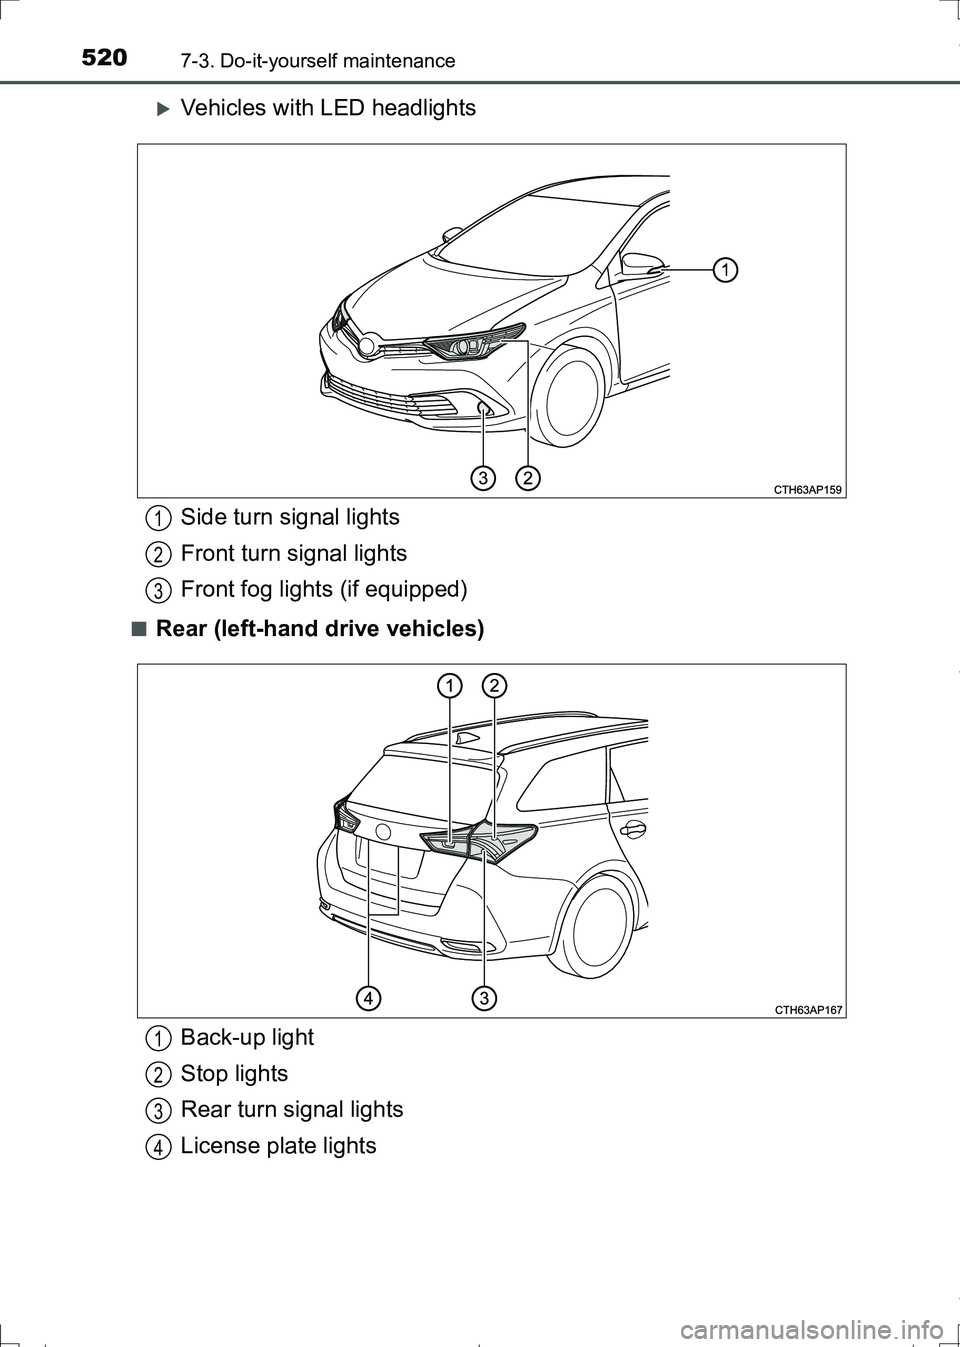
Vehicles with LED headlights
■Rear (left-hand drive vehicles)
Side turn signal lights
Front turn signal lights
Front fog lights (if equipped)1
2
3
Back-up light
Stop lights
Rear turn signal lights
License plate lights1
2
3
4
AURIS Touring Sports_OM_Europe_OM12L13E.book 520 ページ 2016年6月27日 月曜日 午後5時21分
Page 521 of 664
5217-3. Do-it-yourself maintenance
AURIS Touring Sports_EE (12L13E)
7
Maintenance and care
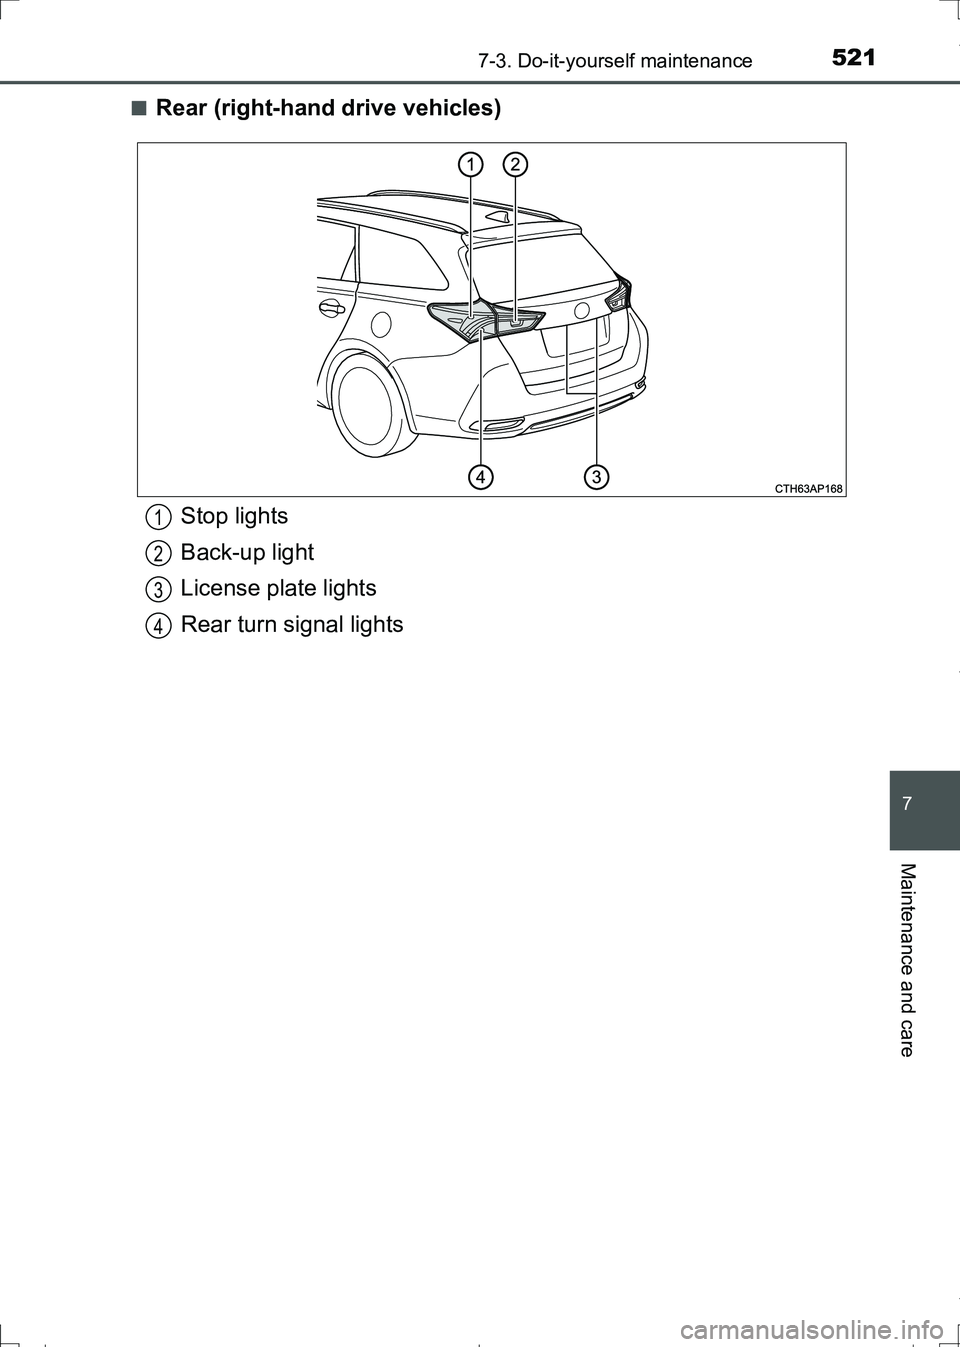
■Rear (right-hand drive vehicles)
Stop lights
Back-up light
License plate lights
Rear turn signal lights1
2
3
4
AURIS Touring Sports_OM_Europe_OM12L13E.book 521 ページ 2016年6月27日 月曜日 午後5時21分
Page 522 of 664
5227-3. Do-it-yourself maintenance
AURIS Touring Sports_EE (12L13E)■
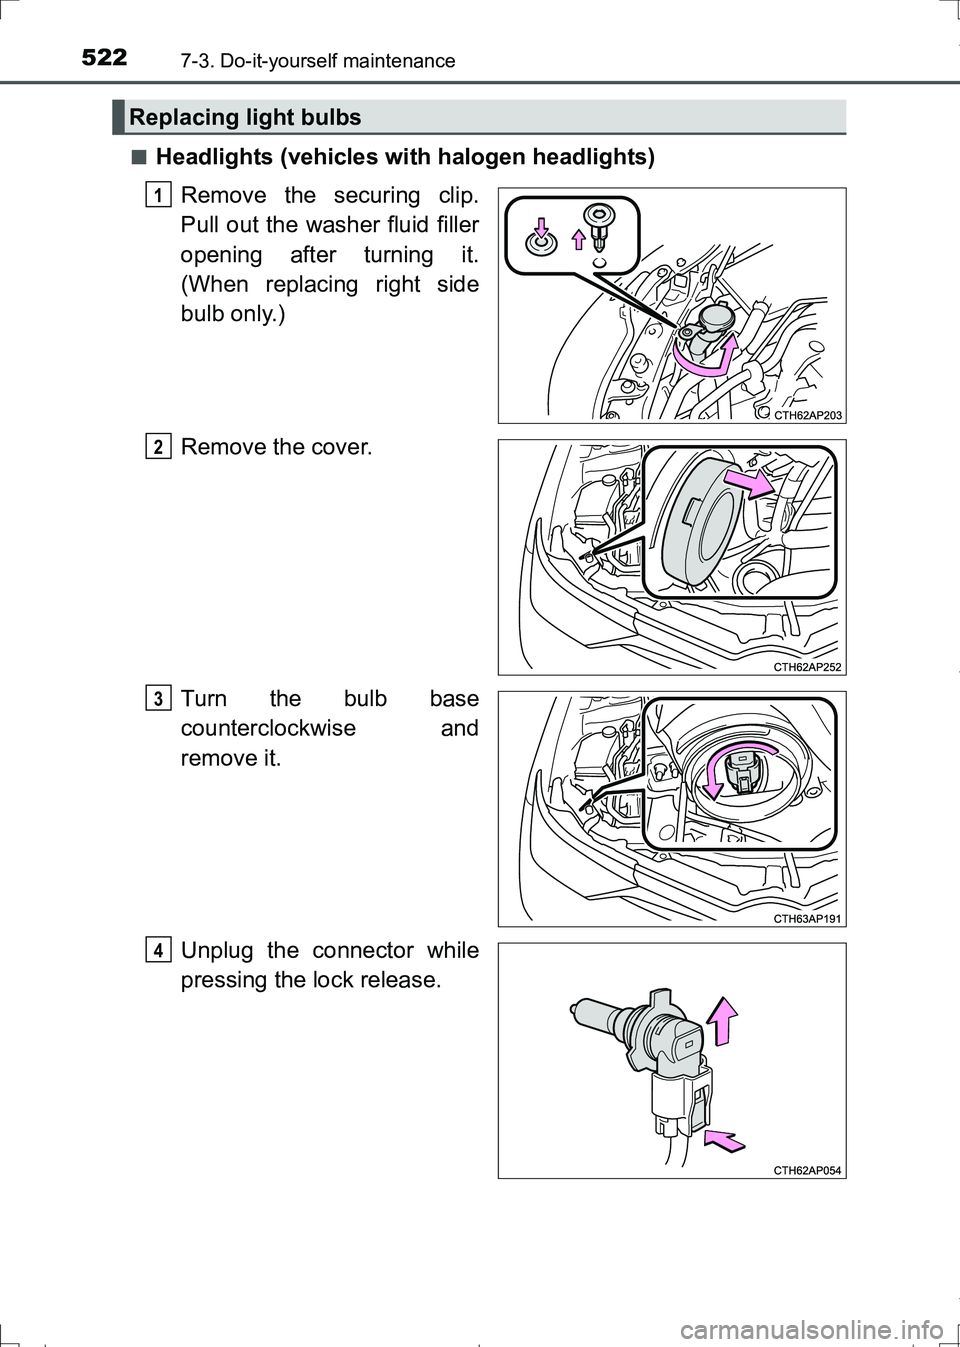
Headlights (vehicles with halogen headlights)
Remove the securing clip.
Pull out the washer fluid filler
opening after turning it.
(When replacing right side
bulb only.)
Remove the cover.
Turn the bulb base
counterclockwise and
remove it.
Unplug the connector while
pressing the lock release.
Replacing light bulbs
1
2
3
4
AURIS Touring Sports_OM_Europe_OM12L13E.book 522 ページ 2016年6月27日 月曜日 午後5時21分
Page 523 of 664
5237-3. Do-it-yourself maintenance
AURIS Touring Sports_EE (12L13E)
7
Maintenance and care
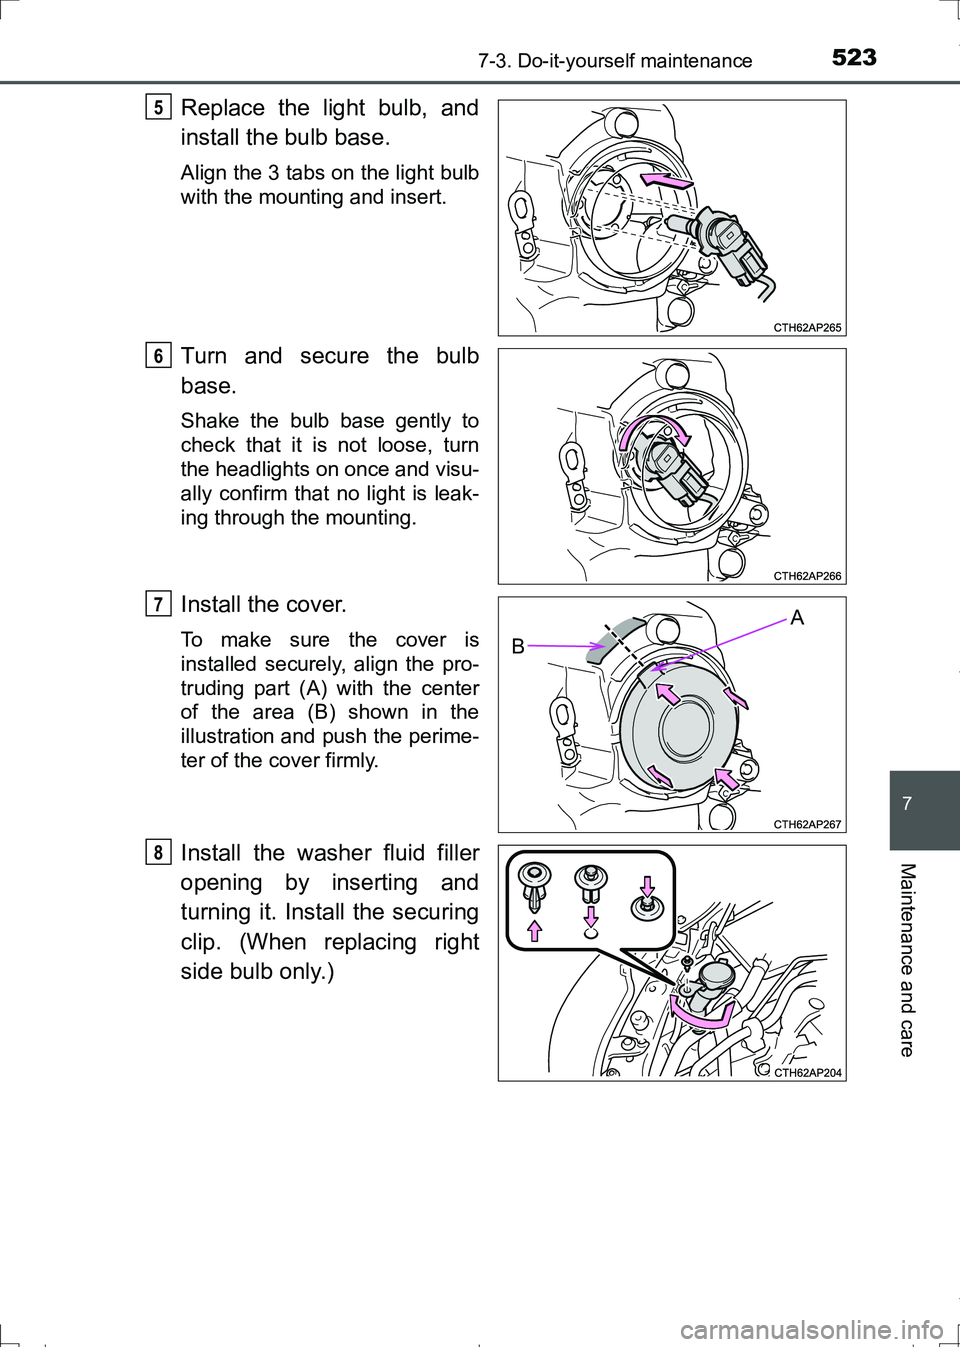
Replace the light bulb, and
install the bulb base.
Align the 3 tabs on the light bulb
with the mounting and insert.
Turn and secure the bulb
base.
Shake the bulb base gently to
check that it is not loose, turn
the headlights on once and visu-
ally confirm that no light is leak-
ing through the mounting.
Install the cover.
To make sure the cover is
installed securely, align the pro-
truding part (A) with the center
of the area (B) shown in the
illustration and push the perime-
ter of the cover firmly.
Install the washer fluid filler
opening by inserting and
turning it. Install the securing
clip. (When replacing right
side bulb only.)
5
6
A
B
7
8
AURIS Touring Sports_OM_Europe_OM12L13E.book 523 ページ 2016年6月27日 月曜日 午後5時21分
Page 524 of 664
5247-3. Do-it-yourself maintenance
AURIS Touring Sports_EE (12L13E)■
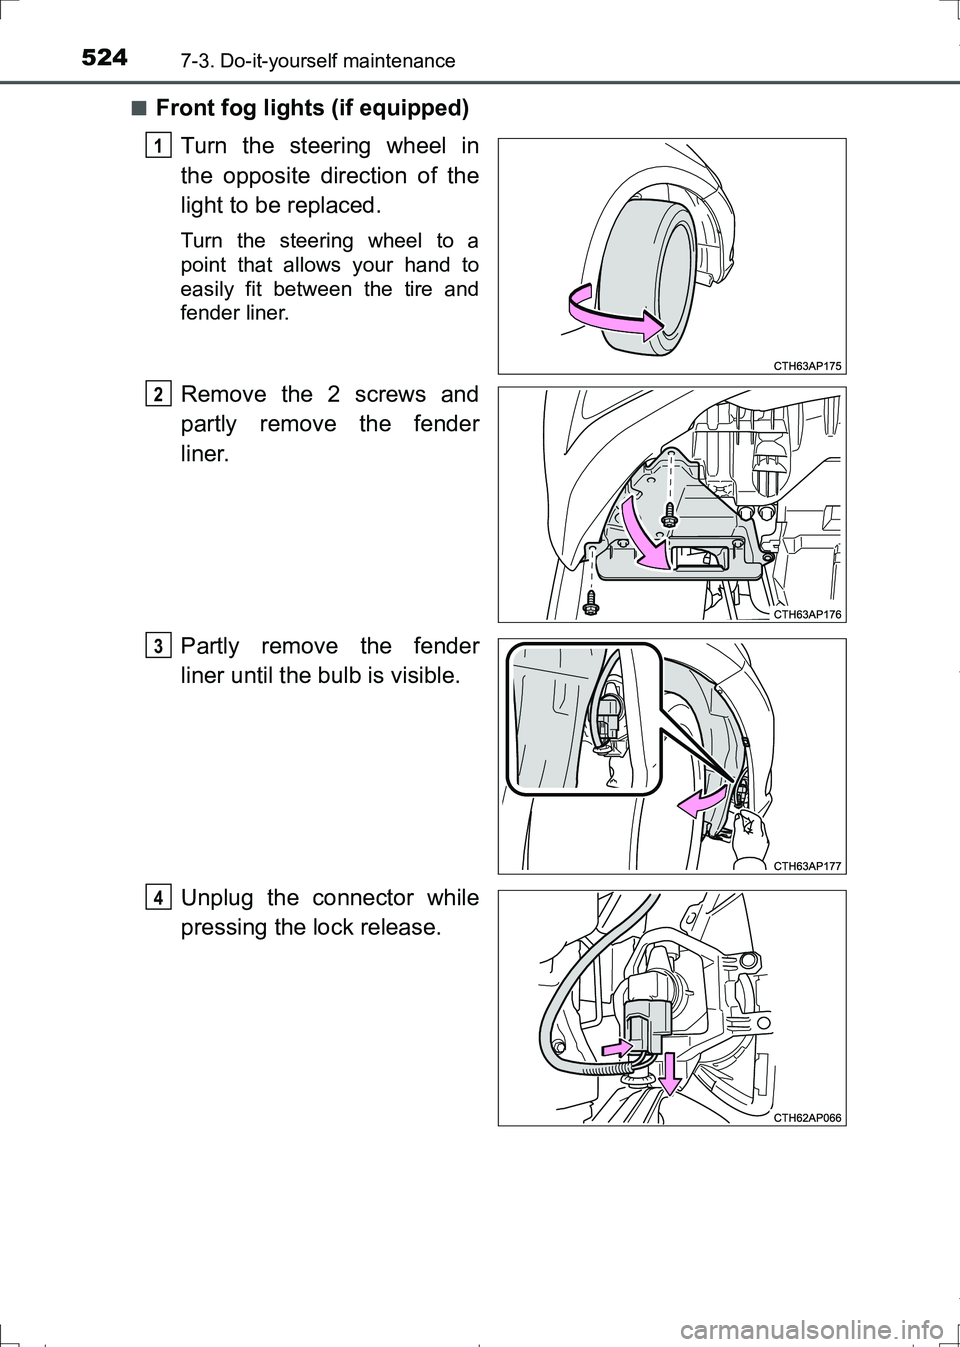
Front fog lights (if equipped)
Turn the steering wheel in
the opposite direction of the
light to be replaced.
Turn the steering wheel to a
point that allows your hand to
easily fit between the tire and
fender liner.
Remove the 2 screws and
partly remove the fender
liner.
Partly remove the fender
liner until the bulb is visible.
Unplug the connector while
pressing the lock release.
1
2
3
4
AURIS Touring Sports_OM_Europe_OM12L13E.book 524 ページ 2016年6月27日 月曜日 午後5時21分
Page 525 of 664
5257-3. Do-it-yourself maintenance
AURIS Touring Sports_EE (12L13E)
7
Maintenance and care
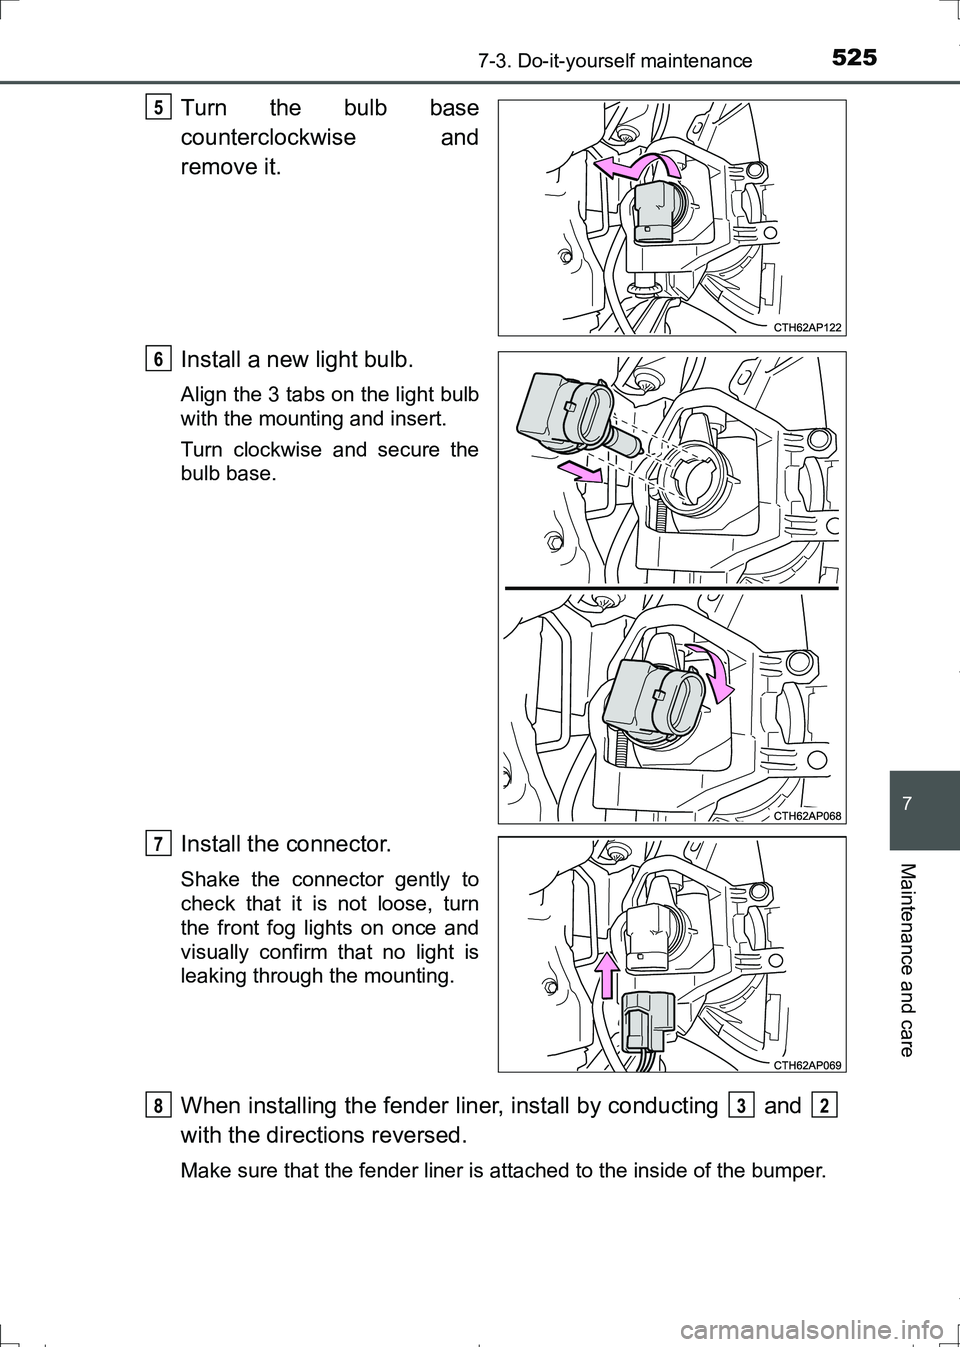
Turn the bulb base
counterclockwise and
remove it.
Install a new light bulb.
Align the 3 tabs on the light bulb
with the mounting and insert.
Turn clockwise and secure the
bulb base.
Install the connector.
Shake the connector gently to
check that it is not loose, turn
the front fog lights on once and
visually confirm that no light is
leaking through the mounting.
When installing the fender liner, install by conducting and
with the directions reversed.
Make sure that the fender liner is attached to the inside of the bumper.
5
6
7
832
AURIS Touring Sports_OM_Europe_OM12L13E.book 525 ページ 2016年6月27日 月曜日 午後5時21分
Page 526 of 664
5267-3. Do-it-yourself maintenance
AURIS Touring Sports_EE (12L13E)■
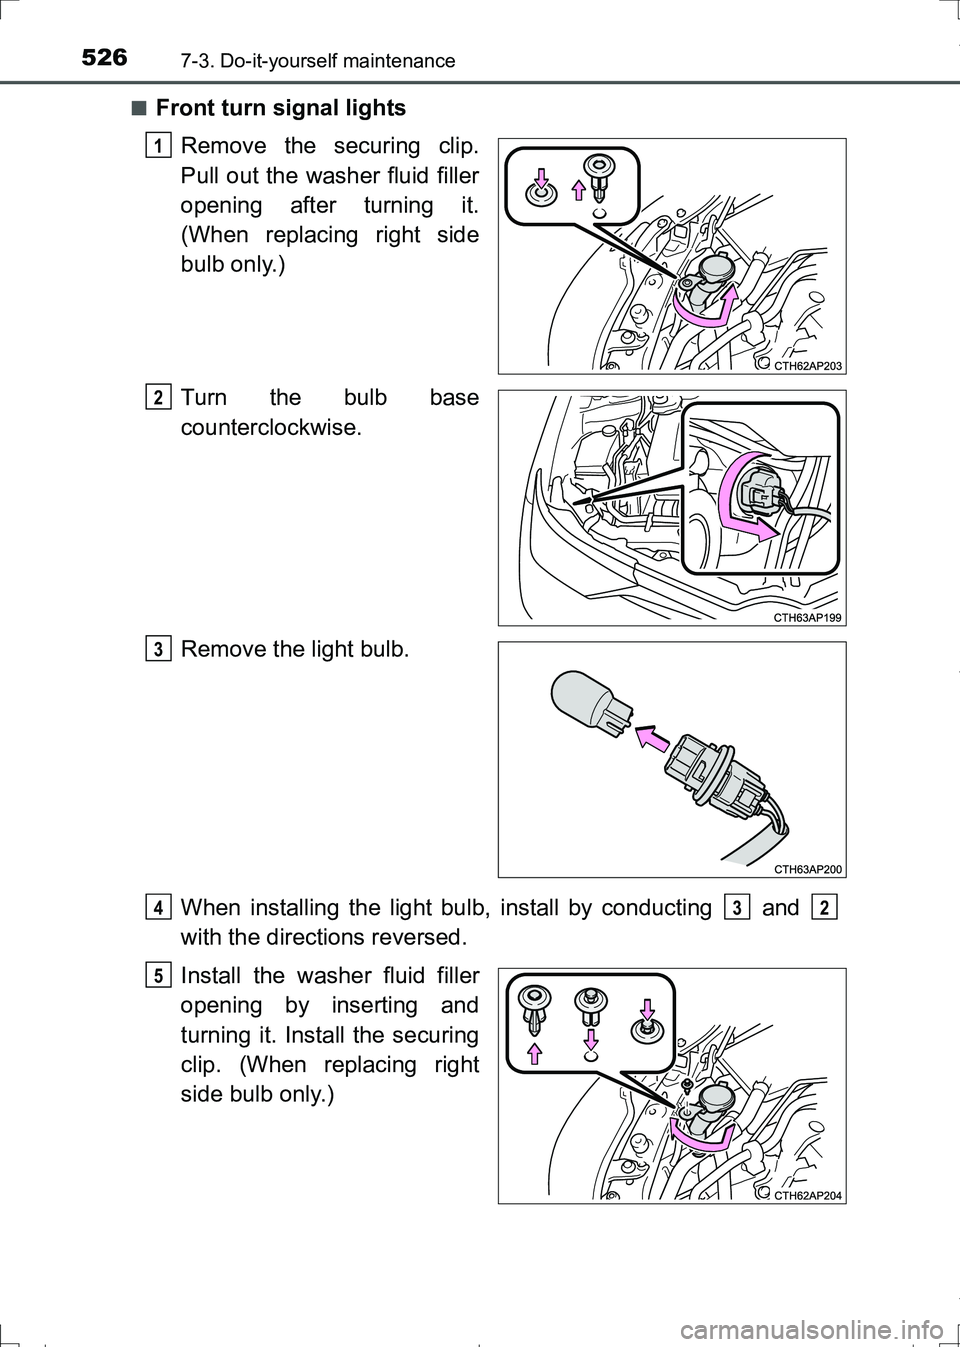
Front turn signal lights
Remove the securing clip.
Pull out the washer fluid filler
opening after turning it.
(When replacing right side
bulb only.)
Turn the bulb base
counterclockwise.
Remove the light bulb.
When installing the light bulb, install by conducting and
with the directions reversed.
Install the washer fluid filler
opening by inserting and
turning it. Install the securing
clip. (When replacing right
side bulb only.)
1
2
3
432
5
AURIS Touring Sports_OM_Europe_OM12L13E.book 526 ページ 2016年6月27日 月曜日 午後5時21分
Page 527 of 664
5277-3. Do-it-yourself maintenance
AURIS Touring Sports_EE (12L13E)
7
Maintenance and care
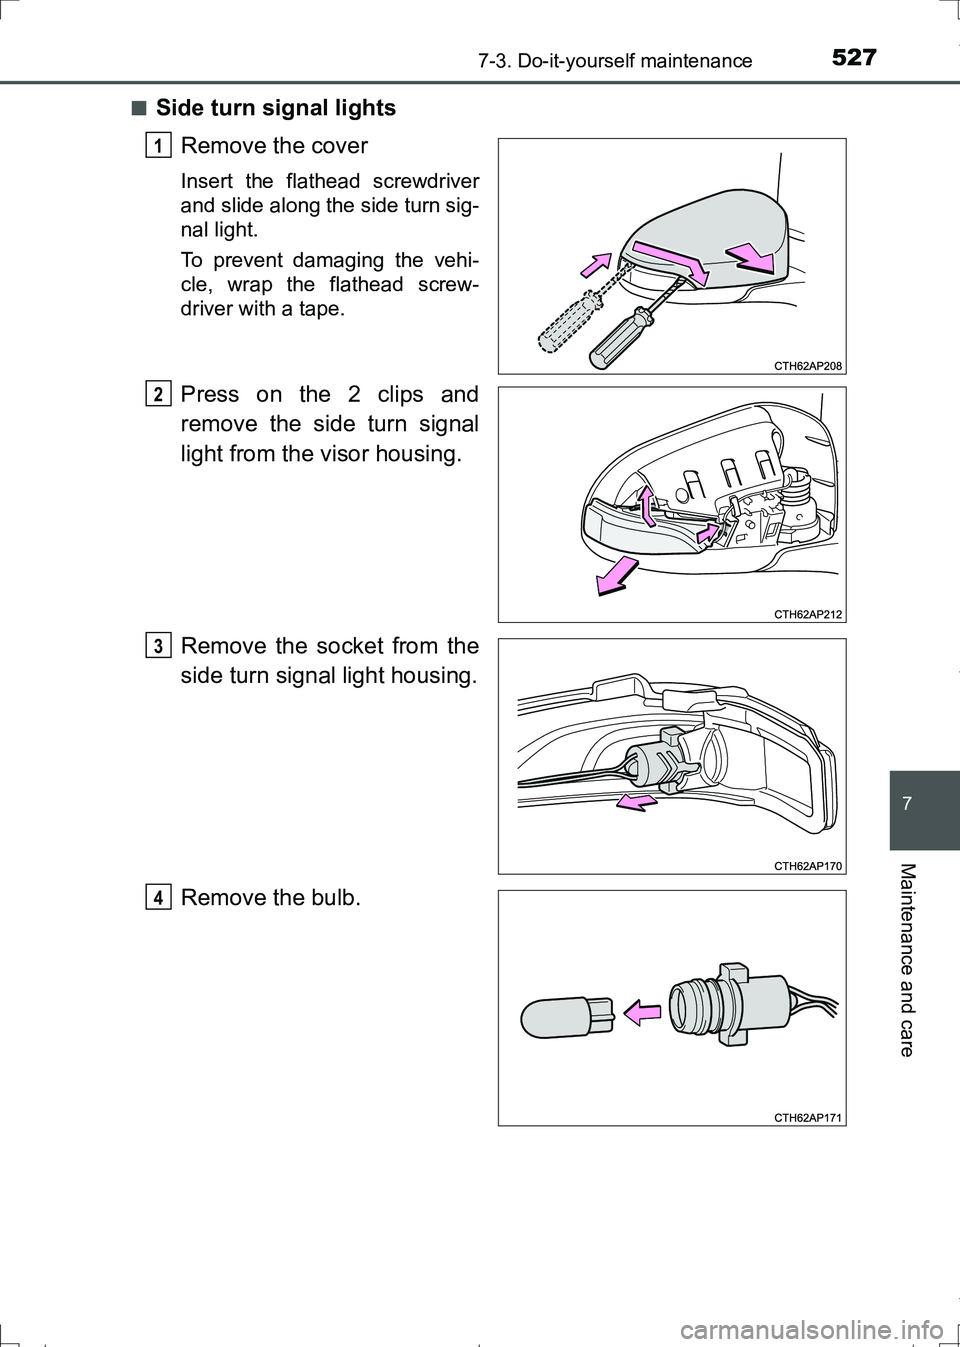
■Side turn signal lights
Remove the cover
Insert the flathead screwdriver
and slide along the side turn sig-
nal light.
To prevent damaging the vehi-
cle, wrap the flathead screw-
driver with a tape.
Press on the 2 clips and
remove the side turn signal
light from the visor housing.
Remove the socket from the
side turn signal light housing.
Remove the bulb.
1
2
3
4
AURIS Touring Sports_OM_Europe_OM12L13E.book 527 ページ 2016年6月27日 月曜日 午後5時21分
Page 529 of 664
5297-3. Do-it-yourself maintenance
AURIS Touring Sports_EE (12L13E)
7
Maintenance and care
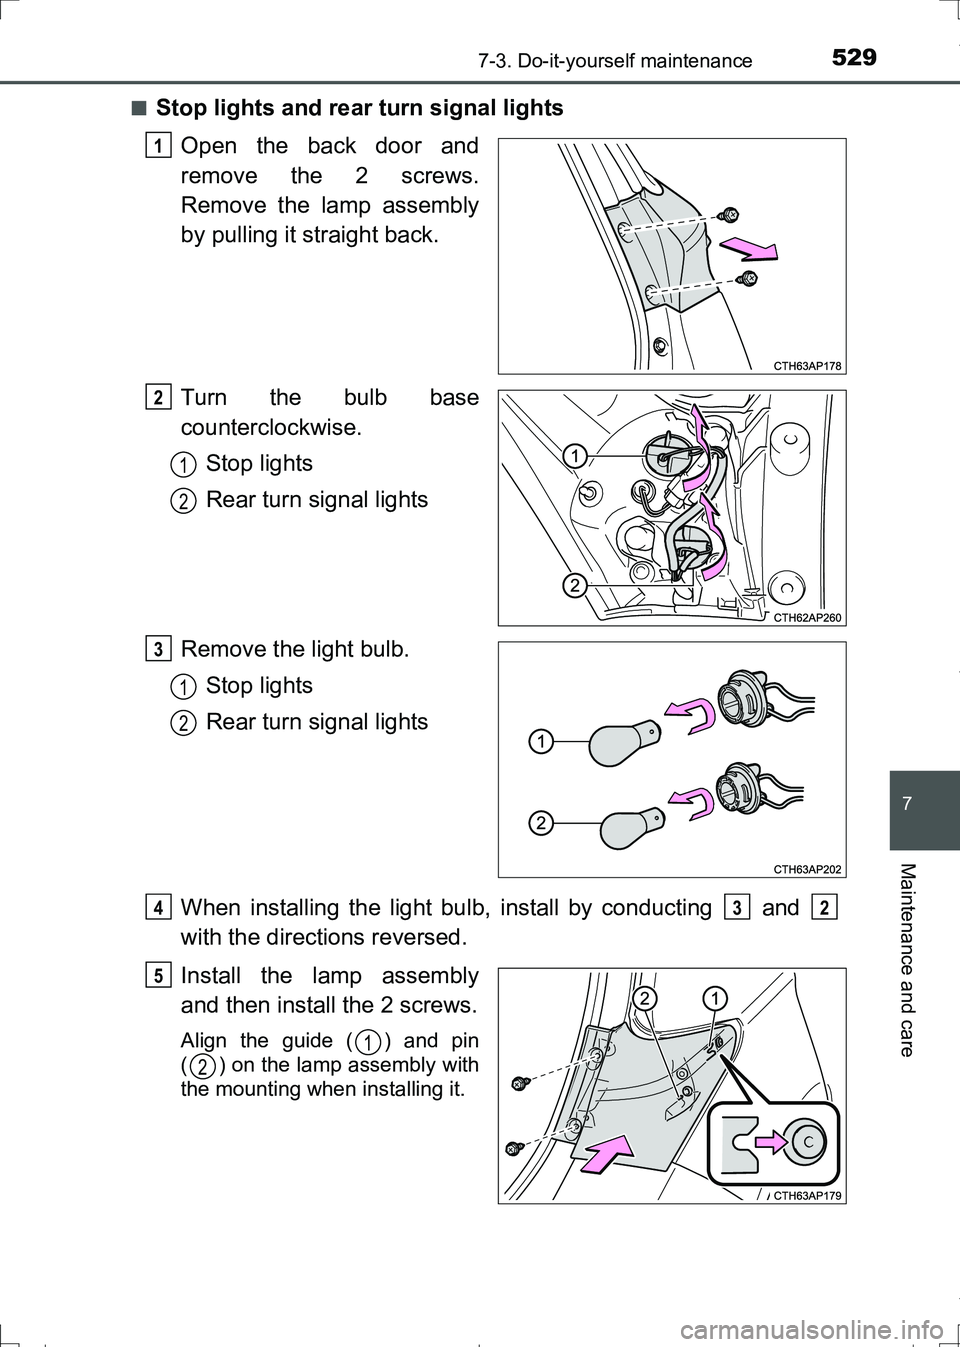
■Stop lights and rear turn signal lights
Open the back door and
remove the 2 screws.
Remove the lamp assembly
by pulling it straight back.
Turn the bulb base
counterclockwise.
Stop lights
Rear turn signal lights
Remove the light bulb.
Stop lights
Rear turn signal lights
When installing the light bulb, install by conducting and
with the directions reversed.
Install the lamp assembly
and then install the 2 screws.
Align the guide ( ) and pin
( ) on the lamp assembly with
the mounting when installing it.
1
2
1
2
3
1
2
432
5
1
2
AURIS Touring Sports_OM_Europe_OM12L13E.book 529 ページ 2016年6月27日 月曜日 午後5時21分
Page 531 of 664
5317-3. Do-it-yourself maintenance
AURIS Touring Sports_EE (12L13E)
7
Maintenance and care
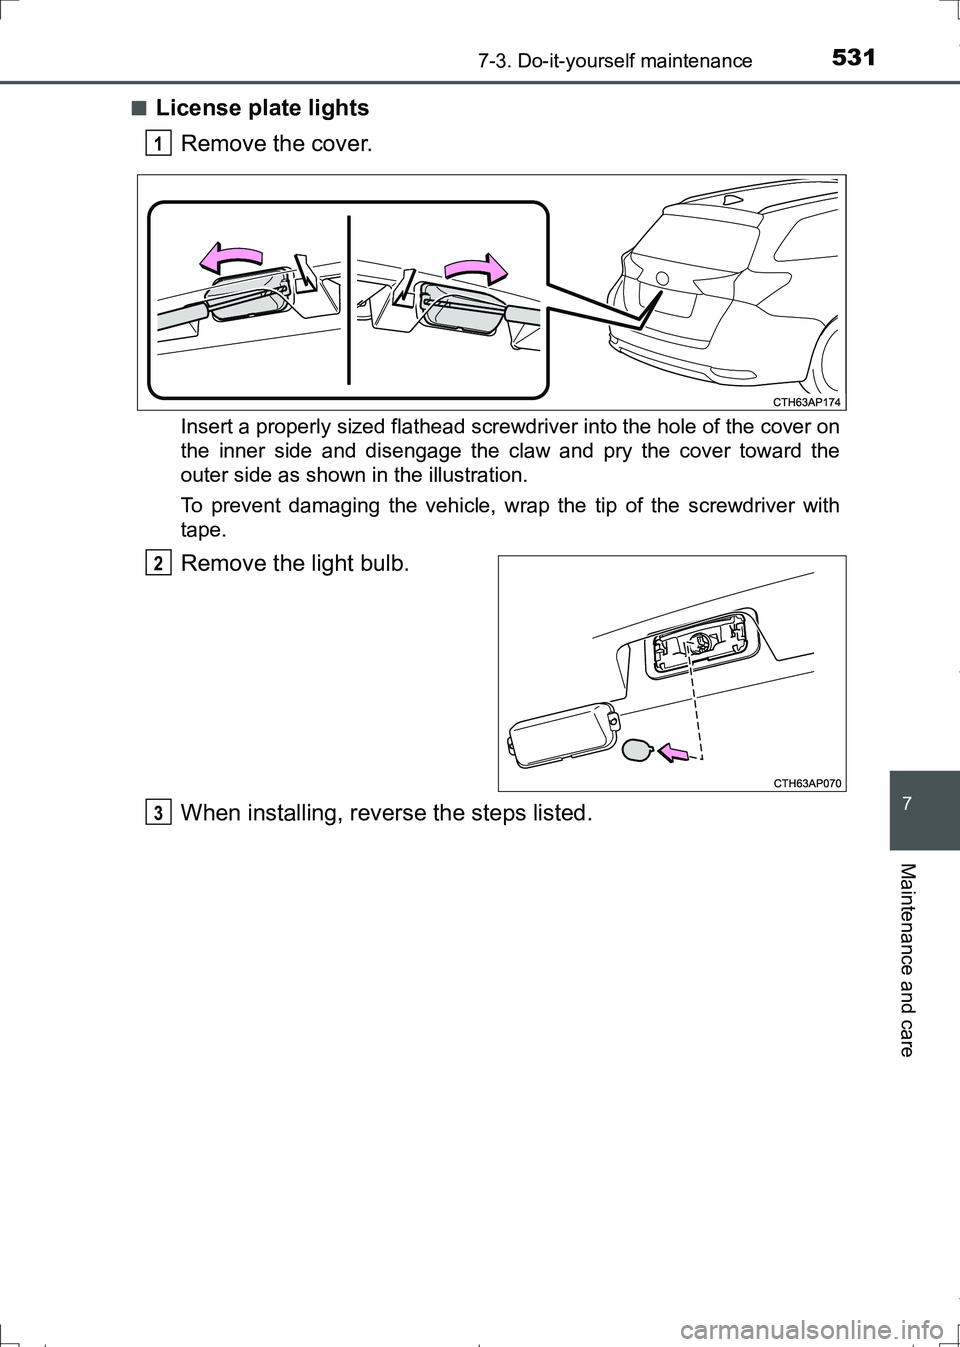
■License plate lights
Remove the cover.
Insert a properly sized flathead screwdriver into the hole of the cover on
the inner side and disengage the claw and pry the cover toward the
outer side as shown in the illustration.
To prevent damaging the vehicle, wrap the tip of the screwdriver with
tape.
Remove the light bulb.
When installing, reverse the steps listed.
1
2
3
AURIS Touring Sports_OM_Europe_OM12L13E.book 531 ページ 2016年6月27日 月曜日 午後5時21分