key TOYOTA AVALON 2007 XX30 / 3.G Navigation Manual
[x] Cancel search | Manufacturer: TOYOTA, Model Year: 2007, Model line: AVALON, Model: TOYOTA AVALON 2007 XX30 / 3.GPages: 138, PDF Size: 4.82 MB
Page 14 of 138

xiv
CANADA
CAN
Alberta
British Columbia
Manitoba
New Brunswick
Newfoundland and Labrador
Nova Scotia
Ontario
Prince Edward Island
Québec
Saskatchewan
Yukon Territory
You can find your destination using vari-
ous methods. See pages xv through
xxx for the detailed steps.
1. By “Address”: You can input the
house number and the street address
by using the input keys. See page
xv for the detailed steps.2. By “POI” (Point of Interest): You can
select one of the many points of inter-
est that have been already stored in
the system’s database. There are 54
categories to choose from including
restaurants, hotels and so on. See
page xix for the detailed steps.
3. By “Marked points”: You can select
your own favorite destinations as
“Marked points”. The system allows
you to store up 100 marked points.
See page xxv for the detailed steps.
4. By “Previous destination”: You can
select a destination from any of the
last 20 previously set destinations. See
page xxvi for the detailed steps.
5. By “Emergency”: You can select one
of the three points of emergency ser-
vice points that have been already
stored in the system’s database. See
page xxvi for the detailed steps.
6. By “Intersection”: You can enter the
names of two intersecting streets. This
is helpful if you do not know the spe-
cific street address of your destination
but know the general vicinity. See page
xxvii for the detailed steps.7. By “Prev. start point”: You can enter
a point where the system has started
to guide last time. See page xxix for
the detailed steps.
8. By “Freeway Ent./Exit”: You can enter
the name of the freeway (interstate)
entrance or exit. See page xxviii for
the detailed steps.
9. By Map Selection: You can select a
destination simply by selecting the
location on the displayed map. See
page xxx for the detailed steps.
10. By Preset Destination (
—
switches on the “Destination”
screen): You can choose the destina-
tion by selecting one of the preset des-
tination switch. In this case, it is nec-
essary to register your desired
destination beforehand. See page xxx
for the detailed steps.
11 . B y H o m e (
switch on the “Des-
tination” screen): You can select your
own home without entering the address
each time. In this case, it is necessary
to register your home beforehand. See
page xxx for the detailed steps.
Page 16 of 138
xvi
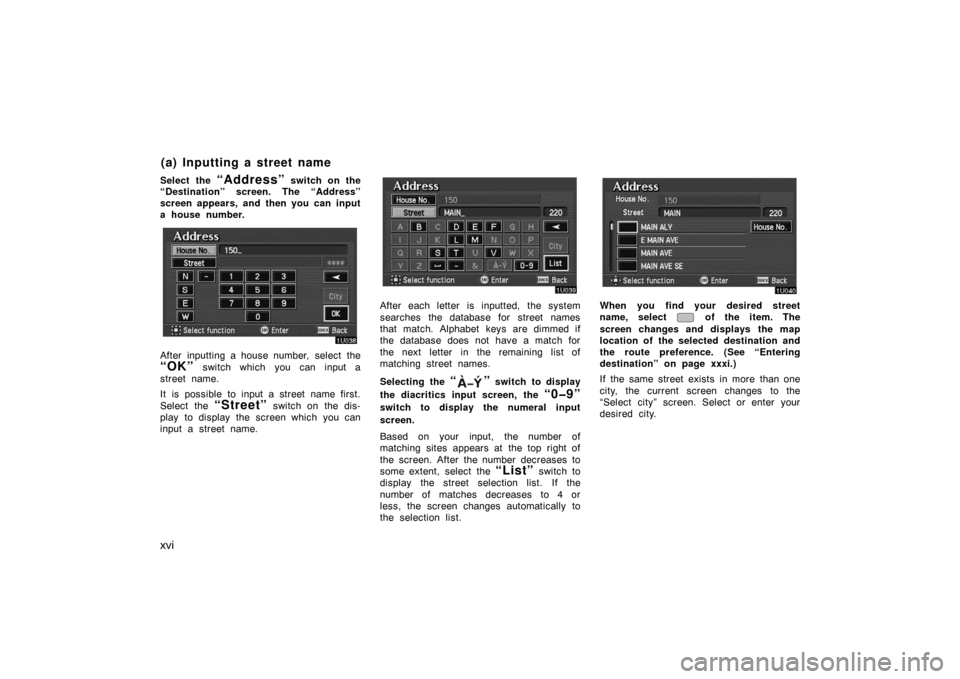
Select the “Address” switch on the
“Destination” screen. The “Address”
screen appears, and then you can input
a house number.
After inputting a house number, select the
“OK” switch which you can input a
street name.
It is possible to input a street name first.
Select the
“Street” switch on the dis-
play to display the screen which you can
input a street name.
After each letter is inputted, the system
searches the database for street names
that match. Alphabet keys are dimmed if
the database does not have a match for
the next letter in the remaining list of
matching street names.
Selecting the
“” switch to display
the diacritics input screen, the
“0�9”
switch to display the numeral input
screen.
Based on your input, the number of
matching sites appears at the top right of
the screen. After the number decreases to
some extent, select the
“List” switch to
display the street selection list. If the
number of matches decreases to 4 or
less, the screen changes automatically to
the selection list.
When you find your desired street
name, select
of the item. The
screen changes and displays the map
location of the selected destination and
the route preference. (See “Entering
destination” on page xxxi.)
If the same street exists in more than one
city, the current screen changes to the
“Select city” screen. Select or enter your
desired city.
(a) Inputting a street name
Page 44 of 138
xliv
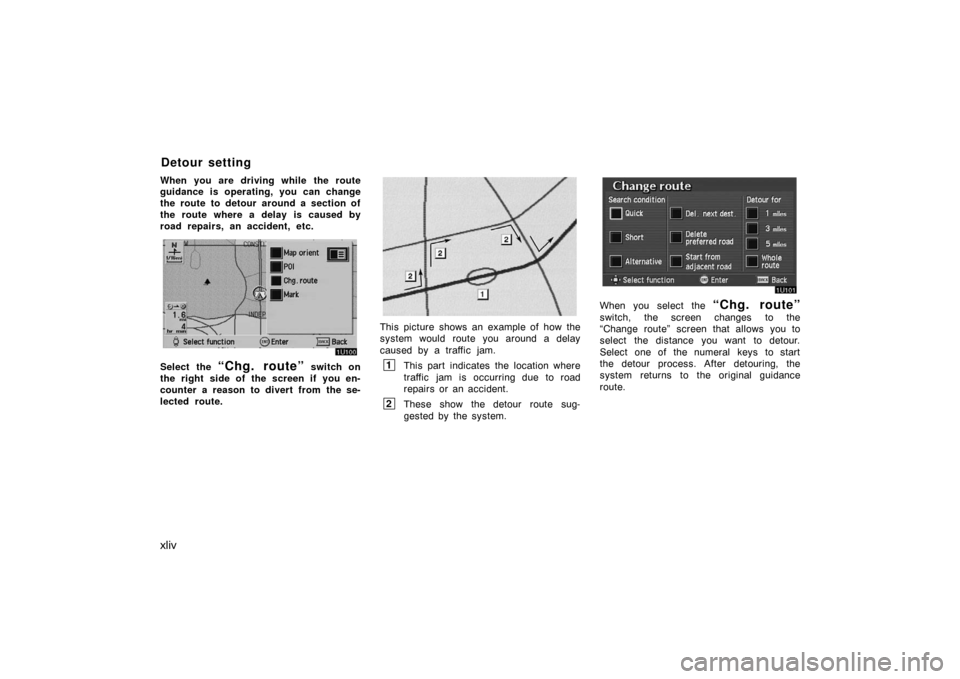
When you are driving while the route
guidance is operating, you can change
the route to detour around a section of
the route where a delay is caused by
road repairs, an accident, etc.
Select the “Chg. route” switch on
the right side of the screen if you en-
counter a reason to divert from the se-
lected route.
EMV3065U
This picture shows an example of how the
system would route you around a delay
caused by a traffic jam.
1This part indicates the location where
traffic jam is occurring due to road
repairs or an accident.
2These show the detour route sug-
gested by the system.
When you select the “Chg. route”
switch, the screen changes to the
“Change route” screen that allows you to
select the distance you want to detour.
Select one of the numeral keys to start
the detour process. After detouring, the
system returns to the original guidance
route.
Detour setting
Page 81 of 138
lxxxi
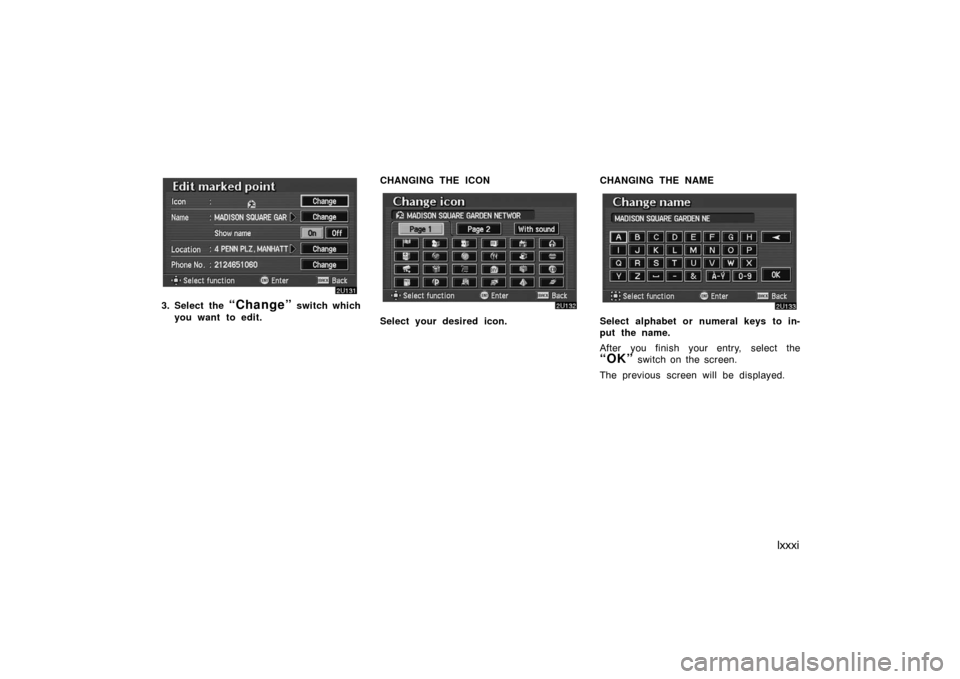
3. Select the “Change” switch which
you want to edit.CHANGING THE ICON
Select your desired icon.CHANGING THE NAMESelect alphabet or numeral keys to in-
put the name.
After you finish your entry, select the
“OK” switch on the screen.
The previous screen will be displayed.
Page 82 of 138
lxxxii
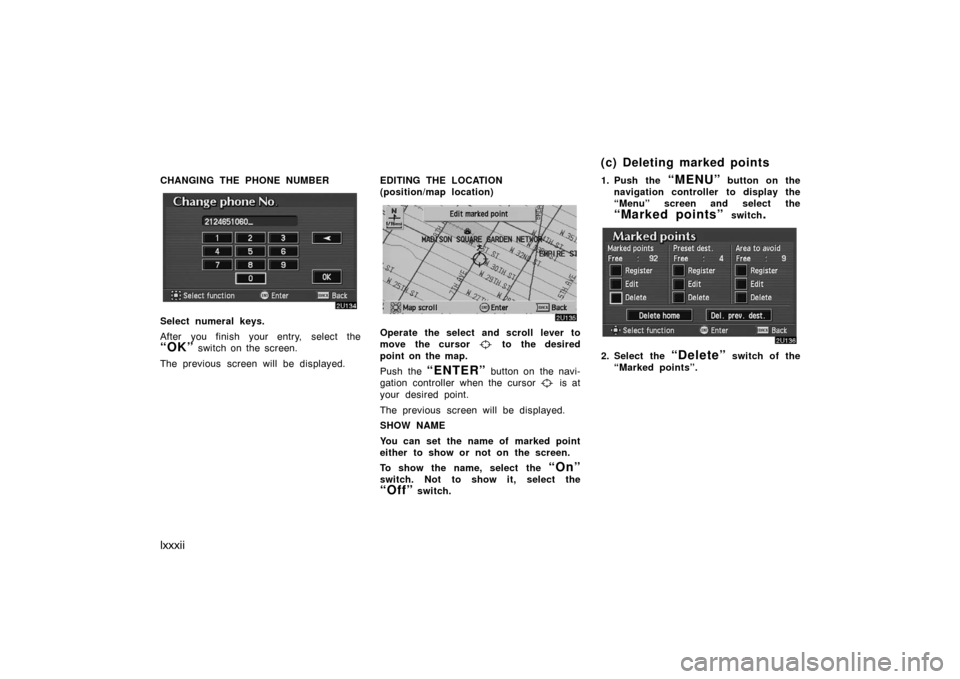
CHANGING THE PHONE NUMBER
Select numeral keys.
After you finish your entry, select the
“OK” switch on the screen.
The previous screen will be displayed.EDITING THE LOCATION
(position/map location)
Operate the select and scroll lever to
move the cursor
to the desired
point on the map.
Push the
“ENTER” button on the navi-
gation controller when the cursor
is at
your desired point.
The previous screen will be displayed.
SHOW NAME
You can set the name of marked point
either to show or not on the screen.
To show the name, select the
“On”
switch. Not to show it, select the
“Off” switch.1. Push the
“MENU” button on the
navigation controller to display the
“Menu” screen and select the
“Marked points” switch.
2. Select the “Delete” switch of the
“Marked points”.
(c) Deleting marked points
Page 88 of 138
lxxxviii
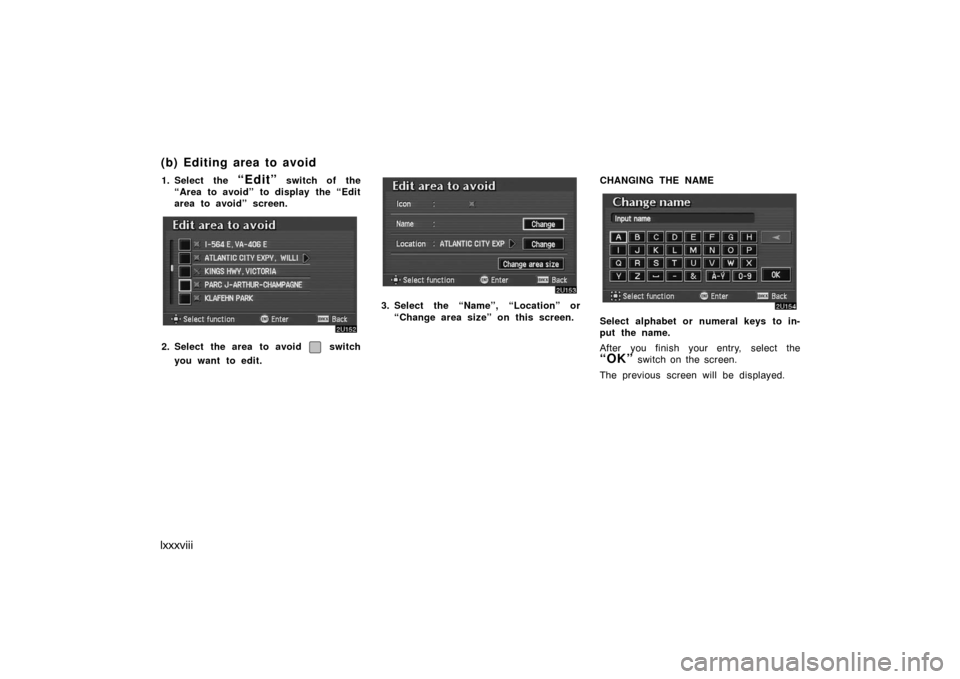
1. Select the “Edit” switch of the
“Area to avoid” to display the “Edit
area to avoid” screen.
2. Select the area to avoid switch
you want to edit.
3. Select the “Name”, “Location” or
“Change area size” on this screen.CHANGING THE NAME
Select alphabet or numeral keys to in-
put the name.
After you finish your entry, select the
“OK” switch on the screen.
The previous screen will be displayed.
(b) Editing area to avoid
Page 109 of 138
cix
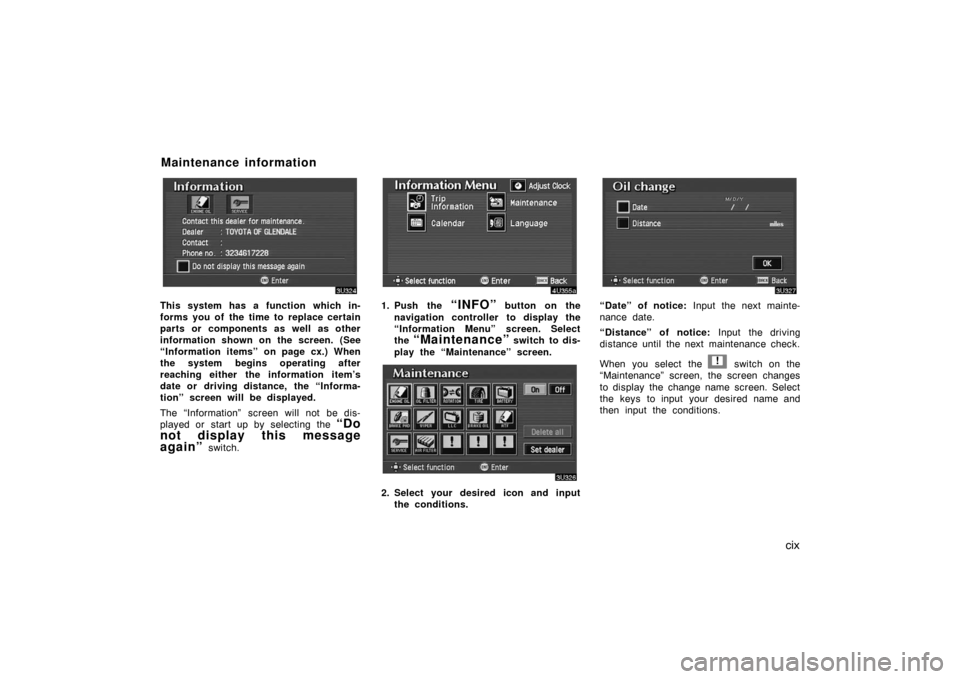
This system has a function which in-
forms you of the time to replace certain
parts or components as well as other
information shown on the screen. (See
“Information items” on page cx.) When
the system begins operating after
reaching either the information item’s
date or driving distance, the “Informa-
tion” screen will be displayed.
The “Information” screen will not be dis-
played or start up by selecting the
“Do
not display this message
again”
switch.
1. Push the “INFO” button on the
navigation controller to display the
“Information Menu” screen. Select
the
“Maintenance” switch to dis-
play the “Maintenance” screen.
2. Select your desired icon and input
the conditions.
“Date” of notice: Input the next mainte-
nance date.
“Distance” of notice: Input the driving
distance until the next maintenance check.
When you select the
! switch on the
“Maintenance” screen, the screen changes
to display the change name screen. Select
the keys to input your desired name and
then input the conditions.
Maintenance information
Page 112 of 138
cxii
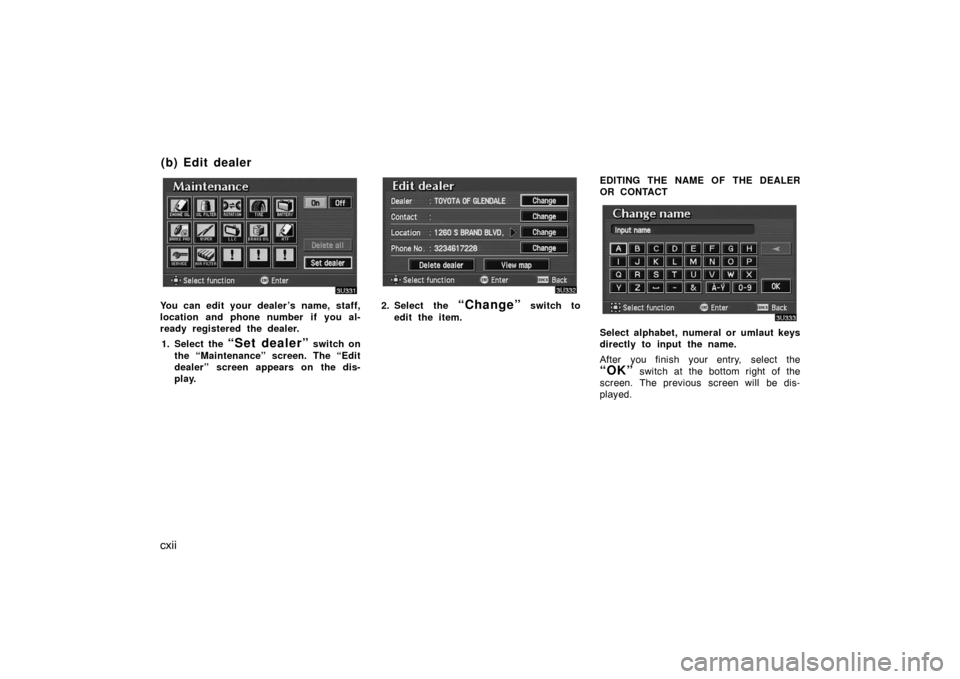
You can edit your dealer’s name, staff,
location and phone number if you al-
ready registered the dealer.
1. Select the
“Set dealer” switch on
the “Maintenance” screen. The “Edit
dealer” screen appears on the dis-
play.
2. Select the “Change” switch to
edit the item.EDITING THE NAME OF THE DEALER
OR CONTACT
Select alphabet, numeral or umlaut keys
directly to input the name.
After you finish your entry, select the
“OK” switch at the bottom right of the
screen. The previous screen will be dis-
played.
(b) Edit dealer
Page 113 of 138
cxiii
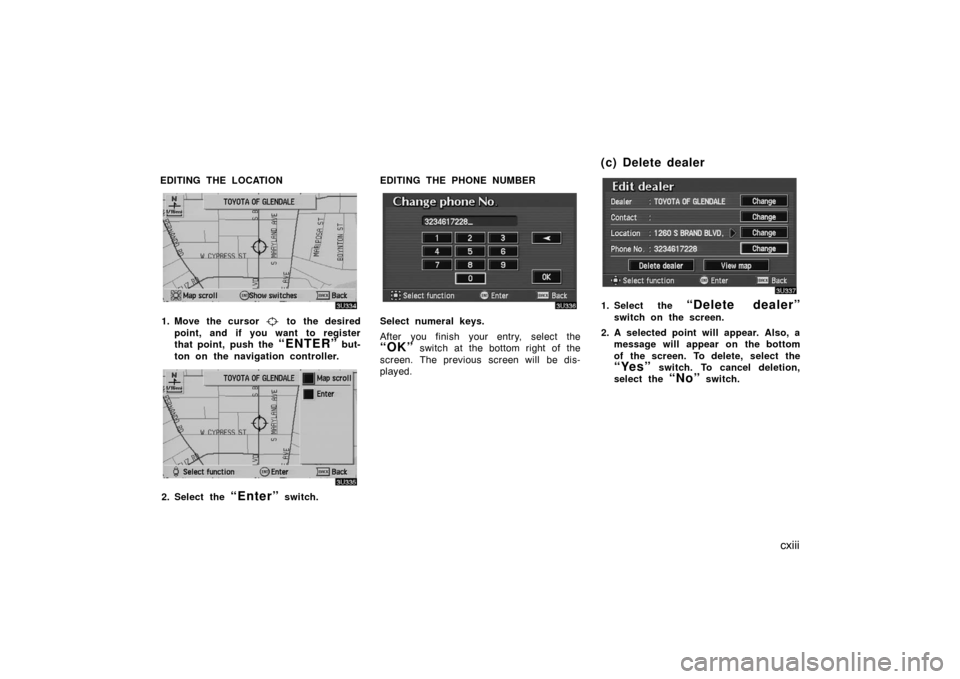
EDITING THE LOCATION
1. Move the cursor to the desired
point, and if you want to register
that point, push the
“ENTER” but-
ton on the navigation controller.
2. Select the “Enter” switch.EDITING THE PHONE NUMBER
Select numeral keys.
After you finish your entry, select the
“OK” switch at the bottom right of the
screen. The previous screen will be dis-
played.
1. Select the “Delete dealer”
switch on the screen.
2. A selected point will appear. Also, a
message will appear on the bottom
of the screen. To delete, select the
“Yes” switch. To cancel deletion,
select the
“No” switch.
(c) Delete dealer
Page 115 of 138
cxv
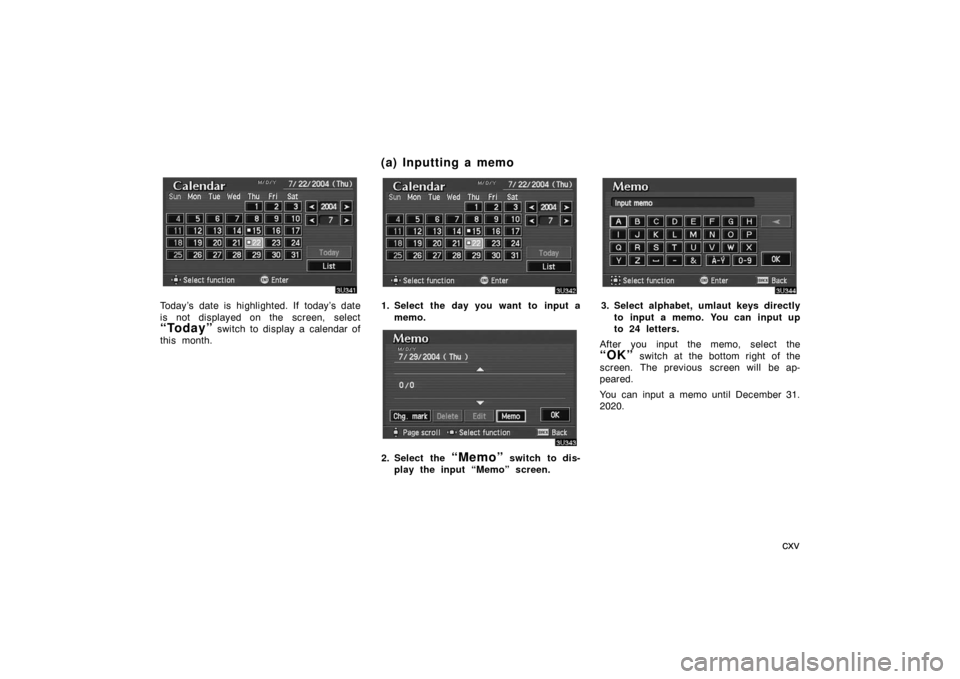
Today’s date is highlighted. If today’s date
is not displayed on the screen, select
“Today” switch to display a calendar of
this month.
1. Select the day you want to input a
memo.
2. Select the “Memo” switch to dis-
play the input “Memo” screen.
3. Select alphabet, umlaut keys directly
to input a memo. You can input up
to 24 letters.
After you input the memo, select the
“OK” switch at the bottom right of the
screen. The previous screen will be ap-
peared.
You can input a memo until December 31.
2020.
(a) Inputting a memo