low beam TOYOTA AVALON 2012 XX40 / 4.G Owners Manual
[x] Cancel search | Manufacturer: TOYOTA, Model Year: 2012, Model line: AVALON, Model: TOYOTA AVALON 2012 XX40 / 4.GPages: 580, PDF Size: 9.33 MB
Page 8 of 580
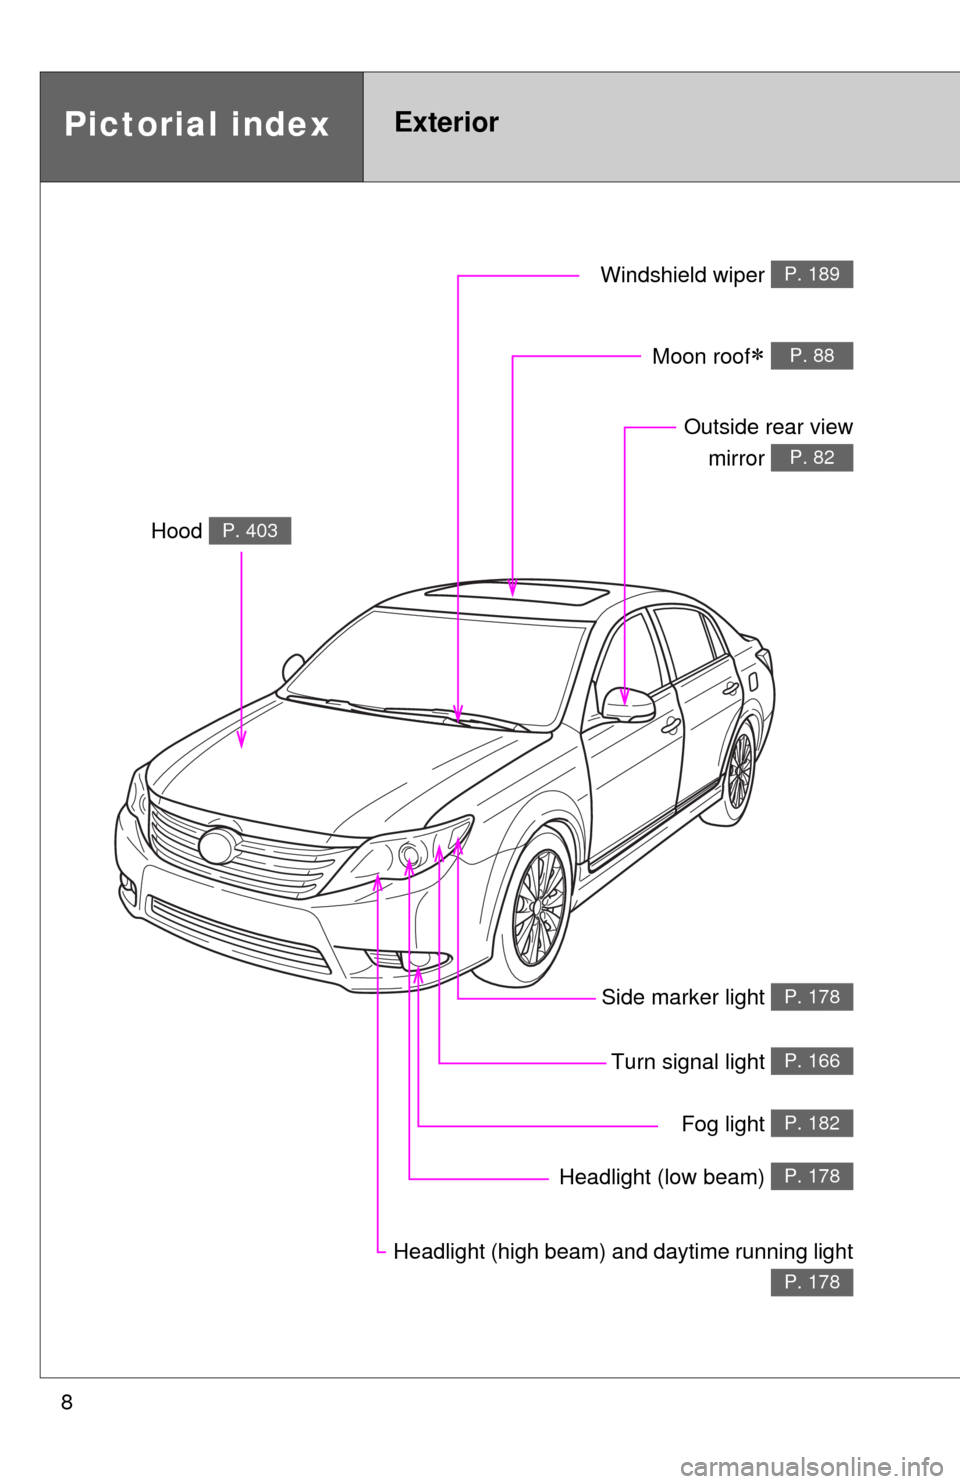
8
Headlight (high beam) and daytime running light
P. 178
Pictorial indexExterior
Turn signal light P. 166
Fog light P. 182
Side marker light P. 178
Headlight (low beam) P. 178
Hood P. 403
Windshield wiper P. 189
Moon roof P. 88
Outside rear viewmirror
P. 82
Page 182 of 580
182
2-3. Operating the lights and windshield wipers
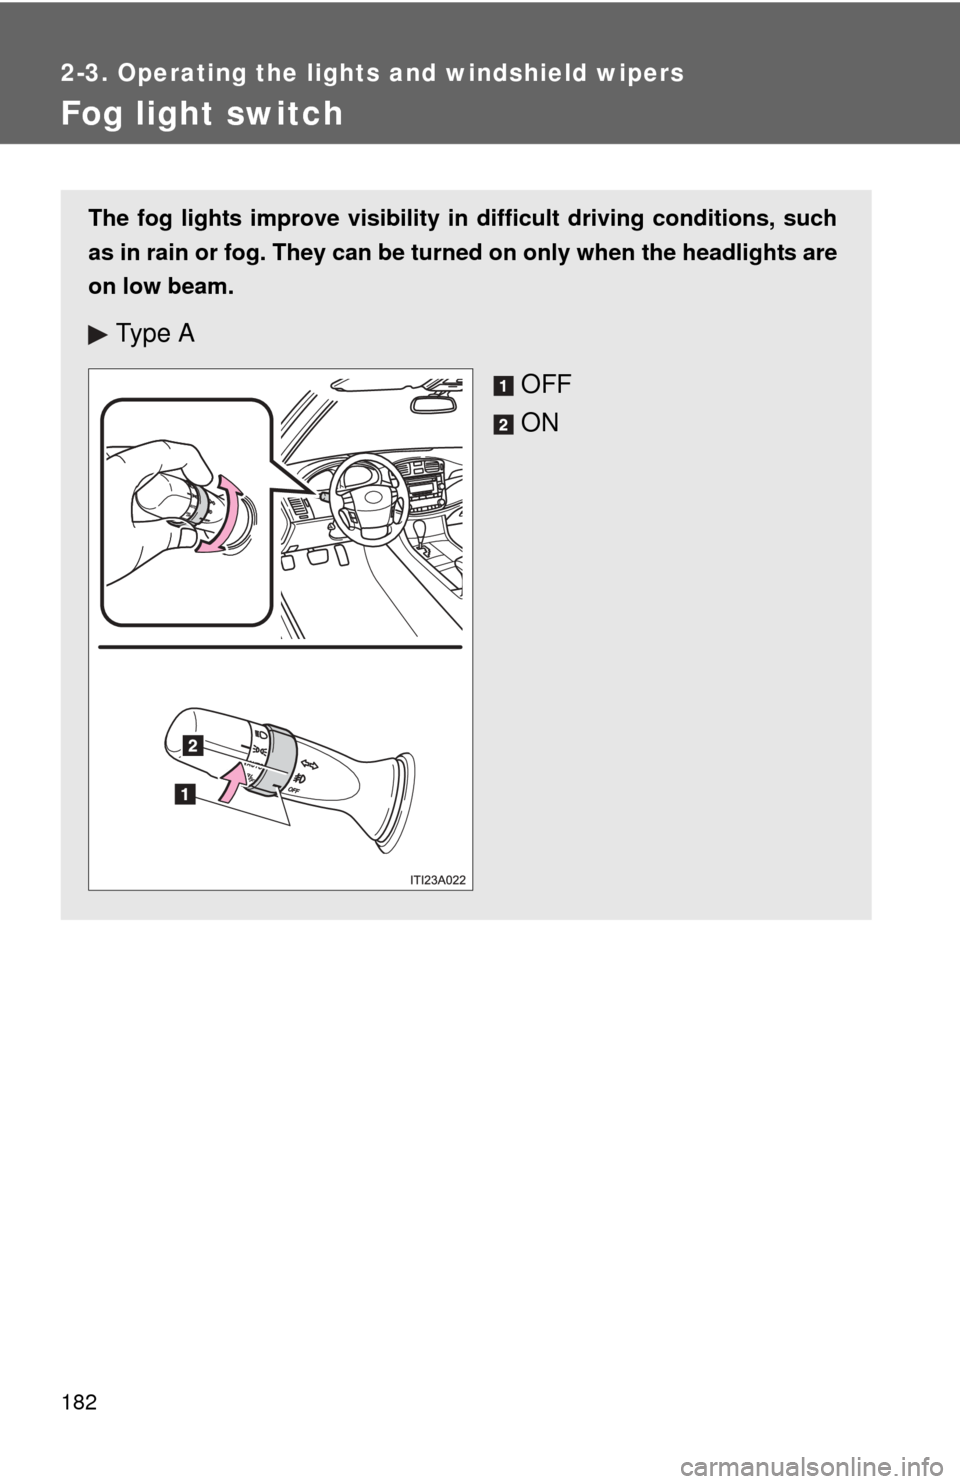
Fog light switch
The fog lights improve visibility in difficult driving conditions, such
as in rain or fog. They can be turned on only when the headlights are
on low beam.
Ty p e AOFF
ON
Page 448 of 580

448 4-3. Do-it-yourself maintenance
FuseAmpereCircuit
21 EFI No.1 25 A Multiport fuel injection system/
sequential multiport fuel injection
system, fuel pump
22 HORN 10 A Horn
23 HEAD LH UPR 15 A Left-hand headlight (high beam)
24 HEAD RH UPR 15 A Right-hand headlight (high beam)
25 A/F 25 A Air fuel ratio sensor
26 WASHER 20 A Windshield washer
27 S-HORN 7.5 A Horn
28 DOME 7.5 A Gauges and meters, clock, front
personal lights, door courtesy
lights, garage door opener, rear
personal lights, trunk light
29 ECU-B 10 A Center display, multiplex
communication system
30 RAD No.1 15 A Audio system, center display,
navigation system
31 EFI No.2 10 A Multiport fuel injection system/
sequential multiport fuel injection
system
32 STOP No.2 7.5 A Stop lights, high mounted
stoplight, vehicle stability control
system, anti-lock brake system
33 HEAD RH LWR 15 A Right-hand headlight (low beam)
34 HEAD LH LWR 15 A Left-hand headlight (low beam)
Page 455 of 580
455
4-3. Do-it-yourself maintenance
4
Maintenance and care
Light bulbs
You may replace the following bulbs yourself. The difficulty level of
replacement varies depending on the bulb. If necessary bulb
replacement seems difficult to perfor m, contact your Toyota dealer.
For more information about replacing other light bulbs, contact your
Toyota dealer.
■ Prepare a replacement light bulb.
Check the wattage of the light bulb being replaced. ( P. 527)
■ Remove the engine compartment cover
P. 407
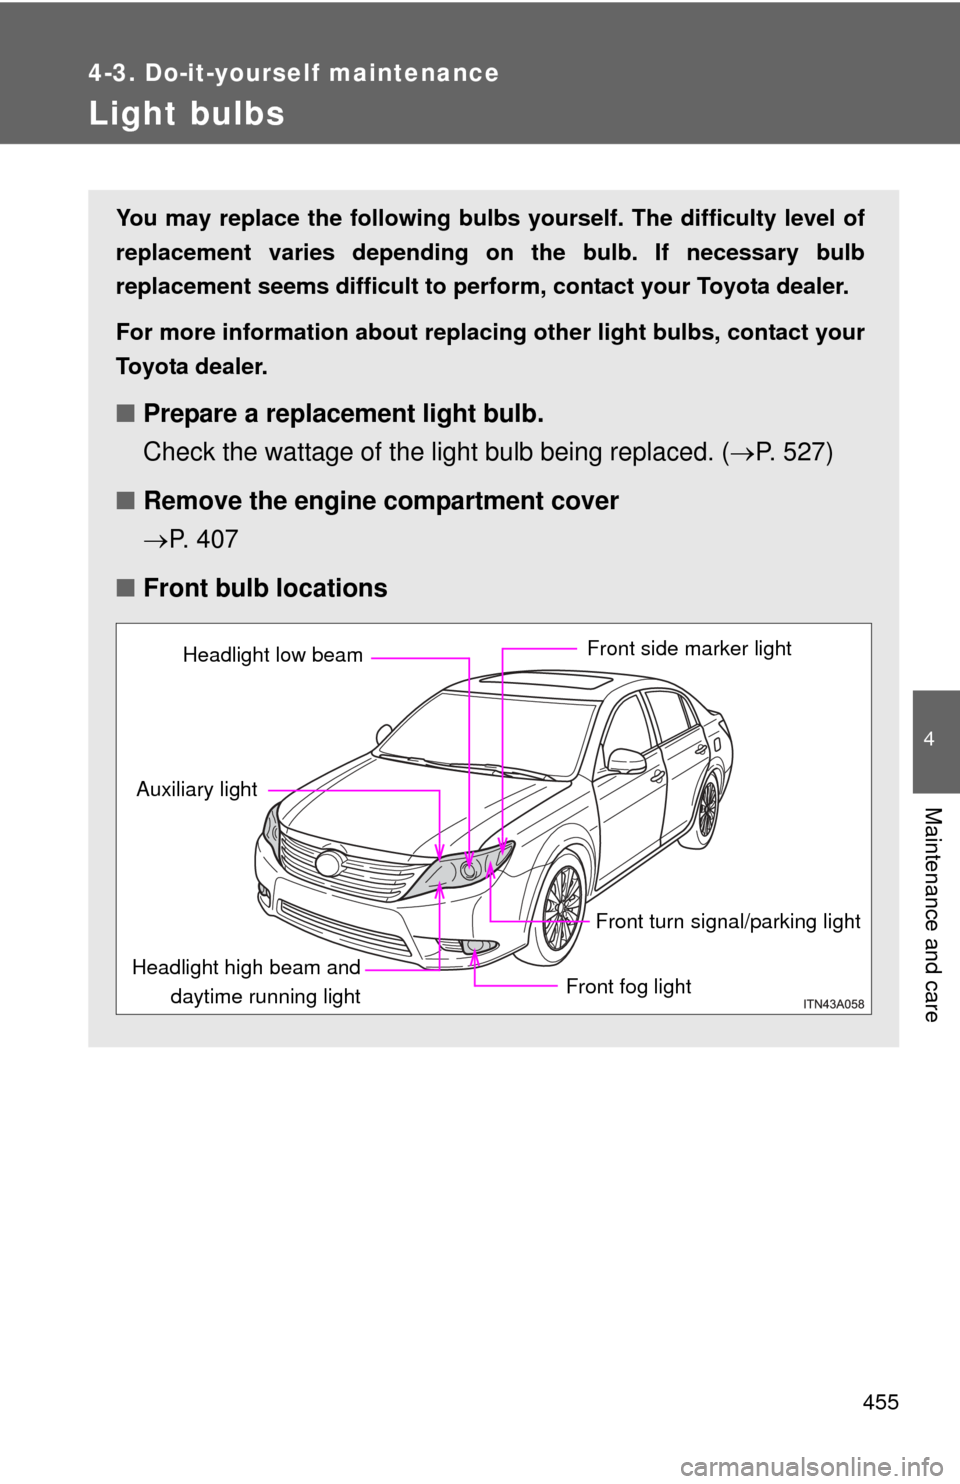
■ Front bulb locations
Front side marker light
Front turn signal/parking light
Front fog light
Headlight high beam and
daytime running light
Auxiliary light
Headlight low beam
Page 456 of 580
456 4-3. Do-it-yourself maintenance
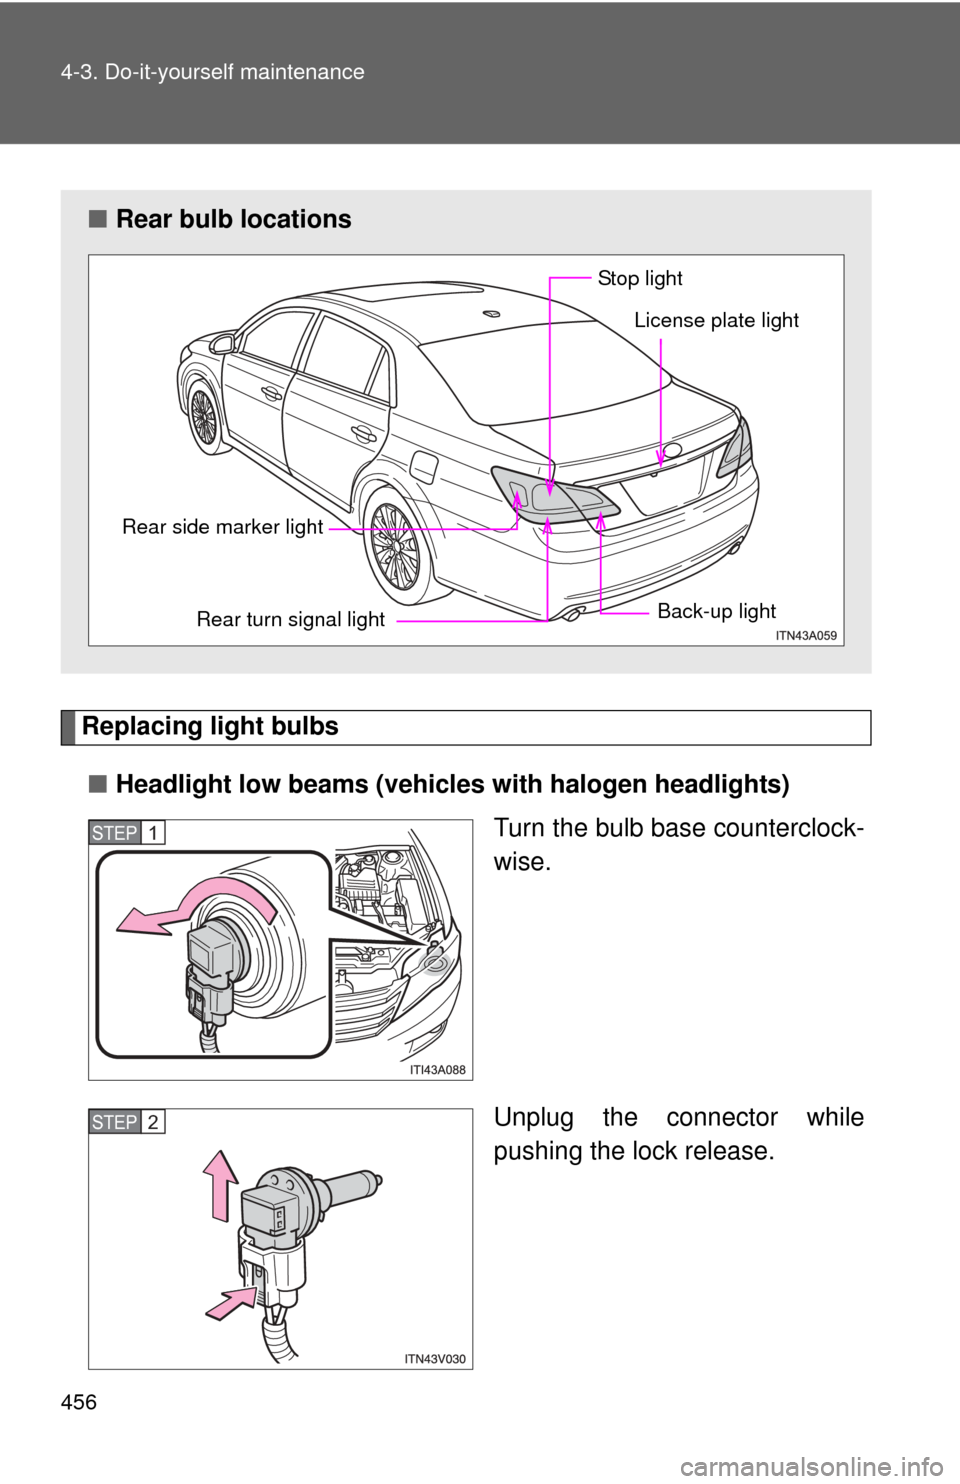
Replacing light bulbs■ Headlight low beams (vehicle s with halogen headlights)
Turn the bulb base counterclock-
wise.
Unplug the connector while
pushing the lock release.
■ Rear bulb locations
Rear side marker light
Rear turn signal light Back-up light
License plate light
St o p li gh t
STEP1
STEP2
Page 457 of 580
4
Maintenance and care
457
4-3. Do-it-yourself maintenance
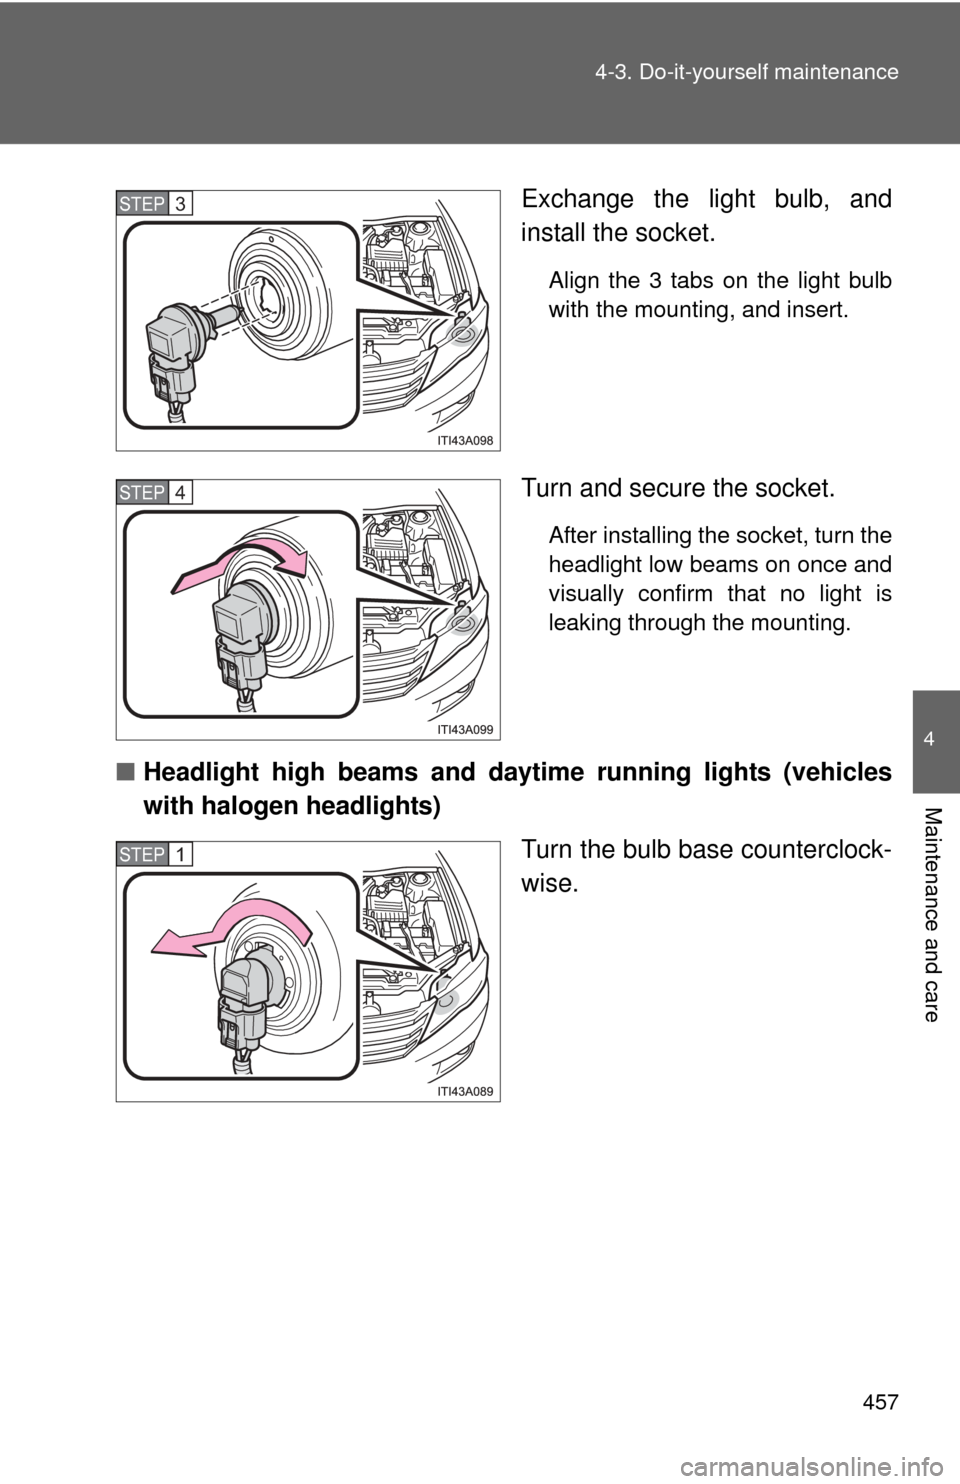
Exchange the light bulb, and
install the socket.
Align the 3 tabs on the light bulb
with the mounting, and insert.
Turn and secure the socket.
After installing the socket, turn the
headlight low beams on once and
visually confirm that no light is
leaking through the mounting.
■
Headlight high beams and d aytime running lights (vehicles
with halogen headlights)
Turn the bulb base counterclock-
wise.
STEP3
STEP4
STEP1
Page 469 of 580
4
Maintenance and care
469
4-3. Do-it-yourself maintenance
CAUTION
■
Replacing light bulbs
●Turn off the headlights. Do not attempt to replace the bulb immediately
after turning off the headlights.
The bulbs become very hot and may cause burns.
● Do not touch the glass portion of the light bulb with bare hands. Hold the
bulb by the plastic or metal portion.
If the bulb is scratched or dropped it may blow out or crack.
● Fully install light bulbs and any parts used to secure them. Failing to do so
may result in heat damage, fire, or water entering the headlight unit. This
may damage the headlights or cause condensation to build up on the lens.
● Do not take apart or repair the low beam discharge headlight bulbs, con-
nectors, power supply circuits, or related components.
Doing so could result in electric shock and death or serious injury.
Page 470 of 580
470 4-3. Do-it-yourself maintenance
CAUTION
■High-intensity discharge (HID) headlights (if equipped)
●Contact your Toyota dealer before replacing high-intensity discharge
headlights (including light bulbs).
● Do not touch the high-intensity discharge headlight’s high voltage socket
when the headlights are turned on. An extremely high voltage of 20000V
will be discharged and could result in serious injury or death by electric
shock.
■ To prevent damage or fire
Make sure bulbs are fully seated and locked.
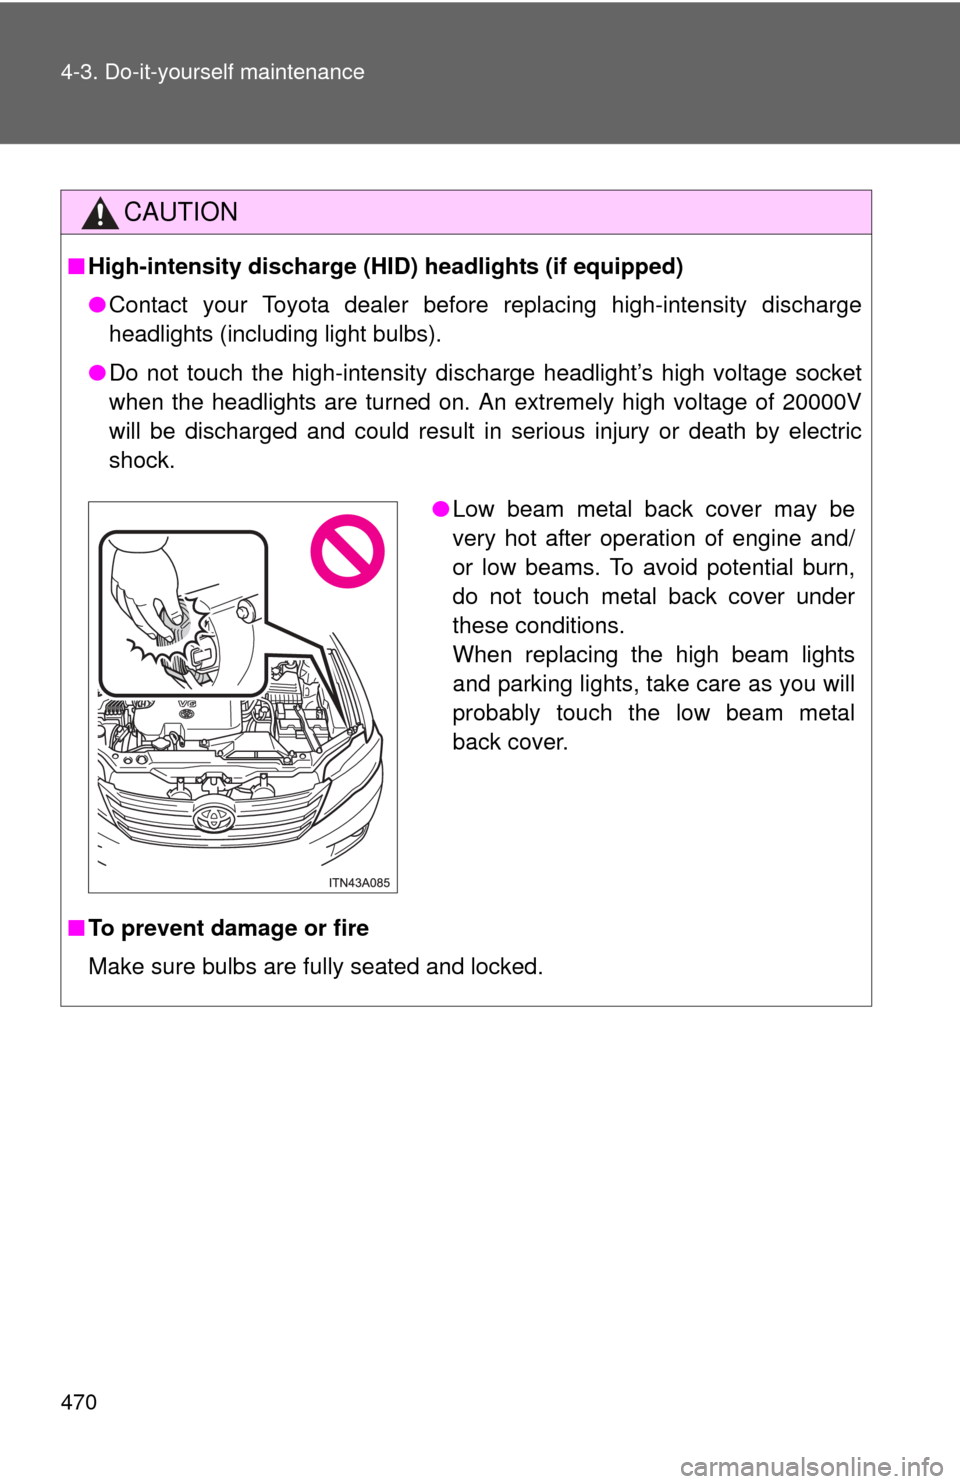
●Low beam metal back cover may be
very hot after operation of engine and/
or low beams. To avoid potential burn,
do not touch metal back cover under
these conditions.
When replacing the high beam lights
and parking lights, take care as you will
probably touch the low beam metal
back cover.
Page 527 of 580
527
6-1. Specifications
6
Vehicle specifications
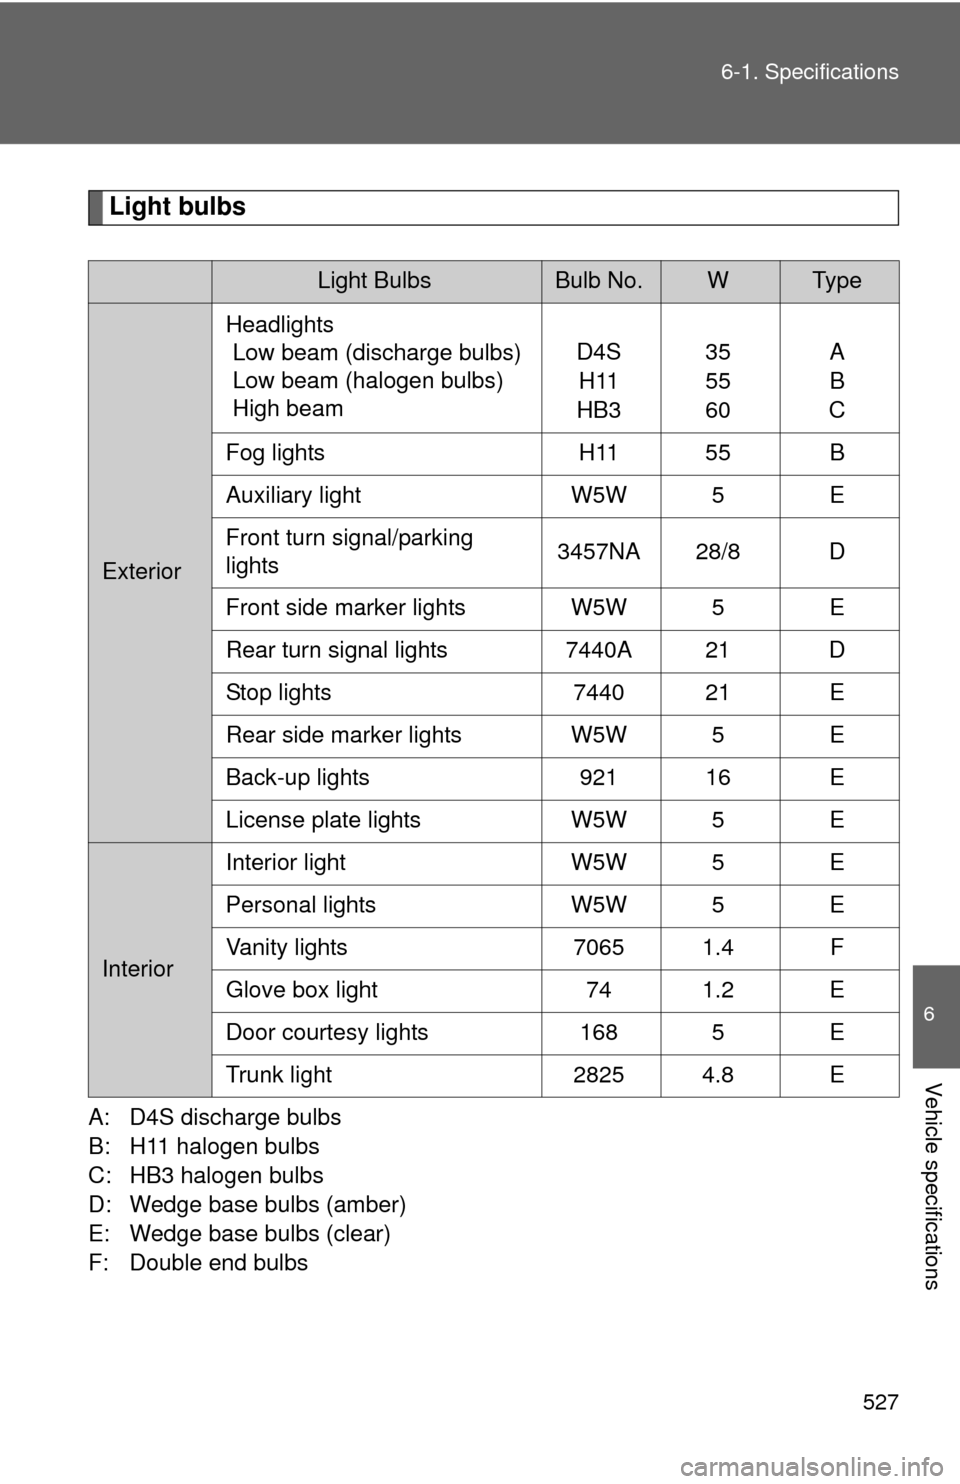
Light bulbs
A: D4S discharge bulbs
B: H11 halogen bulbs
C: HB3 halogen bulbs
D: Wedge base bulbs (amber)
E: Wedge base bulbs (clear)
F: Double end bulbs
Light BulbsBulb No.WTy p e
Exterior
Headlights
Low beam (discharge bulbs)
Low beam (halogen bulbs)
High beam D4S
H11
HB3 35
55
60A
B
C
Fog lights H11 55 B
Auxiliary light W5W 5 E
Front turn signal/parking
lights 3457NA 28/8 D
Front side marker lights W5W 5 E
Rear turn signal lights 7440A 21 D
Stop lights 7440 21 E
Rear side marker lights W5W 5 E
Back-up lights 921 16 E
License plate lights W5W 5 E
Interior Interior light W5W 5 E
Personal lights W5W 5 E
Vanity lights 7065 1.4 F
Glove box light 74 1.2 E
Door courtesy lights 168 5 E
Trunk light 2825 4.8 E