turn signal TOYOTA AVALON 2012 XX40 / 4.G Owners Manual
[x] Cancel search | Manufacturer: TOYOTA, Model Year: 2012, Model line: AVALON, Model: TOYOTA AVALON 2012 XX40 / 4.GPages: 580, PDF Size: 9.33 MB
Page 3 of 580
1
2
3
4
5
6
7
3
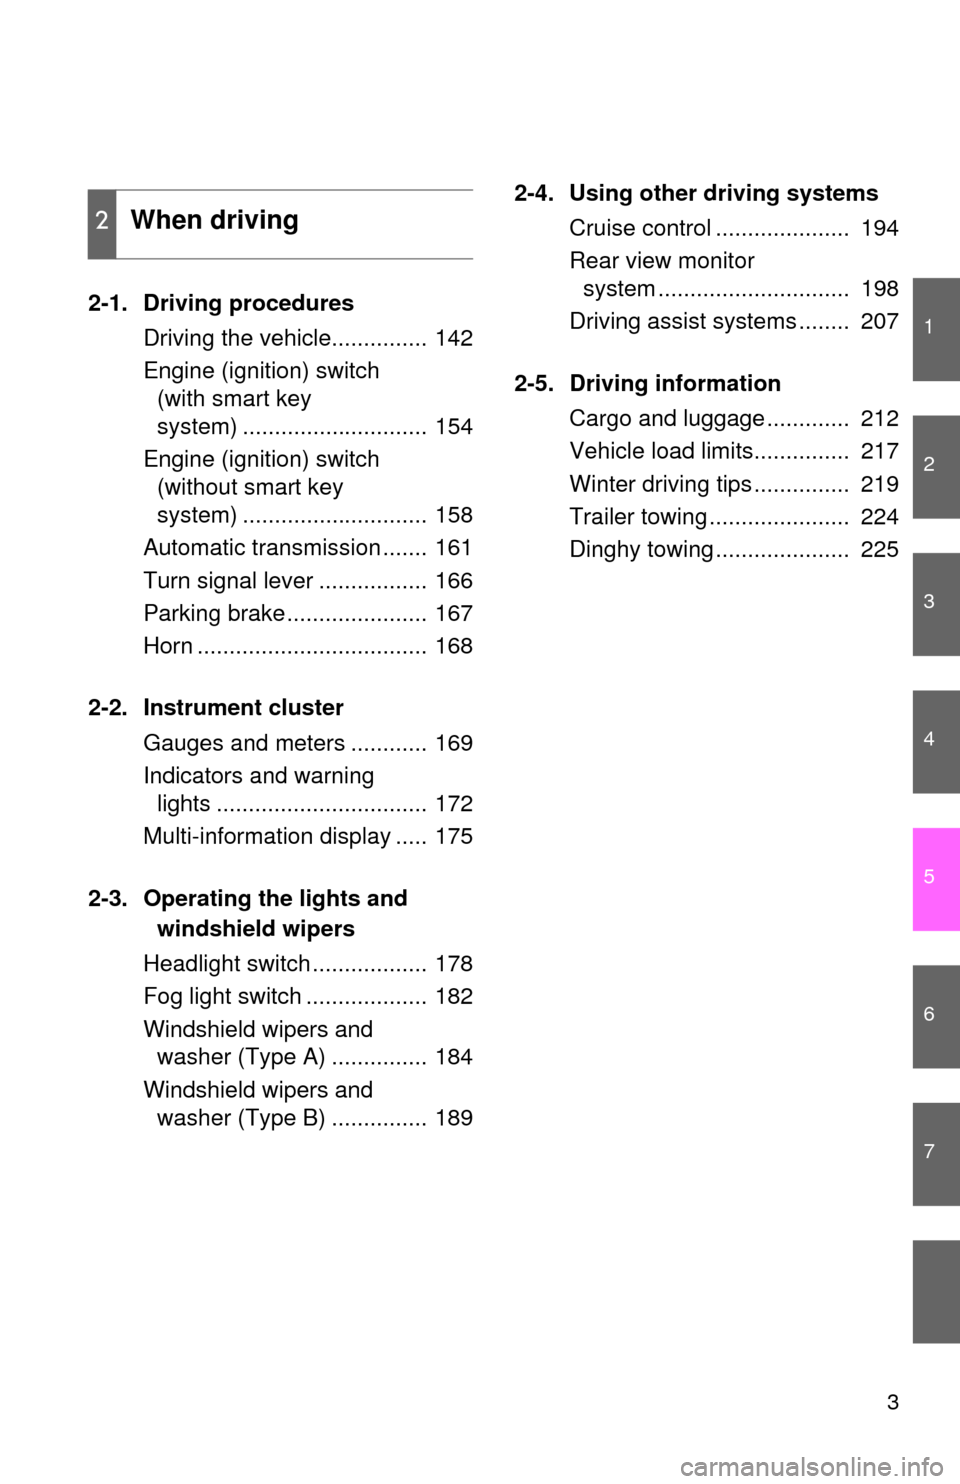
2-1. Driving proceduresDriving the vehicle............... 142
Engine (ignition) switch (with smart key
system) ............................. 154
Engine (ignition) switch (without smart key
system) ............................. 158
Automatic transmission ....... 161
Turn signal lever ................. 166
Parking brake ...................... 167
Horn .................................... 168
2-2. Instrument cluster Gauges and meters ............ 169
Indicators and warning lights ................................. 172
Multi-information display ..... 175
2-3. Operating the lights and windshield wipers
Headlight switch .................. 178
Fog light switch ................... 182
Windshield wipers and washer (Type A) ............... 184
Windshield wipers and washer (Type B) ............... 189 2-4. Using other driving systems
Cruise control ..................... 194
Rear view monitor system .............................. 198
Driving assist systems ........ 207
2-5. Driving information Cargo and luggage ............. 212
Vehicle load limits............... 217
Winter driving tips ............... 219
Trailer towing ...................... 224
Dinghy towing ..................... 225
2When driving
Page 8 of 580
8
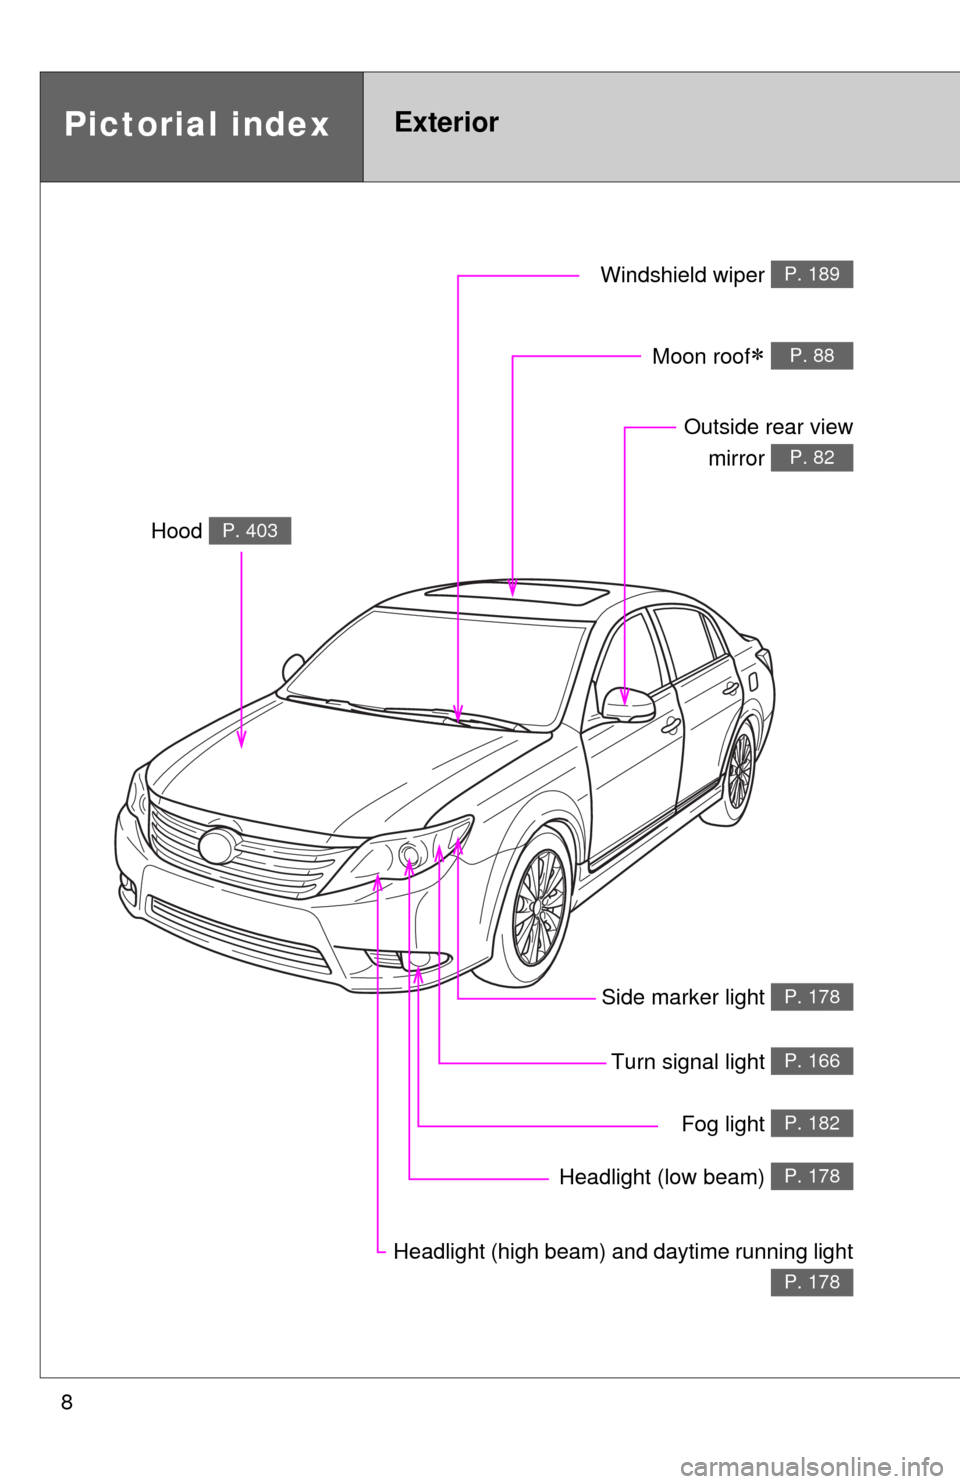
Headlight (high beam) and daytime running light
P. 178
Pictorial indexExterior
Turn signal light P. 166
Fog light P. 182
Side marker light P. 178
Headlight (low beam) P. 178
Hood P. 403
Windshield wiper P. 189
Moon roof P. 88
Outside rear viewmirror
P. 82
Page 9 of 580
9
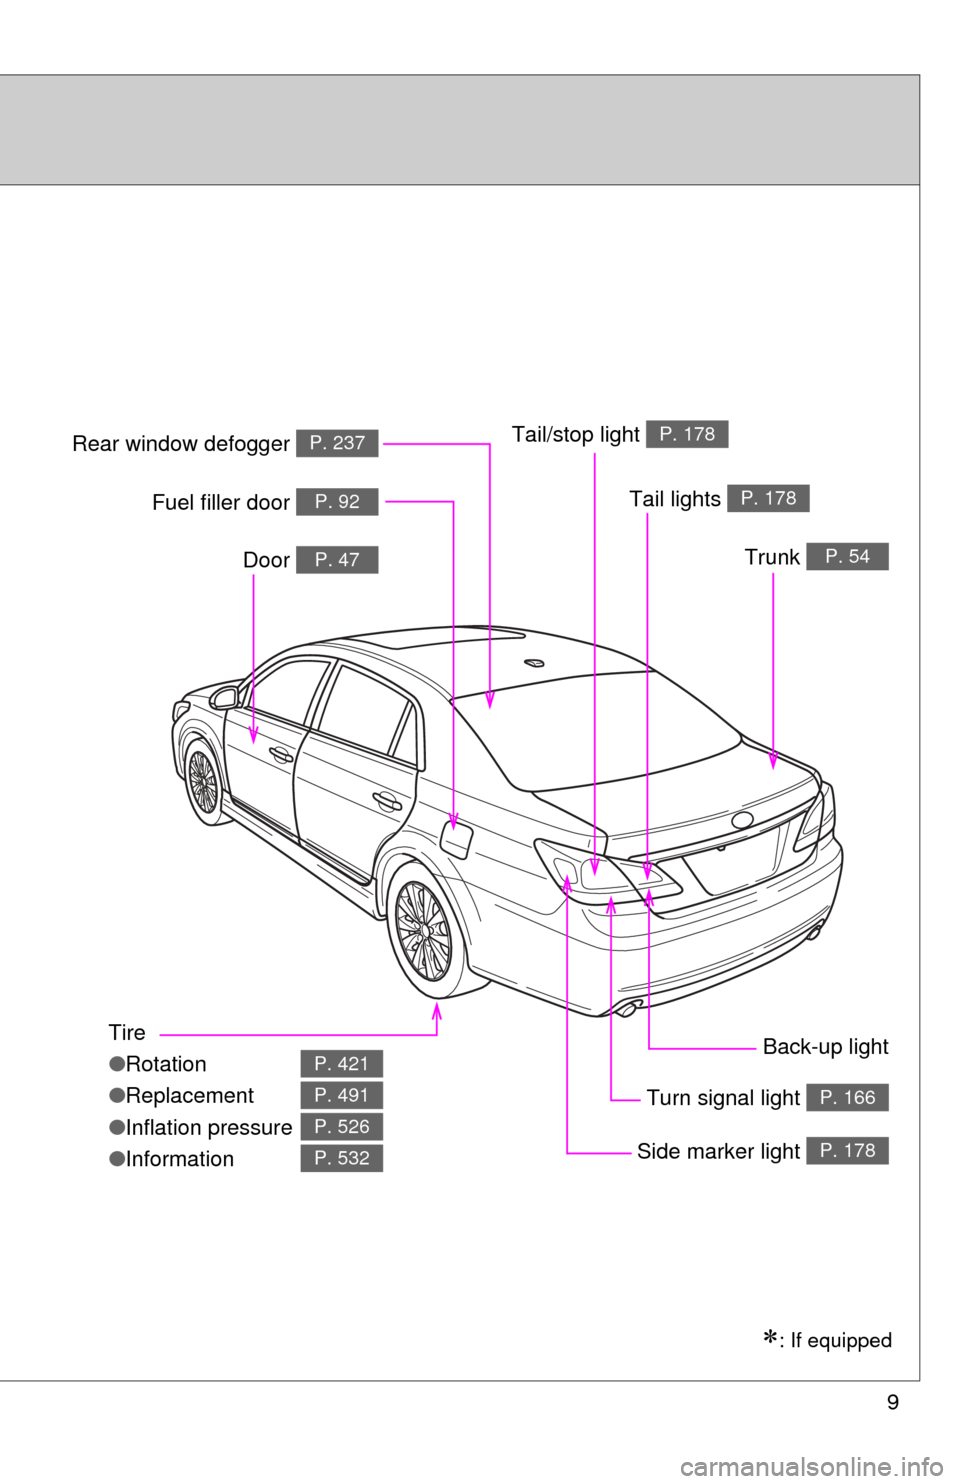
Tire
●Rotation
● Replacement
● Inflation pressure
● Information
P. 421
P. 491
P. 526
P. 532
Tail lights P. 178
Side marker light P. 178
Trunk P. 54
Rear window defogger P. 237
Door P. 47
Fuel filler door P. 92
Turn signal light P. 166
: If equipped
Back-up light
Tail/stop light
P. 178
Page 14 of 580
14
Pictorial indexInstrument panel
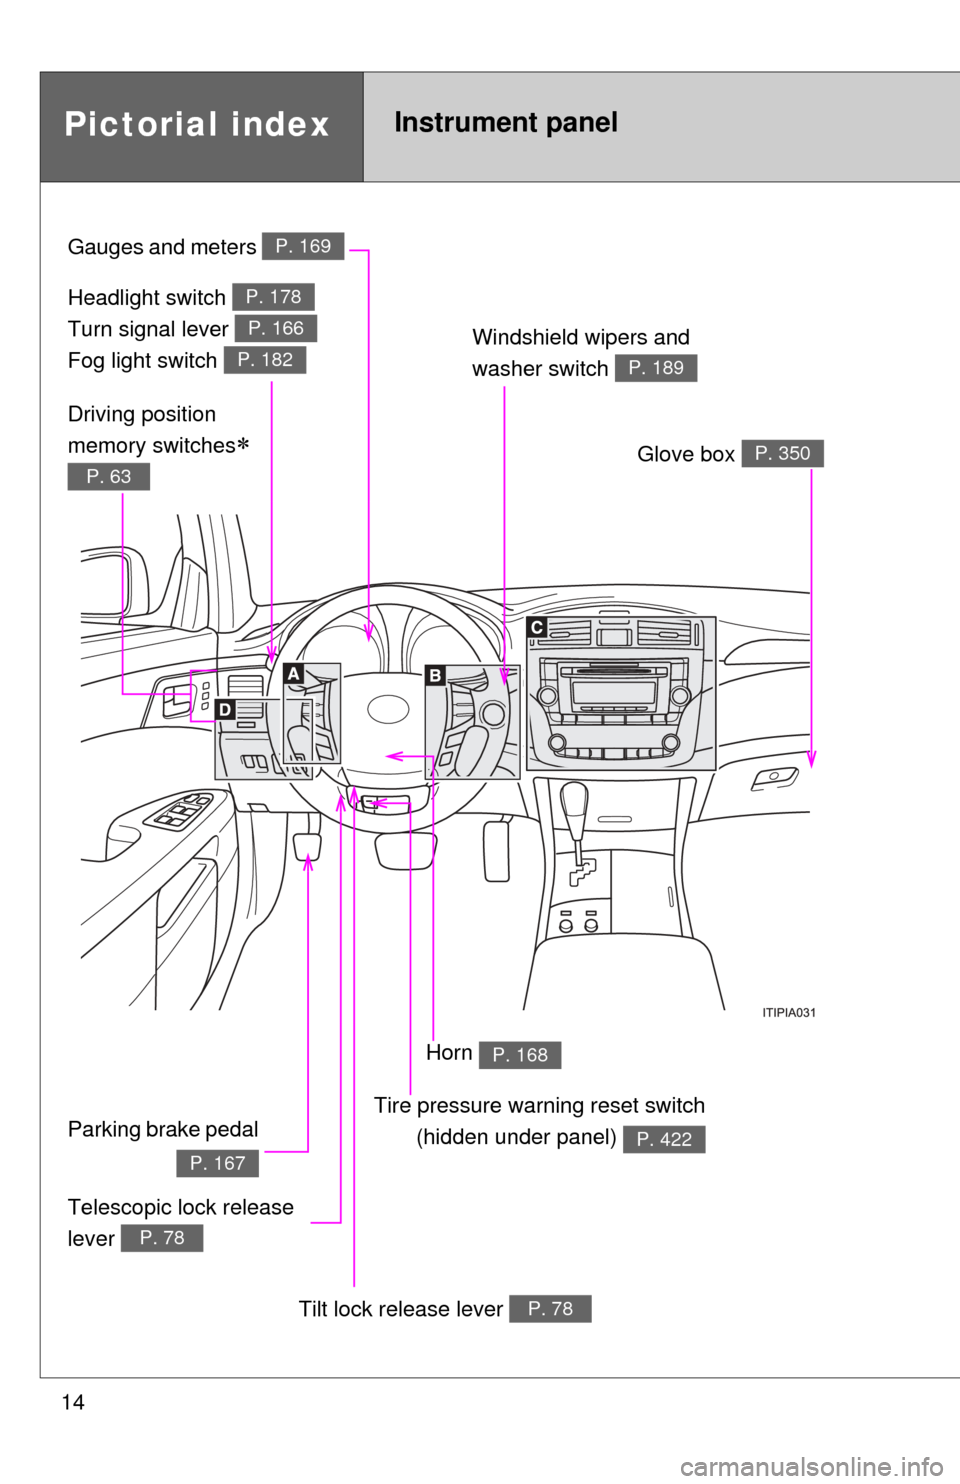
Headlight switch
Turn signal lever
Fog light switch P. 178
P. 166
P. 182
Gauges and meters P. 169
Windshield wipers and
washer switch
P. 189
Glove box P. 350
Telescopic lock release
lever
P. 78
Parking brake pedal
P. 167
Tilt lock release lever P. 78
Driving position
memory switches
P. 63
Tire pressure warning reset switch(hidden under panel)
P. 422
Horn P. 168
Page 63 of 580
63
1
1-3. Adjustable components (seats, steering wheel, mirrors)
Before driving
Driving position memor y system
: If equipped
Your preferred driving position (the position of the driver’s seat and
outside rear view mirrors) can be entered into the computer’s mem-
ory and recalled with the touch of a button. It is also possible to set
this function to activate automati cally when the doors are unlocked.
Two different driving positions can be entered into memory.
■ Entering a position to memory
Vehicles with smart key system: Turn the “ENGINE START
STOP” switch to IGNITION ON mode.
Vehicles without smart key system: Turn the engine switch
to the “ON” position.
Adjust the driver’s seat and outside rear view mirrors to the
desired positions.
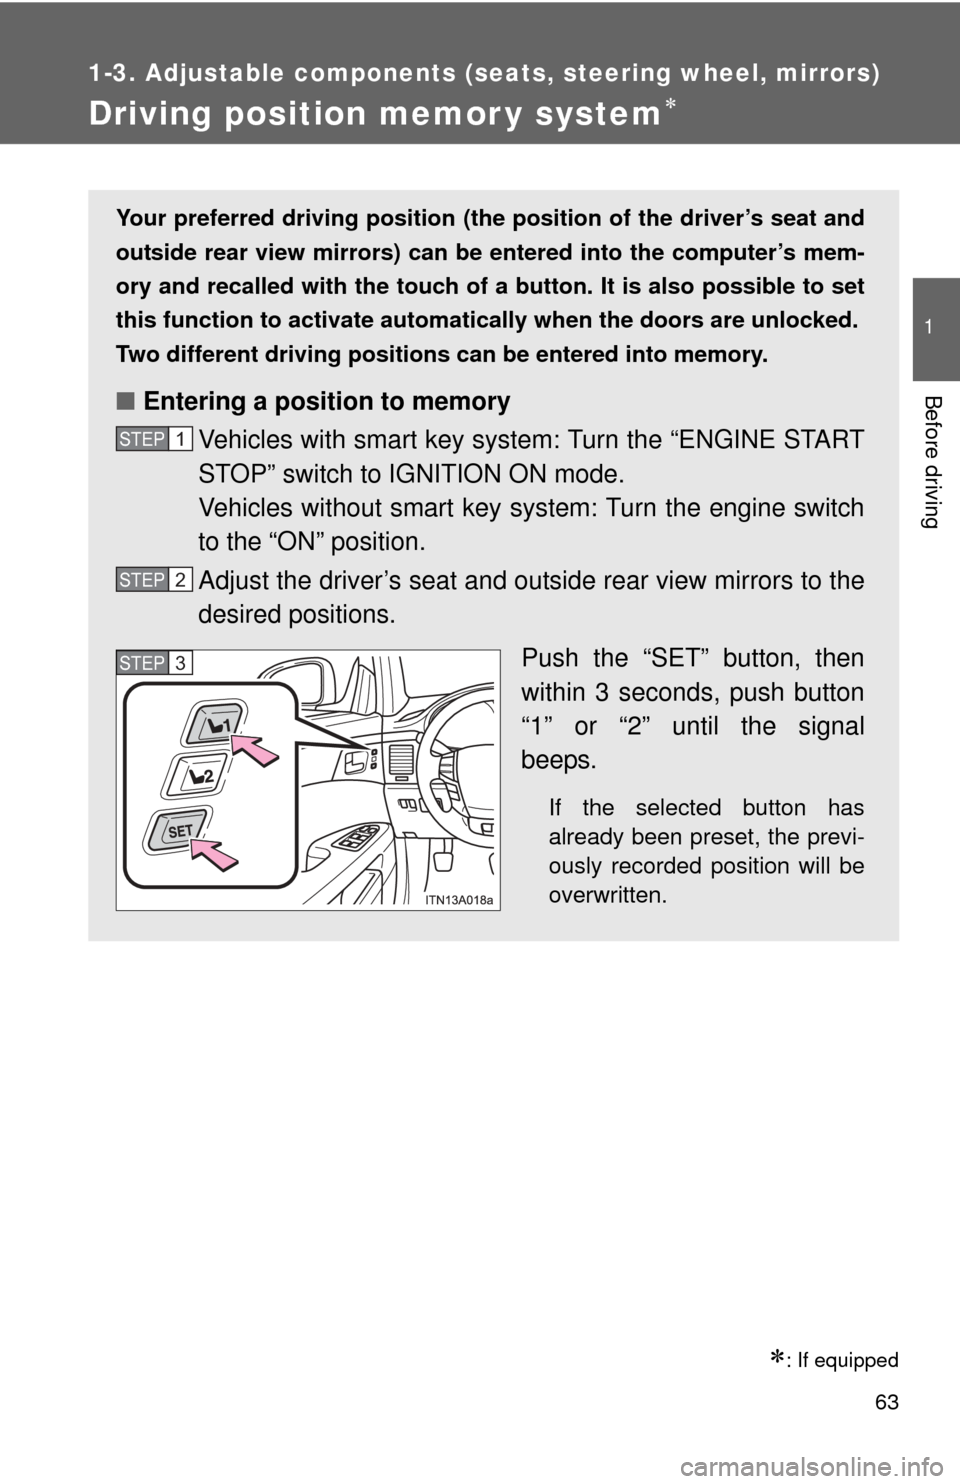
Push the “SET” button, then
within 3 seconds, push button
“1” or “2” until the signal
beeps.
If the selected button has
already been preset, the previ-
ously recorded position will be
overwritten.
STEP1
STEP2
STEP3STEP3
Page 141 of 580
When driving2
141
2-1. Driving proceduresDriving the vehicle............ 142
Engine (ignition) switch (with smart key
system) .......................... 154
Engine (ignition) switch (without smart key
system) .......................... 158
Automatic transmission................... 161
Turn signal lever .............. 166
Parking brake ................... 167
Horn ................................. 168 2-2. Instrument cluster
Gauges and meters ......... 169
Indicators and warning lights .............................. 172
Multi-information display............................ 175
2-3. Operating the lights and windshield wipers
Headlight switch ............... 178
Fog light switch ................ 182
Windshield wipers and washer (Type A) ............ 184
Windshield wipers and washer (Type B) ............ 189
2-4. Using other driving systems Cruise control ................... 194
Rear view monitor system ........................... 198
Driving assist systems ..... 207
2-5. Driving information Cargo and luggage .......... 212
Vehicle load limits ............ 217
Winter driving tips ............ 219
Trailer towing ................... 224
Dinghy towing .................. 225
Page 166 of 580
166
2-1. Driving procedures
Tur n signal lever
■Turn signals can be operated when
Vehicles with smart key system
The “ENGINE START STOP” switch is in IGNITION ON mode. Vehicles without smart key system
The engine switch is in the “ON” position.
■ If the indicators flash faster than usual
Check that a light bulb in the front or rear turn signal lights has not burned
out.
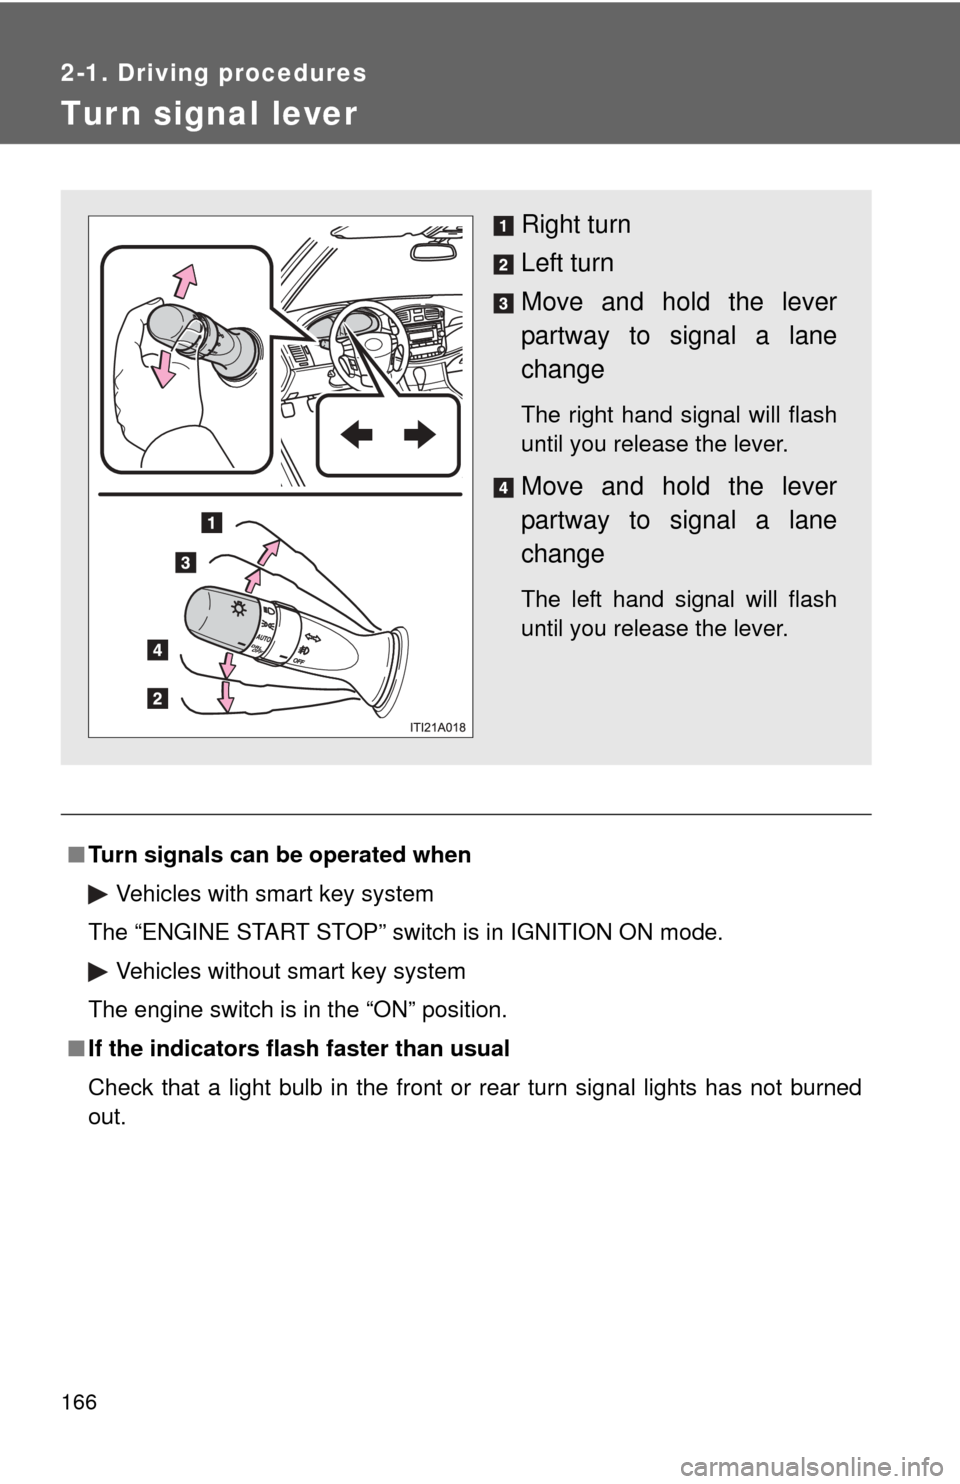
Right turn
Left turn
Move and hold the lever
partway to signal a lane
change
The right hand signal will flash
until you release the lever.
Move and hold the lever
partway to signal a lane
change
The left hand signal will flash
until you release the lever.
Page 173 of 580
173
2-2. Instrument cluster
2
When driving
■
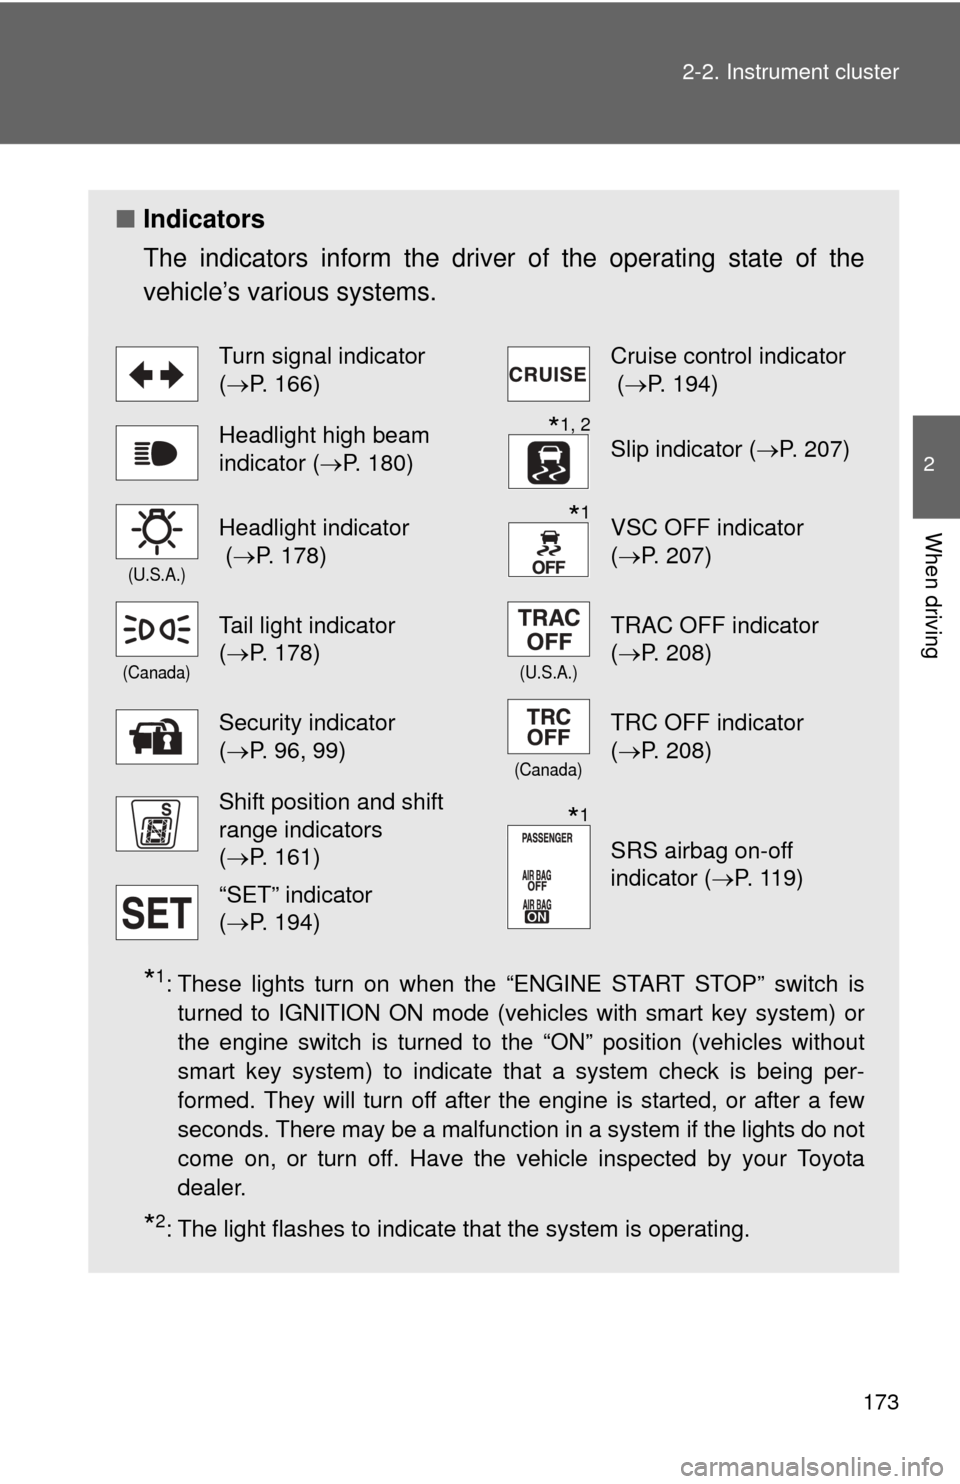
Indicators
The indicators inform the driver of the operating state of the
vehicle’s various systems.
*1: These lights turn on when the “ENGINE START STOP” switch is
turned to IGNITION ON mode (vehicles with smart key system) or
the engine switch is turned to the “ON” position (vehicles without
smart key system) to indicate that a system check is being per-
formed. They will turn off after the engine is started, or after a few
seconds. There may be a malfunction in a system if the lights do not
come on, or turn off. Have the vehicle inspected by your Toyota
dealer.
*2: The light flashes to indicate that the system is operating.
Turn signal indicator
(P. 166)Cruise control indicator
( P. 194)
Headlight high beam
indicator ( P. 180)Slip indicator ( P. 207)
(U.S.A.)
Headlight indicator
(P. 178)VSC OFF indicator
(P. 207)
(Canada)
Tail light indicator
(P. 178)
(U.S.A.)
TRAC OFF indicator
(P. 208)
Security indicator
(P. 96, 99)
(Canada)
TRC OFF indicator
(P. 208)
Shift position and shift
range indicators
(P. 161)
SRS airbag on-off
indicator (P. 119)
“SET” indicator
(P. 194)
*1, 2
*1
*1
Page 249 of 580
249
3-2. Using the audio system
3
Interior features
■
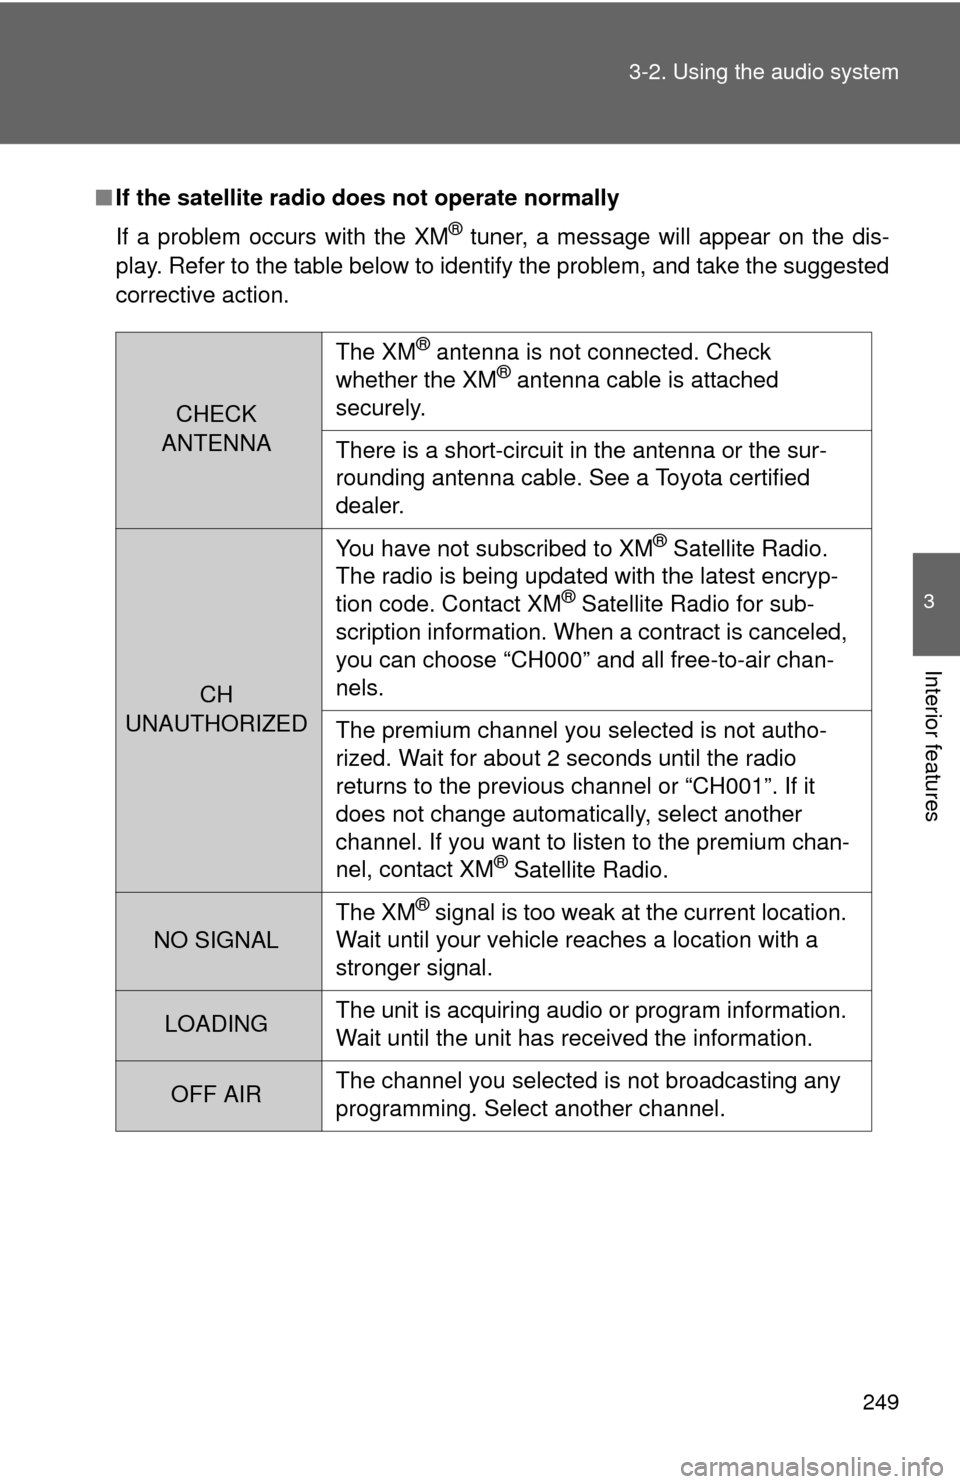
If the satellite radio does not operate normally
If a problem occurs with the XM
® tuner, a message will appear on the dis-
play. Refer to the table below to identify the problem, and take the suggested
corrective action.
CHECK
ANTENNA
The XM® antenna is not connected. Check
whether the XM® antenna cable is attached
securely.
There is a short-circuit in the antenna or the sur-
rounding antenna cable. See a Toyota certified
dealer.
CH
UNAUTHORIZED You have not subscribed to XM
® Satellite Radio.
The radio is being updated with the latest encryp-
tion code. Contact XM
® Satellite Radio for sub-
scription information. When a contract is canceled,
you can choose “CH000” and all free-to-air chan-
nels.
The premium channel you selected is not autho-
rized. Wait for about 2 seconds until the radio
returns to the previous channel or “CH001”. If it
does not change automatically, select another
channel. If you want to listen to the premium chan-
nel, contact XM
® Satellite Radio.
NO SIGNAL The XM
® signal is too weak at the current location.
Wait until your vehicle reaches a location with a
stronger signal.
LOADING The unit is acquiring audio or program information.
Wait until the unit has received the information.
OFF AIRThe channel you selected is not broadcasting any
programming. Select another channel.
Page 377 of 580
377
3-7. Other interior features
3
Interior features
Operating the HomeLink
Press the appropriate HomeLink button. The HomeLink indicator
light on the HomeLink transceiver should turn on.
The HomeLink continues to send a signal for up to 20 seconds as long
as the button is pressed.
Reprogramming a HomeLink® button
Press and hold the desired HomeLink
® button. After 20 seconds, the
HomeLink
® indicator light will start flas hing slowly. Keep pressing the
HomeLink
® button and press and hold the transmitter button until the
HomeLink
® indicator light changes from a slow to a rapid flash.
Release the buttons.
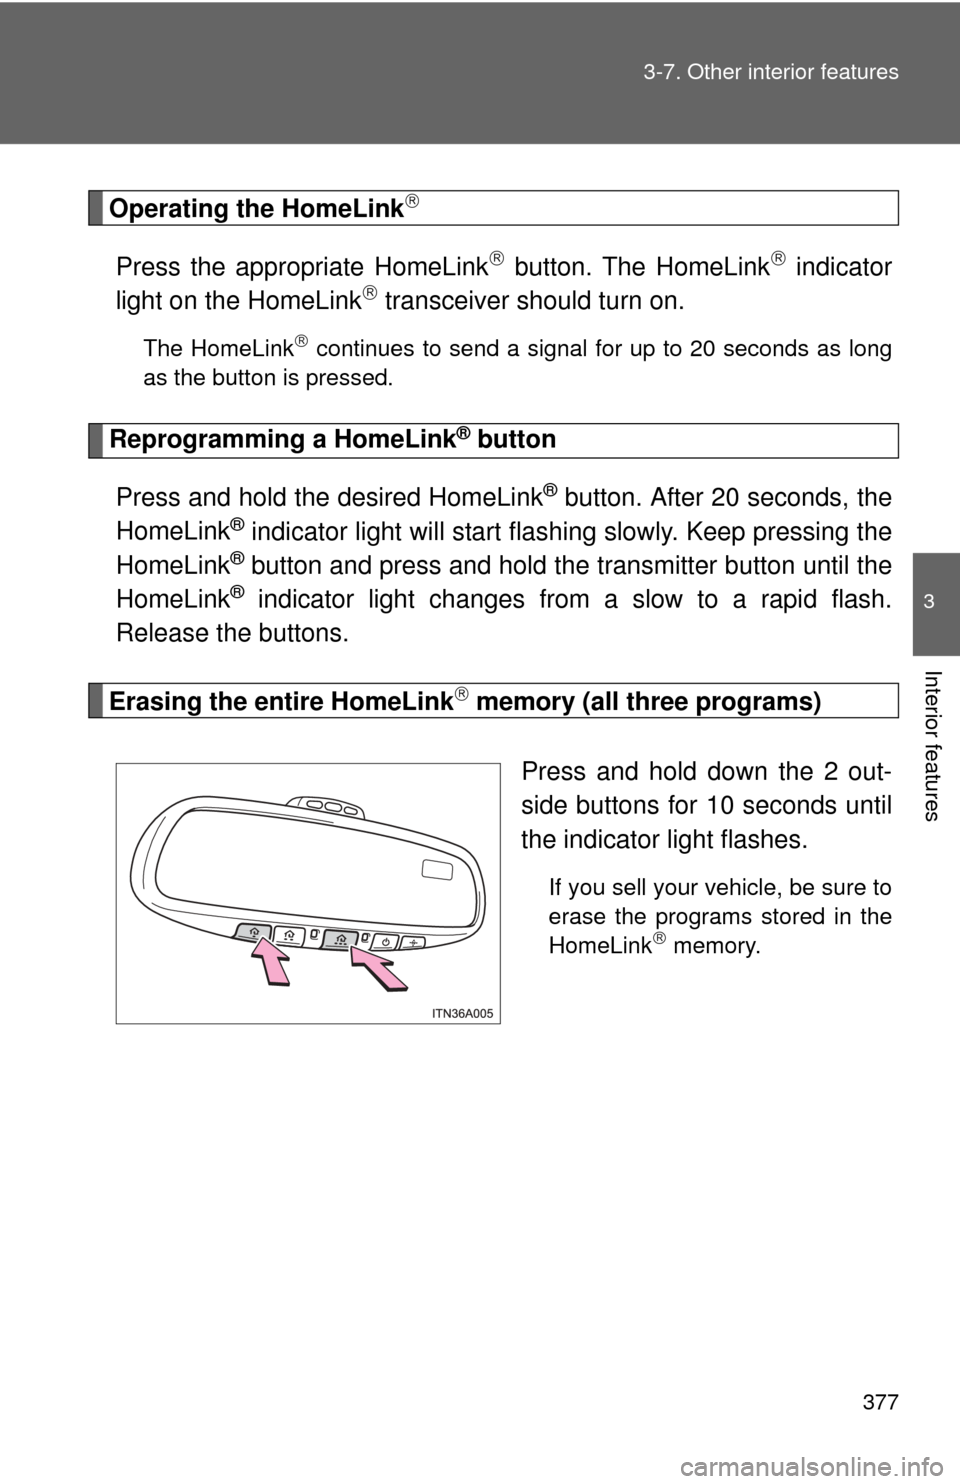
Erasing the entire HomeLink memory (all three programs)
Press and hold down the 2 out-
side buttons for 10 seconds until
the indicator light flashes.
If you sell your vehicle, be sure to
erase the programs stored in the
HomeLink
memory.