audio TOYOTA AVALON 2014 XX40 / 4.G Navigation Manual
[x] Cancel search | Manufacturer: TOYOTA, Model Year: 2014, Model line: AVALON, Model: TOYOTA AVALON 2014 XX40 / 4.GPages: 346, PDF Size: 6.47 MB
Page 122 of 346
122
1. PHONE OPERATION
2. PHONE (HANDS-FREE SYSTEM FOR CELLULAR PHONE)
*: This profile is necessary when using
Entune. (See “ENTUNE SERVICE” on
page 276.)
The hands-free system enables calls
to be made and received without hav-
ing to take your hands off the steering
wheel.
This system supports Bluetooth
®.
Bluetooth
® is a wireless data system
that enables cellular phones to be used
without being connected by a cable or
placed in a cradle.
The operating procedure of the phone
is explained here.
For registering and setting of the phone,
see “PHONE SETTINGS” on page 144
and “Bluetooth
® SETTINGS” on page
163.
CAUTION
● While driving, do not use a cellular
phone or connect the Bluetooth® phone.
● Your audio unit is fitted with Bluetooth®
antennas. People with implantable car-
diac pacemakers, cardiac resynchroni-
zation therapy-pacemakers or
implantable cardioverter defibrillators
should maintain a reasonable distance
between themselves and the Bluetooth
®
antennas. The radio waves may affect
the operation of such devices.
● Before using Bluetooth
® devices, users
of any electrical medical device other
than implantable cardiac pacemakers,
cardiac resynchronization therapy-pace-
makers or implantable cardioverter
defibrillators should consult the manu-
facturer of the device for information
about its operation under the influence
of radio waves. Radio waves could have
unexpected effects on the operation of
such medical devices.
NOTICE
● Do not leave your cellular phone in the
vehicle. The temperature inside may rise
to a level that could damage the phone.
INFORMATION
●If your cellular phone does not support
Bluetooth®, this system cannot function.
● In the following conditions, the system
may not function:
• The cellular phone is turned off.
• The current position is outside the
communication area.
• The cellular phone is not connected.
• The cellular phone has a low battery.
● When using Bluetooth
® audio and
hands-free at the same time, the follow-
ing problems may occur:
• The Bluetooth
® connection may be
cut.
• Noise may be heard on the Bluetooth
®
audio playback.
● This system supports the following ser-
vices:
•Bluetooth
® Specification
Ver.1.1 or higher
(Recommended: Ver.2.1 + EDR or
higher)
•Profiles HFP (Hands Free Profile)
Ver.1.0 or higher
(Recommended: Ver.1.5 or higher)
OPP (Object Push Profile)
Ver.1.1 or higher
PBAP (Phone Book Access Profile)
Ver.1.0 or higher
MAP (Message Access Profile)
Ver.1.0 or higher
SPP (Serial Port Profile)
Ver.1.1 or higher*
Page 124 of 346
124
1. PHONE OPERATION
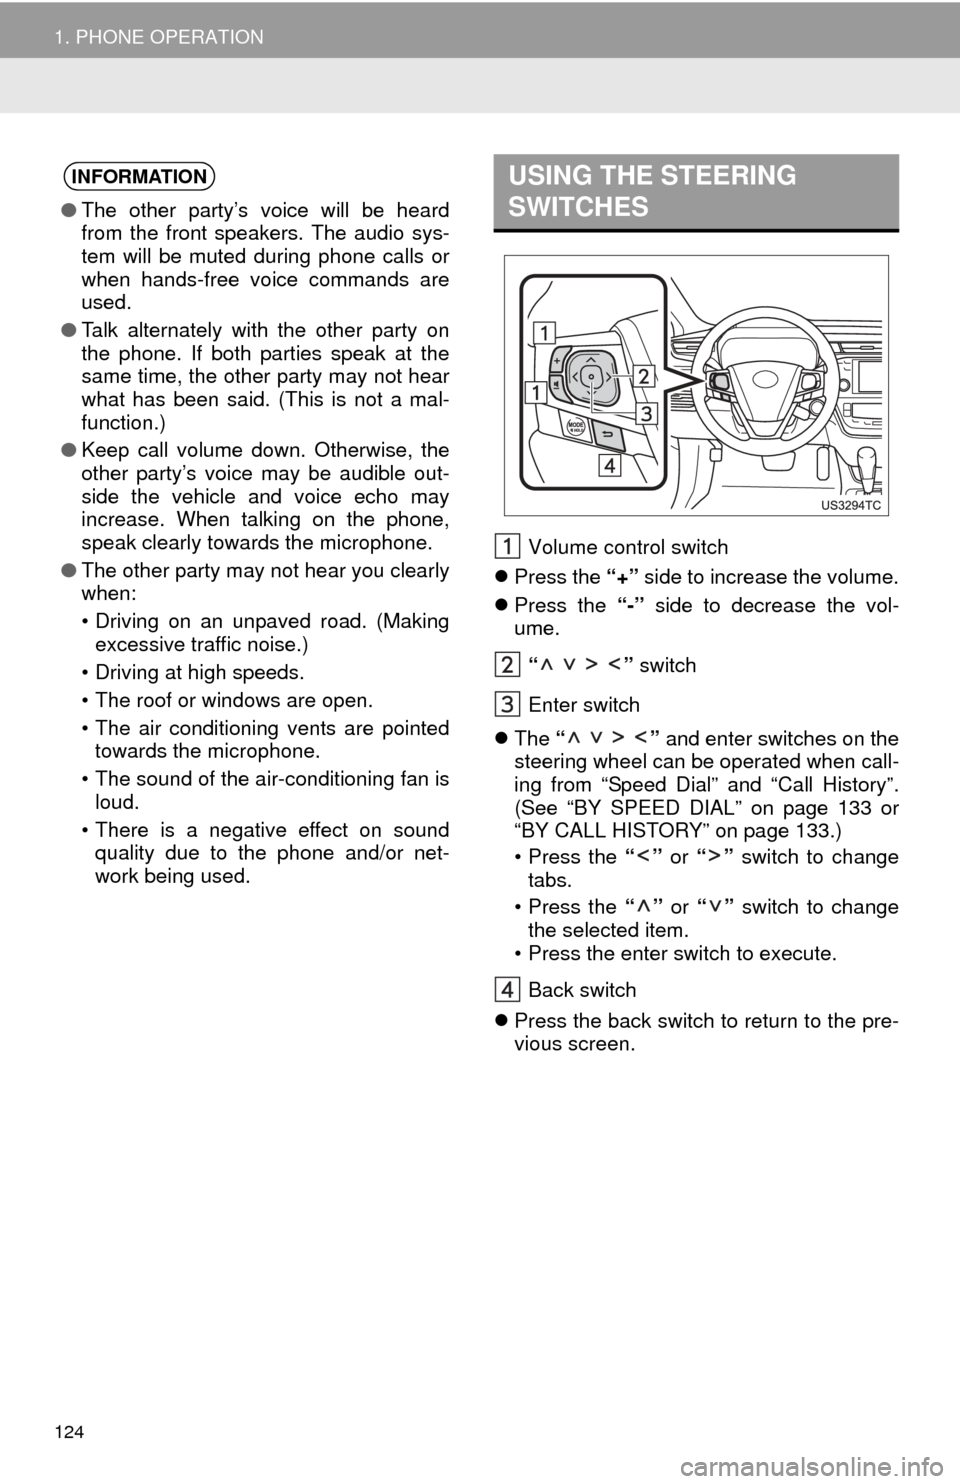
Volume control switch
Press the “+” side to increase the volume.
Press the “-” side to decrease the vol-
ume.
“ ” switch
Enter switch
The “ ” and enter switches on the
steering wheel can be operated when call-
ing from “Speed Dial” and “Call History”.
(See “BY SPEED DIAL” on page 133 or
“BY CALL HISTORY” on page 133.)
• Press the “” or “” switch to change
tabs.
• Press the “” or “” switch to change
the selected item.
• Press the enter switch to execute.
Back switch
Press the back switch to return to the pre-
vious screen.
INFORMATION
●The other party’s voice will be heard
from the front speakers. The audio sys-
tem will be muted during phone calls or
when hands-free voice commands are
used.
● Talk alternately with the other party on
the phone. If both parties speak at the
same time, the other party may not hear
what has been said. (This is not a mal-
function.)
● Keep call volume down. Otherwise, the
other party’s voice may be audible out-
side the vehicle and voice echo may
increase. When talking on the phone,
speak clearly towards the microphone.
● The other party may not hear you clearly
when:
• Driving on an unpaved road. (Making
excessive traffic noise.)
• Driving at high speeds.
• The roof or windows are open.
• The air conditioning vents are pointed towards the microphone.
• The sound of the air-conditioning fan is loud.
• There is a negative effect on sound quality due to the phone and/or net-
work being used.
USING THE STEERING
SWITCHES
Page 127 of 346
127
1. PHONE OPERATION
4
TELEPHONE
3. REGISTER A Bluetooth® PHONE
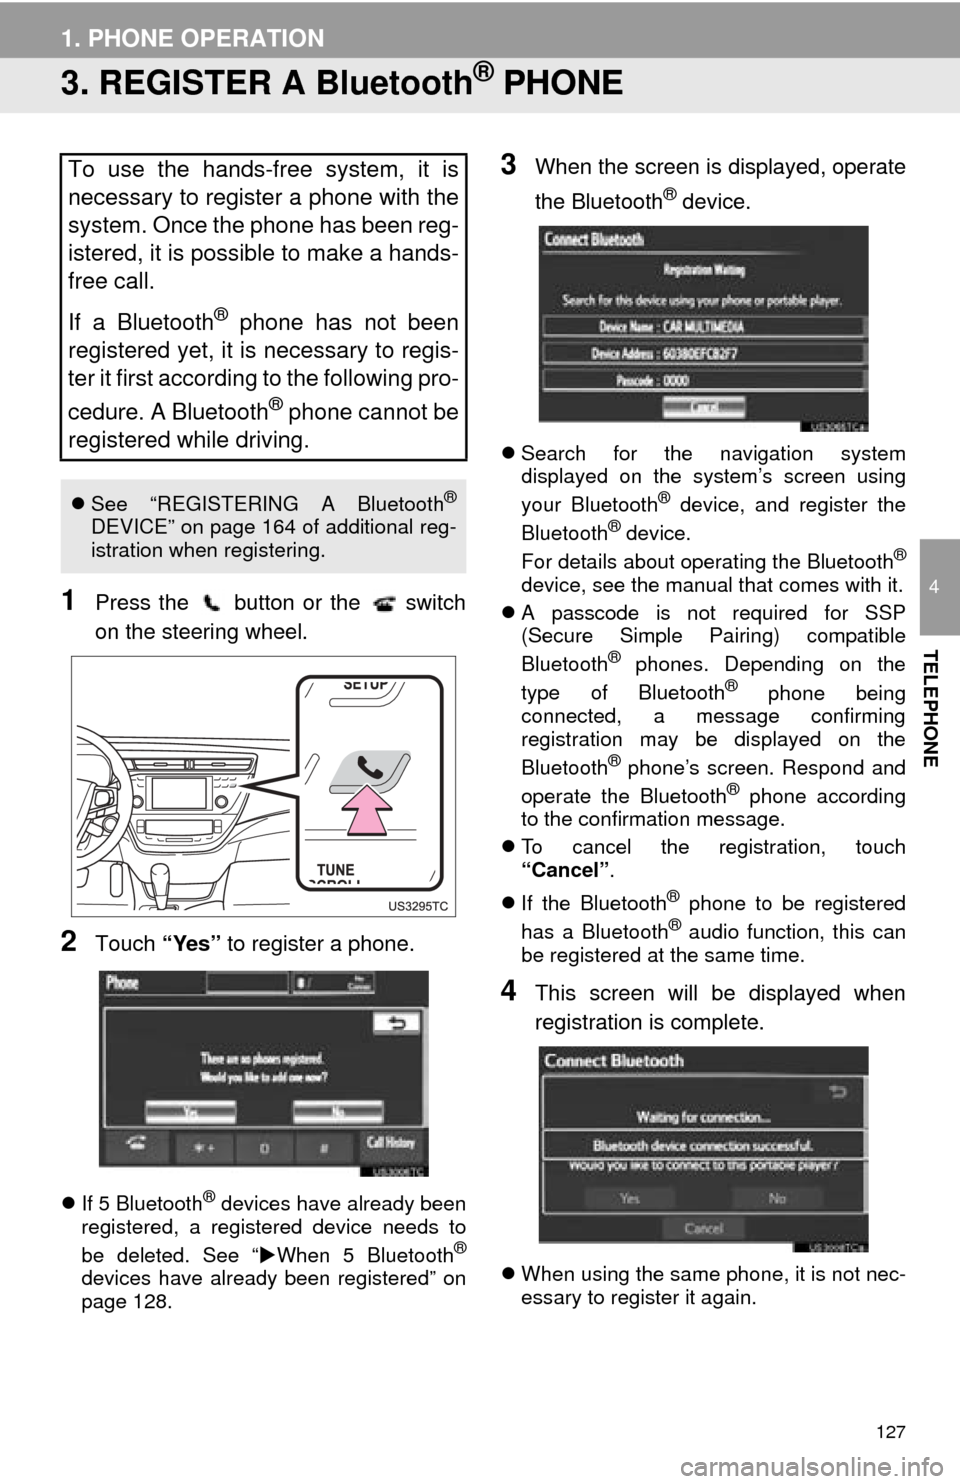
1Press the button or the switch
on the steering wheel.
2Touch “Yes” to register a phone.
If 5 Bluetooth® devices have already been
registered, a registered device needs to
be deleted. See “ When 5 Bluetooth
®
devices have already been registered” on
page 128.
3When the screen is displayed, operate
the Bluetooth
® device.
Search for the navigation system
displayed on the system’s screen using
your Bluetooth
® device, and register the
Bluetooth® device.
For details about operating the Bluetooth®
device, see the manual that comes with it.
A passcode is not required for SSP
(Secure Simple Pairing) compatible
Bluetooth
® phones. Depending on the
type of Bluetooth® phone being
connected, a message confirming
registration may be displayed on the
Bluetooth
® phone’s screen. Respond and
operate the Bluetooth® phone according
to the confirmation message.
To cancel the registration, touch
“Cancel” .
If the Bluetooth
® phone to be registered
has a Bluetooth® audio function, this can
be registered at the same time.
4This screen will be displayed when
registration is complete.
When using the same phone, it is not nec-
essary to register it again.
To use the hands-free system, it is
necessary to register a phone with the
system. Once the phone has been reg-
istered, it is possible to make a hands-
free call.
If a Bluetooth
® phone has not been
registered yet, it is necessary to regis-
ter it first according to the following pro-
cedure. A Bluetooth
® phone cannot be
registered while driving.
See “REGISTERING A Bluetooth®
DEVICE” on page 164 of additional reg-
istration when registering.
Page 128 of 346
128
1. PHONE OPERATION
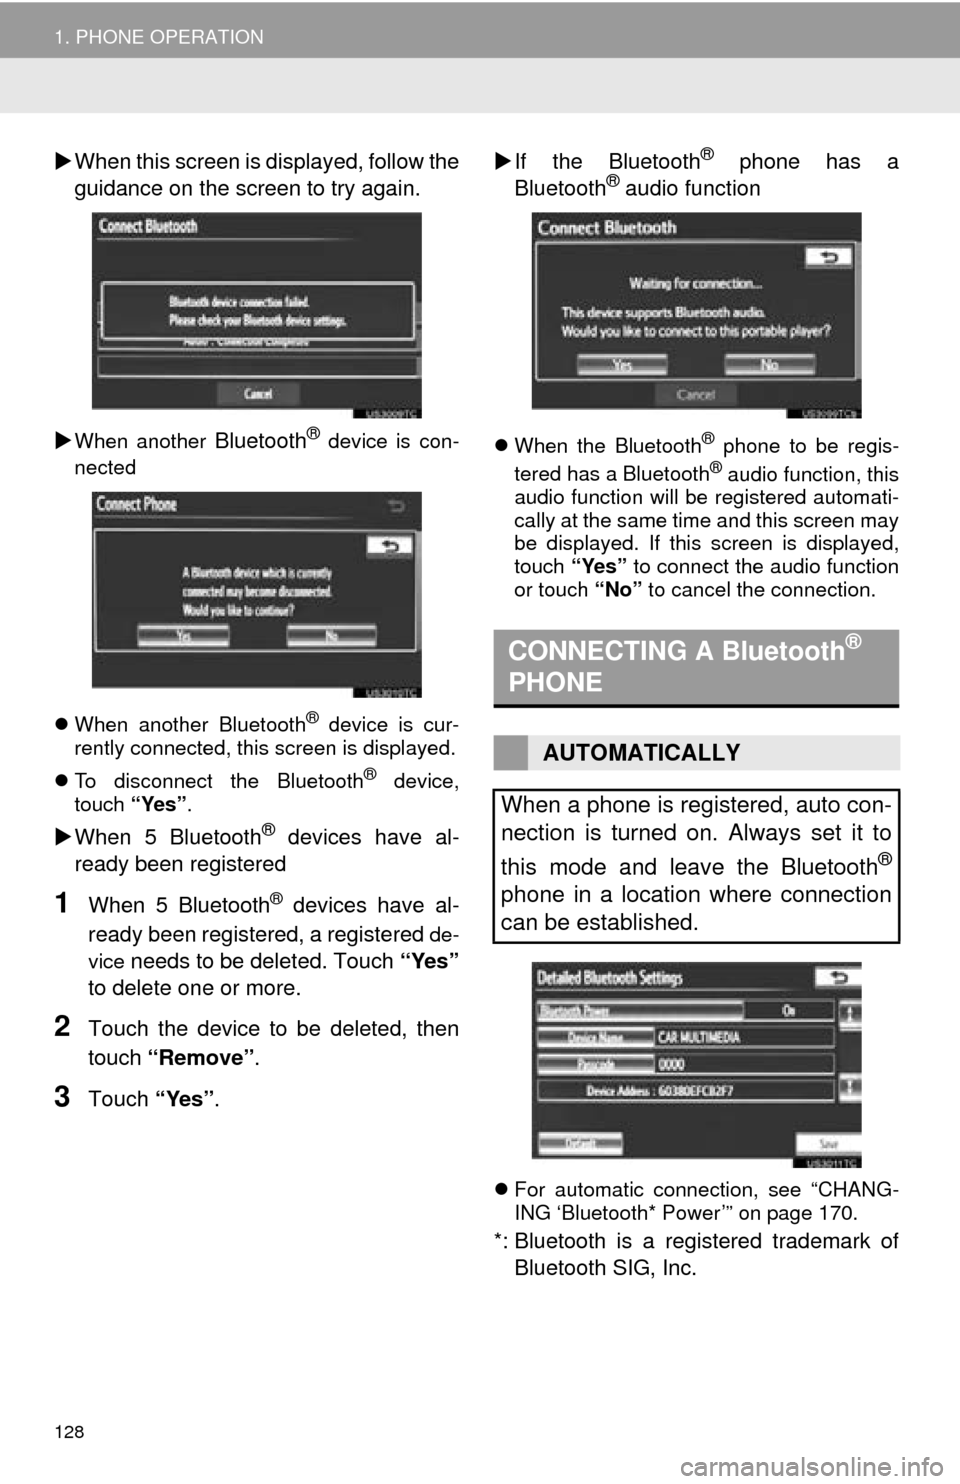
When this screen is displayed, follow the
guidance on the screen to try again.
When another Bluetooth® device is con-
nected
When another Bluetooth
® device is cur-
rently connected, this screen is displayed.
To disconnect the Bluetooth
® device,
touch “Yes”.
When 5 Bluetooth® devices have al-
ready been registered
1When 5 Bluetooth® devices have al-
ready been registered, a registered
de-
vice
needs to be deleted. Touch “Yes”
to delete one or more.
2Touch the device to be deleted, then
touch “Remove” .
3Touch “Yes”.
If the Bluetooth
® phone has a
Bluetooth® audio function
When the Bluetooth® phone to be regis-
tered has a Bluetooth® audio function, this
audio function will be registered automati-
cally at the same time and this screen may
be displayed. If this screen is displayed,
touch “Yes” to connect the audio function
or touch “No” to cancel the connection.
For automatic connection, see “CHANG-
ING ‘Bluetooth* Power’” on page 170.
*: Bluetooth is a registered trademark of
Bluetooth SIG, Inc.
CONNECTING A Bluetooth®
PHONE
AUTOMATICALLY
When a phone is registered, auto con-
nection is turned on. Always set it to
this mode and leave the Bluetooth
®
phone in a location where connection
can be established.
Page 130 of 346
130
1. PHONE OPERATION
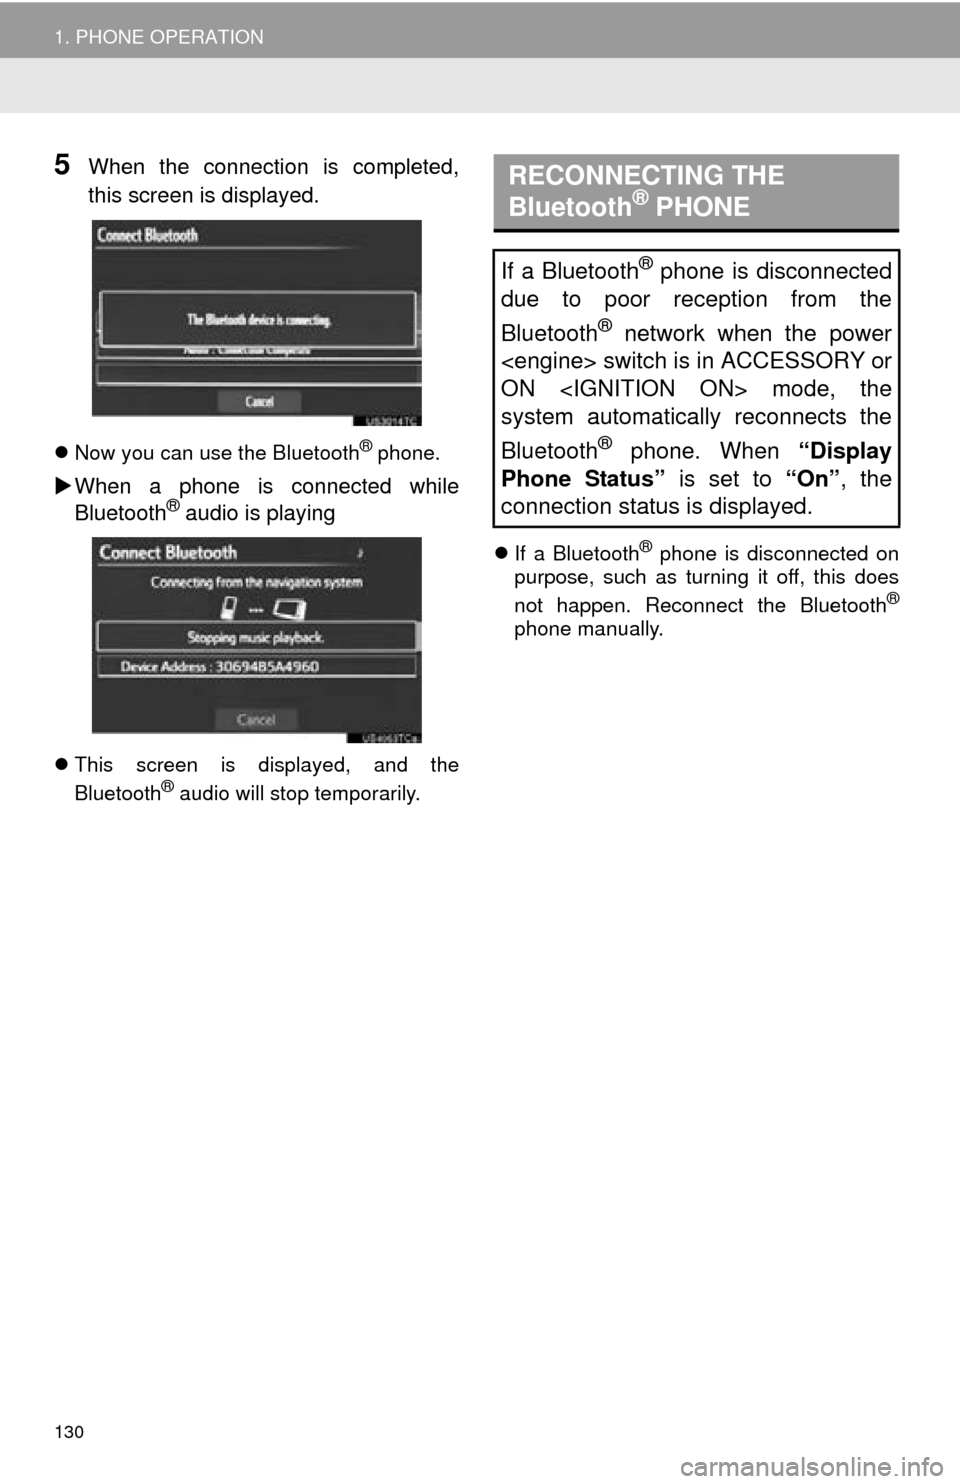
5When the connection is completed,
this screen is displayed.
Now you can use the Bluetooth® phone.
When a phone is connected while
Bluetooth® audio is playing
This screen is displayed, and the
Bluetooth® audio will stop temporarily.
If a Bluetooth
® phone is disconnected on
purpose, such as turning it off, this does
not happen. Reconnect the Bluetooth
®
phone manually.
RECONNECTING THE
Bluetooth® PHONE
If a Bluetooth® phone is disconnected
due to poor reception from the
Bluetooth
® network when the power
ON
system automatically reconnects the
Bluetooth
® phone. When “Display
Phone Status” is set to “On”, the
connection status is displayed.
Page 166 of 346
166
2. SETUP
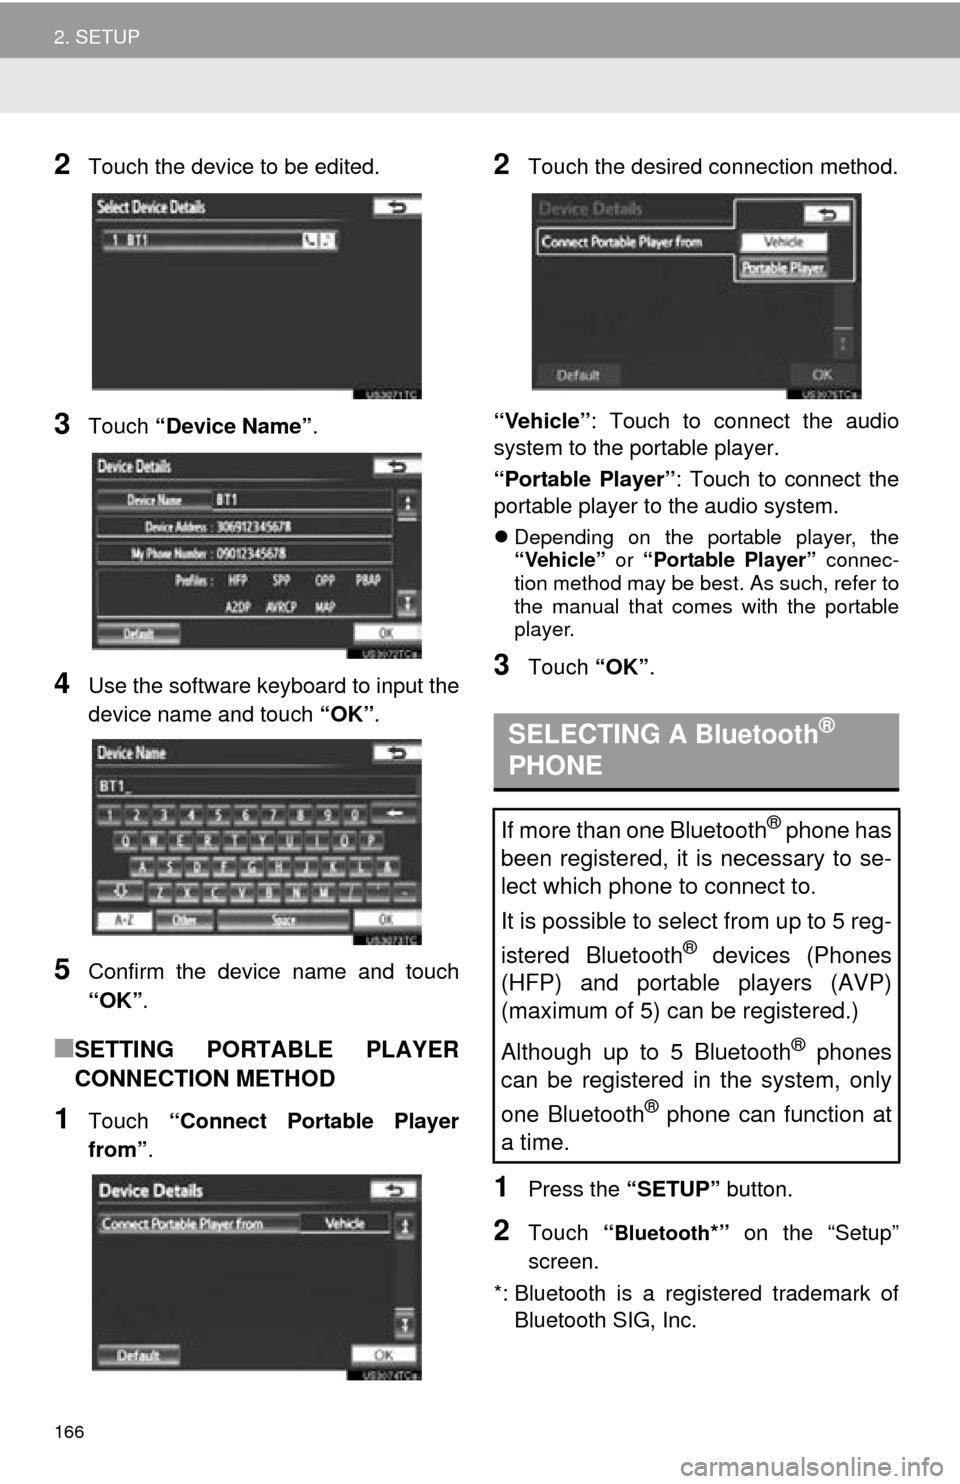
2Touch the device to be edited.
3Touch “Device Name” .
4Use the software keyboard to input the
device name and touch “OK”.
5Confirm the device name and touch
“OK”.
■SETTING PORTABLE PLAYER
CONNECTION METHOD
1Touch “Connect Portable Player
from” .
2Touch the desired connection method.
“Vehicle” : Touch to connect the audio
system to the portable player.
“Portable Player” : Touch to connect the
portable player to the audio system.
Depending on the portable player, the
“Vehicle” or “Portable Player” connec-
tion method may be best. As such, refer to
the manual that comes with the portable
player.
3Touch “OK”.
1Press the “SETUP” button.
2Touch “Bluetooth*” on the “Setup”
screen.
*: Bluetooth is a registered trademark of Bluetooth SIG, Inc.
SELECTING A Bluetooth®
PHONE
If more than one Bluetooth® phone has
been registered, it is necessary to se-
lect which phone to connect to.
It is possible to select from up to 5 reg-
istered Bluetooth
® devices (Phones
(HFP) and portable players (AVP)
(maximum of 5) can be registered.)
Although up to 5 Bluetooth
® phones
can be registered in the system, only
one Bluetooth
® phone can function at
a time.
Page 167 of 346
167
2. SETUP
4
TELEPHONE
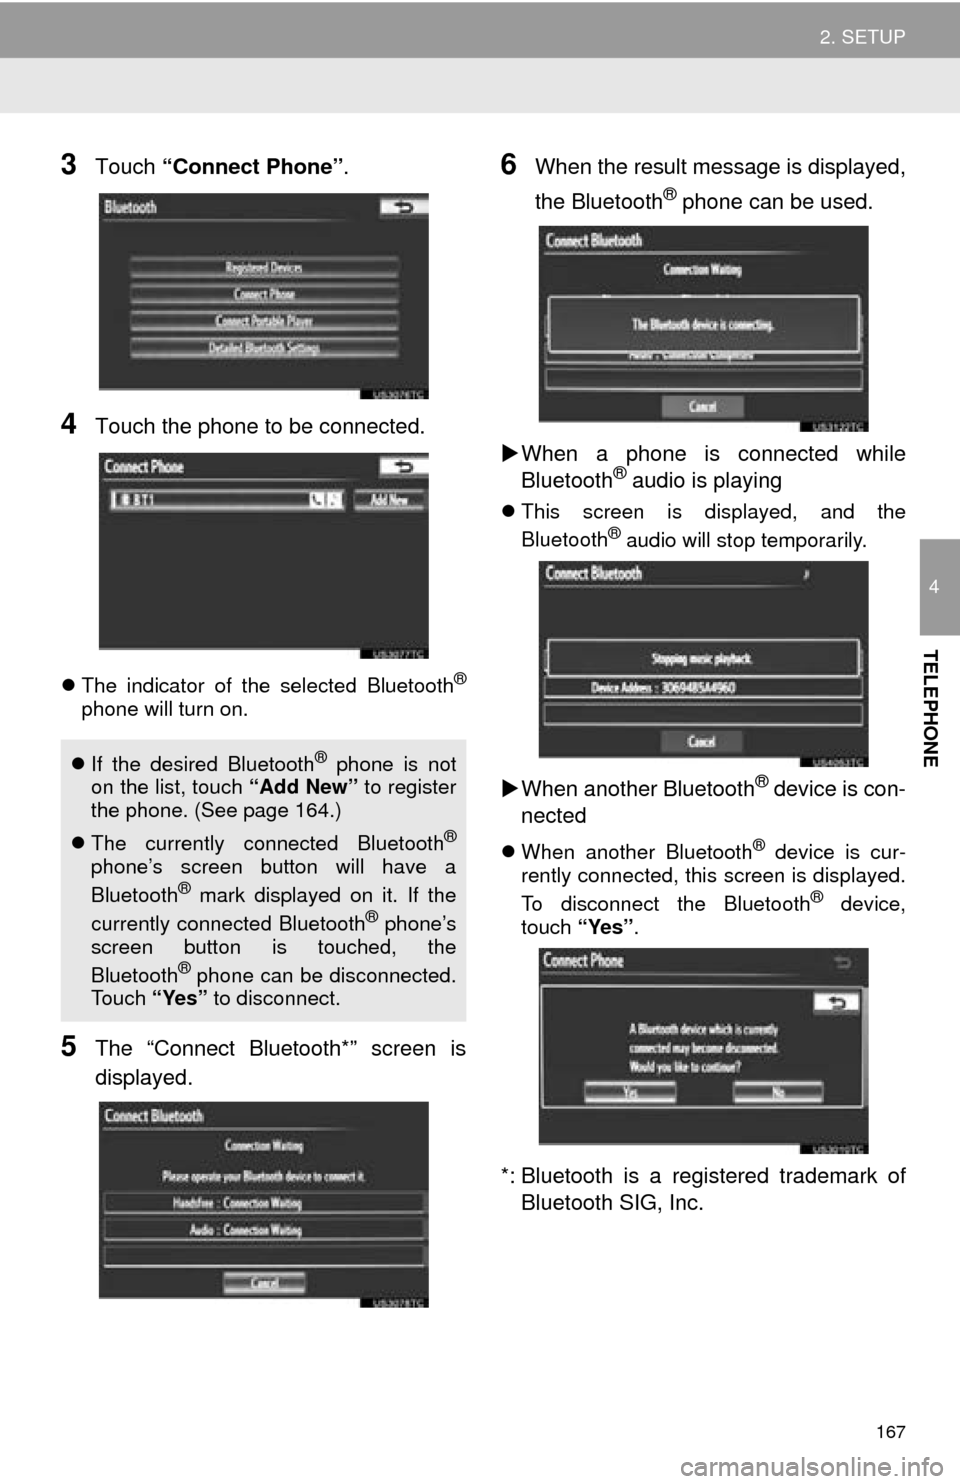
3Touch “Connect Phone” .
4Touch the phone to be connected.
The indicator of the selected Bluetooth®
phone will turn on.
5The “Connect Bluetooth*” screen is
displayed.
6When the result message is displayed,
the Bluetooth
® phone can be used.
When a phone is connected while
Bluetooth
® audio is playing
This screen is displayed, and the
Bluetooth® audio will stop temporarily.
When another Bluetooth® device is con-
nected
When another Bluetooth® device is cur-
rently connected, this screen is displayed.
To disconnect the Bluetooth
® device,
touch “Yes”.
*: Bluetooth is a regi stered trademark of
Bluetooth SIG, Inc.
If the desired Bluetooth® phone is not
on the list, touch “Add New” to register
the phone. (See page 164.)
The currently connected Bluetooth
®
phone’s screen button will have a
Bluetooth® mark displayed on it. If the
currently connected Bluetooth® phone’s
screen button is touched, the
Bluetooth
® phone can be disconnected.
Touch “Yes” to disconnect.
Page 172 of 346
172
1. QUICK REFERENCE .................. 174
2. SOME BASICS ............................ 176
VOICE COMMAND SYSTEM .............. 176
AUDIO SPLIT SCREEN DISPLAY ....... 176
TURNING THE SYSTEM ON AND OFF..................................... 177
SWITCHING BETWEEN FUNCTIONS ...................................... 177
DSP CONTROL ................................... 177
TONE AND BALANCE ......................... 178
SELECTING SCREEN SIZE ................ 179
DVD PLAYER....................................... 179
AUX PORT ........................................... 180
USB PORT ........................................... 180
3. RADIO OPERATION ... ................ 181
LISTENING TO THE RADIO ................ 181
PRESETTING A STATION .................. 181
SELECTING A STATION ..................... 182
RADIO BROADCAST DATA
SYSTEM ............................................ 182
TRAFFIC ANNOUNCEMENT .............. 183
4. HD Radio™ TECHNOLOGY INFORMATION ......................... 184
USING HD Radio™ TECHNOLOGY.... 184
AVAILABLE HD Radio™
TECHNOLOGY.................................. 185
TROUBLESHOOTING GUIDE ............. 186
1AUDIO/VIDEO SYSTEM
OPERATION
5
AUDIO/VIDEO SYSTEM
Page 173 of 346
5
173
1
2
3
4
5
6
7
8
9
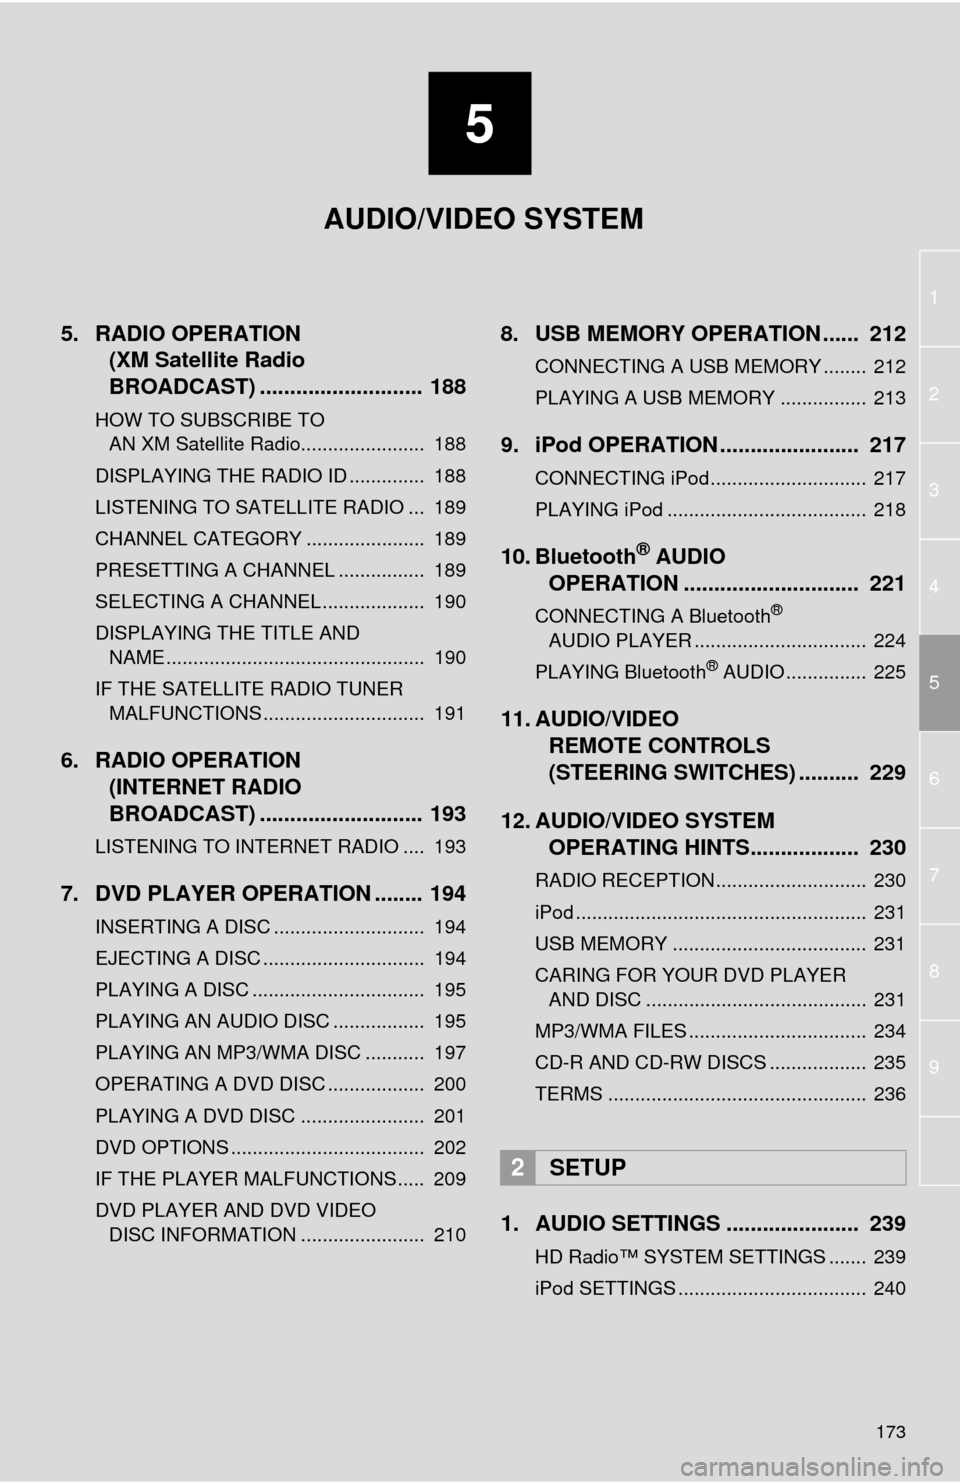
5. RADIO OPERATION(XM Satellite Radio
BROADCAST) ........... ................ 188
HOW TO SUBSCRIBE TO
AN XM Satellite Radio....................... 188
DISPLAYING THE RADIO ID .............. 188
LISTENING TO SATELLITE RADIO ... 189
CHANNEL CATEGORY ...................... 189
PRESETTING A CHANNEL ................ 189
SELECTING A CHANNEL ................... 190
DISPLAYING THE TITLE AND NAME ................................................ 190
IF THE SATELLITE RADIO TUNER MALFUNCTIONS .............................. 191
6. RADIO OPERATION (INTERNET RADIO
BROADCAST) ........... ................ 193
LISTENING TO INTERNET RADIO .... 193
7. DVD PLAYER OPERATION ........ 194
INSERTING A DISC ............................ 194
EJECTING A DISC .............................. 194
PLAYING A DISC ................................ 195
PLAYING AN AUDIO DISC ................. 195
PLAYING AN MP3/WMA DISC ........... 197
OPERATING A DVD DISC .................. 200
PLAYING A DVD DISC ....................... 201
DVD OPTIONS .................................... 202
IF THE PLAYER MALFUNCTIONS..... 209
DVD PLAYER AND DVD VIDEO
DISC INFORMATION ....................... 210
8. USB MEMORY OPERATION ...... 212
CONNECTING A USB MEMORY ........ 212
PLAYING A USB MEMORY ................ 213
9. iPod OPERATION ....................... 217
CONNECTING iPod............................. 217
PLAYING iPod ..................................... 218
10. Bluetooth® AUDIO
OPERATION ............................. 221
CONNECTING A Bluetooth®
AUDIO PLAYER ................................ 224
PLAYING Bluetooth
® AUDIO ............... 225
11. AUDIO/VIDEO REMOTE CONTROLS
(STEERING SWITCHES) .......... 229
12. AUDIO/VIDEO SYSTEM OPERATING HINTS.................. 230
RADIO RECEPTION............................ 230
iPod ...................................................... 231
USB MEMORY .................................... 231
CARING FOR YOUR DVD PLAYER
AND DISC ......................................... 231
MP3/WMA FILES ................................. 234
CD-R AND CD-RW DISCS .................. 235
TERMS ................................................ 236
1. AUDIO SETTINGS ...................... 239
HD Radio™ SYSTEM SETTINGS ....... 239
iPod SETTINGS ................................... 240
2SETUP
AUDIO/VIDEO SYSTEM
Page 174 of 346
174
1. AUDIO/VIDEO SYSTEM OPERATION
1. QUICK REFERENCE
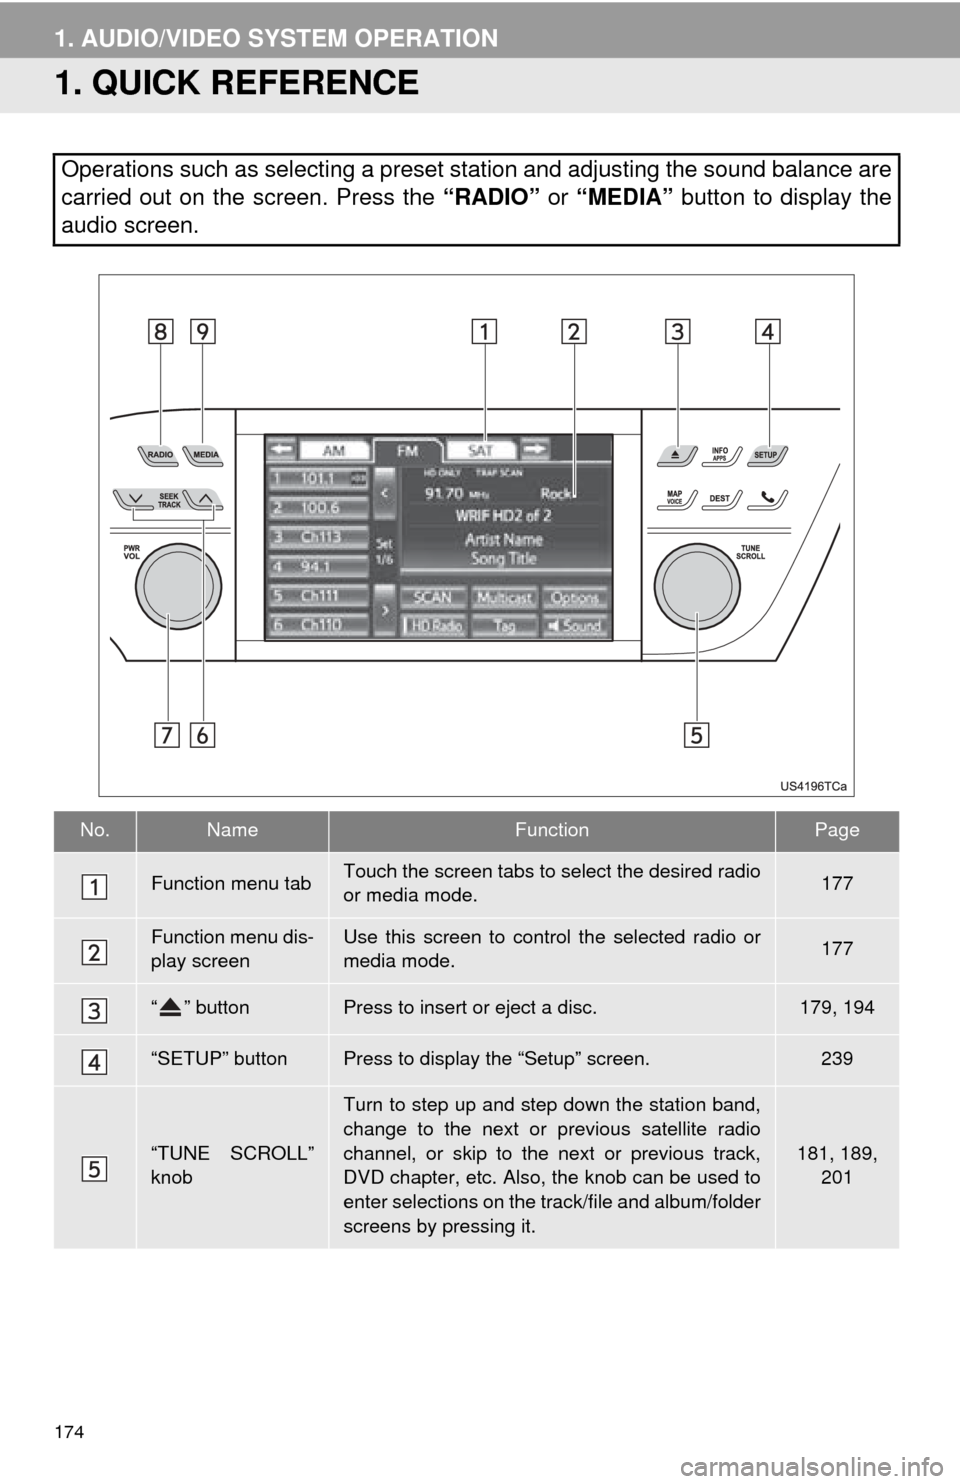
Operations such as selecting a preset station and adjusting the sound balance are
carried out on the screen. Press the “RADIO” or “MEDIA” button to display the
audio screen.
No.NameFunctionPage
Function menu tabTouch the screen tabs to select the desired radio
or media mode.177
Function menu dis-
play screenUse this screen to control the selected radio or
media mode.177
“ ” buttonPress to insert or eject a disc.179, 194
“SETUP” buttonPress to display the “Setup” screen.239
“TUNE SCROLL”
knob
Turn to step up and step down the station band,
change to the next or previous satellite radio
channel, or skip to the next or previous track,
DVD chapter, etc. Also, the knob can be used to
enter selections on the track/file and album/folder
screens by pressing it.
181, 189,
201