screen size TOYOTA AVALON 2014 XX40 / 4.G Navigation Manual
[x] Cancel search | Manufacturer: TOYOTA, Model Year: 2014, Model line: AVALON, Model: TOYOTA AVALON 2014 XX40 / 4.GPages: 346, PDF Size: 6.47 MB
Page 101 of 346
101
3. ADDRESS BOOK
3
NAVIGATION SYSTEM
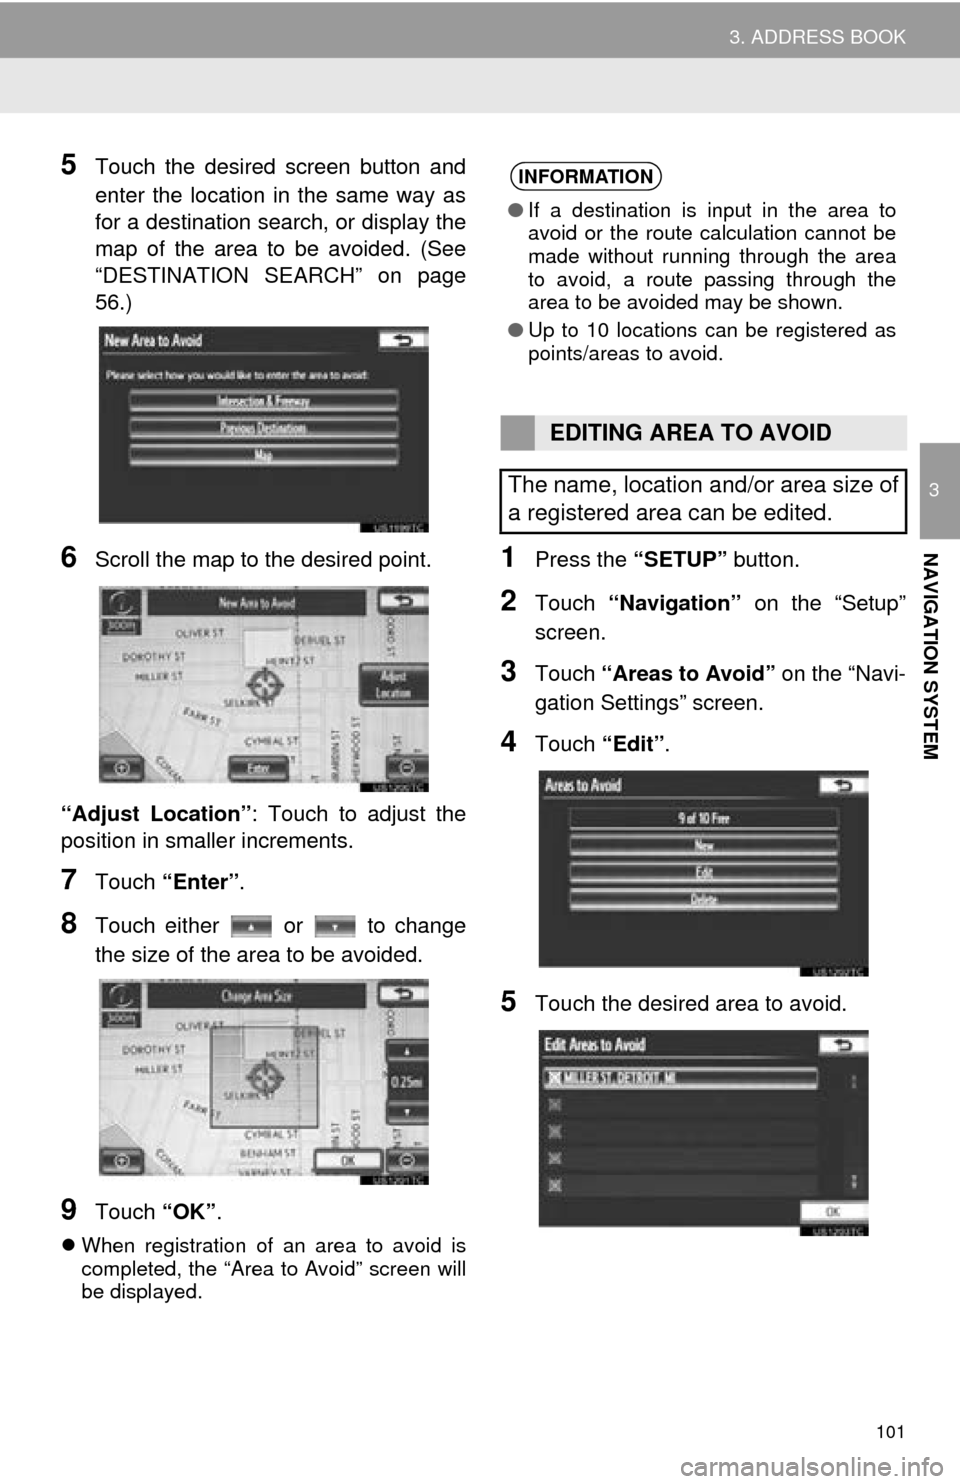
5Touch the desired screen button and
enter the location in the same way as
for a destination search, or display the
map of the area to be avoided. (See
“DESTINATION SEARCH” on page
56.)
6Scroll the map to the desired point.
“Adjust Location” : Touch to adjust the
position in smaller increments.
7Touch “Enter” .
8Touch either or to change
the size of the area to be avoided.
9Touch “OK”.
When registration of an area to avoid is
completed, the “Area to Avoid” screen will
be displayed.
1Press the “SETUP” button.
2Touch “Navigation” on the “Setup”
screen.
3Touch “Areas to Avoid” on the “Navi-
gation Settings” screen.
4Touch “Edit”.
5Touch the desired area to avoid.
INFORMATION
●If a destination is input in the area to
avoid or the route calculation cannot be
made without running through the area
to avoid, a route passing through the
area to be avoided may be shown.
● Up to 10 locations can be registered as
points/areas to avoid.
EDITING AREA TO AVOID
The name, location and/or area size of
a registered area can be edited.
Page 102 of 346
102
3. ADDRESS BOOK
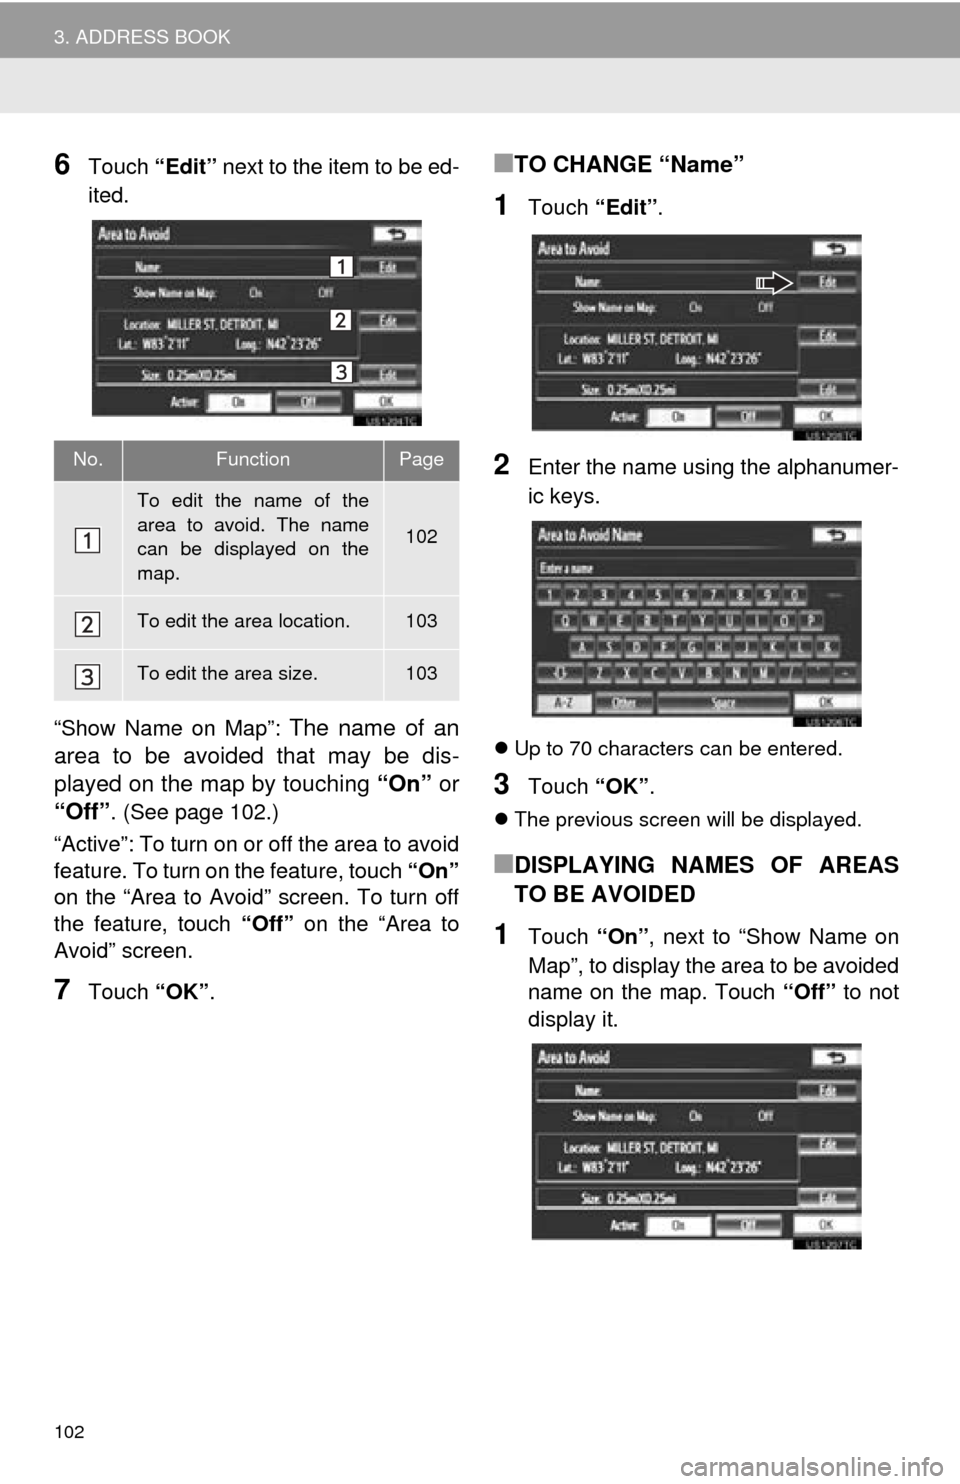
6Touch “Edit” next to the item to be ed-
ited.
“Show Name on Map”:
The name of an
area to be avoided that may be dis-
played on the map by touching “On” or
“Off”.
(See page 102.)
“Active”: To turn on or off the area to avoid
feature. To turn on the feature, touch “On”
on the “Area to Avoid” screen. To turn off
the feature, touch “Off” on the “Area to
Avoid” screen.
7Touch “OK”.
■TO CHANGE “Name”
1Touch “Edit”.
2Enter the name using the alphanumer-
ic keys.
Up to 70 characters can be entered.
3Touch “OK”.
The previous screen will be displayed.
■DISPLAYING NAMES OF AREAS
TO BE AVOIDED
1Touch “On”, next to “Show Name on
Map”, to display the area to be avoided
name on the map. Touch “Off” to not
display it.
No.FunctionPage
To edit the name of the
area to avoid. The name
can be displayed on the
map.
102
To edit the area location.103
To edit the area size.103
Page 103 of 346
103
3. ADDRESS BOOK
3
NAVIGATION SYSTEM
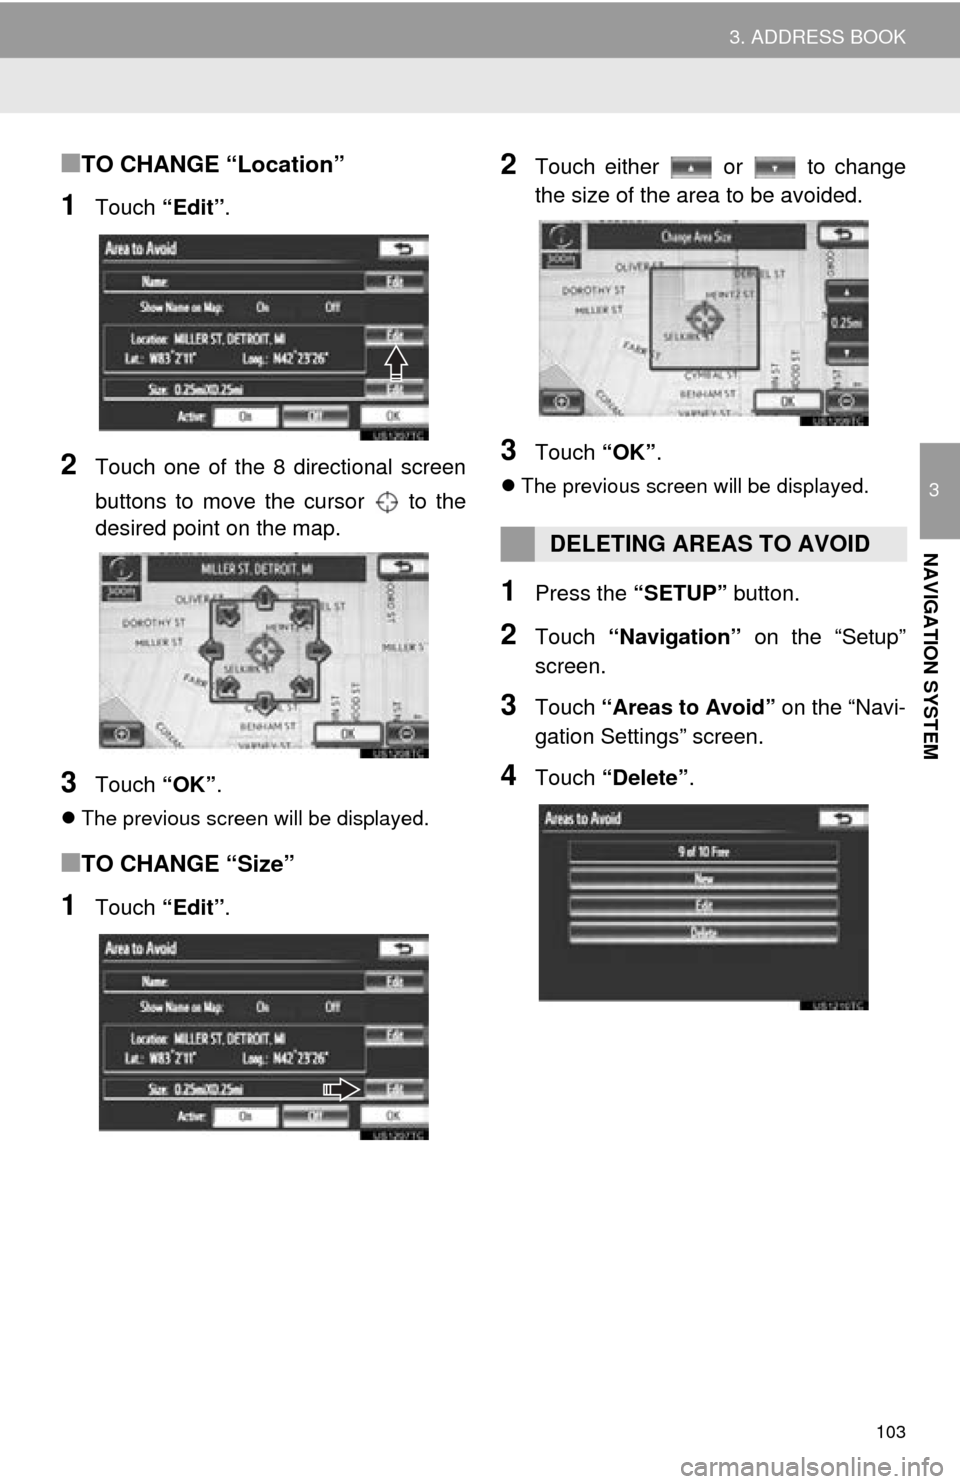
■TO CHANGE “Location”
1Touch “Edit”.
2Touch one of the 8 directional screen
buttons to move the cursor to the
desired point on the map.
3Touch “OK”.
The previous screen will be displayed.
■TO CHANGE “Size”
1Touch “Edit”.
2Touch either or to change
the size of the area to be avoided.
3Touch “OK”.
The previous screen will be displayed.
1Press the “SETUP” button.
2Touch “Navigation” on the “Setup”
screen.
3Touch “Areas to Avoid” on the “Navi-
gation Settings” screen.
4Touch “Delete” .
DELETING AREAS TO AVOID
Page 172 of 346
172
1. QUICK REFERENCE .................. 174
2. SOME BASICS ............................ 176
VOICE COMMAND SYSTEM .............. 176
AUDIO SPLIT SCREEN DISPLAY ....... 176
TURNING THE SYSTEM ON AND OFF..................................... 177
SWITCHING BETWEEN FUNCTIONS ...................................... 177
DSP CONTROL ................................... 177
TONE AND BALANCE ......................... 178
SELECTING SCREEN SIZE ................ 179
DVD PLAYER....................................... 179
AUX PORT ........................................... 180
USB PORT ........................................... 180
3. RADIO OPERATION ... ................ 181
LISTENING TO THE RADIO ................ 181
PRESETTING A STATION .................. 181
SELECTING A STATION ..................... 182
RADIO BROADCAST DATA
SYSTEM ............................................ 182
TRAFFIC ANNOUNCEMENT .............. 183
4. HD Radio™ TECHNOLOGY INFORMATION ......................... 184
USING HD Radio™ TECHNOLOGY.... 184
AVAILABLE HD Radio™
TECHNOLOGY.................................. 185
TROUBLESHOOTING GUIDE ............. 186
1AUDIO/VIDEO SYSTEM
OPERATION
5
AUDIO/VIDEO SYSTEM
Page 179 of 346
179
1. AUDIO/VIDEO SYSTEM OPERATION
5
AUDIO/VIDEO SYSTEM
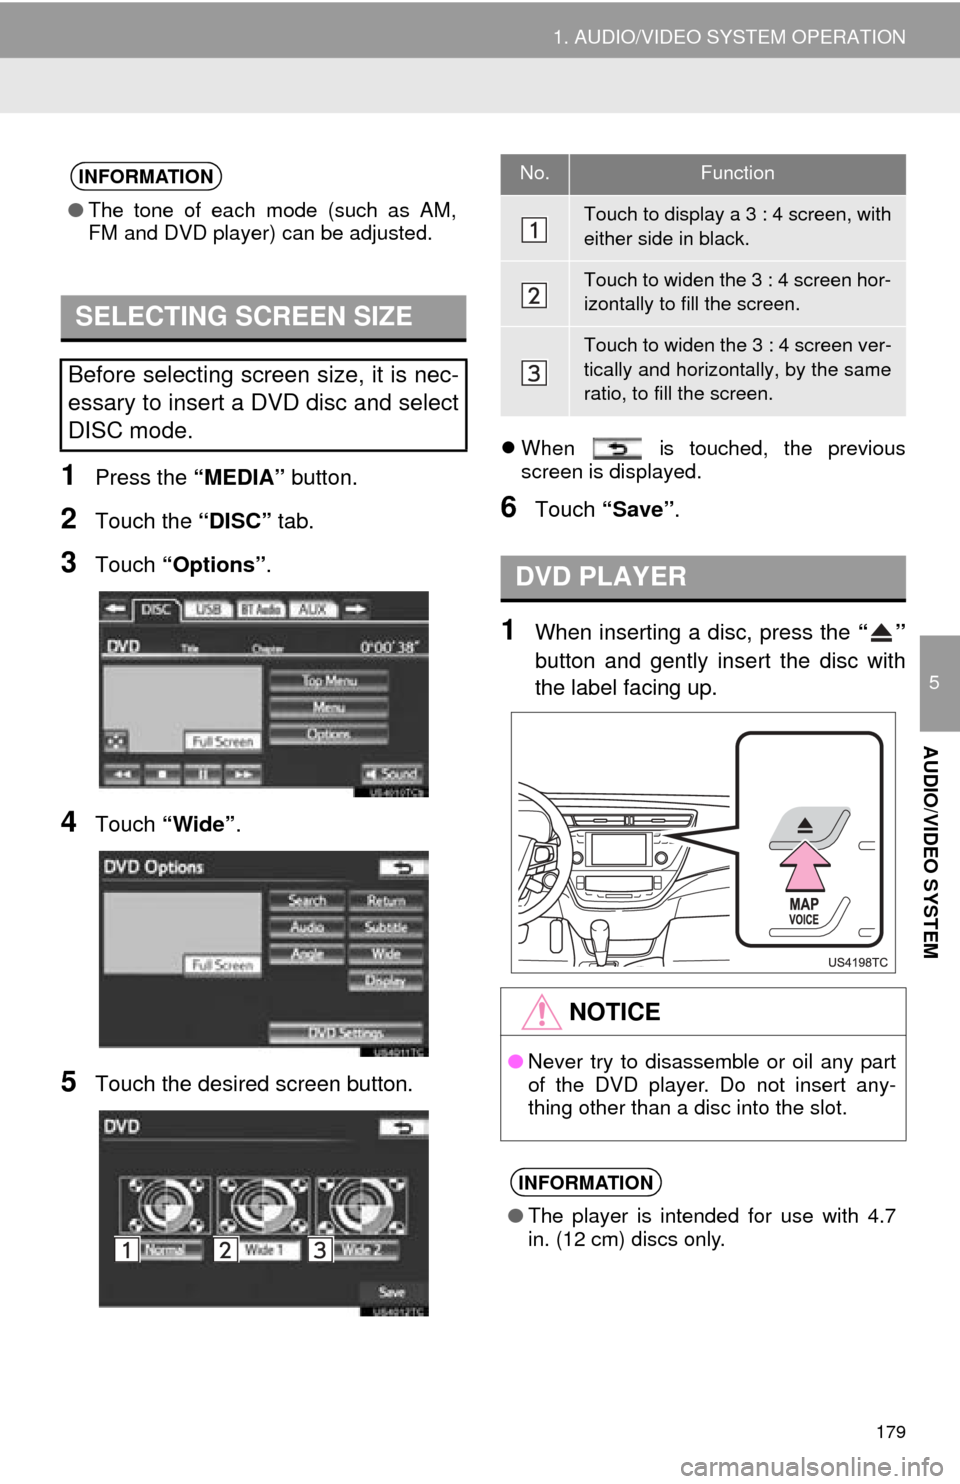
1Press the “MEDIA” button.
2Touch the “DISC” tab.
3Touch “Options”.
4Touch “Wide” .
5Touch the desired screen button.
When is touched, the previous
screen is displayed.
6Touch “Save” .
1When inserting a disc, press the “”
button and gently insert the disc with
the label facing up.
INFORMATION
● The tone of each mode (such as AM,
FM and DVD player) can be adjusted.
SELECTING SCREEN SIZE
Before selecting screen size, it is nec-
essary to insert a DVD disc and select
DISC mode.
No.Function
Touch to display a 3 : 4 screen, with
either side in black.
Touch to widen the 3 : 4 screen hor-
izontally to fill the screen.
Touch to widen the 3 : 4 screen ver-
tically and horizontally, by the same
ratio, to fill the screen.
DVD PLAYER
NOTICE
●Never try to disassemble or oil any part
of the DVD player. Do not insert any-
thing other than a disc into the slot.
INFORMATION
●The player is intended for use with 4.7
in. (12 cm) discs only.
Page 180 of 346
180
1. AUDIO/VIDEO SYSTEM OPERATION
1Press the “MEDIA” button to display
the media control screen and touch the
“AUX” tab or press the “MEDIA” but-
ton repeatedly to change to AUX
mode.
1Press the “MEDIA” button to display
the media control screen and touch the
“USB” or “iPod” tab or press the
“MEDIA” button repeatedly to change
to USB memory/iPod mode.
AUX PORT
The sound of portable audio players
connected to the AUX port can be en-
joyed. For details, refer to “Owner’s
Manual” .
CAUTION
●Do not connect portable audio device or
operate the controls while driving.
NOTICE
●Depending on the size and shape of the
portable audio device that is connected
to the system, the lid may not close fully.
In this case, do not forcibly close the lid
as this may damage the portable audio
device or the terminal, etc.
● Do not leave portable audio device in
the vehicle. The temperature inside the
vehicle may become high, resulting in
damage to the player.
● Do not push down on or apply unneces-
sary pressure to the portable audio
device while it is connected as this may
damage the portable audio device or its
terminal.
● Do not insert foreign objects into the port
as this may damage the portable audio
device or its terminal.
INFORMATION
●When the portable audio player is not
connected to the AUX port, the tab will
be dimmed.
USB PORT
A USB memory/iPod can be connect-
ed to the USB port. For details, see
“CONNECTING A USB MEMORY” on
page 212 and “CONNECTING iPod”
on page 217.
INFORMATION
●When a USB memory/iPod is not con-
nected with the USB port, the tab will be
dimmed.
Page 200 of 346
200
1. AUDIO/VIDEO SYSTEM OPERATION
■PLAYING THE FILES IN ALL THE
FOLDERS ON THE DISC IN RAN-
DOM ORDER
1Touch “RAND” repeatedly until
“FLD.RAND” appears on the screen.
Once “FLD.RAND” appears on the
screen, the system selects a file randomly
from all of the existing folders. To cancel
this function, touch “RAND” again.
INFORMATION
●When a file is skipped or the system is
inoperative, touch “RAND” to reset.
OPERATING A DVD DISC
The playback condition of some DVD
discs may be determined by the DVD
software producer. This DVD player
plays a disc as the software producer
intended. As such some functions may
not work properly. Be sure to read the
instruction manual that comes with the
individual DVD disc. For detailed infor-
mation about DVD video discs, see
“DVD PLAYER AND DVD VIDEO
DISC INFORMATION” on page 210.
PRECAUTIONS ON DVD VIDEO
DISC
When recording with a DVD video, au-
dio tracks may not record in some cas-
es while the menu is displayed. As
audio will not play in this case, verify
that the video tracks are playing and
then activate playback.
When playback of a disc is completed:
If an audio CD or MP3/WMA disc is
playing, the first track or file starts.
If a DVD video is playing, playback will
stop or the menu screen will be dis-
played.
The title/chapter number and playback
time display may not appear while
playing back certain DVD video discs.
CAUTION
● Conversational speech on some DVDs
is recorded at a low volume to empha-
size the impact of sound effects. If you
adjust the volume assuming that the
conversations represent the maximum
volume level that the DVD will play, you
may be startled by louder sound effects
or when you change to a different audio
source. The louder sounds may have a
significant impact on the human body or
pose a driving hazard. Keep this in mind
when you adjust the volume.
Page 289 of 346
289
1. TOYOTA PARKING ASSIST MONITOR
9
PERIPHERAL MONITORING SYSTEM
CAUTION
●The instructions given are only guide-
lines. When and how much to turn the
steering wheel will vary according to
traffic conditions, road surface condi-
tions, vehicle condition, etc. when park-
ing. It is necessary to be fully aware of
this before using the parking assist sys-
tem.
● When parking, be sure to check that the
parking space will accommodate your
vehicle before maneuvering into it.
● Do not use system in the following
cases:
• On icy or slick road surfaces, or in
snow
• When using tire chains
• When the trunk is not closed com-
pletely
• On roads that are not flat or straight, such as curves or slopes.
● In low temperatures, the screen may
darken or the image may become faint.
The image could distort when the vehi-
cle is moving, or you may become
unable to see the image on the screen.
Be sure to visually check all around the
vehicle both directly and using the mir-
rors before proceeding.
● If the tire sizes are changed, the position
of the guide lines displayed on the
screen may change.
● The camera uses a special lens. The
distances between objects and pedestri-
ans that appear in the image displayed
on the screen will differ from the actual
distances. ( P.307)