clock TOYOTA AVALON 2014 XX40 / 4.G Owners Manual
[x] Cancel search | Manufacturer: TOYOTA, Model Year: 2014, Model line: AVALON, Model: TOYOTA AVALON 2014 XX40 / 4.GPages: 496, PDF Size: 6.75 MB
Page 4 of 496

TABLE OF CONTENTS4
AVALON (U)_(OM41452U)5-1. Using the air conditioning
system and defogger
Automatic air conditioning system ........ 238
Rear window and outside rear view mirror
defoggers ........................ 248
5-2. Using the audio system Audio system types ........... 249
Using the USB/AUX port .................................. 253
5-3. Using the interior lights Interior lights list ................ 254
• Personal/interior light main switch ................... 255
• Personal/interior lights ............................. 255
•
Ambient lights................. 256 5-4. Using the storage
features
List of storage features ...... 257
• Glove box ...................... 258
• Console box .................. 259
• Cup holders ................... 260
• Auxiliary boxes .............. 261
Trunk features ................... 266
5-5. Other interior features Sun visors and vanity mirrors ............................. 268
Clock.................................. 269
Outside temperature display ............................. 271
Power outlets ..................... 272
Seat heaters/seat ventilators ........................ 274
Armrest .............................. 277
Rear sunshade .................. 278
Trunk storage extension ......................... 280
Coat hooks ........................ 281
Assist grips ........................ 282
Garage door opener .......... 283
Safety Connect .................. 290
Compass ........................... 296
5Interior features
Page 17 of 496
17Pictorial index
AVALON (U)_(OM41452U)Multi-information display . . . . . . . . . . . . . . . . . . . . . . . . . . . . P. 80
Display . . . . . . . . . . . . . . . . . . . . . . . . . . . . . . . . . . . . . . . . . . . . P. 80
When the warning messages are displayed . . . . . . . . . . . . . . P. 398
Turn signal lever . . . . . . . . . . . . . . . . . . . . . . . . . . . . . . . . . . P. 165
Headlight switch . . . . . . . . . . . . . . . . . . . . . . . . . . . . . . . . . . . . P. 168
Headlights/parking lights/tail lights/daytime running lights . . . . P. 168
Fog lights
*. . . . . . . . . . . . . . . . . . . . . . . . . . . . . . . . . . . . . . . . P. 177
Windshield wiper and washer switch . . . . . . . . . . . . . . . . . P. 179
Usage . . . . . . . . . . . . . . . . . . . . . . . . . . . . . . . . . . . . . . . . . . . P. 179
Adding washer fluid . . . . . . . . . . . . . . . . . . . . . . . . . . . . . . . . . P. 333
Hood lock release lever. . . . . . . . . . . . . . . . . . . . . . . . . . . . . P. 319
Tilt and telescopic steering lock release lever . . . . . . . . . . P. 124
Air conditioning system . . . . . . . . . . . . . . . . . . . . . . . . . . . . P. 238
Usage . . . . . . . . . . . . . . . . . . . . . . . . . . . . . . . . . . . . . . . . . . . P. 238
Rear window defogger . . . . . . . . . . . . . . . . . . . . . . . . . . . . . . . P. 248
Audio system . . . . . . . . . . . . . . . . . . . . . . . . . . . . . . . . . . . . . P. 249
Glove box . . . . . . . . . . . . . . . . . . . . . . . . . . . . . . . . . . . . . . . . P. 258
Clock . . . . . . . . . . . . . . . . . . . . . . . . . . . . . . . . . . . . . . . . . . . . P. 269
*: If equipped
4
5
6
7
8
9
10
11
12
Page 79 of 496
792. Instrument cluster
2
Instrument cluster
AVALON (U)_(OM41452U)
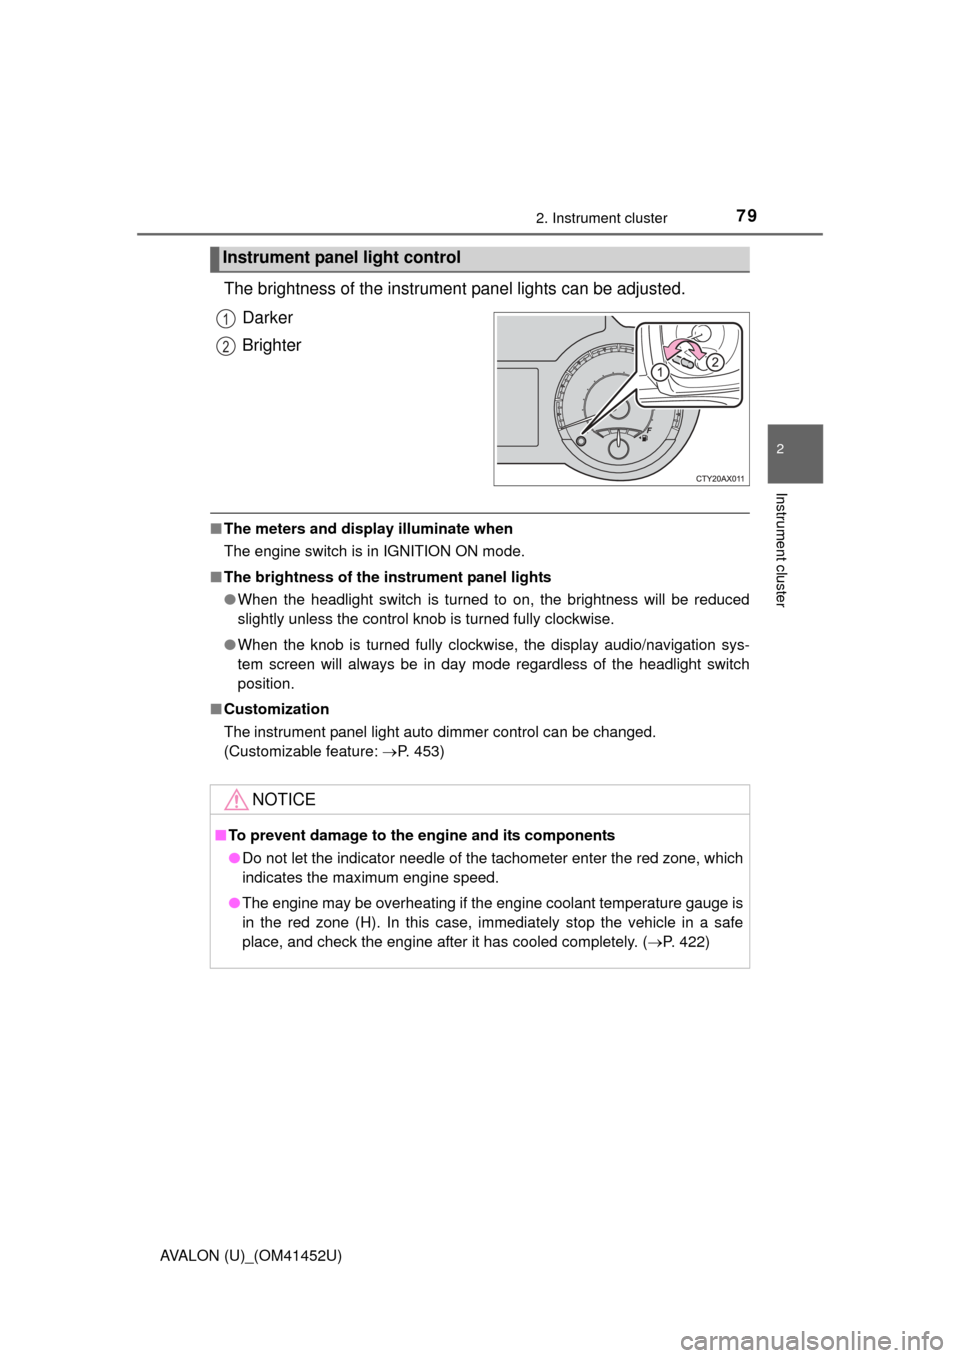
The brightness of the instrument panel lights can be adjusted.
Darker
Brighter
■ The meters and display illuminate when
The engine switch is in IGNITION ON mode.
■ The brightness of the in strument panel lights
● When the headlight switch is turned to on, the brightness will be reduced
slightly unless the control knob is turned fully clockwise.
● When the knob is turned fully clockwise, the display audio/navigation sys-
tem screen will always be in day mode regardless of the headlight switch
position.
■ Customization
The instrument panel light auto dimmer control can be changed.
(Customizable feature: P. 453)
Instrument panel light control
1
2
NOTICE
■To prevent damage to the engine and its components
● Do not let the indicator needle of the tachometer enter the red zone, which
indicates the maximum engine speed.
● The engine may be overheating if the engine coolant temperature gauge is
in the red zone (H). In this case, immediately stop the vehicle in a safe
place, and check the engine after it has cooled completely. (P. 422)
Page 237 of 496

237
Interior features5
AVALON (U)_(OM41452U)5-1. Using the air conditioning
system and defogger
Automatic air conditioning system ........ 238
Rear window and outside rear view mirror
defoggers ........................ 248
5-2. Using the audio system Audio system types ........... 249
Using the USB/AUX port .................................. 253
5-3. Using the interior lights Interior lights list ................ 254
• Personal/interior light main switch ................... 255
• Personal/interior lights ............................. 255
•
Ambient lights................ 256 5-4. Using the storage features
List of storage features ..... 257
• Glove box...................... 258
• Console box .................. 259
• Cup holders .................. 260
• Auxiliary boxes.............. 261
Trunk features ................... 266
5-5. Other interior features Sun visors and vanity mirrors ............................. 268
Clock ................................. 269
Outside temperature display............................. 271
Power outlets .................... 272
Seat heaters/seat ventilators ....................... 274
Armrest ............................. 277
Rear sunshade.................. 278
Trunk storage extension ........................ 280
Coat hooks ........................ 281
Assist grips........................ 282
Garage door opener.......... 283
Safety Connect ................. 290
Compass ........................... 296
Page 241 of 496
2415-1. Using the air conditioning system and defogger
5
Interior features
AVALON (U)_(OM41452U)■
Changing the rear seat temperature settings (vehicles with a
rear control switch)
Turn clockwise to increase the temperature and turn
counterclockwise to decrease the temperature.
■Confirming automatic operation status
During automatic operation, the operation status of fan speed, air
outlet mode, outside/recirculated air mode and whether the A/C is
on or off can be confirmed on the display by touching .
The display will return to its previous state after a few seconds.
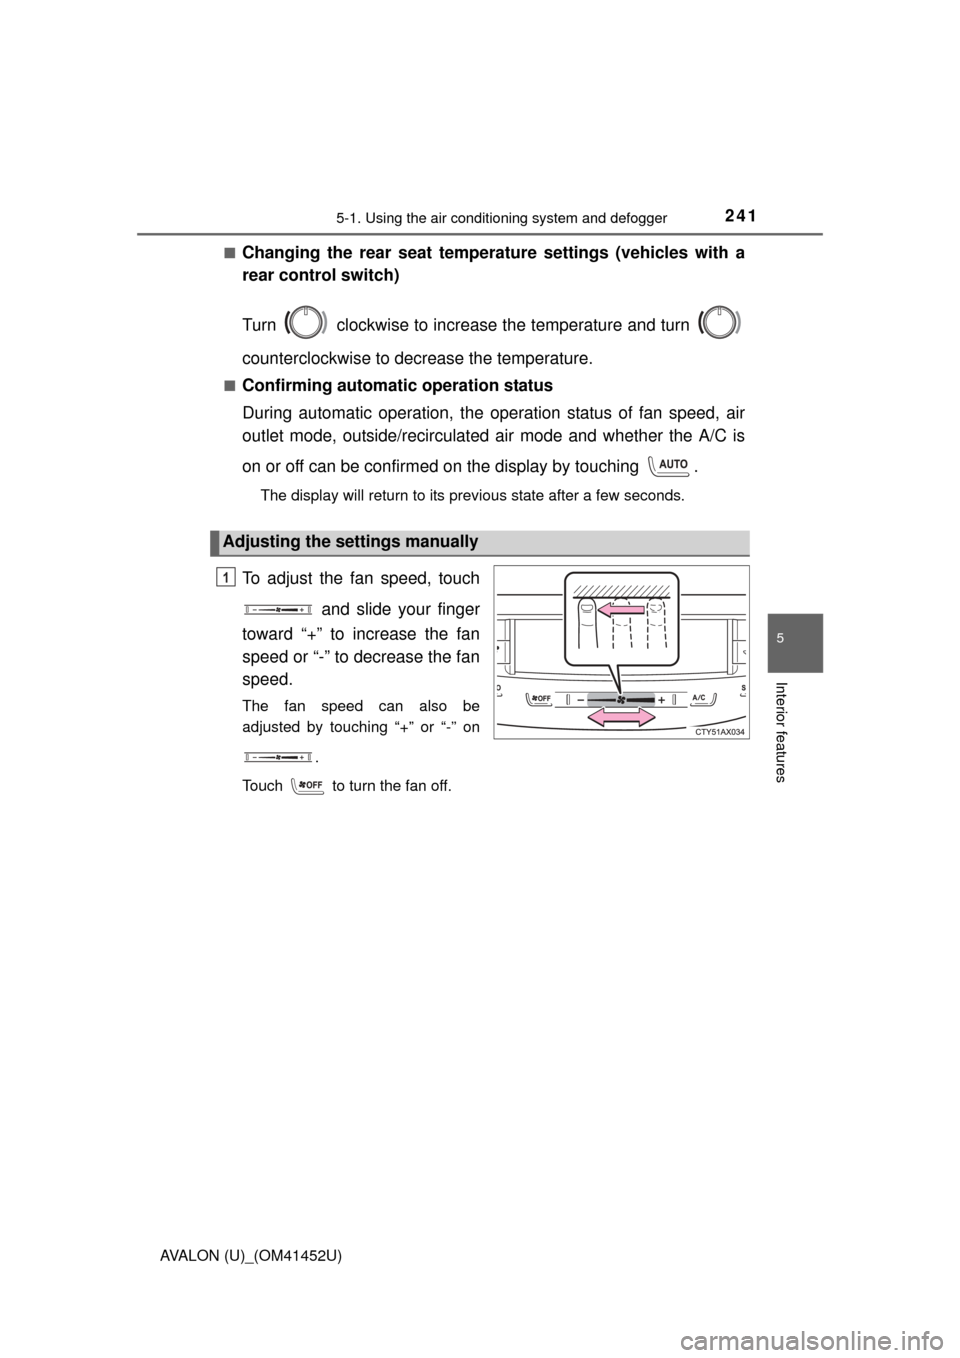
To adjust the fan speed, touch
and slide your finger
toward “+” to increase the fan
speed or “-” to decrease the fan
speed.
The fan speed can also be
adjusted by touching “+” or “-” on
.
Touch to turn the fan off.
Adjusting the settings manually
1
Page 269 of 496
2695-5. Other interior features
5
Interior features
AVALON (U)_(OM41452U)
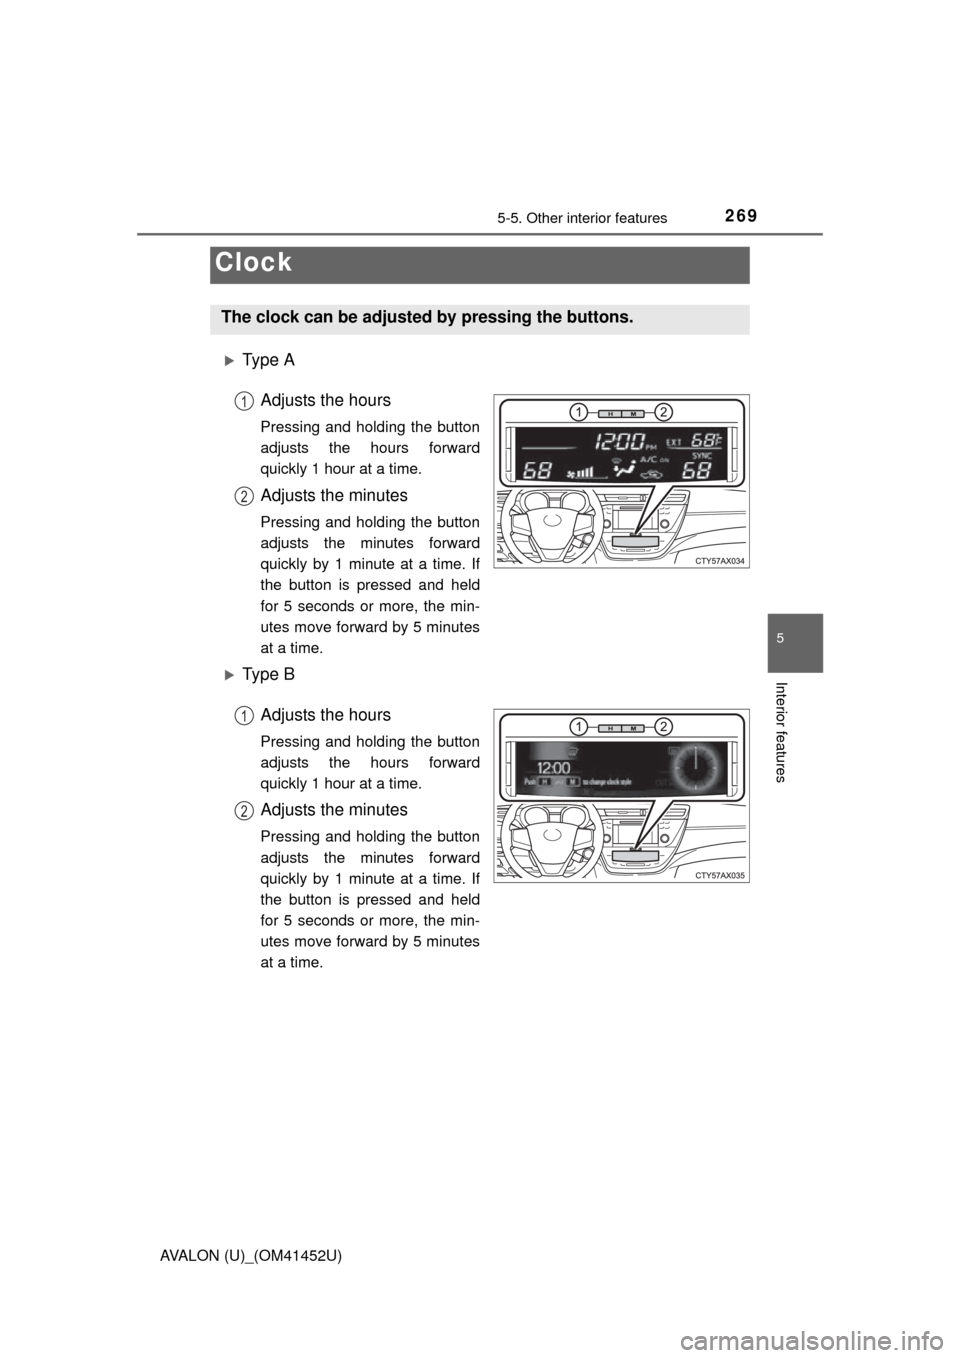
Ty p e AAdjusts the hours
Pressing and holding the button
adjusts the hours forward
quickly 1 hour at a time.
Adjusts the minutes
Pressing and holding the button
adjusts the minutes forward
quickly by 1 minute at a time. If
the button is pressed and held
for 5 seconds or more, the min-
utes move forward by 5 minutes
at a time.
Ty p e B
Adjusts the hours
Pressing and holding the button
adjusts the hours forward
quickly 1 hour at a time.
Adjusts the minutes
Pressing and holding the button
adjusts the minutes forward
quickly by 1 minute at a time. If
the button is pressed and held
for 5 seconds or more, the min-
utes move forward by 5 minutes
at a time.
Clock
The clock can be adjusted by pressing the buttons.
1
2
1
2
Page 270 of 496

2705-5. Other interior features
AVALON (U)_(OM41452U)
■The clock is displayed when
The engine switch is in ACCESSORY or IGNITION ON mode.
■ When disconnecting and reco nnecting battery terminals
Type A
The time display will automatically be set to 12:00 AM.
Type B
The time display will automatically be set to 12:00.
■ Time display (Type B)
After pressing “H” or “M” to show the setting screen, press “H” and “M” at the
same time to change between the analog and digital displays.
Page 274 of 496
2745-5. Other interior features
AVALON (U)_(OM41452U)■
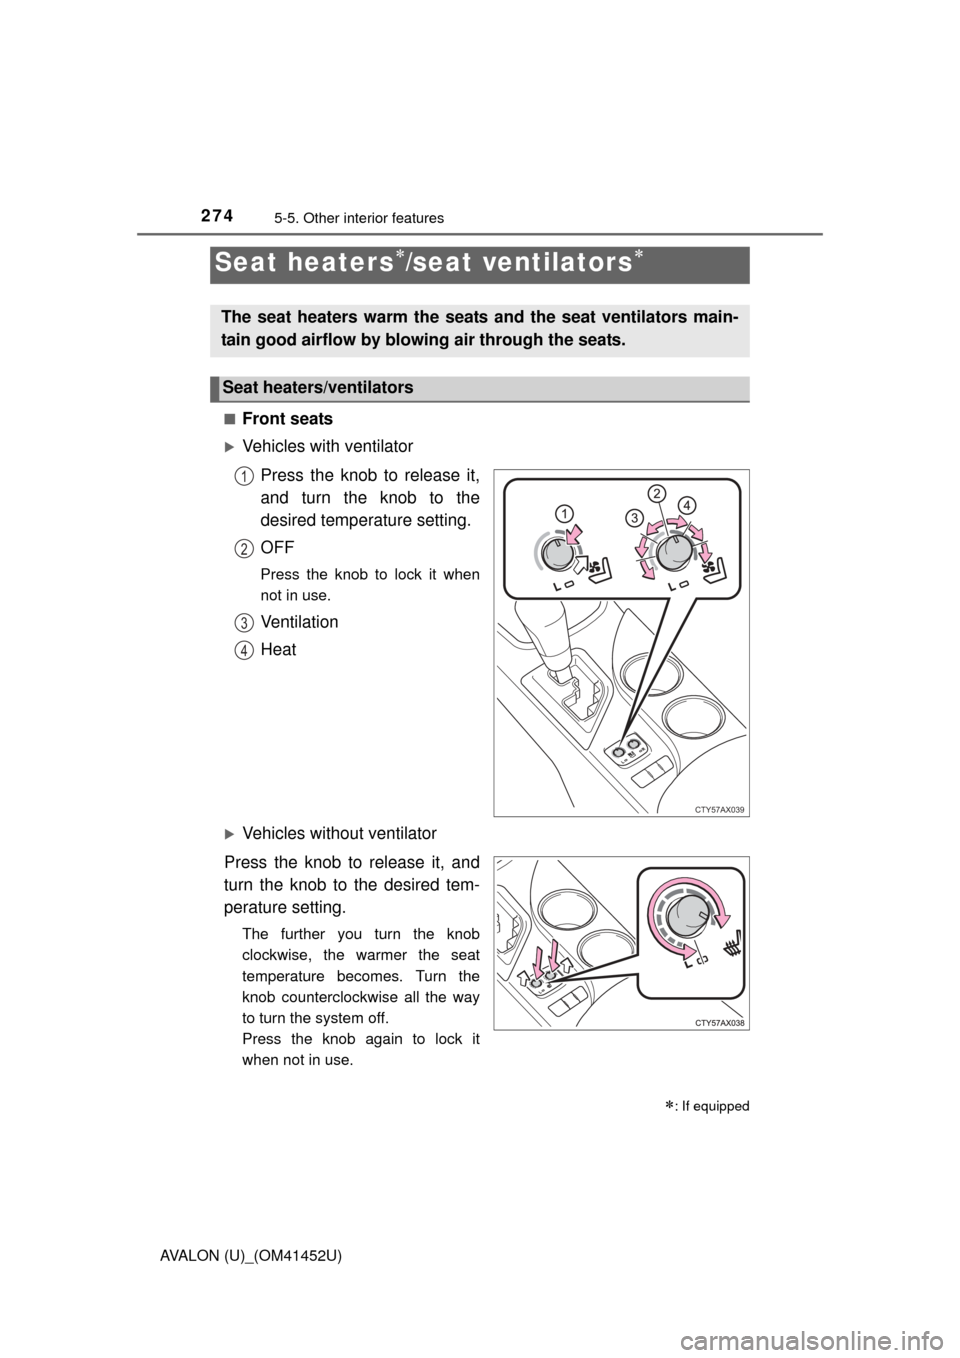
Front seats
Vehicles with ventilator
Press the knob to release it,
and turn the knob to the
desired temperature setting.
OFF
Press the knob to lock it when
not in use.
Ventilation
Heat
Vehicles without ventilator
Press the knob to release it, and
turn the knob to the desired tem-
perature setting.
The further you turn the knob
clockwise, the warmer the seat
temperature becomes. Turn the
knob counterclockwise all the way
to turn the system off.
Press the knob again to lock it
when not in use.
Seat heaters/seat ventilators
: If equipped
The seat heaters warm the seats and the seat ventilators main-
tain good airflow by blowing air through the seats.
Seat heaters/ventilators
CTY57AX039
1
2
3
4
Page 324 of 496
3246-3. Do-it-yourself maintenance
AVALON (U)_(OM41452U)■
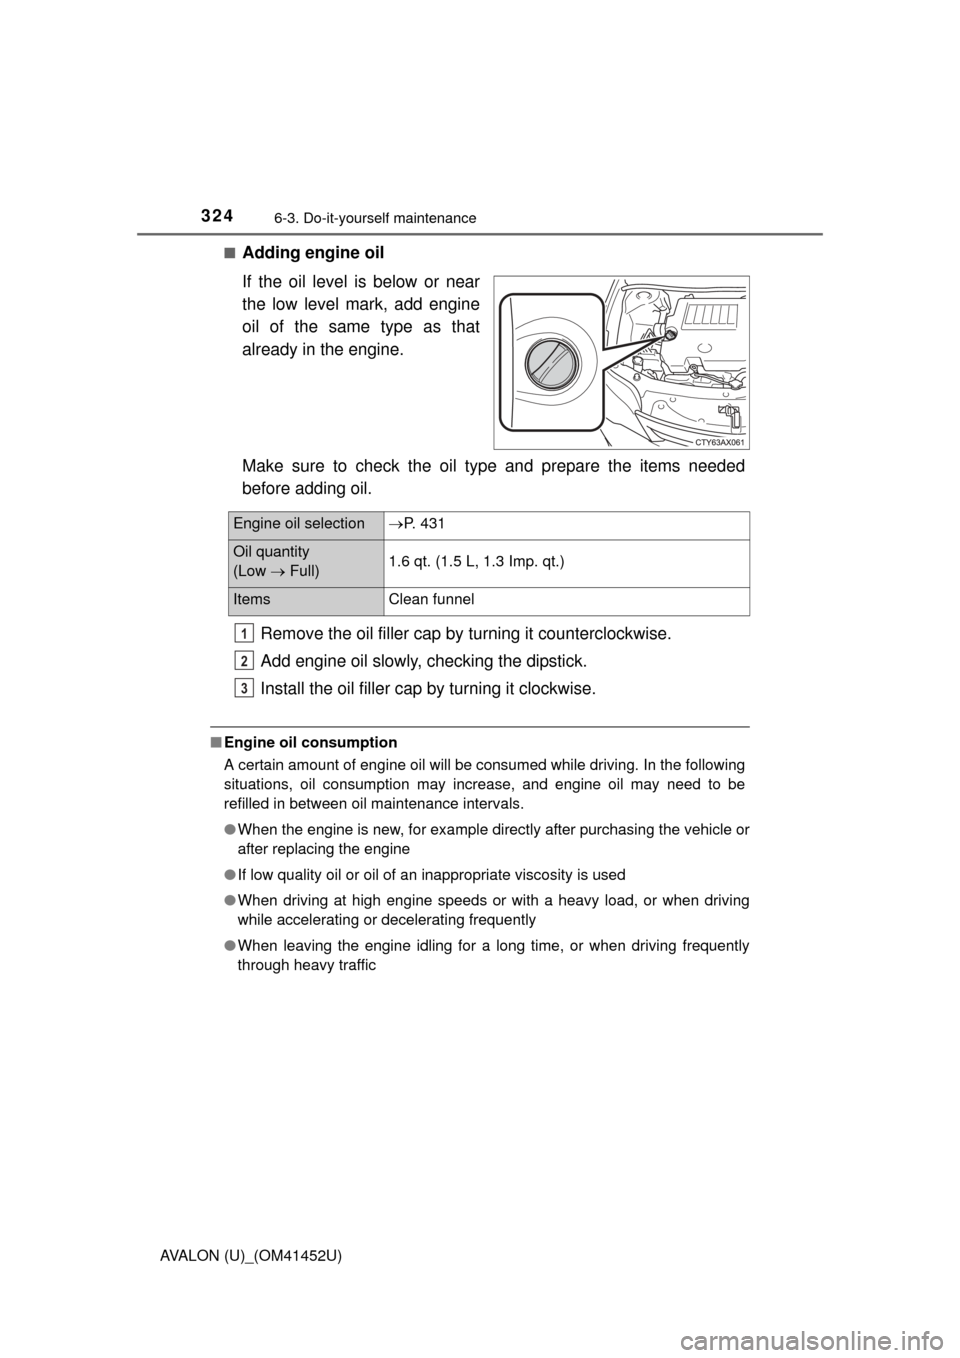
Adding engine oil
If the oil level is below or near
the low level mark, add engine
oil of the same type as that
already in the engine.
Make sure to check the oil type and prepare the items needed
before adding oil.
Remove the oil filler cap by turning it counterclockwise.
Add engine oil slowly, checking the dipstick.
Install the oil filler cap by turning it clockwise.
■ Engine oil consumption
A certain amount of engine oil will be consumed while driving. In the following
situations, oil consumption may increase, and engine oil may need to be
refilled in between oil maintenance intervals.
●When the engine is new, for example directly after purchasing the vehicle or
after replacing the engine
● If low quality oil or oil of an inappropriate viscosity is used
● When driving at high engine speeds or with a heavy load, or when driving
while accelerating or decelerating frequently
● When leaving the engine idling for a long time, or when driving frequently
through heavy traffic
Engine oil selection P. 431
Oil quantity
(Low Full) 1.6 qt. (1.5 L, 1.3 Imp. qt.)
Items
Clean funnel
1
2
3
Page 364 of 496
3646-3. Do-it-yourself maintenance
AVALON (U)_(OM41452U)■
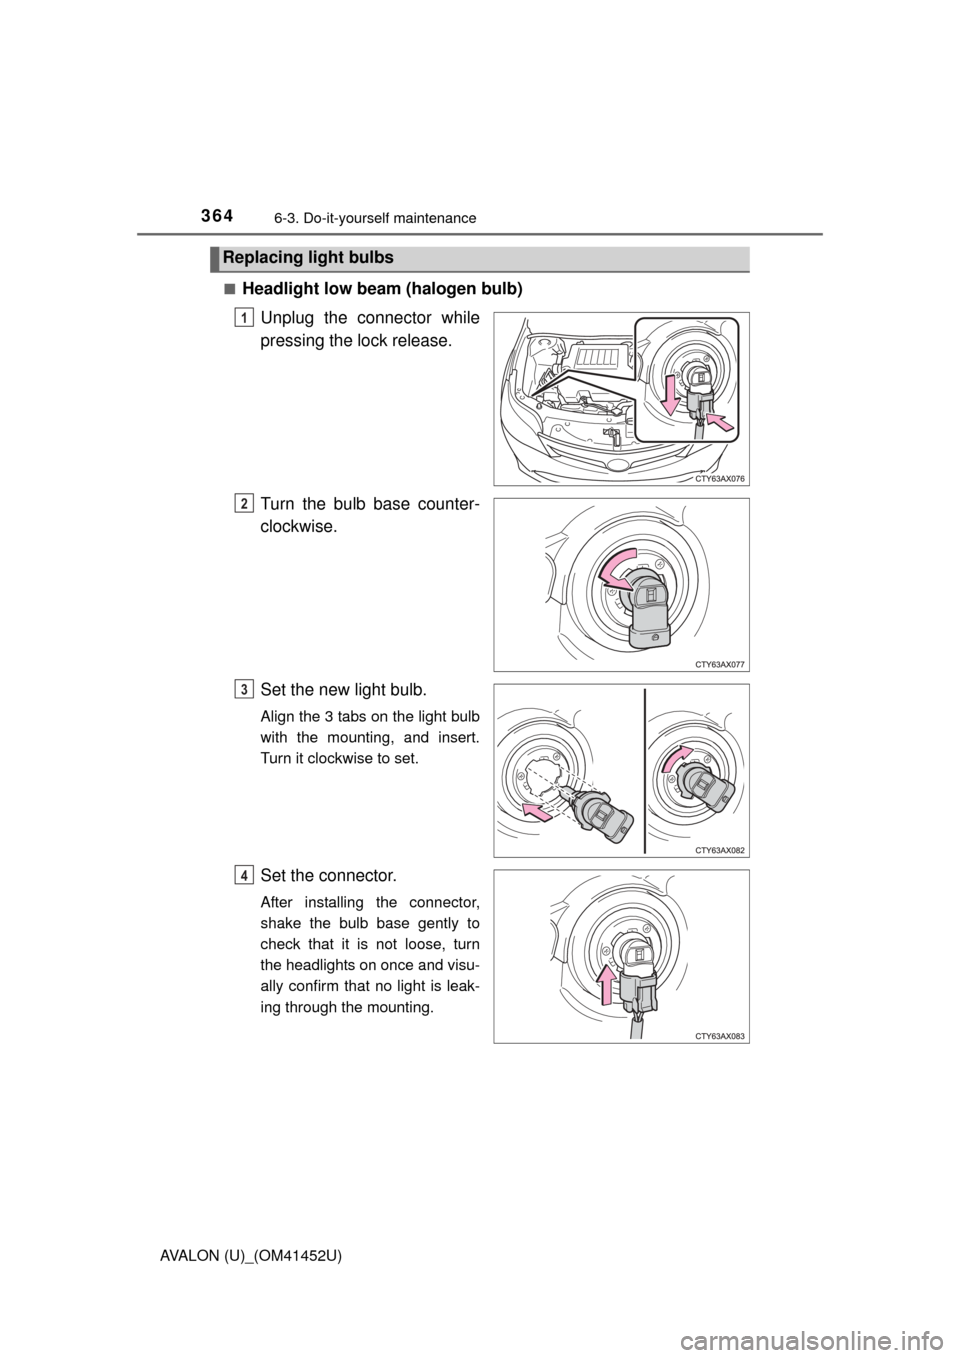
Headlight low beam (halogen bulb)
Unplug the connector while
pressing the lock release.
Turn the bulb base counter-
clockwise.
Set the new light bulb.
Align the 3 tabs on the light bulb
with the mounting, and insert.
Turn it clockwise to set.
Set the connector.
After installing the connector,
shake the bulb base gently to
check that it is not loose, turn
the headlights on once and visu-
ally confirm that no light is leak-
ing through the mounting.
Replacing light bulbs
1
2
3
4