bulb TOYOTA AVALON 2017 XX40 / 4.G User Guide
[x] Cancel search | Manufacturer: TOYOTA, Model Year: 2017, Model line: AVALON, Model: TOYOTA AVALON 2017 XX40 / 4.GPages: 492, PDF Size: 7.17 MB
Page 370 of 492
3706-3. Do-it-yourself maintenance
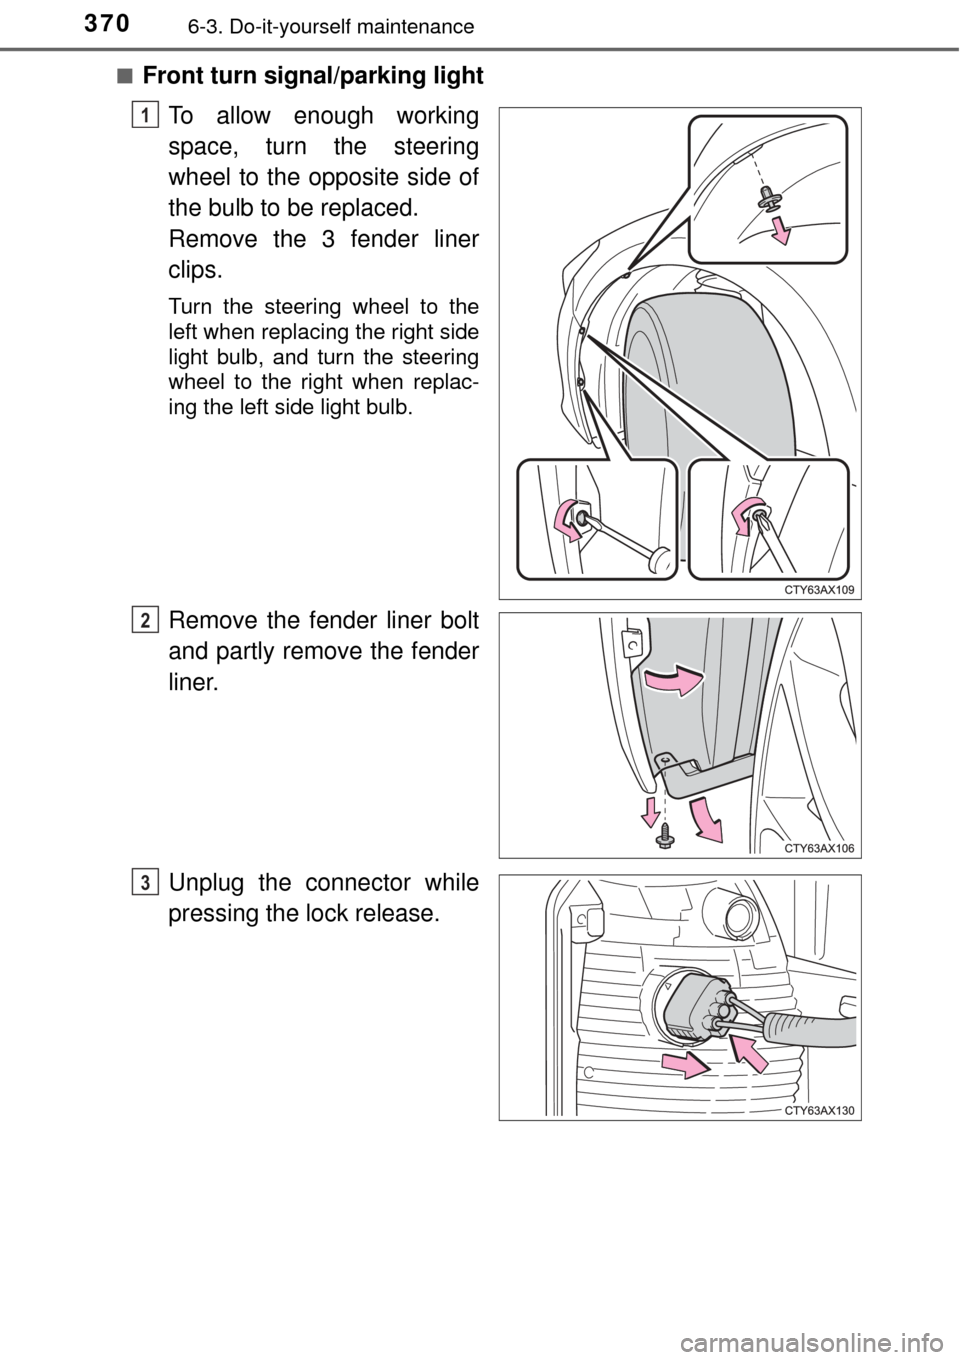
■Front turn signal/parking lightTo allow enough working
space, turn the steering
wheel to the opposite side of
the bulb to be replaced.
Remove the 3 fender liner
clips.
Turn the steering wheel to the
left when replacing the right side
light bulb, and turn the steering
wheel to the right when replac-
ing the left side light bulb.
Remove the fender liner bolt
and partly remove the fender
liner.
Unplug the connector while
pressing the lock release.
1
2
3
Page 371 of 492
3716-3. Do-it-yourself maintenance
6
Maintenance and care
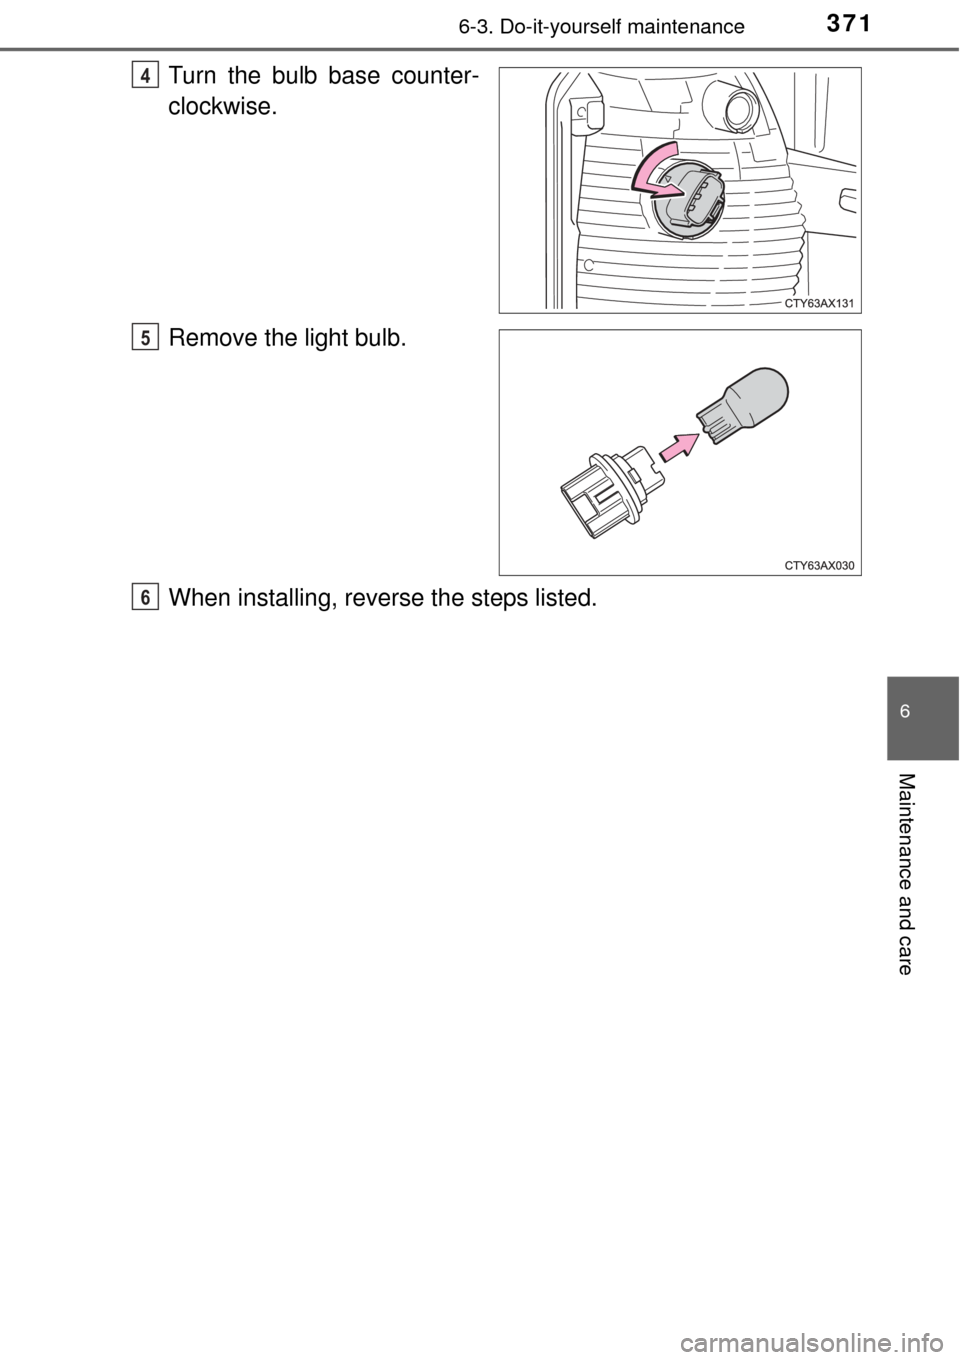
Turn the bulb base counter-
clockwise.
Remove the light bulb.
When installing, reverse the steps listed.4
5
6
Page 373 of 492
3736-3. Do-it-yourself maintenance
6
Maintenance and care
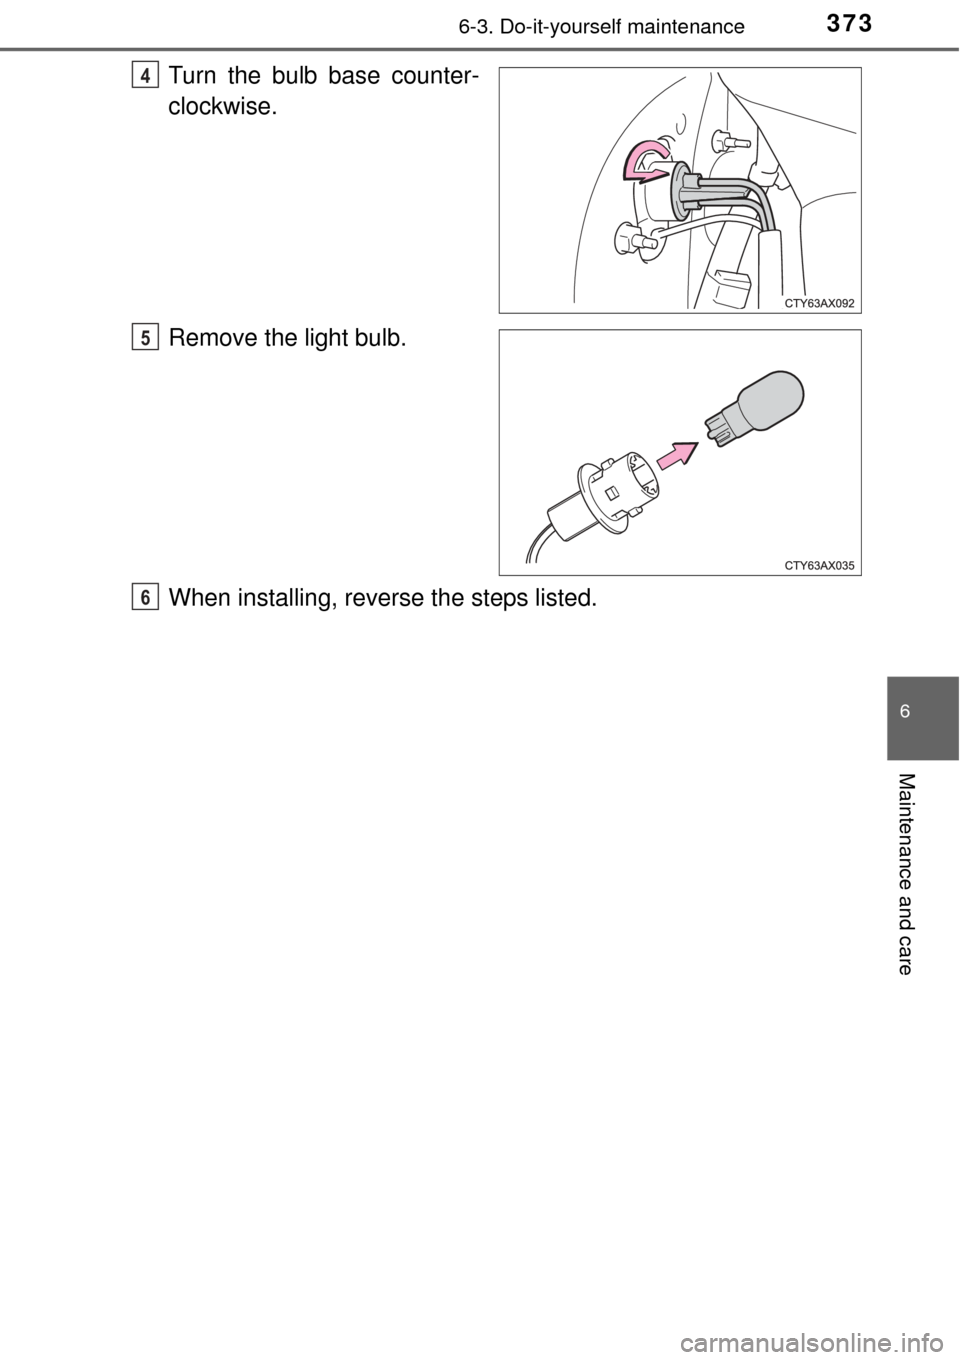
Turn the bulb base counter-
clockwise.
Remove the light bulb.
When installing, reverse the steps listed.4
5
6
Page 374 of 492
3746-3. Do-it-yourself maintenance
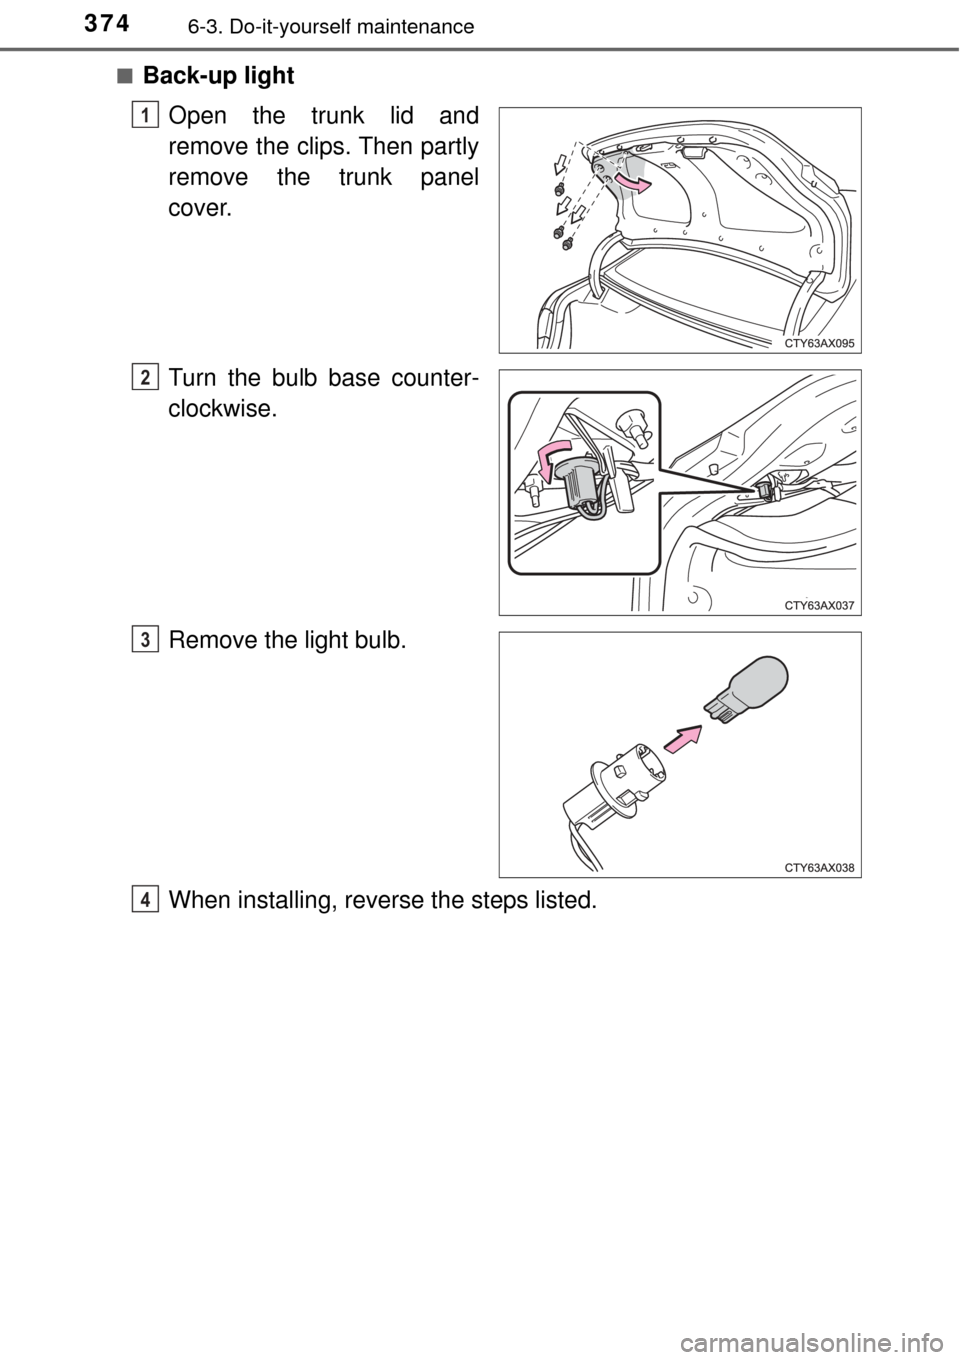
■Back-up lightOpen the trunk lid and
remove the clips. Then partly
remove the trunk panel
cover.
Turn the bulb base counter-
clockwise.
Remove the light bulb.
When installing, reve rse the steps listed.
1
2
3
4
Page 375 of 492
3756-3. Do-it-yourself maintenance
6
Maintenance and care
■Replacing the following bulbs
If any of the lights listed below has burnt out, have it replaced by
your Toyota dealer.
● Headlight low/high beams (LED type)
● Headlight low beams (discharge bulb type)
● Daytime running lights (vehicle s with discharge or LED head-
lights)
● Side marker lights
● Side turn signal lights
● Stop/tail lights
● High mounted stoplight
● Outer foot lights (if equipped)
● License plate light
Page 376 of 492
3766-3. Do-it-yourself maintenance
■Discharge headlights (if equipped)
If voltage to the discharge bulbs is insufficient, the bulbs may not come on, or
may go out temporarily. The discharge bulbs will come on when normal
power is restored.
■ LED light bulbs
The headlight low/high beams (LED ty pe), parking lights/daytime running
lights (vehicles with discharge or LED headlights), side marker lights (vehi-
cles with LED headlights), stop/tail lights, high mounted stoplight, outer foot
lights and license plate light each consist of a number of LEDs. If any of the
LEDs burn out, take your vehicle to your Toyota dealer to have the light
replaced.
■ Condensation build-up on the inside of the lens
Temporary condensation build-up on the inside of the lens does not indicate a
malfunction. Contact your Toyota dealer for more information in the following
situations:
●Large drops of water have built up on the inside of the lens.
● Water has built up inside the lens.
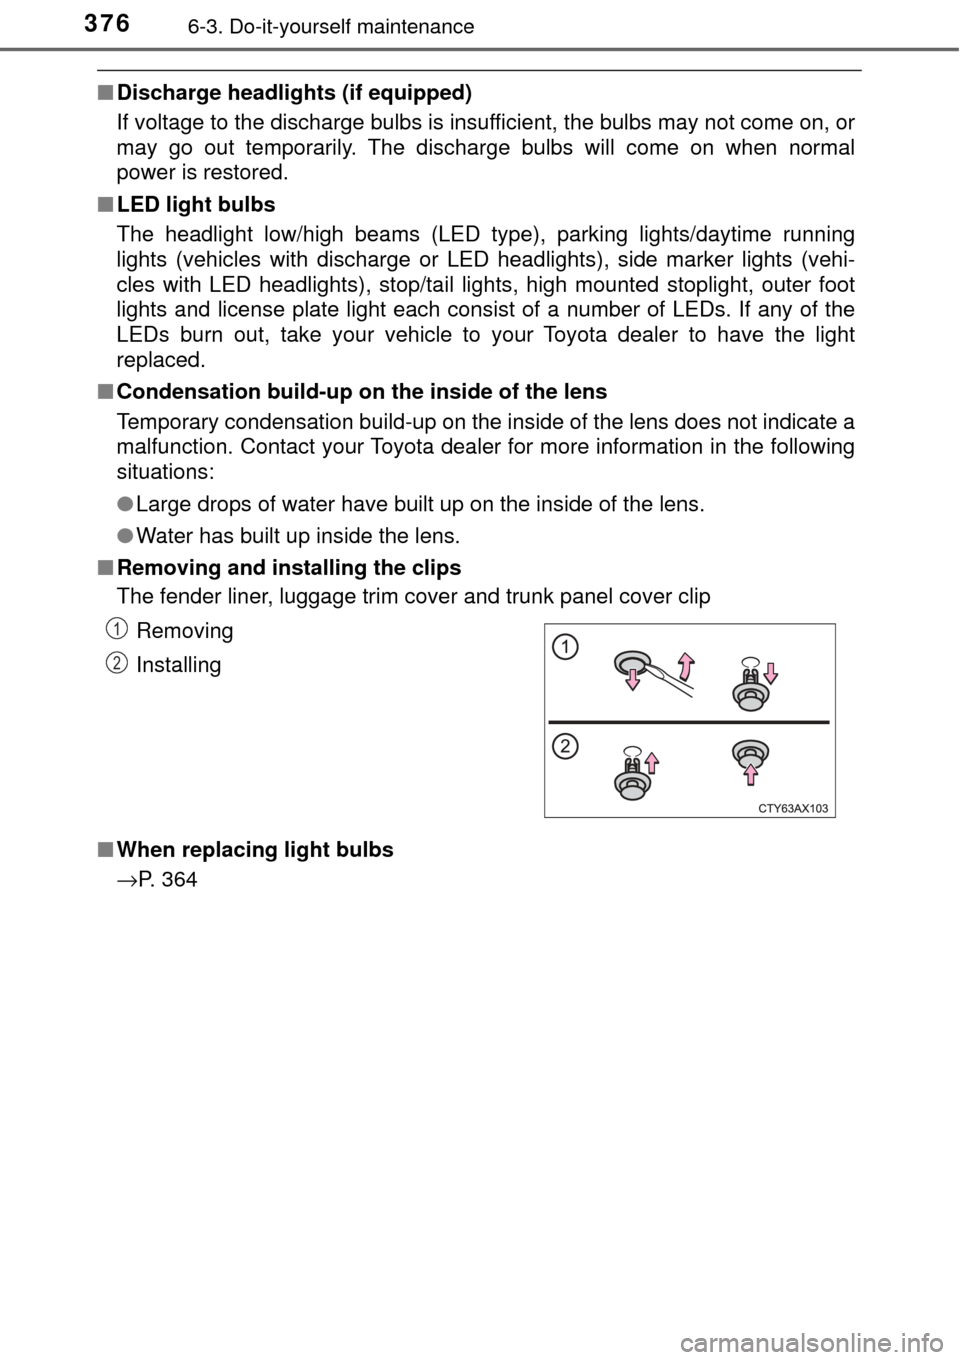
■ Removing and installing the clips
The fender liner, luggage trim cover and trunk panel cover clip
■ When replacing light bulbs
→P. 364Removing
Installing
1
2
Page 377 of 492
3776-3. Do-it-yourself maintenance
6
Maintenance and care
WARNING
■Replacing light bulbs
● Turn off the lights. Do not attempt to replace the bulb immediately after
turning off the lights.
The bulbs become very hot and may cause burns.
● Do not touch the glass portion of the light bulb with bare hands. When it is
unavoidable to hold the glass portion, use and hold with a clean dry cloth
to avoid getting moisture and oils on the bulb.
Also, if the bulb is scratched or dropped, it may blow out or crack.
● Fully install light bulbs and any parts used to secure them. Failure to do so
may result in heat damage, fire, or water entering the headlight unit. This
may damage the headlights or cause condensation to build up on the lens.
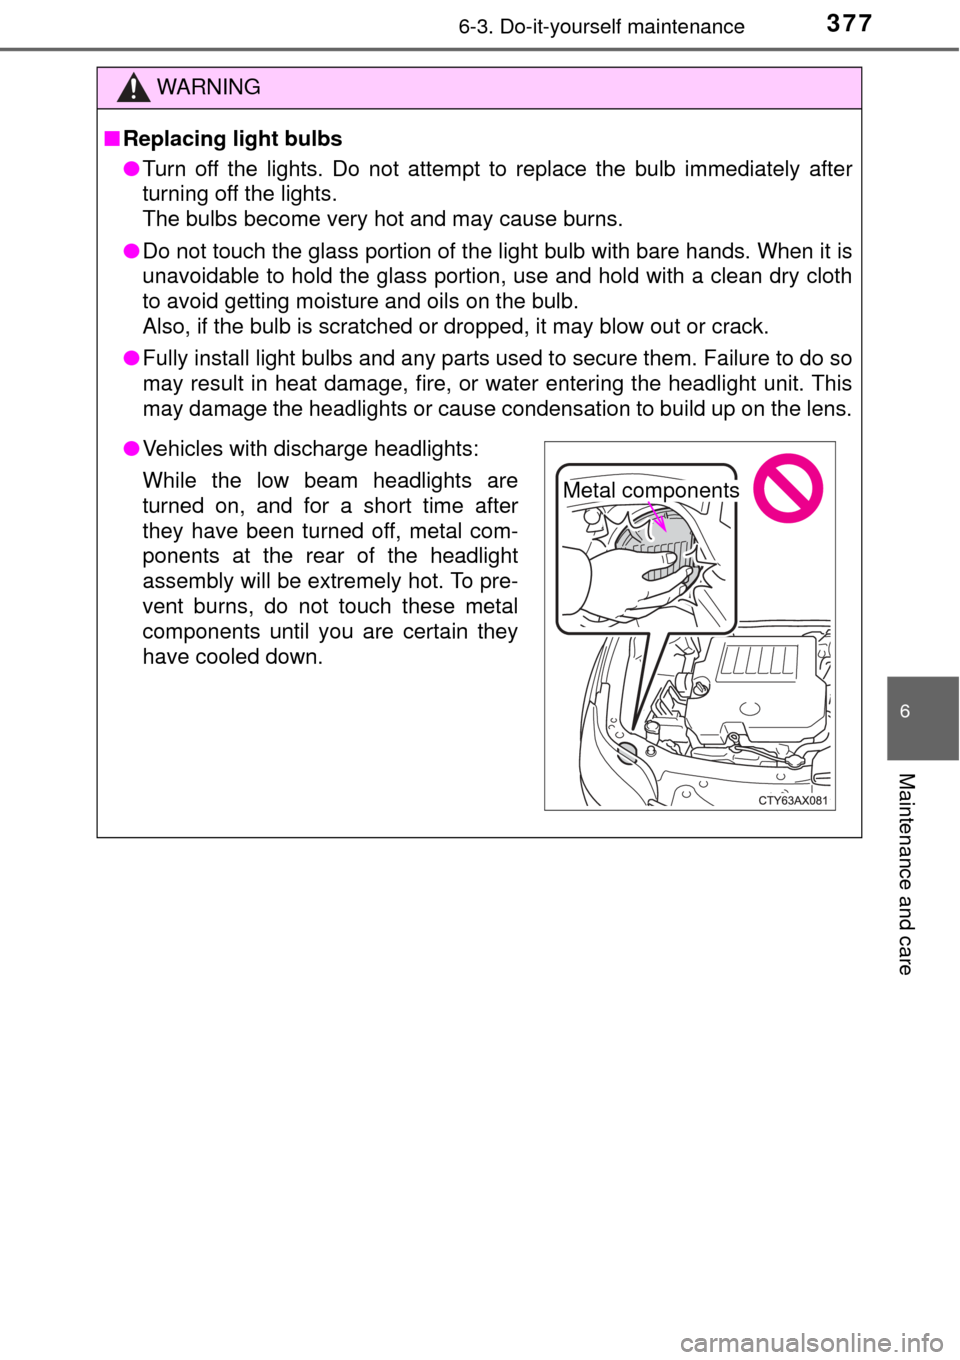
●Vehicles with discharge headlights:
While the low beam headlights are
turned on, and for a short time after
they have been turned off, metal com-
ponents at the rear of the headlight
assembly will be extremely hot. To pre-
vent burns, do not touch these metal
components until you are certain they
have cooled down.
Metal components
Page 378 of 492
3786-3. Do-it-yourself maintenance
WARNING
■Discharge headlights (if equipped)
● Contact your Toyota dealer befor e replacing the discharge headlights
(including light bulbs).
● Do not touch the discharge headlight’s high voltage socket when the head-
lights are turned on.
An extremely high voltage of 30000 V will be discharged and could result
in death or serious injury by electric shock.
● Do not attempt to take apart or repair the headlight bulbs, connectors,
power supply circuits, or related components.
Doing so could result in electric shock and death or serious injury.
■ To prevent damage or fire
● Make sure bulbs are fully seated and locked.
● Check the wattage of the bulb before installing to prevent heat damage.
Page 432 of 492
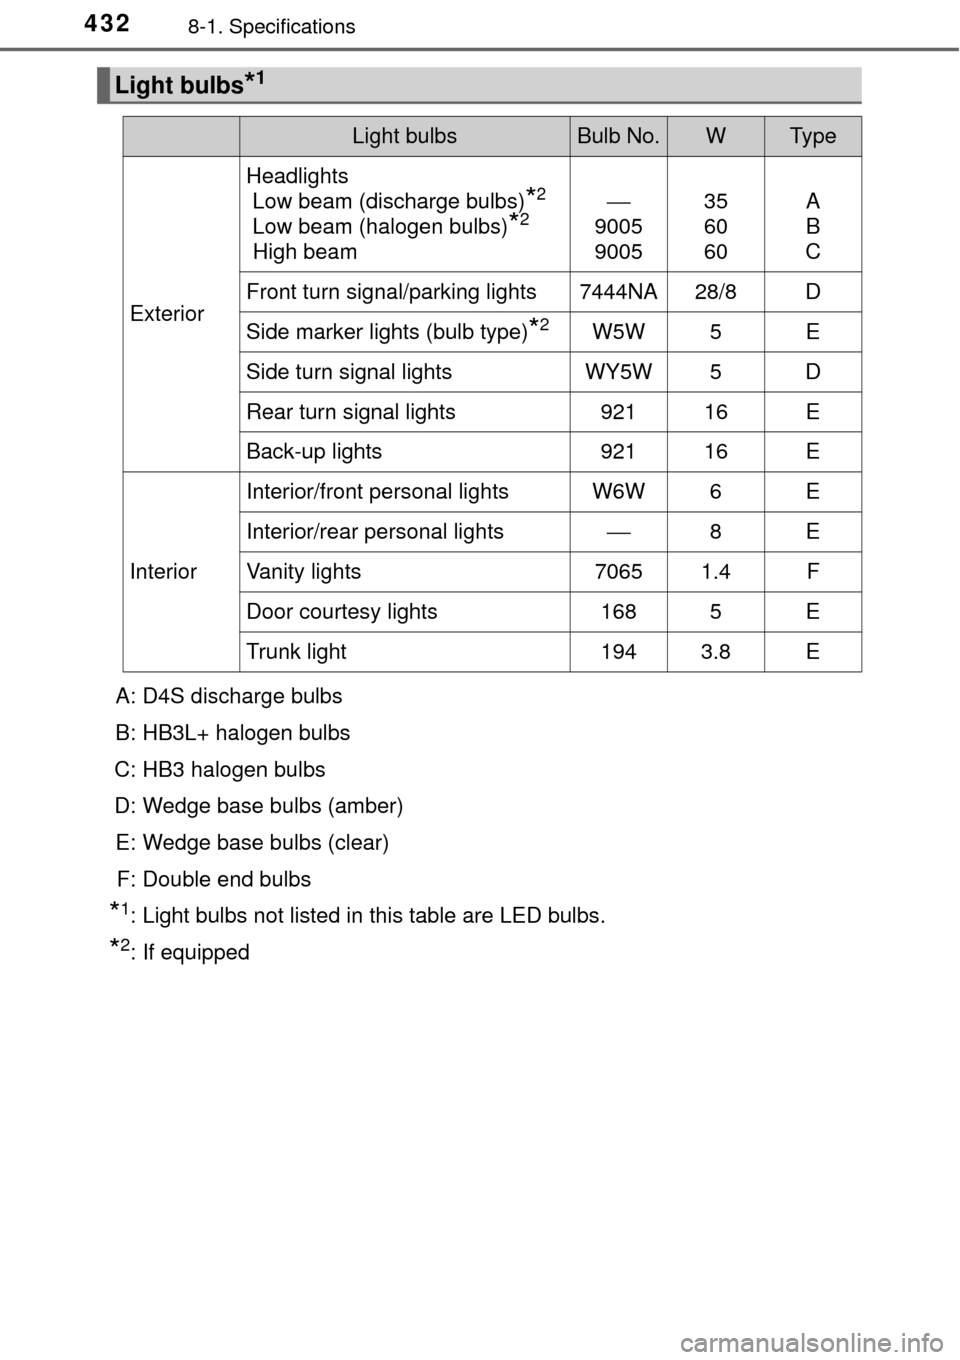
4328-1. Specifications
A: D4S discharge bulbs
B: HB3L+ halogen bulbs
C: HB3 halogen bulbs
D: Wedge base bulbs (amber)
E: Wedge base bulbs (clear) F: Double end bulbs
*1: Light bulbs not listed in this table are LED bulbs.
*2: If equipped
Light bulbs*1
Light bulbsBulb No.WTy p e
Exterior
Headlights Low beam (discharge bulbs)
*2
Low beam (halogen bulbs)
*2
High beam
⎯
9005
900535
60
60A
B
C
Front turn signal/parking lights 7444NA28/8D
Side marker lights (bulb type)*2W5W5E
Side turn signal lights WY5W5D
Rear turn signal lights92116E
Back-up lights92116E
InteriorInterior/front personal lights W6W 6 E
Interior/rear personal lights
⎯8EVanity lights70651.4F
Door courtesy lights1685E
Trunk light1943.8E
Page 479 of 492
479Alphabetical index
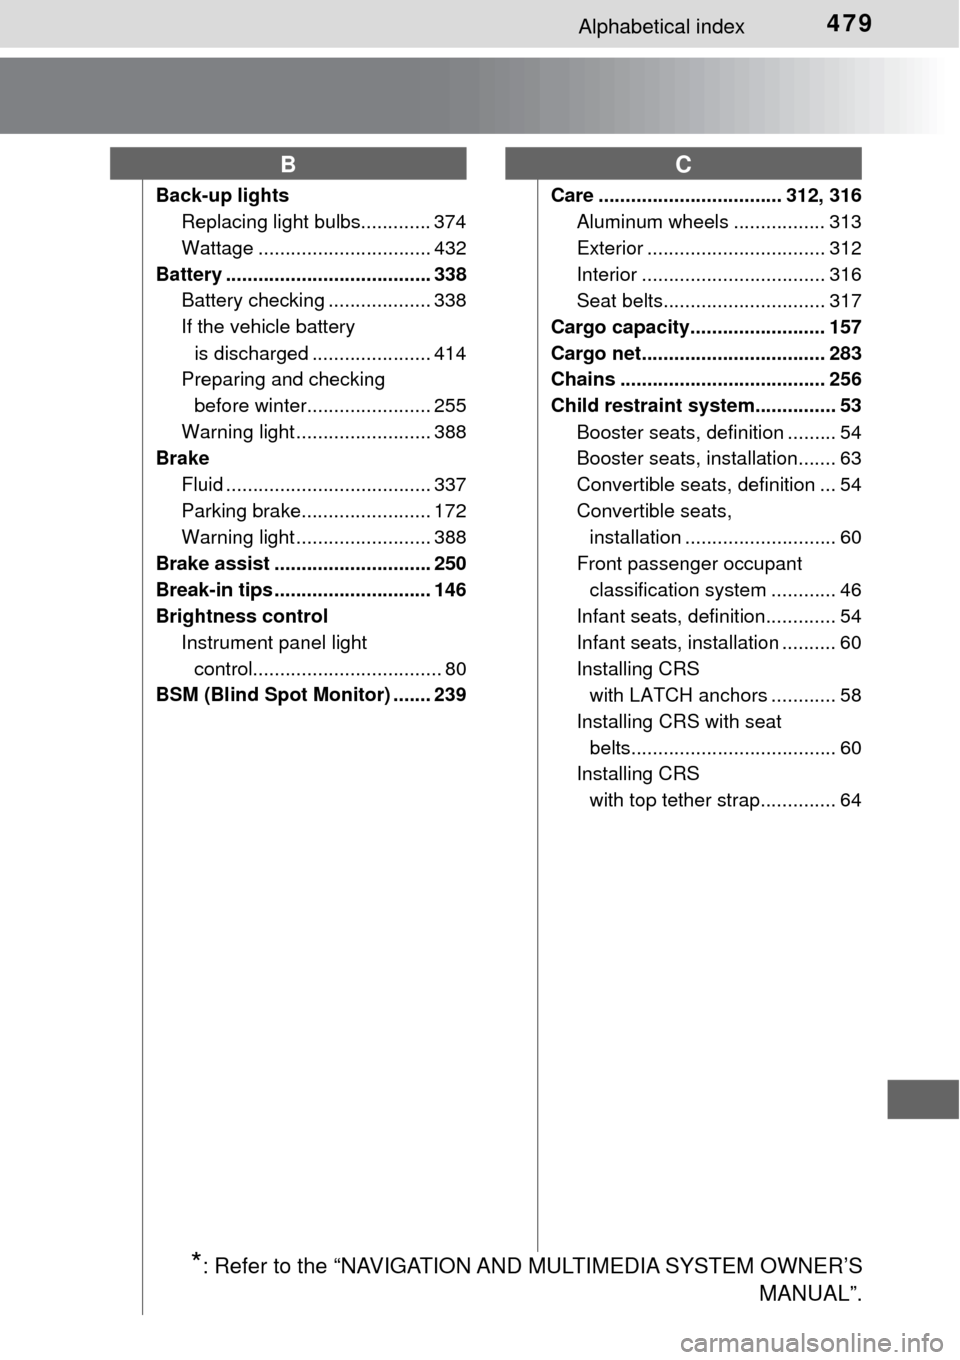
Back-up lightsReplacing light bulbs............. 374
Wattage ................................ 432
Battery ...................................... 338 Battery checking ................... 338
If the vehicle battery
is discharged ...................... 414
Preparing and checking
before winter....................... 255
Warning light ......................... 388
Brake
Fluid ...................................... 337
Parking brake........................ 172
Warning light ......................... 388
Brake assist ............................. 250
Break-in tips ............................. 146
Brightness control Instrument panel light control................................... 80
BSM (Blind Spot Monitor) ....... 239 Care .................................. 312, 316
Aluminum wheels ................. 313
Exterior ................................. 312
Interior .................................. 316
Seat belts.............................. 317
Cargo capacity......................... 157
Cargo net.................................. 283
Chains ...................................... 256
Child restraint system............... 53 Booster seats, definition ......... 54
Booster seats, installation....... 63
Convertible seats, definition ... 54
Convertible seats, installation ............................ 60
Front passenger occupant classification system ............ 46
Infant seats, definition............. 54
Infant seats, installation .......... 60
Installing CRS with LATCH anchors ............ 58
Installing CRS with seat belts...................................... 60
Installing CRS
with top tether strap.............. 64
BC
*: Refer to the “NAVIGATION AND MULTIMEDIA SYSTEM OWNER’S MANUAL”.