clock TOYOTA AVALON HYBRID 2018 Owners Manual (in English)
[x] Cancel search | Manufacturer: TOYOTA, Model Year: 2018, Model line: AVALON HYBRID, Model: TOYOTA AVALON HYBRID 2018Pages: 492, PDF Size: 7.3 MB
Page 4 of 492

TABLE OF CONTENTS4
5-1. Using the air conditioning system
and defogger
Automatic air conditioning system............................. 274
Seat heaters/seat ventilators....................... 283
5-2. Using the interior lights Interior lights list ................ 286
• Personal/interior light main switch ................... 287
• Personal/interior lights ............................. 287
• Ambient lights ............... 288
5-3. Using the storage features
List of storage features...... 289
• Glove box...................... 290
• Console box .................. 291
• Cup holders .................. 292
• Auxiliary boxes .............. 293
Trunk features ................... 297 5-4. Other interior features
Other interior features........ 299
• Sun visors ..................... 299
• Vanity mirrors ................ 299
• Clock ............................. 300
• Outside temperature display ........................... 301
• Power outlets ................ 302
• Armrest.......................... 304
• Rear sunshade .............. 304
• Coat hooks .................... 306
• Assist grips .................... 306
Garage door opener .......... 307
Safety Connect .................. 314
Compass ........................... 320
5Interior features
Page 19 of 492
19Pictorial index
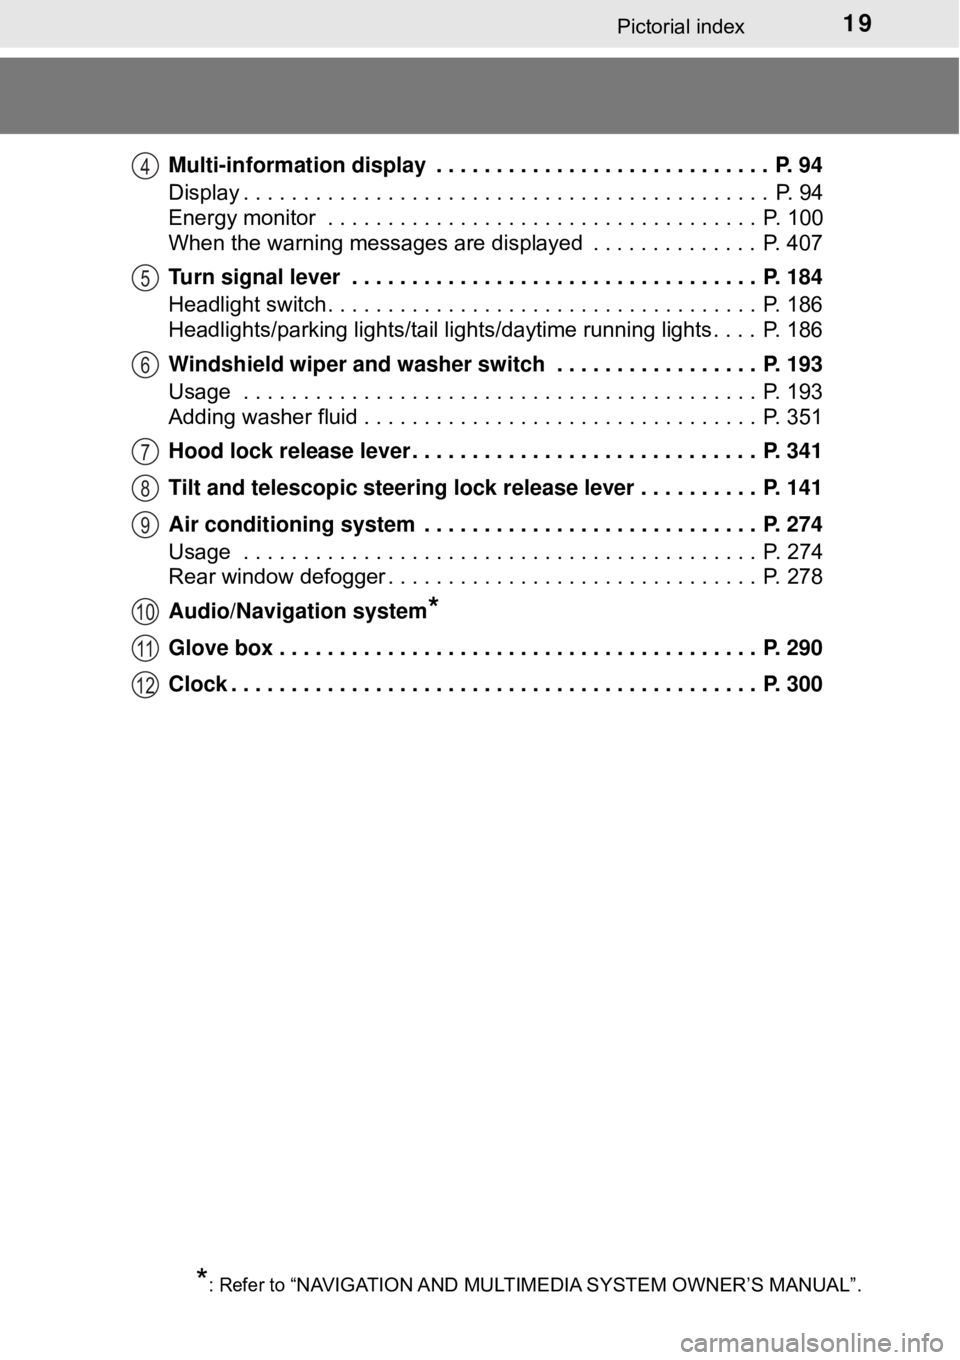
Multi-information display . . . . . . . . . . . . . . . . . . . . . . . . . . . . P. 94
Display . . . . . . . . . . . . . . . . . . . . . . . . . . . . . . . . . . . . . . . . . . . . P. 94
Energy monitor . . . . . . . . . . . . . . . . . . . . . . . . . . . . . . . . . . . . P. 100
When the warning messages are displayed . . . . . . . . . . . . . . P. 407
Turn signal lever . . . . . . . . . . . . . . . . . . . . . . . . . . . . . . . . . . P. 184
Headlight switch . . . . . . . . . . . . . . . . . . . . . . . . . . . . . . . . . . . . P. 186
Headlights/parking lights/tail lights/daytime running lights . . . . P. 186
Windshield wiper and washer switch . . . . . . . . . . . . . . . . . P. 193
Usage . . . . . . . . . . . . . . . . . . . . . . . . . . . . . . . . . . . . . . . . . . . P. 193
Adding washer fluid . . . . . . . . . . . . . . . . . . . . . . . . . . . . . . . . . P. 351
Hood lock release lever. . . . . . . . . . . . . . . . . . . . . . . . . . . . . P. 341
Tilt and telescopic steering lock release lever . . . . . . . . . . P. 141
Air conditioning system . . . . . . . . . . . . . . . . . . . . . . . . . . . . P. 274
Usage . . . . . . . . . . . . . . . . . . . . . . . . . . . . . . . . . . . . . . . . . . . P. 274
Rear window defogger . . . . . . . . . . . . . . . . . . . . . . . . . . . . . . . P. 278
Audio/Navigation system
*
Glove box . . . . . . . . . . . . . . . . . . . . . . . . . . . . . . . . . . . . . . . . P. 290
Clock . . . . . . . . . . . . . . . . . . . . . . . . . . . . . . . . . . . . . . . . . . . . P. 300
*: Refer to “NAVIGATION AND MULTIMEDIA SYSTEM OWNER’S MANUAL”.
4
5
6
7
8
9
10
11
12
Page 92 of 492
922. Instrument cluster
■The meters and display illuminate when
The power switch is in ON mode.
■ The brightness of the in strument panel lights
● When the headlight switch is turned to on, the brightness will be reduced
slightly unless the control knob is turned fully clockwise.
● When the knob is turned fully clockwise, the display audio/navigation sys-
tem screen will always be in day mode regardless of the headlight switch
position.
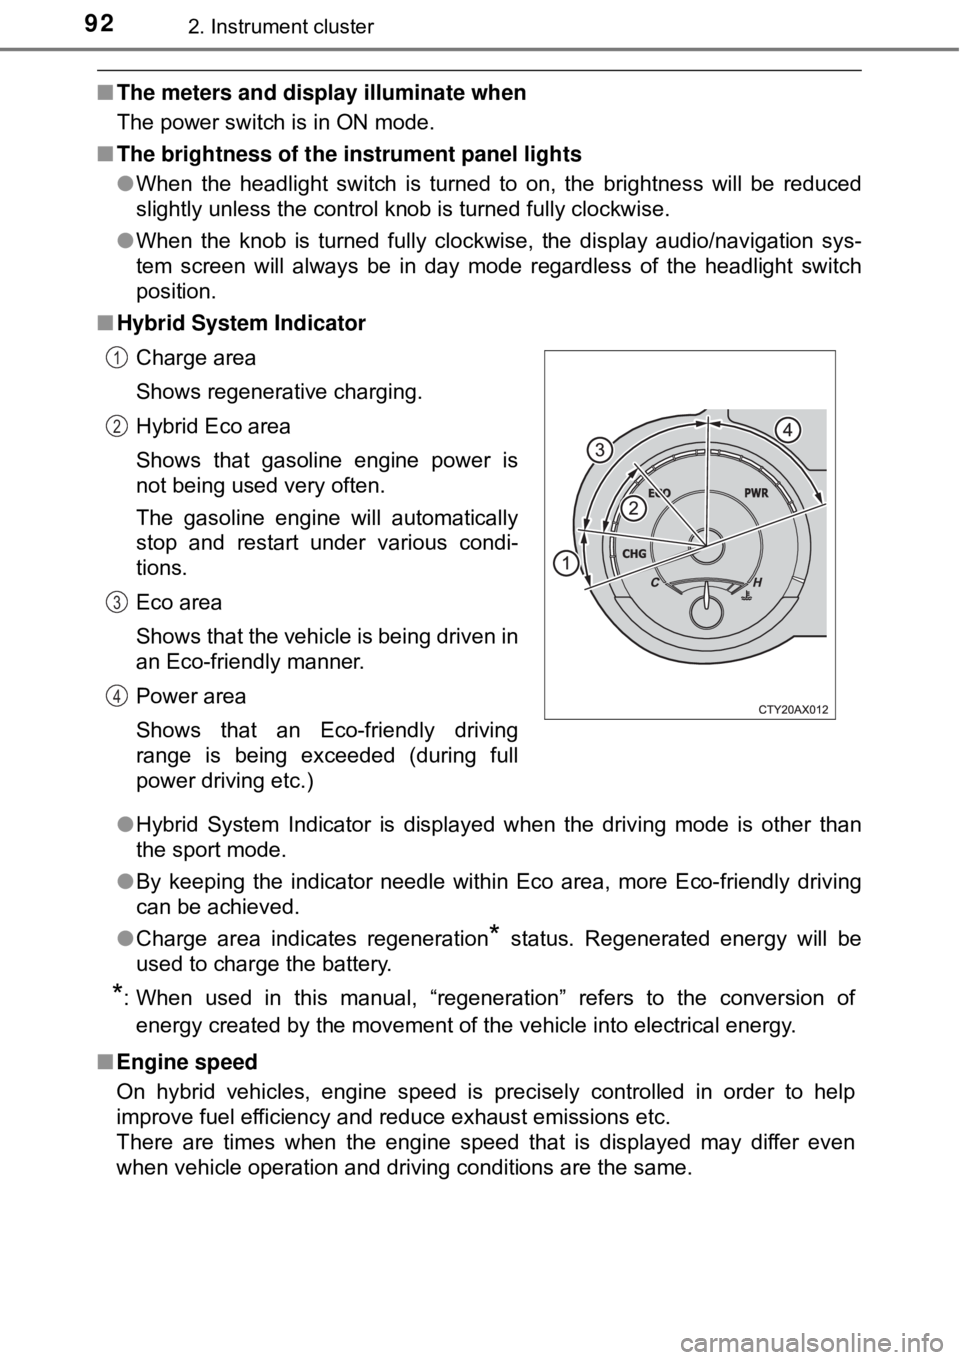
■ Hybrid System Indicator
●Hybrid System Indicator is displayed when the driving mode is other than
the sport mode.
● By keeping the indicator needle within Eco area, more Eco-friendly driving
can be achieved.
● Charge area indicates regeneration
* status. Regenerated energy will be
used to charge the battery.
*: When used in this manual, “regeneration” refers to the conversion of
energy created by the movement of the vehicle into electrical energy.
■ Engine speed
On hybrid vehicles, engine speed is precisely controlled in order to help
improve fuel efficiency and reduce exhaust emissions etc.
There are times when the engine speed that is displayed may differ even
when vehicle operation and driving conditions are the same.Charge area
Shows regenerative charging.
Hybrid Eco area
Shows that gasoline engine power is
not being used very often.
The gasoline engine will automatically
stop and restart under various condi-
tions.
Eco area
Shows that the vehicle is being driven in
an Eco-friendly manner.
Power area
Shows that an Eco-friendly driving
range is being exceeded (during full
power driving etc.)
1
2
3
4
Page 273 of 492

273
Interior features5
5-1. Using the air conditioning system
and defogger
Automatic air conditioning system............................. 274
Seat heaters/seat ventilators........................ 283
5-2. Using the interior lights Interior lights list ................ 286
• Personal/interior light main switch ................... 287
• Personal/interior lights ............................. 287
• Ambient lights ............... 288
5-3. Using the storage features
List of storage features ..... 289
• Glove box...................... 290
• Console box .................. 291
• Cup holders .................. 292
• Auxiliary boxes.............. 293
Trunk features ................... 297 5-4. Other interior features
Other interior features ....... 299
• Sun visors ..................... 299
• Vanity mirrors................ 299
• Clock ............................. 300
• Outside temperature display........................... 301
• Power outlets ................ 302
• Armrest ......................... 304
• Rear sunshade ............. 304
• Coat hooks.................... 306
• Assist grips ................... 306
Garage door opener.......... 307
Safety Connect ................. 314
Compass ........................... 320
Page 277 of 492
2775-1. Using the air conditioning system and defogger
5
Interior features
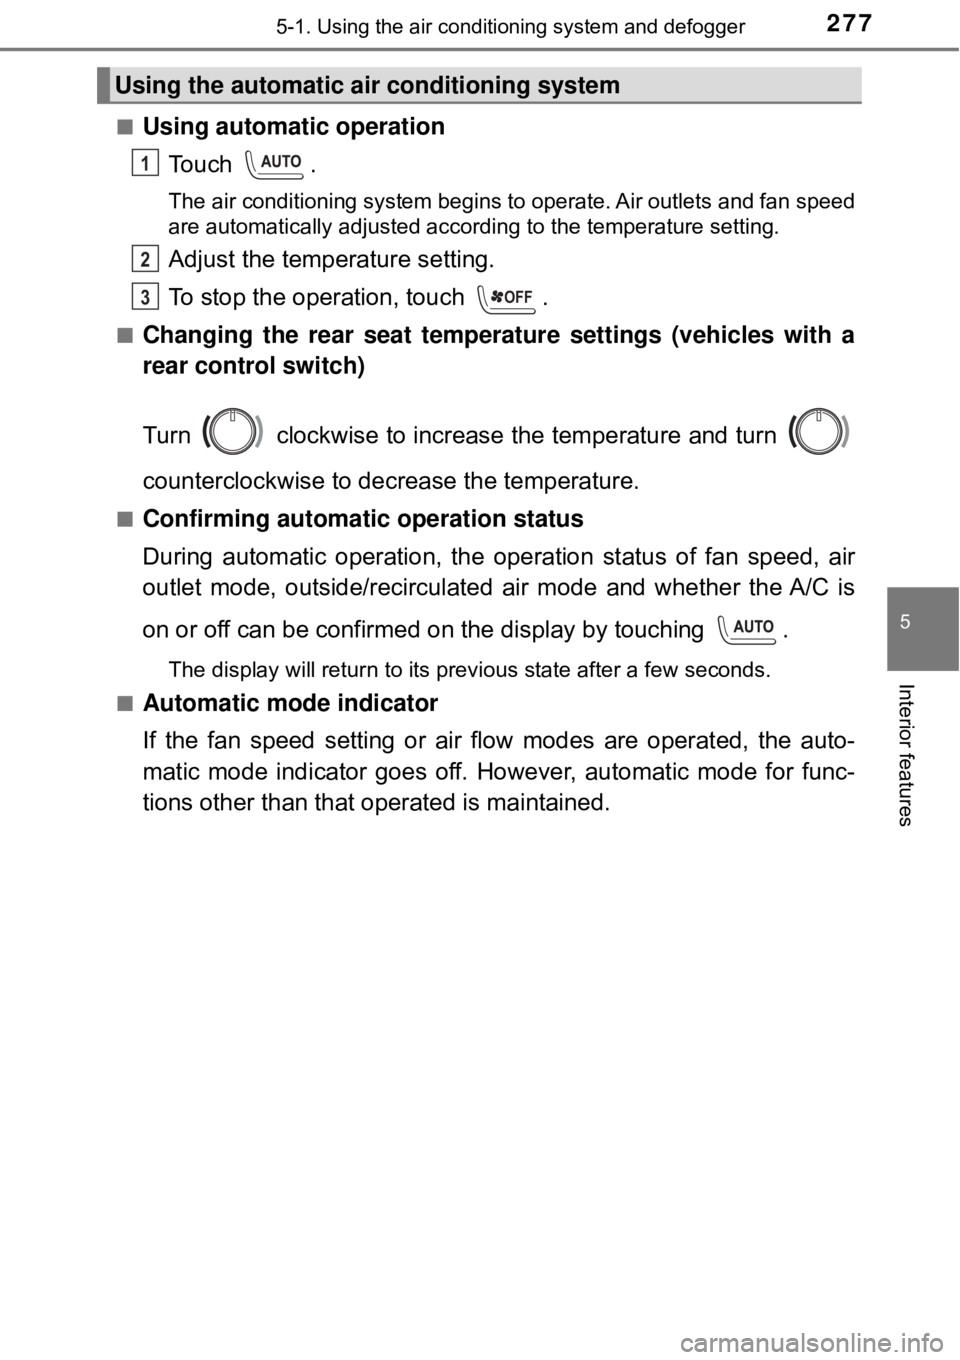
■Using automatic operation
Touch .
The air conditioning system begins to operate. Air outlets and fan speed
are automatically adjusted according to the temperature setting.
Adjust the temperature setting.
To stop the operation, touch .
■Changing the rear seat temperature settings (vehicles with a
rear control switch)
Turn clockwise to increase the temperature and turn
counterclockwise to decrease the temperature.
■Confirming automatic operation status
During automatic operati on, the operation status of fan speed, air
outlet mode, outside/recirculated air mode and whether the A/C is
on or off can be confirmed on the display by touching .
The display will return to its previous state after a few seconds.
■
Automatic mode indicator
If the fan speed setting or air fl ow modes are operated, the auto-
matic mode indicator goes off. However, automatic mode for func-
tions other than that operated is maintained.
Using the automatic air conditioning system
1
2
3OFF
Page 284 of 492
2845-1. Using the air conditioning system and defogger
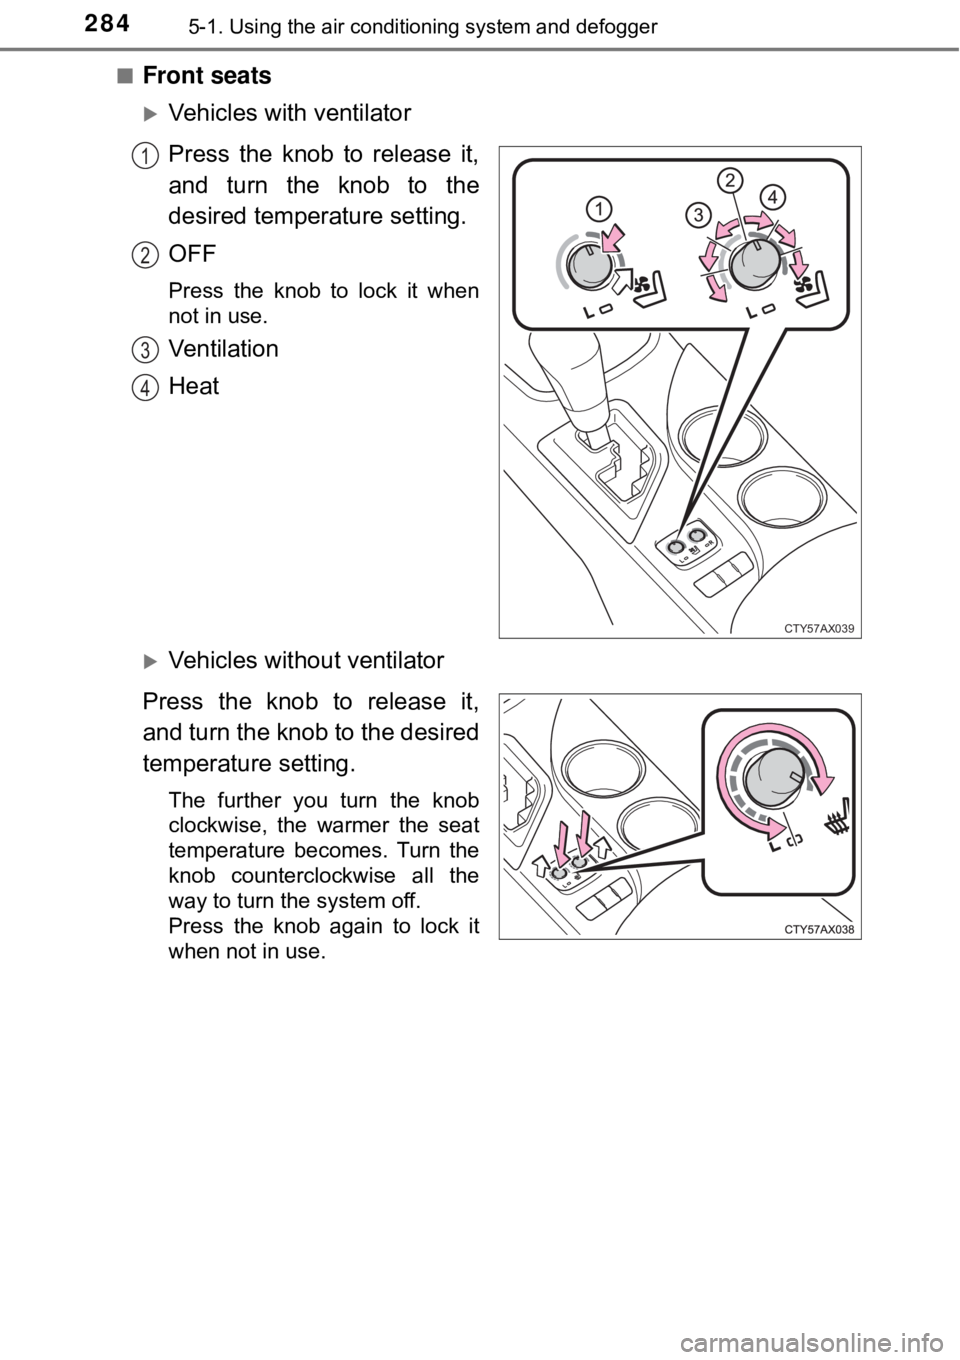
■Front seats
Vehicles with ventilator
Press the knob to release it,
and turn the knob to the
desired temperature setting.
OFF
Press the knob to lock it when
not in use.
Ventilation
Heat
Vehicles without ventilator
Press the knob to release it,
and turn the knob to the desired
temperature setting.
The further you turn the knob
clockwise, the warmer the seat
temperature becomes. Turn the
knob counterclockwise all the
way to turn the system off.
Press the knob again to lock it
when not in use.
CTY57AX039
1
2
3
4
Page 300 of 492
3005-4. Other interior features
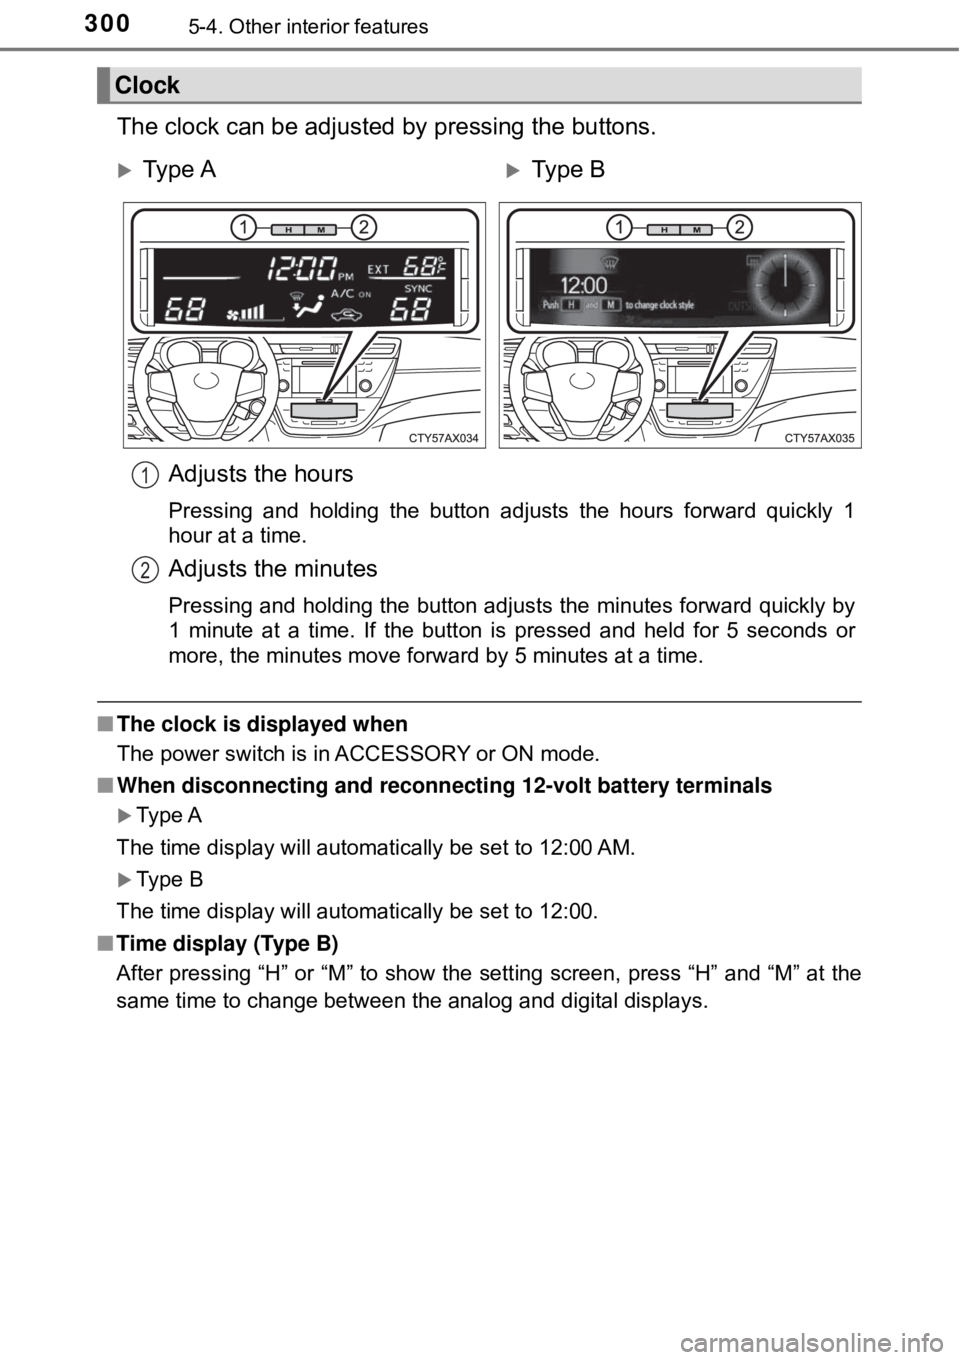
The clock can be adjusted by pressing the buttons.
■The clock is displayed when
The power switch is in ACCESSORY or ON mode.
■ When disconnecting and reconnect ing 12-volt battery terminals
Type A
The time display will automatically be set to 12:00 AM.
Type B
The time display will automatically be set to 12:00.
■ Time display (Type B)
After pressing “H” or “M” to show the setting screen, press “H” and “M” at the
same time to change between the analog and digital displays.
Clock
Ty p e AType B
Adjusts the hours
Pressing and holding the button adjusts the hours forward quickly 1
hour at a time.
Adjusts the minutes
Pressing and holding the button adjusts the minutes forward quickly by
1 minute at a time. If the button is pressed and held for 5 seconds or
more, the minutes move forward by 5 minutes at a time.
1
2
Page 345 of 492
3456-3. Do-it-yourself maintenance
6
Maintenance and care
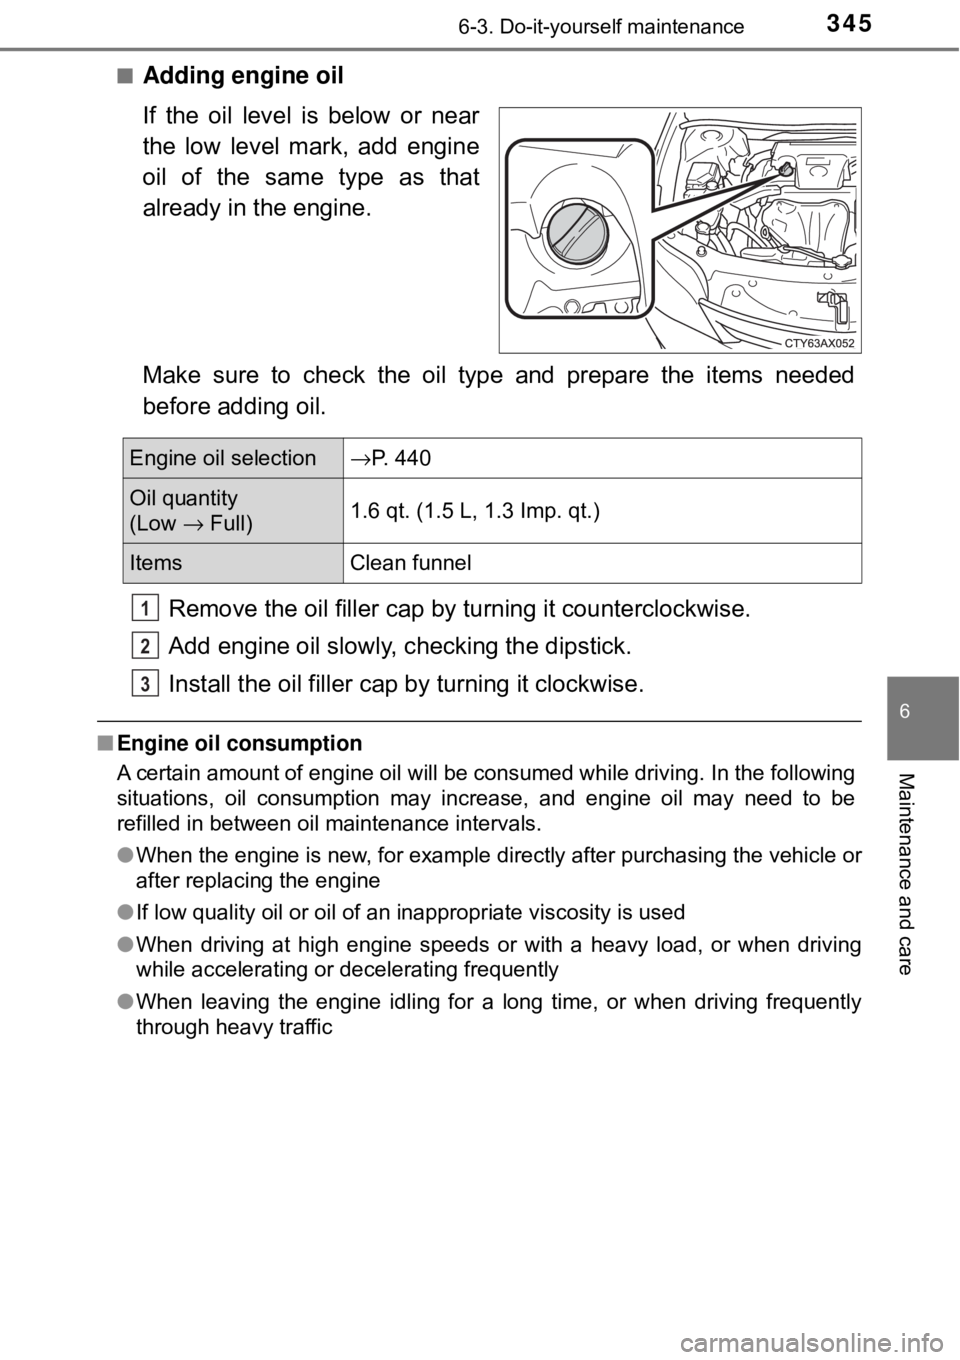
■Adding engine oil
If the oil level is below or near
the low level mark, add engine
oil of the same type as that
already in the engine.
Make sure to check the oil type and prepare the items needed
before adding oil.Remove the oil filler cap by turning it counterclockwise.
Add engine oil slowly, c hecking the dipstick.
Install the oil filler cap by turning it clockwise.
■Engine oil consumption
A certain amount of engine oil will be consumed while driving. In the following
situations, oil consumption may increase, and engine oil may need to be
refilled in between oil maintenance intervals.
●When the engine is new, for example directly after purchasing the vehicle or
after replacing the engine
● If low quality oil or oil of an inappropriate viscosity is used
● When driving at high engine speeds or with a heavy load, or when driving
while accelerating or decelerating frequently
● When leaving the engine idling for a long time, or when driving frequently
through heavy traffic
Engine oil selection →P. 440
Oil quantity
(Low → Full) 1.6 qt. (1.5 L, 1.3 Imp. qt.)
Items
Clean funnel
1
2
3
Page 380 of 492
3806-3. Do-it-yourself maintenance
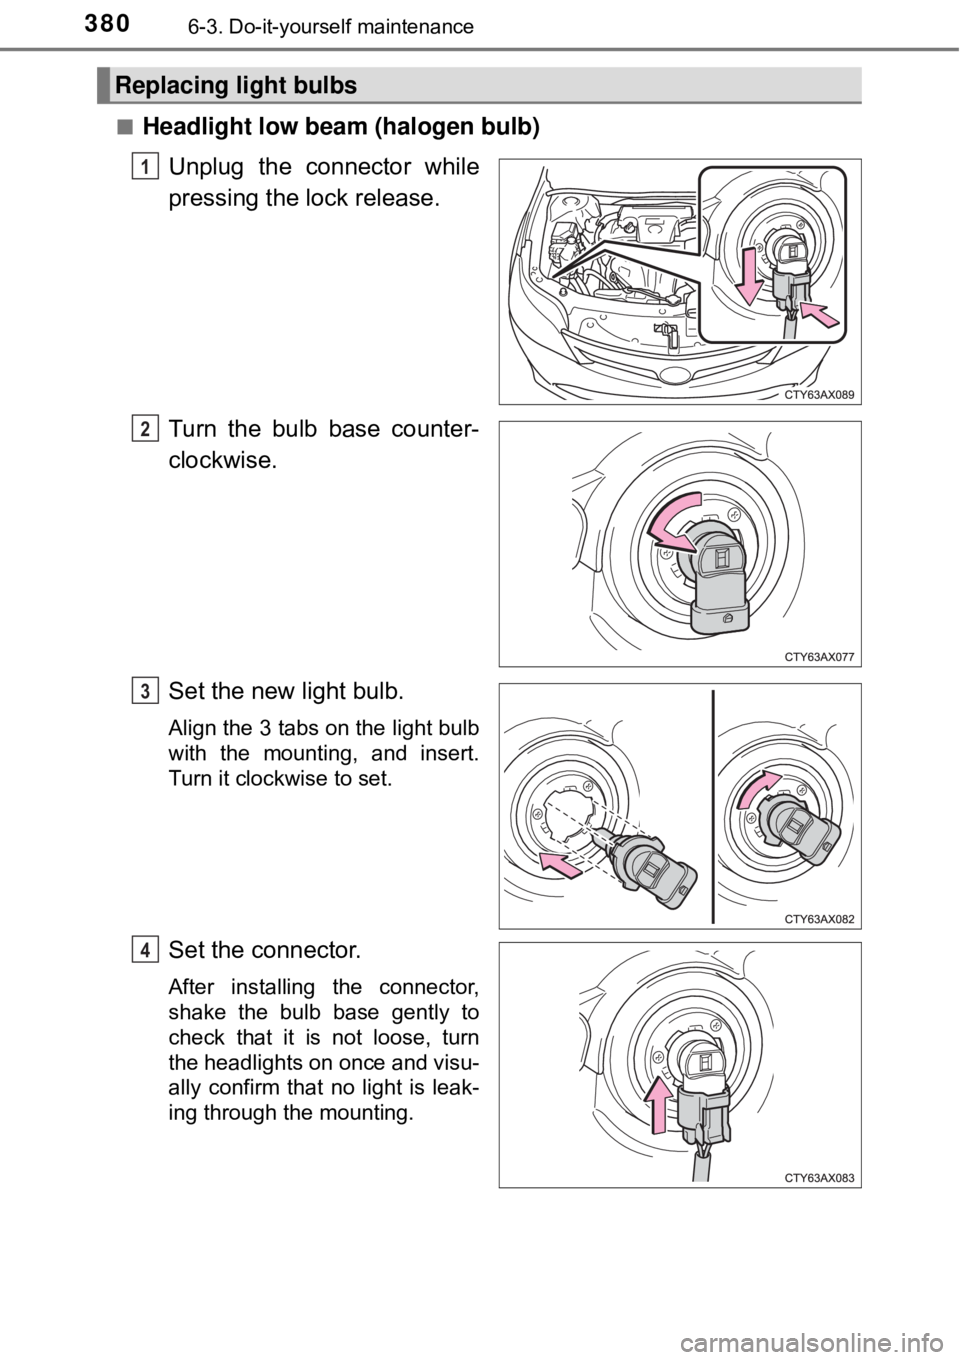
■Headlight low beam (halogen bulb)Unplug the connector while
pressing the lock release.
Turn the bulb base counter-
clockwise.
Set the new light bulb.
Align the 3 tabs on the light bulb
with the mounting, and insert.
Turn it clockwise to set.
Set the connector.
After installing the connector,
shake the bulb base gently to
check that it is not loose, turn
the headlights on once and visu-
ally confirm that no light is leak-
ing through the mounting.
Replacing light bulbs
1
2
3
4
Page 381 of 492
3816-3. Do-it-yourself maintenance
6
Maintenance and care
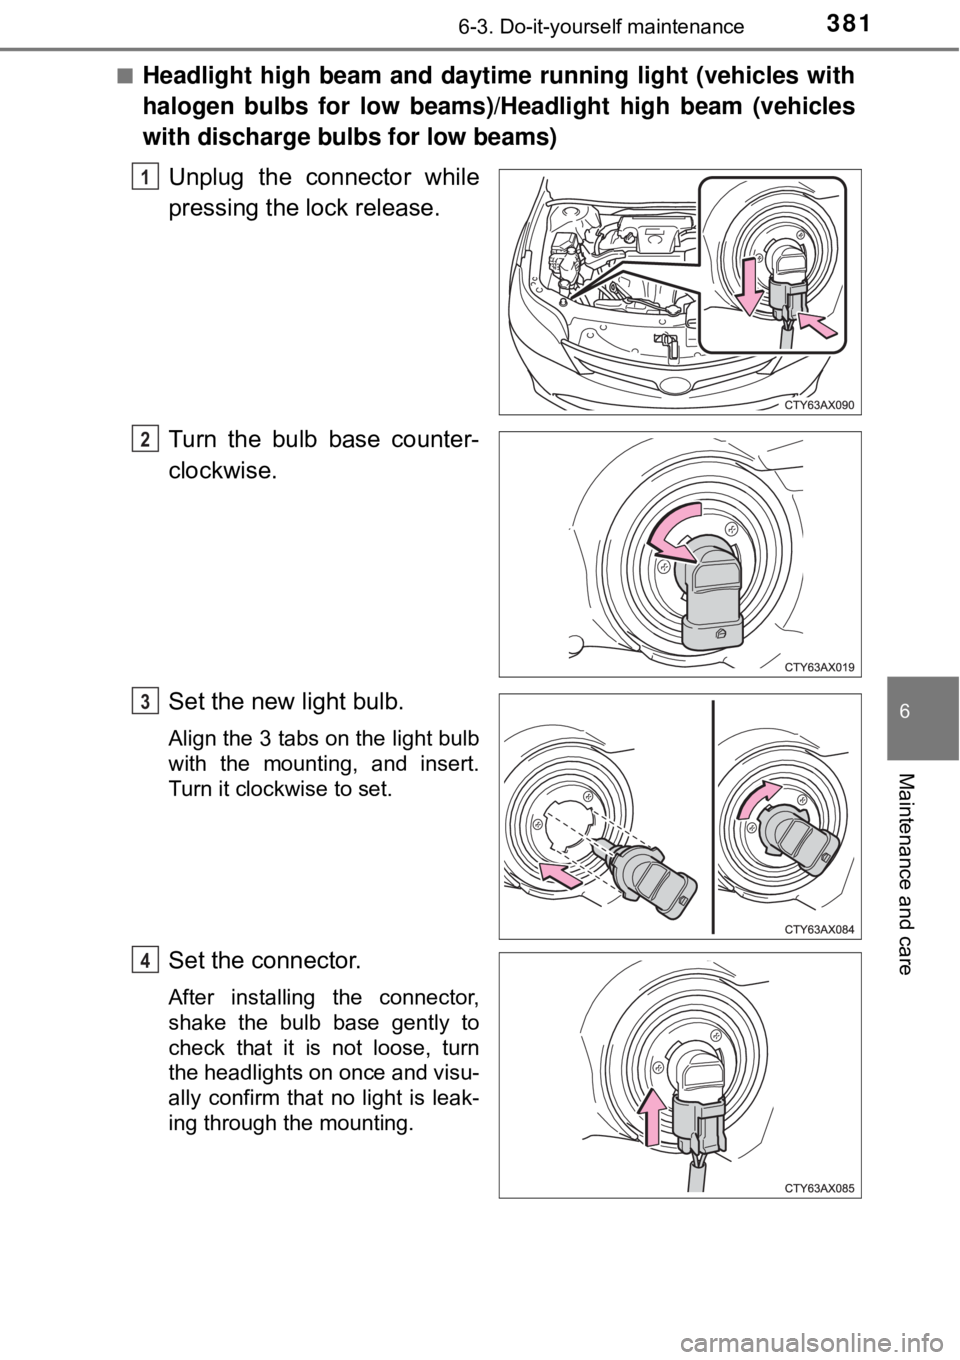
■Headlight high beam and daytime running light (vehicles with
halogen bulbs for low beams)/Headlight high beam (vehicles
with discharge bulbs for low beams)
Unplug the connector while
pressing the lock release.
Turn the bulb base counter-
clockwise.
Set the new light bulb.
Align the 3 tabs on the light bulb
with the mounting, and insert.
Turn it clockwise to set.
Set the connector.
After installing the connector,
shake the bulb base gently to
check that it is not loose, turn
the headlights on once and visu-
ally confirm that no light is leak-
ing through the mounting.
1
2
3
4