TOYOTA AVALON HYBRID 2019 Owners Manual (in English)
Manufacturer: TOYOTA, Model Year: 2019, Model line: AVALON HYBRID, Model: TOYOTA AVALON HYBRID 2019Pages: 556, PDF Size: 9.73 MB
Page 151 of 556
1513-3. Adjusting the seats
3
Operation of each component
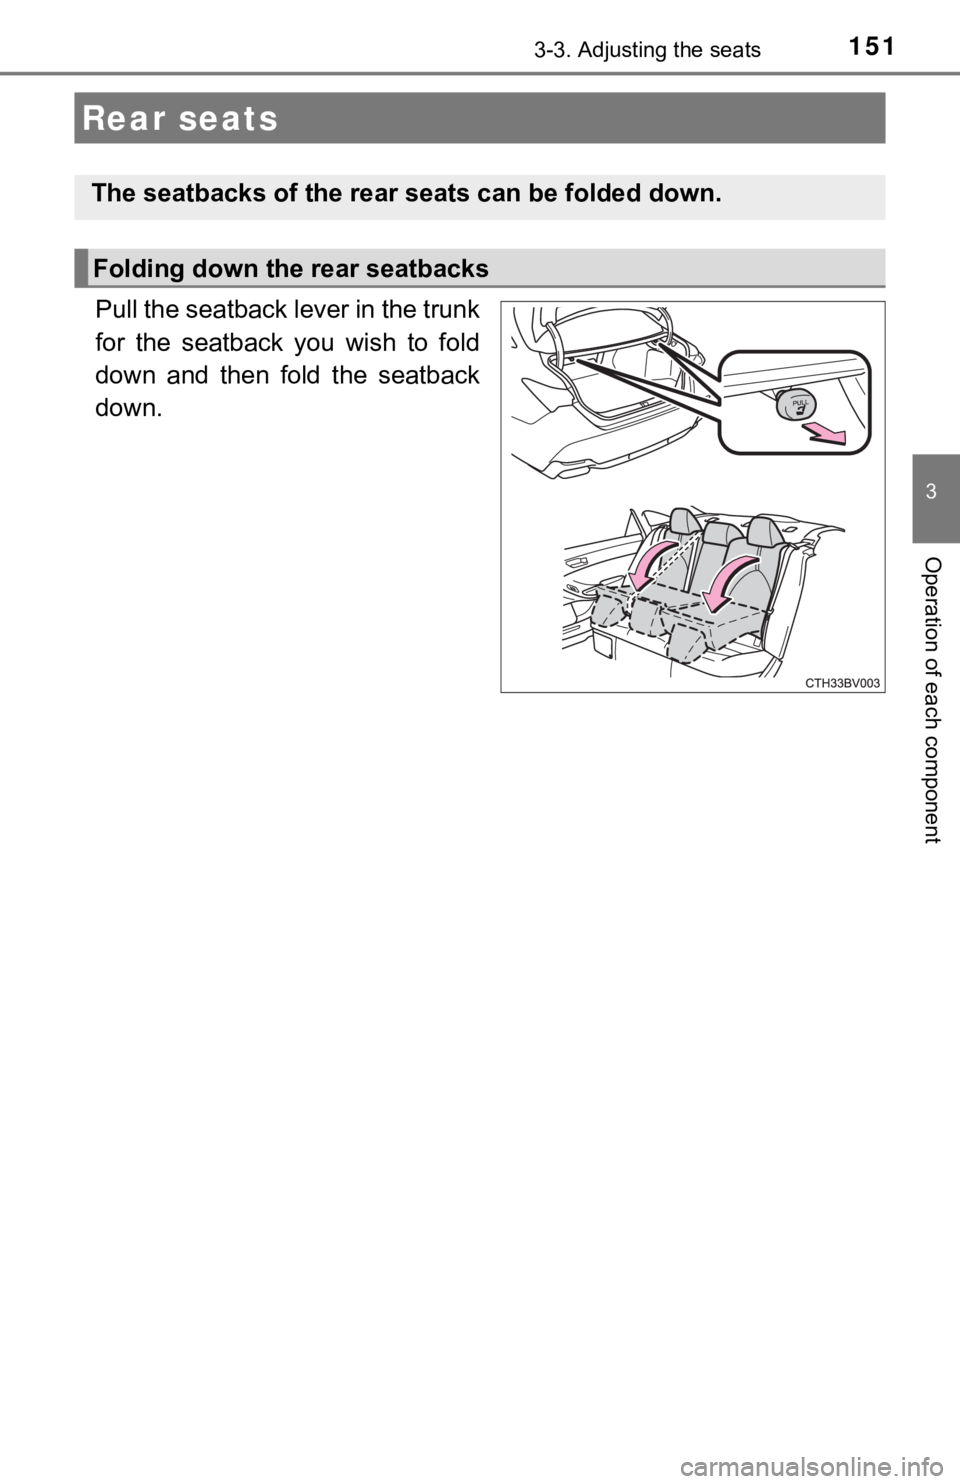
Pull the seatback lever in the trunk
for the seatback you wish to fold
down and then fold the seatback
down.
Rear seats
The seatbacks of the rear seats can be folded down.
Folding down the rear seatbacks
Page 152 of 556
1523-3. Adjusting the seats
WARNING
■When folding the seatbacks down
Observe the following precautions. Failure to do so may result in death or
serious injury.
● Do not fold the seatbacks down while driving.
● Stop the vehicle on level ground, set the parking brake and shi ft the shift
lever to P.
● Do not allow anyone to sit on a folded seatback or in the trunk while driv-
ing.
● Do not allow children to enter the trunk.
■ When returning the seat t o its original position
● Ensure that the seat belt does not get caught between or behind the seats.
● If the seat belt has been released from its guide, pass the sea t belt through
its guide. ( P. 30)
■ Seat adjustment
Be careful not to get hands or feet pinched between the rear co nsole box
and the rear seat when folding down the rear seatback.
■ After returning the seatback to the upright position
Observe the following precautions. Failure to do so may result in death or
serious injury.
● Make sure the seatback is securely locked by pressing it forwar d and rear-
ward on the top.
● Check that the seat belts are not twisted or caught in the seat back.
● Make sure that the seat belt is passed through its guide.
NOTICE
■When the right seatback is folded down
Make sure the luggage loaded in the enlarged trunk will not dam age the
webbing of the rear center seat belt.
Page 153 of 556
1533-3. Adjusting the seats
3
Operation of each component
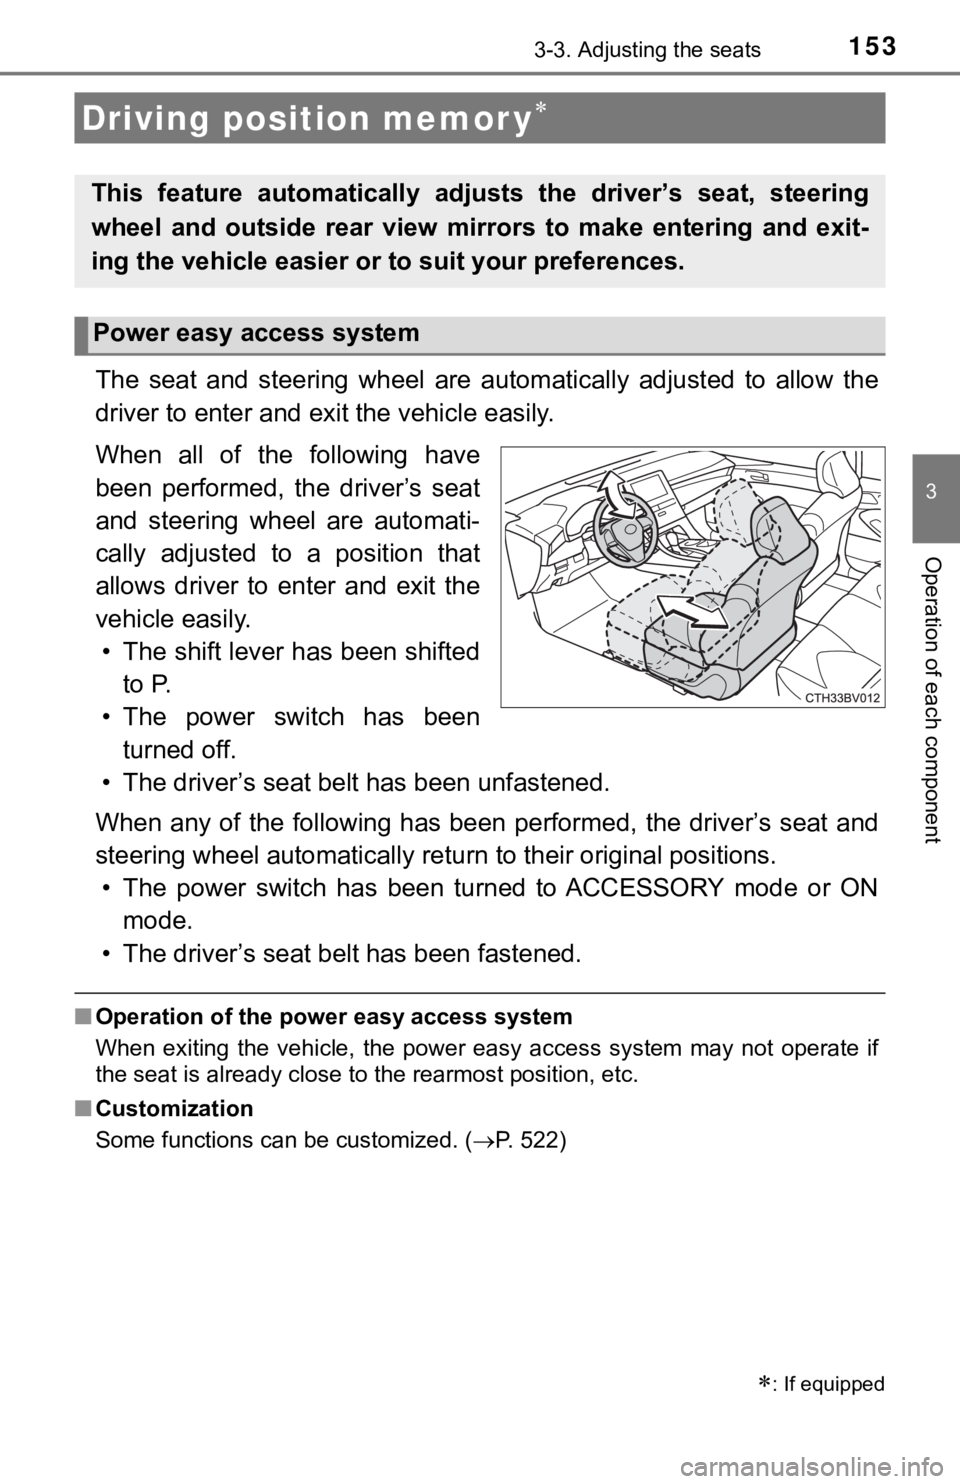
The seat and steering wheel are automatically adjusted to allow the
driver to enter and exi t the vehicle easily.
When all of the following have
been performed, the driver’s seat
and steering wheel are automati-
cally adjusted to a position that
allows driver to enter and exit the
vehicle easily. • The shift lever has been shifted to P.
• The power switch has been turned off.
• The driver’s seat belt has been unfastened.
When any of the following has be en performed, the driver’s seat and
steering wheel automatically ret urn to their original positions.
• The power switch has been turned to ACCESSORY mode or ON mode.
• The driver’s seat belt has been fastened.
■ Operation of the power easy access system
When exiting the vehicle, the power easy access system may not operate if
the seat is already close to the rearmost position, etc.
■ Customization
Some functions can be customized. ( P. 522)
Driving position memor y
: If equipped
This feature automatically adjusts the driver’s seat, steering
wheel and outside rear view mirrors to make entering and exit-
ing the vehicle easier or to suit your preferences.
Power easy access system
Page 154 of 556
1543-3. Adjusting the seats
Your preferred driving position (the position of the driver’s seat, steer-
ing wheel and outside rear view mirrors) can be recorded and re called
by pressing a button.
Two different driving positions can be recorded into memory.
■Recording procedure
Check that the shift lever is in P.
Turn the power switch to ON mode.
Adjust the driver’s seat, steerin g wheel, and outside rear view
mirrors to the desired positions.
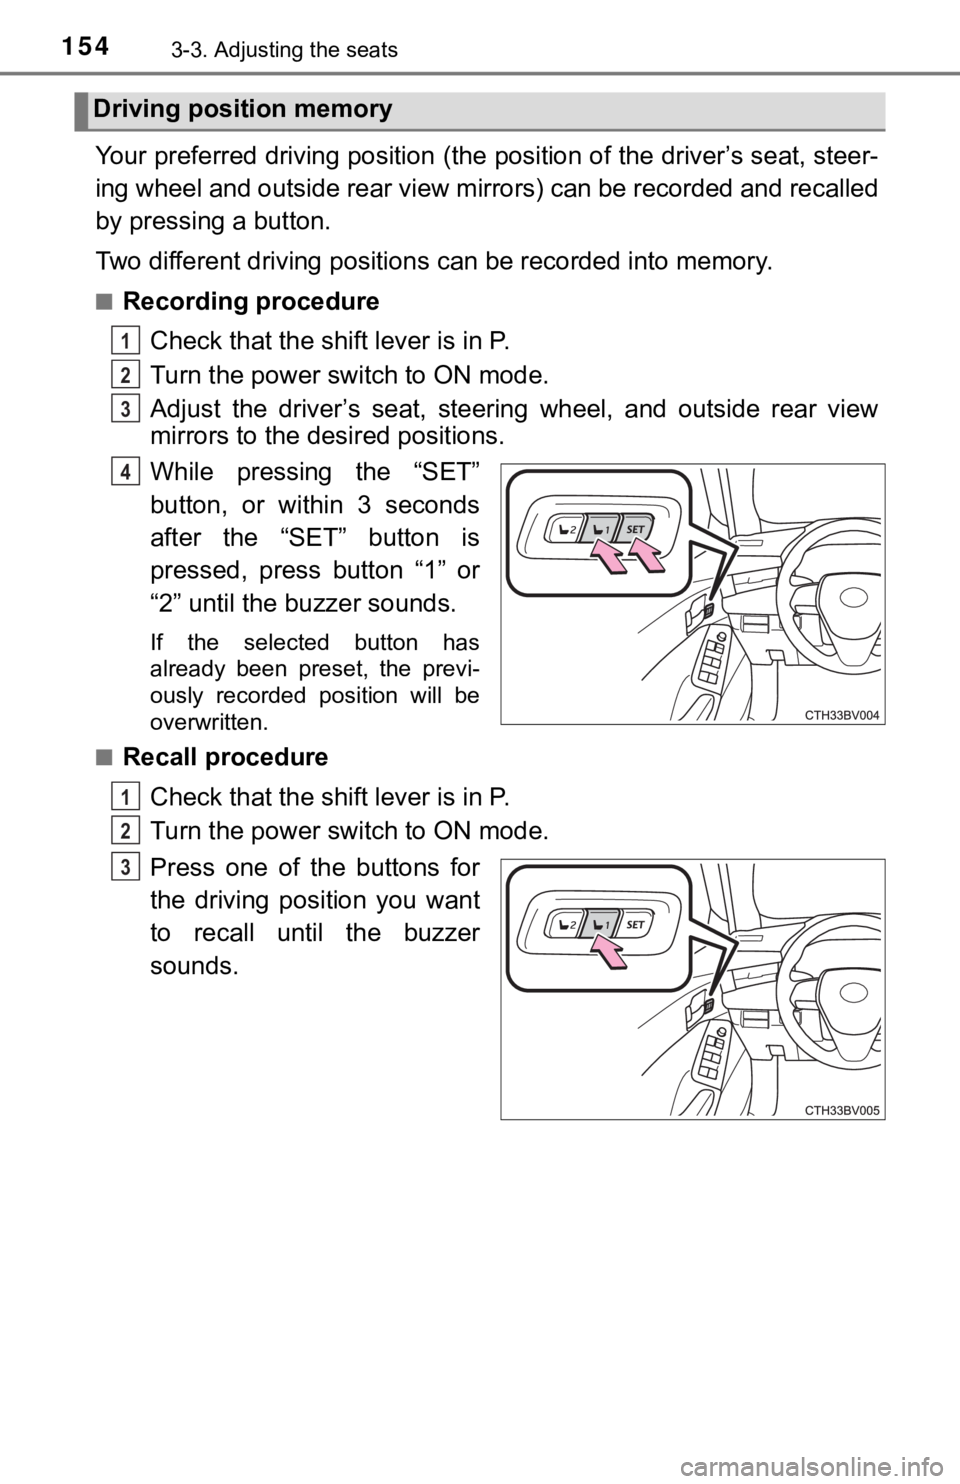
While pressing the “SET”
button, or within 3 seconds
after the “SET” button is
pressed, press button “1” or
“2” until the buzzer sounds.
If the selected button has
already been preset, the previ-
ously recorded position will be
overwritten.
■
Recall procedure
Check that the shift lever is in P.
Turn the power switch to ON mode.
Press one of the buttons for
the driving position you want
to recall until the buzzer
sounds.
Driving position memory
1
2
3
4
1
2
3
Page 155 of 556

1553-3. Adjusting the seats
3
Operation of each component
■To stop the position recall operation part-way through
Perform any of the following operations:
●Press the “SET” button.
● Press button “1” or “2”.
● Operate any of the seat adjustment switches (only cancels seat position
recall).
● Operate the tilt and telescopic steering control switch (only cancels steering
wheel position recall).
■ Seat positions that can be memorized ( P. 149)
The adjusted positions other than the position adjusted by lumb ar support
switch can be recorded.
■ Operating the driving position memory after turning the power s witch off
Recorded seat positions can be activated up to 180 seconds afte r the driver’s
door is opened and another 60 seconds after it is closed again.
■ In order to correctly use the dr iving position memory function
If a seat position is already in the furthest possible position and the seat is
operated in the same direction, the recorded position may be sl ightly different
when it is recalled.
Page 156 of 556
1563-3. Adjusting the seats
Each electronic key can be registered to recall your preferred driving
position.
■Registering procedure
Record your driving position to button 1 or 2 before performing the
following:
Carry only the key you want to register, and then close the dri ver’s
door.
If 2 or more keys are in the vehicle, the driving position cann ot be
recorded properly.
Check that the shift lever is in P.
Turn the power switch to ON mode.
Recall the driving position that you want to record.
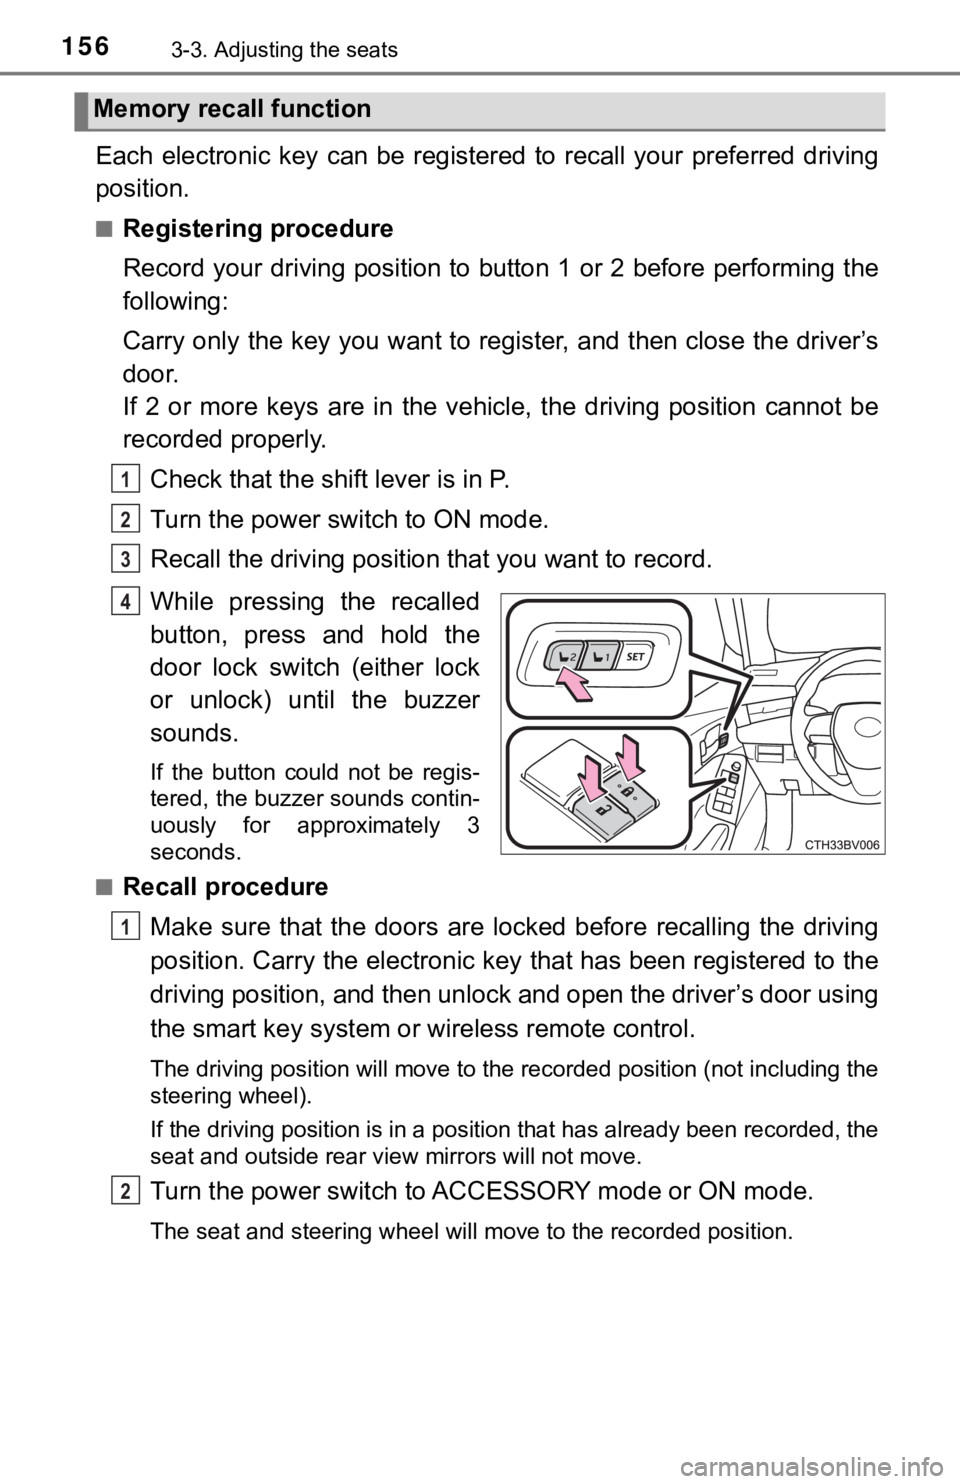
While pressing the recalled
button, press and hold the
door lock switch (either lock
or unlock) until the buzzer
sounds.
If the button could not be regis-
tered, the buzzer sounds contin-
uously for approximately 3
seconds.
■
Recall procedure
Make sure that the doors are locked before recalling the drivin g
position. Carry the electronic ke y that has been registered to the
driving position, and then unlock and open the driver’s door using
the smart key system or wireless remote control.
The driving position will move to the recorded position (not in cluding the
steering wheel).
If the driving position is in a position that has already been recorded, the
seat and outside rear view mirrors will not move.
Turn the power switch to ACCESSORY mode or ON mode.
The seat and steering wheel will move to the recorded position.
Memory recall function
1
2
3
4
1
2
Page 157 of 556

1573-3. Adjusting the seats
3
Operation of each component
■Cancelation procedure
Carry only the key you want to cancel and then close the driver ’s
door.
If 2 or more keys are in the vehicle, the driving position cann ot be
canceled properly.
Turn the power switch to ON mode.
While pressing the “SET” button, press and hold the door lock
switch (either lock or unlock) until the buzzer sounds twice.
If it button could not be canceled, the buzzer sounds continuou sly for
approximately 3 seconds.
■ Recalling the driving position u sing the memory recall function
● Different driving positions can be registered for each electron ic key. There-
fore, the driving position that is recalled may be different de pending on the
key being carried.
● If a door other than the driver’s door is unlocked with the sma rt key system,
the driving position cannot be recalled. In this case, press the driving posi-
tion button which has been set.
■ Customization
Some functions can be customized. ( P. 522)
WARNING
■Seat adjustment caution
Take care during seat adjustment so that the seat does not stri ke the rear
passenger or squeeze your body against the steering wheel.
1
2
Page 158 of 556
1583-3. Adjusting the seats
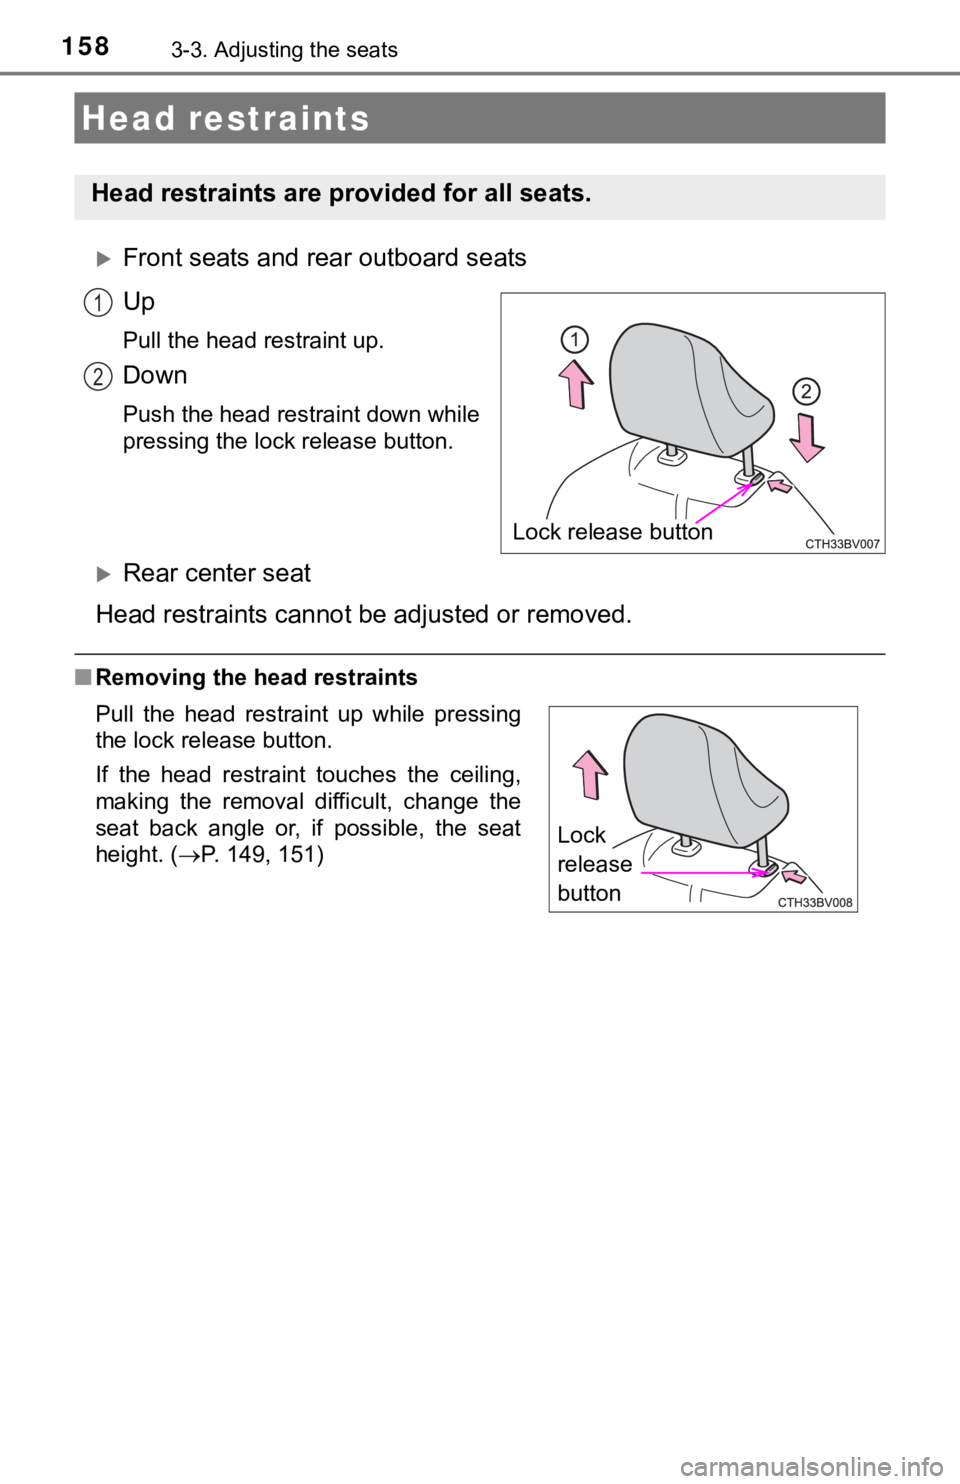
Front seats and rear outboard seats
Up
Pull the head restraint up.
Down
Push the head restraint down while
pressing the lock release button.
Rear center seat
Head restraints cannot b e adjusted or removed.
■Removing the head restraints
Head restraints
Head restraints are provided for all seats.
Lock release button
1
2
Pull the head restraint up while pressing
the lock release button.
If the head restraint touches the ceiling,
making the removal difficult, change the
seat back angle or, if possible, the seat
height. ( P. 149, 151)
Lock
release
button
Page 159 of 556
1593-3. Adjusting the seats
3
Operation of each component
■Installing the head restraints
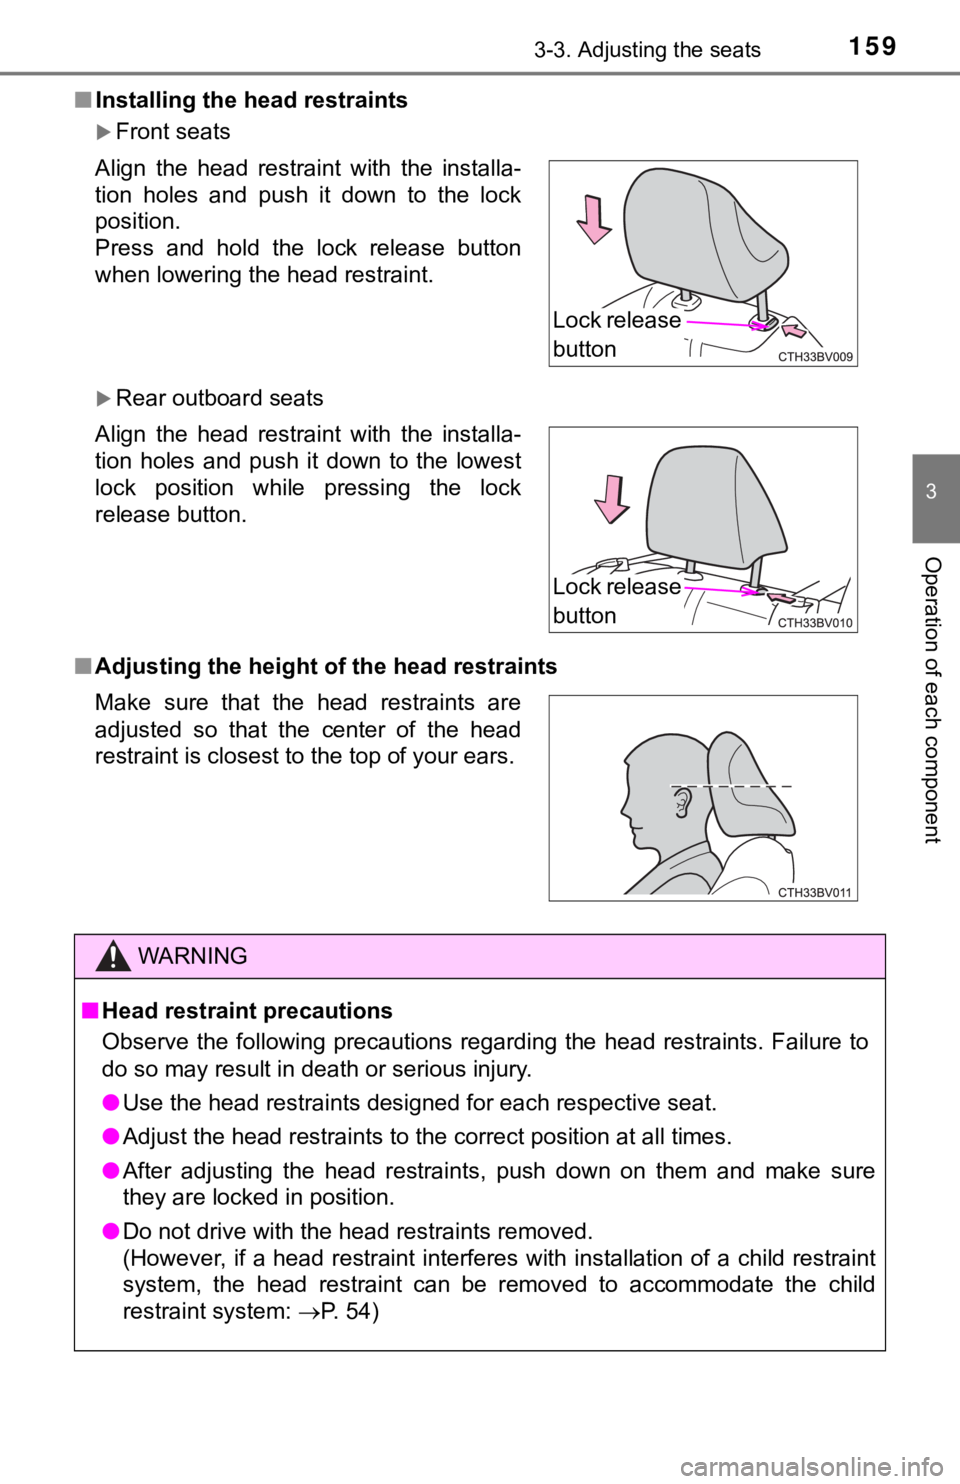
Front seats
Rear outboard seats
■ Adjusting the height o f the head restraints
Align the head restraint with the installa-
tion holes and push it down to the lock
position.
Press and hold the lock release button
when lowering the head restraint.
Align the head restraint with the installa-
tion holes and push it down to the lowest
lock position while pressing the lock
release button.
Make sure that the head restraints are
adjusted so that the center of the head
restraint is closest to the top of y
our ears.
WARNING
■Head restraint precautions
Observe the following precautions regarding the head restraints. Failure to
do so may result in death or serious injury.
● Use the head restraints designed for each respective seat.
● Adjust the head restraints to the correct position at all times.
● After adjusting the head restraints, push down on them and make sure
they are locked in position.
● Do not drive with the head rest raints removed.
(However , if a head restraint interferes with installation of a child restraint
system, the head restraint can be removed to accommodate the ch ild
restraint system: P. 54)
Lock release
button
Lock release
button
Page 160 of 556
1603-4. Adjusting the steering wheel and mirrors
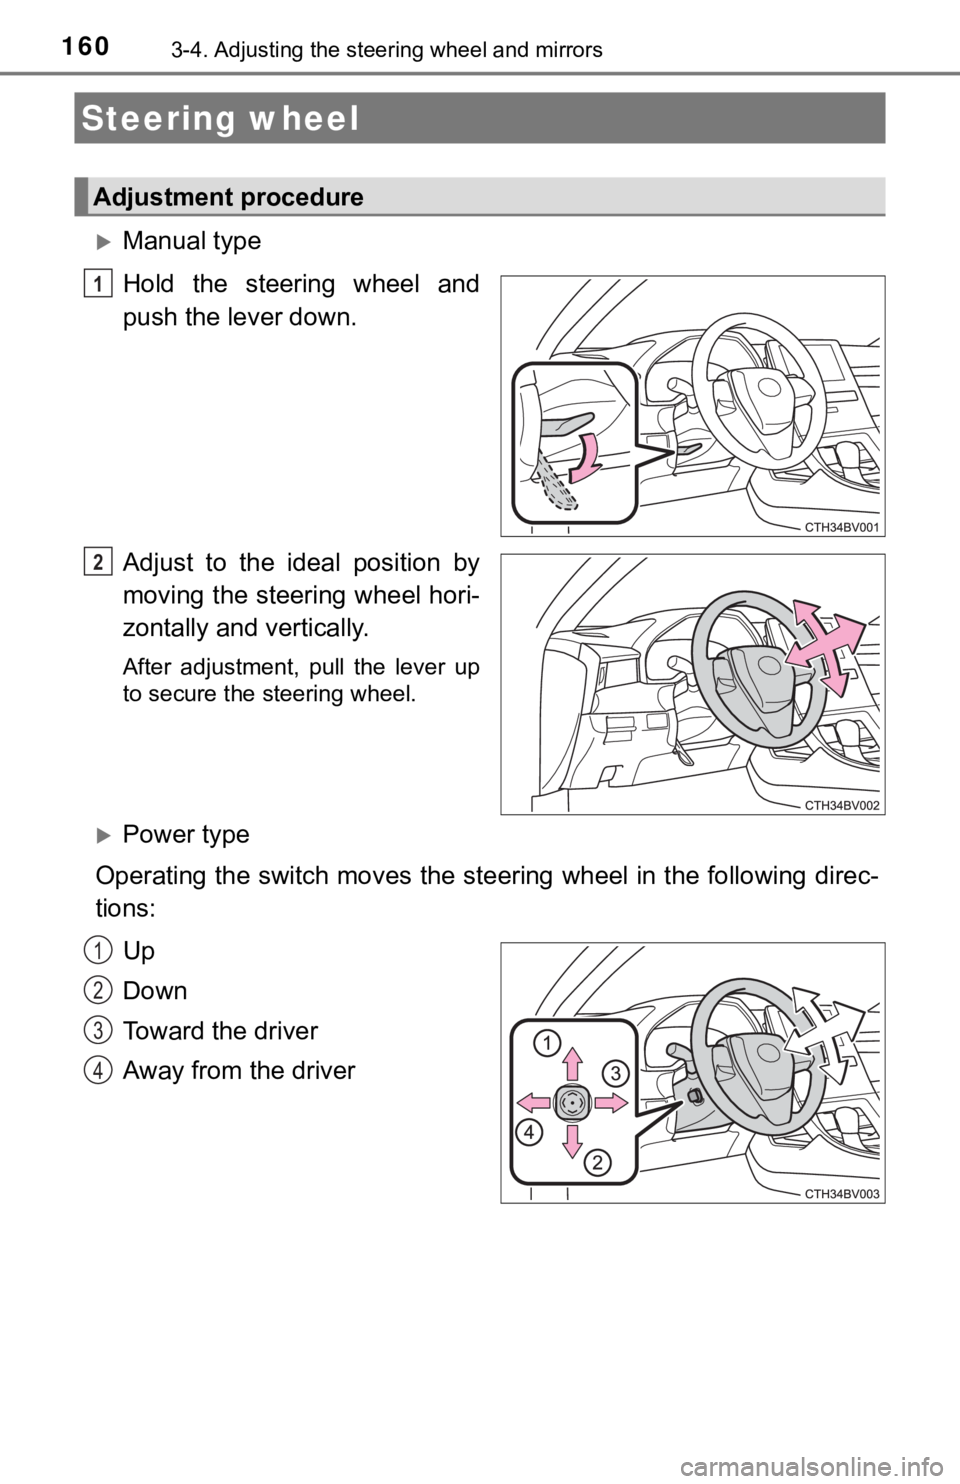
Manual type
Hold the steering wheel and
push the lever down.
Adjust to the ideal position by
moving the steering wheel hori-
zontally and vertically.
After adjustment, pull the lever up
to secure the steering wheel.
Power type
Operating the switch moves the steering wheel in the following direc-
tions:
Up
Down
Toward the driver
Away from the driver
Steering wheel
Adjustment procedure
1
2
1
2
3
4