warning lights TOYOTA AVALON HYBRID 2019 (in English) User Guide
[x] Cancel search | Manufacturer: TOYOTA, Model Year: 2019, Model line: AVALON HYBRID, Model: TOYOTA AVALON HYBRID 2019Pages: 556, PDF Size: 9.73 MB
Page 87 of 556
872. Instrument cluster
2
Instrument cluster
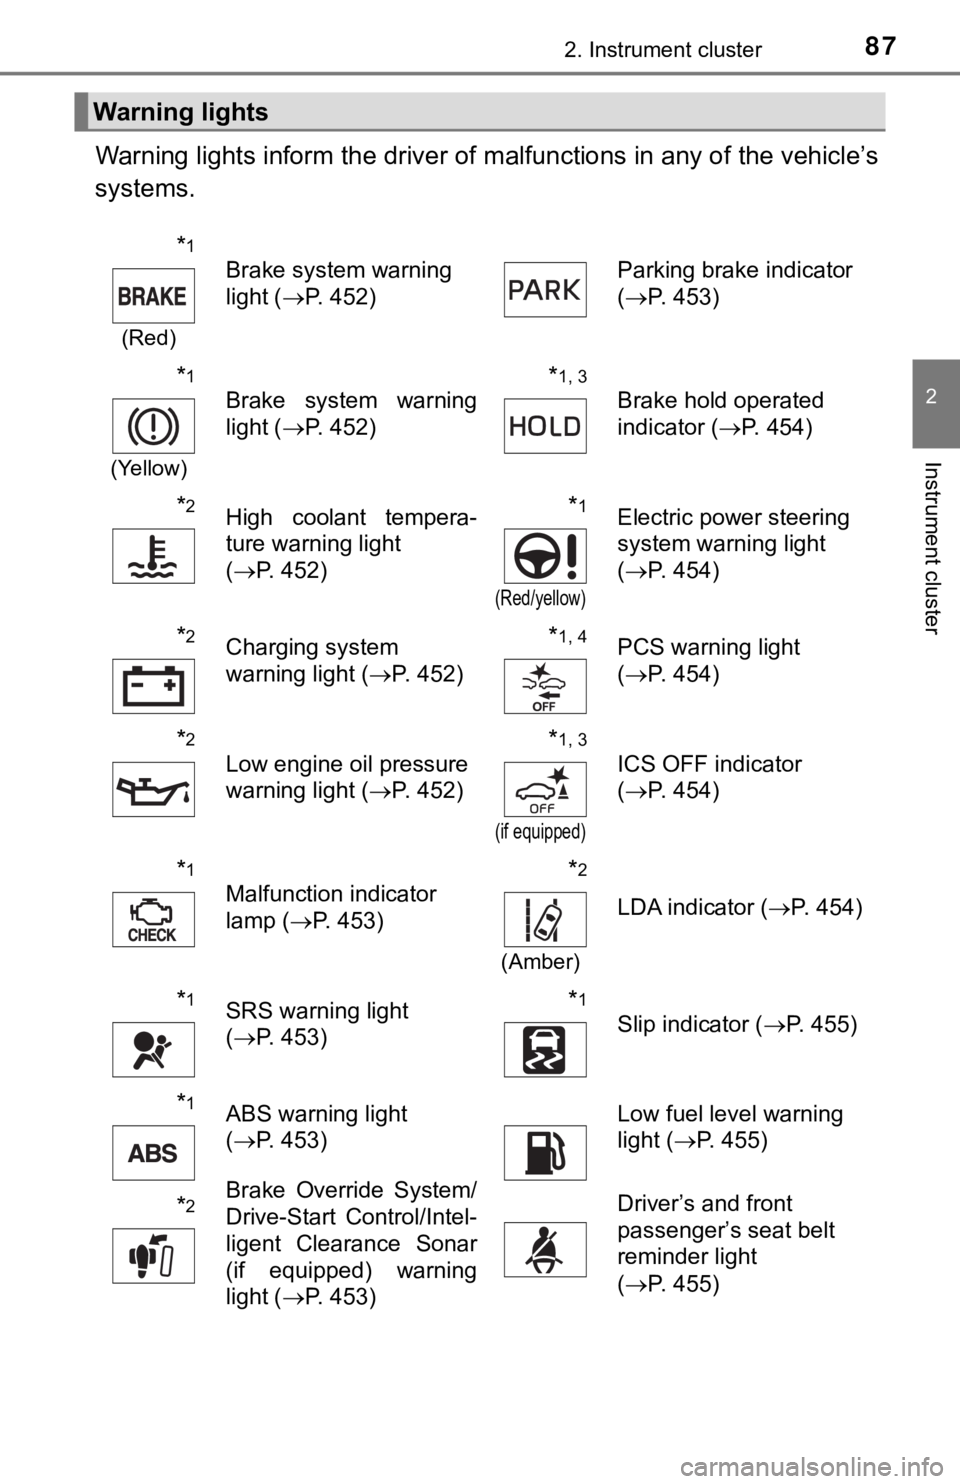
Warning lights inform the driver of malfunctions in any of the vehicle’s
systems.
Warning lights
*1
(Red)
Brake system warning
light ( P. 452) Parking brake indicator
(
P. 453)
*1
(Yellow)
Brake system warning
light ( P. 452)*1, 3
Brake hold operated
indicator ( P. 454)
*2High coolant tempera-
ture warning light
(P. 452)*1
(Red/yellow)
Electric power steering
system warning light
(P. 454)
*2Charging system
warning light ( P. 452)*1, 4PCS warning light
(P. 454)
*2
Low engine oil pressure
warning light ( P. 452)*1, 3
(if equipped)
ICS OFF indicator
(P. 454)
*1
Malfunction indicator
lamp ( P. 453)*2
(Amber)
LDA indicator ( P. 454)
*1SRS warning light
(P. 453)*1
Slip indicator ( P. 455)
*1ABS warning light
(P. 453)Low fuel level warning
light ( P. 455)
*2Brake Override System/
Drive-Start Control/Intel-
ligent Clearance Sonar
(if equipped) warning
light (P. 453)Driver’s and front
passenger’s seat belt
reminder light
(P. 455)
Page 88 of 556
882. Instrument cluster
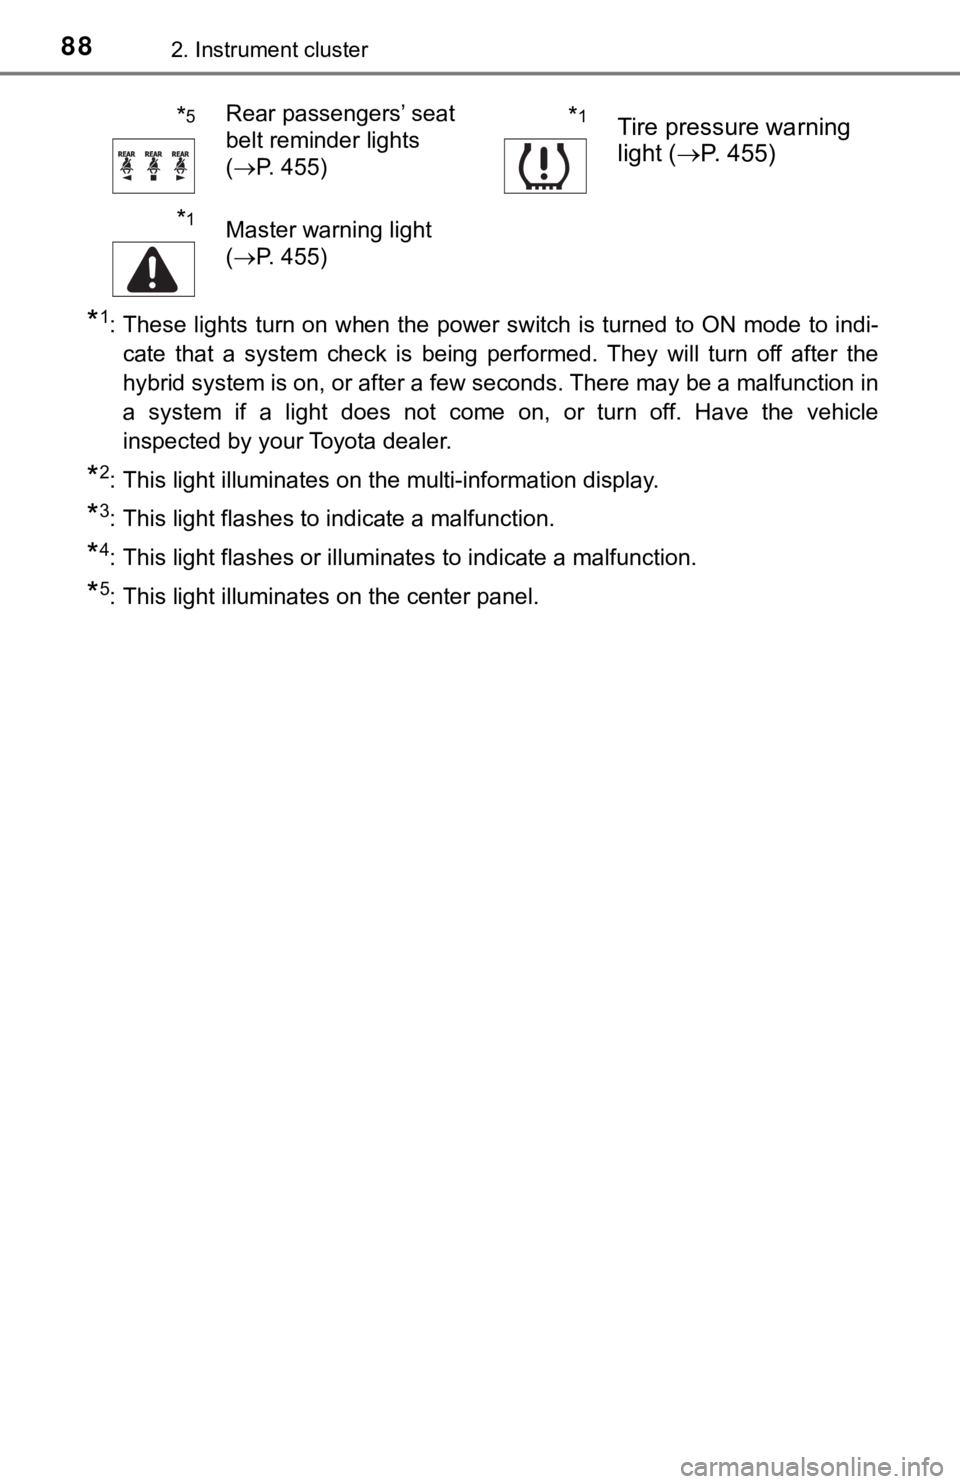
*1: These lights turn on when the power switch is turned to ON mode to indi-
cate that a system check is being performed. They will turn off after the
hybrid system is on, or after a few seconds. There may be a mal function in
a system if a light does not come on, or turn off. Have the veh icle
inspected by your Toyota dealer.
*2: This light illuminates on the multi-information display.
*3: This light flashes to indicate a malfunction.
*4: This light flashes or illuminates to indicate a malfunction.
*5: This light illuminates on the center panel.
*5Rear passengers’ seat
belt reminder lights
( P. 455)*1Tire pressure warning
light ( P. 455)
*1Master warning light
(P. 455)
Page 91 of 556

912. Instrument cluster
2
Instrument cluster
*1: These lights turn on when the power switch is turned to ON mode to indi-
cate that a system check is being performed. They will turn off after the
hybrid system is on, or after a few seconds. There may be a mal function in
a system if a light does not come on, or turn off. Have the veh icle
inspected by your Toyota dealer.
*2: This light illuminates on the multi-information display.
*3: This light turns on when the system is off.
*4: This light flashes to indicate that the system is operating.
*5: These indicators will illuminate in the following situations t o indicate that
the system initial check is being performed:
• When the BSM function or RCTA function is enabled and the powe r
switch is turned to ON mode.
• When the power switch is ON mode and the BSM function is enabl ed.
• When the power switch is ON mode and the RCTA function is enab led.
(At this time, a buzzer will also sound).
The indicators will turn off after a few seconds. If the indicators do not
illuminate or turn off, or if a buzzer does not sound when the RCTA func-
tion is enabled, the system may be malfunctioning. Have the veh icle
inspected by your Toyota dealer.
*6: This light illuminates on the outside rear view mirrors.
*7: This light illuminates on the center panel.
*8: When the outside temperature is approximately 37°F (3°C) or lo wer, this
indicator will flash for approximately 10 seconds, then stay on .
WARNING
■If a safety system warning light does not come on
Should a safety system light such as the ABS and SRS warning lights not
come on when you start the hybrid system, this could mean that these sys-
tems are not available to help protect you in an accident, whic h could result
in death or serious injury. Have the vehicle inspected by your Toyota dealer
immediately if this occurs.
Page 216 of 556
2164-3. Operating the lights and wipers
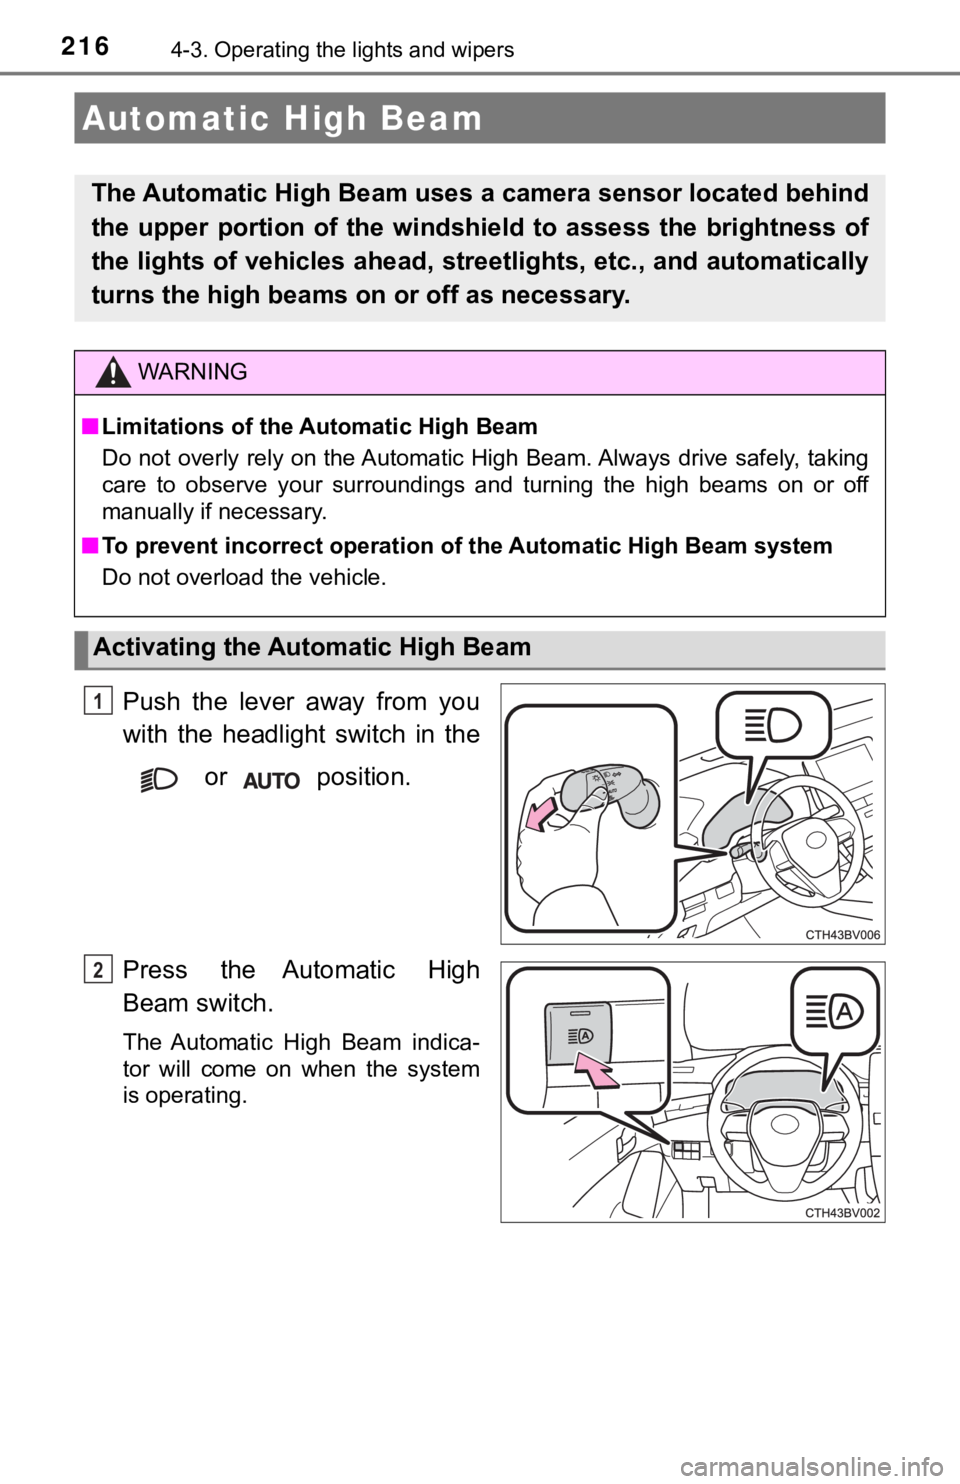
Push the lever away from you
with the headlight switch in the or position.
Press the Automatic High
Beam switch.
The Automatic High Beam indica-
tor will come on when the system
is operating.
Automatic High Beam
The Automatic High Beam uses a camera sensor located behind
the upper portion of the windshi eld to assess the brightness of
the lights of vehicles ahead, streetlights, etc., and automatic ally
turns the high beams on or off as necessary.
WARNING
■Limitations of the Automatic High Beam
Do not overly rely on the Automatic High Beam. Always drive saf ely, taking
care to observe your surroundings and turning the high beams on or off
manually if necessary.
■ To prevent incorrect operation o f the Automatic High Beam syste m
Do not overload the vehicle.
Activating the Automatic High Beam
1
2
Page 221 of 556
2214-3. Operating the lights and wipers
4
Driving
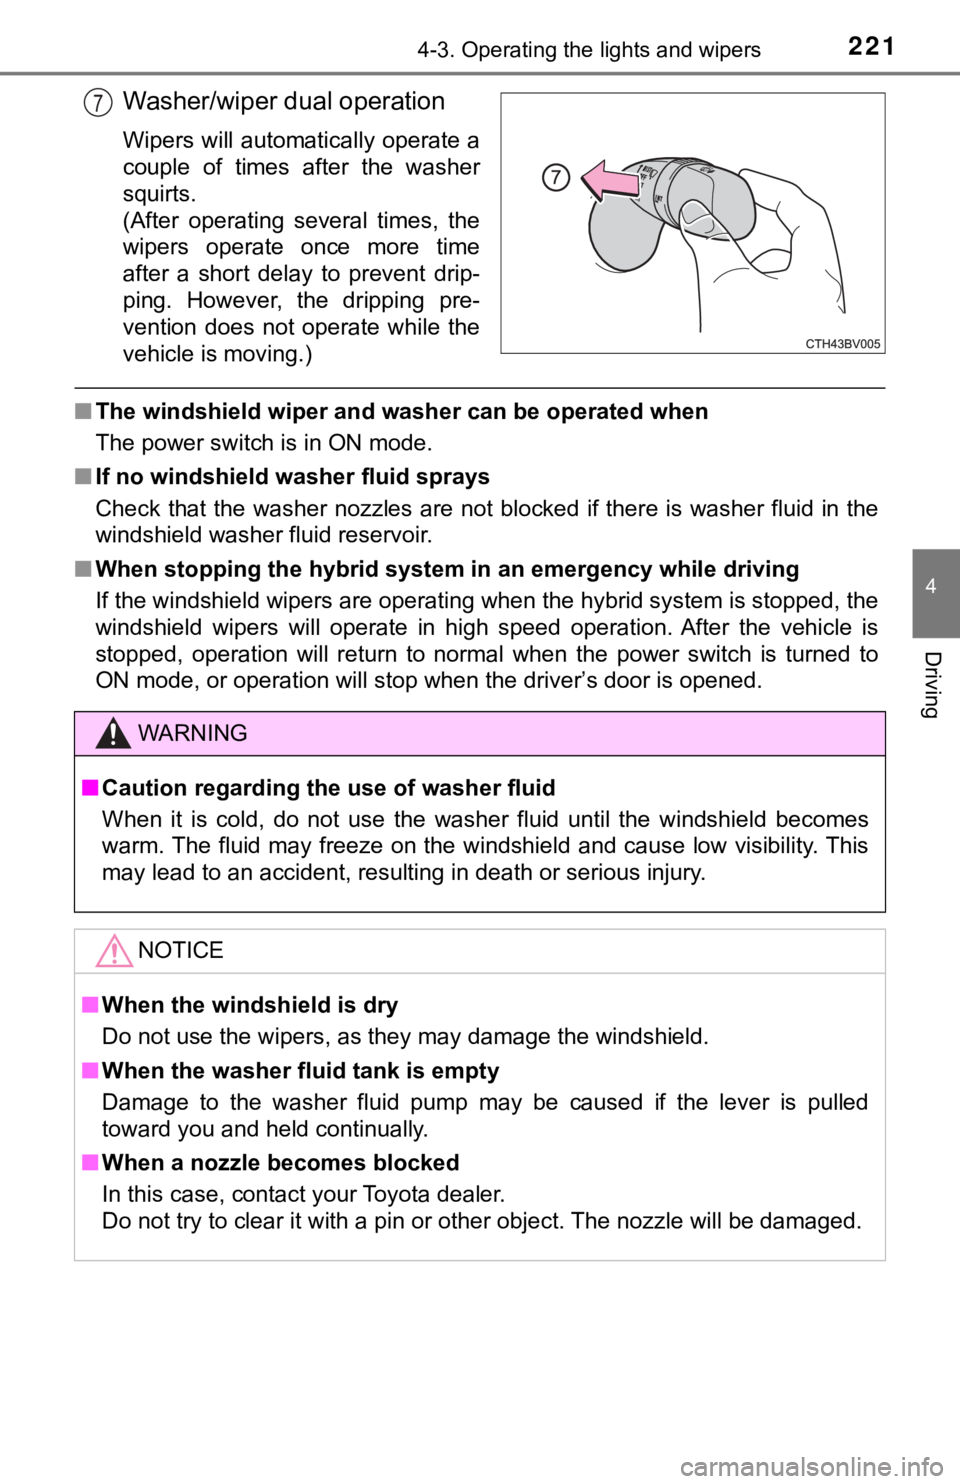
Washer/wiper dual operation
Wipers will automatically operate a
couple of times after the washer
squirts.
(After operating several times, the
wipers operate once more time
after a short delay to prevent drip-
ping. However, the dripping pre-
vention does not operate while the
vehicle is moving.)
■The windshield wiper and washer can be operated when
The power switch is in ON mode.
■ If no windshield washer fluid sprays
Check that the washer nozzles are not blocked if there is washe r fluid in the
windshield washer fluid reservoir.
■ When stopping the hybrid system in an emergency while driving
If the windshield wipers are operating when the hybrid system is stopped, the
windshield wipers will operate in high speed operation. After t he vehicle is
stopped, operation will return to normal when the power switch is turned to
ON mode, or operation will stop when the driver’s door is opene d.
7
WARNING
■Caution regarding the use of washer fluid
When it is cold, do not use the washer fluid until the windshie ld becomes
warm. The fluid may freeze on the windshield and cause low visi bility. This
may lead to an accident, resulting in death or serious injury.
NOTICE
■ When the windshield is dry
Do not use the wipers, as they may damage the windshield.
■ When the washer fluid tank is empty
Damage to the washer fluid pump may be caused if the lever is p ulled
toward you and held continually.
■ When a nozzle becomes blocked
In this case, contact your Toyota dealer.
Do not try to clear it with a pin or other object. The nozzle will be damaged.
Page 233 of 556
2334-5. Using the driving support systems
4
Driving
WARNING
■To avoid malfunction of the camera sensor
Observe the following precautions.
Otherwise, the camera sensor may not operate properly, possibly leading to
an accident resulting in death or serious injury.
● Keep the windshield clean at all times.
• If the windshield is dirty or covered with an oily film, water droplets,
snow, etc., clear the windshield.
• If a glass coating agent is applied to the windshield, it will still be neces-
sary to use the windshield wipers to remove water droplets, etc . from
the area of the windshield in front of the camera sensor.
• If the inner side of the windshield where the camera sensor is installed
is dirty, contact your Toyota dealer.
● If the part of the windshield in front of the camera sensor is fogged up or
covered with condensation or ice, use the windshield defogger t o remove
the fog, condensation or ice. ( P. 337)
● If water droplets cannot be properly removed from the area of t he wind-
shield in front of the camera sensor by the windshield wipers, replace the
wiper insert or wiper blade.
If the wiper inserts or wiper blades need to be replaced, contact your Toy-
ota dealer.
● Do not attach window tinting to the windshield.
● Replace the windshield if it is damaged or cracked.
If the windshield needs to be replaced, contact your Toyota dea ler.
● Do not get the camera sensor wet.
● Do not allow bright lights to shine into the camera sensor.
● Do not dirty or damage the camera sensor.
When cleaning the inside of the windshield, do not allow glass cleaner to
contact the lens. Also, do not touch the lens.
If the lens is dirty or damaged, contact your Toyota dealer.
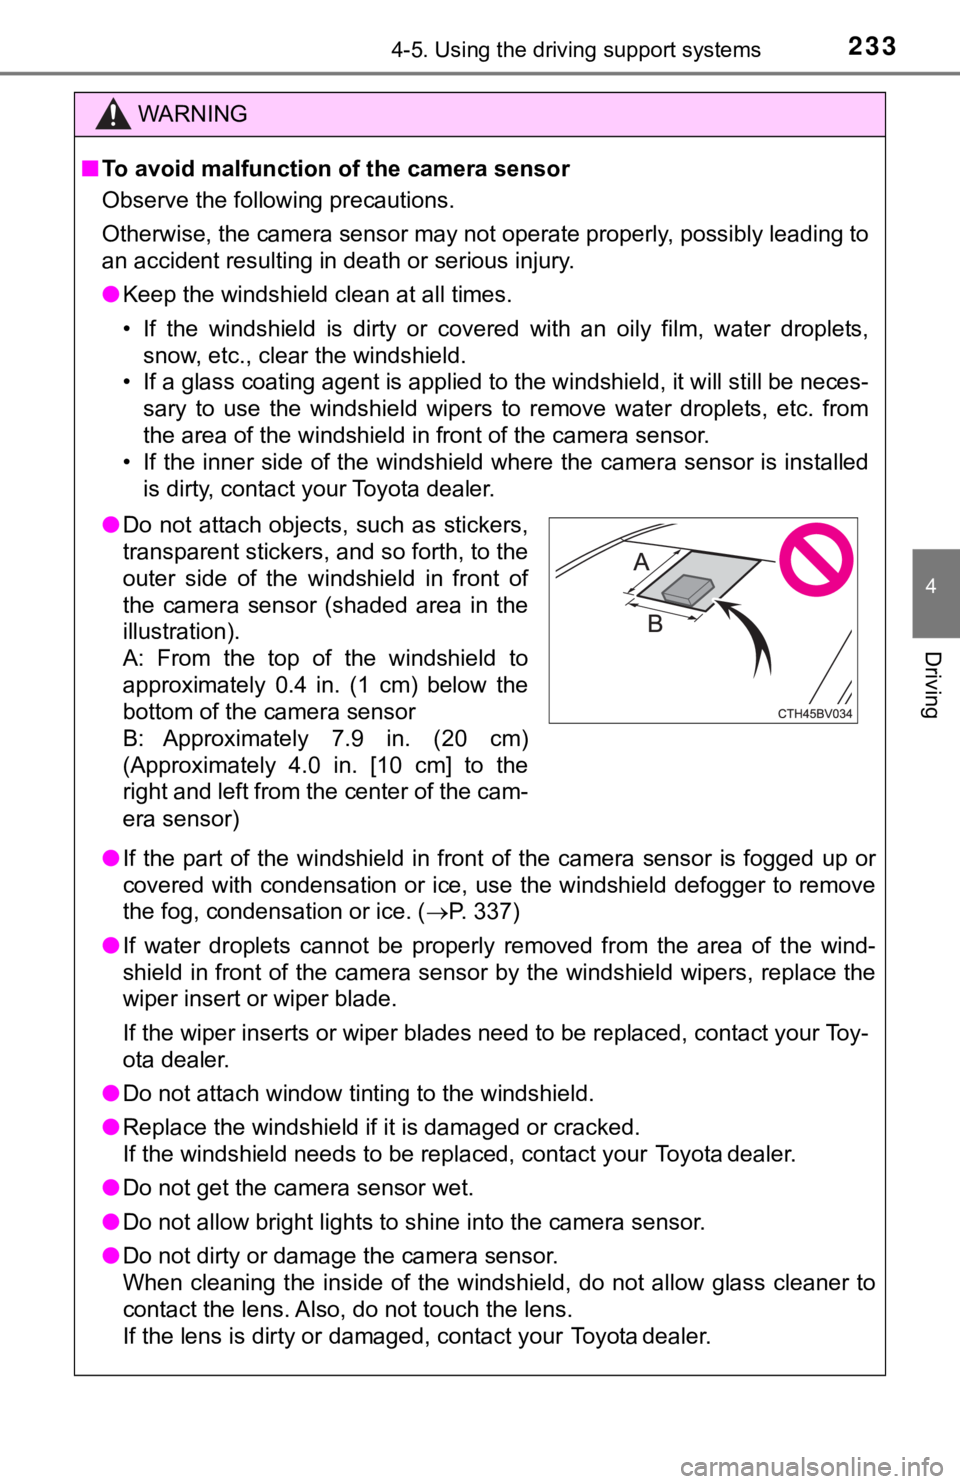
● Do not attach objects, such as stickers,
transparent stickers, and so forth, to the
outer side of the windshield in front of
the camera sensor (shaded area in the
illustration).
A: From the top of the windshield to
approximately 0.4 in. (1 cm) below the
bottom of the camera sensor
B: Approximately 7.9 in. (20 cm)
(Approximately 4.0 in. [10 cm] to the
right and left from the center of the cam-
era sensor)
Page 234 of 556

2344-5. Using the driving support systems
WARNING
●Do not subject the camera sensor to a strong impact.
● Do not change the installation position or direction of the cam era sensor or
remove it.
● Do not disassemble the camera sensor.
● Do not modify any components of the vehicle around the camera s ensor
(inside rear view mirror, etc.) or ceiling.
● Do not attach any accessories that may obstruct the camera sens or to the
hood, front grille or front bumper. Contact your Toyota dealer for details.
● If a surfboard or other long object is to be mounted on the roo f, make sure
that it will not obstruct the camera sensor.
● Do not modify the headlights or other lights.
Page 251 of 556
2514-5. Using the driving support systems
4
Driving
WARNING
■Situations unsuitable for LDA system
Do not use the LDA system in the following situations.
The system may not operate properly and lead to an accident, re sulting in
death or serious injury.
● A spare tire, tire chains, etc. are equipped.
● When the tires have been excessively worn, or when the tire inf lation pres-
sure is low.
● Tires which differ by structure, manufacturer, brand or tread p attern are
used.
● Objects or patterns that could be mistaken for white (yellow) l ines are
present on the side of the road (guardrails, curbs, reflective poles, etc.).
● Vehicle is driven on a snow-covered road.
● White (yellow) lines are diffi cult to see due to rain, snow, fo g, dust, etc.
● Asphalt repair marks, white (yellow) line marks, etc. are prese nt due to
road repair.
● Vehicle is driven in a temporary lane or restricted lane due to construction
work.
● Vehicle is driven on a road surface which is slippery due to rainy weather,
fallen snow, freezing, etc.
● Vehicle is driven in traffic lanes other than on highways and freeways.
● Vehicle is driven in a construction zone.
■ Preventing LDA system malfunctio ns and operations performed by
mistake
● Do not modify the headlights or place stickers, etc. on the sur face of the
lights.
● Do not modify the suspension etc. If the suspension etc. needs to be
replaced, contact your Toyota dealer.
● Do not install or place anything on the hood or grille. Also, d o not install a
grille guard (bull bars, kangaroo bar, etc.).
● If your windshield needs repairs, contact your Toyota dealer.
Page 261 of 556
2614-5. Using the driving support systems
4
Driving
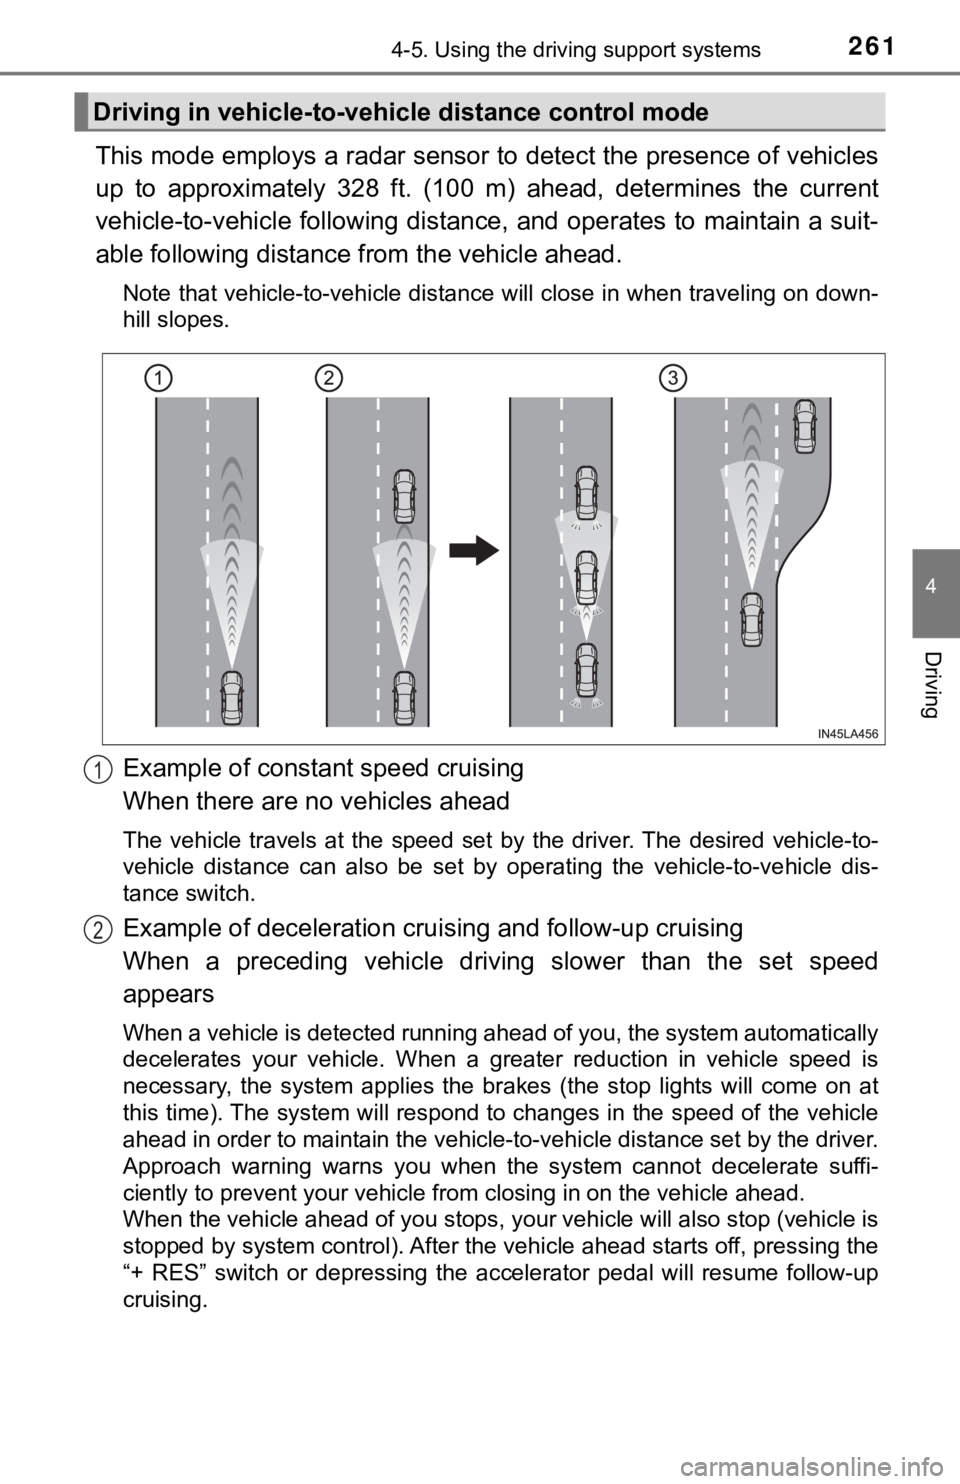
This mode employs a radar sensor to detect the presence of vehicles
up to approximately 328 ft. (100 m) ahead, determines the curre nt
vehicle-to-vehicle following distance, and operates to maintain a suit-
able following distance from the vehicle ahead.
Note that vehicle-to-vehicle distance will close in when travel ing on down-
hill slopes.
Example of constant speed cruising
When there are no vehicles ahead
The vehicle travels at the speed set by the driver. The desired vehicle-to-
vehicle distance can also be set by operating the vehicle-to-ve hicle dis-
tance switch.
Example of deceleration crui sing and follow-up cruising
When a preceding vehicle driving slower than the set speed
appears
When a vehicle is detected running ahead of you, the system automatically
decelerates your vehicle. When a greater reduction in vehicle s peed is
necessary, the system applies the brakes (the stop lights will come on at
this time). The system will respond to changes in the speed of the vehicle
ahead in order to maintain the vehicle-to-vehicle distance set by the driver.
Approach warning warns you when the system cannot decelerate su ffi-
ciently to prevent your vehicle from closing in on the vehicle ahead.
When the vehicle ahead of you stops, your vehicle will also sto p (vehicle is
stopped by system control). After the vehicle ahead starts off, pressing the
“+ RES” switch or depressing the accelerator pedal will resume follow-up
cruising.
Driving in vehicle-to-vehi cle distance control mode
1
2
Page 418 of 556
4186-3. Do-it-yourself maintenance
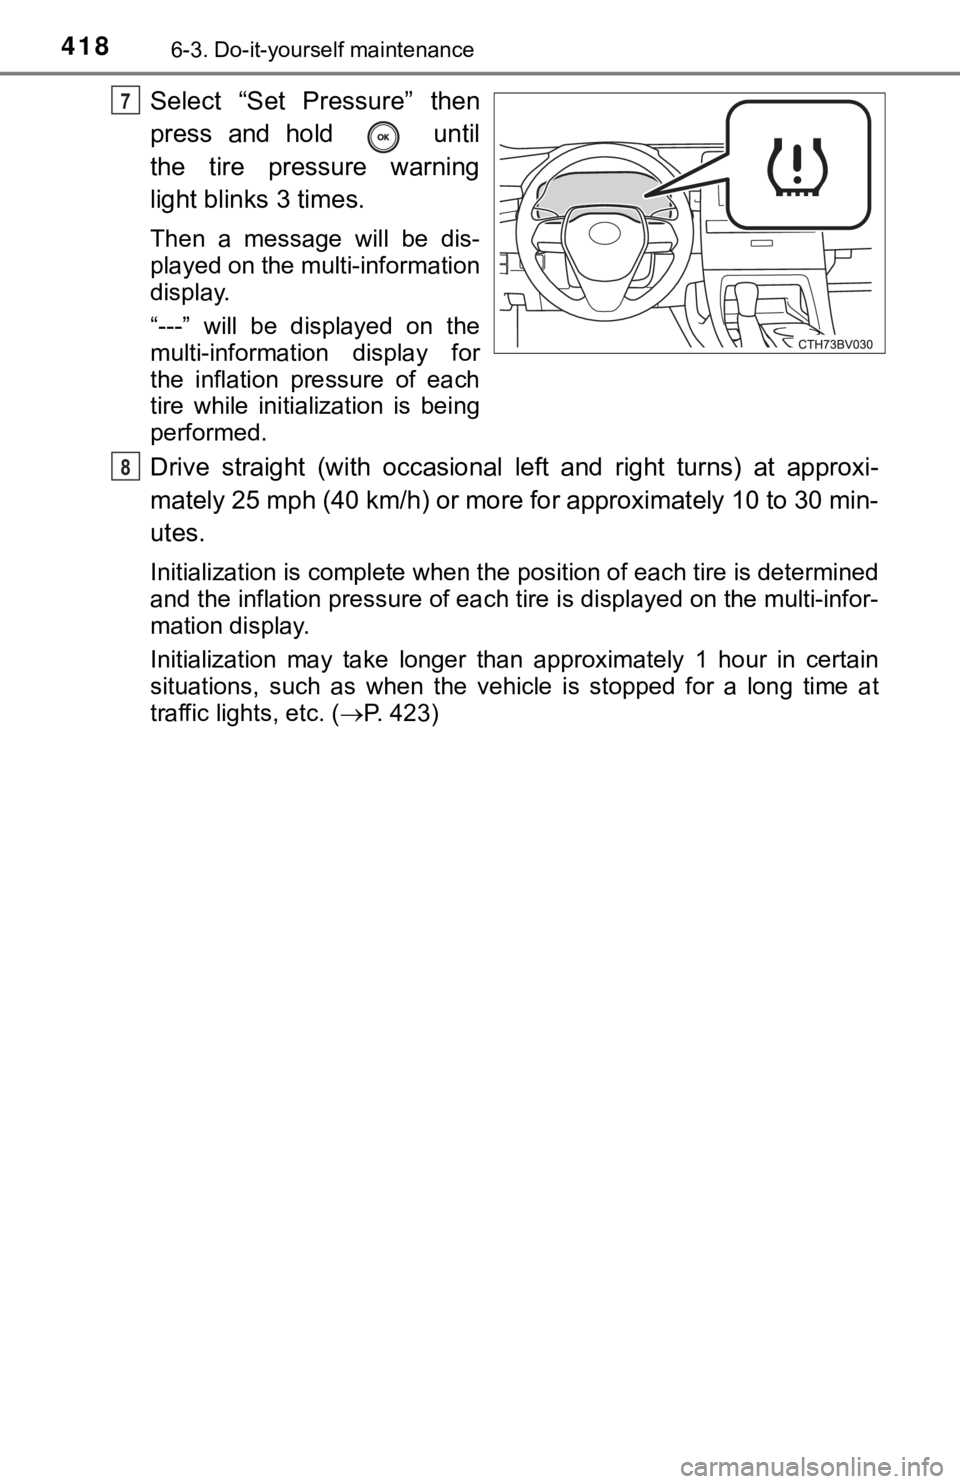
Select “Set Pressure” then
press and hold until
the tire pressure warning
light blinks 3 times.
Then a message will be dis-
played on the multi-information
display.
“---” will be displayed on the
multi-information display for
the inflation pressure of each
tire while initialization is being
performed.
Drive straight (with occasional left and right turns) at approxi-
mately 25 mph (40 km/h) or more for approximately 10 to 30 min-
utes.
Initialization is complete when the position of each tire is determined
and the inflation pressure of ea ch tire is displayed on the multi-infor-
mation display.
Initialization may ta ke longer than approximately 1 hour in cer tain
situations, such as when the veh icle is stopped for a long time at
traffic lights, etc. ( P. 423)
7
8