TOYOTA AVALON HYBRID 2020 Accessories, Audio & Navigation (in English)
Manufacturer: TOYOTA, Model Year: 2020, Model line: AVALON HYBRID, Model: TOYOTA AVALON HYBRID 2020Pages: 326, PDF Size: 7.79 MB
Page 171 of 326
171
2. PANORAMIC VIEW MONITOR
PERIPHERAL MONITORING SYSTEM
6
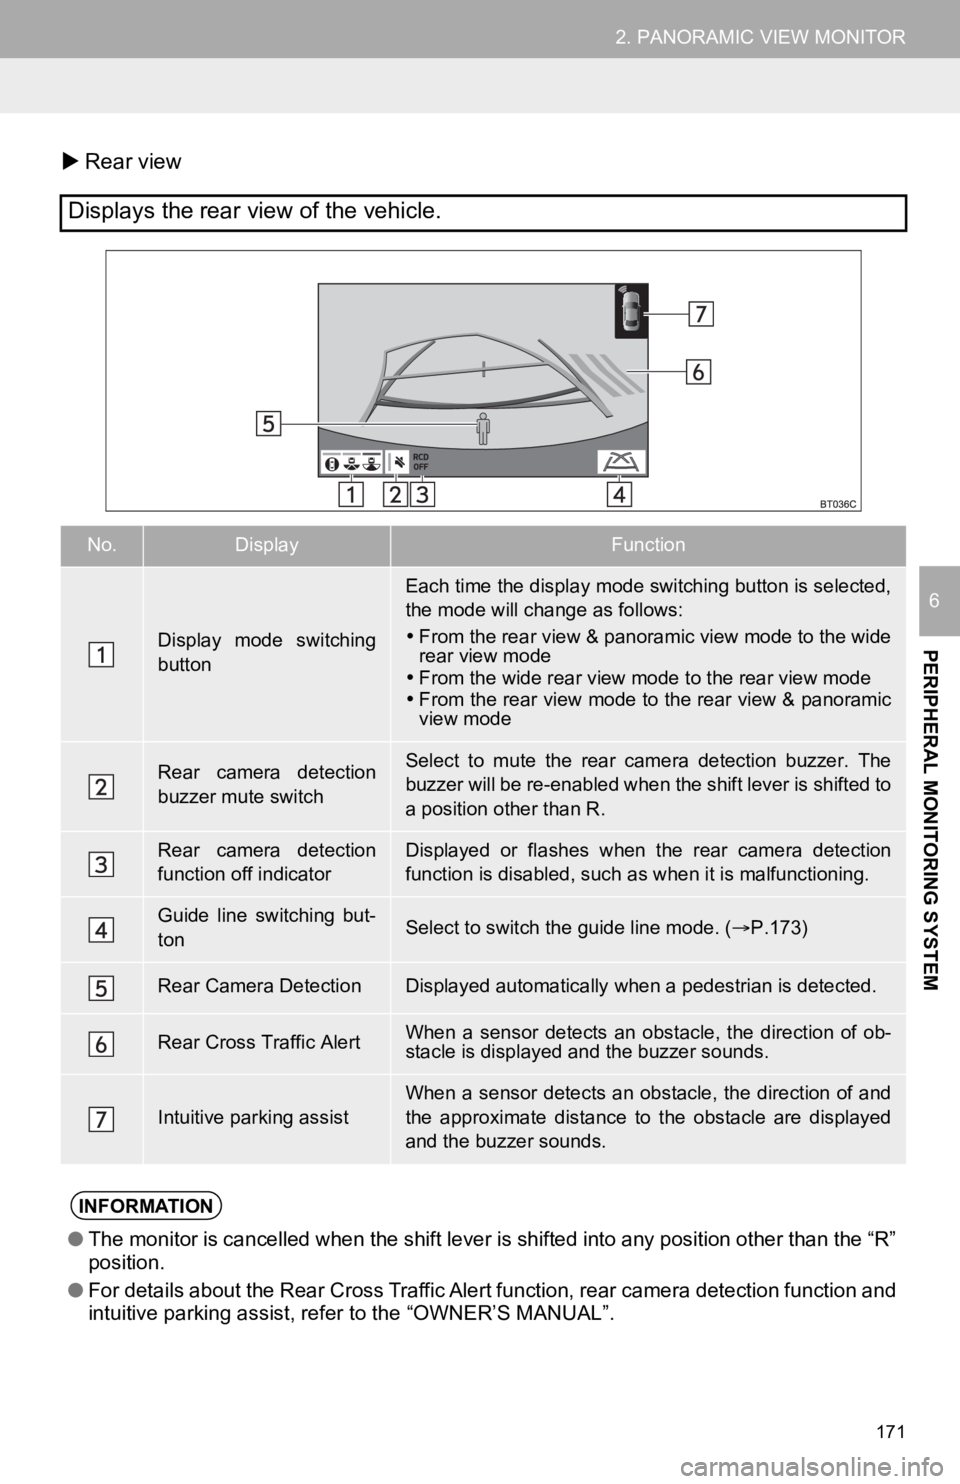
Rear view
Displays the rear view of the vehicle.
No.DisplayFunction
Display mode switching
button
Each time the display mode switching button is selected,
the mode will change as follows:
From the rear view & panoramic view mode to the wide
rear view mode
From the wide rear view mode to the rear view mode
From the rear view mode to the rear view & panoramic
view mode
Rear camera detection
buzzer mute switchSelect to mute the rear camera detection buzzer. The
buzzer will be re-enabled when the shift lever is shifted to
a position other than R.
Rear camera detection
function off indicatorDisplayed or flashes when the rear camera detection
function is disabled, such as when it is malfunctioning.
Guide line switching but-
tonSelect to switch the guide line mode. ( P.173)
Rear Camera DetectionDisplayed automatically when a pedestrian is detected.
Rear Cross Traffic AlertWhen a sensor detects an obs tacle, the direction of ob-
stacle is displayed and the buzzer sounds.
Intuitive parking assist
When a sensor detects an obstacle, the direction of and
the approximate distance to the obstacle are displayed
and the buzzer sounds.
INFORMATION
● The monitor is cancelled when the shift lever is shifted into any position other than the “R”
position.
● For details about the Rear Cross Traffic Alert function, rear c amera detection function and
intuitive parking assist, refer to the “OWNER’S MANUAL”.
Page 172 of 326

172
2. PANORAMIC VIEW MONITOR
WA R N I N G
●As the Rear Cross Traffic Alert display is displayed over the c amera view, it may be diffi-
cult to see the Rear Cross Traffic Alert display depending on t he color and brightness of
the surrounding area.
Page 173 of 326
173
2. PANORAMIC VIEW MONITOR
PERIPHERAL MONITORING SYSTEM
6
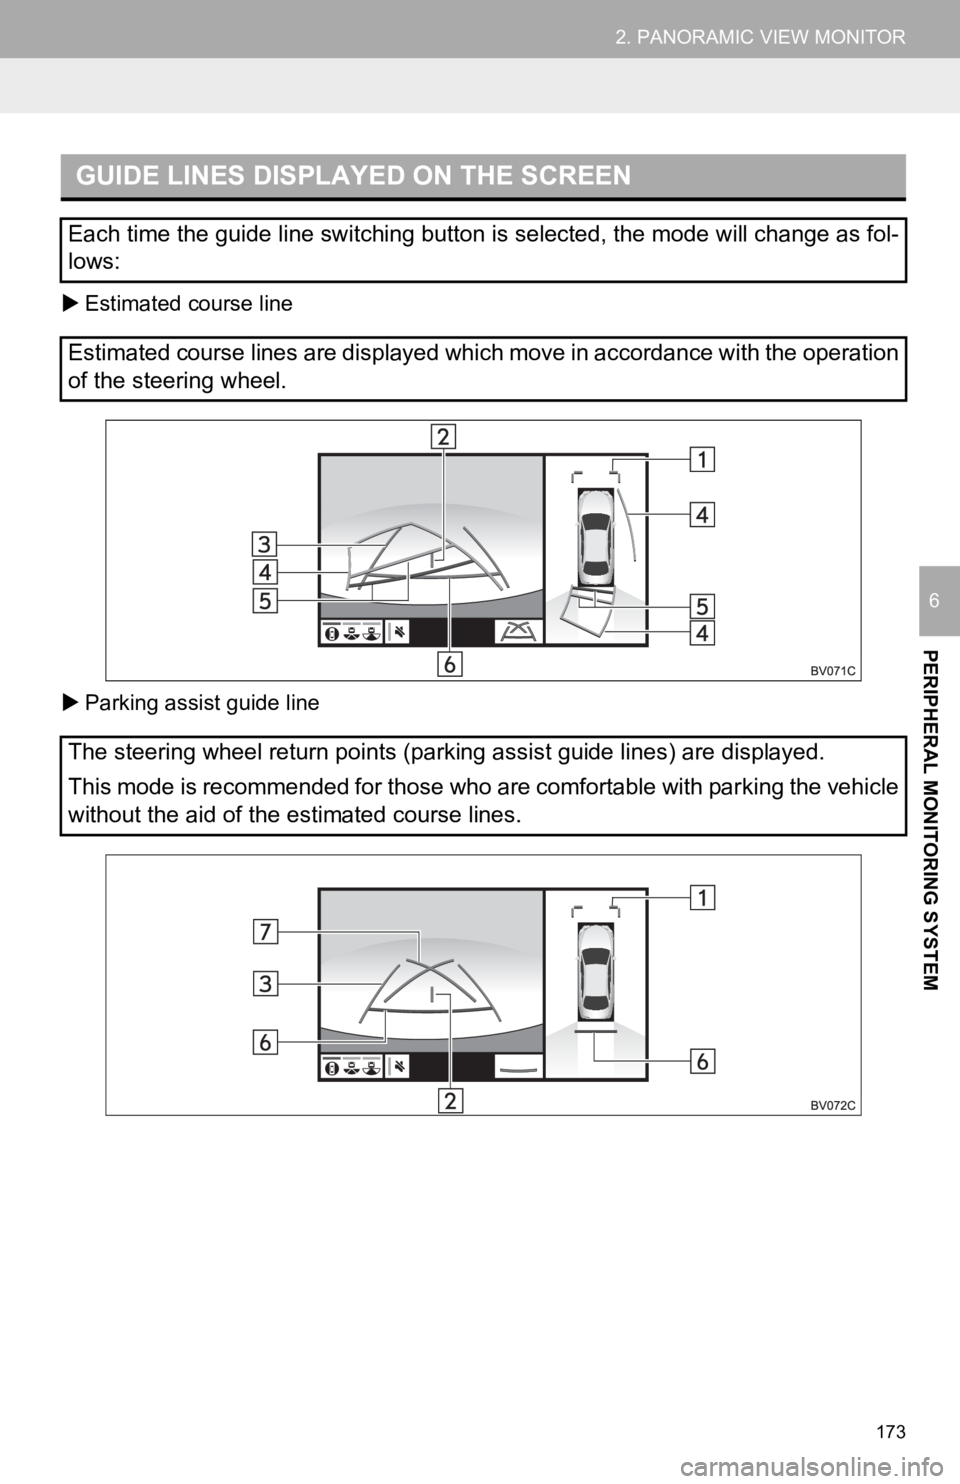
Estimated course line
Parking assist guide line
GUIDE LINES DISPLAYED ON THE SCREEN
Each time the guide line switching button is selected, the mode will change as fol-
lows:
Estimated course lines are displayed which move in accordance w ith the operation
of the steering wheel.
The steering wheel return points (parking assist guide lines) a re displayed.
This mode is recommended for those who are comfortable with par king the vehicle
without the aid of the estimated course lines.
Page 174 of 326
174
2. PANORAMIC VIEW MONITOR
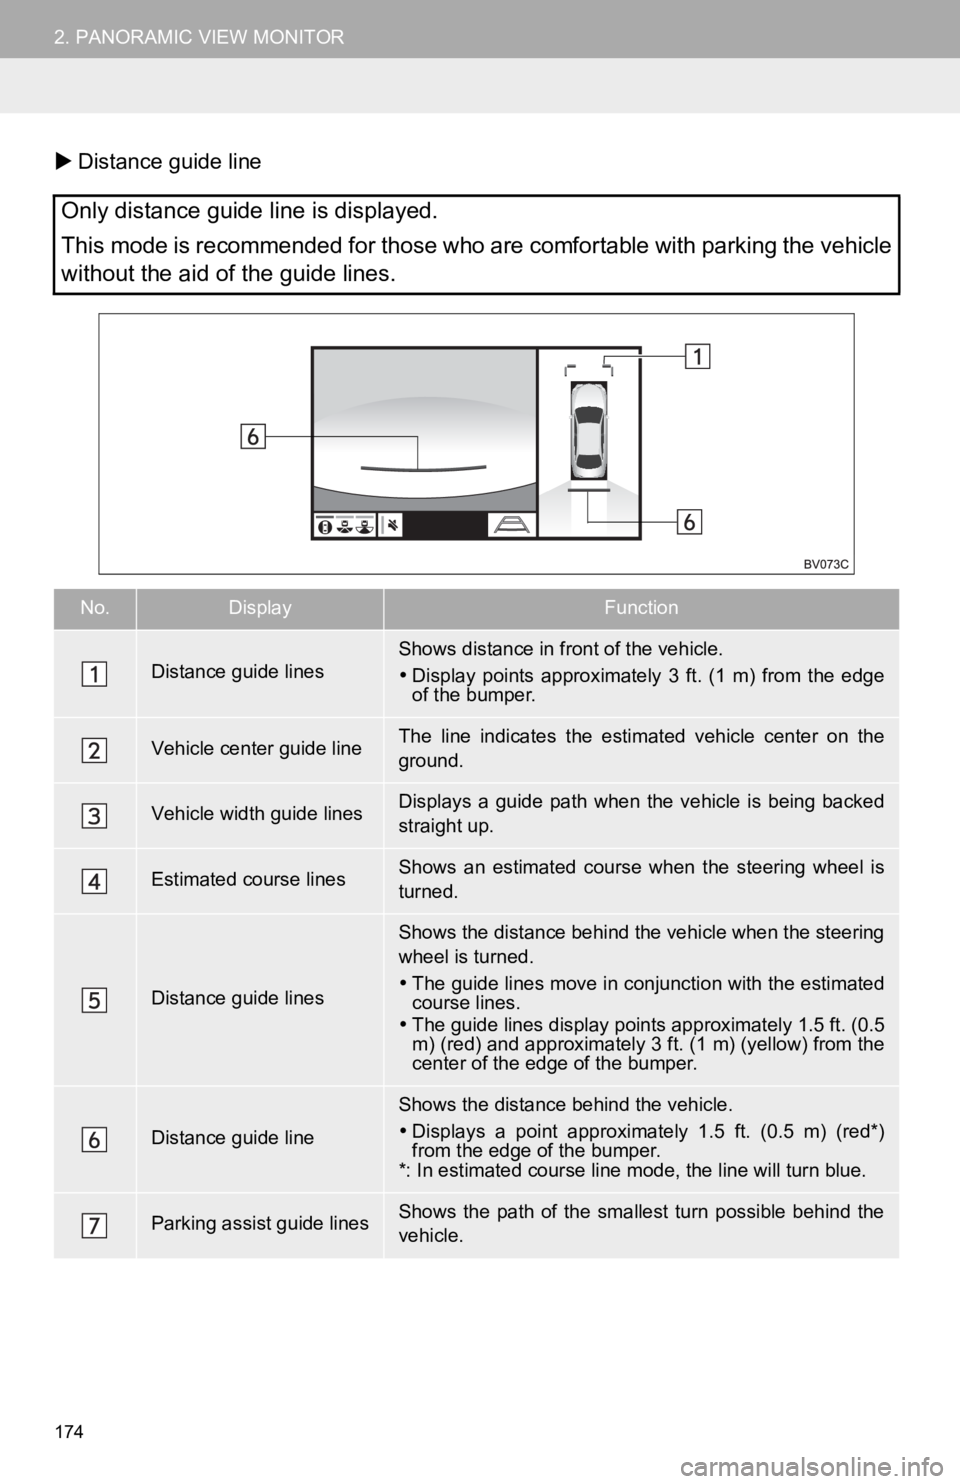
Distance guide line
Only distance guide line is displayed.
This mode is recommended for those who are comfortable with par king the vehicle
without the aid of the guide lines.
No.DisplayFunction
Distance guide linesShows distance in front of the vehicle.
Display points approximately 3 ft. (1 m) from the edge
of the bumper.
Vehicle center guide line The line indicates the estima ted vehicle center on the
ground.
Vehicle width guide linesDisplays a guide path when the vehicle is being backed
straight up.
Estimated course linesShows an estimated course when the steering wheel is
turned.
Distance guide lines
Shows the distance behind the vehicle when the steering
wheel is turned.
The guide lines move in conjunction with the estimated
course lines.
The guide lines display points approximately 1.5 ft. (0.5
m) (red) and approximately 3 ft. (1 m) (yellow) from the
center of the edge of the bumper.
Distance guide line
Shows the distance behind the vehicle.
Displays a point approximately 1.5 ft. (0.5 m) (red*)
from the edge of the bumper.
*: In estimated course line mode, the line will turn blue.
Parking assist guide linesShows the path of the smallest turn possible behind the
vehicle.
Page 175 of 326

175
2. PANORAMIC VIEW MONITOR
PERIPHERAL MONITORING SYSTEM
6
WA R N I N G
●Depending on the circumstances of the vehicle (number of passen gers, amount of lug-
gage, etc.), the position of the guide lines displayed on the s creen may change. Be sure
to check visually around the vehicle before proceeding.
● If the steering wheel is straight and the vehicle width guide l ines and the estimated
course lines are not in alignment, have the vehicle inspected b y your Toyota dealer.
● Do not use the system if the display is incorrect due to an une ven (hilly) road or a non-
straight (curvy) road.
Page 176 of 326
176
2. PANORAMIC VIEW MONITOR
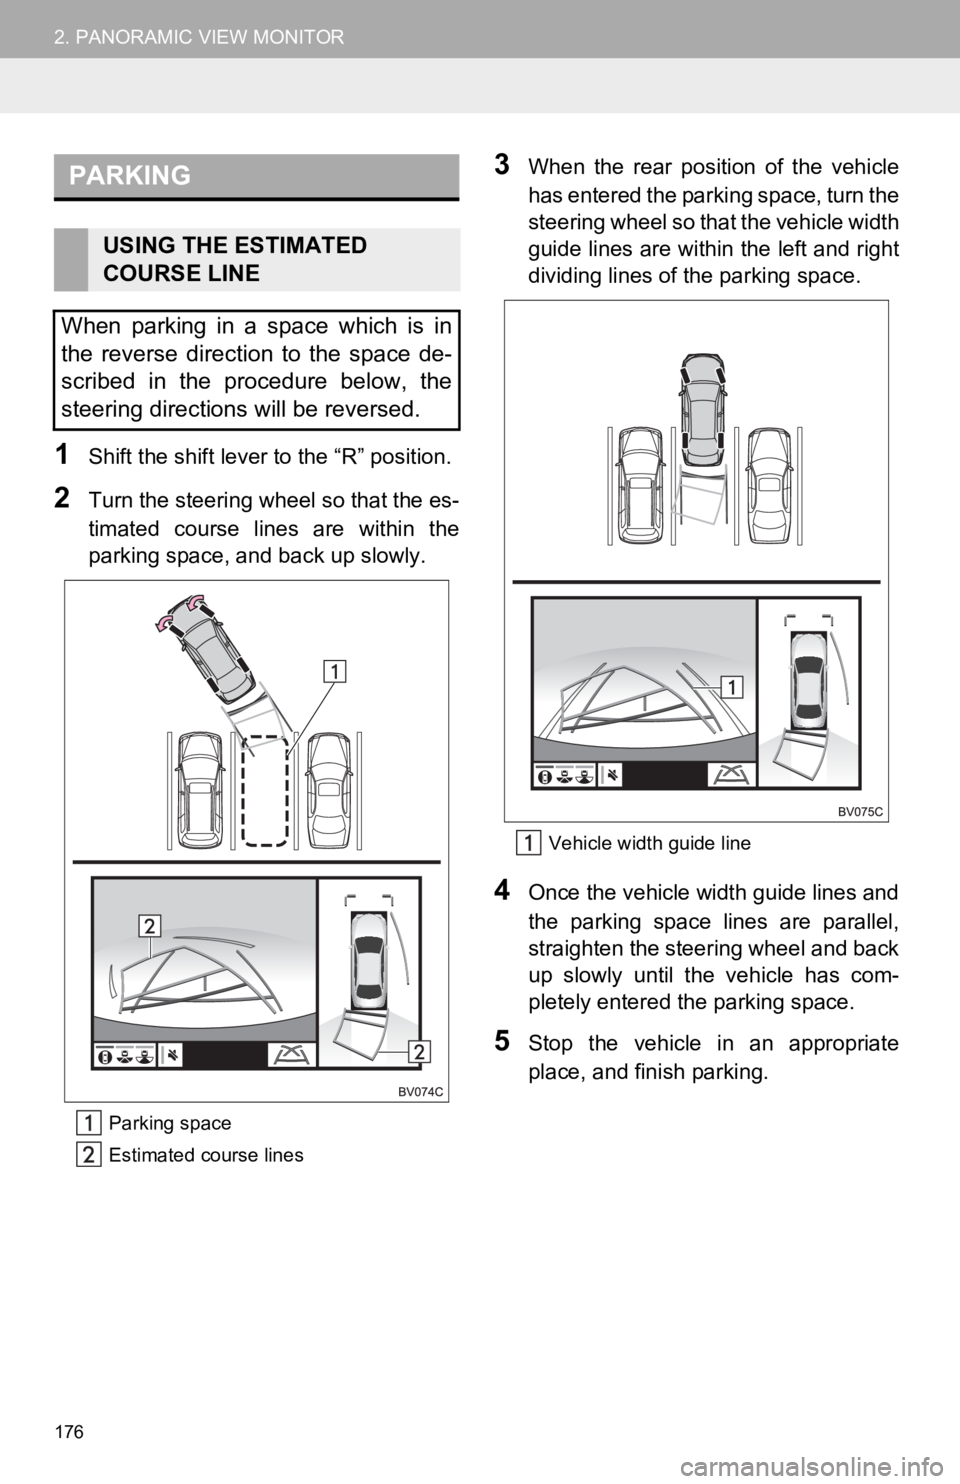
1Shift the shift lever to the “R” position.
2Turn the steering wh eel so that the es-
timated course lines are within the
parking space, and back up slowly.
Parking space
Estimated course lines
3When the rear position of the vehicle
has entered the parking space, turn the
steering wheel so that the vehicle width
guide lines are within the left and right
dividing lines of the parking space.
Vehicle width guide line
4Once the vehicle width guide lines and
the parking space lines are parallel,
straighten the steering wheel and back
up slowly until the vehicle has com-
pletely entered the parking space.
5Stop the vehicle in an appropriate
place, and finish parking.
PARKING
USING THE ESTIMATED
COURSE LINE
When parking in a space which is in
the reverse direction to the space de-
scribed in the procedure below, the
steering directions will be reversed.
Page 177 of 326
177
2. PANORAMIC VIEW MONITOR
PERIPHERAL MONITORING SYSTEM
6
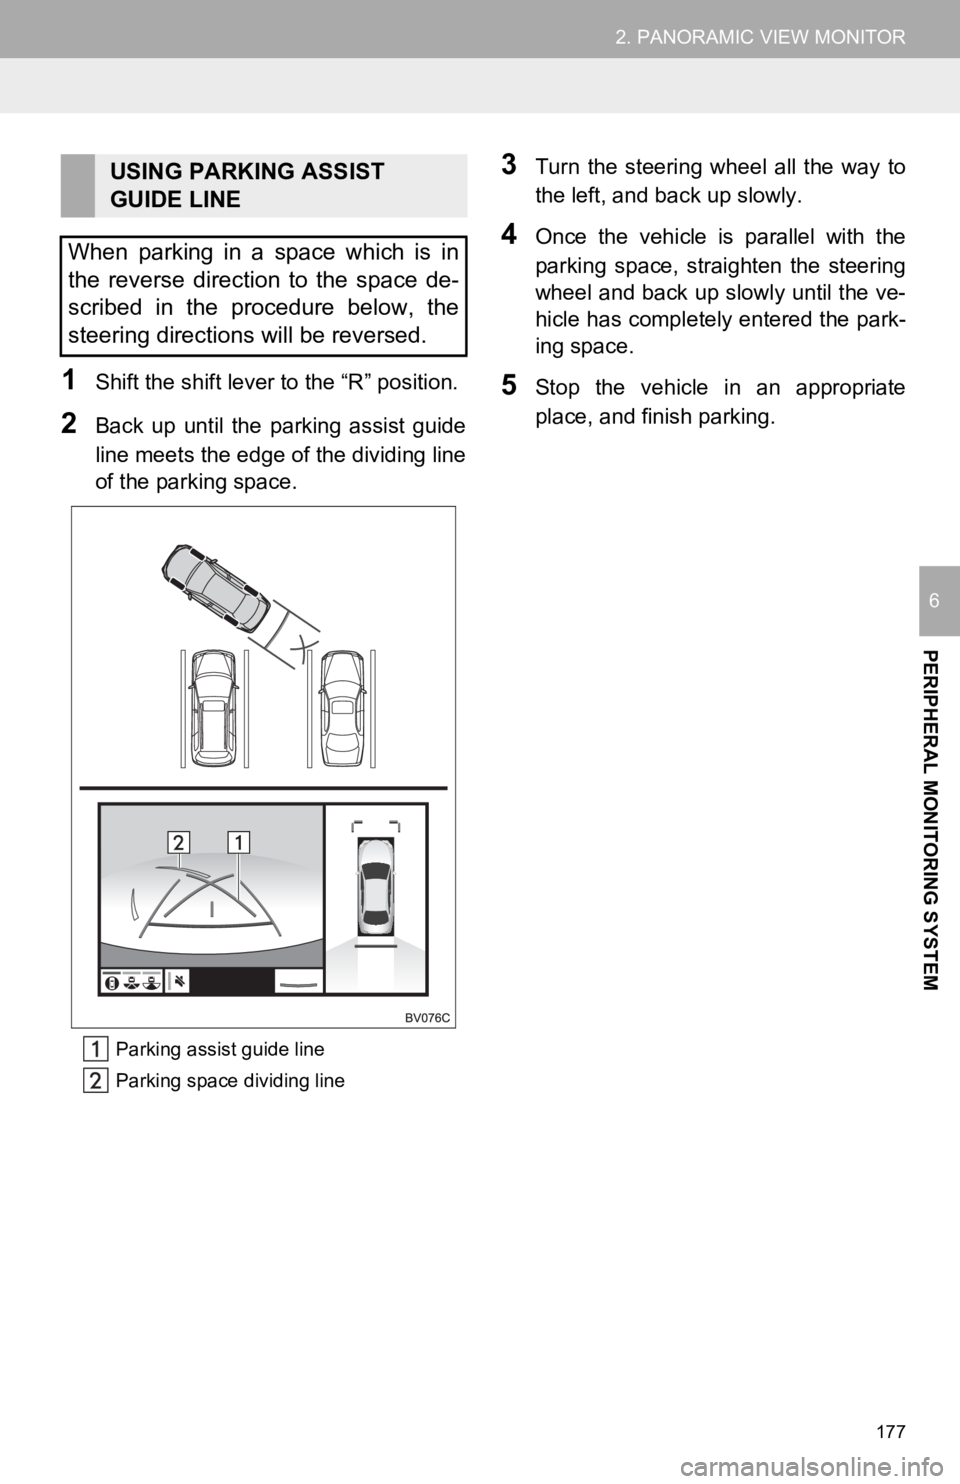
1Shift the shift lever to the “R” position.
2Back up until the parking assist guide
line meets the edge of the dividing line
of the parking space.
Parking assist guide line
Parking space dividing line
3Turn the steering wheel all the way to
the left, and back up slowly.
4Once the vehicle is parallel with the
parking space, straighten the steering
wheel and back up slowly until the ve-
hicle has completely entered the park-
ing space.
5Stop the vehicle in an appropriate
place, and finish parking.
USING PARKING ASSIST
GUIDE LINE
When parking in a space which is in
the reverse direction to the space de-
scribed in the procedure below, the
steering directions will be reversed.
Page 178 of 326
178
2. PANORAMIC VIEW MONITOR
6. MAGNIFYING FUNCTION
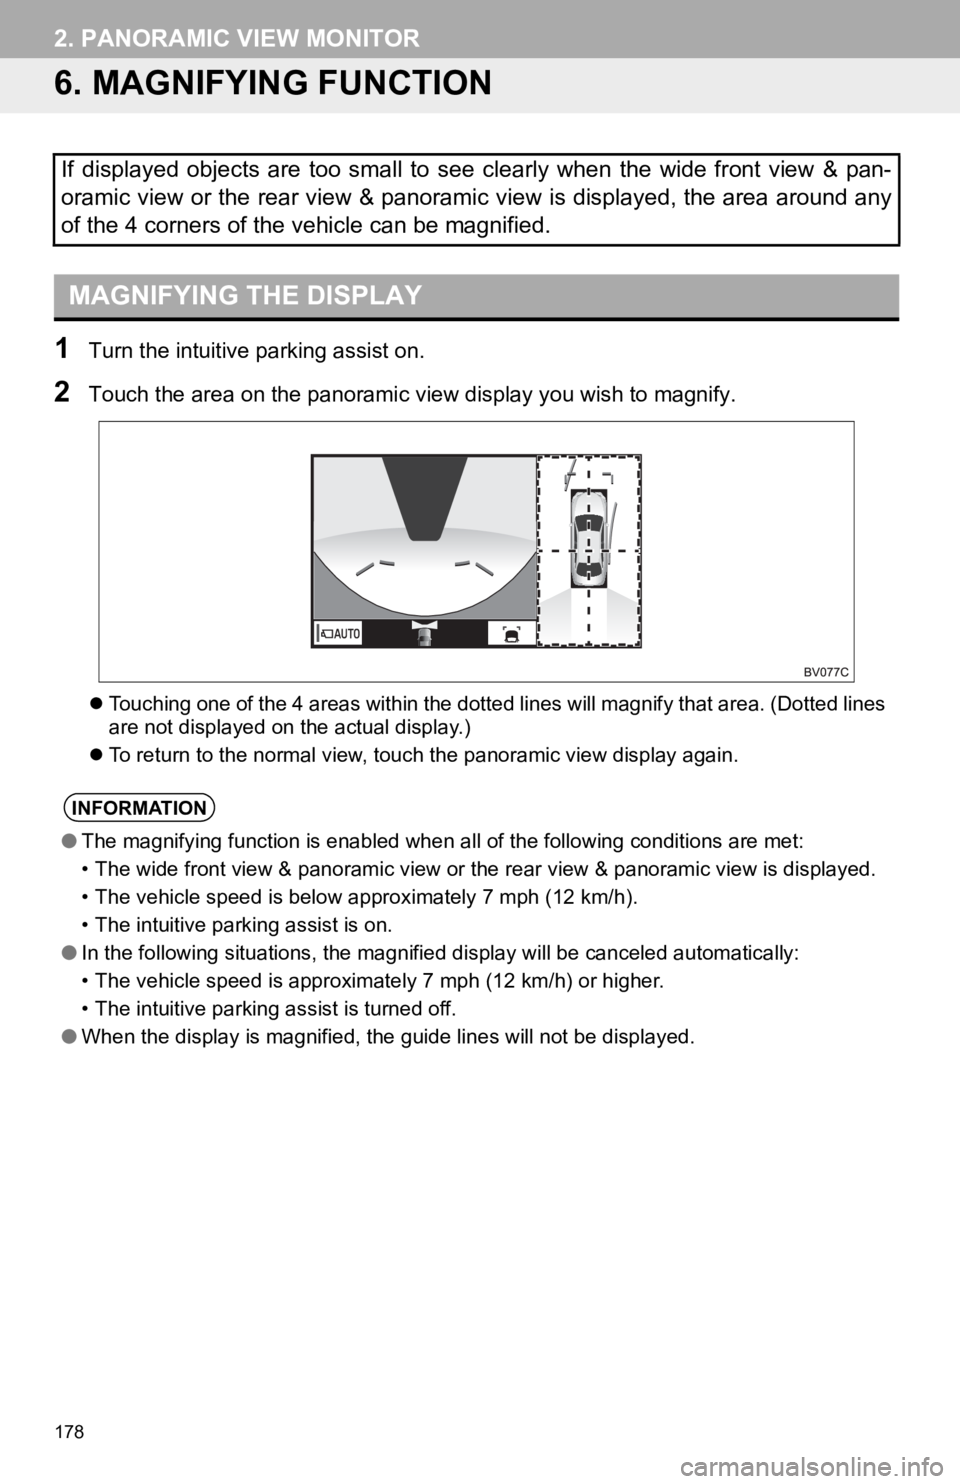
1Turn the intuitive parking assist on.
2Touch the area on the panoramic v iew display you wish to magnify.
Touching one of the 4 areas within the dotted lines will magnif y that area. (Dotted lines
are not displayed on the actual display.)
To return to the normal view, touch the panoramic view display again.
If displayed objects are too small to see clearly when the wide front view & pan-
oramic view or the rear view & panoramic view is displayed, the area around any
of the 4 corners of the vehicle can be magnified.
MAGNIFYING THE DISPLAY
INFORMATION
● The magnifying function is enabled when all of the following conditions are met:
• The wide front view & panoramic view or the rear view & panoramic view is displayed.
• The vehicle speed is below approximately 7 mph (12 km/h).
• The intuitive parking assist is on.
● In the following situations, the magnified display will be canc eled automatically:
• The vehicle speed is approximately 7 mph (12 km/h) or higher.
• The intuitive parking assist is turned off.
● When the display is magnified, the guide lines will not be disp layed.
Page 179 of 326
179
2. PANORAMIC VIEW MONITOR
PERIPHERAL MONITORING SYSTEM
6
7. CUSTOMIZING THE PANORAMIC VIEW MONITOR
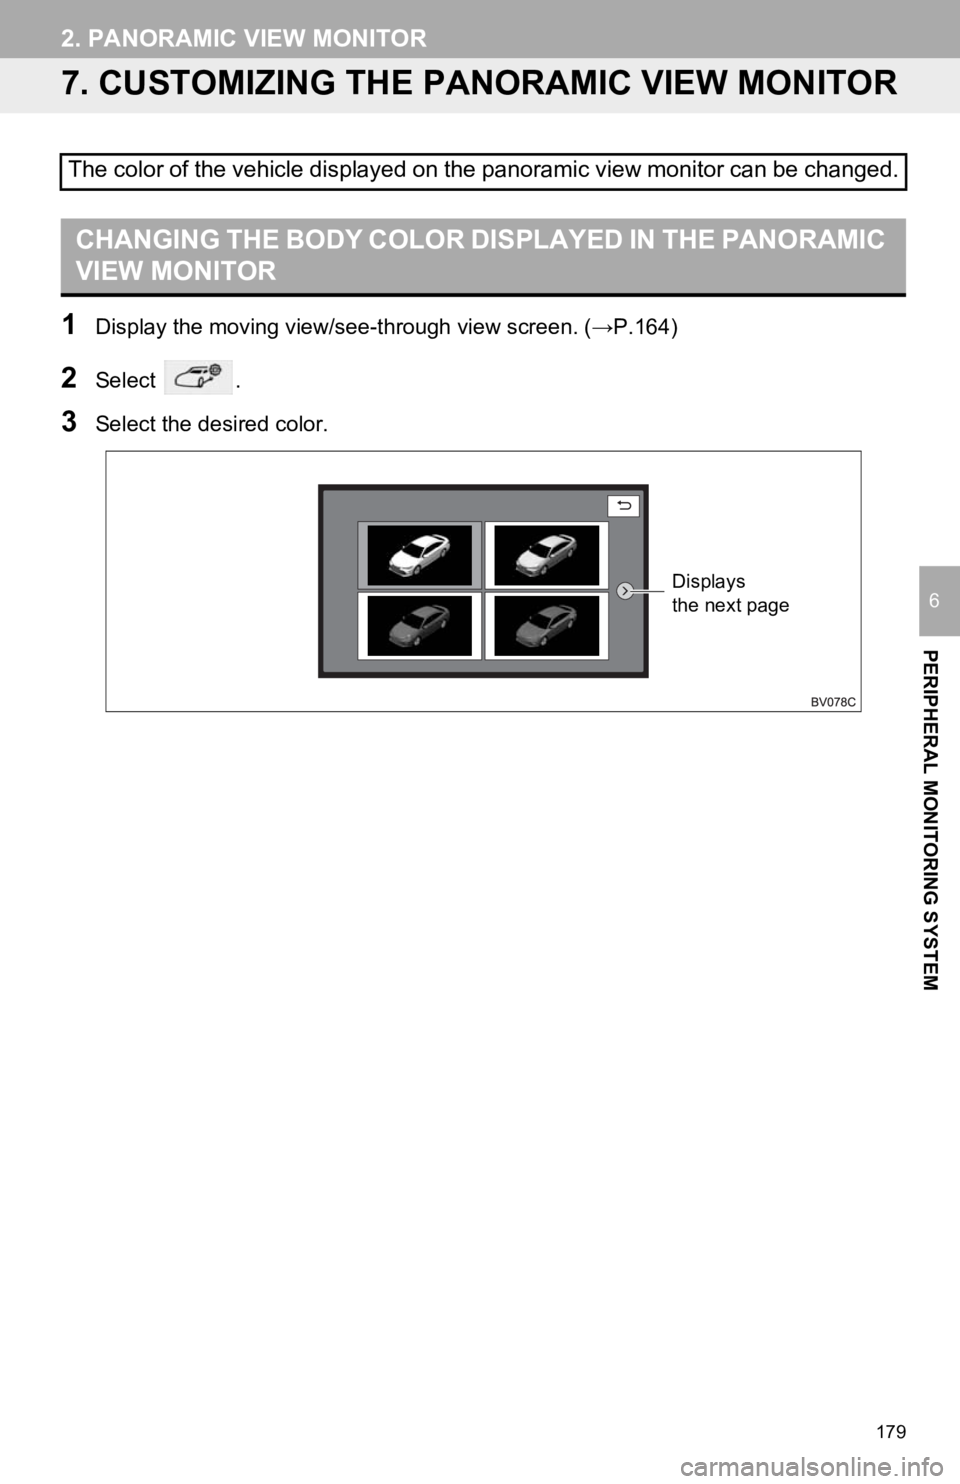
1Display the moving view/see- through view screen. (→P.164)
2Select .
3Select the desired color.
The color of the vehicle displayed on the panoramic view monitor can be changed.
CHANGING THE BODY COLOR DISPLAYED IN THE PANORAMIC
VIEW MONITOR
Displays
the next page
Page 180 of 326
180
2. PANORAMIC VIEW MONITOR
8. PANORAMIC VIEW MONITOR PRECAUTIONS
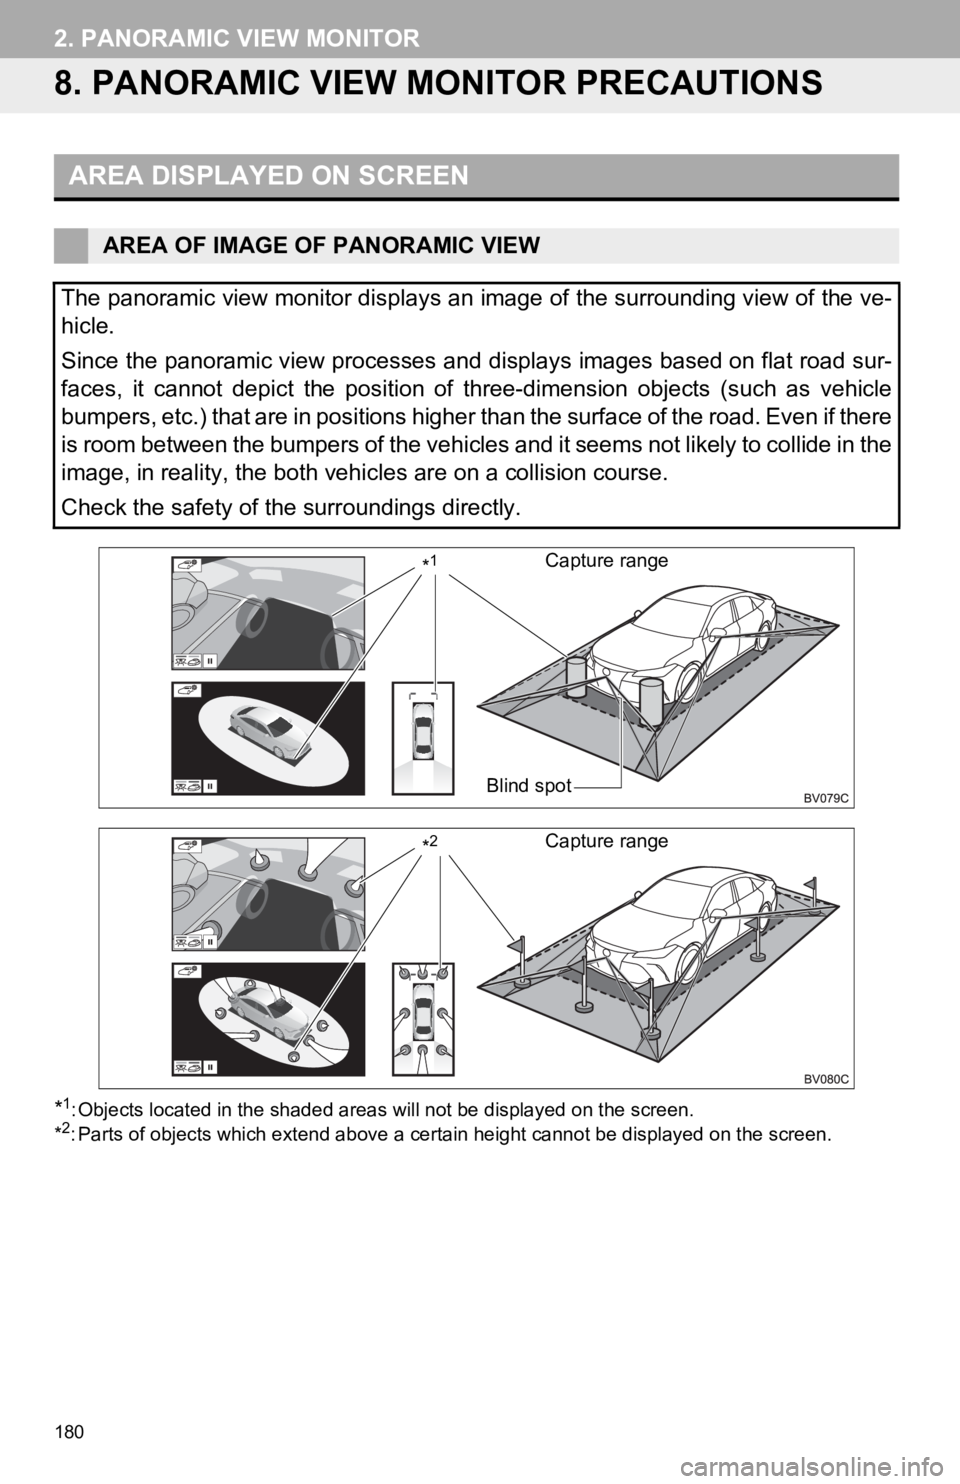
*1: Objects located in the shaded areas will not be displayed on t he screen.
*2: Parts of objects which extend ab ove a certain height cannot be displayed on the screen.
AREA DISPLAYED ON SCREEN
AREA OF IMAGE OF PANORAMIC VIEW
The panoramic view monitor displays an image of the surrounding view of the ve-
hicle.
Since the panoramic view processes and displays images based on flat road sur-
faces, it cannot depict the position of three-dimension objects (such as vehicle
bumpers, etc.) that are in positions higher than the surface of the road. Even if there
is room between the bumpers of the vehicles and it seems not li kely to collide in the
image, in reality, the both vehicles are on a collision course.
Check the safety of the surroundings directly.
Blind spot
Capture range*1
Capture range*2