TOYOTA AVALON HYBRID 2020 (in English) User Guide
Manufacturer: TOYOTA, Model Year: 2020, Model line: AVALON HYBRID, Model: TOYOTA AVALON HYBRID 2020Pages: 52, PDF Size: 4.71 MB
Page 11 of 52
9
FEATURES & OPERATIONS
The Hybrid Synergy Drive System utilizes a computer-controlled gasoline \
engine
and electric motor to provide the most efficient combination of power fo\
r the
vehicle. To conserve energy, when the brakes are applied the braking for\
ce
generates electricity which is then sent to the traction battery. In add\
ition, the
engine shuts off when the vehicle is stopped. The benefits are better fu\
el economy,
reduced vehicle emissions and improved performance.
NOTE: Fuel consumption and energy information of the Hybrid System are
shown on the Multi-Information Display (MID) and/or Audio Multimedia System
screen.
1. Ensure tire pressures are maintained at levels specified in the Owner\
’s Manual.
2. Link trips to reduce engine cold starts whenever possible.
3. Avoid driving at speeds that are higher than necessary, especially on\
the highway.
4. When possible, avoid sudden stops to maximize regenerative braking en\
ergy.
5. Minimize use of the air conditioning.
OVERVIEW
FEATURES & OPERATIONS
TOYOTA SAFETY SENSE
SAFETY & EMERGENCY FEATURES
Hybrid Synergy Drive System
TIPS FOR IMPROVED FUEL ECONOMY
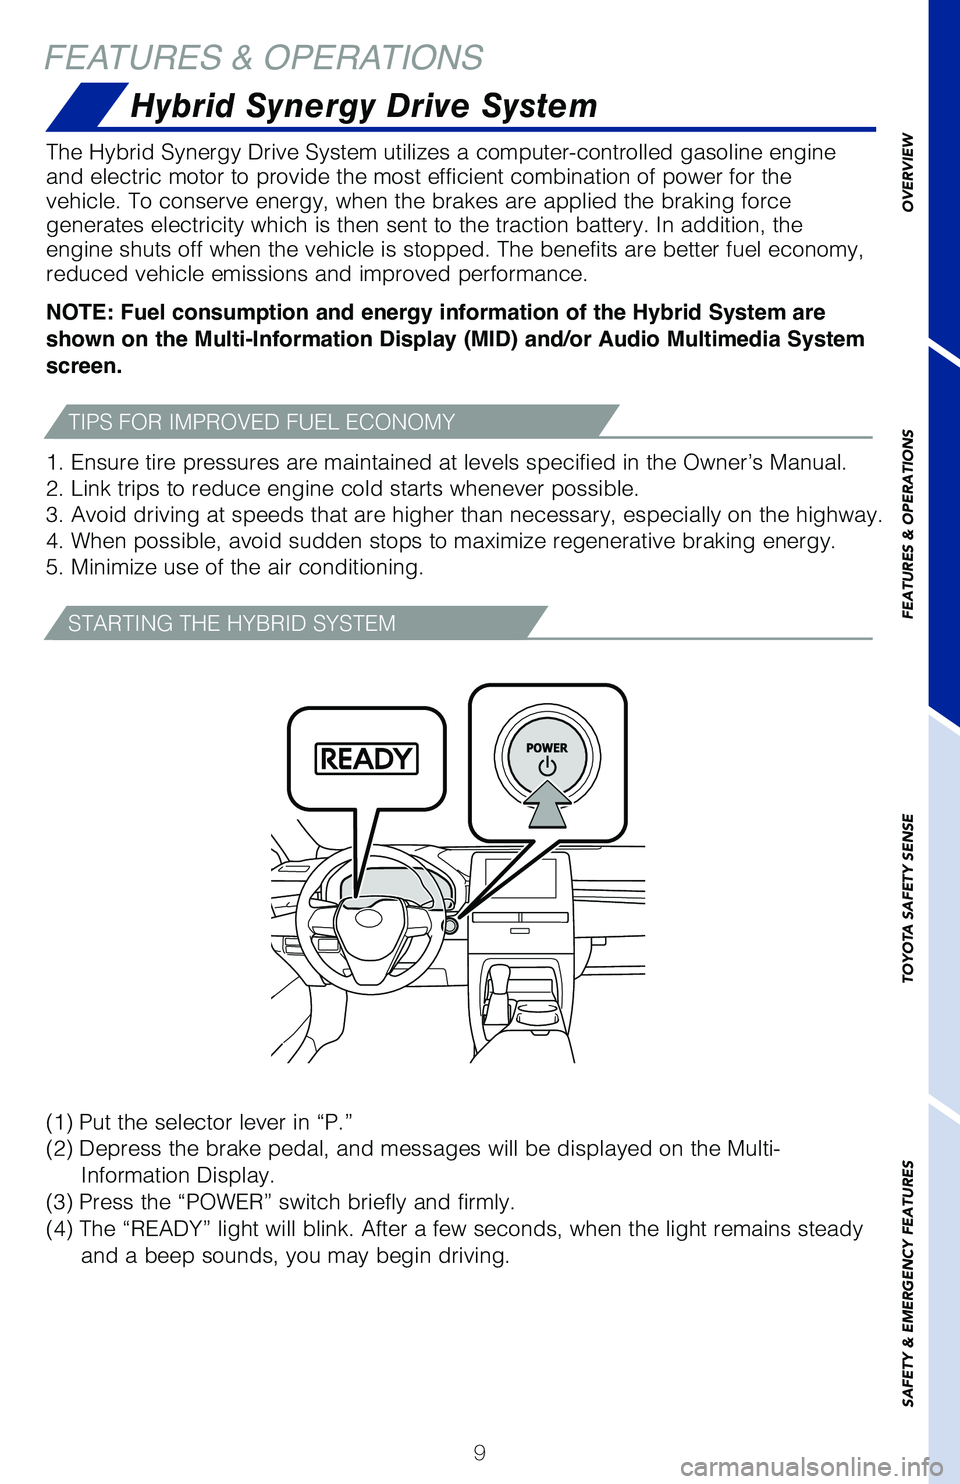
(1) Put the selector lever in “P.”
(2) Depress the brake pedal, and messages will be displayed on the Multi-
Information Display.
(3) Press the “POWER” switch briefly and firmly.
(4) The “READY” light will blink. After a few seconds, when the light remains steady and a beep sounds, you may begin driving.
STARTING THE HYBRID SYSTEM
Page 12 of 52
10
Hybrid transmission
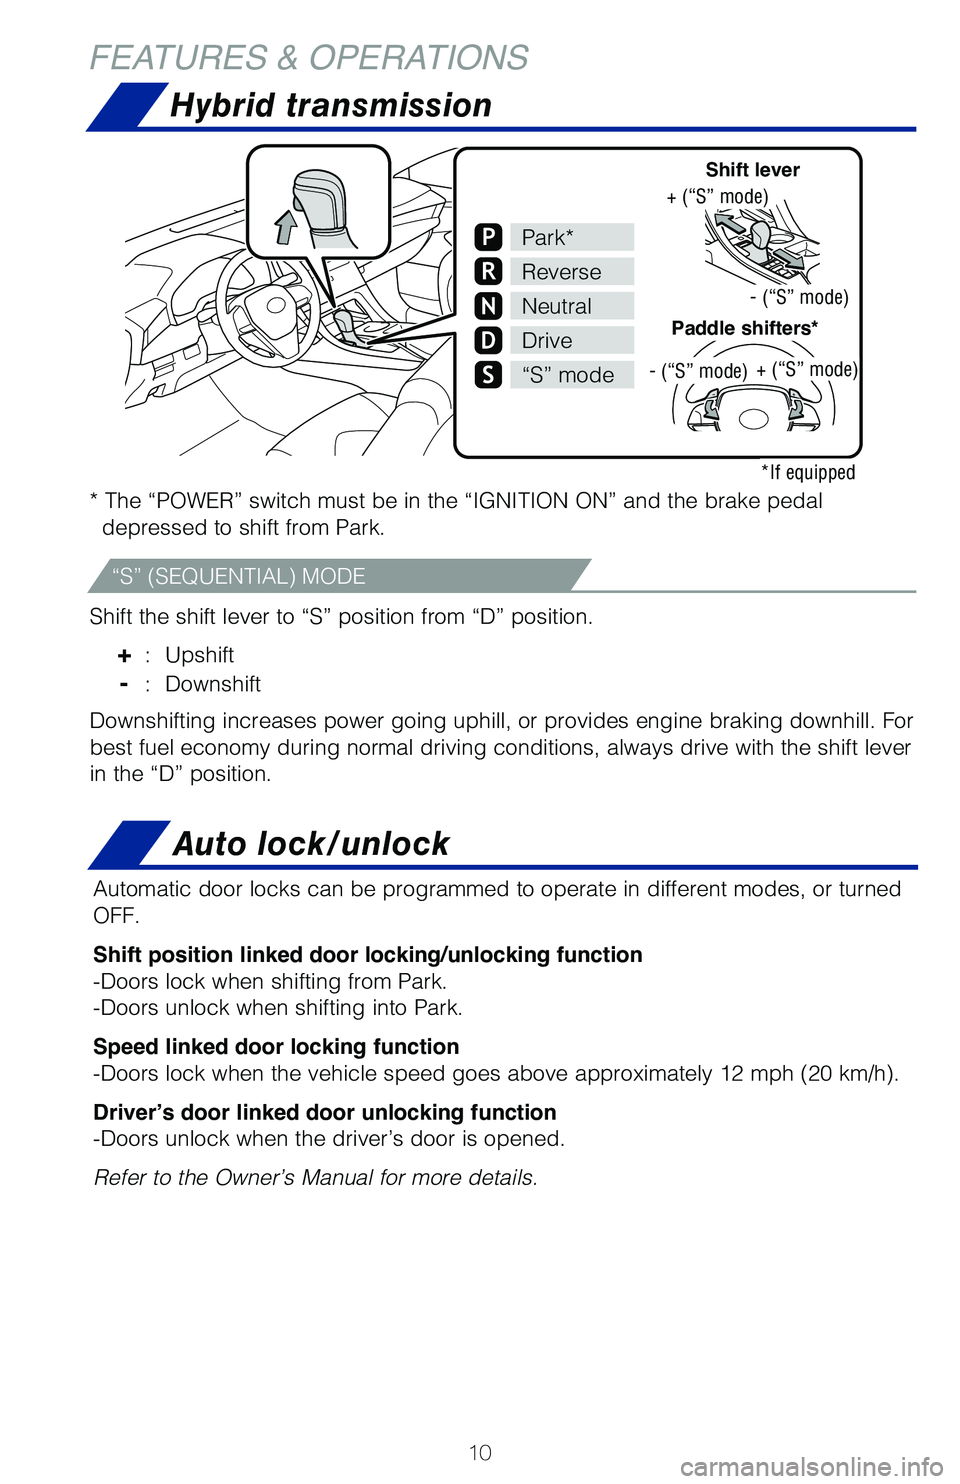
* The “POWER” switch must be in the “IGNITION ON” and the br\
ake pedal depressed to shift from Park.
Shift the shift lever to “S” position from “D” position.
+ : Upshift
- : Downshift
Downshifting increases power going uphill, or provides engine braking do\
wnhill. For
best fuel economy during normal driving conditions, always drive with th\
e shift lever
in the “D” position.
Auto lock/unlock
Automatic door locks can be programmed to operate in different modes, or\
turned
OFF.
Shift position linked door locking/unlocking function
-Doors lock when shifting from Park.
-Doors unlock when shifting into Park.
Speed linked door locking function
-Doors lock when the vehicle speed goes above approximately 12 mph (20 km/h).
Driver’s door linked door unlocking function
-Doors unlock when the driver’s door is opened.
Refer to the Owner’s Manual for more details.
+ (“S” mode)
- (“S” mode)
- (“S” mode)
+ (“S” mode)
N
P
R
N
D
Park*
Reverse
Neutral
Drive
“S” mode
Shift lever
Paddle shifters*
*If equipped
FEATURES & OPERATIONS
“S” (SEQUENTIAL) MODE
Page 13 of 52
11
Driving mode select
EV drive mode
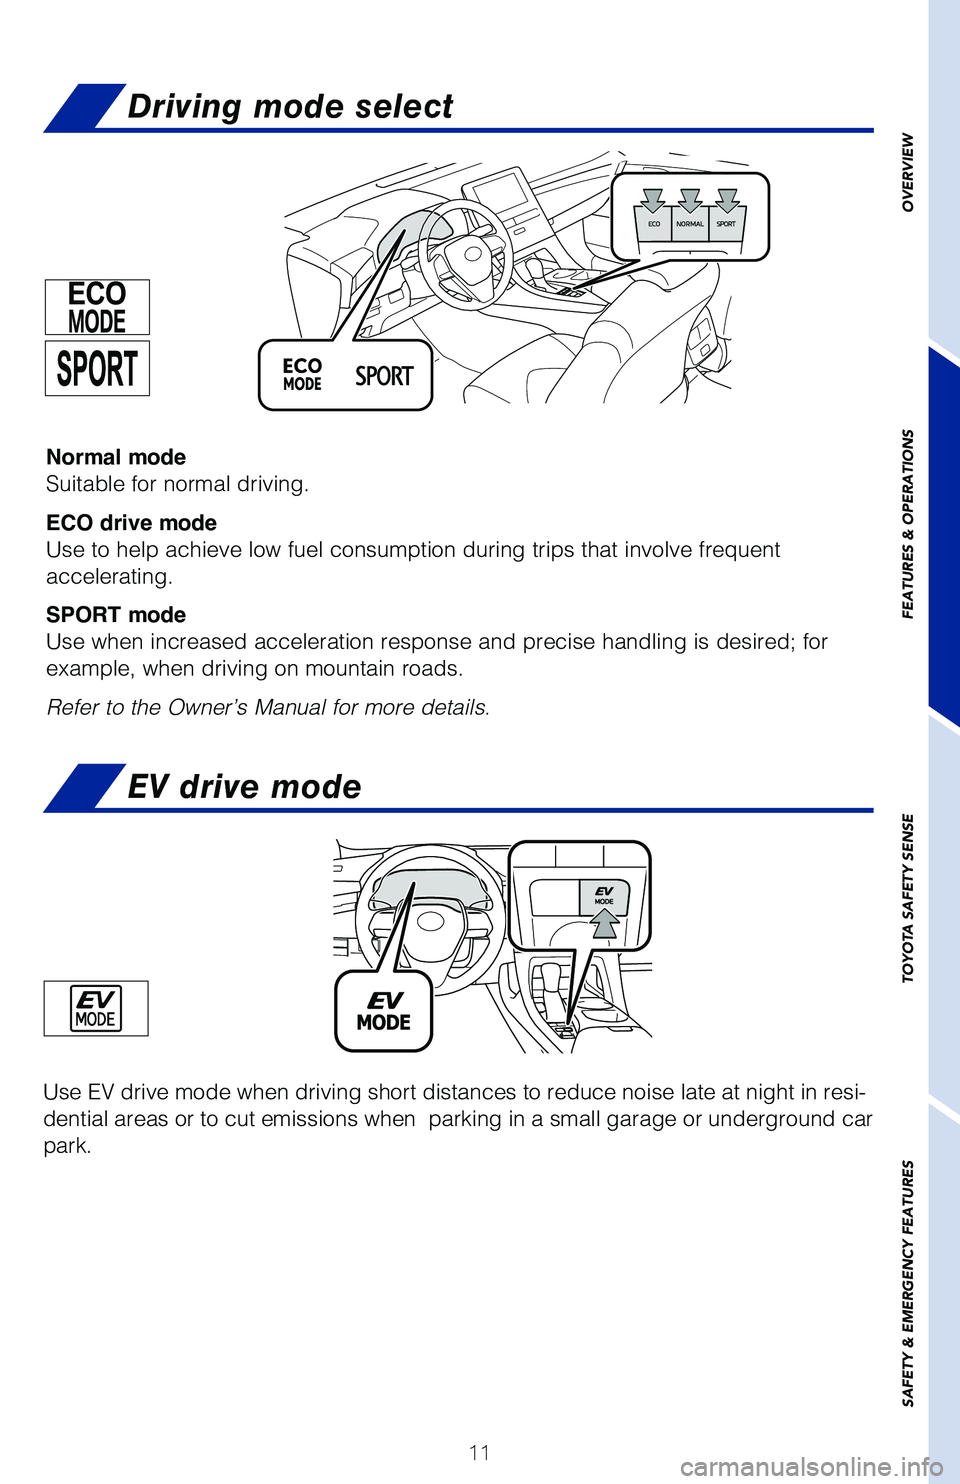
Normal mode
Suitable for normal driving.
ECO drive mode
Use to help achieve low fuel consumption during trips that involve frequ\
ent
accelerating.
SPORT mode
Use when increased acceleration response and precise handling is desired\
; for
example, when driving on mountain roads.
Refer to the Owner’s Manual for more details.
Use EV drive mode when driving short distances to reduce noise late at n\
ight in resi-
dential areas or to cut emissions when parking in a small garage or und\
erground car
park.
OVERVIEW
FEATURES & OPERATIONS
TOYOTA SAFETY SENSE
SAFETY & EMERGENCY FEATURES
Page 14 of 52
12
Electric parking brake
Driver sideAutomatic modeManual mode (Brake HOLD switch)
Parking brake lightStandby indicatorOperated indicator
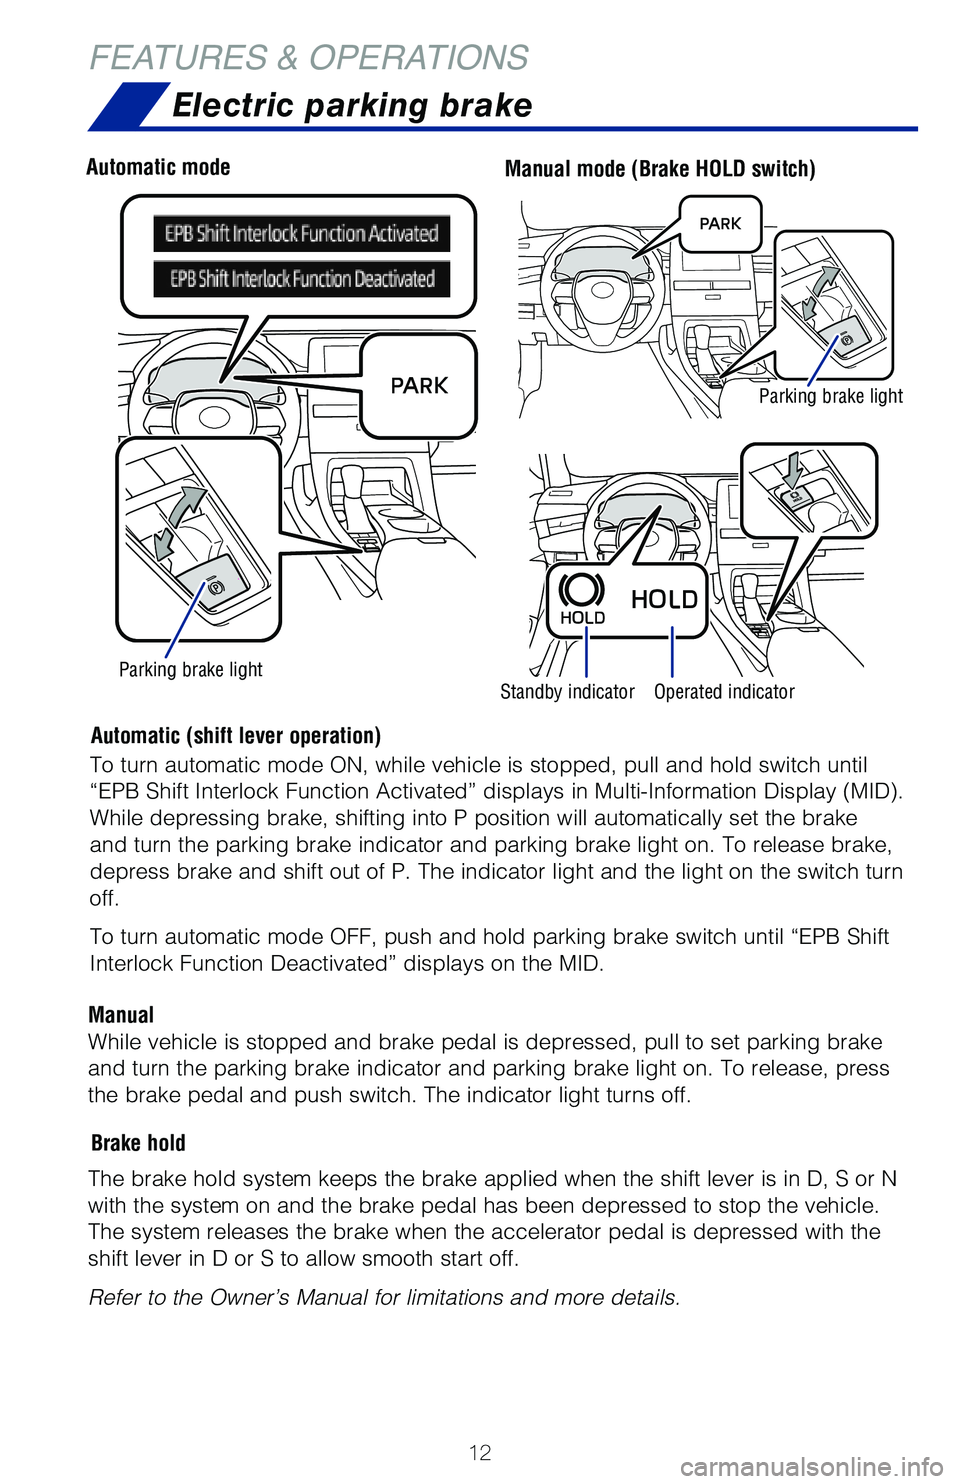
Automatic (shift lever operation)
Brake hold
ManualTo turn automatic mode ON, while vehicle is stopped, pull and hold switc\
h until
“EPB Shift Interlock Function Activated” displays in Multi-Information Display (MID).
While depressing brake, shifting into P position will automatically set \
the brake
and turn the parking brake indicator and parking brake light on. To rele\
ase brake,
depress brake and shift out of P. The indicator light and the light on t\
he switch turn
off.
To turn automatic mode OFF, push and hold parking brake switch until “\
EPB Shift
Interlock Function Deactivated” displays on the MID.
While vehicle is stopped and brake pedal is depressed, pull to set parki\
ng brake
and turn the parking brake indicator and parking brake light on. To rele\
ase, press
the brake pedal and push switch. The indicator light turns off.
The brake hold system keeps the brake applied when the shift lever is in\
D, S or N
with the system on and the brake pedal has been depressed to stop the ve\
hicle.
The system releases the brake when the accelerator pedal is depressed wi\
th the
shift lever in D or S to allow smooth start off.
Refer to the Owner’s Manual for limitations and more details.
Parking brake light
FEATURES & OPERATIONS
Page 15 of 52
13
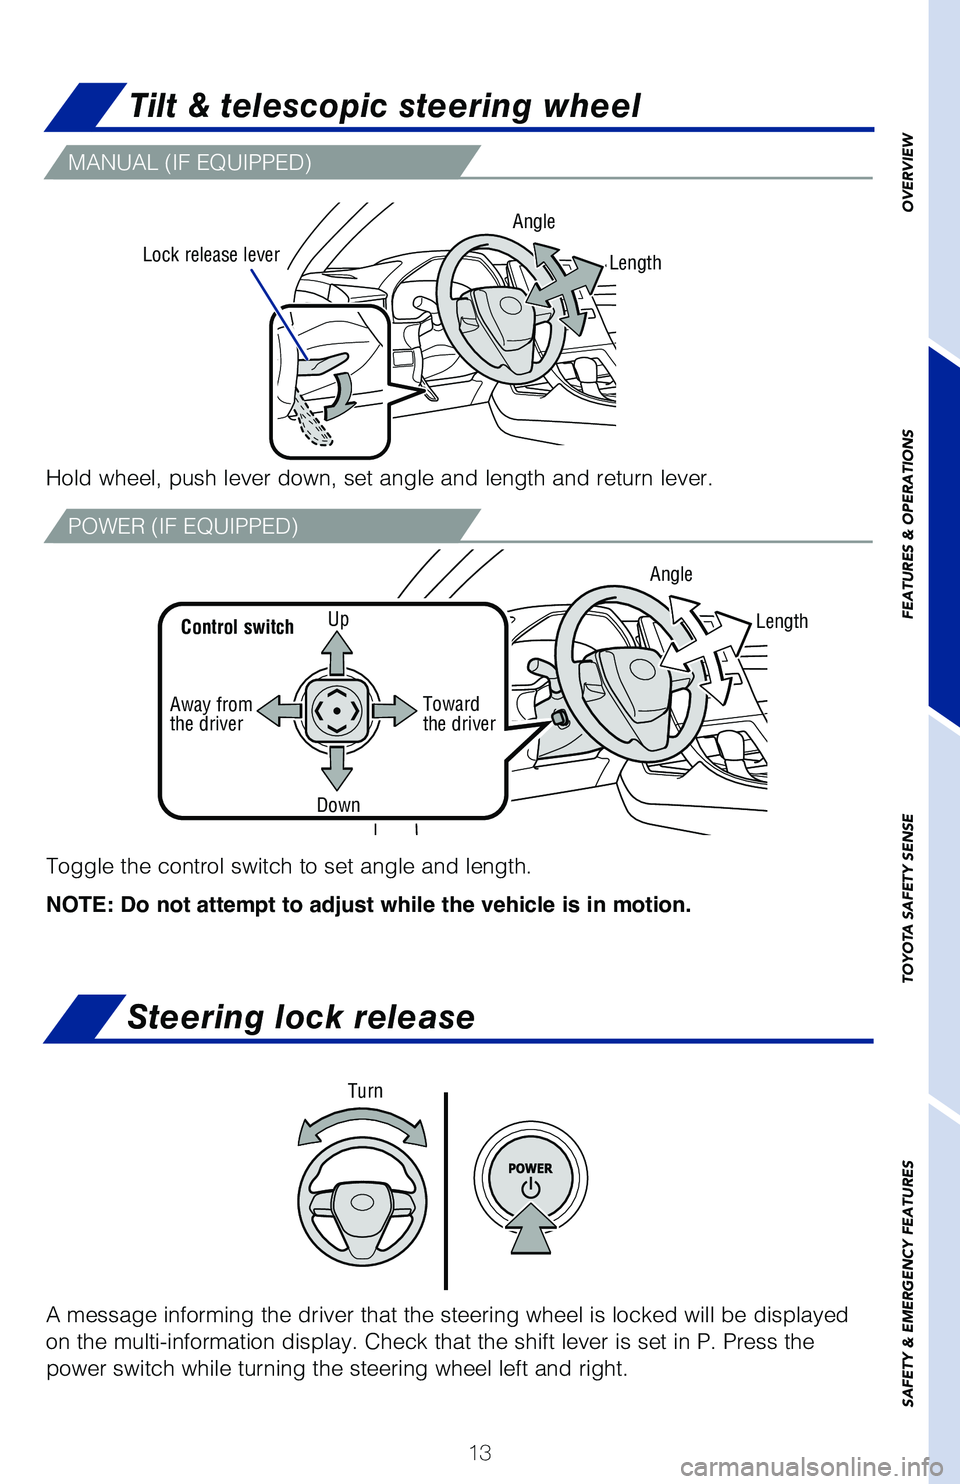
Tilt & telescopic steering wheel
Steering lock release
A message informing the driver that the steering wheel is locked will be\
displayed
on the multi-information display. Check that the shift lever is set in P\
. Press the
power switch while turning the steering wheel left and right.
Turn
MANUAL (IF EQUIPPED)
POWER (IF EQUIPPED)
Hold wheel, push lever down, set angle and length and return lever.
Lock release leverAngle
Toggle the control switch to set angle and length.
NOTE: Do not attempt to adjust while the vehicle is in motion.
UpControl switch
Away from
the driver
Length
Toward
the driver
Down Angle
Length
OVERVIEW
FEATURES & OPERATIONS
TOYOTA SAFETY SENSE
SAFETY & EMERGENCY FEATURES
Page 16 of 52
14
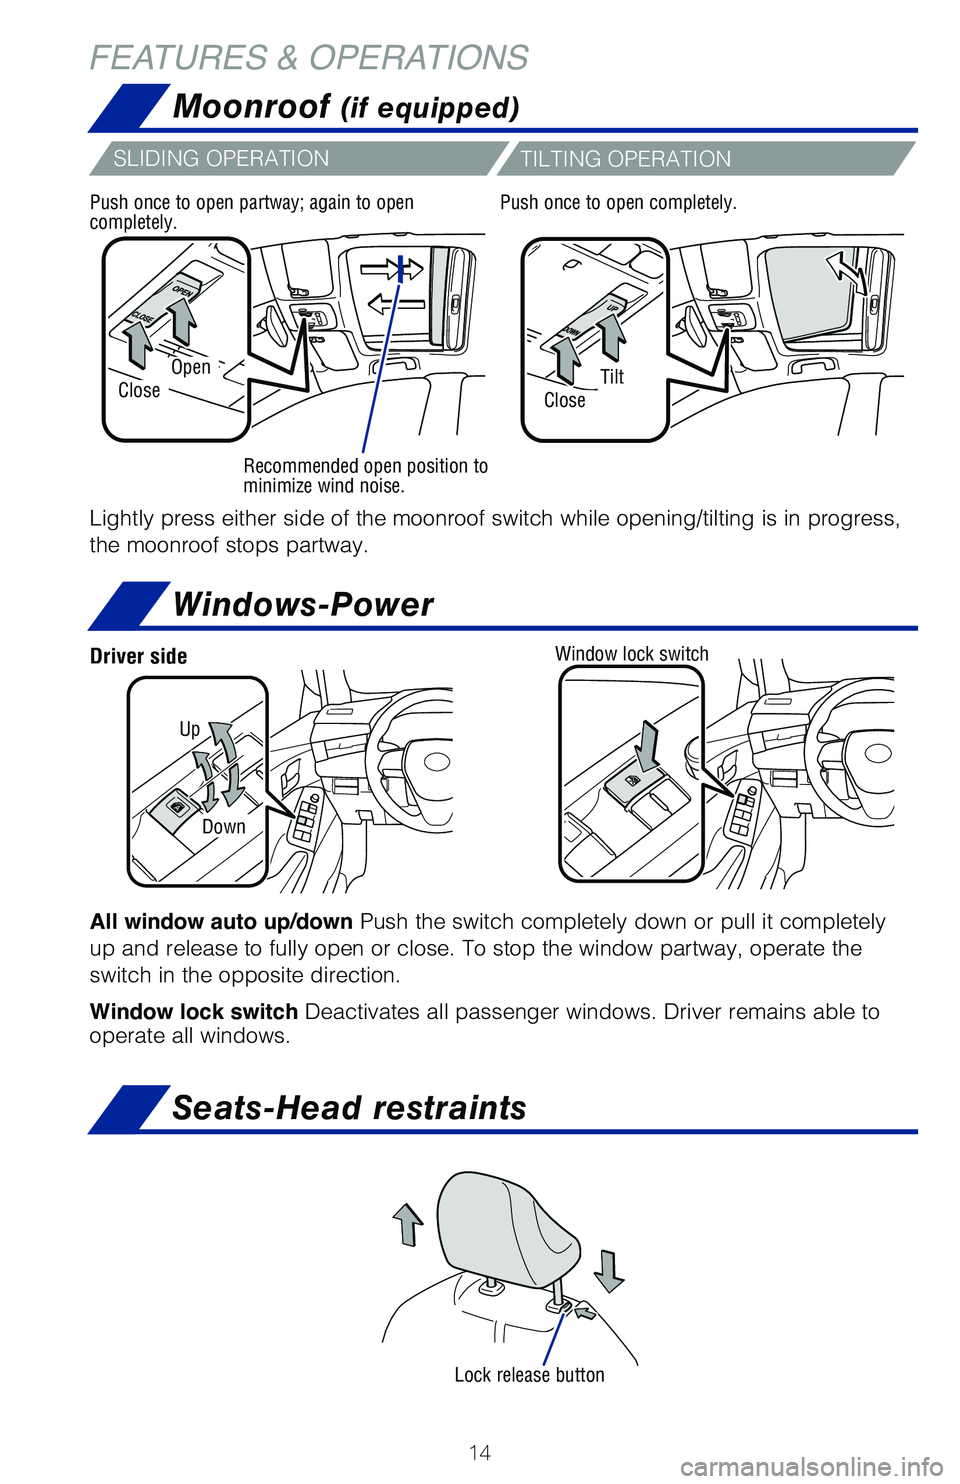
Windows-Power
Moonroof (if equipped)
Seats-Head restraints
FEATURES & OPERATIONS
All window auto up/down Push the switch completely down or pull it completely
up and release to fully open or close. To stop the window partway, opera\
te the
switch in the opposite direction.
Window lock switch Deactivates all passenger windows. Driver remains able to
operate all windows.
OpenTiltCloseClose
Recommended open position to
minimize wind noise.
Lightly press either side of the moonroof switch while opening/tilting i\
s in progress,
the moonroof stops partway.
Push once to open partway; again to open
completely. Push once to open completely.
SLIDING OPERATION
TILTING OPERATION
Up
Down
Driver sideWindow lock switch
Lock release button
Page 17 of 52
15
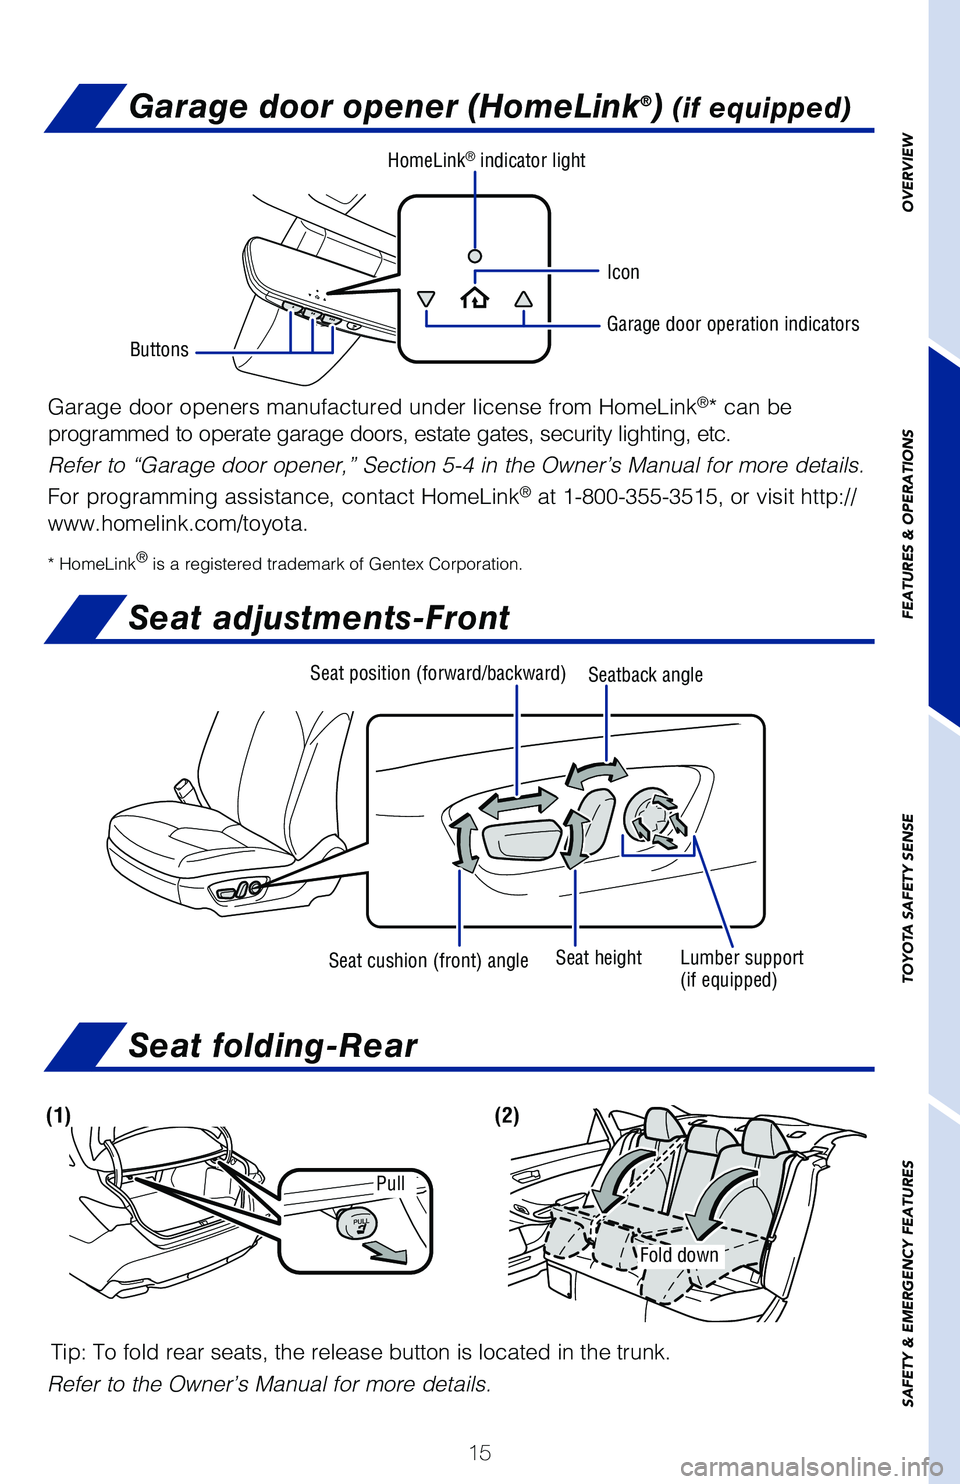
Seat adjustments-Front
Garage door openers manufactured under license from HomeLink®* can be
programmed to operate garage doors, estate gates, security lighting, etc\
.
Refer to “Garage door opener,” Section 5-4 in the Owner’s Manual for more details.
For programming assistance, contact HomeLink
® at 1-800-355-3515, or visit http://
www.homelink.com/toyota.
* HomeLink® is a registered trademark of Gentex Corporation.
Garage door opener (HomeLink®) (if equipped)
HomeLink® indicator light
Buttons
Garage door operation indicators
Icon
Seat position (forward/backward)
Seat cushion (front) angle Seat height
Lumber support
(if equipped)
Seatback angle
OVERVIEW
FEATURES & OPERATIONS
TOYOTA SAFETY SENSE
SAFETY & EMERGENCY FEATURES
Seat folding-Rear
(1)(2)
Tip: To fold rear seats, the release button is located in the trunk.
Refer to the Owner’s Manual for more details.
Pull
Fold down
Page 18 of 52
16
FEATURES & OPERATIONS
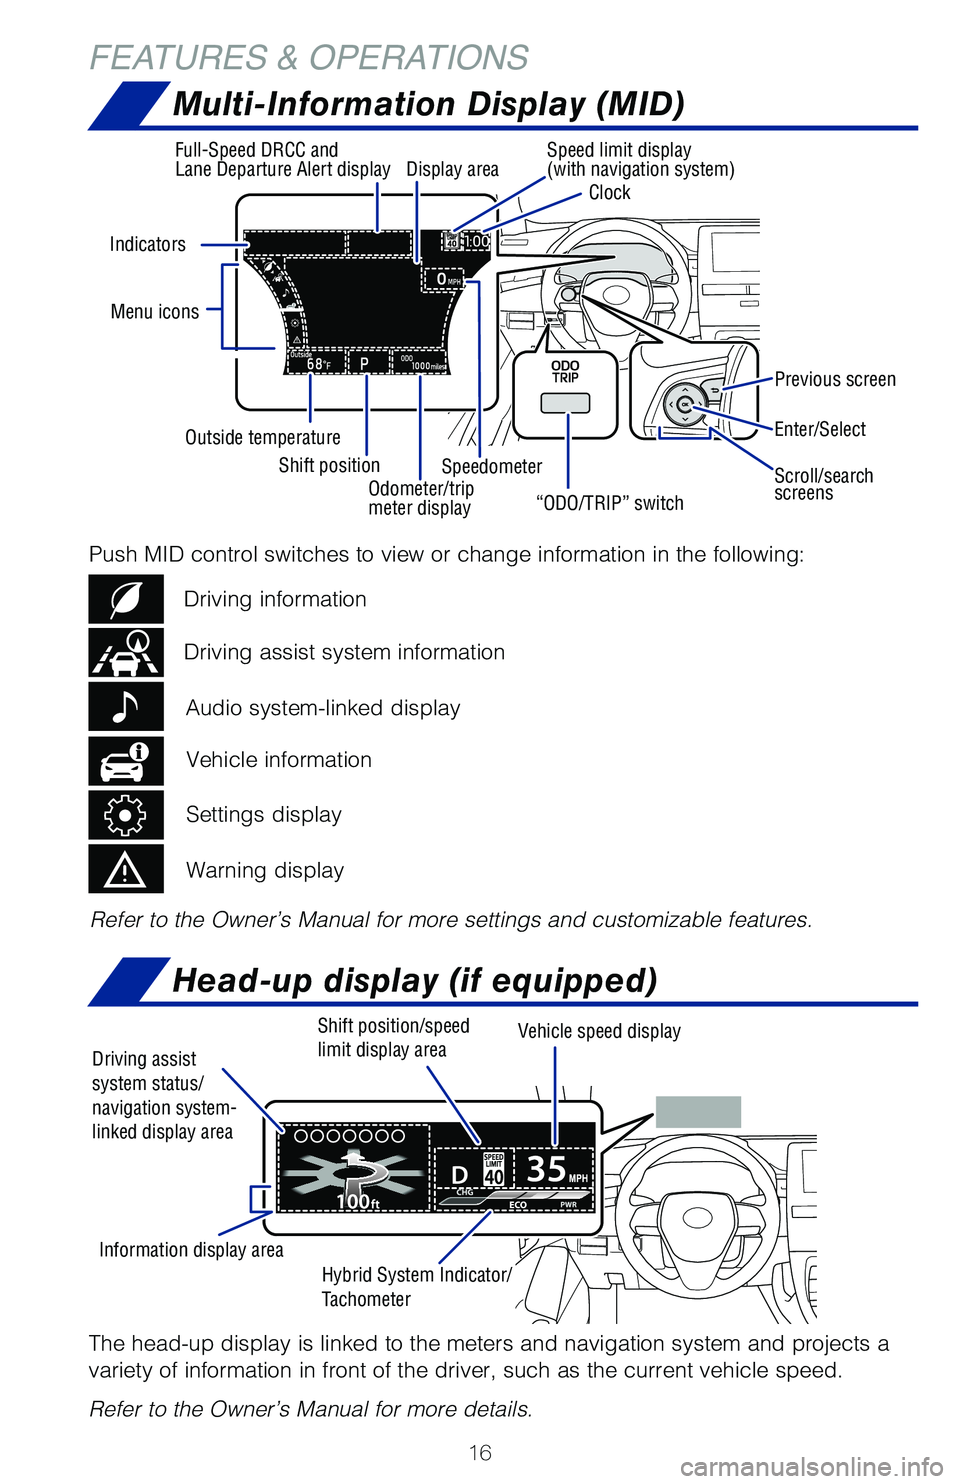
Multi-Information Display (MID)
Head-up display (if equipped)
Refer to the Owner’s Manual for more settings and customizable features.
Previous screen
Indicators
Enter/Select
Scroll/search
screens
“ODO/TRIP” switch
Speed limit display
(with navigation system)
Full-Speed DRCC and
Lane Departure Alert display
Menu icons
Shift positionDisplay area
Speedometer
Outside temperature
Odometer/trip
meter display
Push MID control switches to view or change information in the following\
:
Driving assist system information Driving information
Vehicle information
Audio system-linked display
Settings display
Warning display
The head-up display is linked to the meters and navigation system and pr\
ojects a
variety of information in front of the driver, such as the current vehic\
le speed.
Refer to the Owner’s Manual for more details.
Driving assist
system status/
navigation system-
linked display area Shift position/speed
limit display area
Hybrid System Indicator/
Tachometer
Information display area Vehicle speed display
Clock
Page 19 of 52
17
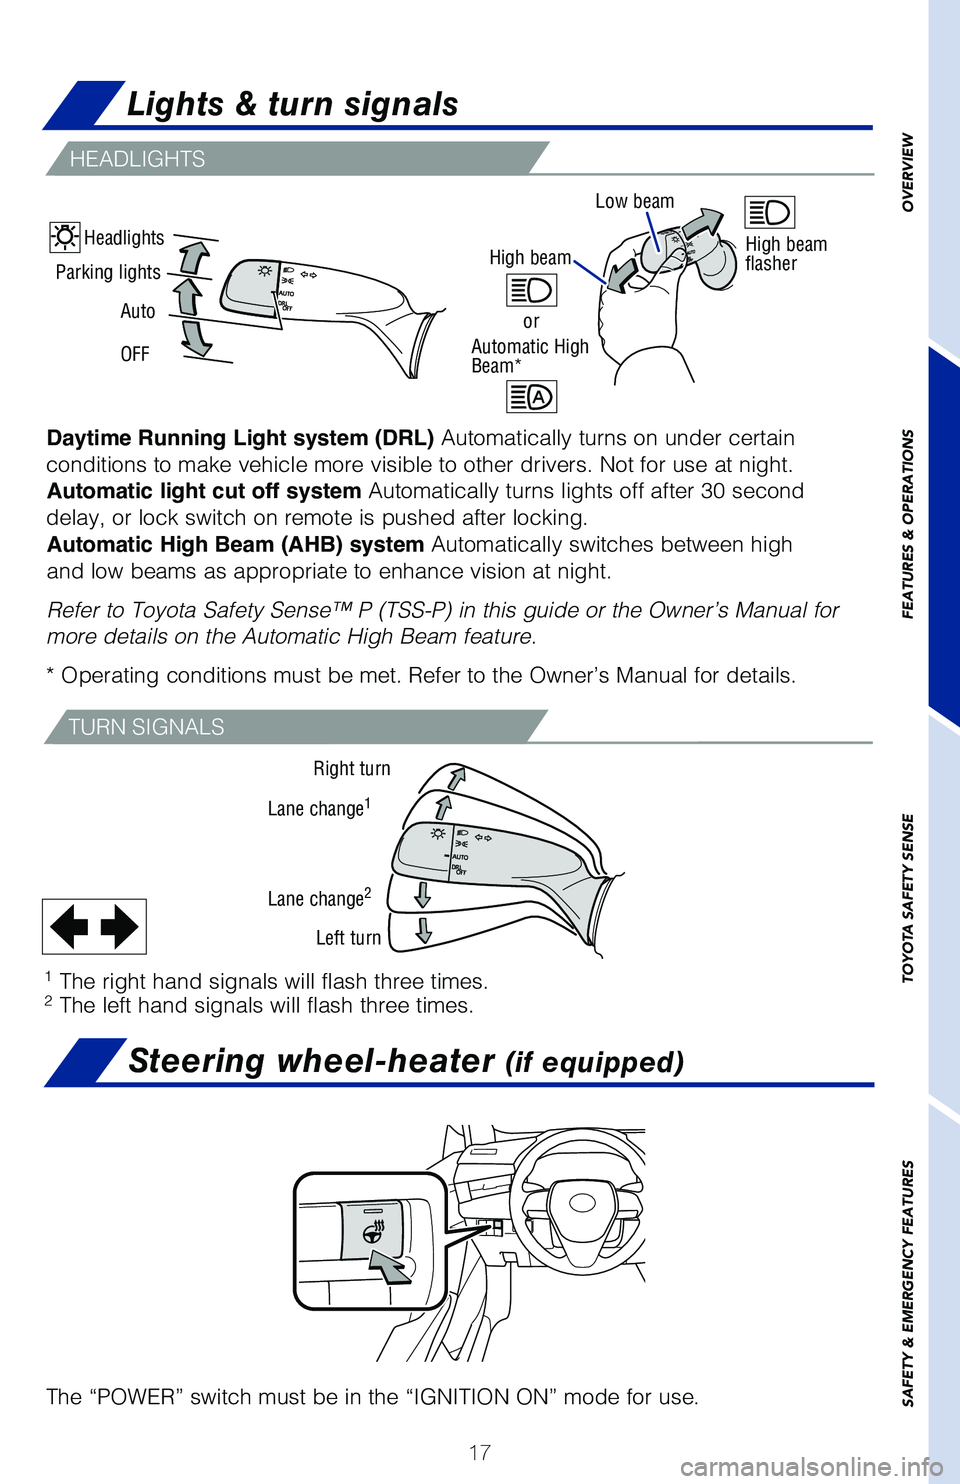
High beam
or
Automatic High
Beam*
Headlights
Parking lights High beam
flasher
Auto OFF Low beam
Right turn
Lane change
1
Lane change2
Left turn
1 The right hand signals will flash three times.
2 The left hand signals will flash three times.
Daytime Running Light system (DRL)
Automatically turns on under certain
conditions to make vehicle more visible to other drivers. Not for use at\
night. Automatic light cut off system Automatically turns lights off after 30 second
delay, or lock switch on remote is pushed after locking. Automatic High Beam (AHB) system Automatically switches between high
and low beams as appropriate to enhance vision at night.
Refer to Toyota Safety Sense™ P (TSS-P) in this guide or the Owner’\
s Manual for
more details on the Automatic High Beam feature.
* Operating conditions must be met. Refer to the Owner’s Manual for d\
etails.
TURN SIGNALS
The “POWER” switch must be in the “IGNITION ON” mode for use\
.
Steering wheel-heater (if equipped)
OVERVIEW
FEATURES & OPERATIONS
TOYOTA SAFETY SENSE
SAFETY & EMERGENCY FEATURES
Lights & turn signals
HEADLIGHTS
Page 20 of 52
18
FEATURES & OPERATIONS
CONTROL PANEL
CONTROL SCREEN
Air conditioning/heating
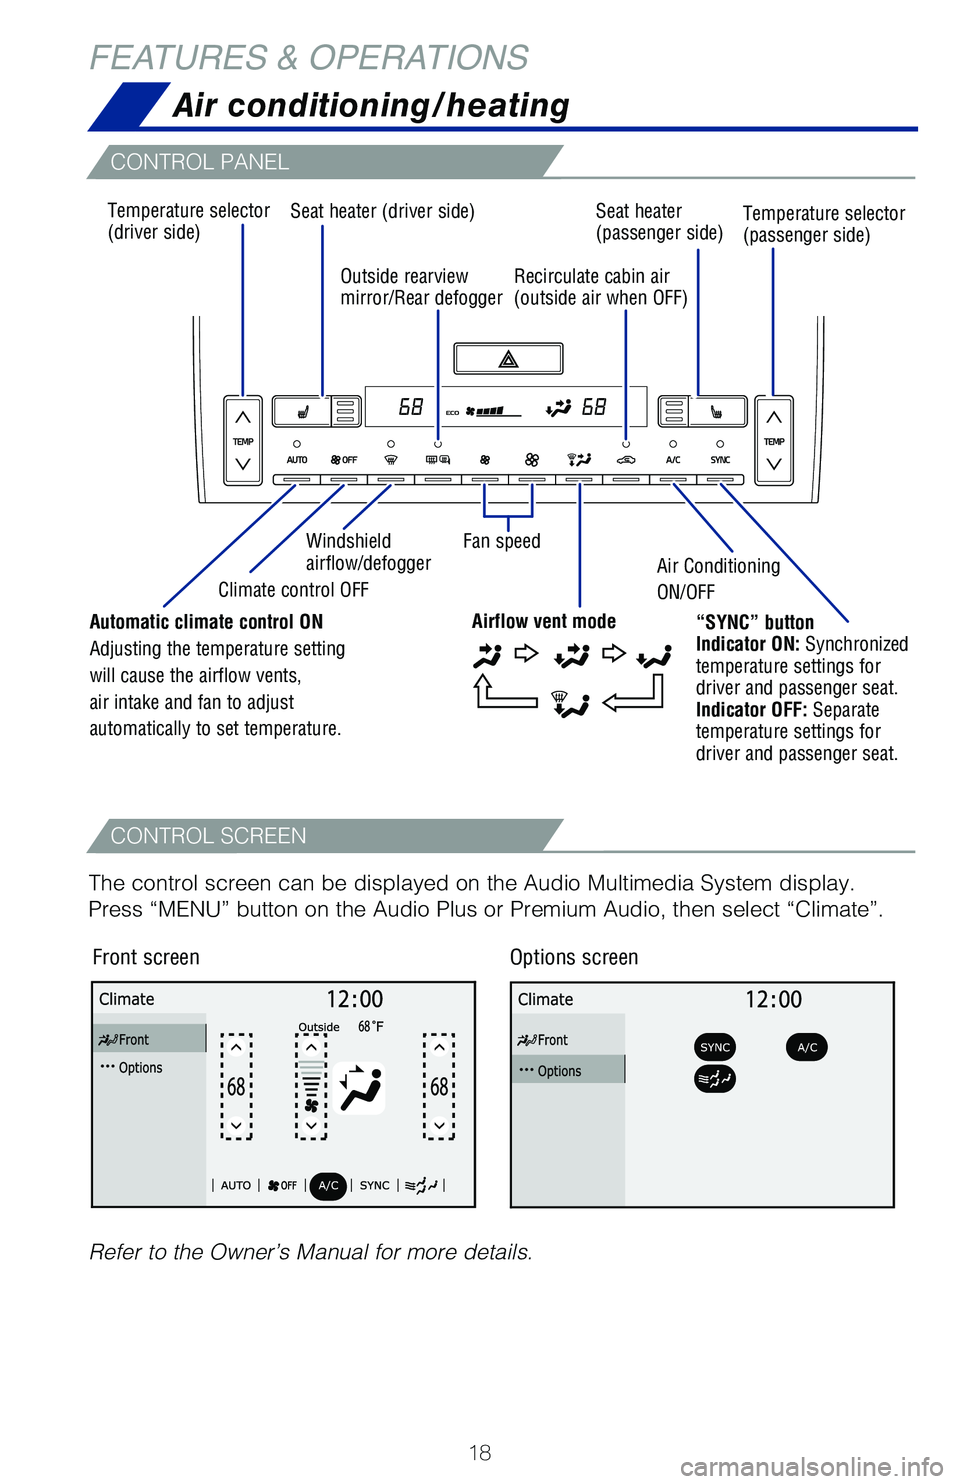
Temperature selector
(driver side)Seat heater (driver side)
Seat heater
(passenger side)
Windshield
airflow/defogger Air Conditioning
ON/OFF
Climate control OFF Fan speed
Outside rearview
mirror/Rear defogger
Recirculate cabin air
(outside air when OFF) Temperature selector
(passenger side)
“SYNC” button
Indicator ON: Synchronized
temperature settings for
driver and passenger seat.
Indicator OFF: Separate
temperature settings for
driver and passenger seat.
Automatic climate control ON
Adjusting the temperature setting
will cause the airflow vents,
air intake and fan to adjust
automatically to set temperature.
Airflow vent mode
The control screen can be displayed on the Audio Multimedia System displ\
ay.
Press “MENU” button on the Audio Plus or Premium Audio, then selec\
t “Climate”.
Front screenOptions screen
Refer to the Owner’s Manual for more details.