TOYOTA AVENSIS 2018 Owners Manual
Manufacturer: TOYOTA, Model Year: 2018, Model line: AVENSIS, Model: TOYOTA AVENSIS 2018Pages: 660, PDF Size: 63.16 MB
Page 551 of 660
5518-2. Steps to take in an emergency
AVENSIS_OM_OM20C79E_(EE)
8
When trouble arises
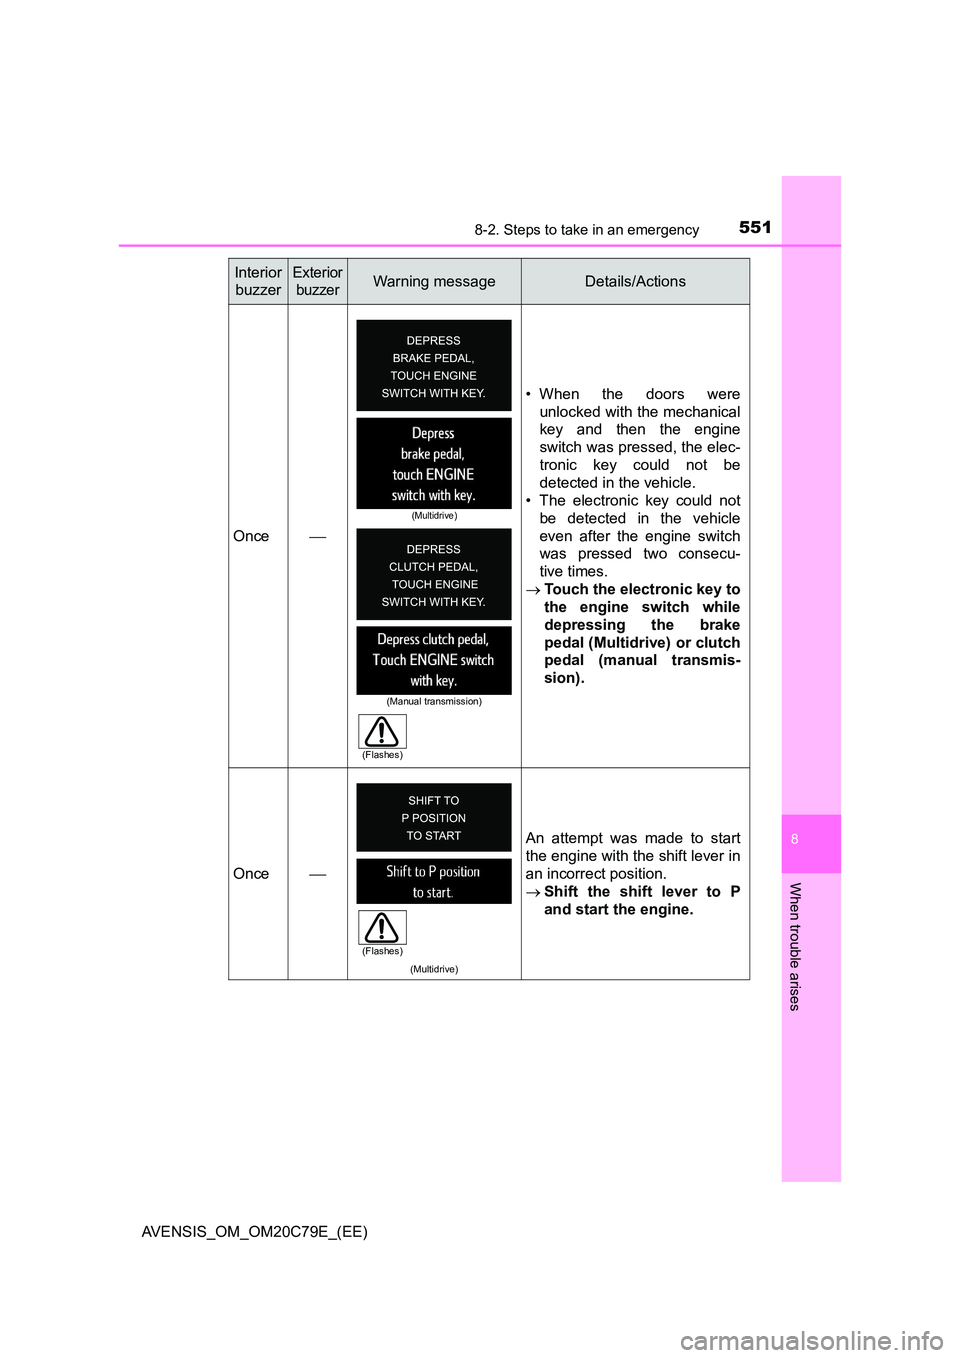
Once
• When the doors were
unlocked with the mechanical
key and then the engine
switch was pressed, the elec-
tronic key could not be
detected in the vehicle.
• The electronic key could not
be detected in the vehicle
even after the engine switch
was pressed two consecu-
tive times.
Touch the electronic key to
the engine switch while
depressing the brake
pedal (Multidrive) or clutch
pedal (manual transmis-
sion).
Once
(Multidrive)
An attempt was made to start
the engine with the shift lever in
an incorrect position.
Shift the shift lever to P
and start the engine.
Interior
buzzer
Exterior
buzzerWarning messageDetails/Actions
(Multidrive)
(Manual transmission)
(Flashes)
(Flashes)
Page 552 of 660
5528-2. Steps to take in an emergency
AVENSIS_OM_OM20C79E_(EE)
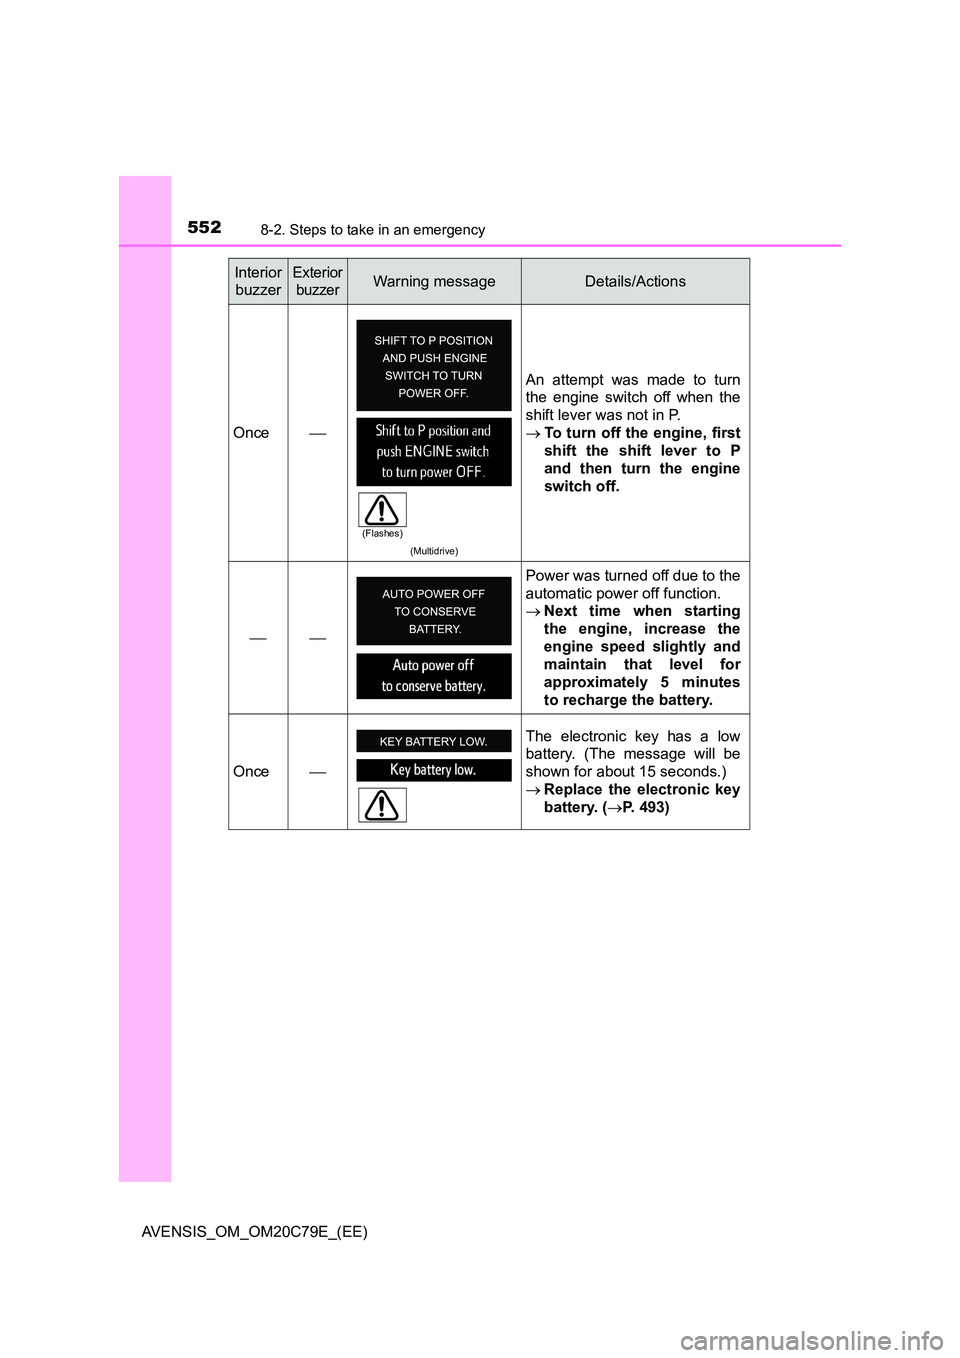
Once
(Multidrive)
An attempt was made to turn
the engine switch off when the
shift lever was not in P.
To turn off the engine, first
shift the shift lever to P
and then turn the engine
switch off.
Power was turned off due to the
automatic power off function.
Next time when starting
the engine, increase the
engine speed slightly and
maintain that level for
approximately 5 minutes
to recharge the battery.
Once
The electronic key has a low
battery. (The message will be
shown for about 15 seconds.)
Replace the electronic key
battery. ( P. 493)
Interior
buzzer
Exterior
buzzerWarning messageDetails/Actions
(Flashes)
Page 553 of 660
5538-2. Steps to take in an emergency
AVENSIS_OM_OM20C79E_(EE)
8
When trouble arises
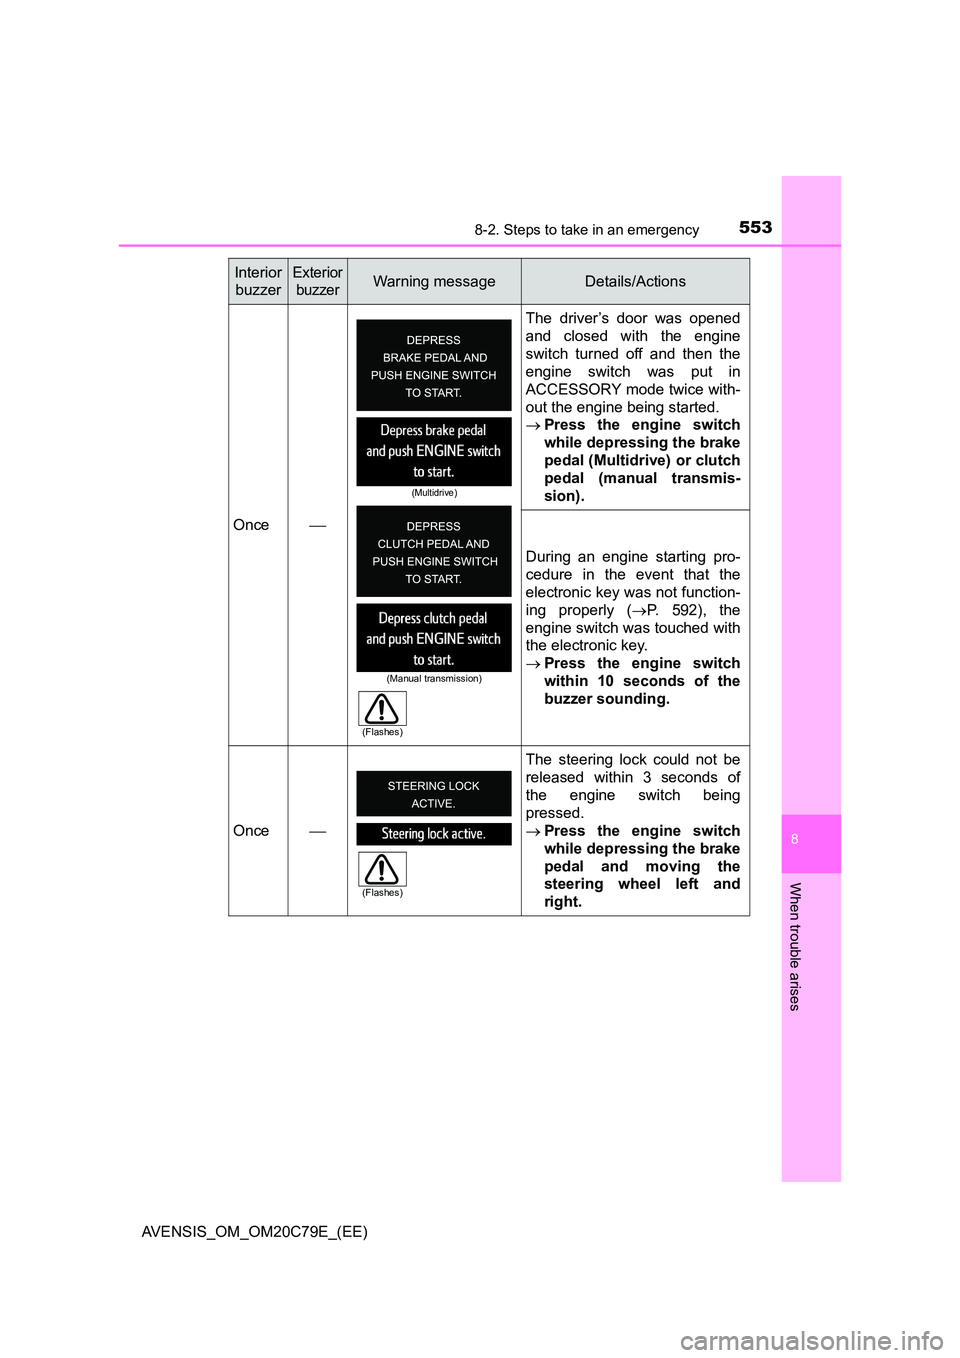
Once
The driver’s door was opened
and closed with the engine
switch turned off and then the
engine switch was put in
ACCESSORY mode twice with-
out the engine being started.
Press the engine switch
while depressing the brake
pedal (Multidrive) or clutch
pedal (manual transmis-
sion).
During an engine starting pro-
cedure in the event that the
electronic key was not function-
ing properly ( P. 592), the
engine switch was touched with
the electronic key.
Press the engine switch
within 10 seconds of the
buzzer sounding.
Once
The steering lock could not be
released within 3 seconds of
the engine switch being
pressed.
Press the engine switch
while depressing the brake
pedal and moving the
steering wheel left and
right.
Interior
buzzer
Exterior
buzzerWarning messageDetails/Actions
(Multidrive)
(Manual transmission)
(Flashes)
(Flashes)
Page 554 of 660

5548-2. Steps to take in an emergency
AVENSIS_OM_OM20C79E_(EE)
If you have a flat tire (vehicles with emer-
gency tire puncture repair kit)
Your vehicle is not equipped with a spare tire, but instead is
equipped with an emergency tire puncture repair kit.
A puncture caused by a nail or screw passing through the tire
tread can be repaired temporarily using the emergency tire
puncture repair kit. (The kit contains a bottle of sealant. The
sealant can be used only once to temporarily repair one tire
without removing the nail or screw from the tire.) Depending on
the damage, this kit cannot be used to repair the tire. ( P. 555)
After temporarily repairing the tire with the kit, have the tire
repaired or replaced by any authorized Toyota retailer or Toyota
authorized repairer, or any reliable repairer. Repairs conducted
using the emergency tire puncture repair kit are only a tempo-
rary measure. Have the tire repaired and replaced as soon as
possible.
WARNING
■ If you have a flat tire
Do not continue driving with a flat tire.
Driving even a short distance with a flat tire can damage the tire and the
wheel beyond repair, which could result in an accident.
Driving with a flat tire may cause a circumferential groove on the side wall.
In such a case, the tire may explode when using a repair kit.
Page 555 of 660
5558-2. Steps to take in an emergency
AVENSIS_OM_OM20C79E_(EE)
8
When trouble arises
●Stop the vehicle in a safe place on a hard, flat surface.
● Set the parking brake.
● Shift the shift lever to P (Multidrive) or N (manual transmission).
● Stop the engine.
● Turn on the emergency flashers. (P. 518)
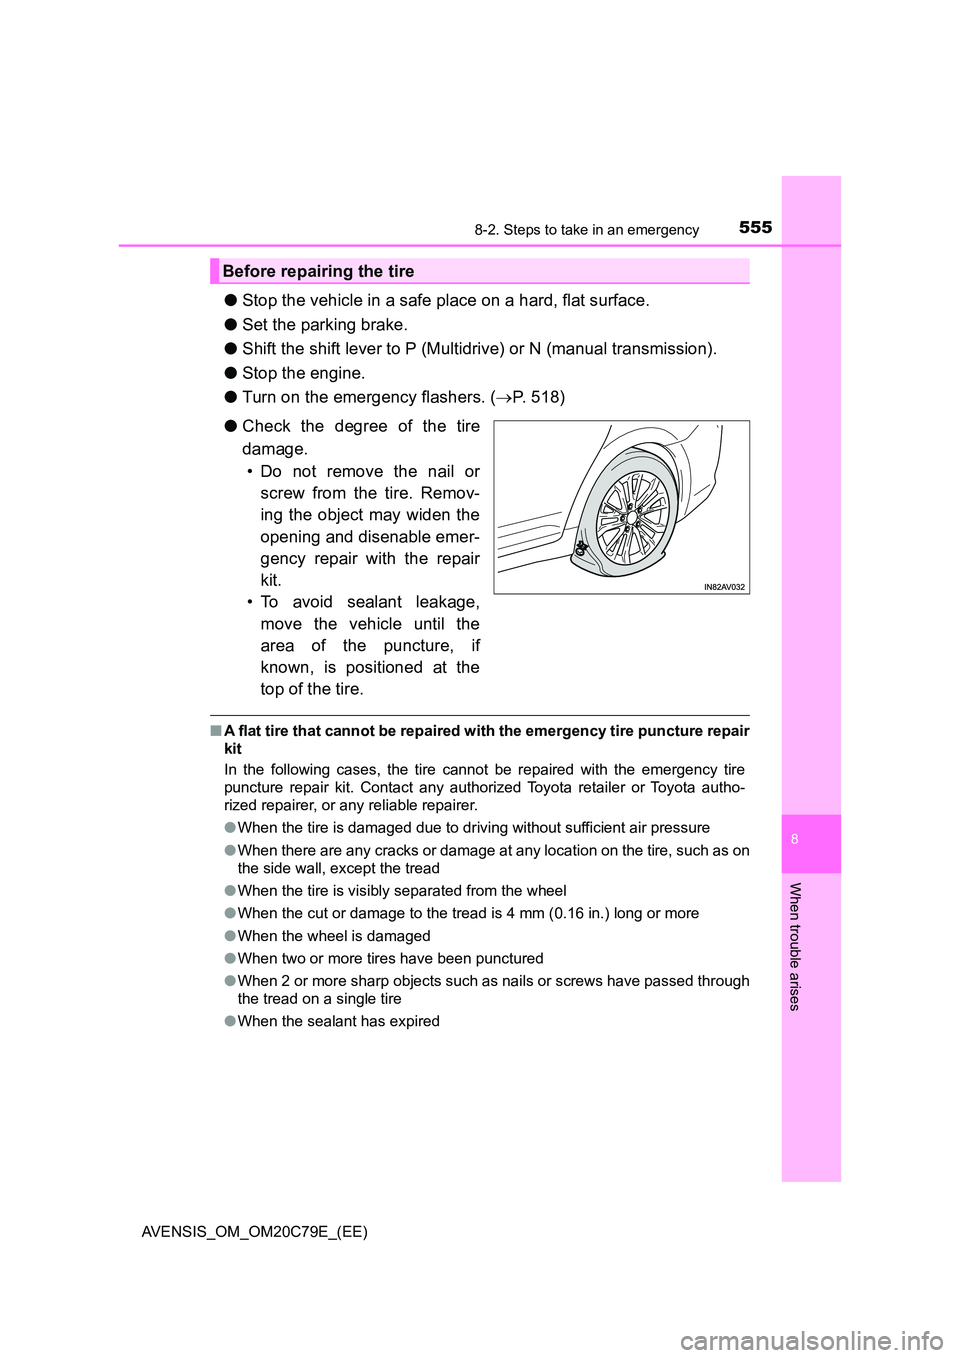
● Check the degree of the tire
damage.
• Do not remove the nail or
screw from the tire. Remov-
ing the object may widen the
opening and disenable emer-
gency repair with the repair
kit.
• To avoid sealant leakage,
move the vehicle until the
area of the puncture, if
known, is positioned at the
top of the tire.
■ A flat tire that cannot be repaired with the emergency tire puncture repair
kit
In the following cases, the tire c annot be repaired with the emergency tire
puncture repair kit. Contact any authorized Toyota retailer or Toyota autho-
rized repairer, or any reliable repairer.
● When the tire is damaged due to driving without sufficient air pressure
● When there are any cracks or damage at any location on the tire, such as on
the side wall, except the tread
● When the tire is visibly separated from the wheel
● When the cut or damage to the tread is 4 mm (0.16 in.) long or more
● When the wheel is damaged
● When two or more tires have been punctured
● When 2 or more sharp objects such as nails or screws have passed through
the tread on a single tire
● When the sealant has expired
Before repairing the tire
Page 556 of 660
5568-2. Steps to take in an emergency
AVENSIS_OM_OM20C79E_(EE)
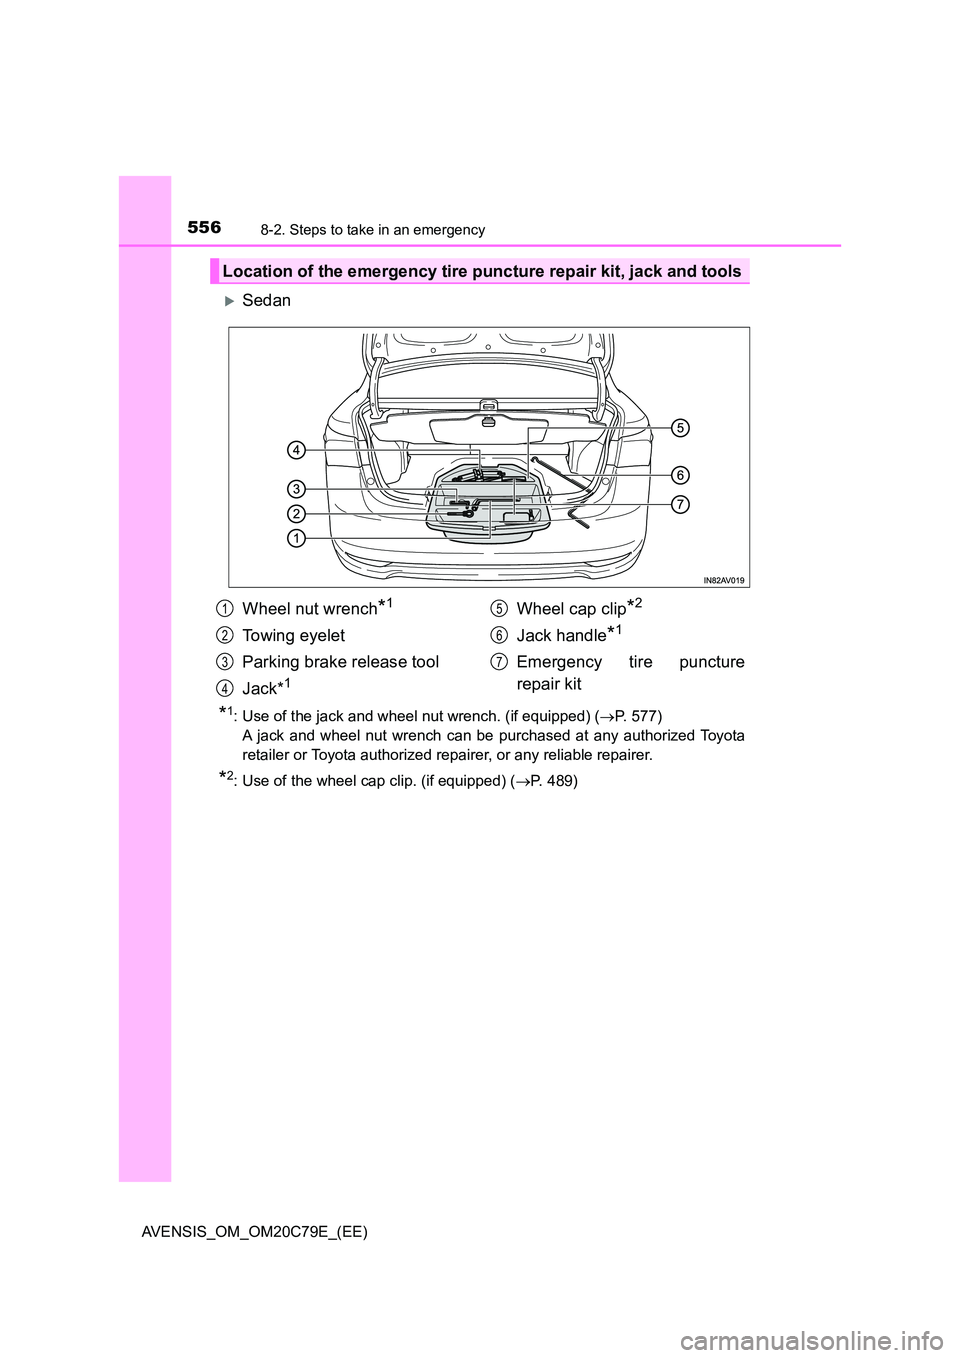
Sedan
*1: Use of the jack and wheel nut wrench. (if equipped) (P. 577)
A jack and wheel nut wrench can be purchased at any authorized Toyota
retailer or Toyota authorized repairer, or any reliable repairer.
*2: Use of the wheel cap clip. (if equipped) ( P. 489)
Location of the emergency tire puncture repair kit, jack and tools
Wheel nut wrench*1
Towing eyelet
Parking brake release tool
Jack*1
Wheel cap clip*2
Jack handle*1
Emergency tire puncture
repair kit
1
2
3
4
5
6
7
Page 557 of 660
5578-2. Steps to take in an emergency
AVENSIS_OM_OM20C79E_(EE)
8
When trouble arises
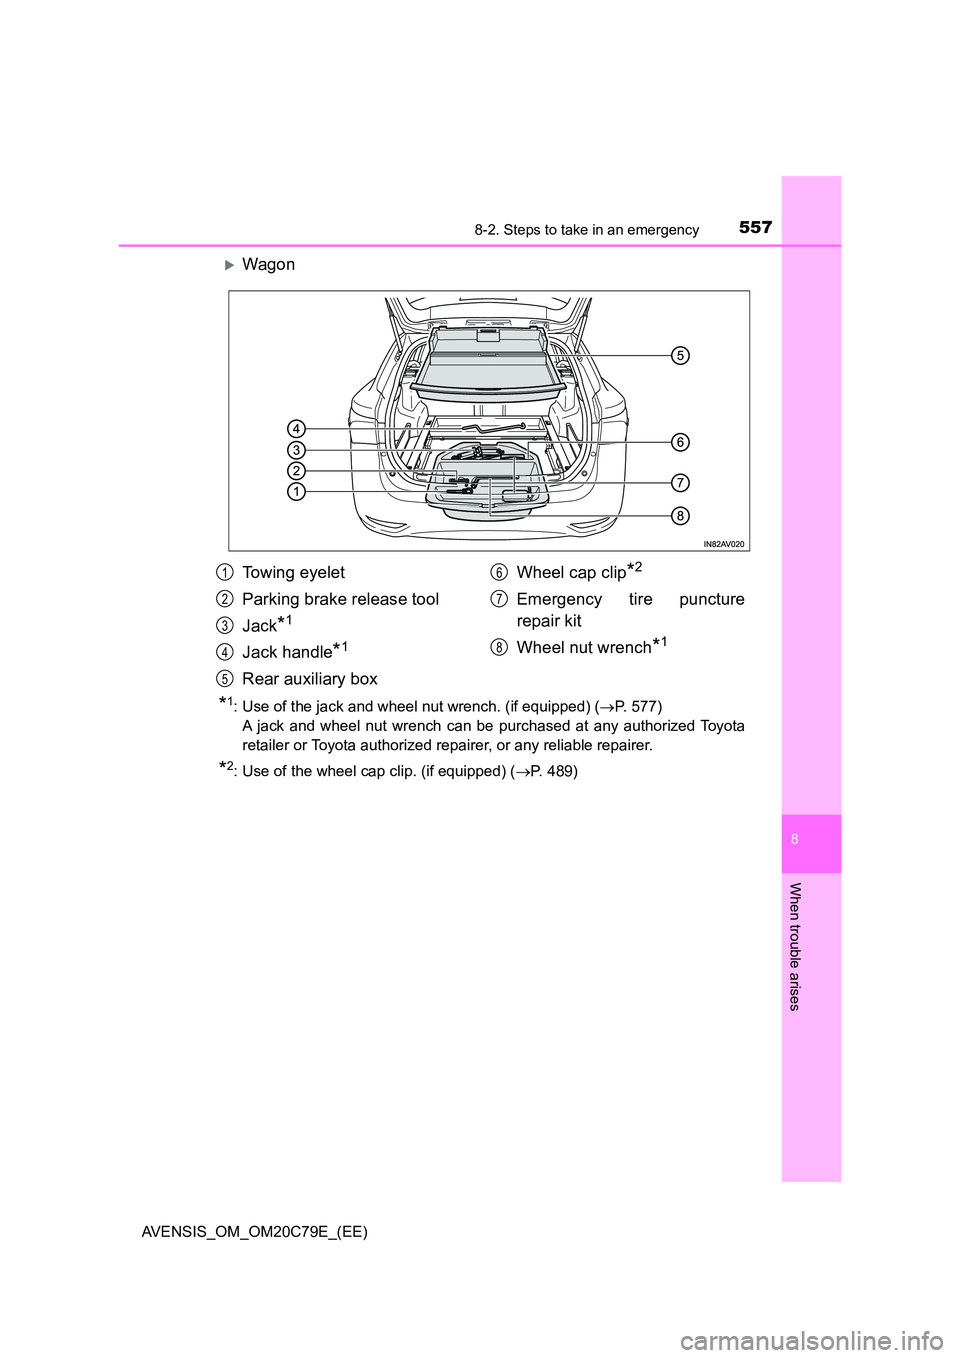
Wagon
*1: Use of the jack and wheel nut wrench. (if equipped) (P. 577)
A jack and wheel nut wrench can be purchased at any authorized Toyota
retailer or Toyota authorized repairer, or any reliable repairer.
*2: Use of the wheel cap clip. (if equipped) ( P. 489)
Towing eyelet
Parking brake release tool
Jack*1
Jack handle*1
Rear auxiliary box
Wheel cap clip*2
Emergency tire puncture
repair kit
Wheel nut wrench*1
1
2
3
4
5
6
7
8
Page 558 of 660
5588-2. Steps to take in an emergency
AVENSIS_OM_OM20C79E_(EE)
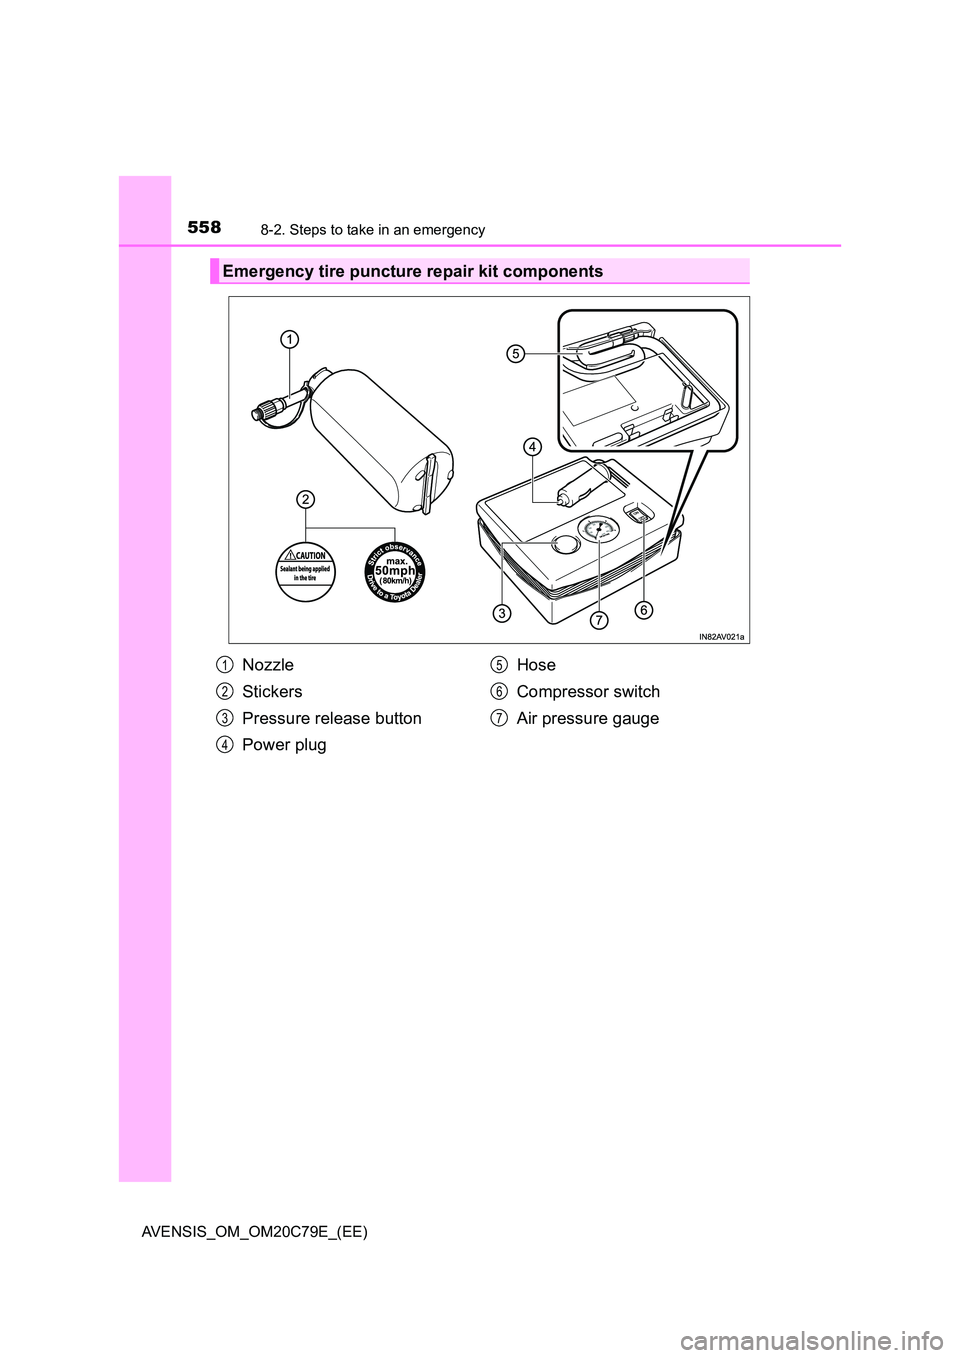
Emergency tire puncture repair kit components
Nozzle
Stickers
Pressure release button
Power plug
Hose
Compressor switch
Air pressure gauge
1
2
3
4
5
6
7
Page 559 of 660
5598-2. Steps to take in an emergency
AVENSIS_OM_OM20C79E_(EE)
8
When trouble arises
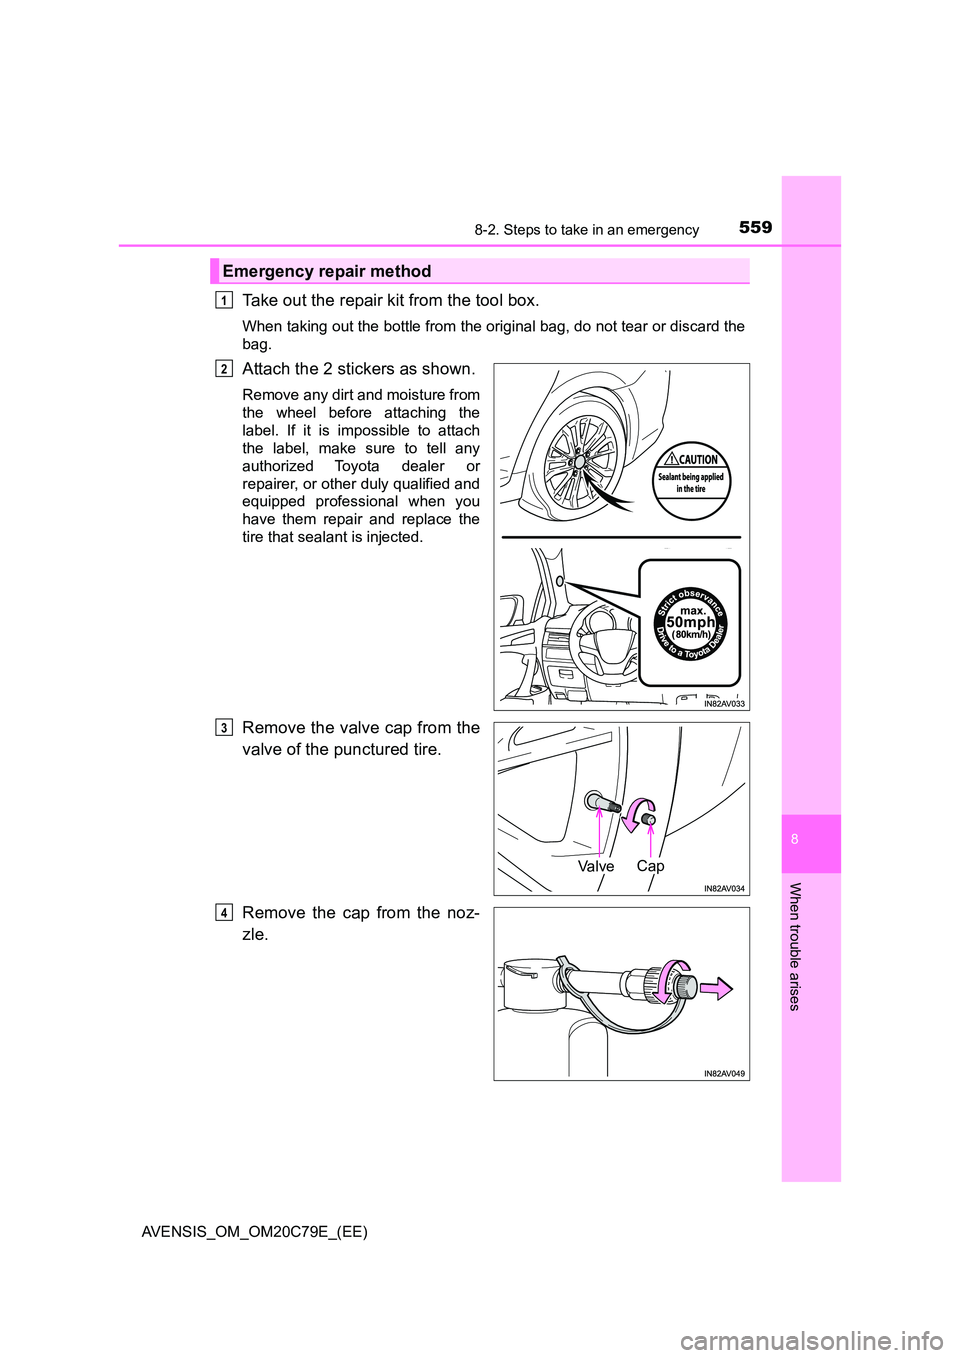
Take out the repair kit from the tool box.
When taking out the bottle from the original bag, do not tear or discard the
bag.
Attach the 2 stickers as shown.
Remove any dirt and moisture from
the wheel before attaching the
label. If it is impossible to attach
the label, make sure to tell any
authorized Toyota dealer or
repairer, or other duly qualified and
equipped professional when you
have them repair and replace the
tire that sealant is injected.
Remove the valve cap from the
valve of the punctured tire.
Remove the cap from the noz-
zle.
Emergency repair method
1
2
Va l v eCap
3
4
Page 560 of 660
5608-2. Steps to take in an emergency
AVENSIS_OM_OM20C79E_(EE)
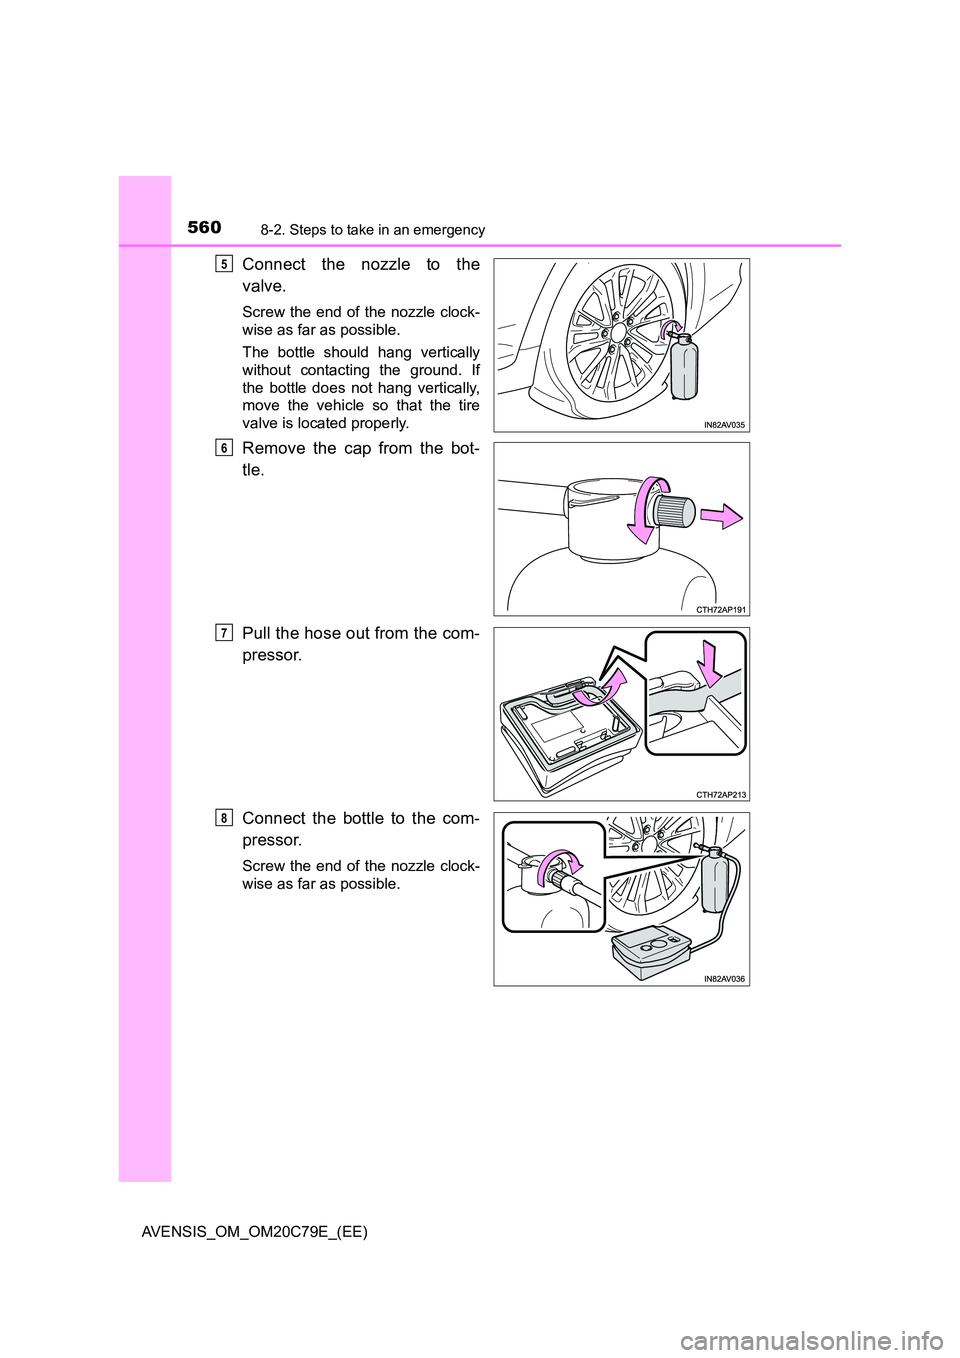
Connect the nozzle to the
valve.
Screw the end of the nozzle clock-
wise as far as possible.
The bottle should hang vertically
without contacting the ground. If
the bottle does not hang vertically,
move the vehicle so that the tire
valve is located properly.
Remove the cap from the bot-
tle.
Pull the hose out from the com-
pressor.
Connect the bottle to the com-
pressor.
Screw the end of the nozzle clock-
wise as far as possible.
5
6
7
8