Body TOYOTA AYGO 2019 (in English) User Guide
[x] Cancel search | Manufacturer: TOYOTA, Model Year: 2019, Model line: AYGO, Model: TOYOTA AYGO 2019Pages: 504, PDF Size: 67.32 MB
Page 210 of 504
2104-4. Refueling
AYGO_OM_Europe_OM99R19E
WARNING
■When refueling the vehicle
Observe the following precautions while refueling the vehicle. Failure to do
so may result in death or serious injury.
● After exiting the vehicle and before opening the fuel door, touch an
unpainted metal surface to discharge any stat ic electricity. It is important to
discharge static electricity before re fueling because sparks resulting from
static electricity can cause fuel vapors to ignite while refueling.
● Always hold the grips on the fuel tank cap and turn it slowly to remove it.
A whooshing sound may be heard when the fuel tank cap is loosened.
Wait until the sound cannot be heard before fully removing the cap. In hot
weather, pressurized fuel may spray out the filler neck and cause injury.
● Do not allow anyone that has not discharged static electricity from their
body to come close to an open fuel tank.
● Do not inhale vaporized fuel.
Fuel contains substances that are harmful if inhaled.
● Do not smoke while refueling the vehicle.
Doing so may cause the fuel to ignite and cause a fire.
● Do not return to the vehicle or touch any person or object that is statically
charged.
This may cause static electricity to build up, resulting in a possible ignition
hazard.
■ When refueling
Observe the following precautions to pr event fuel overflowing from the fuel
tank:
● Securely insert the fuel nozzle into the fuel filler neck.
● Stop filling the tank after the fuel nozzle automatically clicks off.
● Do not top off the fuel tank.
NOTICE
■Refueling
Do not spill fuel during refueling.
Doing so may damage the vehicle, such as causing the emission control
system to operate abnormally or damaging fuel system components or the
vehicle’s painted surface.
Page 249 of 504
2494-6. Using the driving support systems
4
Driving
AYGO_OM_Europe_OM99R19E
■ When the “TRC OFF” indicator light comes on even if has not been
pressed
TRC is temporary deactivated. If the indicator light continues to remain on,
contact any authorized Toyota retailer or Toyota authorized repairer, or any
reliable repairer.
■ Operating conditions of hill-start assist control
When the following four conditions are me t, the hill-start assist control will
operate:
● Vehicles with a multi-mode manual transmission: The shift lever is in a posi-
tion other than N (when starting off forward/backward on an upward incline)
● Vehicles with a manual transmission: The shift lever is in a position other
than R when starting off forward on an upward incline, or the shift lever is in
R when starting off backward on an upward incline
● The vehicle is stopped
● The accelerator pedal is not depressed
● The parking brake is not engaged
■ Automatic system cancelation of hill-start assist control
The hill-start assist control will turn off in any of the following situations:
● Vehicles with a multi-mode manual transmission: The shift lever is shifted to
N
● Vehicles with a manual transmission: The shift lever is shifted to R when
starting off forward on an upward incline, or the shift lever is shifted to other
than R when starting off backward on an upward incline
● The accelerator pedal is depressed
● The parking brake is engaged
● 2 seconds at maximum elapsed after the brake pedal is released
■ Sounds and vibrations caused by the ABS, brake assist, VSC, TRC and
hill-start assist control systems
● A sound may be heard from the engine compartment when the brake pedal
is depressed repeatedly, when the engine is started or just after the vehicle
begins to move. This sound does not indicate that a malfunction has
occurred in any of these systems.
● Any of the following conditions may occur when the above systems are
operating. None of these indicates that a malfunction has occurred.
• Vibrations may be felt through the vehicle body and steering.
• A motor sound may be heard also after the vehicle comes to a stop.
• The brake pedal may pulsate slightly after the ABS is activated.
• The brake pedal may move down slightly after the ABS is activated.
Page 321 of 504
3216-1. Using the air conditioning system and defogger
6
Interior features
AYGO_OM_Europe_OM99R19E
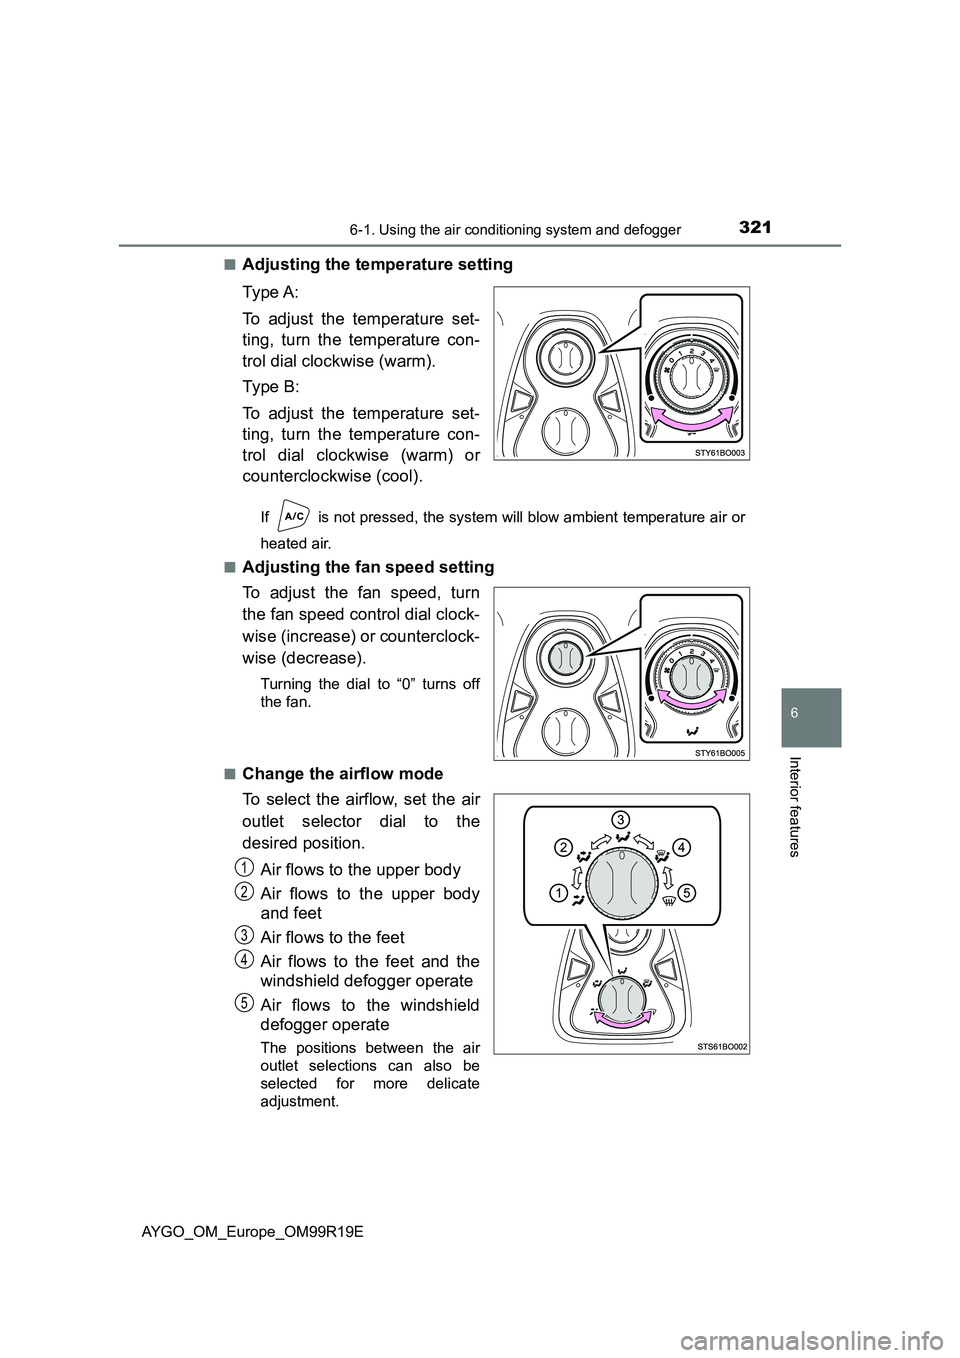
■Adjusting the temperature setting
Ty pe A:
To adjust the temperature set-
ting, turn the temperature con-
trol dial clockwise (warm).
Ty pe B :
To adjust the temperature set-
ting, turn the temperature con-
trol dial clockwise (warm) or
counterclockwise (cool).
If is not pressed, the system will blow ambient temperature air or
heated air.
■Adjusting the fan speed setting
To adjust the fan speed, turn
the fan speed control dial clock-
wise (increase) or counterclock-
wise (decrease).
Turning the dial to “0” turns off
the fan.
■Change the airflow mode
To select the airflow, set the air
outlet selector dial to the
desired position.
Air flows to the upper body
Air flows to the upper body
and feet
Air flows to the feet
Air flows to the feet and the
windshield defogger operate
Air flows to the windshield
defogger operate
The positions between the air
outlet selections can also be
selected for more delicate
adjustment.
1
2
3
4
5
Page 327 of 504
3276-1. Using the air conditioning system and defogger
6
Interior features
AYGO_OM_Europe_OM99R19E
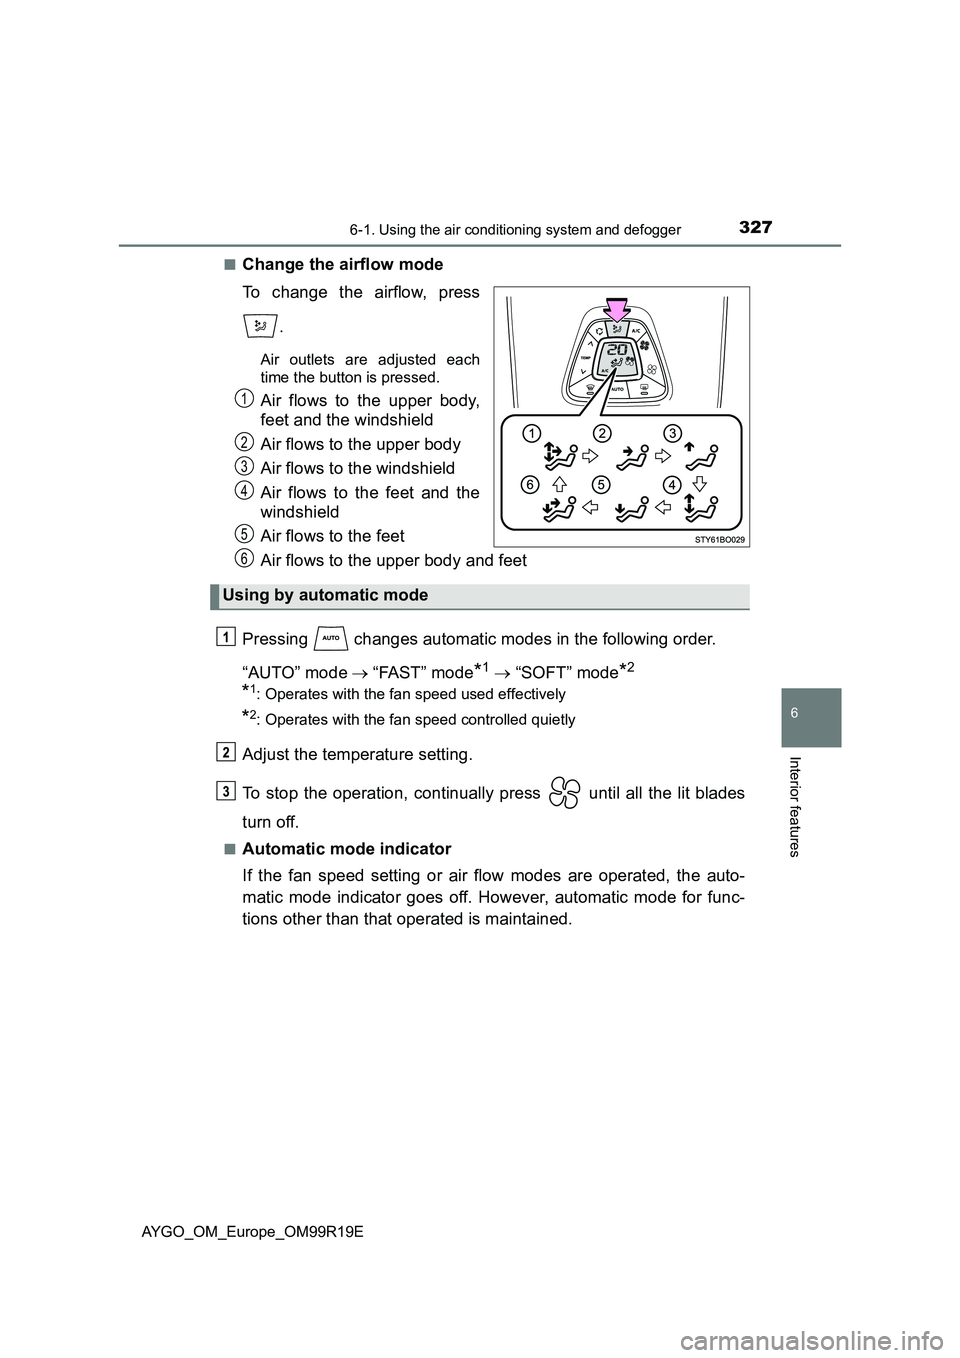
■Change the airflow mode
To change the airflow, press
.
Air outlets are adjusted each
time the button is pressed.
Air flows to the upper body,
feet and the windshield
Air flows to the upper body
Air flows to the windshield
Air flows to the feet and the
windshield
Air flows to the feet
Air flows to the upper body and feet
Pressing changes automatic modes in the following order.
“AUTO” mode “FAST” mode*1 “SOFT” mode*2
*1: Operates with the fan speed used effectively
*2: Operates with the fan speed controlled quietly
Adjust the temperature setting.
To stop the operation, continually press until all the lit blades
turn off.
■Automatic mode indicator
If the fan speed setting or air flow modes are operated, the auto-
matic mode indicator goes off. However, automatic mode for func-
tions other than that operated is maintained.
1
2
3
4
5
Using by automatic mode
6
Page 346 of 504
3467-1. Maintenance and care
AYGO_OM_Europe_OM99R19E
Cleaning and protecting the vehicle exterior
●Working from top to bottom, liberally apply water to the vehicle
body, wheel wells and underside of the vehicle to remove any dirt
and dust.
● Wash the vehicle body using a sponge or soft cloth, such as a
chamois.
● For hard-to-remove marks, use car wash soap and rinse thoroughly
with water.
● Wipe away any water.
● Wax the vehicle when the waterproof coating deteriorates.
If water does not bead on a clean surface, apply wax when the vehicle
body is cool.
● Vehicles with a canvas top:
Vacuuming of outer canvas before washing is helpful in removing
dust and other foreign particles.
Follow the procedure shown below:
• Brush off any loose dirt and rinse off with a hose.
• Using a sponge, wash with a mild solution of soap (hand soap) in
lukewarm water.
• Rinse thoroughly to remove soap.
Perform the following to protect the vehicle and maintain it in
prime condition:
Page 348 of 504
3487-1. Maintenance and care
AYGO_OM_Europe_OM99R19E
NOTICE
■To prevent paint deterioration and corrosion on the body and compo-
nents (aluminum wheels, etc.)
● Wash the vehicle immediately in the following cases:
• After driving near the sea coast
• After driving on salted roads
• If coal tar or tree sap is present on the paint surface
• If dead insects, insect droppings or bird droppings are present on the
paint surface
• After driving in an area contaminated with soot, oily smoke, mine dust,
iron powder or chemical substances
• If the vehicle becomes heavily soiled with dust or mud
• If liquids such as benzene and gasoline are spilled on the paint surface
● If the paint is chipped or scratched, have it repaired immediately.
● To prevent the wheels from corroding, remove any dirt and store in a place
with low humidity when storing the wheels.
■ Cleaning the exterior lights
● Wash carefully. Do not use organic substances or scrub with a hard brush.
This may damage the surfaces of the lights.
● Do not apply wax to the surfaces of the lights.
Wax may cause damage to the lenses.
■ Antenna installation and removal precautions
● Before driving, ensure that the antenna is installed.
● When the antenna is removed, such as before entering an automatic car
wash, make sure to store it in a suitable place so as not to lose it. Also,
before driving, make sure to reinstall the antenna in its original position.
Page 352 of 504
3527-1. Maintenance and care
AYGO_OM_Europe_OM99R19E
NOTICE
■Cleaning detergents
● Do not use the following types of detergent, as they may discolor the vehi-
cle interior or cause streaks or damage to painted surfaces:
• Non-seat portions: Organic substances such as benzene or gasoline,
alkaline or acidic solutions, dye, and bleach
• Seats: Alkaline or acidic solutions, such as thinner, benzene, and alcohol
● Do not use a polish wax or polish cleaner. The instrument panel’s or other
interior part’s painted surface may be damaged.
■ Preventing damage to leather surfaces
Observe the following precautions to avoid damage to and deterioration of
leather surfaces:
● Remove any dust or dirt from leather surfaces immediately.
● Do not expose the vehicle to direct sunlight for extended periods of time.
Park the vehicle in the shade, especially during summer.
● Do not place items made of vinyl, plastic, or containing wax on the uphol-
stery, as they may stick to the leather surface if the vehicle interior heats
up significantly.
■ Water on the floor
Do not wash the vehicle floor with water.
Vehicle systems such as the audio system may be damaged if water comes
into contact with electrical components such as the audio system above or
under the floor of the vehicle. Water may also cause the body to rust.
■ When cleaning the inside of the windshield (vehicles with front sensor)
Be careful not to touch the front sensor ( P. 214).
If the camera is accidentally scratched or hit, PCS and LDA may not oper-
ate properly or may cause a malfunction.
■ Cleaning the inside of the rear window
● Do not use glass cleaner to clean the rear window, as this may cause
damage to the rear window defogger heater wires. Use a cloth dampened
with lukewarm water to gently wipe the window clean. Wipe the window in
strokes running parallel to the heater wires.
● Be careful not to scratch or damage the heater wires.
Page 359 of 504
3597-3. Do-it-yourself maintenance
7
Maintenance and care
AYGO_OM_Europe_OM99R19E
WARNING
■Pre-driving check
Check that the hood is fully closed and locked.
If the hood is not locked properly, it may open while the vehicle is in motion
and cause an accident, which may result in death or serious injury.
■ After installing the support rod into the slot
Make sure the rod supports the hood securely from falling down on to your
head or body.
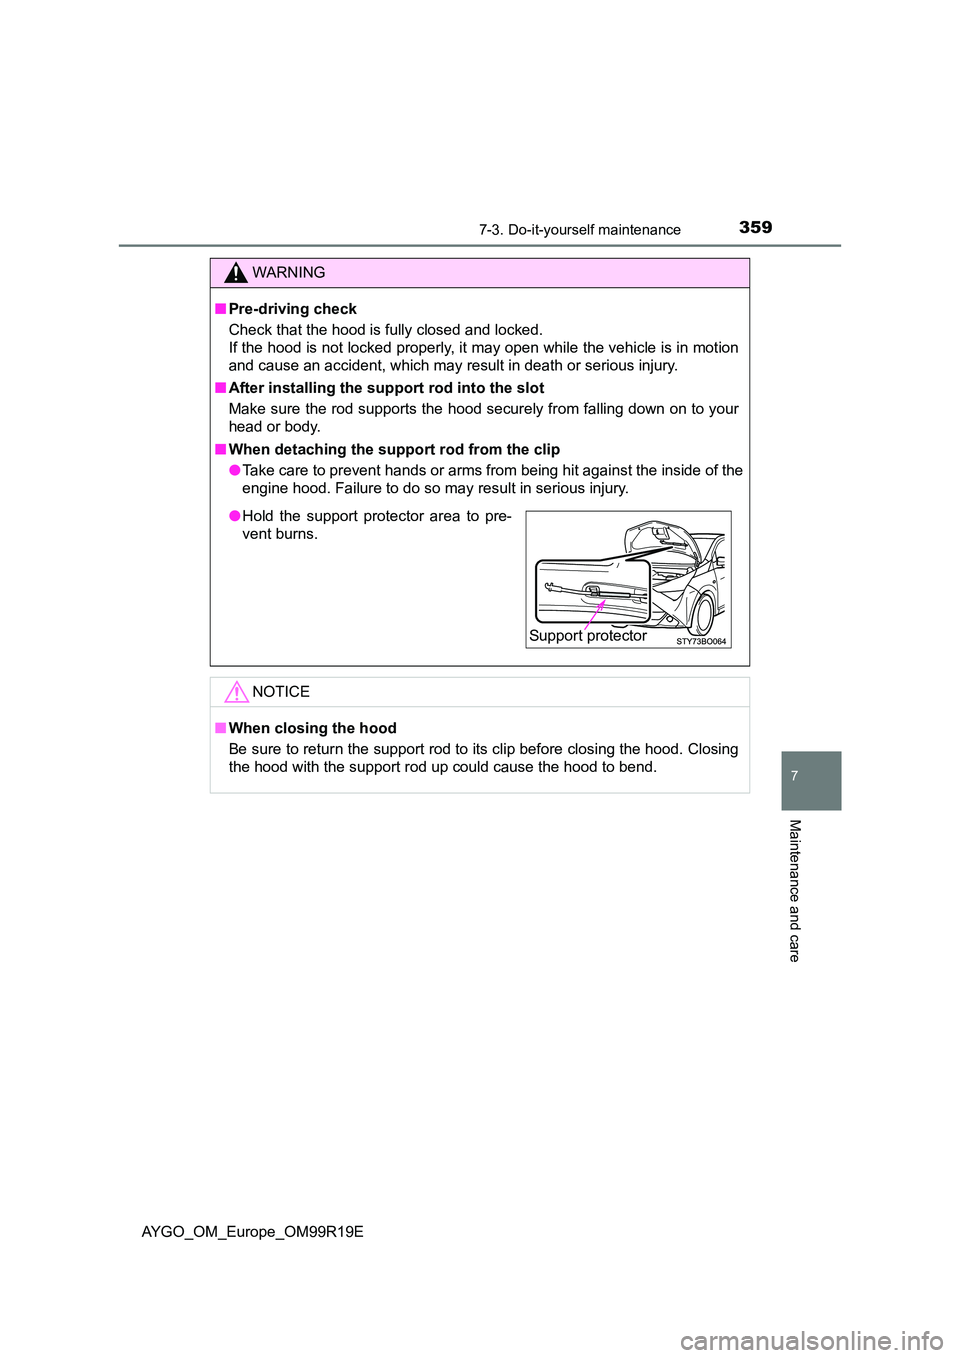
■ When detaching the support rod from the clip
● Take care to prevent hands or arms from being hit against the inside of the
engine hood. Failure to do so may result in serious injury.
NOTICE
■ When closing the hood
Be sure to return the support rod to its clip before closing the hood. Closing
the hood with the support rod up could cause the hood to bend.
● Hold the support protector area to pre-
vent burns.
Support protector
Page 377 of 504
3777-3. Do-it-yourself maintenance
7
Maintenance and care
AYGO_OM_Europe_OM99R19E
NOTICE
■Precaution when installing a different tire (vehicles with the tire pres-
sure warning system)
When differently constructed tires or tires of different makers, models or
tread patterns are installed, the tire pressure warning system may not oper-
ate properly.
■ Driving on rough roads
Take particular care when driving on roads with loose surfaces or potholes.
These conditions may cause losses in tire inflation pressure, reducing the
cushioning ability of the tires. In addition, driving on rough roads may cause
damage to the tires themselves, as well as the vehicle’s wheels and body.
■ Low profile tires (vehicles with 165/60R15 tires)
Low profile tires may cause greater damage than usual to the tire wheel
when sustaining impact from the road surface. Therefore, pay attention to
the following:
● Be sure to use proper tire inflation pressure. If tires are under-inflated, they
may be damaged more severely.
● Avoid potholes, uneven pavement, curbs and other road hazards. Failure
to do so may lead to severe tire and wheel damage.
■ If tire inflation pressure of each tire becomes low while driving
Do not continue driving, or your tires and/or wheels may be ruined.
Page 391 of 504
3917-3. Do-it-yourself maintenance
7
Maintenance and care
AYGO_OM_Europe_OM99R19E
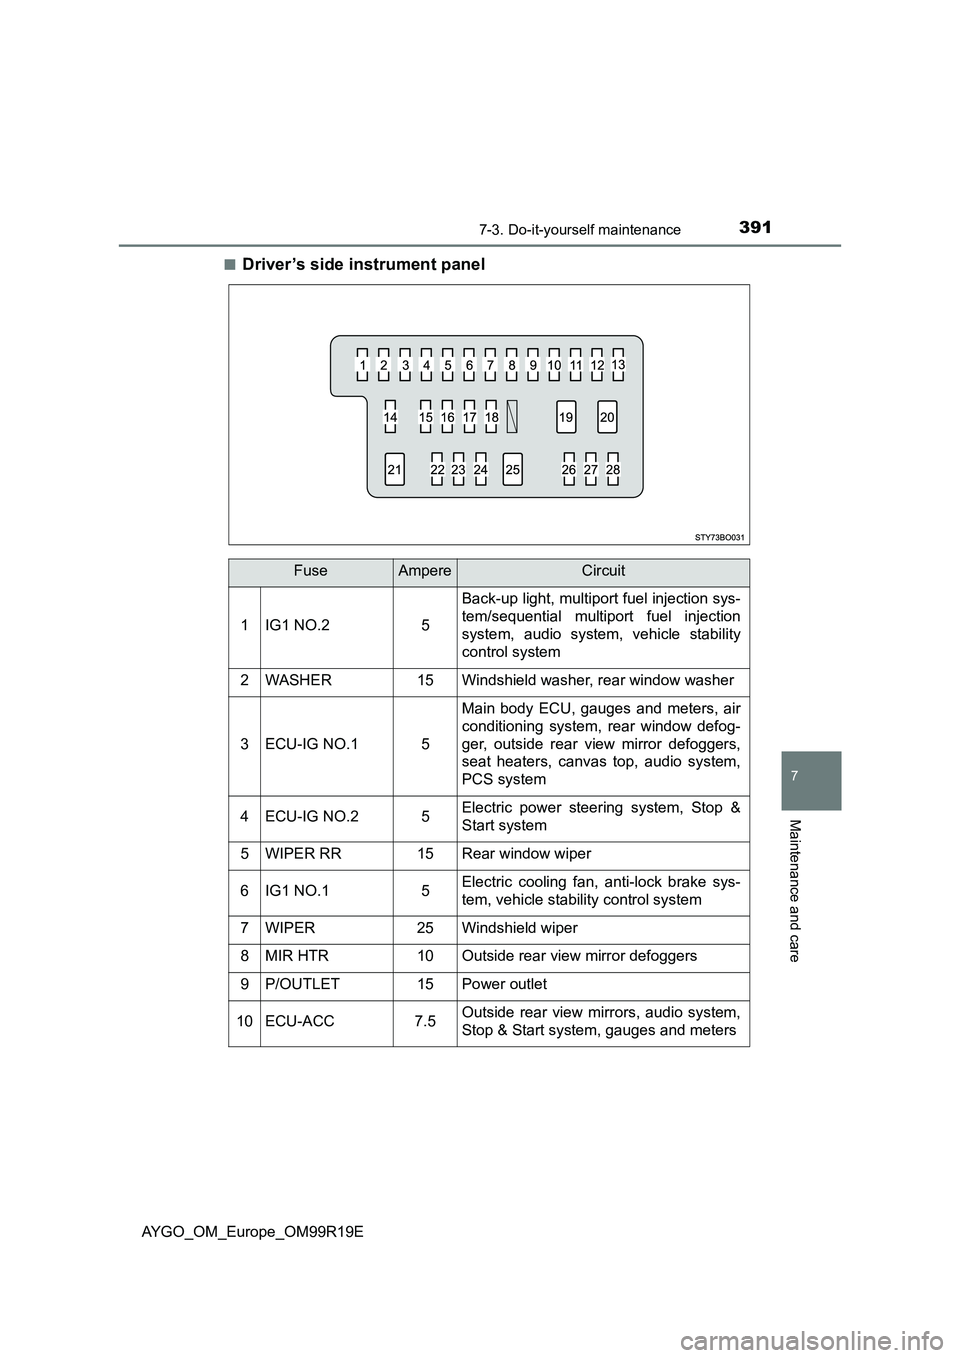
■Driver ’s side instrument panel
FuseAmpereCircuit
1IG1 NO.25
Back-up light, multiport fuel injection sys-
tem/sequential multiport fuel injection
system, audio system, vehicle stability
control system
2WASHER15Windshield washer, rear window washer
3ECU-IG NO.15
Main body ECU, gauges and meters, air
conditioning system, rear window defog-
ger, outside rear view mirror defoggers,
seat heaters, canvas top, audio system,
PCS system
4ECU-IG NO.25Electric power steering system, Stop &
Start system
5WIPER RR15Rear window wiper
6IG1 NO.15Electric cooling fan, anti-lock brake sys-
tem, vehicle stability control system
7WIPER25Windshield wiper
8MIR HTR10Outside rear view mirror defoggers
9P/OUTLET15Power outlet
10ECU-ACC7.5Outside rear view mirrors, audio system,
Stop & Start system, gauges and meters