isofix TOYOTA AYGO 2019 Owners Manual (in English)
[x] Cancel search | Manufacturer: TOYOTA, Model Year: 2019, Model line: AYGO, Model: TOYOTA AYGO 2019Pages: 504, PDF Size: 67.32 MB
Page 50 of 504
501-2. Child safety
AYGO_OM_Europe_OM99R19E
Child restraint systems
Points to remember................................................................. P. 51
Child restraint system ............................................................. P. 53
When using a child restraint system ....................................... P. 56
Child restraint system installation method
• Fixed with a seat belt .......................................................... P. 60
• Fixed with an ISOFIX rigid anchor ...................................... P. 67
• Using an anchor bracket (for top strap)............................... P. 73
Before installing a child restraint system in the vehicle, there are
precautions that need to be observed, different types of child
restraint systems, as well as installation methods, etc., written in
this manual.
● Use a child restraint system when riding with a small child that
cannot properly use a seat belt. For the child’s safety, install the
child restraint system to a rear seat. Be sure to follow the installa-
tion method that is in the operation manual enclosed with the
restraint system.
● The use of a Toyota genuine child restraint system is recom-
mended, as it is safer to use in this vehicle. Toyota genuine child
restraint systems are made specifically for Toyota vehicles. They
can be purchased at a Toyota dealer.
Table of contents
Page 55 of 504
551-2. Child safety
1
For safety and security
AYGO_OM_Europe_OM99R19E
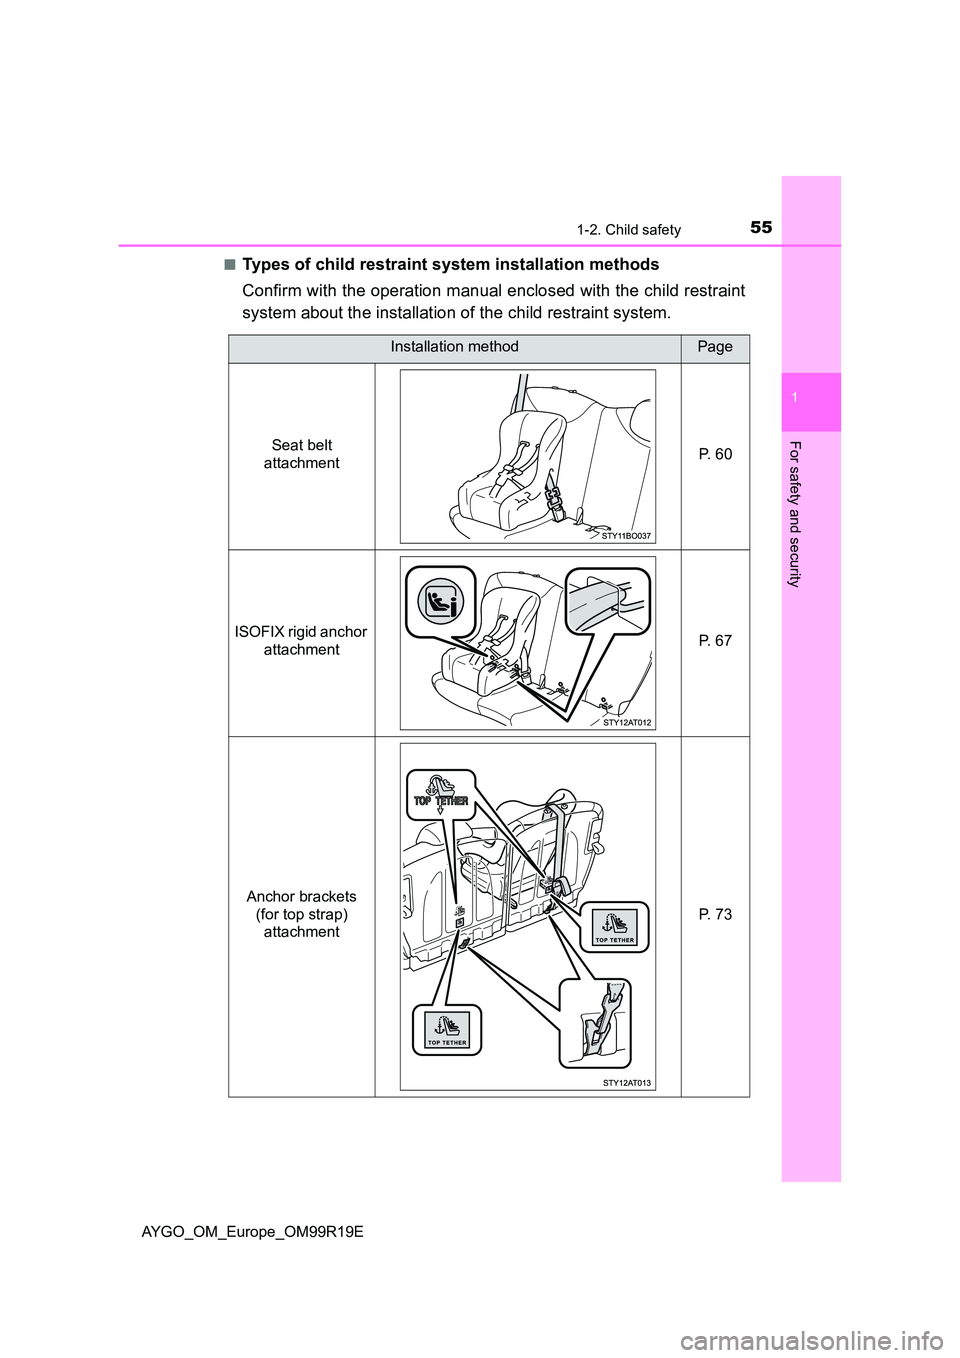
■Types of child restraint system installation methods
Confirm with the operation manual enclosed with the child restraint
system about the installation of the child restraint system.
Installation methodPage
Seat belt
attachment P. 6 0
ISOFIX rigid anchor
attachment P. 6 7
Anchor brackets
(for top strap)
attachment
P. 7 3
Page 61 of 504
611-2. Child safety
1
For safety and security
AYGO_OM_Europe_OM99R19E
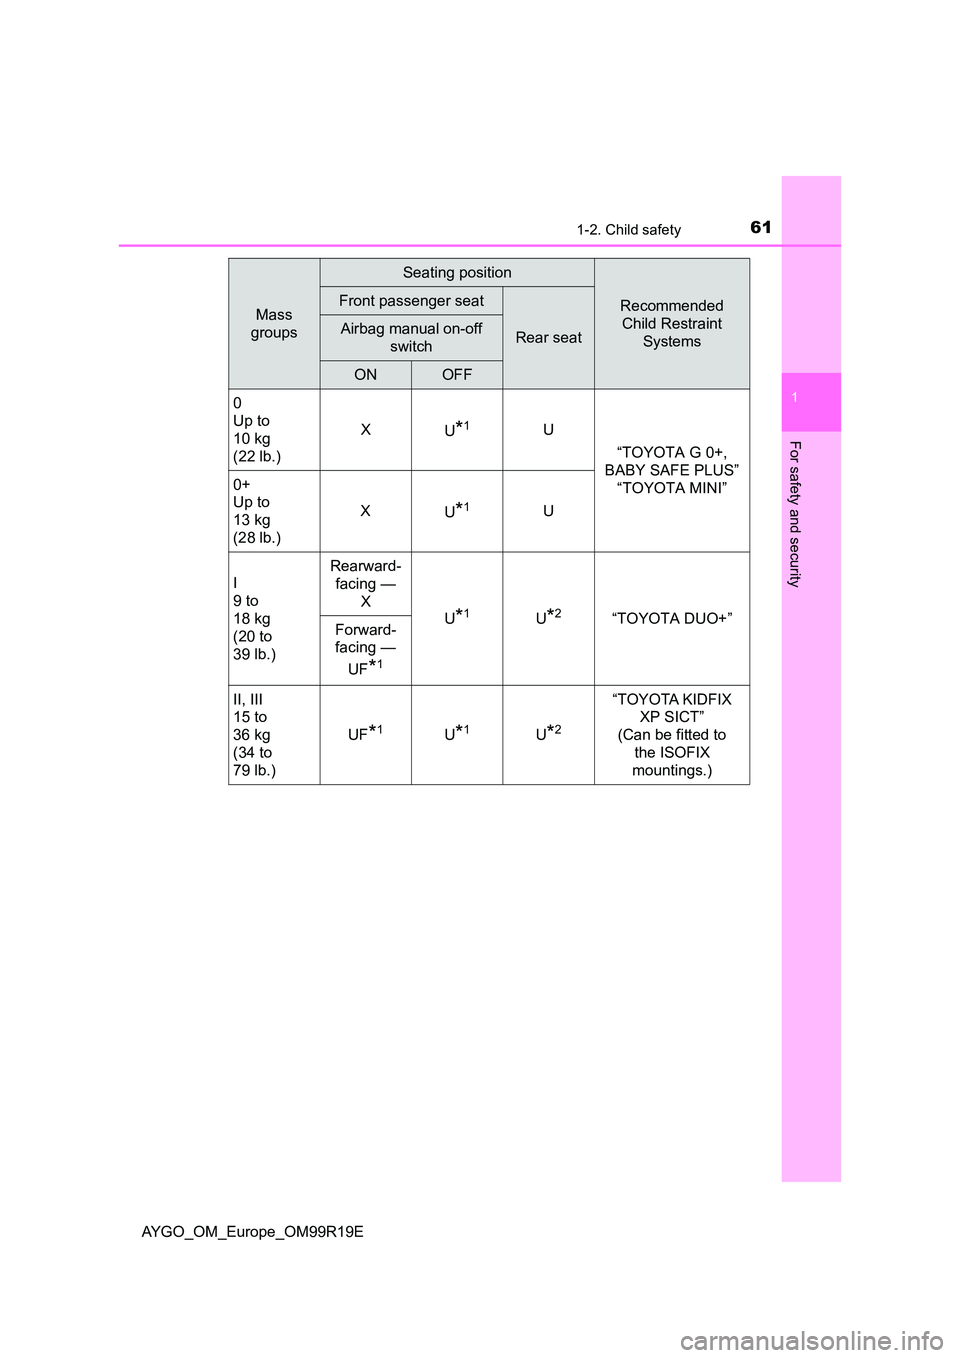
Mass
groups
Seating position
Recommended
Child Restraint
Systems
Front passenger seat
Rear seatAirbag manual on-off
switch
ONOFF
0
Up to
10 kg
(22 lb.)
X U*1U
“TOYOTA G 0+,
BABY SAFE PLUS”
“TOYOTA MINI” 0+
Up to
13 kg
(28 lb.)
X U*1U
I
9 to
18 kg
(20 to
39 lb.)
Rearward-
facing —
X
U*1U*2“TOYOTA DUO+” Forward-
facing —
UF*1
II, III
15 to
36 kg
(34 to
79 lb.)
UF*1U*1U*2
“TOYOTA KIDFIX
XP SICT”
(Can be fitted to
the ISOFIX
mountings.)
Page 67 of 504
671-2. Child safety
1
For safety and security
AYGO_OM_Europe_OM99R19E
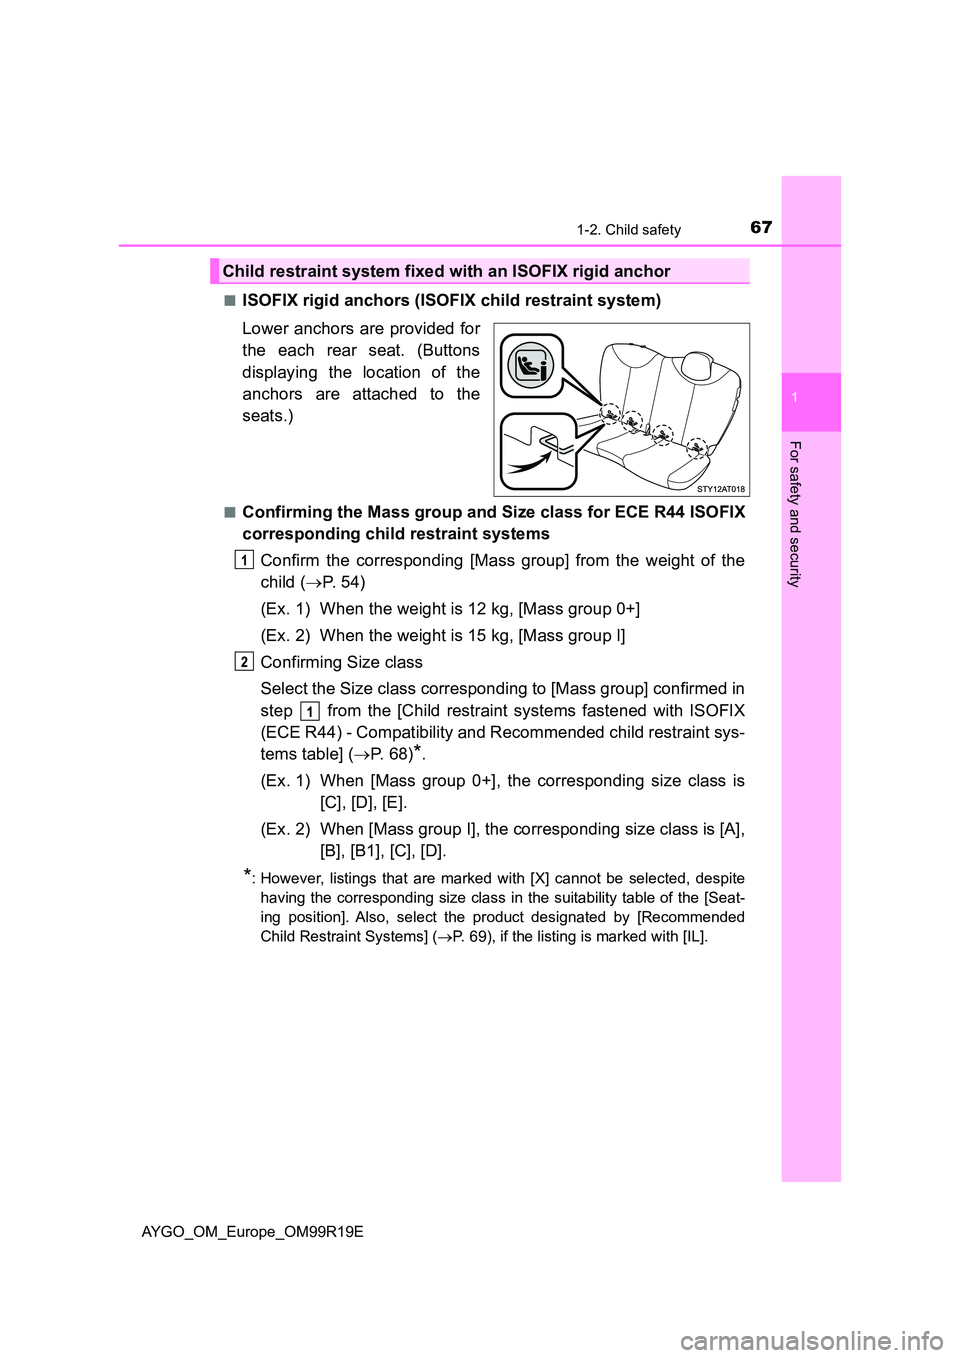
■ISOFIX rigid anchors (ISOFIX child restraint system)
Lower anchors are provided for
the each rear seat. (Buttons
displaying the location of the
anchors are attached to the
seats.)
■Confirming the Mass group and Size class for ECE R44 ISOFIX
corresponding child restraint systems
Confirm the corresponding [Mass group] from the weight of the
child ( P. 54)
(Ex. 1) When the weight is 12 kg, [Mass group 0+]
(Ex. 2) When the weight is 15 kg, [Mass group I]
Confirming Size class
Select the Size class corresponding to [Mass group] confirmed in
step from the [Child restraint systems fastened with ISOFIX
(ECE R44) - Compatibility and Recommended child restraint sys-
tems table] ( P. 68)*.
(Ex. 1) When [Mass group 0+], the corresponding size class is
[C], [D], [E].
(Ex. 2) When [Mass group I], the corresponding size class is [A],
[B], [B1], [C], [D].
*: However, listings that are marked with [X] cannot be selected, despite
having the corresponding size class in the suitability table of the [Seat-
ing position]. Also, select the product designated by [Recommended
Child Restraint Systems] ( P. 69), if the listing is marked with [IL].
Child restraint system fixed with an ISOFIX rigid anchor
Page 68 of 504
681-2. Child safety
AYGO_OM_Europe_OM99R19E
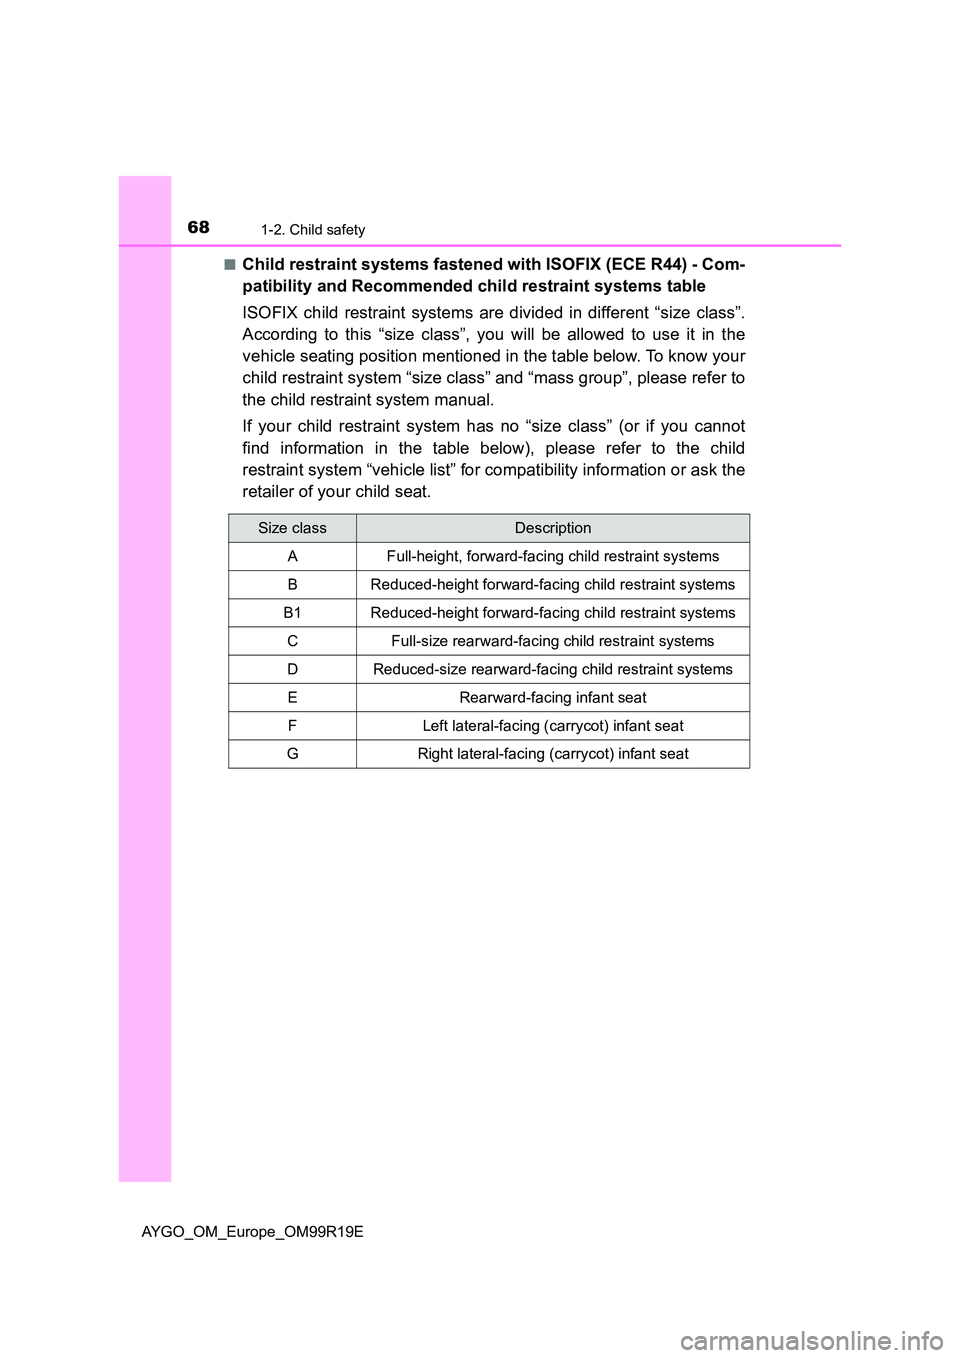
■Child restraint systems fastened with ISOFIX (ECE R44) - Com-
patibility and Recommended child restraint systems table
ISOFIX child restraint systems are divided in different “size class”.
According to this “size class”, you will be allowed to use it in the
vehicle seating position mentioned in the table below. To know your
child restraint system “size class” and “mass group”, please refer to
the child restraint system manual.
If your child restraint system has no “size class” (or if you cannot
find information in the table below), please refer to the child
restraint system “vehicle list” for compatibility information or ask the
retailer of your child seat.
Size classDescription
A Full-height, forward-facing child restraint systems
B Reduced-height forward-facing child restraint systems
B1 Reduced-height forward-facing child restraint systems
C Full-size rearward-facing child restraint systems
D Reduced-size rearward-facing child restraint systems
E Rearward-facing infant seat
F Left lateral-facing (carrycot) infant seat
G Right lateral-facing (carrycot) infant seat
Page 70 of 504
701-2. Child safety
AYGO_OM_Europe_OM99R19E
Key of letters inserted in the above table:
X: Not suitable seat position for ISOFIX child restraint systems in
this mass group and/or size class.
IUF: Suitable for ISOFIX forward-facing child restraint systems of “uni-
versal” category approved for use in this mass group.
IL: Suitable for ISOFIX child restraint systems of the categories for
“specific vehicles”, “restricted”, or “semi-universal”, approved for
use in this mass group.
*1: When installing the ISOFIX child restraint system on the rear seat, adjust
the front seat to the 9th lock position from the most forward position.
*2: If the head restraint interferes with your child restraint system, and the
head restraint can be removed, remove the head restraint.
Otherwise, put the head restraint in the upper most position.
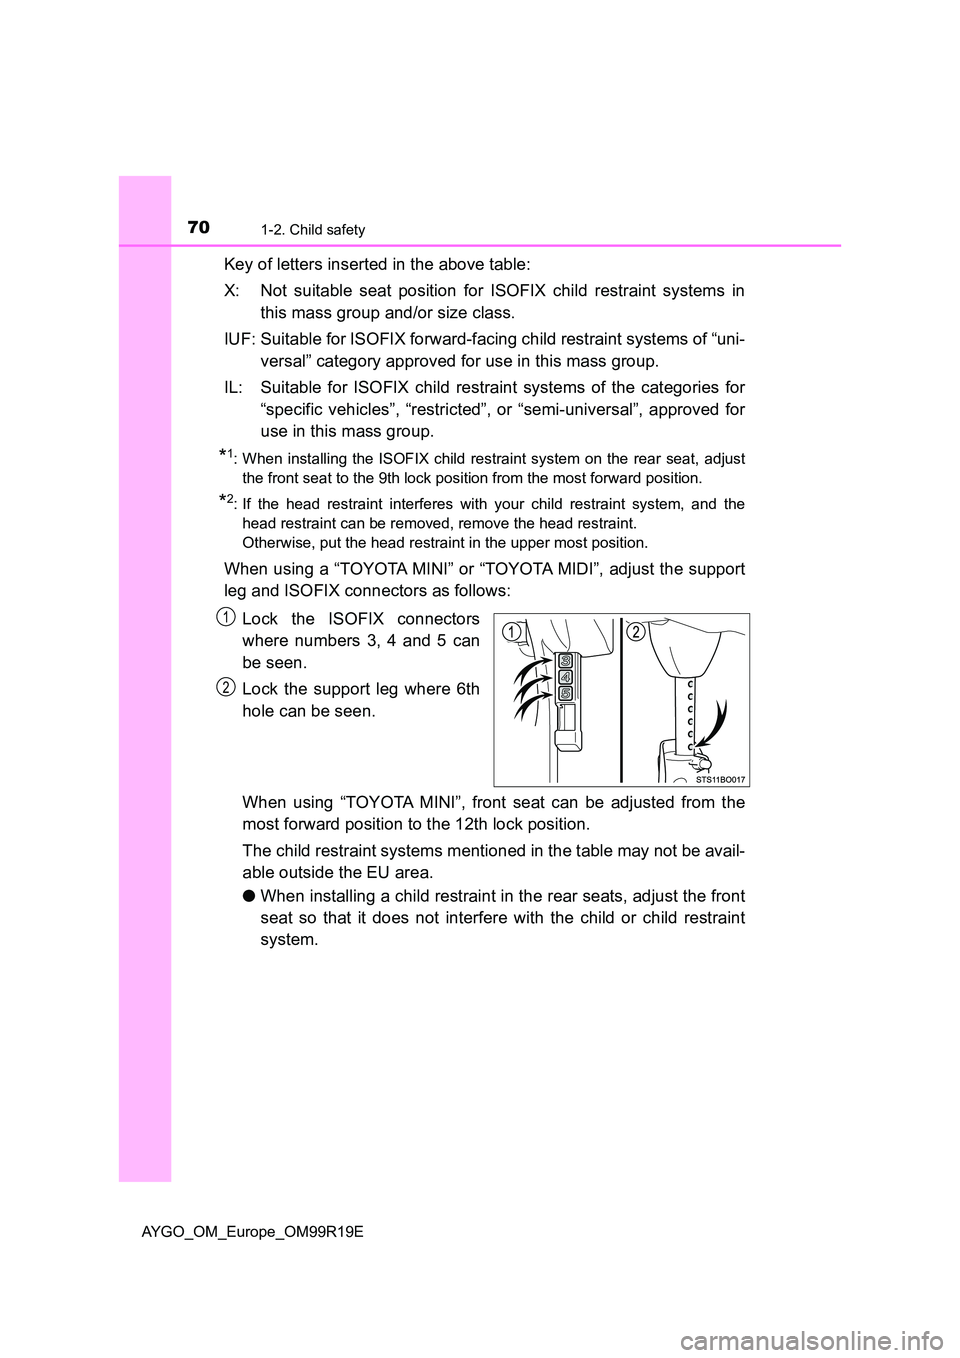
When using a “TOYOTA MINI” or “TOYOTA MIDI”, adjust the support
leg and ISOFIX connectors as follows:
Lock the ISOFIX connectors
where numbers 3, 4 and 5 can
be seen.
Lock the support leg where 6th
hole can be seen.
When using “TOYOTA MINI”, front seat can be adjusted from the
most forward position to the 12th lock position.
The child restraint systems mentioned in the table may not be avail-
able outside the EU area.
● When installing a child restraint in the rear seats, adjust the front
seat so that it does not interfere with the child or child restraint
system.
1
2
Page 71 of 504
711-2. Child safety
1
For safety and security
AYGO_OM_Europe_OM99R19E
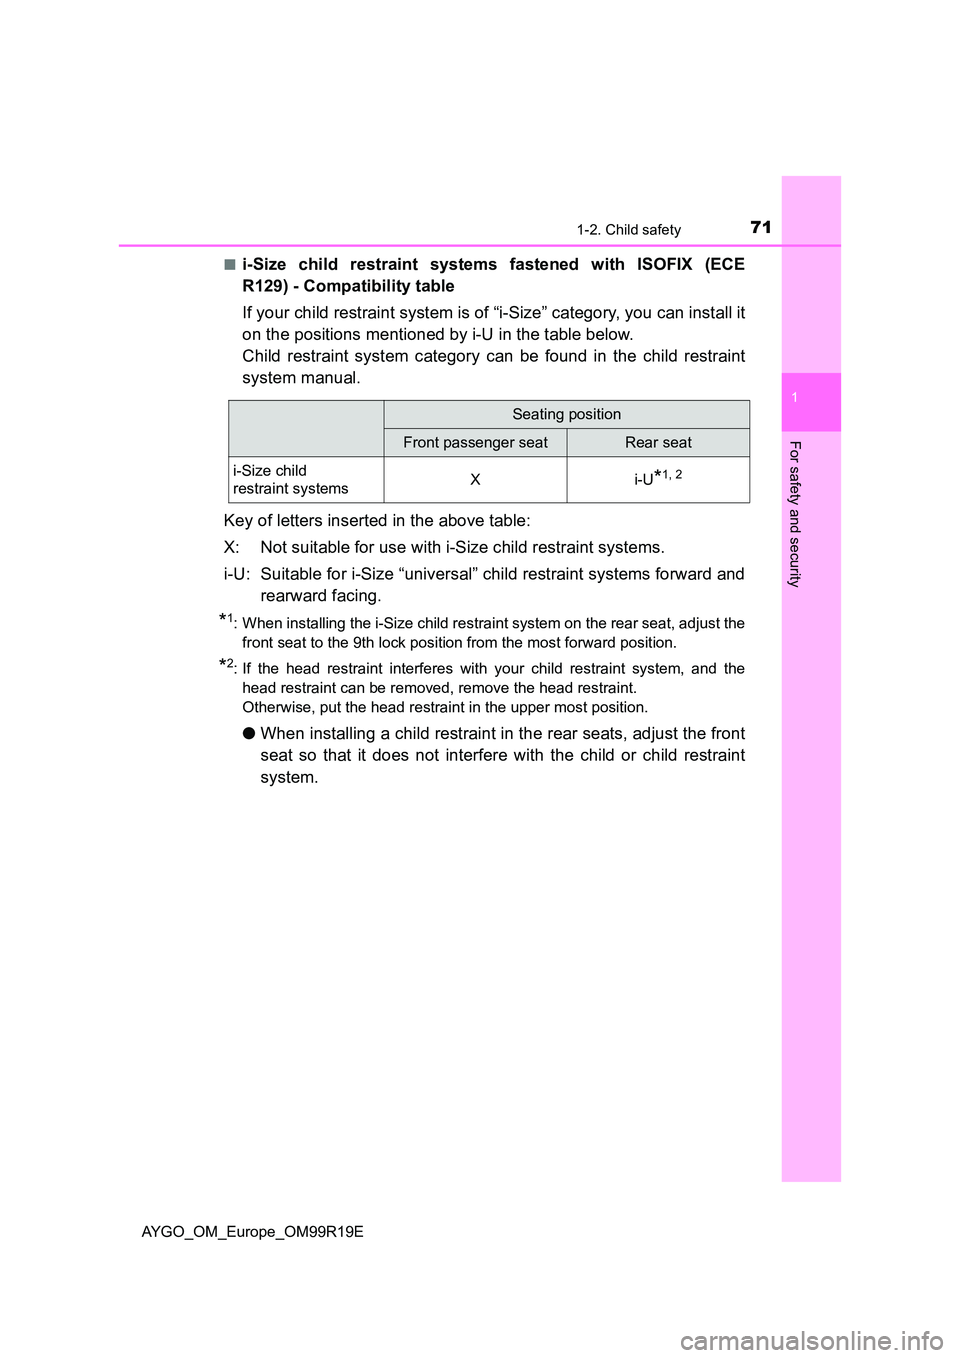
■i-Size child restraint systems fastened with ISOFIX (ECE
R129) - Compatibility table
If your child restraint system is of “i-Size” category, you can install it
on the positions mentioned by i-U in the table below.
Child restraint system category can be found in the child restraint
system manual.
Key of letters inserted in the above table:
X: Not suitable for use with i-Size child restraint systems.
i-U: Suitable for i-Size “universal” child restraint systems forward and
rearward facing.
*1: When installing the i-Size child restraint system on the rear seat, adjust the
front seat to the 9th lock position from the most forward position.
*2: If the head restraint interferes with your child restraint system, and the
head restraint can be removed, remove the head restraint.
Otherwise, put the head restraint in the upper most position.
● When installing a child restraint in the rear seats, adjust the front
seat so that it does not interfere with the child or child restraint
system.
Seating position
Front passenger seatRear seat
i-Size child
restraint systemsXi-U*1, 2
Page 72 of 504
721-2. Child safety
AYGO_OM_Europe_OM99R19E
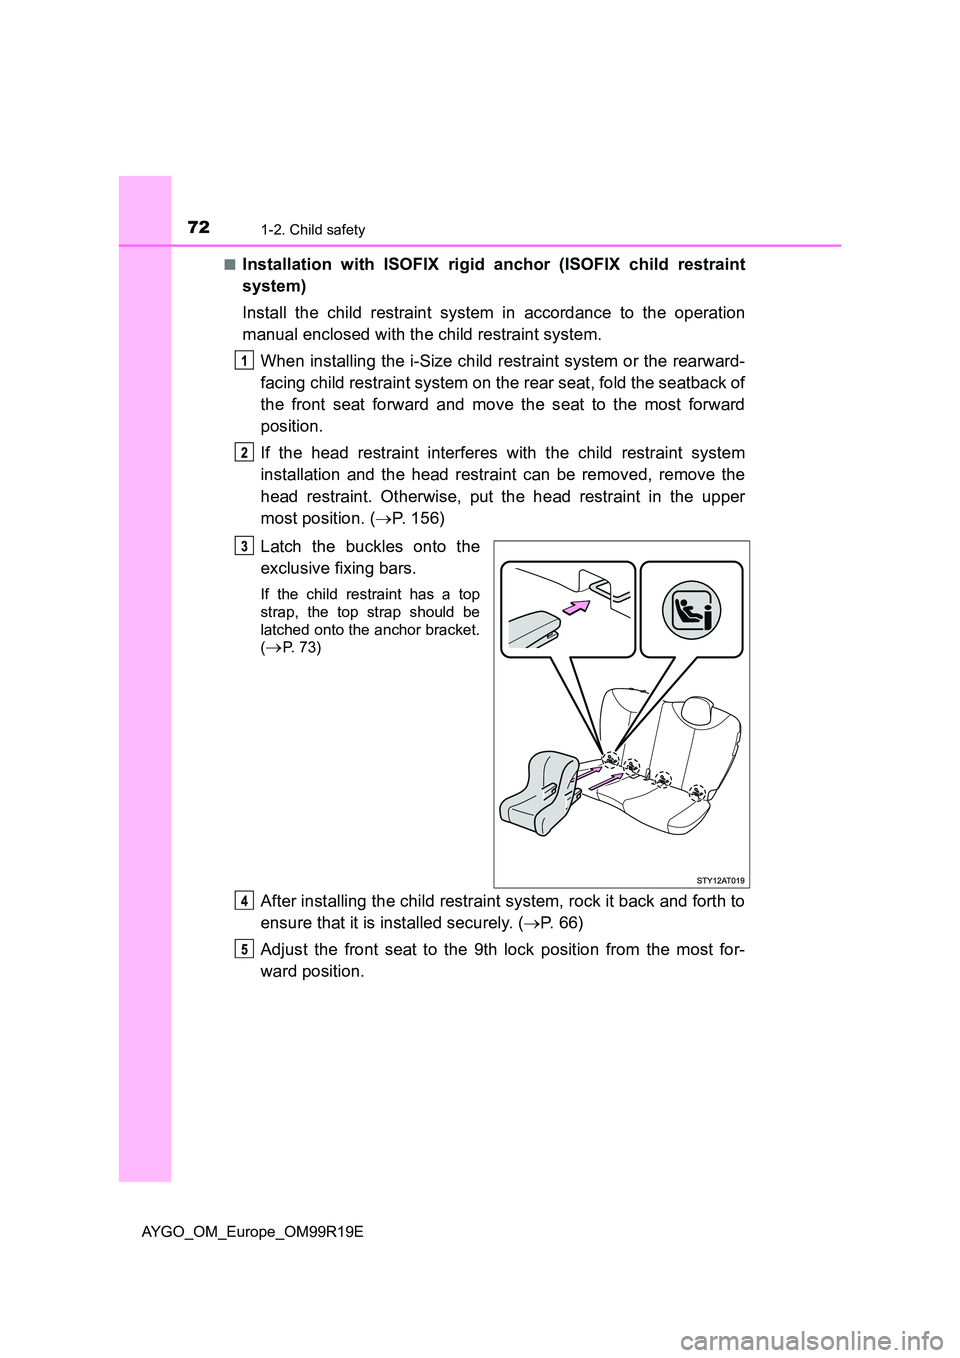
■Installation with ISOFIX rigid anchor (ISOFIX child restraint
system)
Install the child restraint system in accordance to the operation
manual enclosed with the child restraint system.
When installing the i-Size child restraint system or the rearward-
facing child restraint system on the rear seat, fold the seatback of
the front seat forward and move the seat to the most forward
position.
If the head restraint interferes with the child restraint system
installation and the head restraint can be removed, remove the
head restraint. Otherwise, put the head restraint in the upper
most position. ( P. 156)
Latch the buckles onto the
exclusive fixing bars.
If the child restraint has a top
strap, the top strap should be
latched onto the anchor bracket.
(P. 73)
After installing the child restraint system, rock it back and forth to
ensure that it is installed securely. ( P. 6 6 )
Adjust the front seat to the 9th lock position from the most for-
ward position.
Page 74 of 504
741-2. Child safety
AYGO_OM_Europe_OM99R19E
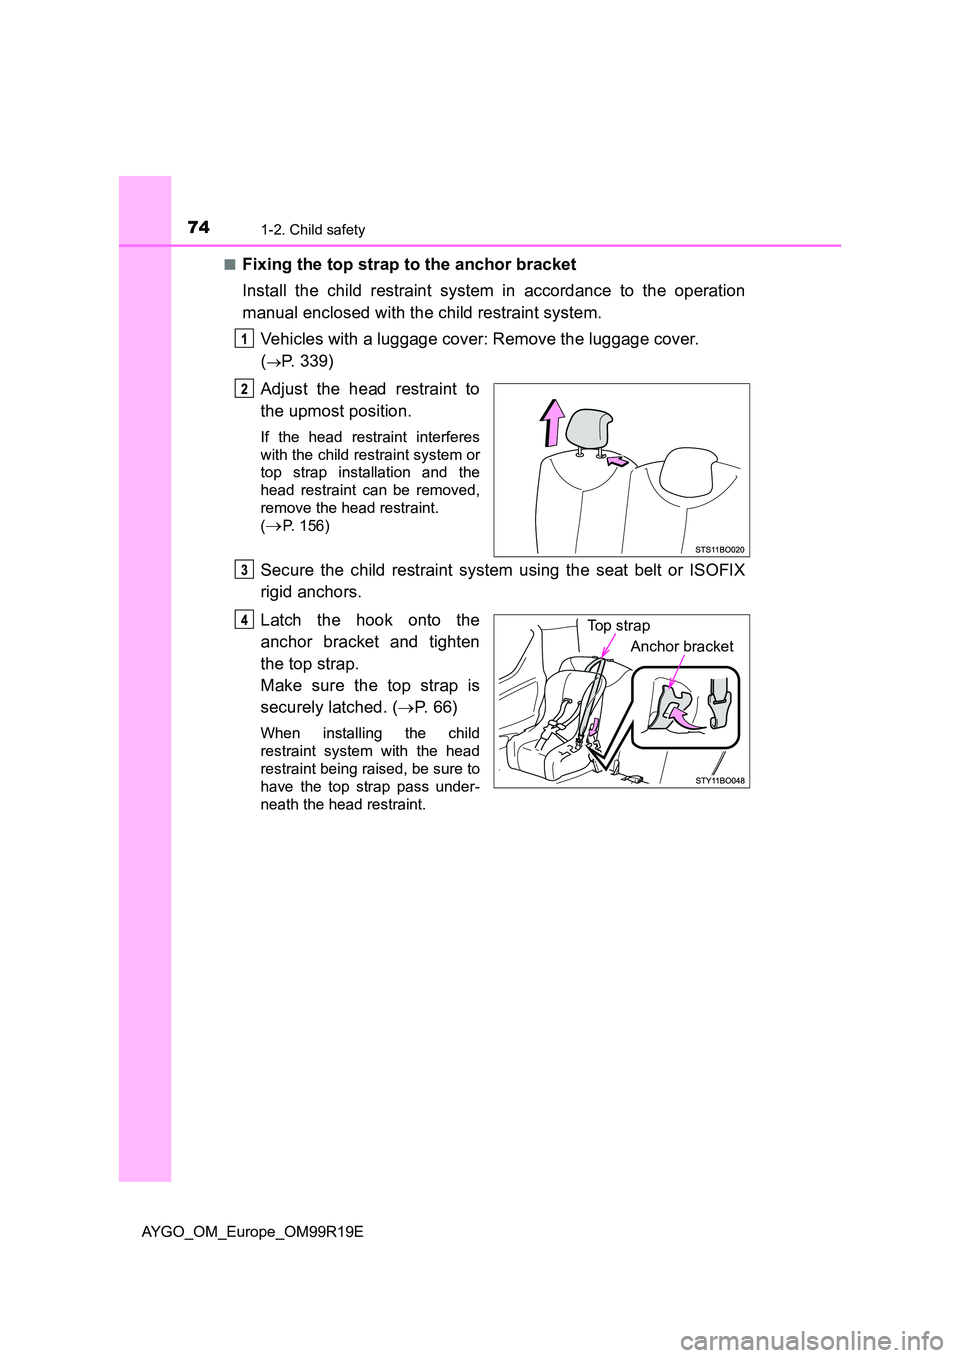
■Fixing the top strap to the anchor bracket
Install the child restraint system in accordance to the operation
manual enclosed with the child restraint system.
Vehicles with a luggage cover: Remove the luggage cover.
(P. 339)
Adjust the head restraint to
the upmost position.
If the head restraint interferes
with the child restraint system or
top strap installation and the
head restraint can be removed,
remove the head restraint.
(P. 156)
Secure the child restraint system using the seat belt or ISOFIX
rigid anchors.
Latch the hook onto the
anchor bracket and tighten
the top strap.
Make sure the top strap is
securely latched. ( P. 6 6 )
When installing the child
restraint system with the head
restraint being raised, be sure to
have the top strap pass under-
neath the head restraint.
Top strap
Anchor bracket
Page 493 of 504
493Alphabetical index
AYGO_OM_Europe_OM99R19E
Back door ................................. 123
Back-up lights
Replacing light bulbs ............. 400
Wattage................................. 482
Battery ...................................... 367
Battery checking ................... 367
If the vehicle battery is
discharged .......................... 461
Preparing and checking
before winter....................... 253
Replacing .............................. 463
Warning light ......................... 417
Bluetooth®*
Audio system ........................ 304
Hands-free system
(for cellular phone).............. 306
Bottle holders........................... 337
Brake
Emergency brake signal ....... 247
Fluid ...................................... 480
Parking brake ........................ 198
Warning light ......................... 417
Brake assist.............................. 247
Break-in tips ............................ 173
Brightness control
Instrument cluster light
control................................. 106
Canvas top ............................... 166
Care................................... 346, 350
Aluminum wheels.................. 347
Canvas top............................ 346
Exterior ................................. 346
Interior................................... 350
Seat belts .............................. 351
Chains....................................... 253
Child restraint system ............... 50
Fixed with a seat belt .............. 60
Fixed with an ISOFIX
rigid anchor........................... 67
Points to remember ................ 51
Riding with children................. 49
Types of child restraint system
installation method ............... 55
Using an anchor bracket ......... 73
Child safety ................................ 49
Airbag precautions .................. 37
Back door precautions .......... 126
Battery precautions ....... 367, 464
Canvas top precautions ........ 167
Child restraint system ............. 50
How your child should wear
the seat belt.......................... 31
Installing child restraints ......... 55
Power window precautions ... 163
Rear door child-protectors .... 121
Removed key battery
precautions......................... 385
Seat belt precautions .............. 32
Seat heater precautions........ 333
BC
*: For vehicles with a multimedia system , refer to “Multimedia owner’s manual”.