start stop button TOYOTA BZ4X 2022 Owners Manual (in English)
[x] Cancel search | Manufacturer: TOYOTA, Model Year: 2022, Model line: BZ4X, Model: TOYOTA BZ4X 2022Pages: 674, PDF Size: 120.02 MB
Page 112 of 674
110
Owners Manual_Europe_M42D76_en
2-2. Charging
■Locking the charging connec-
tor
The AC charging connector will be
automatically locked when inserting
it into the AC charging inlet.
■Unlocking the charging con-
nector
The AC charging connector will be
unlocked when the doors are
unlocked using the smart entry &
start system or wireless remote
control.
The AC charging connector locks
when connected and unlocks when
the door is unlocked, so lock-
ing/unlocking the AC charging con-
nector does not necessarily
correspond to locking/unlocking the
door.
If the door is unlocked and the AC
charging connector is locked, you
can unlock it by doing the following:
• When using the smart entry &
start system, lock the door once
and then unlock it again.
(→P.185)
• When using the wireless remote
control, press the unlock button
to unlock the door. (→P.185)
■AC charging connector lock func-
tion
If the AC charging connector is locked/unlocked repeatedly, it may not
work temporary due to protect the sys- tem by AC charging system. In this case, wait for a while before connecting
the AC charging connector to AC charging inlet again.
The AC charging connector lock func-
tion does not guarantee that theft of the AC charging cable will be prevented, and is not necessarily effective for all
mischiefs.
■Security function for unlocking
If the AC charging connector is not removed within approximately 30 sec-
onds after the vehicle is unlocked, the security function automatically locks the connector again.
■Unlocking the AC charging connec-
tor during charging
If the AC charging connector is unlocked during charging, charging will be
stopped. Once the security function ( P.77) works, charging may not restart automatically. In this case, remove the
AC charging connector* and insert it again.*: When the AC charging connector is
removed, the charging schedule will
be updated. ( P.134)
■When the AC charging connector cannot be inserted into the AC
charging inlet
Check that the connector lock pin is not lowered.
If the connector lock pin is lowered, the connector lock is operating. Unlock the doors using the smart entry & start sys-
Locking and unlocking
AC charging connector
The AC charging connector
will be locked when it is con-
nected to the AC charging
inlet, preventing the AC
charging cable from being dis-
connected while charging.
Locking and unlocking the
AC charging connector
Page 143 of 674
141
2
Owners Manual_Europe_M42D76_en
2-2. Charging
Electric Vehicle system
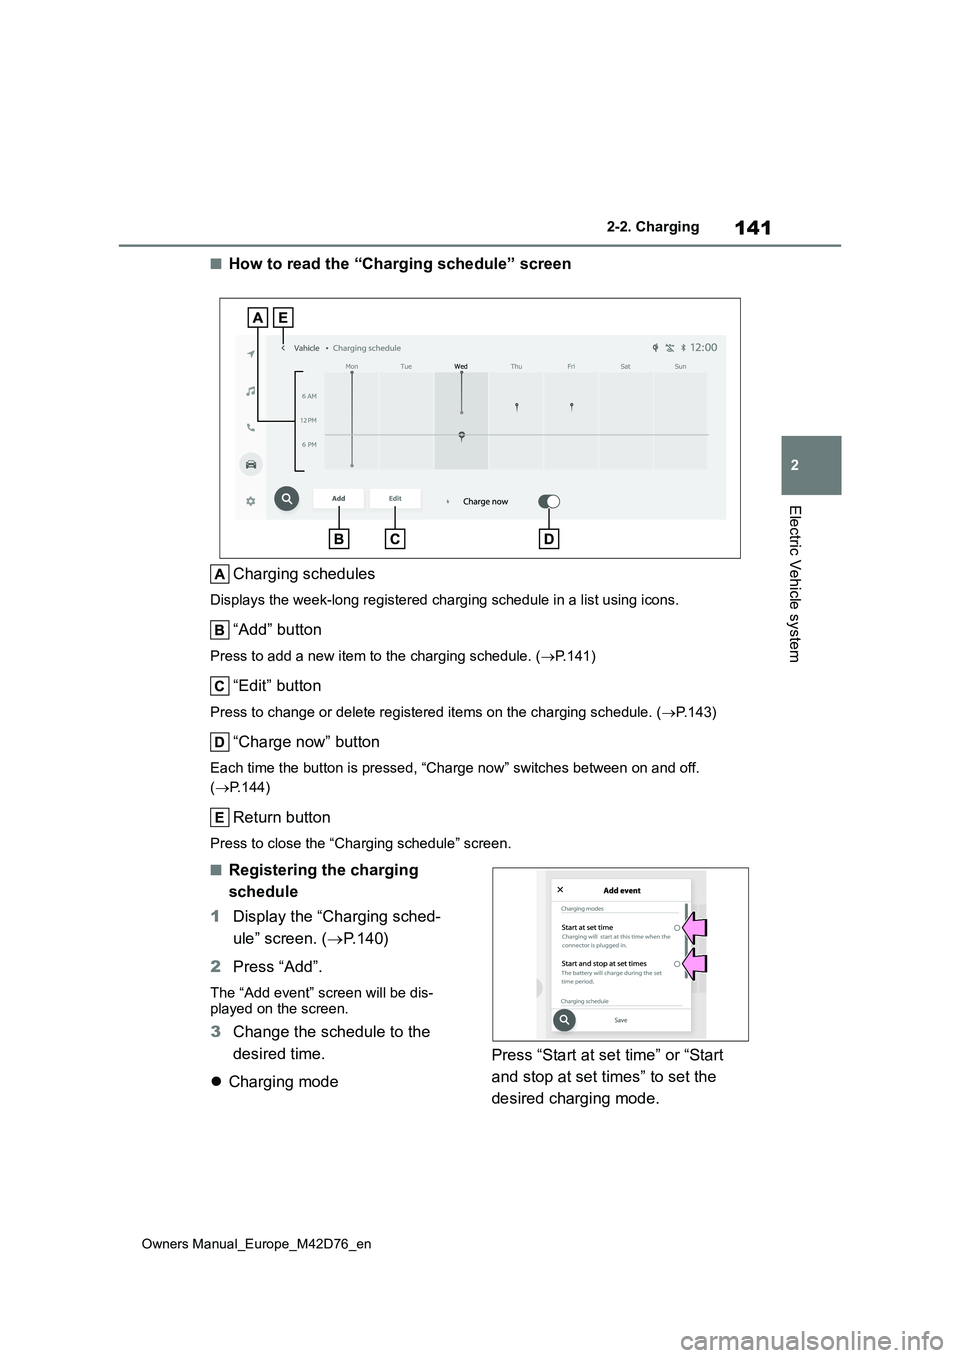
■How to read the “Charging schedule” screen
Charging schedules
Displays the week-long registered charging schedule in a list u sing icons.
“Add” button
Press to add a new item to the charging schedule. (P.141)
“Edit” button
Press to change or delete registered items on the charging schedule. (P.143)
“Charge now” button
Each time the button is pressed, “Charge now” switches between on and off.
( P.144)
Return button
Press to close the “Charging schedule” screen.
■Registering the charging
schedule
1 Display the “Charging sched-
ule” screen. ( P. 1 4 0 )
2 Press “Add”.
The “Add event” screen will be dis- played on the screen.
3 Change the schedule to the
desired time.
Charging mode
Press “Start at set time” or “Start
and stop at set times” to set the
desired charging mode.
Page 144 of 674
142
Owners Manual_Europe_M42D76_en
2-2. Charging
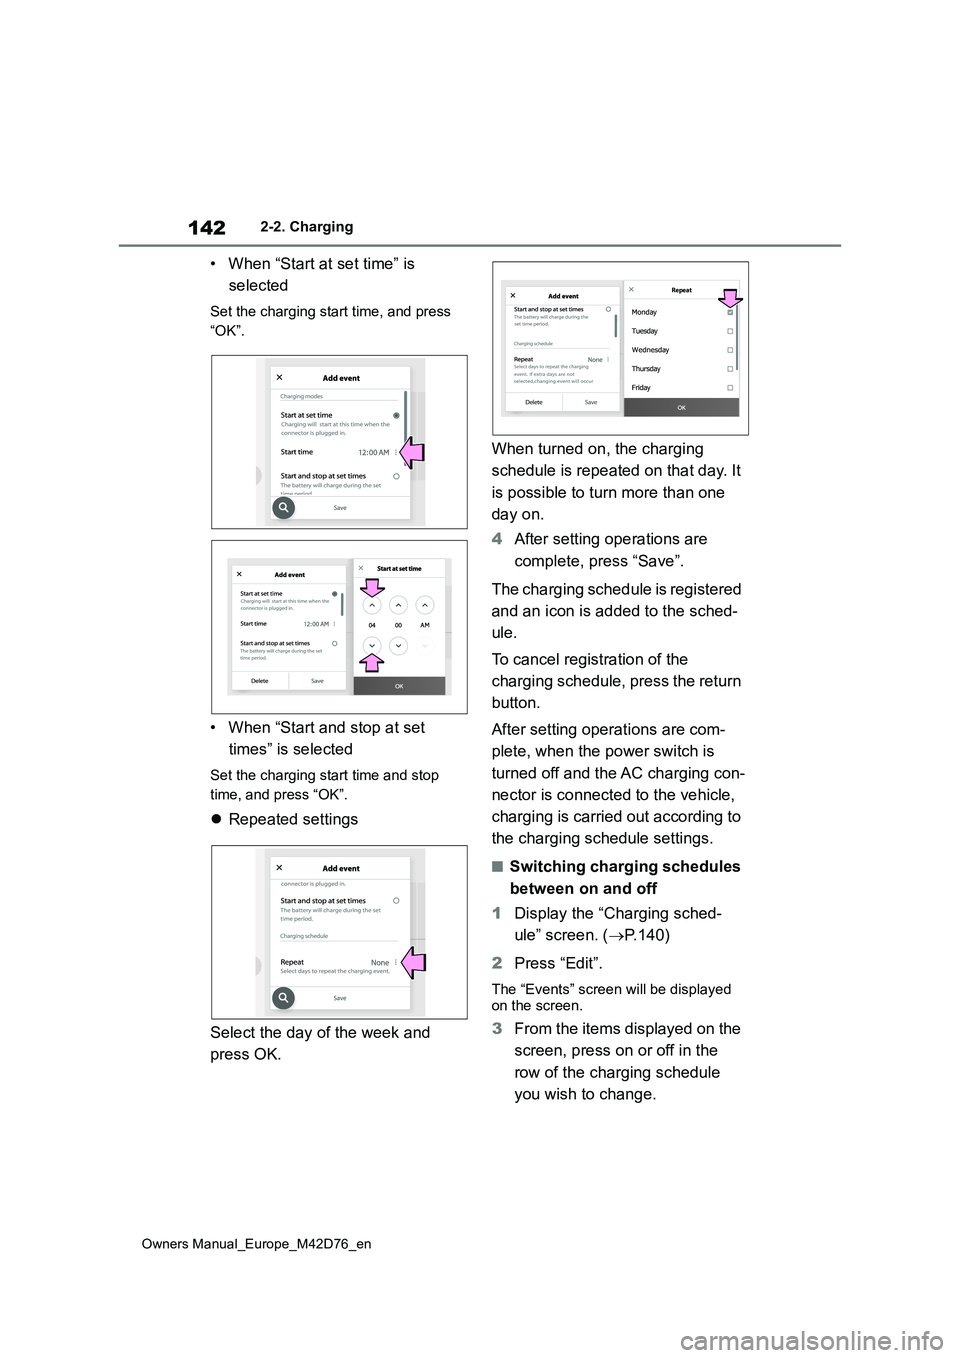
• When “Start at set time” is
selected
Set the charging start time, and press
“OK”.
• When “Start and stop at set
times” is selected
Set the charging start time and stop
time, and press “OK”.
Repeated settings
Select the day of the week and
press OK.
When turned on, the charging
schedule is repeated on that day. It
is possible to turn more than one
day on.
4 After setting operations are
complete, press “Save”.
The charging schedule is registered
and an icon is added to the sched-
ule.
To cancel registration of the
charging schedule, press the return
button.
After setting operations are com-
plete, when the power switch is
turned off and the AC charging con-
nector is connected to the vehicle,
charging is carried out according to
the charging schedule settings.
■Switching charging schedules
between on and off
1 Display the “Charging sched-
ule” screen. ( P.140)
2 Press “Edit”.
The “Events” screen will be displayed on the screen.
3 From the items displayed on the
screen, press on or off in the
row of the charging schedule
you wish to change.
Repeat
Page 146 of 674
144
Owners Manual_Europe_M42D76_en
2-2. Charging
the calendar.
■Turning “Charge now” on
1 Display the “Charging sched-
ule” screen. ( P. 1 4 0 )
2 Press “Charge now”.
Each time the button is pressed,
“Charge now” switches between on
and off.
After setting operations are com-
plete, charging starts when the AC
charging connector is connected.
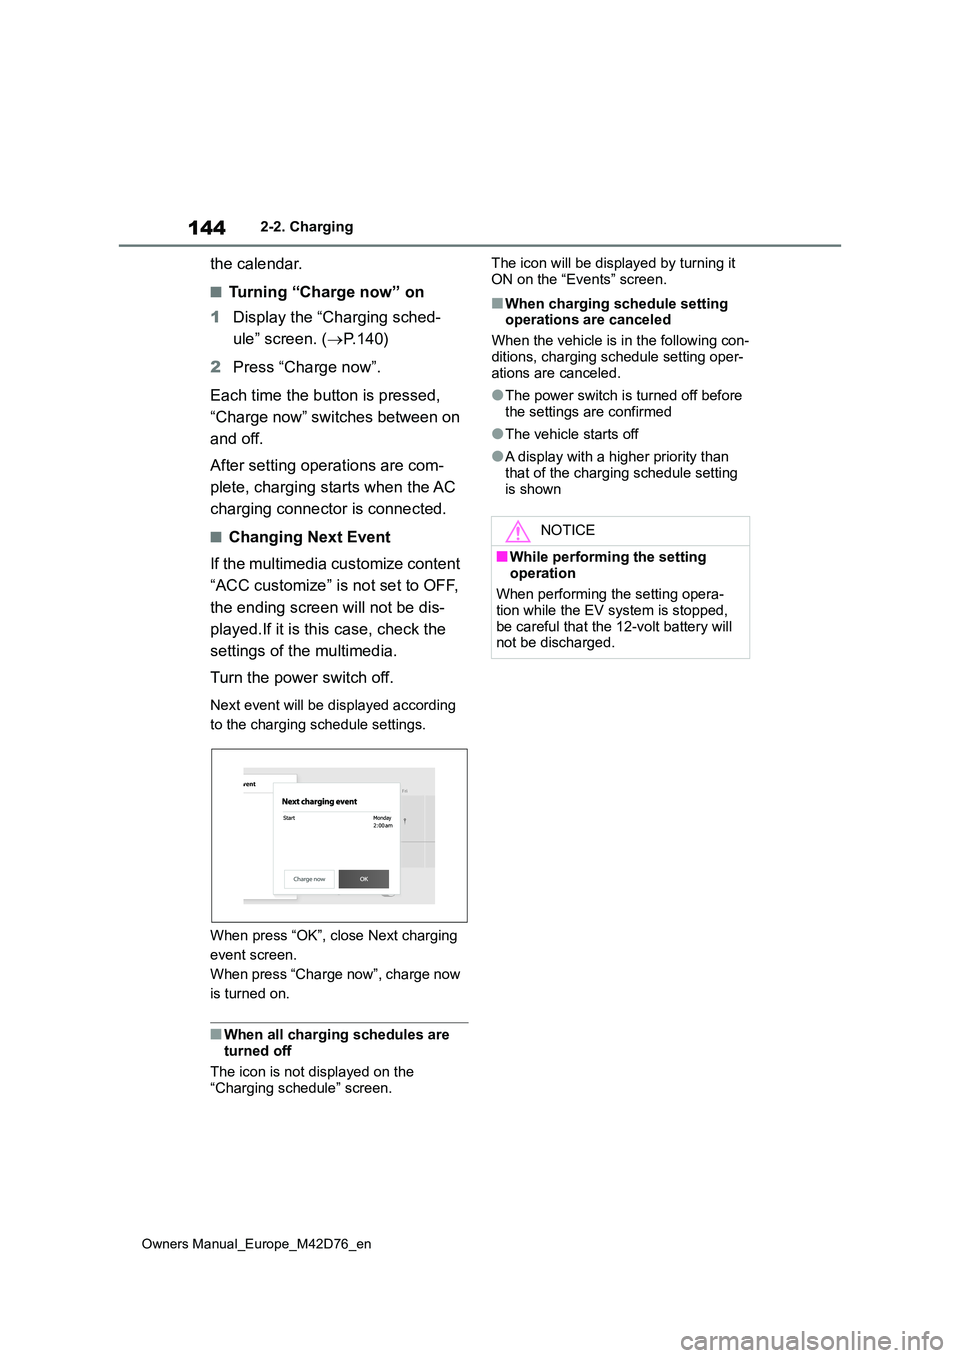
■Changing Next Event
If the multimedia customize content
“ACC customize” is not set to OFF,
the ending screen will not be dis-
played.If it is this case, check the
settings of the multimedia.
Turn the power switch off.
Next event will be displayed according
to the charging schedule settings.
When press “OK”, close Next charging
event screen.
When press “Charge now”, charge now
is turned on.
■When all charging schedules are turned off
The icon is not displayed on the
“Charging schedule” screen.
The icon will be displayed by turning it
ON on the “Events” screen.
■When charging schedule setting operations are canceled
When the vehicle is in the following con-
ditions, charging schedule setting oper- ations are canceled.
●The power switch is turned off before the settings are confirmed
●The vehicle starts off
●A display with a higher priority than
that of the charging schedule setting is shown
NOTICE
■While performing the setting
operation
When performing the setting opera- tion while the EV system is stopped,
be careful that the 12-volt battery will not be discharged.
Page 184 of 674
182
Owners Manual_Europe_M42D76_en
4-1. Key information
4-1.Key info rmation
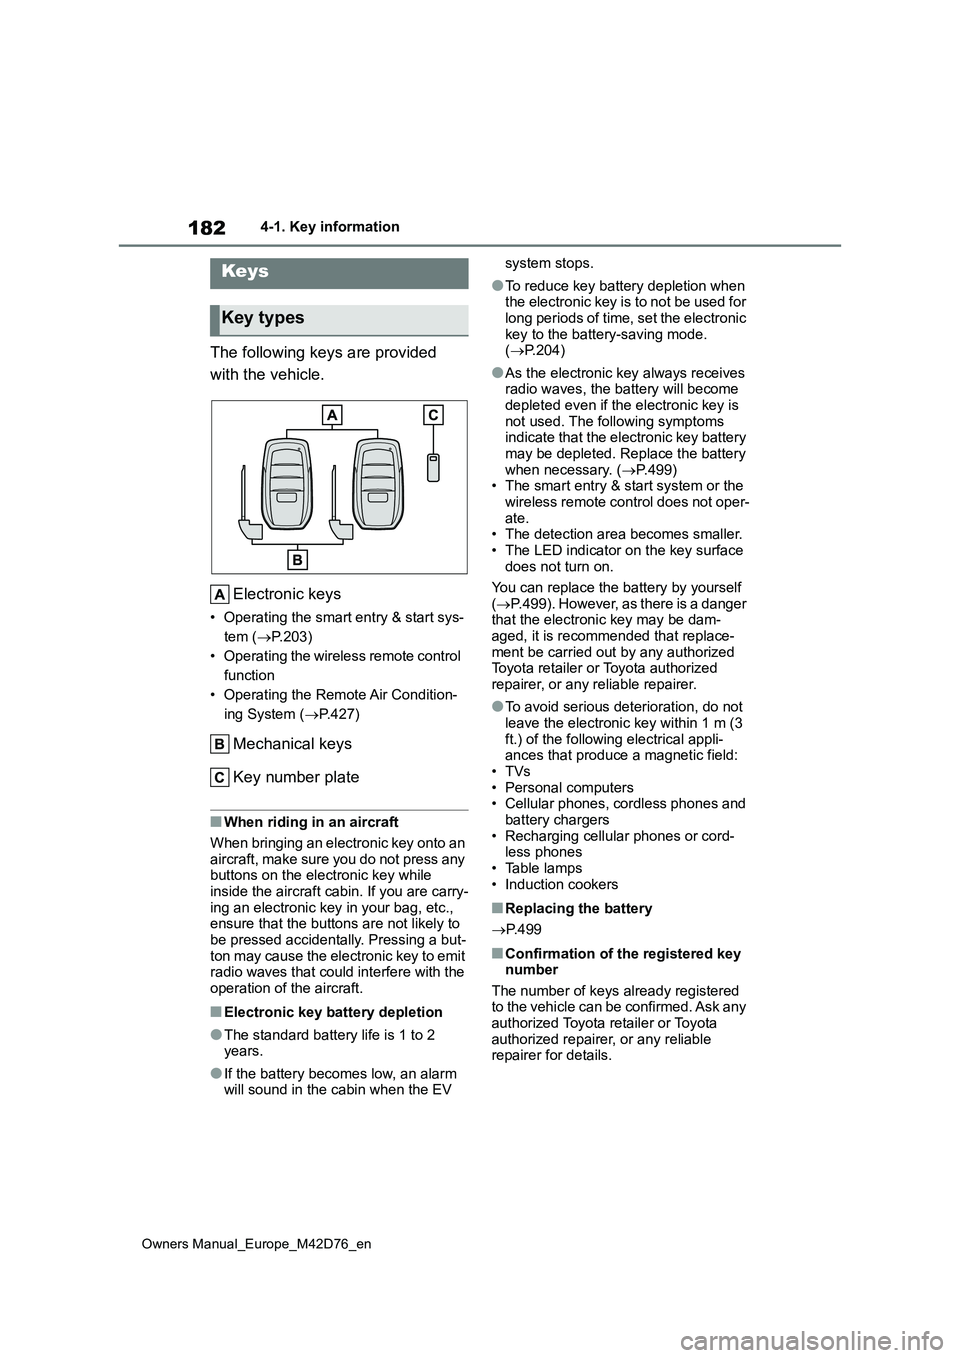
The following keys are provided
with the vehicle.
Electronic keys
• Operating the smart entry & start sys-
tem ( P.203)
• Operating the wireless remote control
function
• Operating the Remote Air Condition-
ing System ( P.427)
Mechanical keys
Key number plate
■When riding in an aircraft
When bringing an electronic key onto an
aircraft, make sure you do not press any buttons on the electronic key while inside the aircraft cabin. If you are carry-
ing an electronic key in your bag, etc., ensure that the buttons are not likely to be pressed accidentally. Pressing a but-
ton may cause the electronic key to emit radio waves that could interfere with the operation of the aircraft.
■Electronic key battery depletion
●The standard battery life is 1 to 2 years.
●If the battery becomes low, an alarm will sound in the cabin when the EV
system stops.
●To reduce key battery depletion when the electronic key is to not be used for
long periods of time, set the electronic key to the battery-saving mode. ( P.204)
●As the electronic key always receives radio waves, the battery will become
depleted even if the electronic key is not used. The following symptoms indicate that the electronic key battery
may be depleted. Replace the battery when necessary. ( P.499) • The smart entry & start system or the
wireless remote control does not oper- ate.• The detection area becomes smaller.
• The LED indicator on the key surface does not turn on.
You can replace the battery by yourself
( P.499). However, as there is a danger that the electronic key may be dam-aged, it is recommended that replace-
ment be carried out by any authorized Toyota retailer or Toyota authorized repairer, or any reliable repairer.
●To avoid serious deterioration, do not leave the electronic key within 1 m (3
ft.) of the following electrical appli- ances that produce a magnetic field:•TVs
• Personal computers • Cellular phones, cordless phones and battery chargers
• Recharging cellular phones or cord- less phones• Table lamps
• Induction cookers
■Replacing the battery
P. 4 9 9
■Confirmation of the registered key number
The number of keys already registered to the vehicle can be confirmed. Ask any authorized Toyota retailer or Toyota
authorized repairer, or any reliable repairer for details.
Keys
Key types
Page 206 of 674
204
Owners Manual_Europe_M42D76_en
4-2. Opening, closing and locking the doors
●When an exterior alarm sounds once
for 5 seconds
●When an interior alarm pings repeat- edly
■If “Key Detected In Vehicle” is shown on the multi-information display
An attempt was made to lock the doors using the smart entry & start system while the electronic key was still inside
the vehicle. Retrieve the electronic key from the vehicle and lock the doors again.
■Battery-saving function
The battery-saving function will be acti- vated in order to prevent the electronic key battery and the 12-volt battery from
being discharged while the vehicle is not in operation for a long time.
●In the following situations, the smart entry & start system may take some time to unlock the doors.
• The electronic key has been left in an
area of approximately 2 m (6 ft.) of the
outside of the vehicle for 10 minutes or longer.• The smart entry & start system has
not been used for 5 days or longer.
●If the smart entry & start system has
not been used for 14 days or longer, the doors cannot be unlocked at any doors except the driver’s door. In this
case, take hold of the driver’s door handle, or use the wireless remote control or the mechanical key, to
unlock the doors.
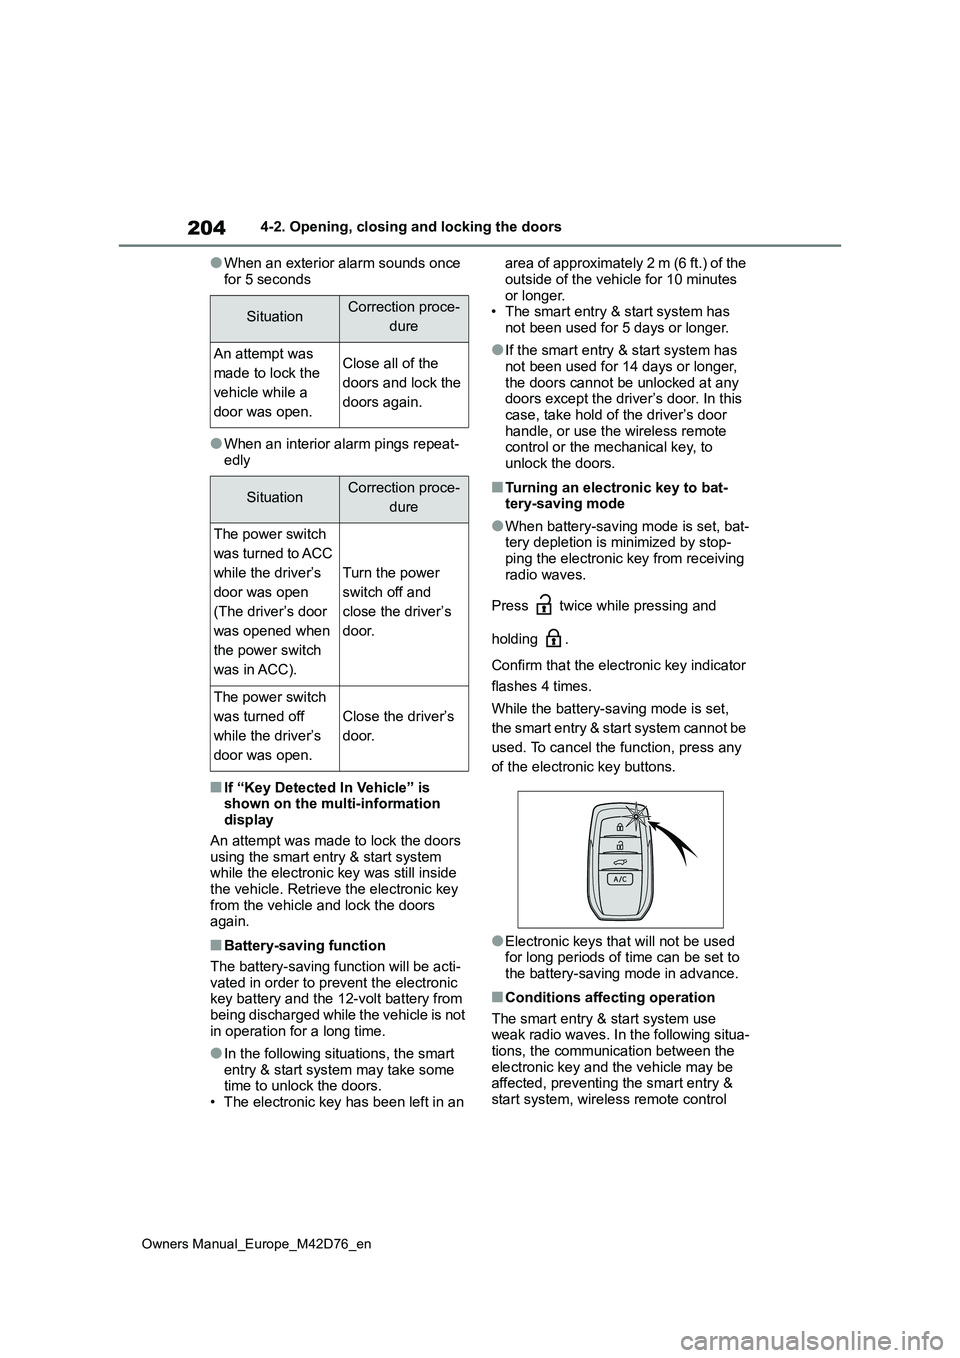
■Turning an electronic key to bat- tery-saving mode
●When battery-saving mode is set, bat-tery depletion is minimized by stop-ping the electronic key from receiving
radio waves.
Press twice while pressing and
holding .
Confirm that the electronic key indicator
flashes 4 times.
While the battery-saving mode is set,
the smart entry & start system cannot be
used. To cancel the function, press any
of the electronic key buttons.
●Electronic keys that will not be used for long periods of time can be set to the battery-saving mode in advance.
■Conditions affecting operation
The smart entry & start system use weak radio waves. In the following situa-tions, the communication between the
electronic key and the vehicle may be affected, preventing the smart entry & start system, wireless remote control
SituationCorrection proce-
dure
An attempt was
made to lock the
vehicle while a
door was open.
Close all of the
doors and lock the
doors again.
SituationCorrection proce-
dure
The power switch
was turned to ACC
while the driver’s
door was open
(The driver’s door
was opened when
the power switch
was in ACC).
Turn the power
switch off and
close the driver’s
door.
The power switch
was turned off
while the driver’s
door was open.
Close the driver’s
door.
Page 259 of 674
257
5
Owners Manual_Europe_M42D76_en
5-2. Driving procedures
Driving
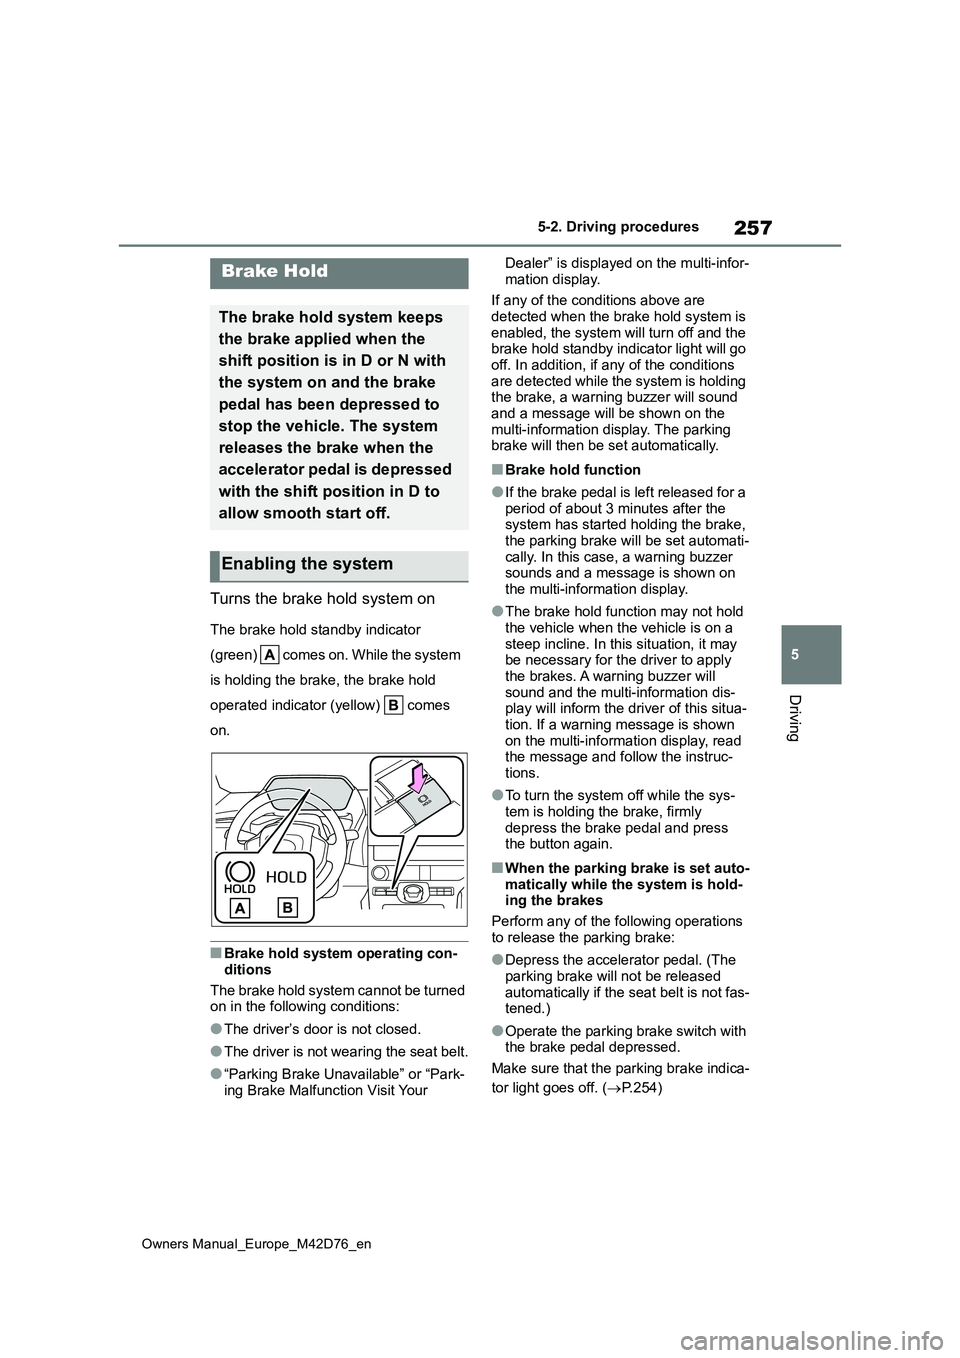
Turns the brake hold system on
The brake hold standby indicator
(green) comes on. While the system
is holding the brake, the brake hold
operated indicator (yellow) comes
on.
■Brake hold system operating con-
ditions
The brake hold system cannot be turned on in the following conditions:
●The driver’s door is not closed.
●The driver is not wearing the seat belt.
●“Parking Brake Unavailable” or “Park-
ing Brake Malfunction Visit Your
Dealer” is displayed on the multi-infor-
mation display.
If any of the conditions above are detected when the brake hold system is
enabled, the system will turn off and the brake hold standby indicator light will go off. In addition, if any of the conditions
are detected while the system is holding the brake, a warning buzzer will sound and a message will be shown on the
multi-information display. The parking brake will then be set automatically.
■Brake hold function
●If the brake pedal is left released for a period of about 3 minutes after the system has started holding the brake,
the parking brake will be set automati- cally. In this case, a warning buzzer sounds and a message is shown on
the multi-information display.
●The brake hold function may not hold
the vehicle when the vehicle is on a steep incline. In this situation, it may be necessary for the driver to apply
the brakes. A warning buzzer will sound and the multi-information dis-play will inform the driver of this situa-
tion. If a warning message is shown on the multi-information display, read the message and follow the instruc-
tions.
●To turn the system off while the sys-
tem is holding the brake, firmly depress the brake pedal and press the button again.
■When the parking brake is set auto-
matically while the system is hold- ing the brakes
Perform any of the following operations
to release the parking brake:
●Depress the accelerator pedal. (The
parking brake will not be released automatically if the seat belt is not fas-tened.)
●Operate the parking brake switch with the brake pedal depressed.
Make sure that the parking brake indica-
tor light goes off. ( P.254)
Brake Hold
The brake hold system keeps
the brake applied when the
shift position is in D or N with
the system on and the brake
pedal has been depressed to
stop the vehicle. The system
releases the brake when the
accelerator pedal is depressed
with the shift position in D to
allow smooth start off.
Enabling the system
Page 374 of 674
372
Owners Manual_Europe_M42D76_en
5-4. Using the driving support systems
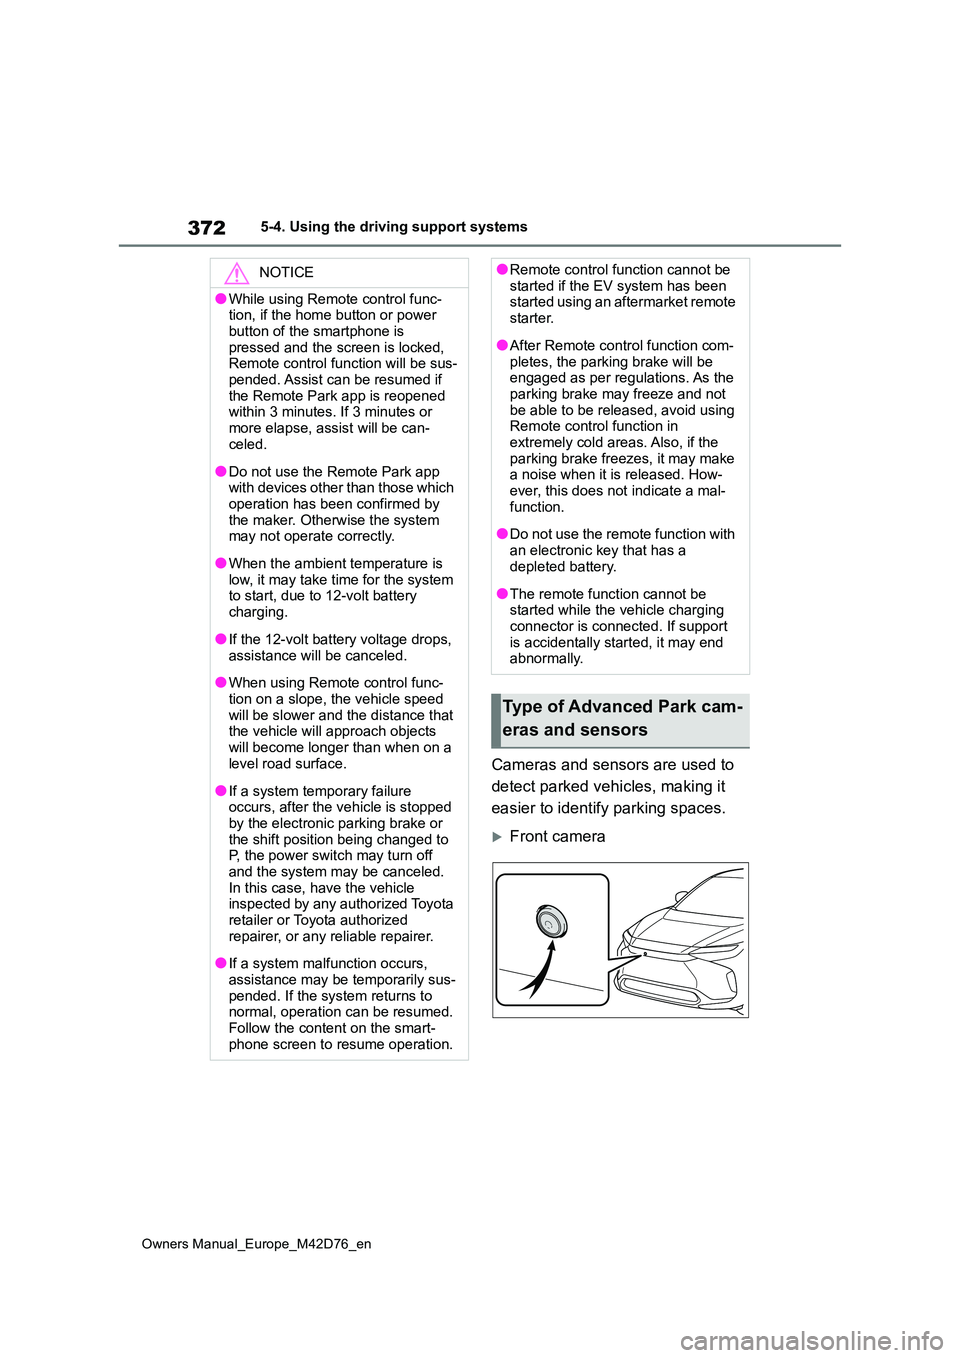
Cameras and sensors are used to
detect parked vehicles, making it
easier to identify parking spaces.
Front camera
NOTICE
●While using Remote control func- tion, if the home button or power
button of the smartphone is pressed and the screen is locked, Remote control function will be sus-
pended. Assist can be resumed if the Remote Park app is reopened within 3 minutes. If 3 minutes or
more elapse, assist will be can- celed.
●Do not use the Remote Park app with devices other than those which operation has been confirmed by
the maker. Otherwise the system may not operate correctly.
●When the ambient temperature is low, it may take time for the system to start, due to 12-volt battery
charging.
●If the 12-volt battery voltage drops,
assistance will be canceled.
●When using Remote control func-
tion on a slope, the vehicle speed will be slower and the distance that the vehicle will approach objects
will become longer than when on a level road surface.
●If a system temporary failure occurs, after the vehicle is stopped by the electronic parking brake or
the shift position being changed to P, the power switch may turn off and the system may be canceled.
In this case, have the vehicle inspected by any authorized Toyota retailer or Toyota authorized
repairer, or any reliable repairer.
●If a system malfunction occurs,
assistance may be temporarily sus- pended. If the system returns to normal, operation can be resumed.
Follow the content on the smart- phone screen to resume operation.
●Remote control function cannot be started if the EV system has been started using an aftermarket remote
starter.
●After Remote control function com-
pletes, the parking brake will be engaged as per regulations. As the parking brake may freeze and not
be able to be released, avoid using Remote control function in extremely cold areas. Also, if the
parking brake freezes, it may make a noise when it is released. How-ever, this does not indicate a mal-
function.
●Do not use the remote function with
an electronic key that has a depleted battery.
●The remote function cannot be started while the vehicle charging connector is connected. If support
is accidentally started, it may end abnormally.
Type of Advanced Park cam-
eras and sensors
Page 380 of 674
378
Owners Manual_Europe_M42D76_en
5-4. Using the driving support systems
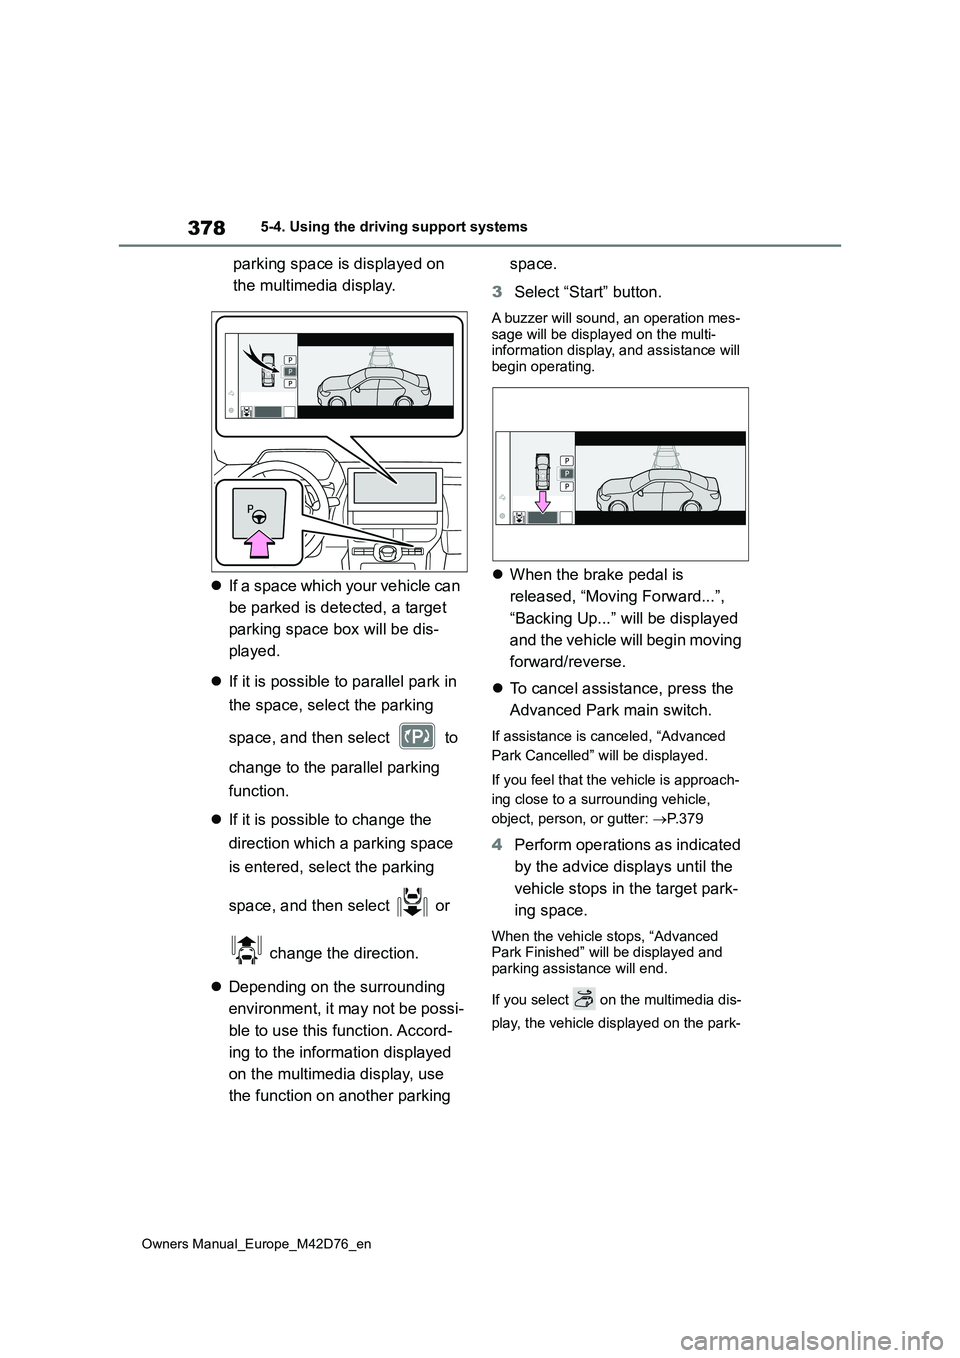
parking space is displayed on
the multimedia display.
If a space which your vehicle can
be parked is detected, a target
parking space box will be dis-
played.
If it is possible to parallel park in
the space, select the parking
space, and then select to
change to the parallel parking
function.
If it is possible to change the
direction which a parking space
is entered, select the parking
space, and then select or
change the direction.
Depending on the surrounding
environment, it may not be possi-
ble to use this function. Accord-
ing to the information displayed
on the multimedia display, use
the function on another parking
space.
3 Select “Start” button.
A buzzer will sound, an operation mes- sage will be displayed on the multi-information display, and assistance will
begin operating.
When the brake pedal is
released, “Moving Forward...”,
“Backing Up...” will be displayed
and the vehicle will begin moving
forward/reverse.
To cancel assistance, press the
Advanced Park main switch.
If assistance is canceled, “Advanced
Park Cancelled” will be displayed.
If you feel that the vehicle is approach-
ing close to a surrounding vehicle,
object, person, or gutter: P. 3 7 9
4Perform operations as indicated
by the advice displays until the
vehicle stops in the target park-
ing space.
When the vehicle stops, “Advanced Park Finished” will be displayed and
parking assistance will end.
If you select on the multimedia dis-
play, the vehicle displayed on the park-
Page 382 of 674
380
Owners Manual_Europe_M42D76_en
5-4. Using the driving support systems
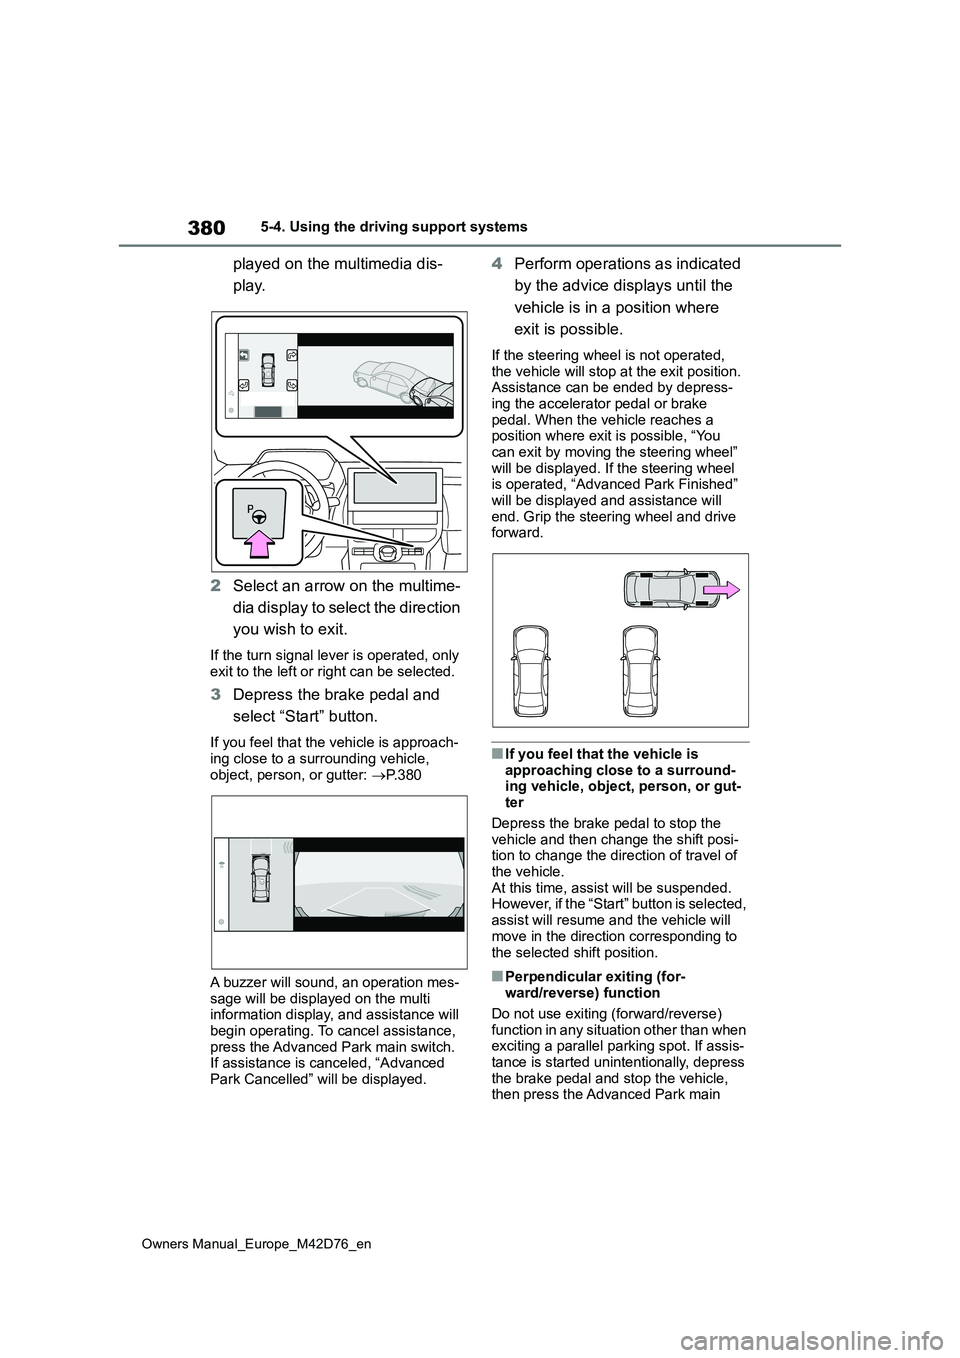
played on the multimedia dis-
play.
2 Select an arrow on the multime-
dia display to select the direction
you wish to exit.
If the turn signal lever is operated, only exit to the left or right can be selected.
3 Depress the brake pedal and
select “Start” button.
If you feel that the vehicle is approach- ing close to a surrounding vehicle,
object, person, or gutter: P. 3 8 0
A buzzer will sound, an operation mes-
sage will be displayed on the multi information display, and assistance will begin operating. To cancel assistance,
press the Advanced Park main switch. If assistance is canceled, “Advanced Park Cancelled” will be displayed.
4 Perform operations as indicated
by the advice displays until the
vehicle is in a position where
exit is possible.
If the steering wheel is not operated,
the vehicle will stop at the exit position. Assistance can be ended by depress-ing the accelerator pedal or brake
pedal. When the vehicle reaches a position where exit is possible, “You can exit by moving the steering wheel”
will be displayed. If the steering wheel is operated, “Advanced Park Finished” will be displayed and assistance will
end. Grip the steering wheel and drive forward.
■If you feel that the vehicle is
approaching close to a surround- ing vehicle, object, person, or gut-ter
Depress the brake pedal to stop the vehicle and then change the shift posi-tion to change the direction of travel of
the vehicle. At this time, assist will be suspended. However, if the “Start” button is selected,
assist will resume and the vehicle will move in the direction corresponding to
the selected shift position.
■Perpendicular exiting (for- ward/reverse) function
Do not use exiting (forward/reverse)
function in any situation other than when exciting a parallel parking spot. If assis-tance is started unintentionally, depress
the brake pedal and stop the vehicle, then press the Advanced Park main