tow TOYOTA BZ4X 2023 Service Manual
[x] Cancel search | Manufacturer: TOYOTA, Model Year: 2023, Model line: BZ4X, Model: TOYOTA BZ4X 2023Pages: 628, PDF Size: 11.91 MB
Page 422 of 628
4226-3. Using the storage features
Owners Manual_USA_M42C01_en
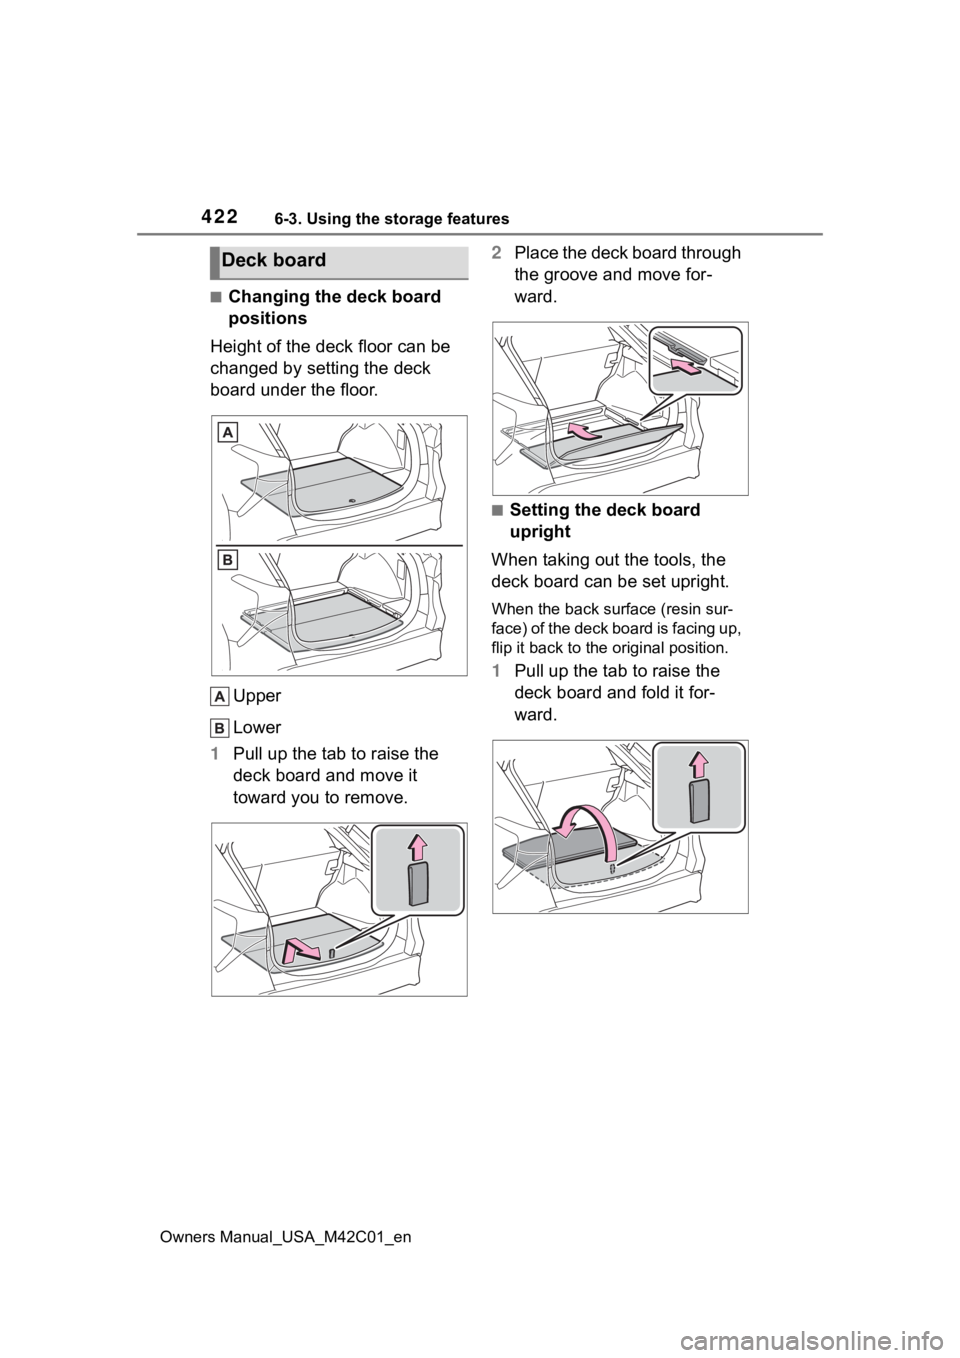
■Changing the deck board
positions
Height of the deck floor can be
changed by setting the deck
board under the floor.
Upper
Lower
1 Pull up the tab to raise the
deck board and move it
toward you to remove. 2
Place the deck board through
the groove and move for-
ward.
■Setting the deck board
upright
When taking out the tools, the
deck board can be set upright.
When the back surf ace (resin sur-
face) of the deck board is facing up,
flip it back to the original position.
1 Pull up the tab to raise the
deck board and fold it for-
ward.
Deck board
Page 424 of 628
4246-3. Using the storage features
Owners Manual_USA_M42C01_en
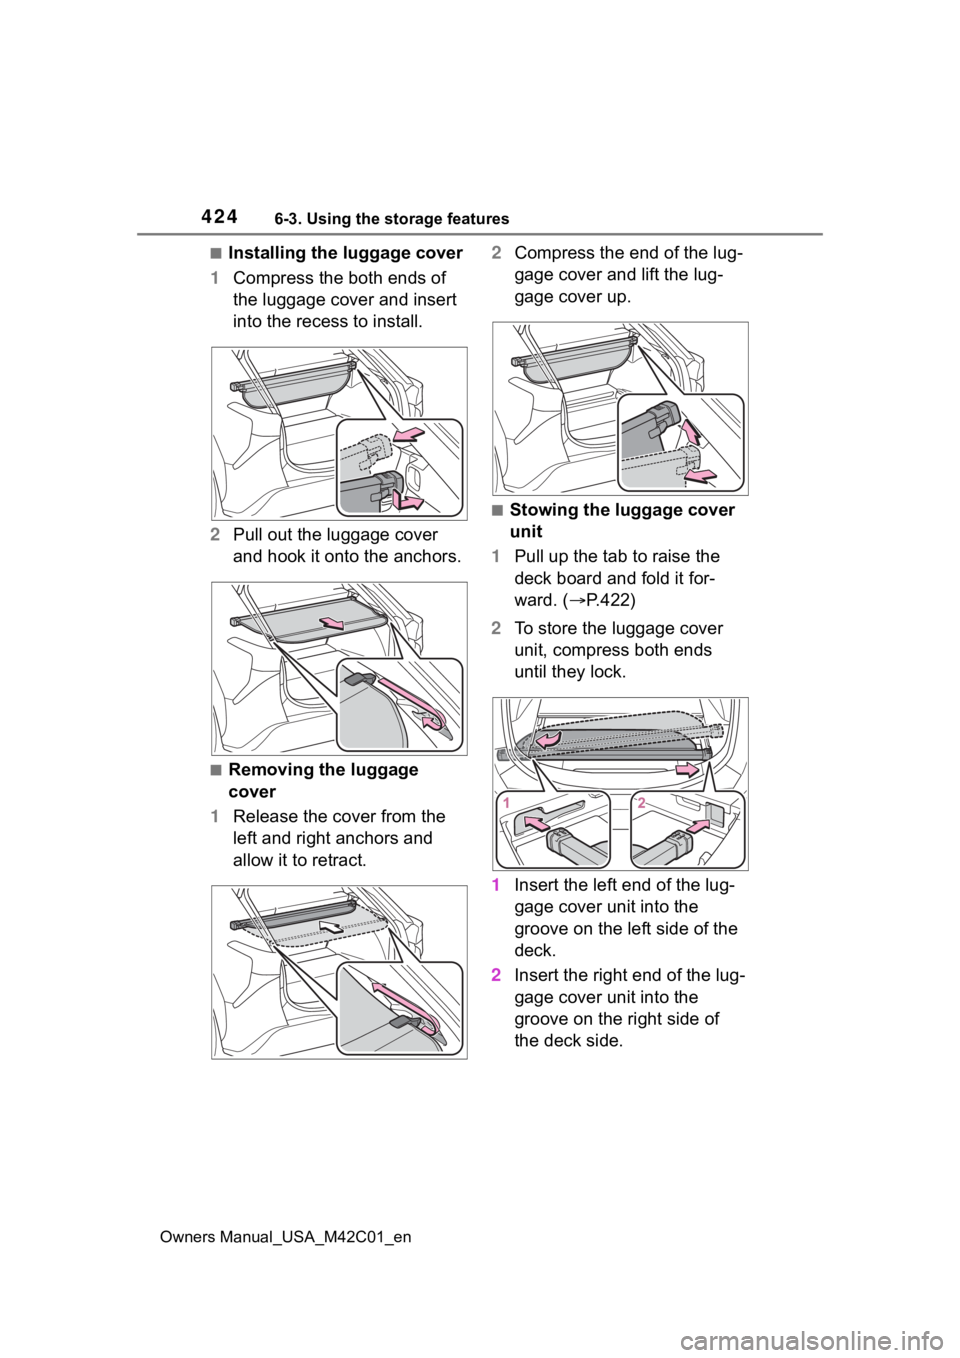
■Installing the luggage cover
1 Compress the both ends of
the luggage cover and insert
into the recess to install.
2 Pull out the luggage cover
and hook it onto the anchors.
■Removing the luggage
cover
1 Release the cover from the
left and right anchors and
allow it to retract. 2
Compress the end of the lug-
gage cover and lift the lug-
gage cover up.
■Stowing the luggage cover
unit
1 Pull up the tab to raise the
deck board and fold it for-
ward. ( P.422)
2 To store the luggage cover
unit, compress both ends
until they lock.
1 Insert the left end of the lug-
gage cover unit into the
groove on the left side of the
deck.
2 Insert the right end of the lug-
gage cover unit into the
groove on the right side of
the deck side.
Page 425 of 628
4256-3. Using the storage features
Owners Manual_USA_M42C01_en
6
Interior features
WARNING
■Luggage cover
●When installing/stowing the lug-
gage cover, make sure that the
luggage cover is securely
installed/stowed. Failure to do
so may result in serious injury in
the event of sudden braking or a
collision.
●Do not place anything on the
luggage cover. In the event of
sudden braking or turning, the
item may go flying and strike an
occupant. This could lead to an
unexpected accident, resulting
in death or serious injury.
●Do not allow ch ildren to climb
on the luggage cover. Climbing
on the luggage cover could
result in damage to the luggage
cover, possibly causing death or
serious injury to the child.
Page 431 of 628
4316-4. Using the other interior features
Owners Manual_USA_M42C01_en
6
Interior features
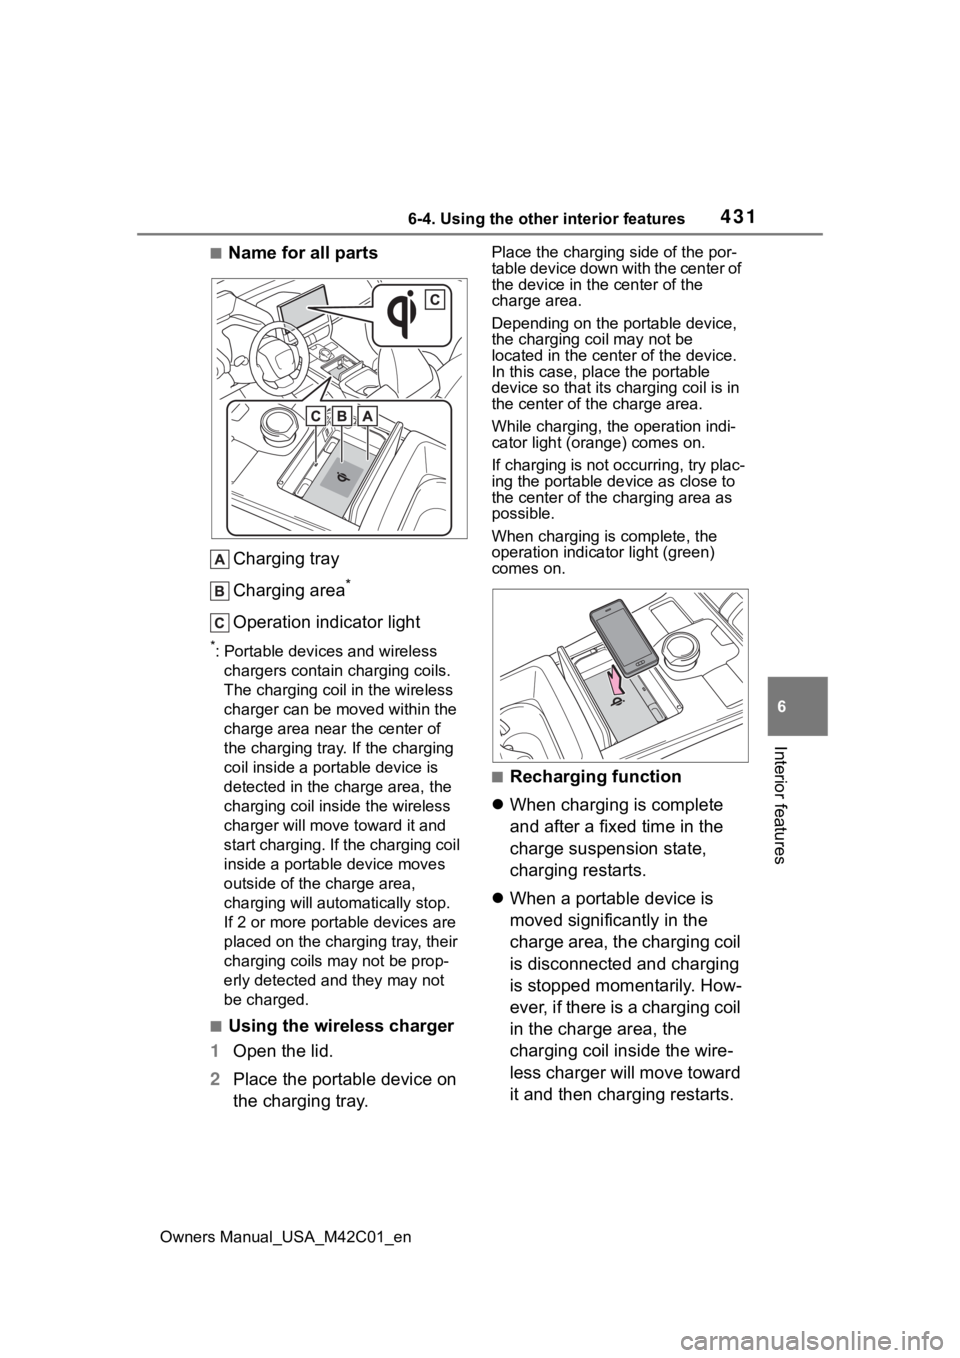
■Name for all parts Charging tray
Charging area
*
Operation indicator light
*: Portable devices and wireless chargers contain charging coils.
The charging coil in the wireless
charger can be m oved within the
charge area near the center of
the charging tray. If the charging
coil inside a portable device is
detected in the charge area, the
charging coil in side the wireless
charger will move t oward it and
start charging. If the charging coil
inside a portable device moves
outside of the charge area,
charging will automatically stop.
If 2 or more porta ble devices are
placed on the charging tray, their
charging coils may not be prop-
erly detected and they may not
be charged.
■Using the wireless charger
1 Open the lid.
2 Place the portable device on
the charging tray.
Place the charging side of the por-
table device down with the center of
the device in the center of the
charge area.
Depending on the portable device,
the charging coil may not be
located in the center of the device.
In this case, place the portable
device so that its charging coil is in
the center of the charge area.
While charging, the operation indi-
cator light (orange) comes on.
If charging is not occurring, try plac-
ing the portable device as close to
the center of the charging area as
possible.
When charging is complete, the
operation indicator light (green)
comes on.
■Recharging function
When charging is complete
and after a fixed time in the
charge suspension state,
charging restarts.
When a portable device is
moved significantly in the
charge area, the charging coil
is disconnected and charging
is stopped momentarily. How-
ever, if there is a charging coil
in the charge area, the
charging coil inside the wire-
less charger will move toward
it and then charging restarts.
Page 436 of 628
4366-4. Using the other interior features
Owners Manual_USA_M42C01_en
WARNING
●Do not attach an aluminum
sticker or other metallic object to
the side of the portable device
(or to its case or cover) that
touches the charge area
●Do not use the charging tray as
a small storage space
●Do not subject to a strong force
or impact
●Do not disassemble, modify or
remove
●Do not charge devices other
than specified portable devices
●Keep away from magnetic items
●Do not charge devices if the
charge area is covered in dust
●Do not cover with a cloth or sim-
ilar material
NOTICE
■Situations in which the func-
tion may not operate normally
Devices may not be charged nor-
mally in the following situations.
●The portable device is fully
charged
●The portable device is being
charged with a cable connected
●There is foreign matter between
the charge area and portable
device
●Charging has caused the porta-
ble device to heat up
●The temperature around the
charging tray is 95°F (35°C) or
higher, such as in extreme heat
●The portable device is placed
with its charging side facing up
●The portable device is placed in
an area misaligned from the
charge area
●The portable device is larger
than the charging tray
●A foldable and portable device
is placed outside the charge
area
●The camera lens protrudes 0.12
in. (3 mm) or more from the sur-
face of the portal device
●The vehicle is in an area where
strong electrical waves or noise
are emitted, such as near a tele-
vision tower, power plant, gaso-
line station, broadcasting
station, large display, airport,
etc.
●Any of the following objects that
is protrudes 0.12 in. (3 mm) or
thicker is stuck or installed
between the charging side of
the portable device and the
charge area.
• Thick cases or covers
• A case or cover attached with an uneven or tilt ed surface, so
that the charging side is not flat
• Thick decorations
• Accessories, such as finger rings, straps, etc.
●When the portable device is in
contact with, or is covered by
any of the following metallic
objects:
• A card that has metal on it, such as aluminum foil, etc.
• A pack of cigarettes that includes aluminum foil
• A wallet or bag that is made of metal
• Coins
Page 460 of 628
4607-3. Do-it-yourself maintenance
Owners Manual_USA_M42C01_en
7-3.Do-it-yourself maintenance
Do-it-yourself ser vice
precautions
If you perform maintenance
by yourself, be sure to fol-
low the correct procedure
as given in these sections.
Maintenance
ItemsParts and tools
12-volt bat-
tery condi-
tion (P.468)
•Warm water
• Baking soda
•Grease
• Conventional
wrench (for termi-
nal clamp bolts)
Brake fluid
level
( P.468)
• FMVSS No.116
DOT 3 or SAE
J1703 brake fluid
FMVSS No.116
DOT 4 or SAE
J1704 brake fluid
• Rag or paper towel
• Funnel (used only for adding brake
fluid)
Power control
unit coolant
level
( P.467)
• In order to ensure
maximum perfor-
mance of the trac-
tion battery
cooling system
and limit risks of
battery short-cir-
cuit and other
damage to your
vehicle, Toyota
recommends
using “Toyota
Genuine Traction
Battery Coolant”
or similar high-
quality ethylene
glycol-based, low
electric conductiv-
ity coolant, non-
amine and non-
borate coolant
with azole addi-
tives.
• Funnel (used only for adding coolant)
ItemsParts and tools
Page 476 of 628
4767-3. Do-it-yourself maintenance
Owners Manual_USA_M42C01_en
●Performance may be affected in
the following situations.
• Near a TV tower, electric power
plant, gas station, radio station,
large display, airpo rt or other facil-
ity that generates strong radio
waves or electrical noise
• When carrying a portable radio, cellular phone, cordless phone or
other wireless communication
device
If tire position information is not cor-
rectly displayed due to the radio
wave conditions, the display may be
corrected by driving and changing
the radio wave conditions.
●When the vehicle is parked, the
time taken for the warning to start
or go off could be extended.
●When tire inflation pressure
declines rapidly for example when
a tire has burst, the warning may
not function.
When replacing tires or wheels,
tire pressure warning valves and
transmitters must also be
installed.
When new tire pressure warning
valves and transmitters are
installed, new ID codes must be
registered in the tire pressure warn-
ing computer and the tire pressure
warning system must be initialized.
( P.481)
■When replacing the tires and
wheels
If the ID code of the tire pressure
warning valve and transmitter is not
registered, the tire pressure warning
system will not work properly. After driving for about 10 minutes, the tire
pressure warning light blinks for 1
minute and stays on to indicate a
system malfunction.
Installing tire pressure
warning valves and trans-
mitters
NOTICE
■Repairing or replacing tires,
wheels, tire pressure warn-
ing valves, transmitters and
tire valve caps
●When removing or fitting the
wheels, tires or the tire pressure
warning valves and transmit-
ters, contact your
Toyota dealer
as the tire pressure warning
valves and transmitters may be
damaged if not handled cor-
rectly.
●Make sure to install the tire
valve caps. If the tire valve caps
are not installed, water could
enter the tire pressure warning
valves and the tire pressure
warning valves could be bound.
●When replacing tire valve caps,
do not use tire valve caps other
than those specified. The cap
may become stuck.
■To avoid damage to the tire
pressure warning valves and
transmitters
When a tire is repa ired with liquid
sealants, the tire pressure warn-
ing valve and transmitter may not
operate properly. If a liquid seal-
ant is used, contact your Toyota
dealer as soon as possible. After
use of liquid sealant, make sure to
replace the tire p ressure warning
valve and transmitter when repair-
ing or replacing the tire.
Page 486 of 628
4867-3. Do-it-yourself maintenance
Owners Manual_USA_M42C01_en
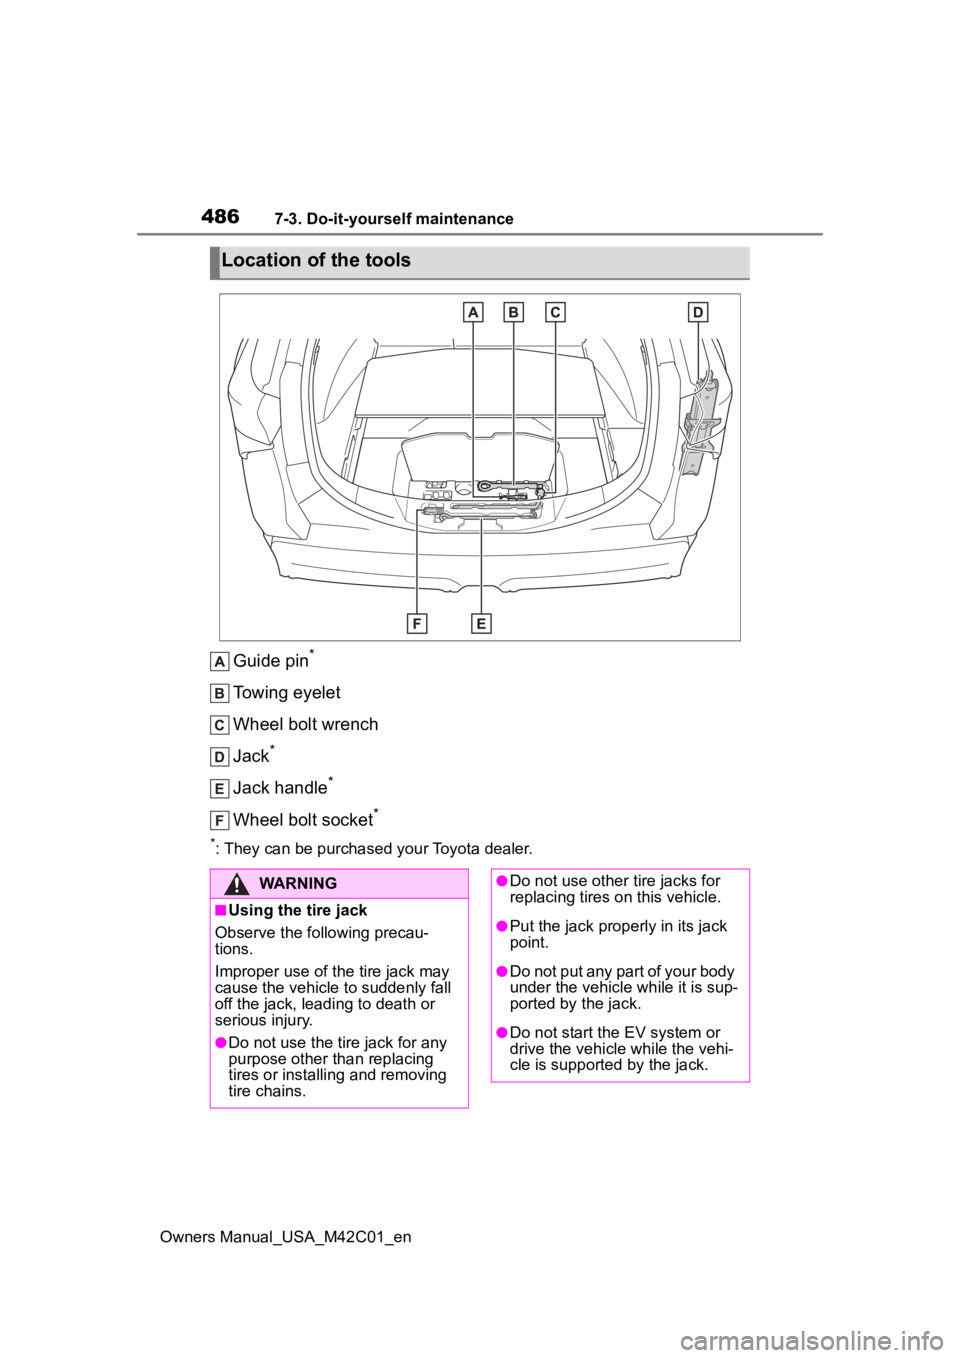
Guide pin*
Towing eyelet
Wheel bolt wrench
Jack
*
Jack handle*
Wheel bolt socket*
*: They can be purchased your Toyota dealer.
Location of the tools
WARNING
■Using the tire jack
Observe the following precau-
tions.
Improper use of the tire jack may
cause the vehicle to suddenly fall
off the jack, leading to death or
serious injury.
●Do not use the tire jack for any
purpose other than replacing
tires or installing and removing
tire chains.
●Do not use other tire jacks for
replacing tires on this vehicle.
●Put the jack properly in its jack
point.
●Do not put any part of your body
under the vehicle while it is sup-
ported by the jack.
●Do not start the EV system or
drive the vehicl e while the vehi-
cle is supported by the jack.
Page 490 of 628
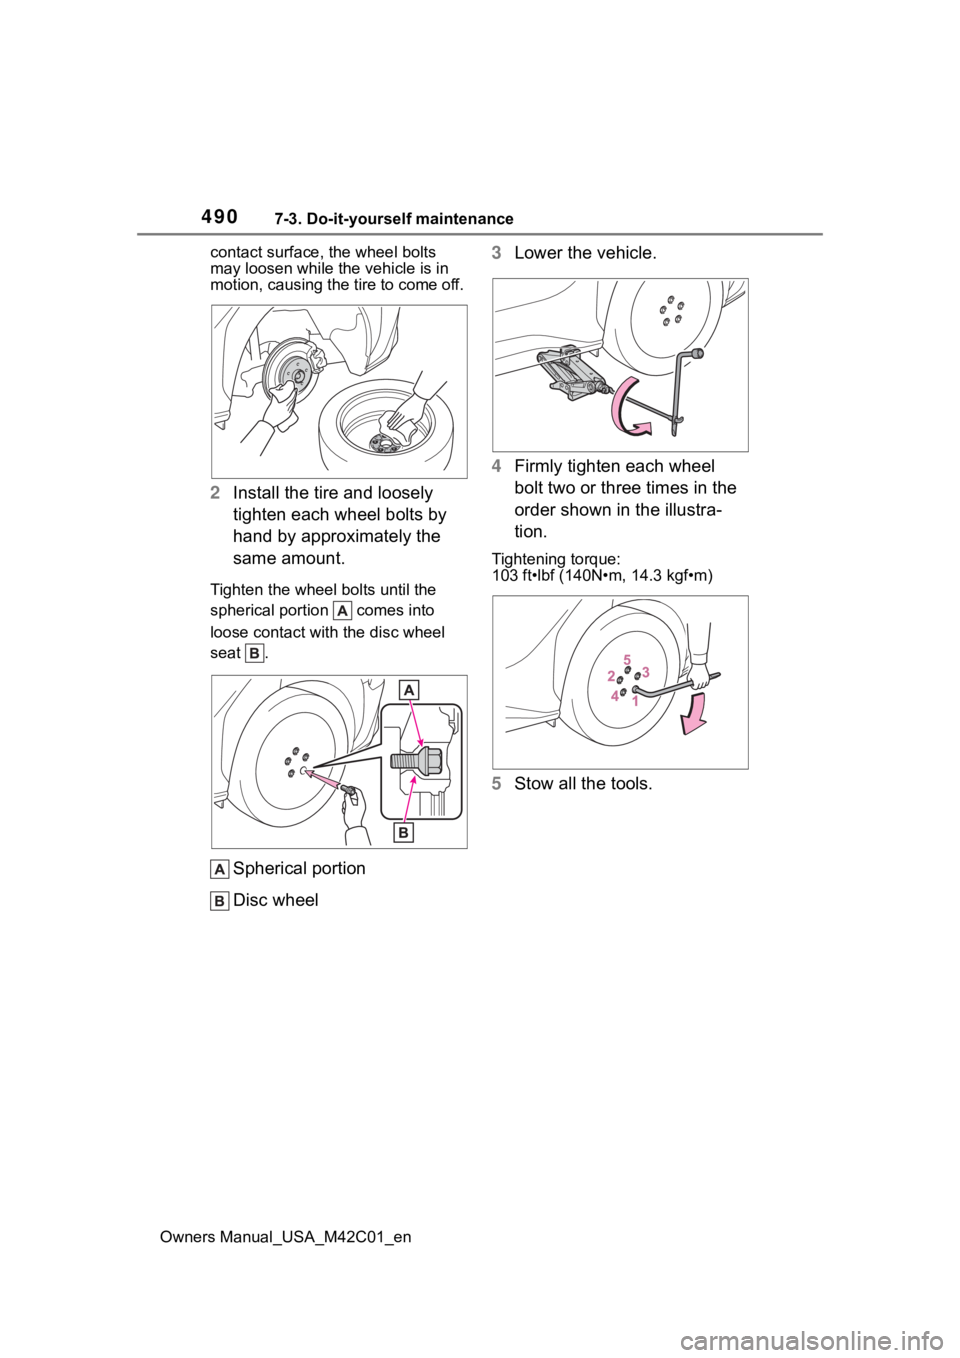
4907-3. Do-it-yourself maintenance
Owners Manual_USA_M42C01_encontact surface, t
he wheel bolts
may loosen while the vehicle is in
motion, causing the tire to come off.
2 Install the tire and loosely
tighten each wheel bolts by
hand by approximately the
same amount.
Tighten the whee l bolts until the
spherical portion comes into
loose contact with the disc wheel
seat .
Spherical portion
Disc wheel 3
Lower the vehicle.
4 Firmly tighten each wheel
bolt two or three times in the
order shown in the illustra-
tion.
Tightening torque:
103 ft•lbf (140N•m, 14.3 kgf•m)
5Stow all the tools.
Page 496 of 628
4967-3. Do-it-yourself maintenance
Owners Manual_USA_M42C01_en
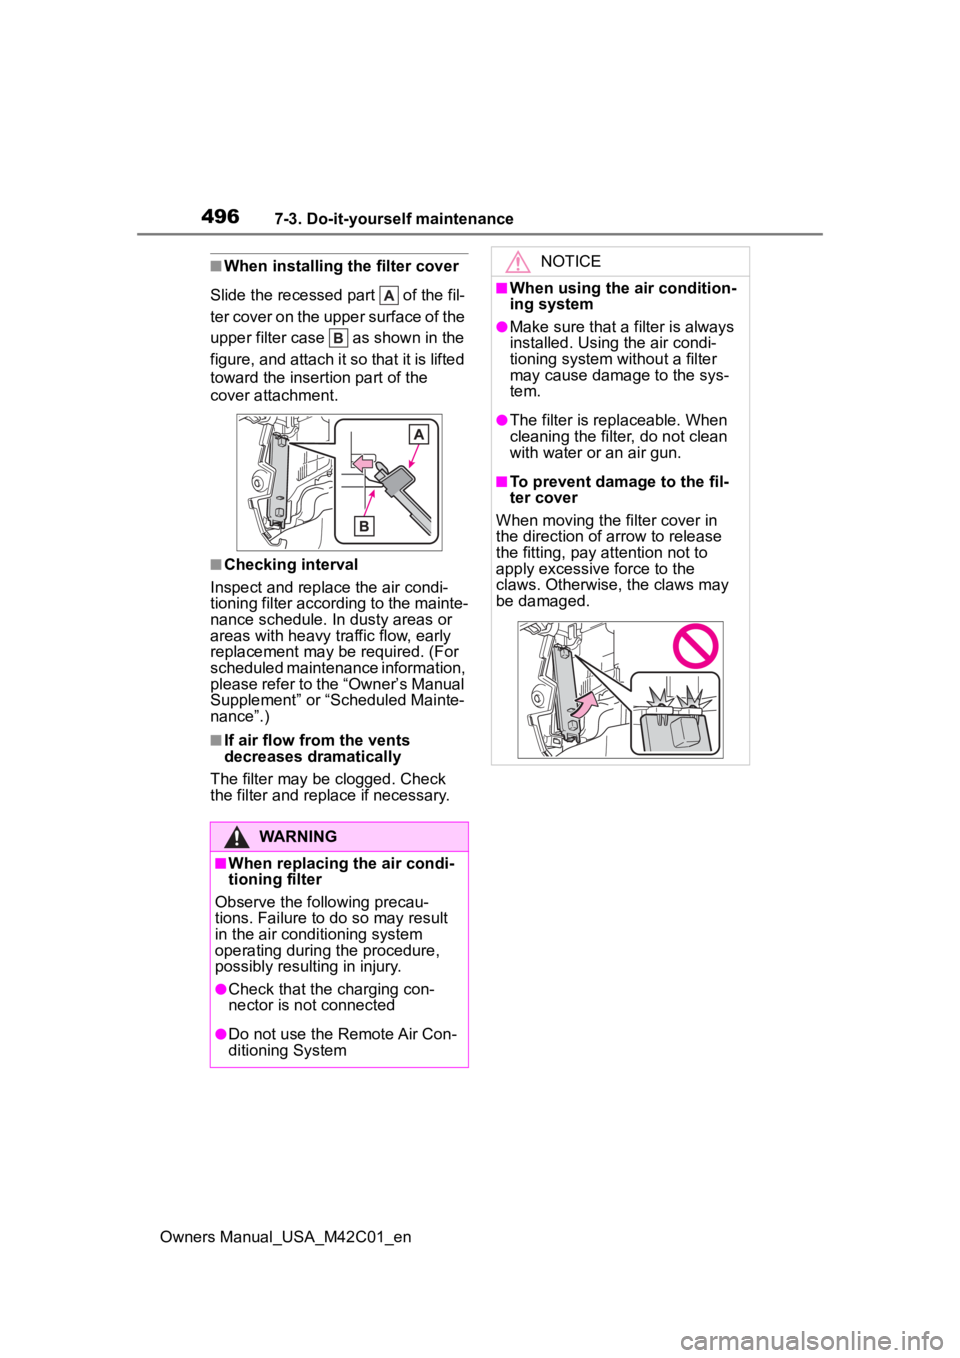
■When installing the filter cover
Slide the recessed part of the fil-
ter cover on the upper surface of the
upper filter case as shown in the
figure, and attach it so that it is lifted
toward the insertion part of the
cover attachment.
■Checking interval
Inspect and replace the air condi-
tioning filter according to the mainte-
nance schedule. In dusty areas or
areas with heavy traffic flow, early
replacement may be required. (For
scheduled maintenance information,
please refer to the “Owner’s Manual
Supplement” or “Scheduled Mainte-
nance”.)
■If air flow from the vents
decreases dramatically
The filter may be clogged. Check
the filter and replace if necessary.
WARNING
■When replacing the air condi-
tioning filter
Observe the following precau-
tions. Failure to do so may result
in the air conditioning system
operating during the procedure,
possibly resulting in injury.
●Check that the charging con-
nector is not connected
●Do not use the Remote Air Con-
ditioning System
NOTICE
■When using the air condition-
ing system
●Make sure that a filter is always
installed. Using the air condi-
tioning system without a filter
may cause damage to the sys-
tem.
●The filter is replaceable. When
cleaning the filter, do not clean
with water or an air gun.
■To prevent damage to the fil-
ter cover
When moving the filter cover in
the direction of arrow to release
the fitting, pay attention not to
apply excessive force to the
claws. Otherwise, the claws may
be damaged.