TOYOTA C-HR 2020 Owners Manual (in English)
Manufacturer: TOYOTA, Model Year: 2020,
Model line: C-HR,
Model: TOYOTA C-HR 2020
Pages: 536, PDF Size: 11.99 MB
TOYOTA C-HR 2020 Owners Manual (in English)
C-HR 2020
TOYOTA
TOYOTA
https://www.carmanualsonline.info/img/14/42415/w960_42415-0.png
TOYOTA C-HR 2020 Owners Manual (in English)
Trending: low beam, fuel, coolant, washer fluid, width, fuel pressure, child seat
Page 391 of 536
3916-3. Do-it-yourself maintenance
6
Maintenance and care
C-HR_OM_USA_OM10634U
Headlight aim (vehicles with front fog
lights)
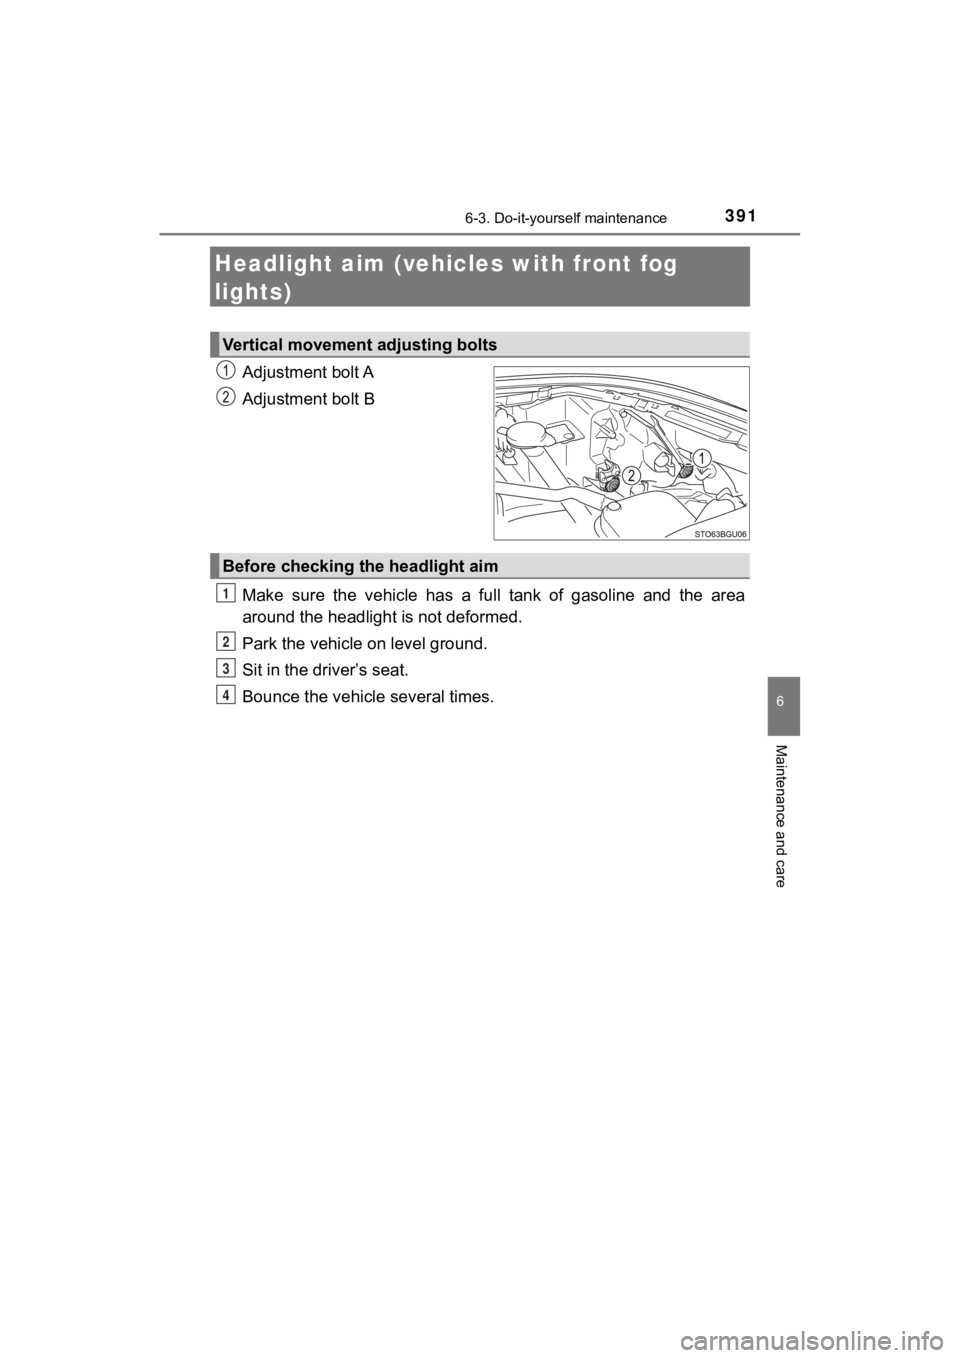
Adjustment bolt A
Adjustment bolt B
Make sure the vehicle has a full tank of gasoline and the area
around the headlight is not deformed.
Park the vehicle on level ground.
Sit in the driver’s seat.
Bounce the vehicle several times.
Vertical movement adjusting bolts
Before checking the headlight aim
1
2
3
4
Page 392 of 536
3926-3. Do-it-yourself maintenance
C-HR_OM_USA_OM10634U
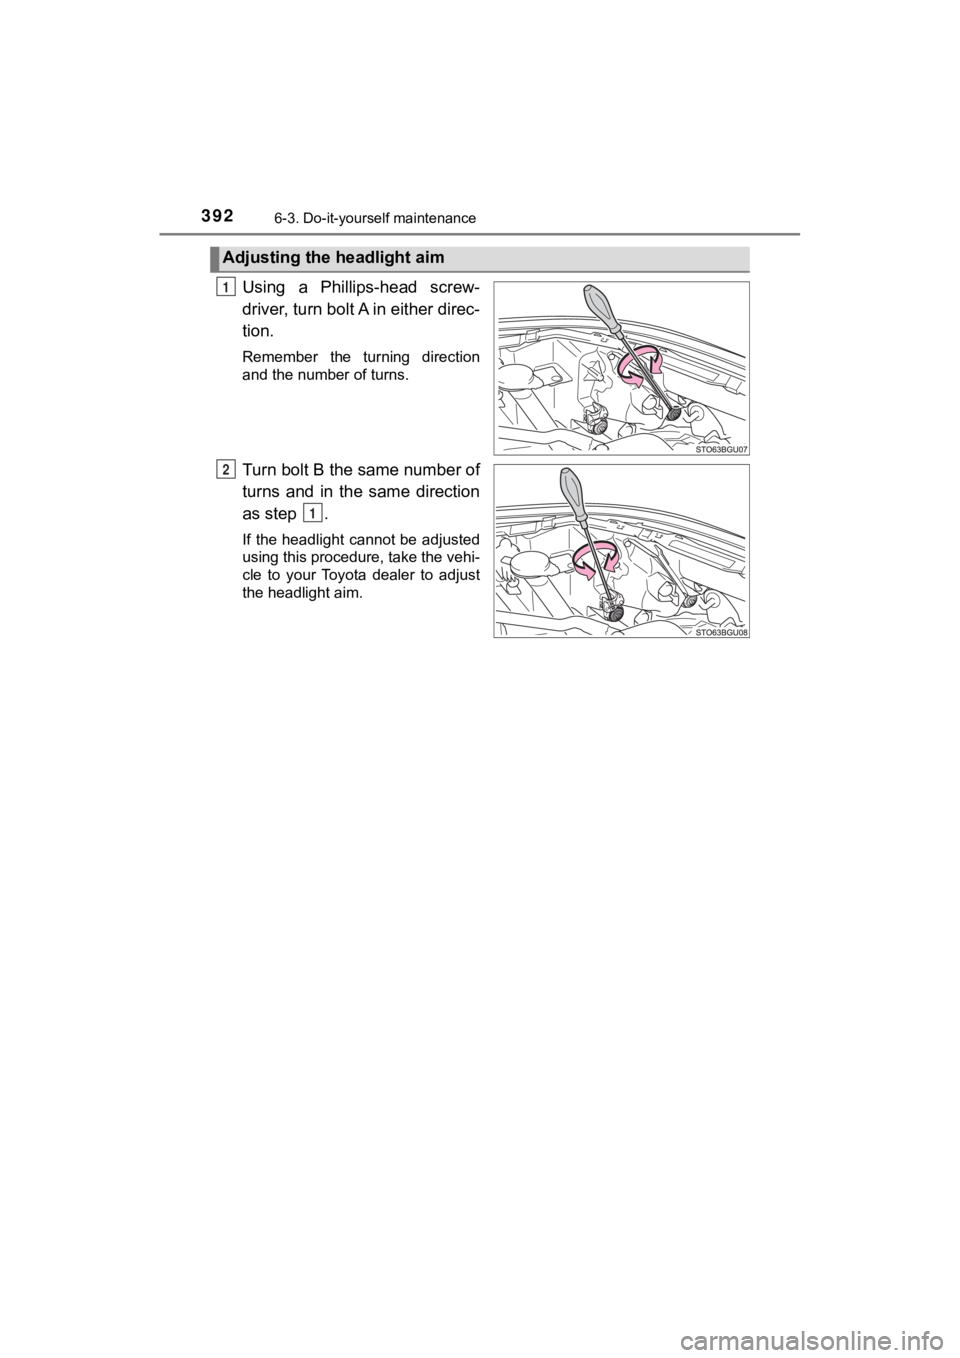
Using a Phillips-head screw-
driver, turn bolt A in either direc-
tion.
Remember the turning direction
and the number of turns.
Turn bolt B the same number of
turns and in the same direction
as step .
If the headlight cannot be adjusted
using this procedure, take the vehi-
cle to your Toyota dealer to adjust
the headlight aim.
Adjusting the headlight aim
1
2
1
Page 393 of 536
3936-3. Do-it-yourself maintenance
6
Maintenance and care
C-HR_OM_USA_OM10634U
Light bulbs
Check the wattage of the light bulb to be replaced. ( P. 471)
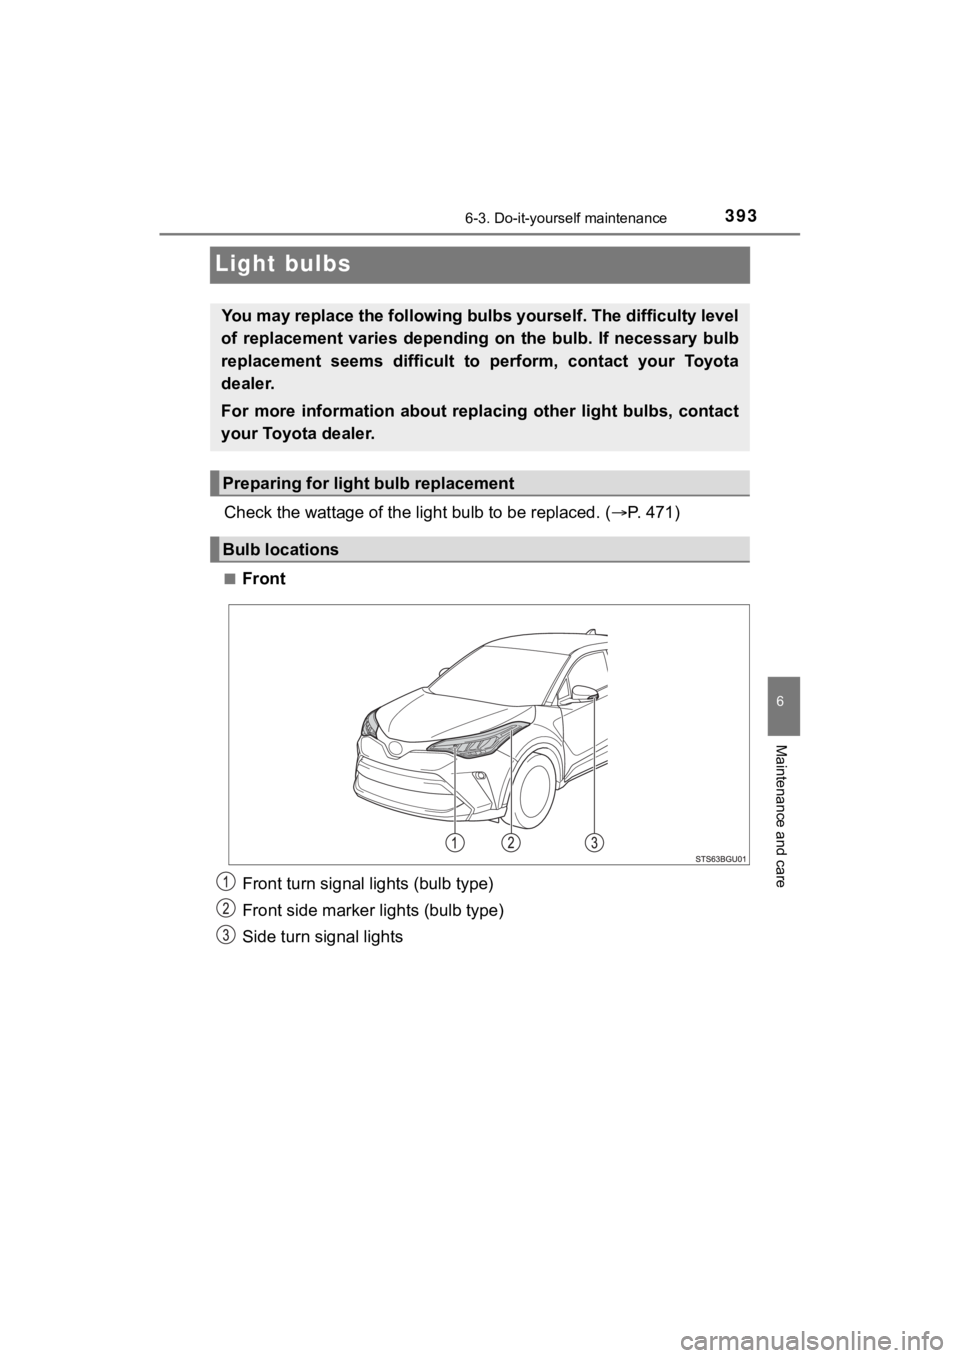
■Front
Front turn signal lights (bulb type)
Front side marker lights (bulb type)
Side turn signal lights
You may replace the following bu lbs yourself. The difficulty level
of replacement varies depending on the bulb. If necessary bulb
replacement seems difficult to perform, contact your Toyota
dealer.
For more information about replacing other light bulbs, contact
your Toyota dealer.
Preparing for light bulb replacement
Bulb locations
Page 394 of 536
3946-3. Do-it-yourself maintenance
C-HR_OM_USA_OM10634U■
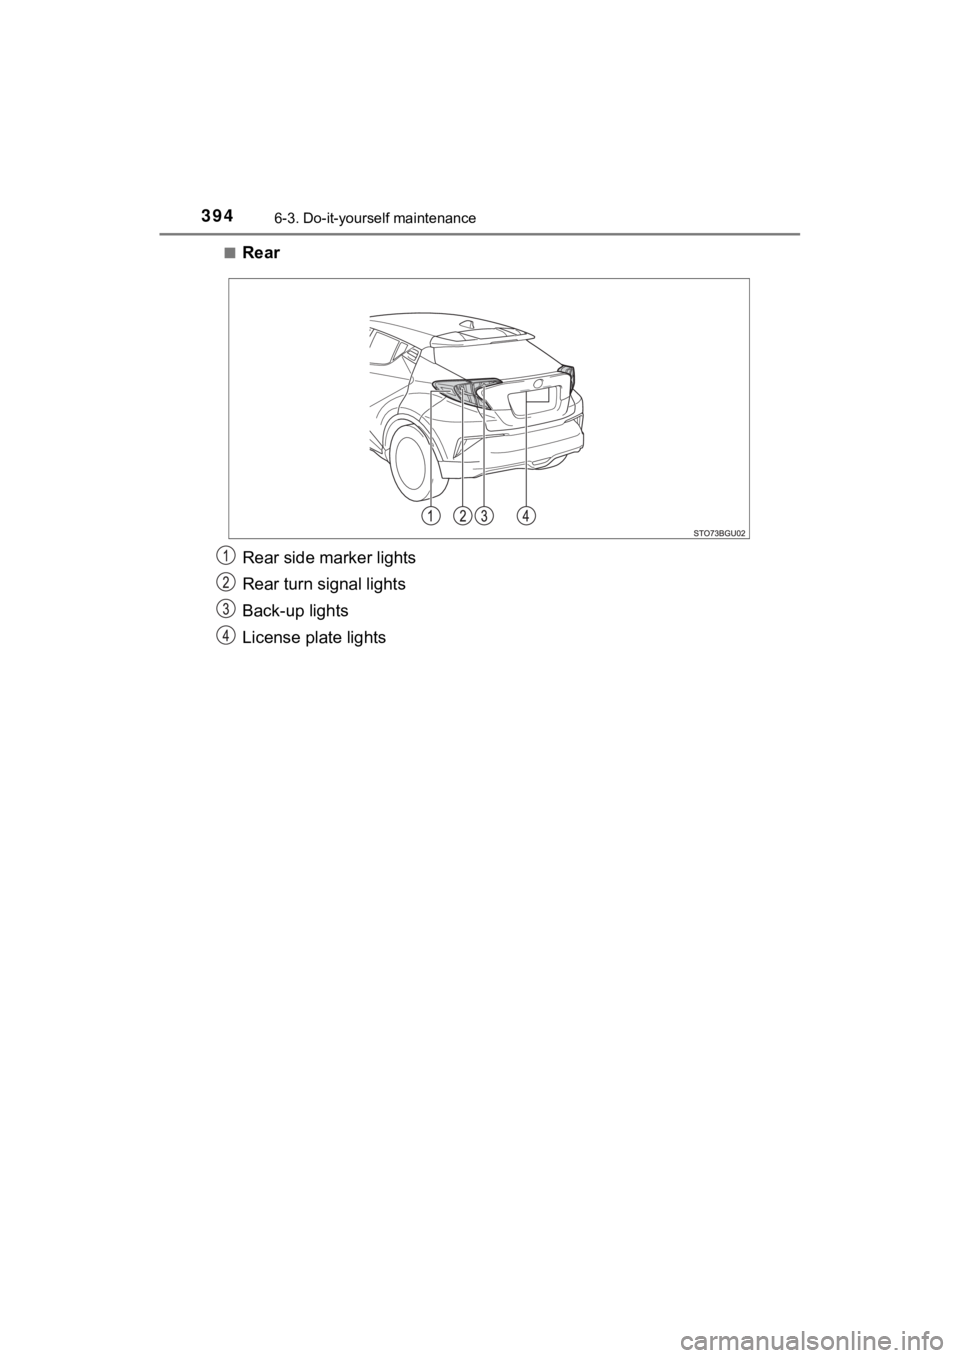
Rear
Rear side marker lights
Rear turn signal lights
Back-up lights
License plate lights
Page 395 of 536
3956-3. Do-it-yourself maintenance
6
Maintenance and care
C-HR_OM_USA_OM10634U■
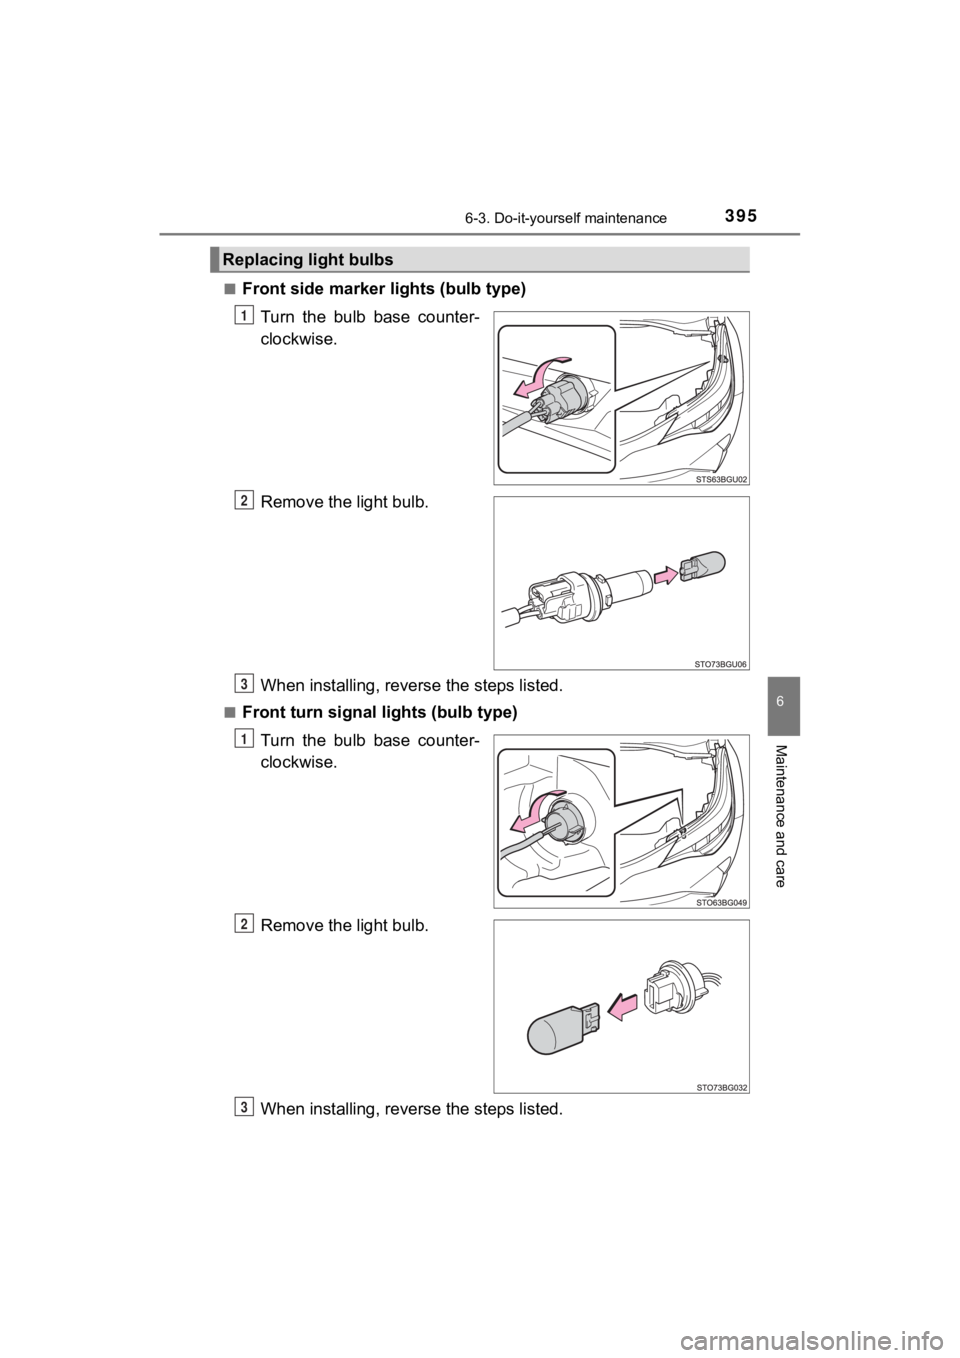
Front side marker l
ights (bulb type)
Turn the bulb base counter-
clockwise.
Remove the light bulb.
When installing, reverse the steps listed.
■Front turn signal lights (bulb type) Turn the bulb base counter-
clockwise.
Remove the light bulb.
When installing, reverse the steps listed.
Replacing light bulbs
1
2
3
1
2
3
Page 396 of 536
3966-3. Do-it-yourself maintenance
C-HR_OM_USA_OM10634U■
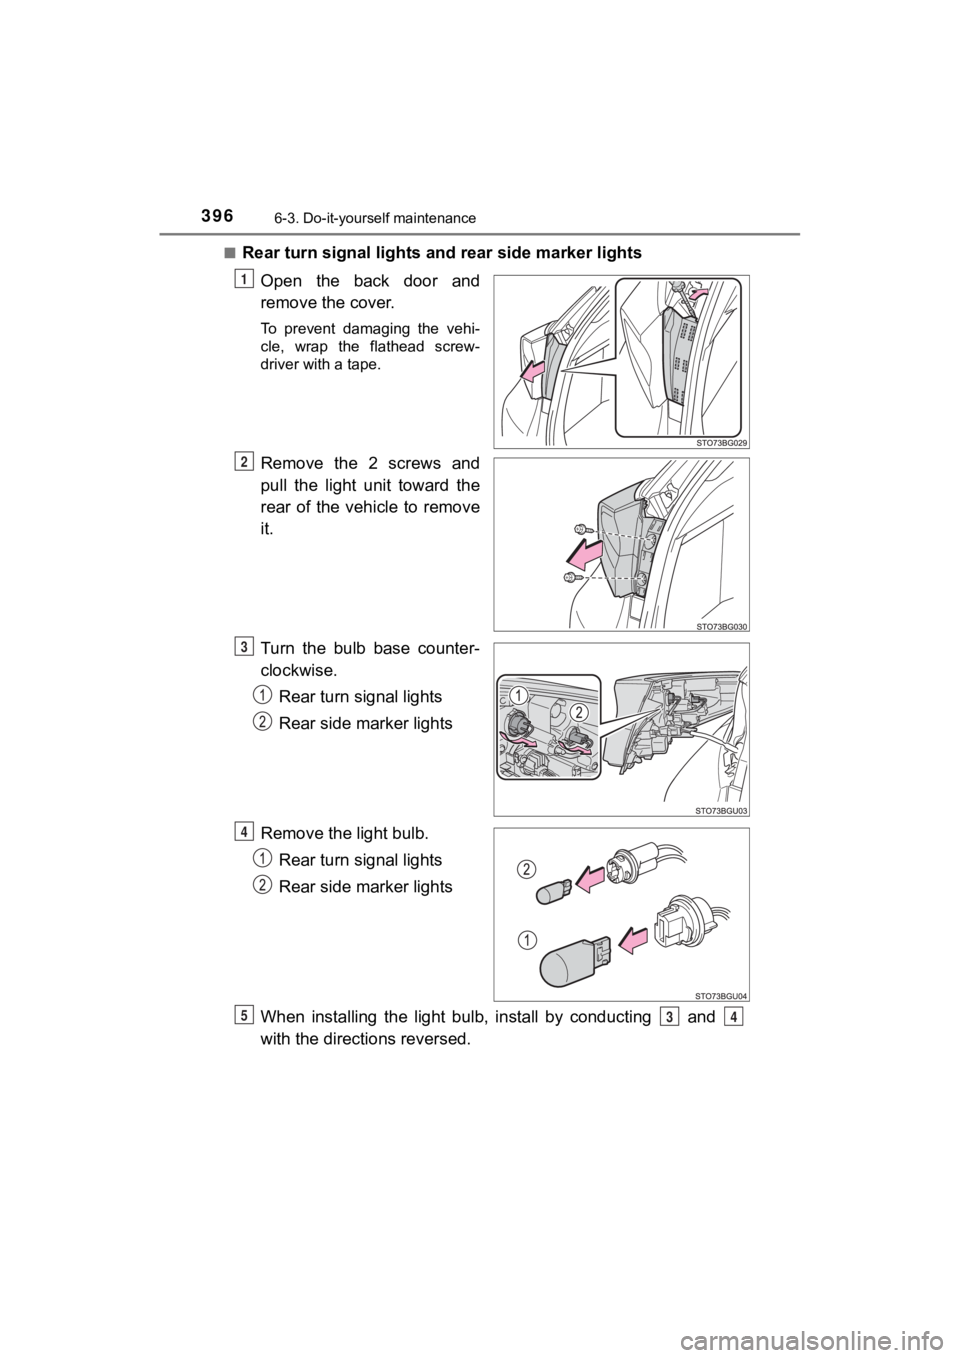
Rear turn signal lights and
rear side marker lights
Open the back door and
remove the cover.
To prevent damaging the vehi-
cle, wrap the flathead screw-
driver with a tape.
Remove the 2 screws and
pull the light unit toward the
rear of the vehicle to remove
it.
Turn the bulb base counter-
clockwise. Rear turn signal lights
Rear side marker lights
Remove the light bulb. Rear turn signal lights
Rear side marker lights
When installing the light bulb, install by conducting and
with the directions reversed.
1
2
3
4
534
Page 397 of 536
3976-3. Do-it-yourself maintenance
6
Maintenance and care
C-HR_OM_USA_OM10634U
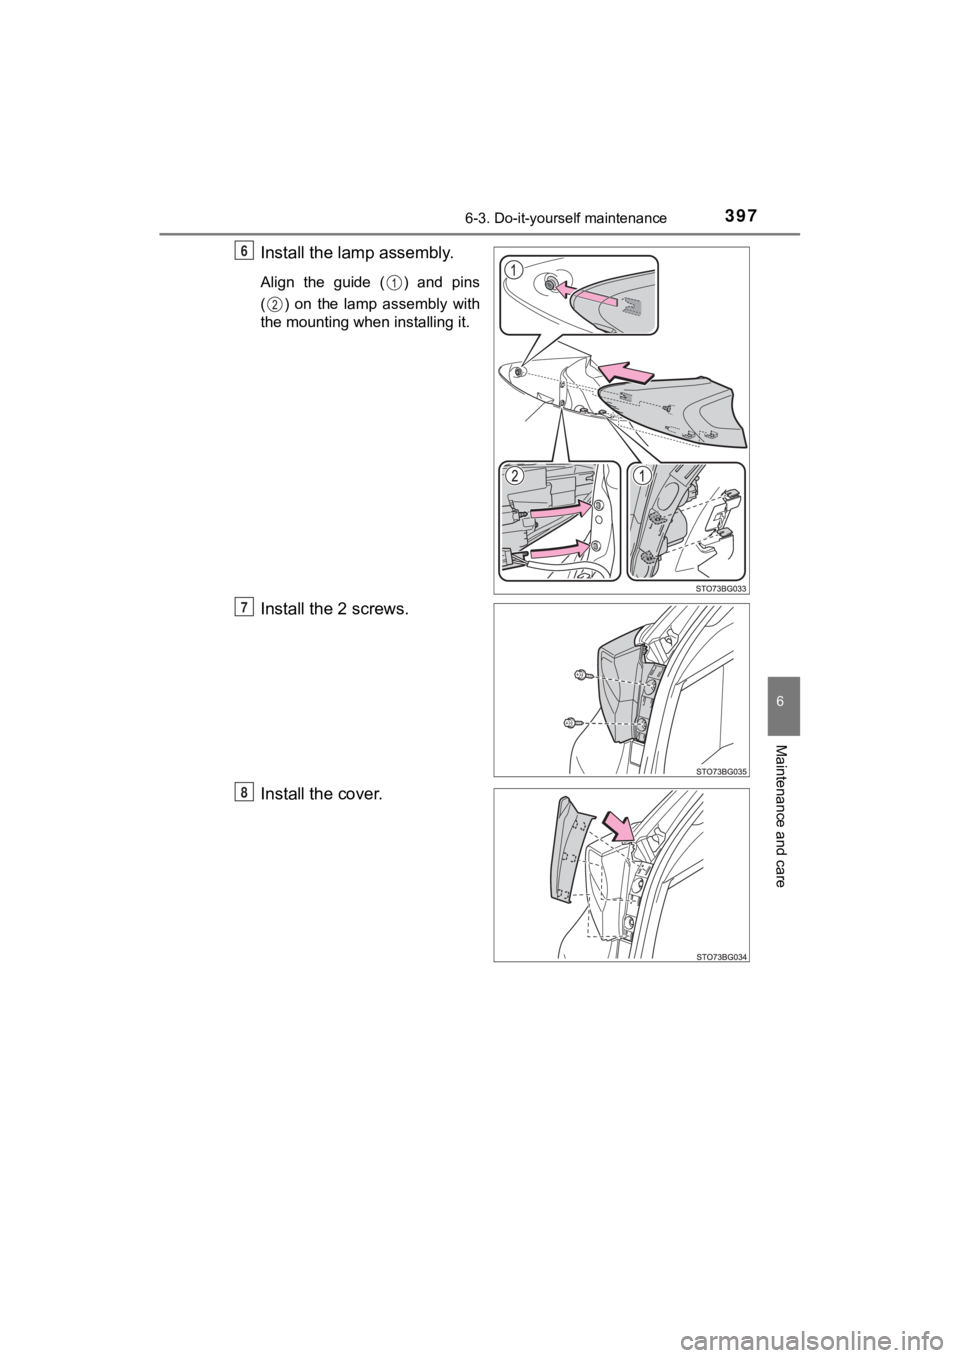
Install the lamp assembly.
Align the guide ( ) and pins
( ) on the lamp assembly with
the mounting when installing it.
Install the 2 screws.
Install the cover.
6
7
8
Page 398 of 536
3986-3. Do-it-yourself maintenance
C-HR_OM_USA_OM10634U■
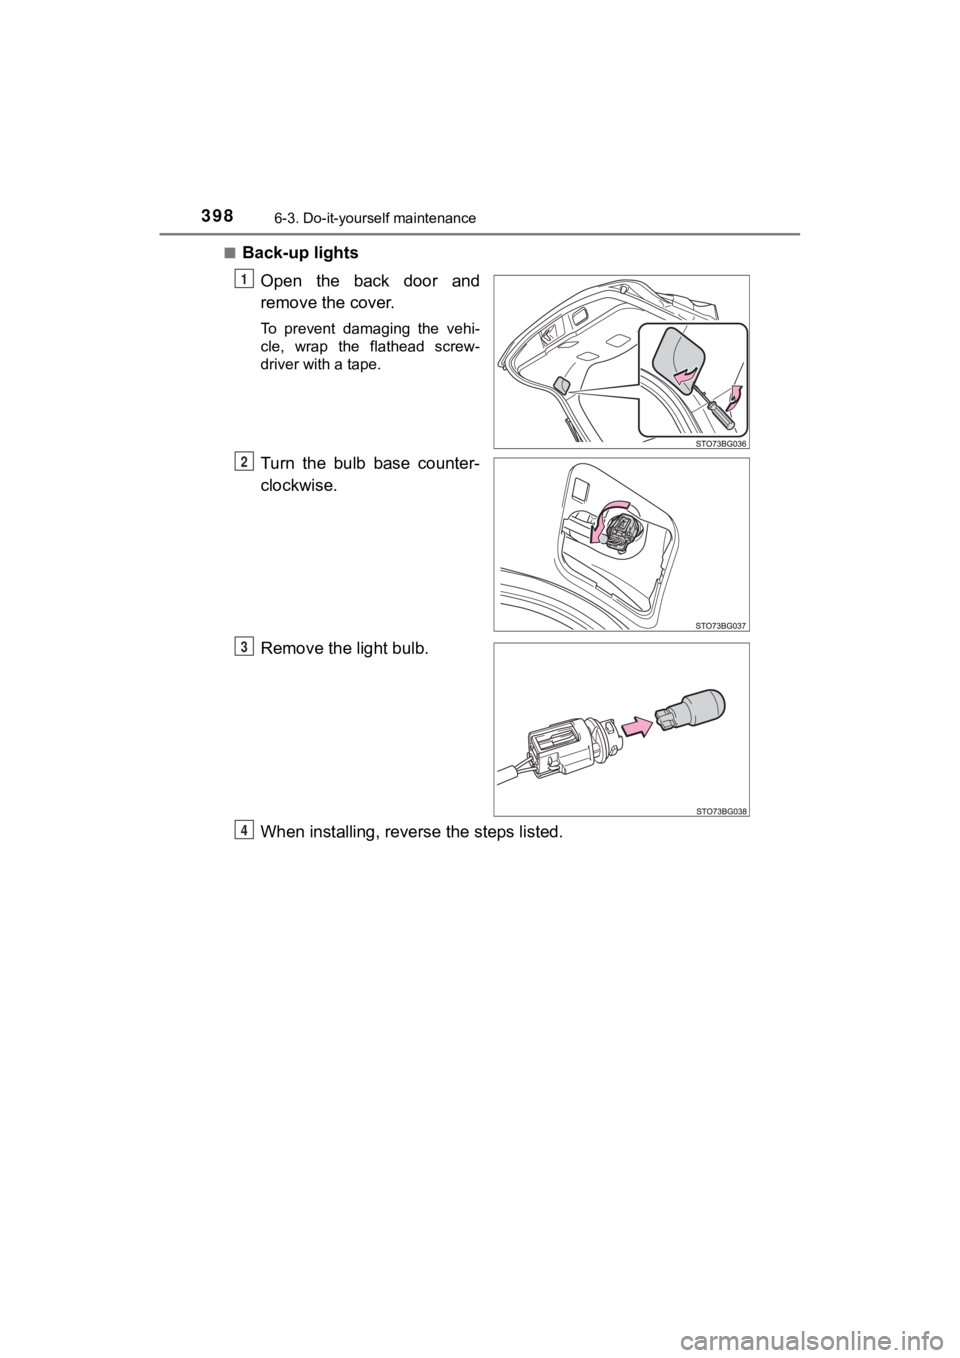
Back-up lights
Open the back door and
remove the cover.
To prevent damaging the vehi-
cle, wrap the flathead screw-
driver with a tape.
Turn the bulb base counter-
clockwise.
Remove the light bulb.
When installing, reverse the steps listed.
1
2
3
4
Page 399 of 536
3996-3. Do-it-yourself maintenance
6
Maintenance and care
C-HR_OM_USA_OM10634U■
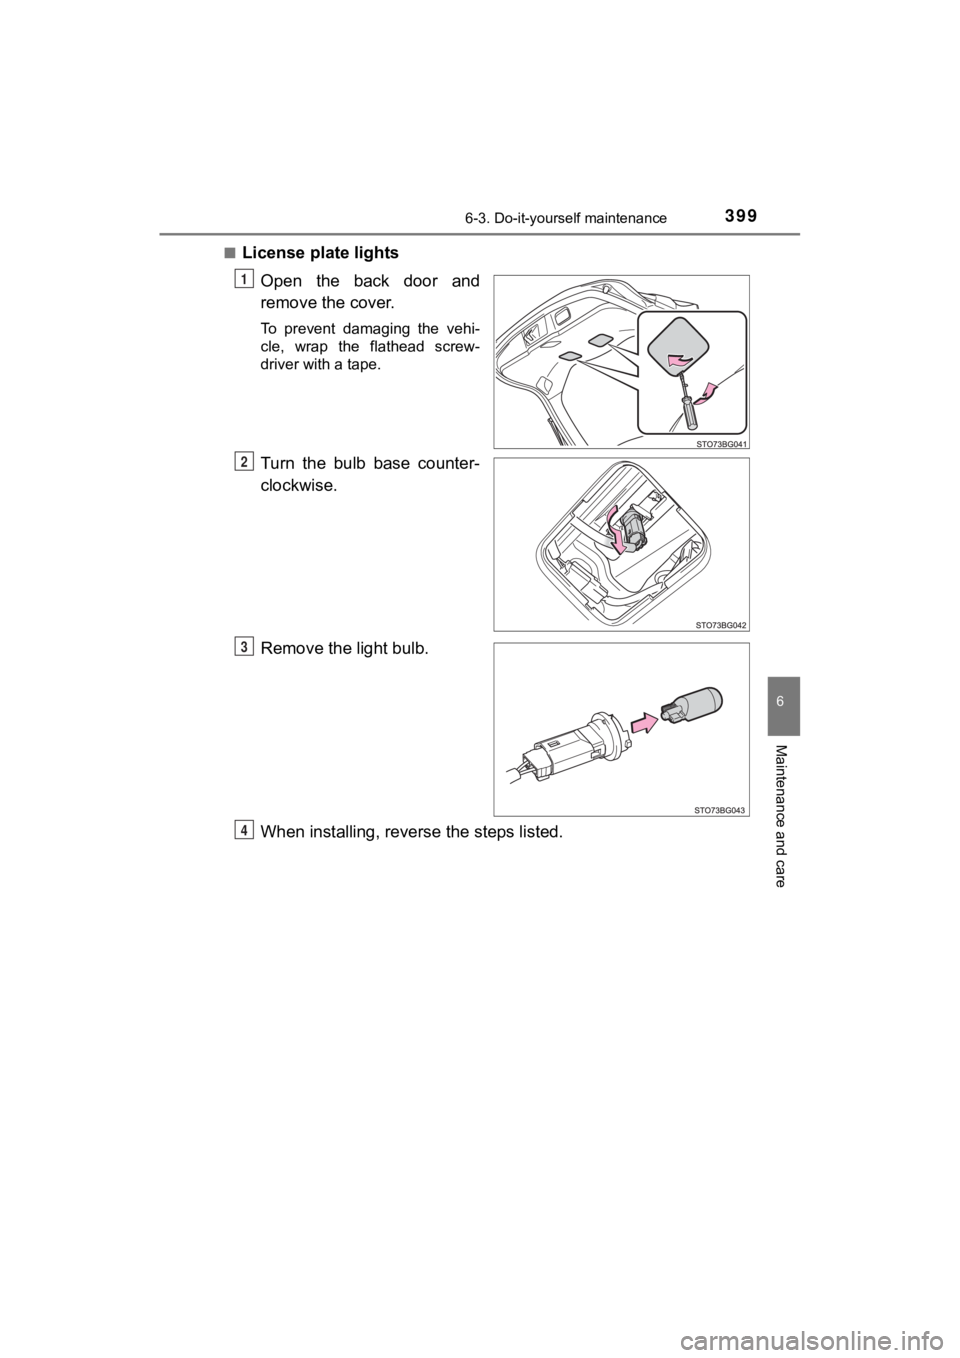
License plate lights
Open the back door and
remove the cover.
To prevent damaging the vehi-
cle, wrap the flathead screw-
driver with a tape.
Turn the bulb base counter-
clockwise.
Remove the light bulb.
When installing, reverse the steps listed.
1
2
3
4
Page 400 of 536
4006-3. Do-it-yourself maintenance
C-HR_OM_USA_OM10634U■
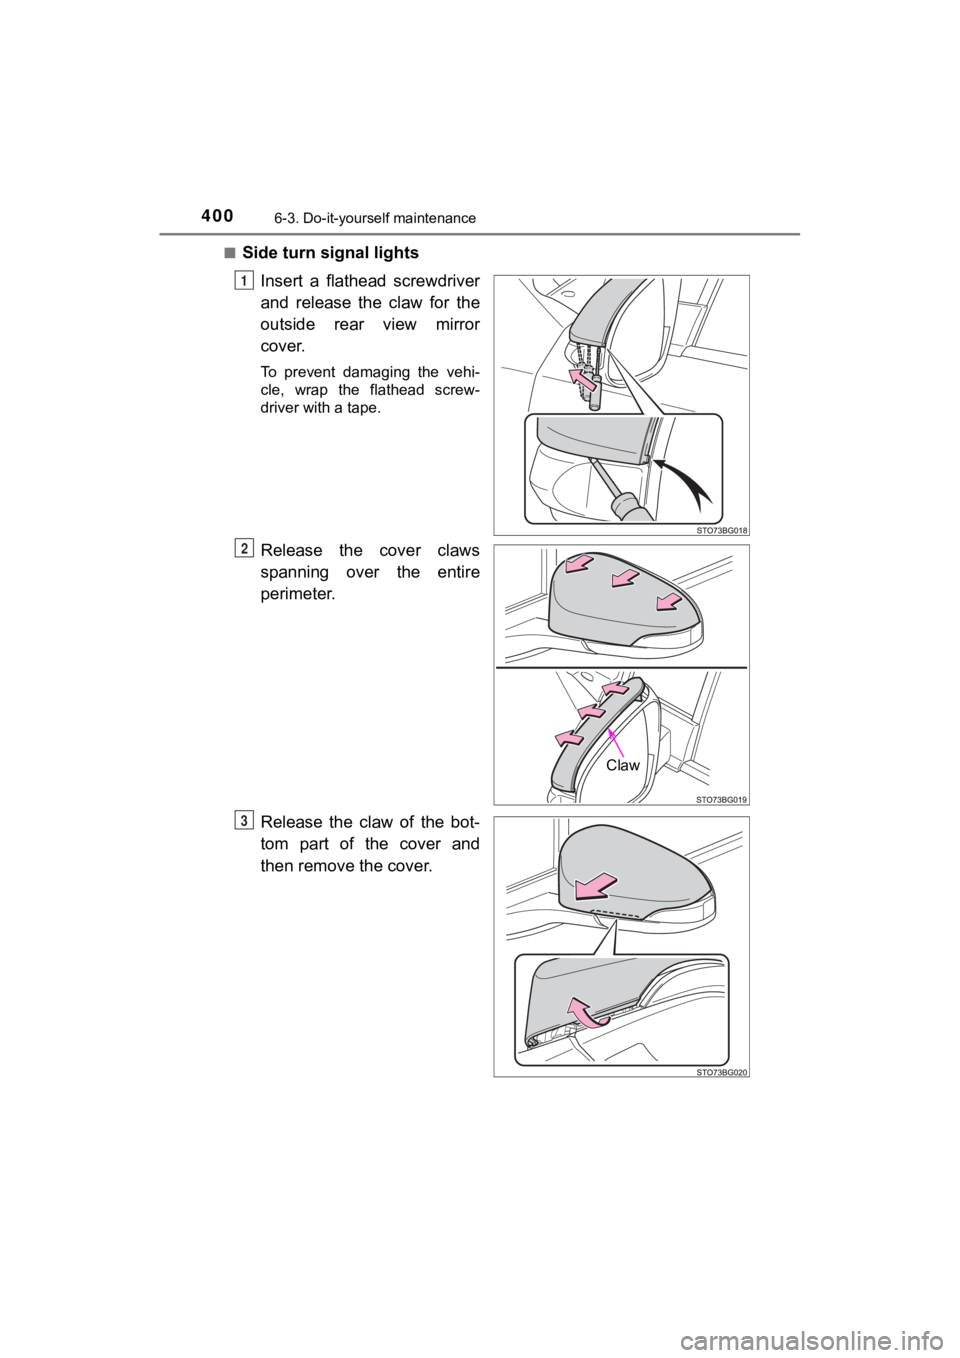
Side turn signal lights
Insert a flathead screwdriver
and release the claw for the
outside rear view mirror
cover.
To prevent damaging the vehi-
cle, wrap the flathead screw-
driver with a tape.
Release the cover claws
spanning over the entire
perimeter.
Release the claw of the bot-
tom part of the cover and
then remove the cover.
1
Claw
O
P
Trending: fuel additives, lumbar support, change key battery, fuel tank capacity, remote control, buttons, octane
