TOYOTA C_HR HYBRID 2017 Owners Manual
Manufacturer: TOYOTA, Model Year: 2017, Model line: C_HR HYBRID, Model: TOYOTA C_HR HYBRID 2017Pages: 712, PDF Size: 49.31 MB
Page 521 of 712
5217-2. Maintenance
C-HR_HV_OM_Europe_OM10538E
7
Maintenance and care
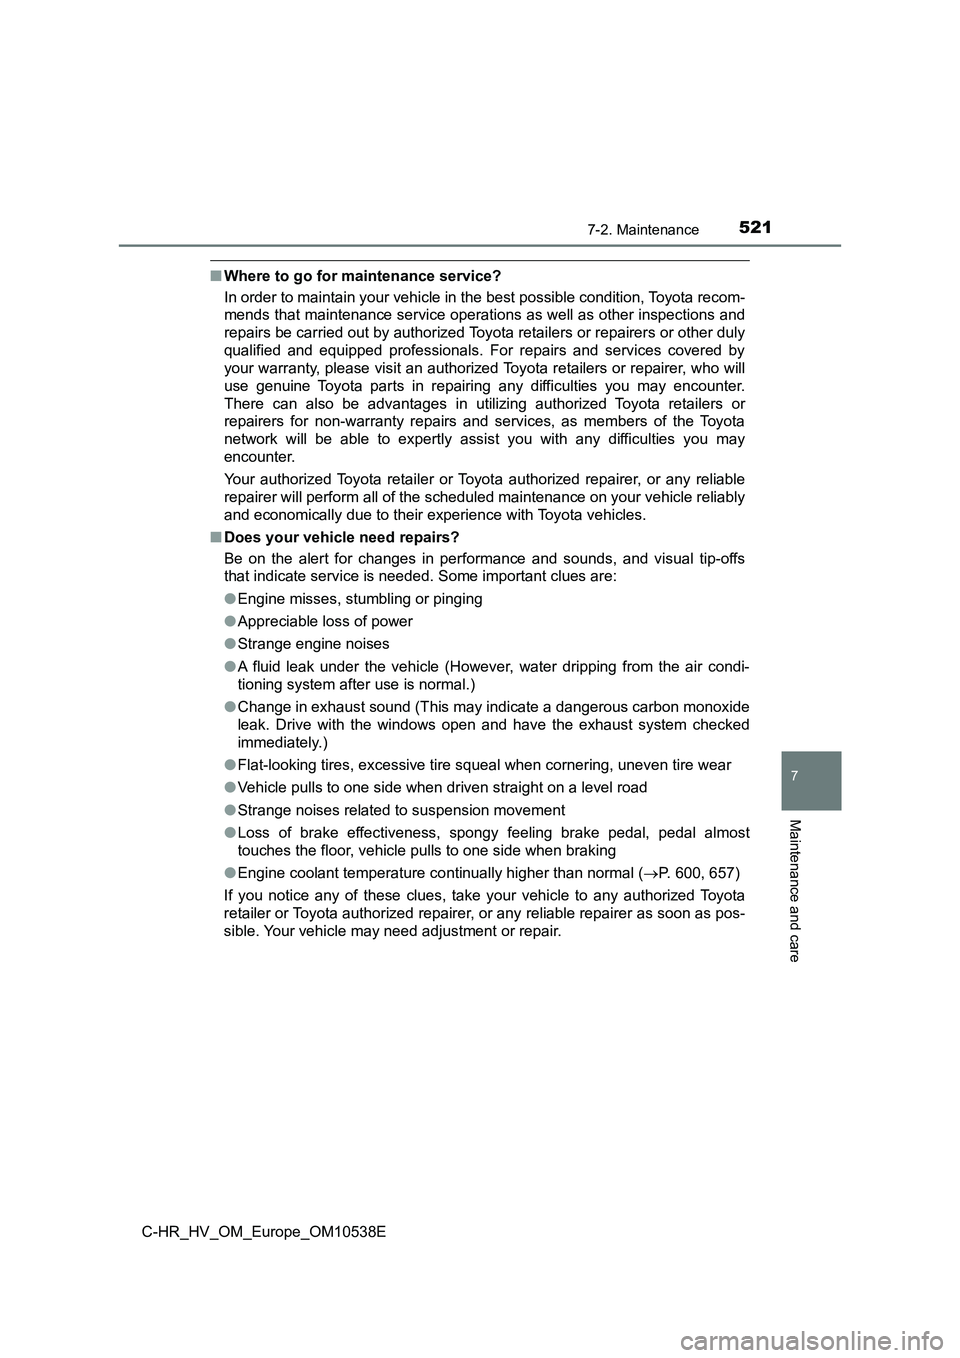
■Where to go for maintenance service?
In order to maintain your vehicle in the best possible condition, Toyota recom-
mends that maintenance service operations as well as other inspections and
repairs be carried out by authorized Toyota retailers or repairers or other duly
qualified and equipped professionals. For repairs and services covered by
your warranty, please visit an authorized Toyota retailers or repairer, who will
use genuine Toyota parts in repairing any difficulties you may encounter.
There can also be advantages in utilizing authorized Toyota retailers or
repairers for non-warranty repairs and services, as members of the Toyota
network will be able to expertly assist you with any difficulties you may
encounter.
Your authorized Toyota retailer or Toyo ta authorized repairer, or any reliable
repairer will perform all of the scheduled maintenance on your vehicle reliably
and economically due to their experience with Toyota vehicles.
■ Does your vehicle need repairs?
Be on the alert for changes in performance and sounds, and visual tip-offs
that indicate service is needed. Some important clues are:
● Engine misses, stumbling or pinging
● Appreciable loss of power
● Strange engine noises
● A fluid leak under the vehicle (However, water dripping from the air condi-
tioning system after use is normal.)
● Change in exhaust sound (This may indicate a dangerous carbon monoxide
leak. Drive with the windows open and have the exhaust system checked
immediately.)
● Flat-looking tires, excessive tire squeal when cornering, uneven tire wear
● Vehicle pulls to one side when driven straight on a level road
● Strange noises related to suspension movement
● Loss of brake effectiveness, spongy feeling brake pedal, pedal almost
touches the floor, vehicle pulls to one side when braking
● Engine coolant temperature continually higher than normal (P. 600, 657)
If you notice any of these clues, take your vehicle to any authorized Toyota
retailer or Toyota authorized repairer, or any reliable repairer as soon as pos-
sible. Your vehicle may need adjustment or repair.
Page 522 of 712
5227-2. Maintenance
C-HR_HV_OM_Europe_OM10538E
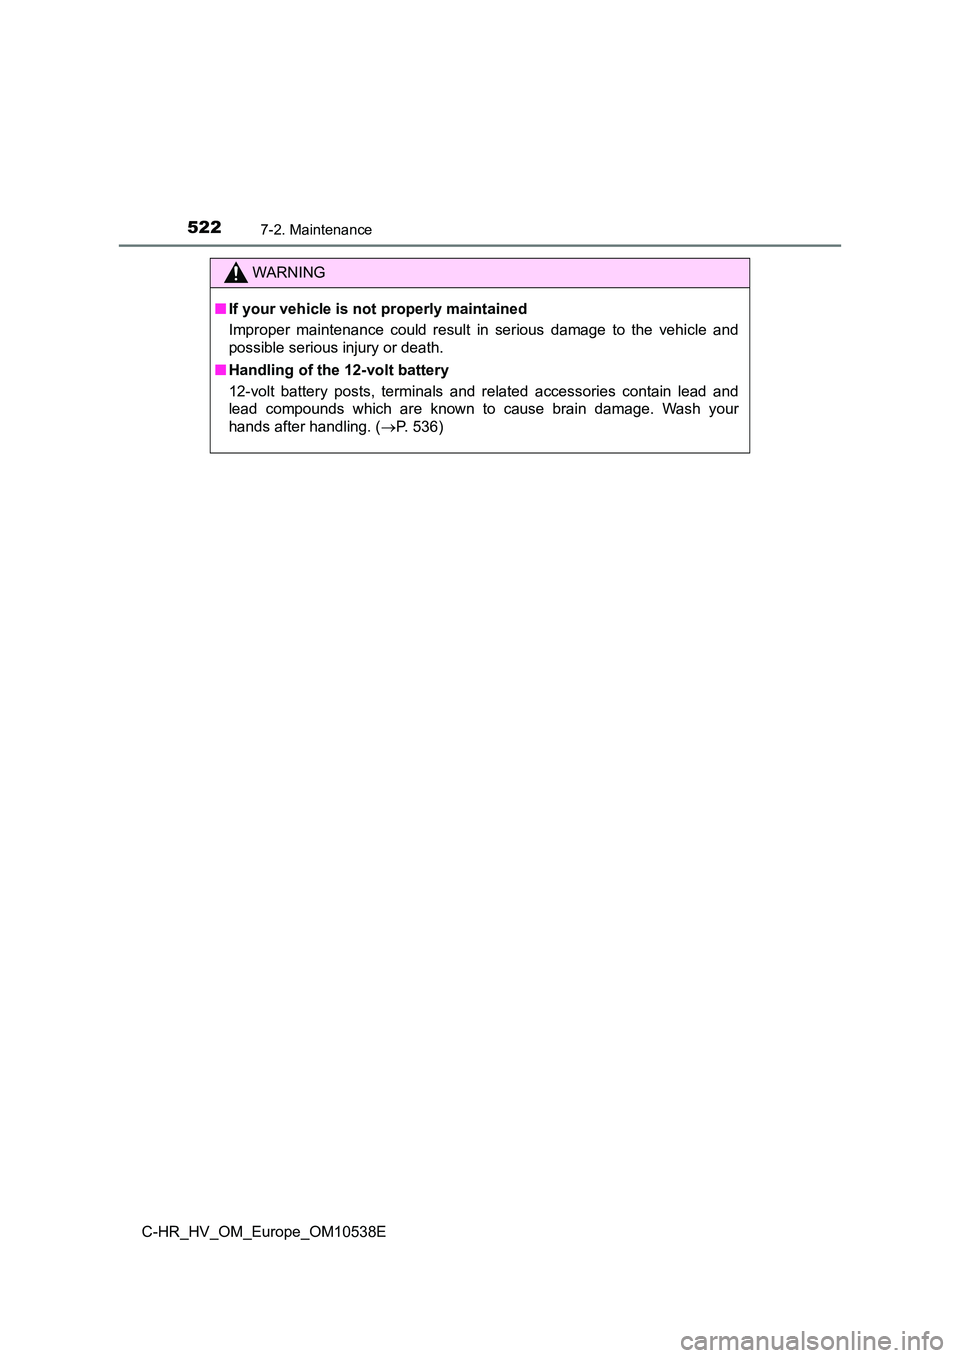
WARNING
■If your vehicle is not properly maintained
Improper maintenance could result in serious damage to the vehicle and
possible serious injury or death.
■ Handling of the 12-volt battery
12-volt battery posts, terminals and related accessories contain lead and
lead compounds which are known to cause brain damage. Wash your
hands after handling. ( P. 536)
Page 523 of 712
5237-3. Do-it-yourself maintenance
C-HR_HV_OM_Europe_OM10538E
7
Maintenance and care
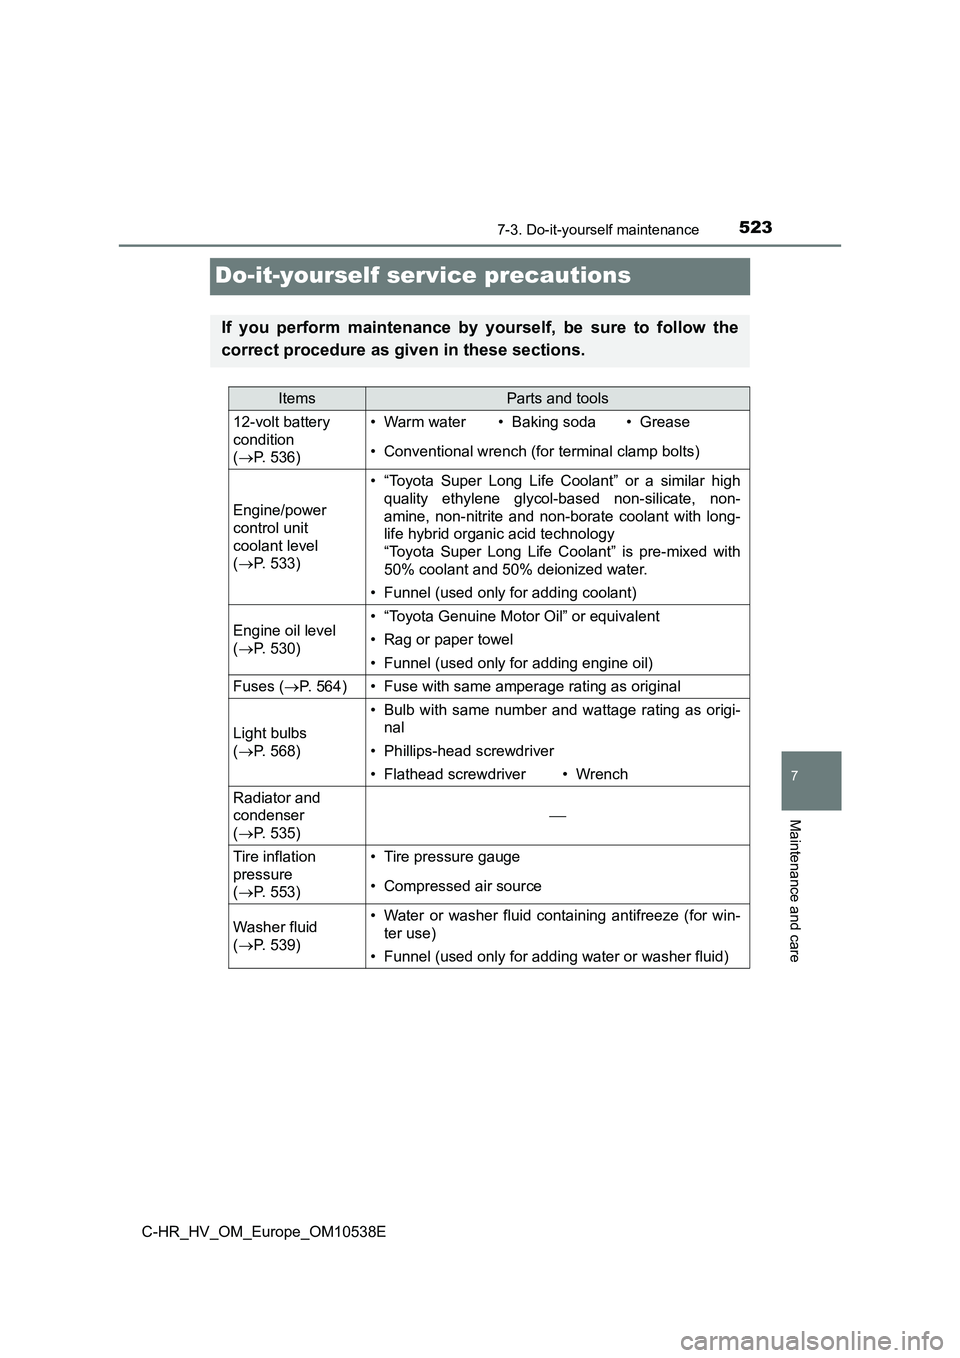
Do-it-yourself service precautions
If you perform maintenance by yourself, be sure to follow the
correct procedure as given in these sections.
ItemsParts and tools
12-volt battery
condition
( P. 536)
• Warm water • Baking soda • Grease
• Conventional wrench (for terminal clamp bolts)
Engine/power
control unit
coolant level
( P. 533)
• “Toyota Super Long Life Coolant” or a similar high
quality ethylene glycol-based non-silicate, non-
amine, non-nitrite and non-borate coolant with long-
life hybrid organic acid technology
“Toyota Super Long Life Coolant” is pre-mixed with
50% coolant and 50% deionized water.
• Funnel (used only for adding coolant)
Engine oil level
( P. 530)
• “Toyota Genuine Motor Oil” or equivalent
• Rag or paper towel
• Funnel (used only for adding engine oil)
Fuses (P. 5 6 4 )• Fuse with same amperage rating as original
Light bulbs
( P. 568)
• Bulb with same number and wattage rating as origi-
nal
• Phillips-head screwdriver
• Flathead screwdriver•Wrench
Radiator and
condenser
( P. 535)
Tire inflation
pressure
( P. 553)
• Tire pressure gauge
• Compressed air source
Washer fluid
( P. 539)
• Water or washer fluid containing antifreeze (for win-
ter use)
• Funnel (used only for adding water or washer fluid)
Page 524 of 712
5247-3. Do-it-yourself maintenance
C-HR_HV_OM_Europe_OM10538E
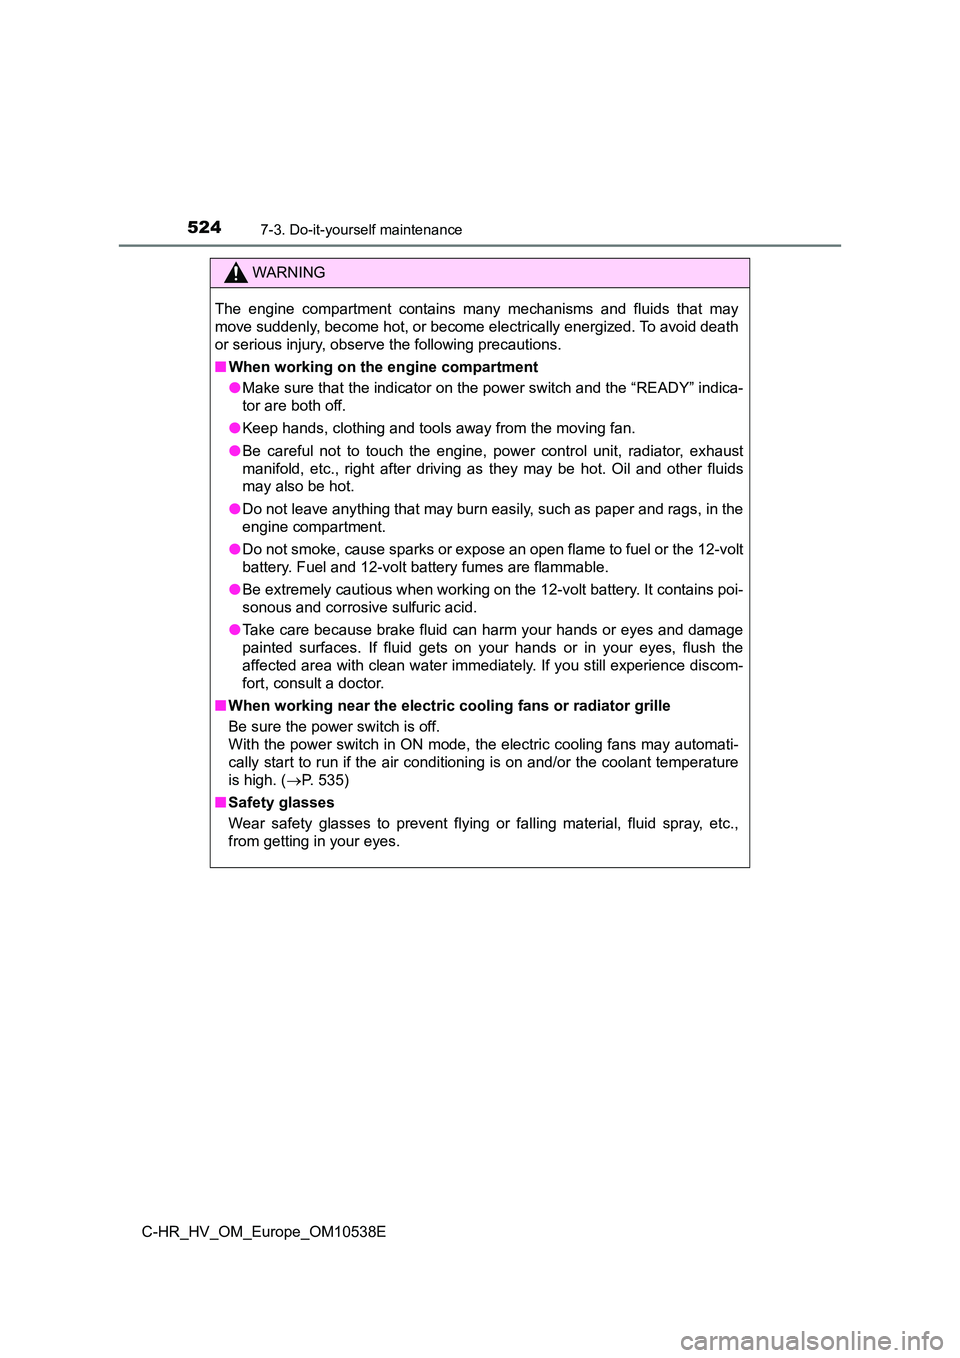
WARNING
The engine compartment contains many mechanisms and fluids that may
move suddenly, become hot, or become el ectrically energized. To avoid death
or serious injury, observe the following precautions.
■ When working on the engine compartment
● Make sure that the indicator on the power switch and the “READY” indica-
tor are both off.
● Keep hands, clothing and tools away from the moving fan.
● Be careful not to touch the engine, power control unit, radiator, exhaust
manifold, etc., right after driving as they may be hot. Oil and other fluids
may also be hot.
● Do not leave anything that may burn easily, such as paper and rags, in the
engine compartment.
● Do not smoke, cause sparks or expose an open flame to fuel or the 12-volt
battery. Fuel and 12-volt battery fumes are flammable.
● Be extremely cautious when working on the 12-volt battery. It contains poi-
sonous and corrosive sulfuric acid.
● Take care because brake fluid can harm your hands or eyes and damage
painted surfaces. If fluid gets on your hands or in your eyes, flush the
affected area with clean water immediately. If you still experience discom-
fort, consult a doctor.
■ When working near the electric cooling fans or radiator grille
Be sure the power switch is off.
With the power switch in ON mode, the electric cooling fans may automati-
cally start to run if the air conditioning is on and/or the coolant temperature
is high. ( P. 535)
■ Safety glasses
Wear safety glasses to prevent flying or falling material, fluid spray, etc.,
from getting in your eyes.
Page 525 of 712
5257-3. Do-it-yourself maintenance
C-HR_HV_OM_Europe_OM10538E
7
Maintenance and care
NOTICE
■If you remove the air cleaner filter
Driving with the air cleaner filter removed may cause excessive engine wear
due to dirt in the air.
■ If the brake fluid level is low or high
It is normal for the brake fluid level to go down slightly as the brake pads
wear or when the fluid level in the accumulator is high.
If the reservoir needs frequent refilling, it may indicate a serious problem.
Page 526 of 712
5267-3. Do-it-yourself maintenance
C-HR_HV_OM_Europe_OM10538E
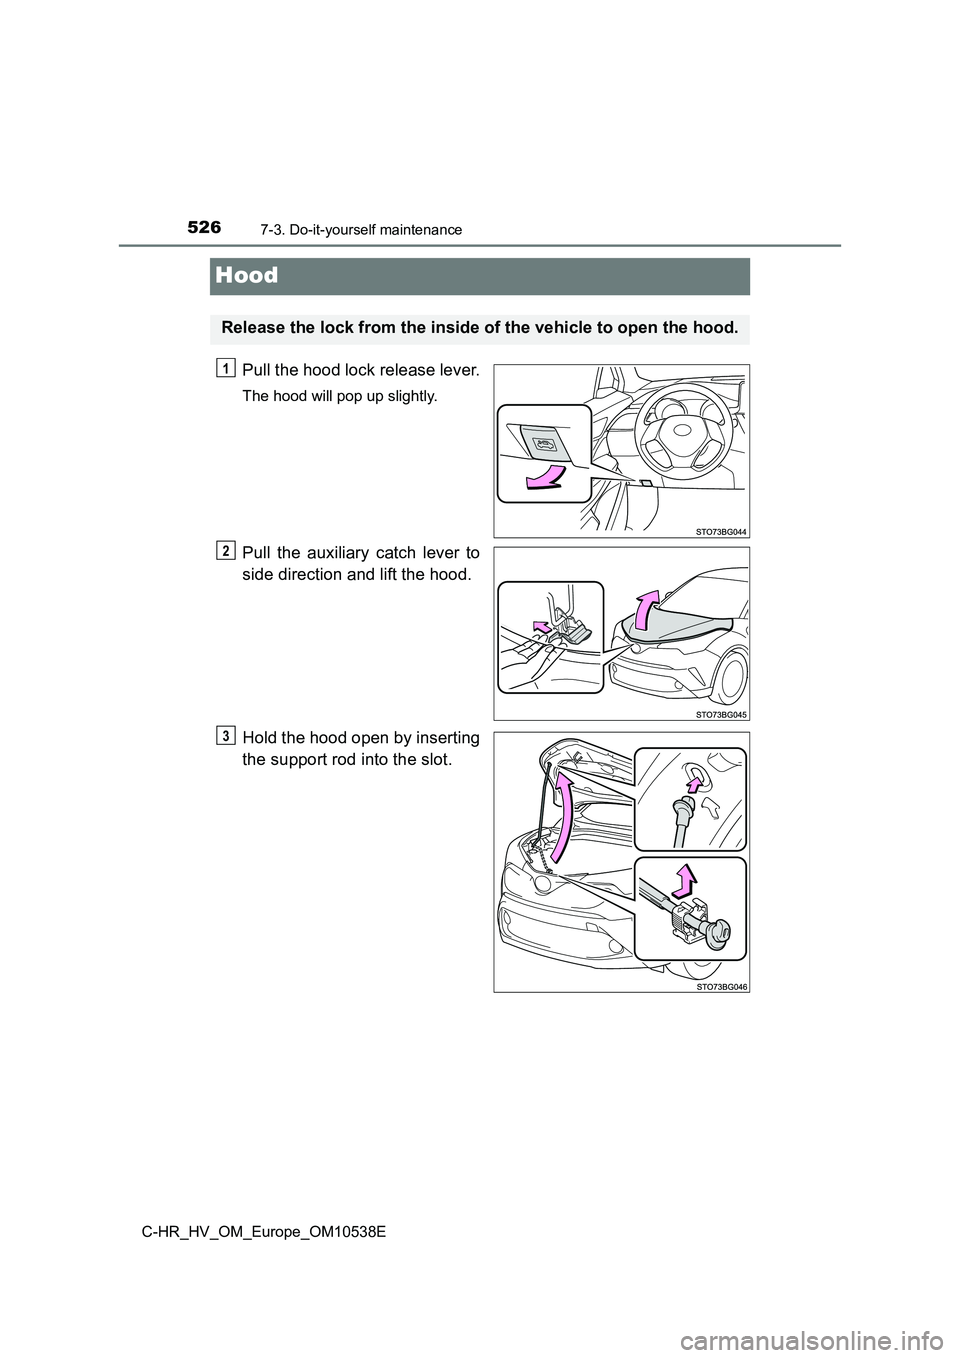
Hood
Pull the hood lock release lever.
The hood will pop up slightly.
Pull the auxiliary catch lever to
side direction and lift the hood.
Hold the hood open by inserting
the support rod into the slot.
Release the lock from the inside of the vehicle to open the hood.
1
2
3
Page 527 of 712
5277-3. Do-it-yourself maintenance
C-HR_HV_OM_Europe_OM10538E
7
Maintenance and care
WARNING
■Pre-driving check
Check that the hood is fully closed and locked.
If the hood is not locked properly, it may open while the vehicle is in motion
and cause an accident, which may result in death or serious injury.
■ After installing the support rod into the slot
Make sure the rod supports the hood securely preventing it from falling
down onto your head or body.
NOTICE
■ When closing the hood
Be sure to return the support rod to its clip before closing the hood. Closing
the hood with the support rod not clipped could cause the hood to bend.
Page 528 of 712
5287-3. Do-it-yourself maintenance
C-HR_HV_OM_Europe_OM10538E
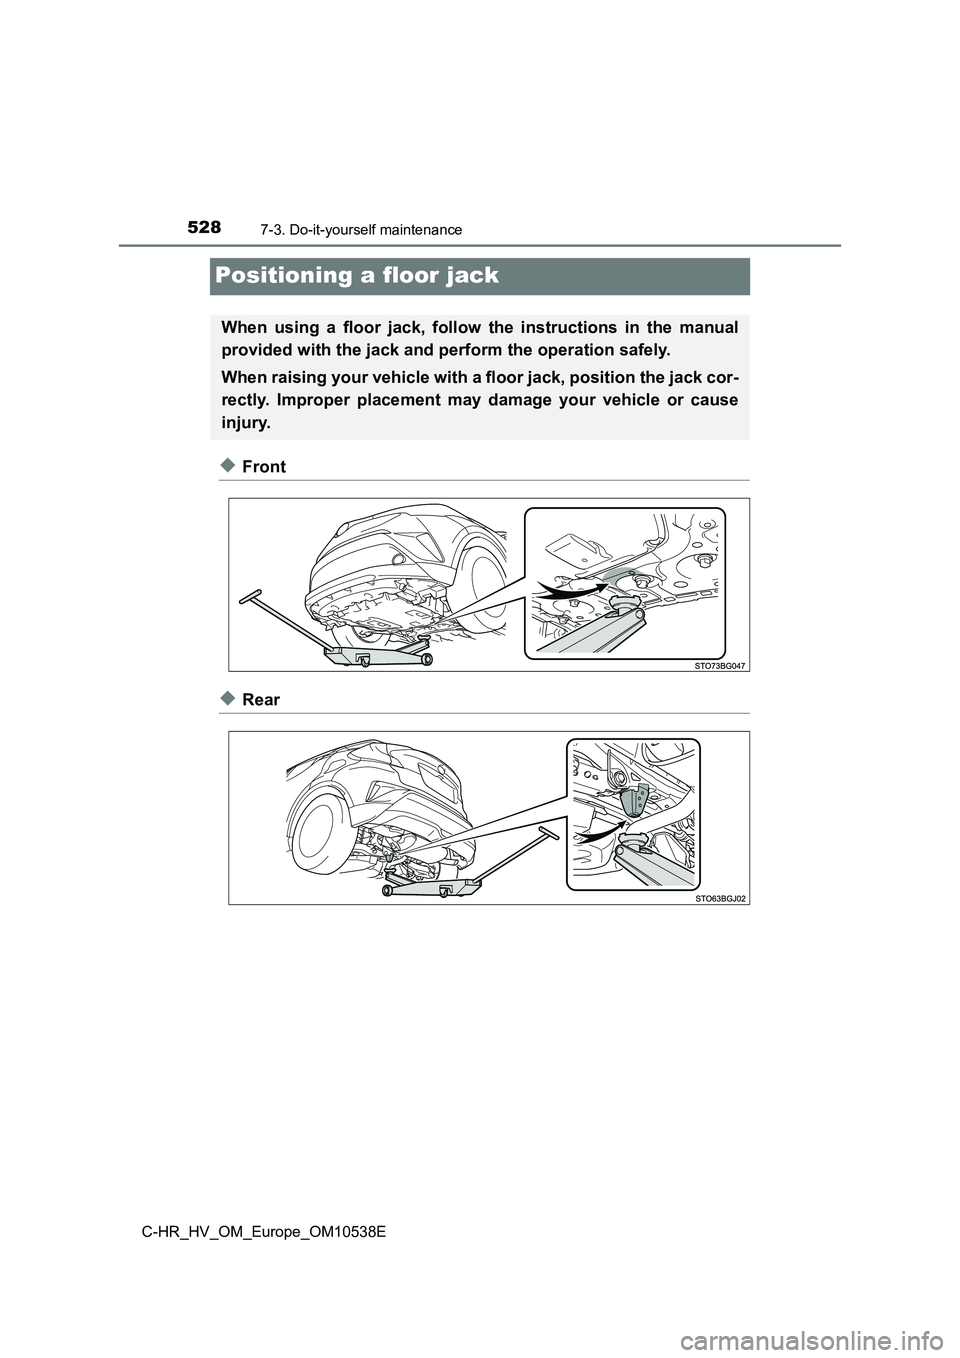
Positioning a floor jack
◆Front
◆Rear
When using a floor jack, follow the instructions in the manual
provided with the jack and perform the operation safely.
When raising your vehicle with a floor jack, position the jack cor-
rectly. Improper placement may damage your vehicle or cause
injury.
Page 529 of 712
5297-3. Do-it-yourself maintenance
C-HR_HV_OM_Europe_OM10538E
7
Maintenance and care
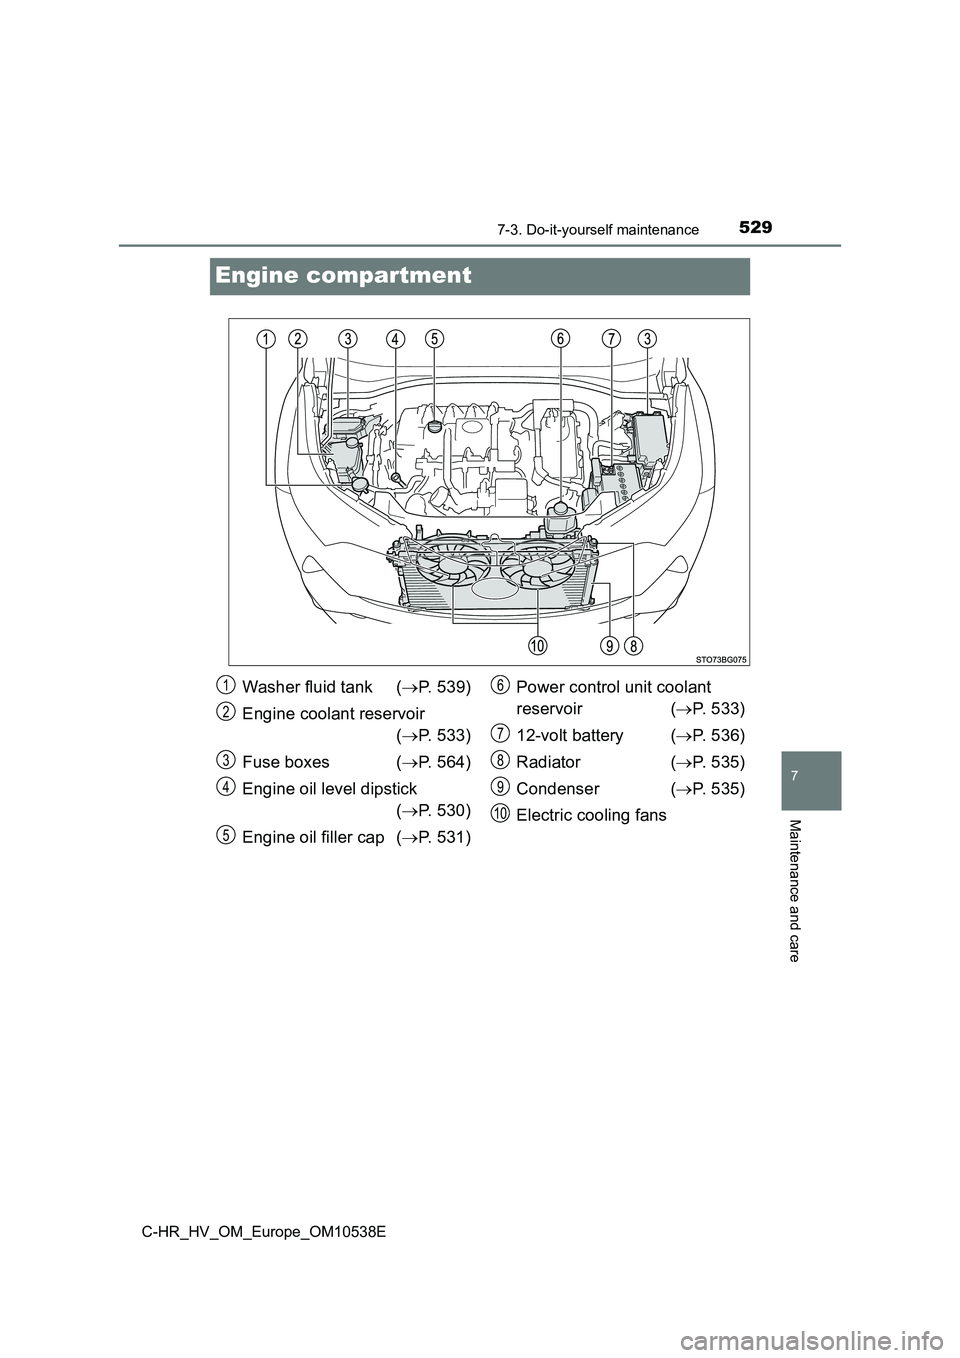
Engine compartment
Washer fluid tank (P. 539)
Engine coolant reservoir
( P. 533)
Fuse boxes ( P. 564)
Engine oil level dipstick
( P. 530)
Engine oil filler cap ( P. 531)
Power control unit coolant
reservoir ( P. 533)
12-volt battery ( P. 536)
Radiator ( P. 535)
Condenser ( P. 535)
Electric cooling fans
1
2
3
4
5
6
7
8
9
10
Page 530 of 712
5307-3. Do-it-yourself maintenance
C-HR_HV_OM_Europe_OM10538E
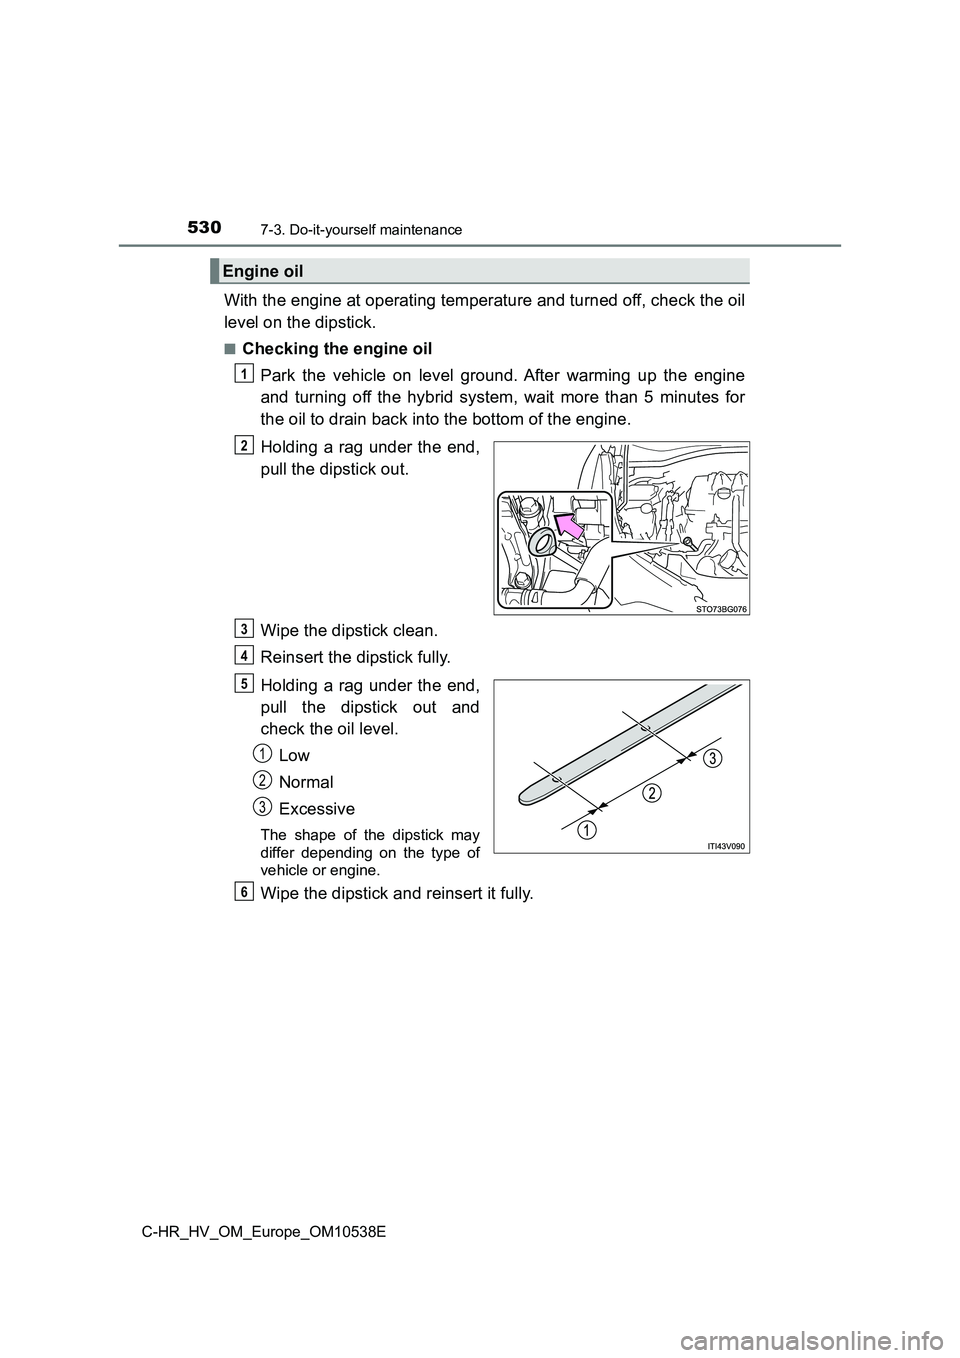
With the engine at operating temperature and turned off, check the oil
level on the dipstick.
■Checking the engine oil
Park the vehicle on level ground. After warming up the engine
and turning off the hybrid system, wait more than 5 minutes for
the oil to drain back into the bottom of the engine.
Holding a rag under the end,
pull the dipstick out.
Wipe the dipstick clean.
Reinsert the dipstick fully.
Holding a rag under the end,
pull the dipstick out and
check the oil level.
Low
Normal
Excessive
The shape of the dipstick may
differ depending on the type of
vehicle or engine.
Wipe the dipstick and reinsert it fully.
Engine oil
1
2
3
4
5
1
2
3
6