buttons TOYOTA C_HR HYBRID 2017 Owners Manual
[x] Cancel search | Manufacturer: TOYOTA, Model Year: 2017, Model line: C_HR HYBRID, Model: TOYOTA C_HR HYBRID 2017Pages: 712, PDF Size: 49.31 MB
Page 22 of 712
22Pictorial index
C-HR_HV_OM_Europe_OM10538E
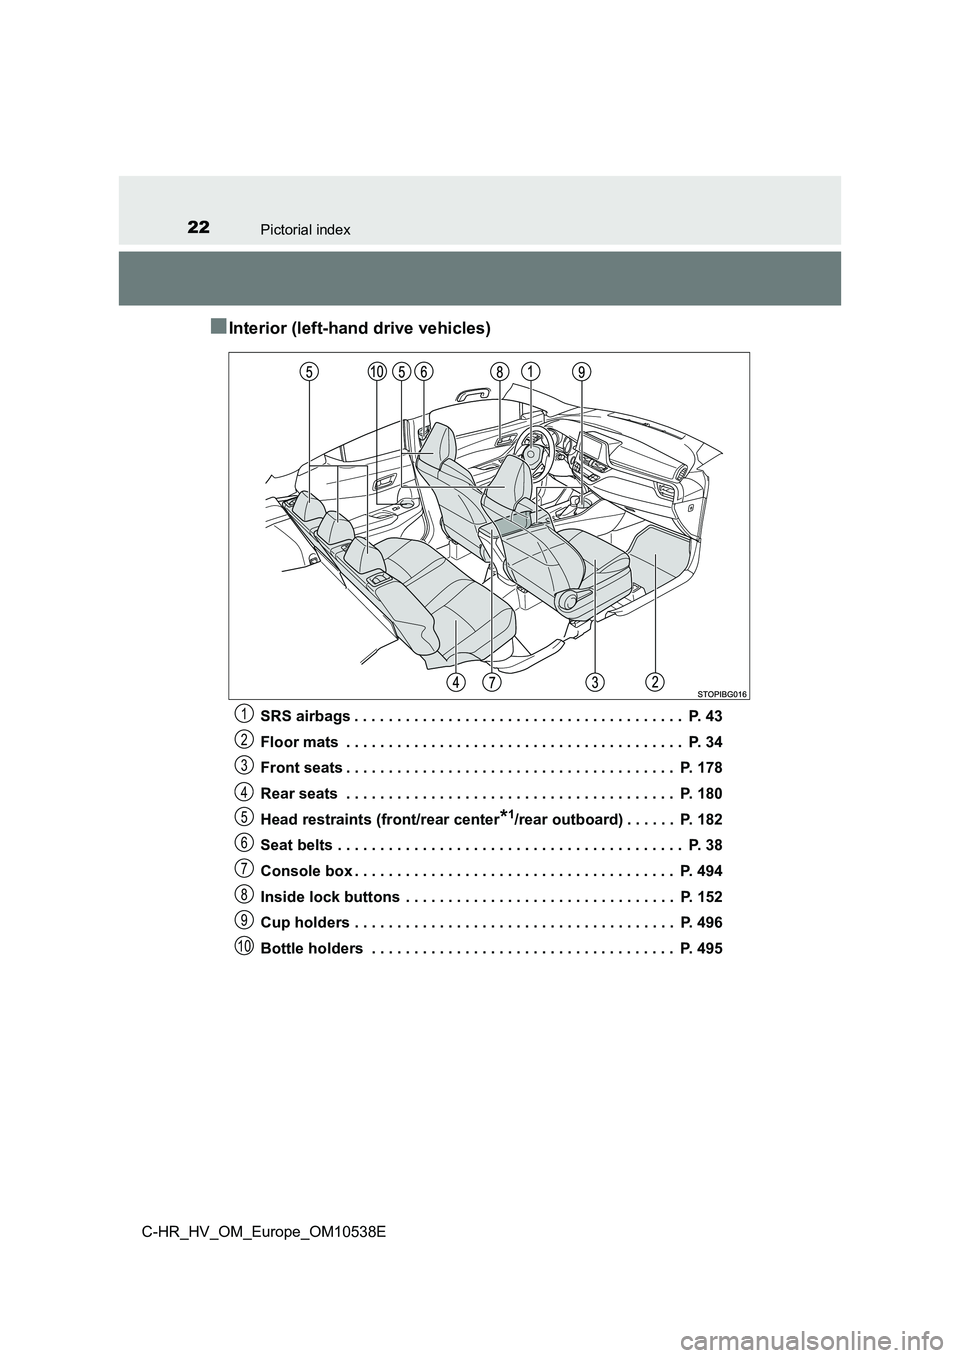
■Interior (left-hand drive vehicles)
SRS airbags . . . . . . . . . . . . . . . . . . . . . . . . . . . . . . . . . . . . . . . P. 43
Floor mats . . . . . . . . . . . . . . . . . . . . . . . . . . . . . . . . . . . . . . . . P. 34
Front seats . . . . . . . . . . . . . . . . . . . . . . . . . . . . . . . . . . . . . . . P. 178
Rear seats . . . . . . . . . . . . . . . . . . . . . . . . . . . . . . . . . . . . . . . P. 180
Head restraints (front/rear center
*1/rear outboard) . . . . . . P. 182
Seat belts . . . . . . . . . . . . . . . . . . . . . . . . . . . . . . . . . . . . . . . . . P. 38
Console box . . . . . . . . . . . . . . . . . . . . . . . . . . . . . . . . . . . . . . P. 494
Inside lock buttons . . . . . . . . . . . . . . . . . . . . . . . . . . . . . . . . P. 152
Cup holders . . . . . . . . . . . . . . . . . . . . . . . . . . . . . . . . . . . . . . P. 496
Bottle holders . . . . . . . . . . . . . . . . . . . . . . . . . . . . . . . . . . . . P. 495
1
2
3
4
5
6
7
8
9
10
Page 30 of 712
30Pictorial index
C-HR_HV_OM_Europe_OM10538E
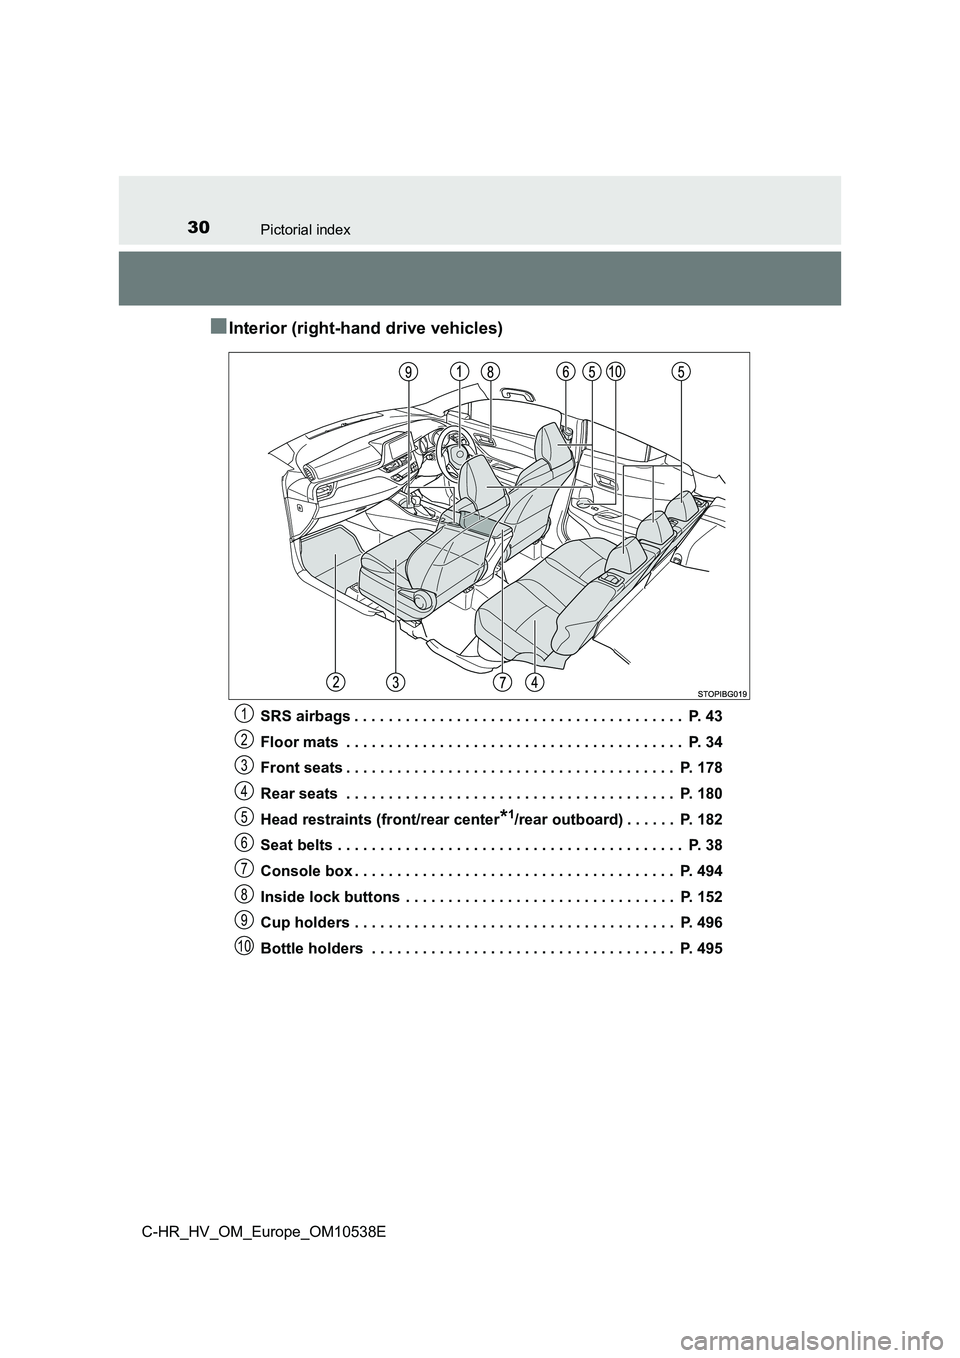
■Interior (right-hand drive vehicles)
SRS airbags . . . . . . . . . . . . . . . . . . . . . . . . . . . . . . . . . . . . . . . P. 43
Floor mats . . . . . . . . . . . . . . . . . . . . . . . . . . . . . . . . . . . . . . . . P. 34
Front seats . . . . . . . . . . . . . . . . . . . . . . . . . . . . . . . . . . . . . . . P. 178
Rear seats . . . . . . . . . . . . . . . . . . . . . . . . . . . . . . . . . . . . . . . P. 180
Head restraints (front/rear center
*1/rear outboard) . . . . . . P. 182
Seat belts . . . . . . . . . . . . . . . . . . . . . . . . . . . . . . . . . . . . . . . . . P. 38
Console box . . . . . . . . . . . . . . . . . . . . . . . . . . . . . . . . . . . . . . P. 494
Inside lock buttons . . . . . . . . . . . . . . . . . . . . . . . . . . . . . . . . P. 152
Cup holders . . . . . . . . . . . . . . . . . . . . . . . . . . . . . . . . . . . . . . P. 496
Bottle holders . . . . . . . . . . . . . . . . . . . . . . . . . . . . . . . . . . . . P. 495
1
2
3
4
5
6
7
8
9
10
Page 145 of 712
1453-1. Key information
3
Operation of each component
C-HR_HV_OM_Europe_OM10538E
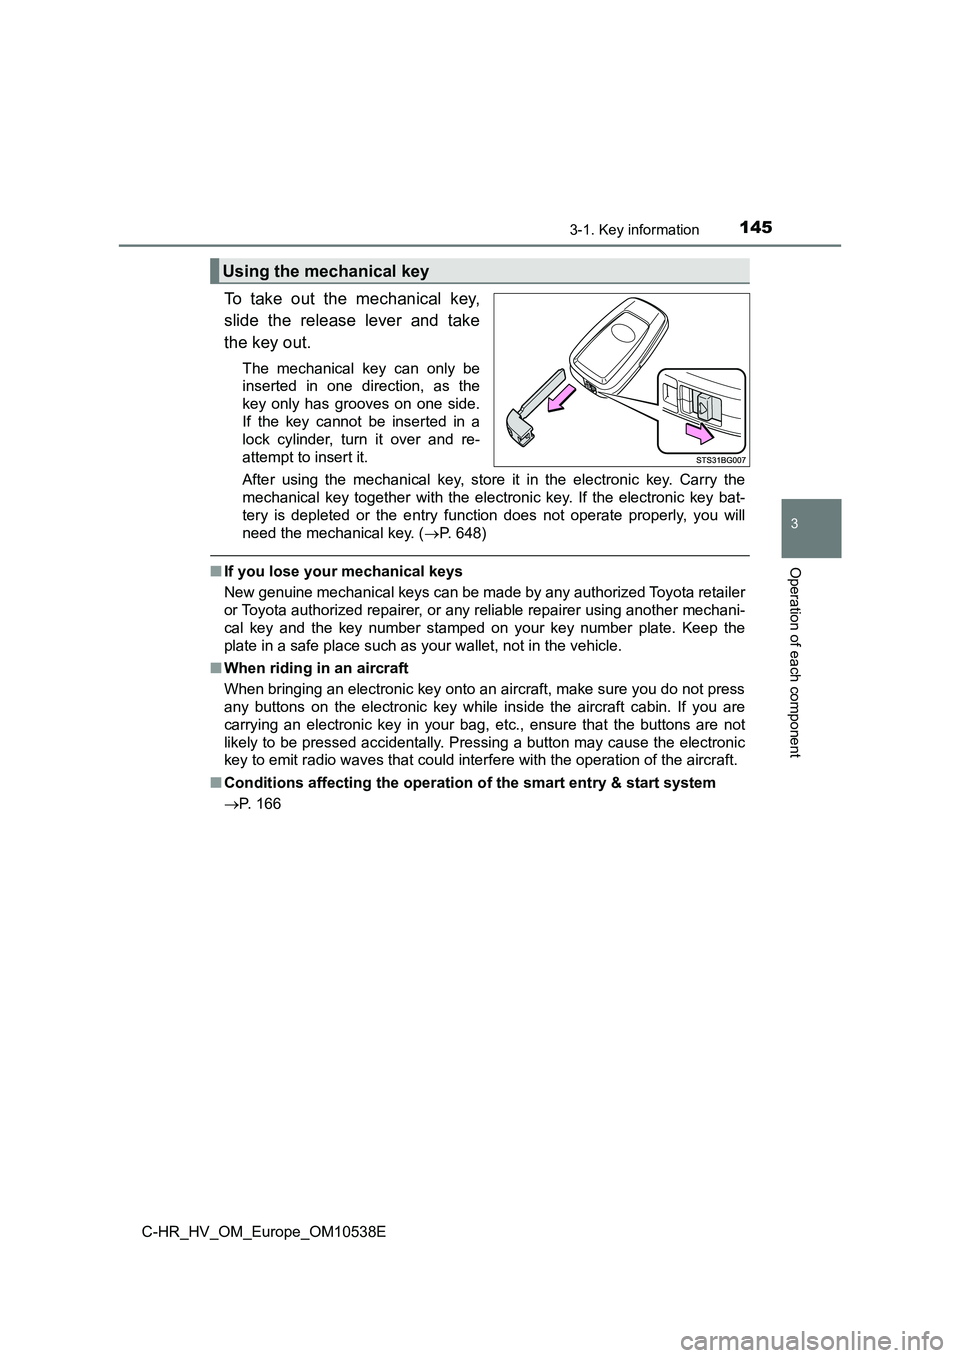
To take out the mechanical key,
slide the release lever and take
the key out.
The mechanical key can only be
inserted in one direction, as the
key only has grooves on one side.
If the key cannot be inserted in a
lock cylinder, turn it over and re-
attempt to insert it.
After using the mechanical key, store it in the electronic key. Carry the
mechanical key together with the electronic key. If the electronic key bat-
tery is depleted or the entry func tion does not operate properly, you will
need the mechanical key. ( P. 648)
■If you lose your mechanical keys
New genuine mechanical keys can be made by any authorized Toyota retailer
or Toyota authorized repairer, or any reliable repairer using another mechani-
cal key and the key number stamped on your key number plate. Keep the
plate in a safe place such as your wallet, not in the vehicle.
■ When riding in an aircraft
When bringing an electronic key onto an aircraft, make sure you do not press
any buttons on the electronic key while inside the aircraft cabin. If you are
carrying an electronic key in your bag, etc., ensure that the buttons are not
likely to be pressed accidentally. Pressing a button may cause the electronic
key to emit radio waves that could interfere with the operation of the aircraft.
■ Conditions affecting the operation of the smart entry & start system
P. 166
Using the mechanical key
Page 152 of 712
1523-2. Opening, closing and locking the doors
C-HR_HV_OM_Europe_OM10538E
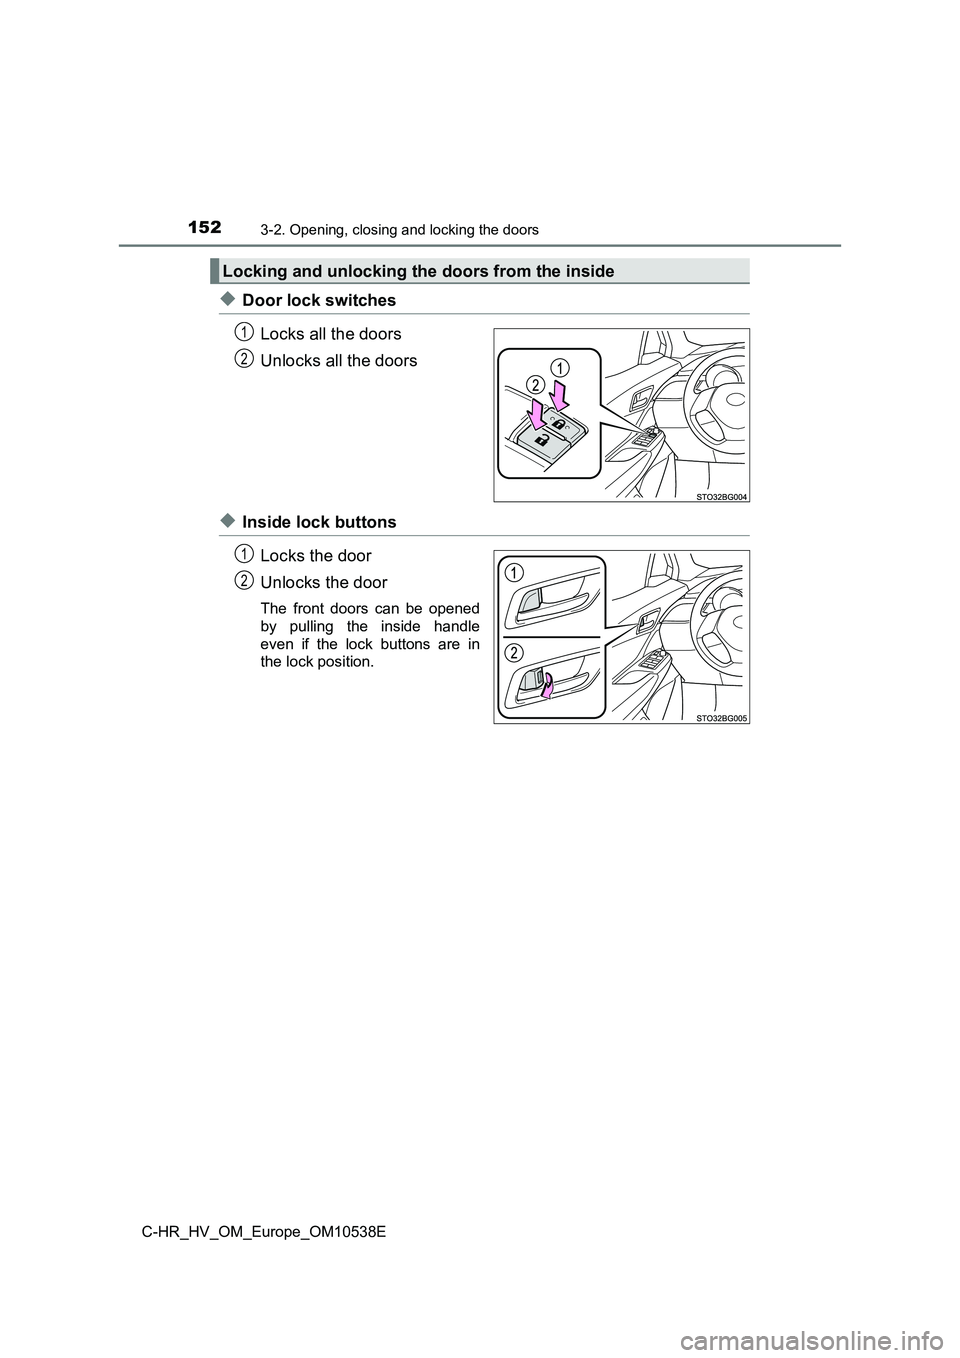
◆Door lock switches
Locks all the doors
Unlocks all the doors
◆Inside lock buttons
Locks the door
Unlocks the door
The front doors can be opened
by pulling the inside handle
even if the lock buttons are in
the lock position.
Locking and unlocking the doors from the inside
1
2
1
2
Page 154 of 712
1543-2. Opening, closing and locking the doors
C-HR_HV_OM_Europe_OM10538E
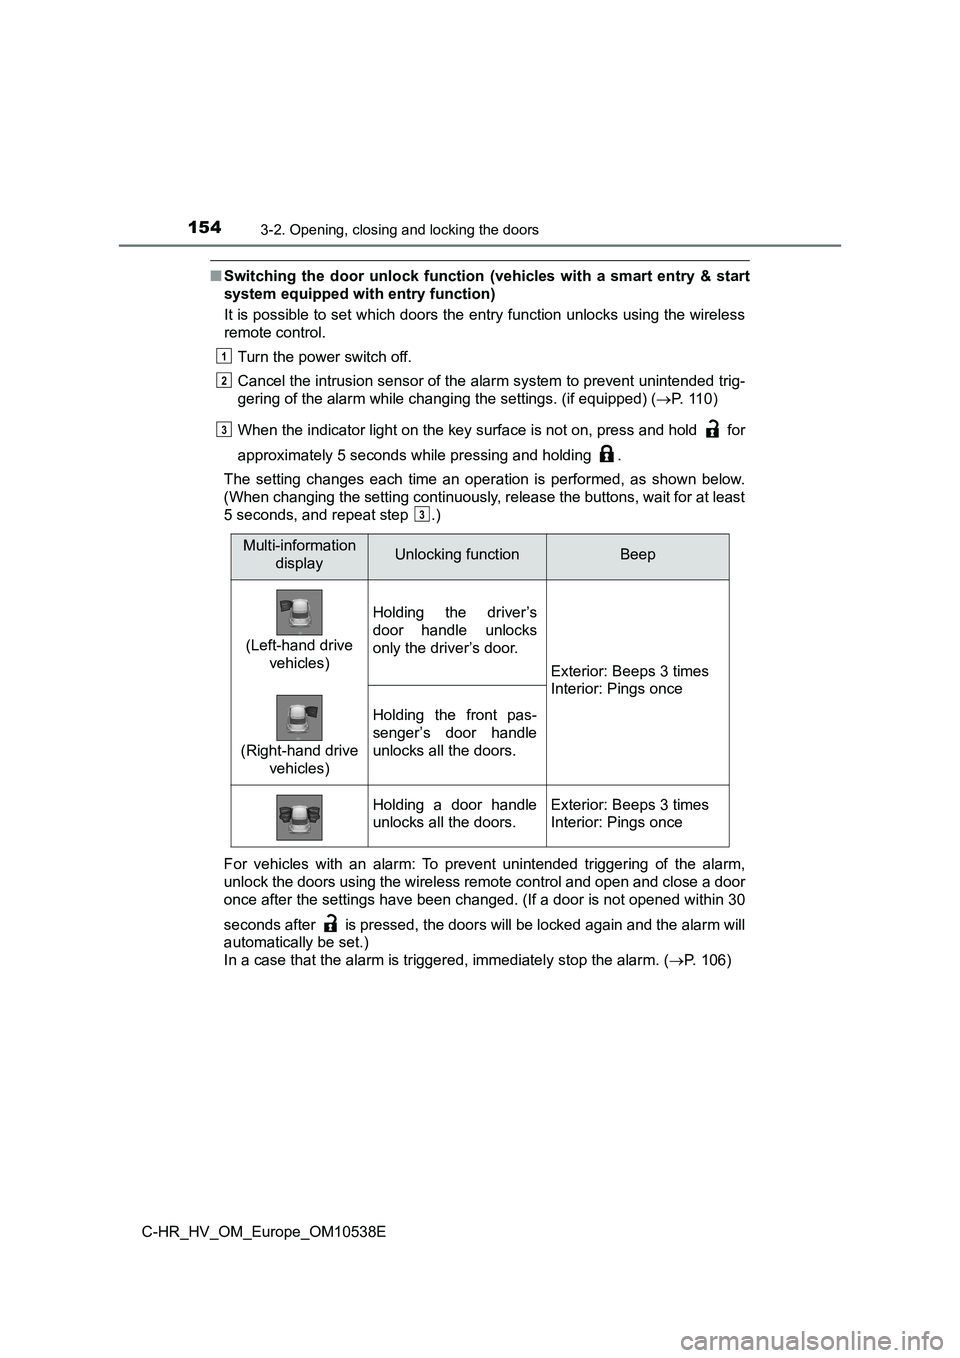
■Switching the door unlock function (vehicles with a smart entry & start
system equipped with entry function)
It is possible to set which doors the entry function unlocks using the wireless
remote control.
Turn the power switch off.
Cancel the intrusion sensor of the alarm system to prevent unintended trig-
gering of the alarm while changing the settings. (if equipped) ( P. 1 1 0 )
When the indicator light on the key surface is not on, press and hold for
approximately 5 seconds while pressing and holding .
The setting changes each time an operation is performed, as shown below.
(When changing the setting continuously, release the buttons, wait for at least
5 seconds, and repeat step .)
For vehicles with an alarm: To prevent unintended triggering of the alarm,
unlock the doors using the wireless remote control and open and close a door
once after the settings have been changed. (If a door is not opened within 30
seconds after is pressed, the doors will be locked again and the alarm will
automatically be set.)
In a case that the alarm is triggered, immediately stop the alarm. ( P. 106)
1
2
3
3
Multi-information
displayUnlocking functionBeep
(Left-hand drive
vehicles)
Holding the driver’s
door handle unlocks
only the driver’s door.
Exterior: Beeps 3 times
Interior: Pings once
(Right-hand drive
vehicles)
Holding the front pas-
senger’s door handle
unlocks all the doors.
Holding a door handle
unlocks all the doors.
Exterior: Beeps 3 times
Interior: Pings once
Page 155 of 712
1553-2. Opening, closing and locking the doors
3
Operation of each component
C-HR_HV_OM_Europe_OM10538E
■ Open door warning buzzer
If the vehicle speed reaches 5 km/h (3 mph), the master warning light flashes
and a buzzer sounds to indicate that the door(s) is not fully closed.
The open door(s) is displayed on the multi-information display.
■ Conditions affecting the operation of the smart entry & start system
P. 166
■ Customization
Some functions can be changed. ( P. 679)
WARNING
■To prevent an accident
Observe the following precautions while driving the vehicle.
Failure to do so may result in a door opening and an occupant falling out,
resulting in death or serious injury.
● Ensure that all doors are properly closed and locked.
● Do not pull the inside handle of the doors while driving.
Be especially careful for the front doors, as the door may be opened even
if the inside lock buttons are in locked position.
● Set the rear door child-protector locks when children are seated in the rear
seats.
Page 165 of 712
1653-2. Opening, closing and locking the doors
3
Operation of each component
C-HR_HV_OM_Europe_OM10538E
■ When “Entry & Start System Malfunction. See Owner’s Manual.” is dis-
played on the multi-information display
The system may be malfunctioning. Have the vehicle inspected by any autho-
rized Toyota retailer or Toyota authorized repairer, or any reliable repairer
immediately.
■ Battery-saving function
The battery-saving function will be activated in order to prevent the electronic
key battery and the 12-volt battery from being discharged while the vehicle is
not operated for a long time.
● In the following situations, the smart entry & start system may take some
time to unlock the doors.
• The electronic key has been left within approximately 2 m (6 ft.) of the
outside of the vehicle for 10 minutes or longer.
• The smart entry & start system has not been used for 5 days or longer.
● If the smart entry & start system has not been used for 14 days or longer,
the doors cannot be unlocked at any doors except the driver’s door. In this
case, hold the driver’s door handle, or use the wireless remote control or
mechanical key to unlock the doors.
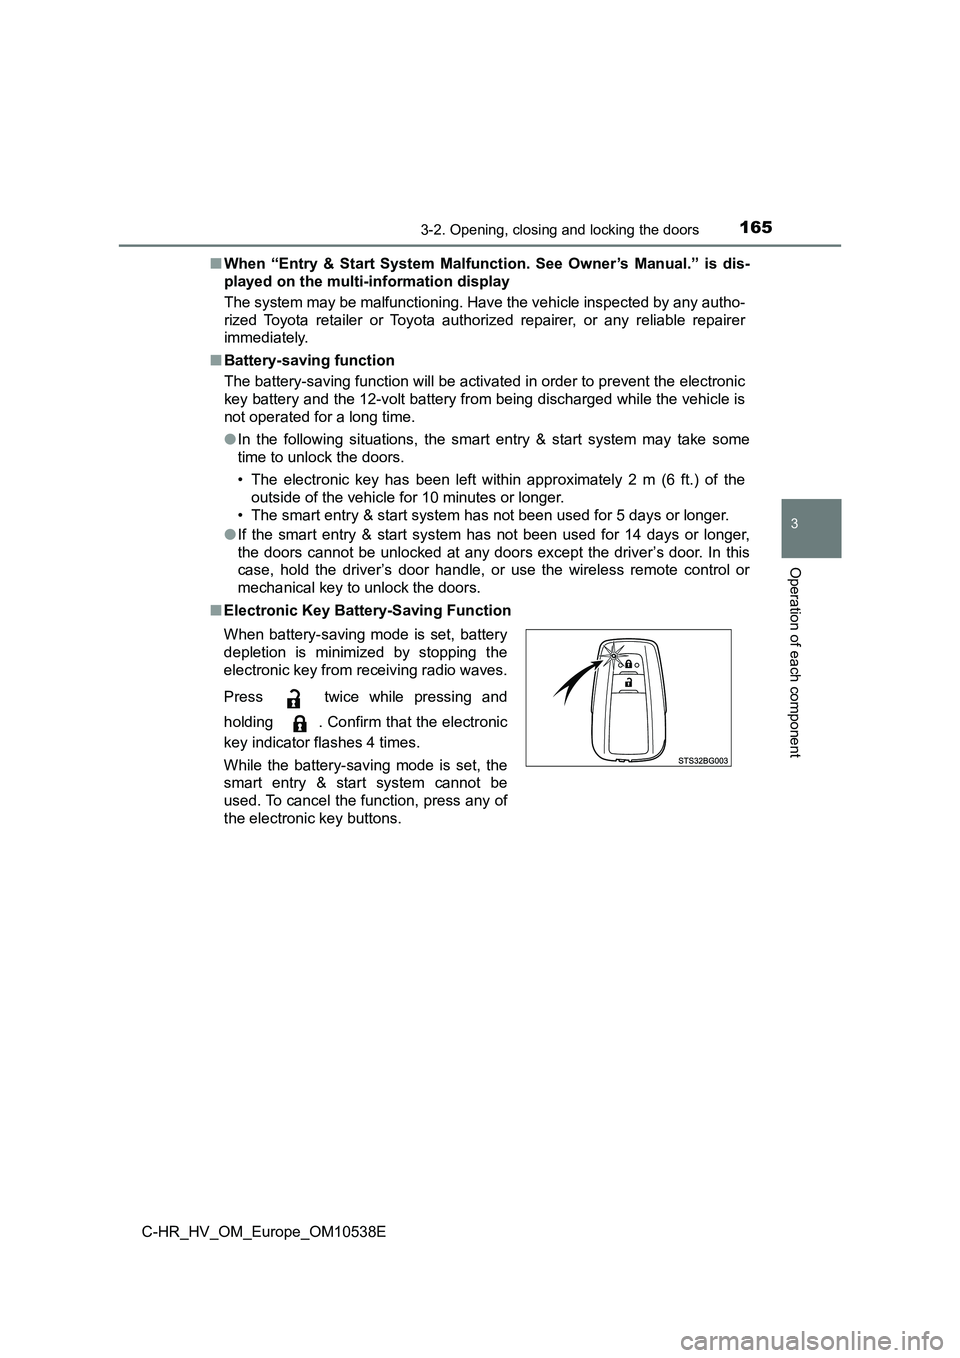
■ Electronic Key Battery-Saving Function
When battery-saving mode is set, battery
depletion is minimized by stopping the
electronic key from receiving radio waves.
Press twice while pressing and
holding . Confirm that the electronic
key indicator flashes 4 times.
While the battery-saving mode is set, the
smart entry & start system cannot be
used. To cancel the function, press any of
the electronic key buttons.
Page 467 of 712
467
5
5-9. Bluetooth® Phone
Audio system
C-HR_HV_OM_Europe_OM10538E
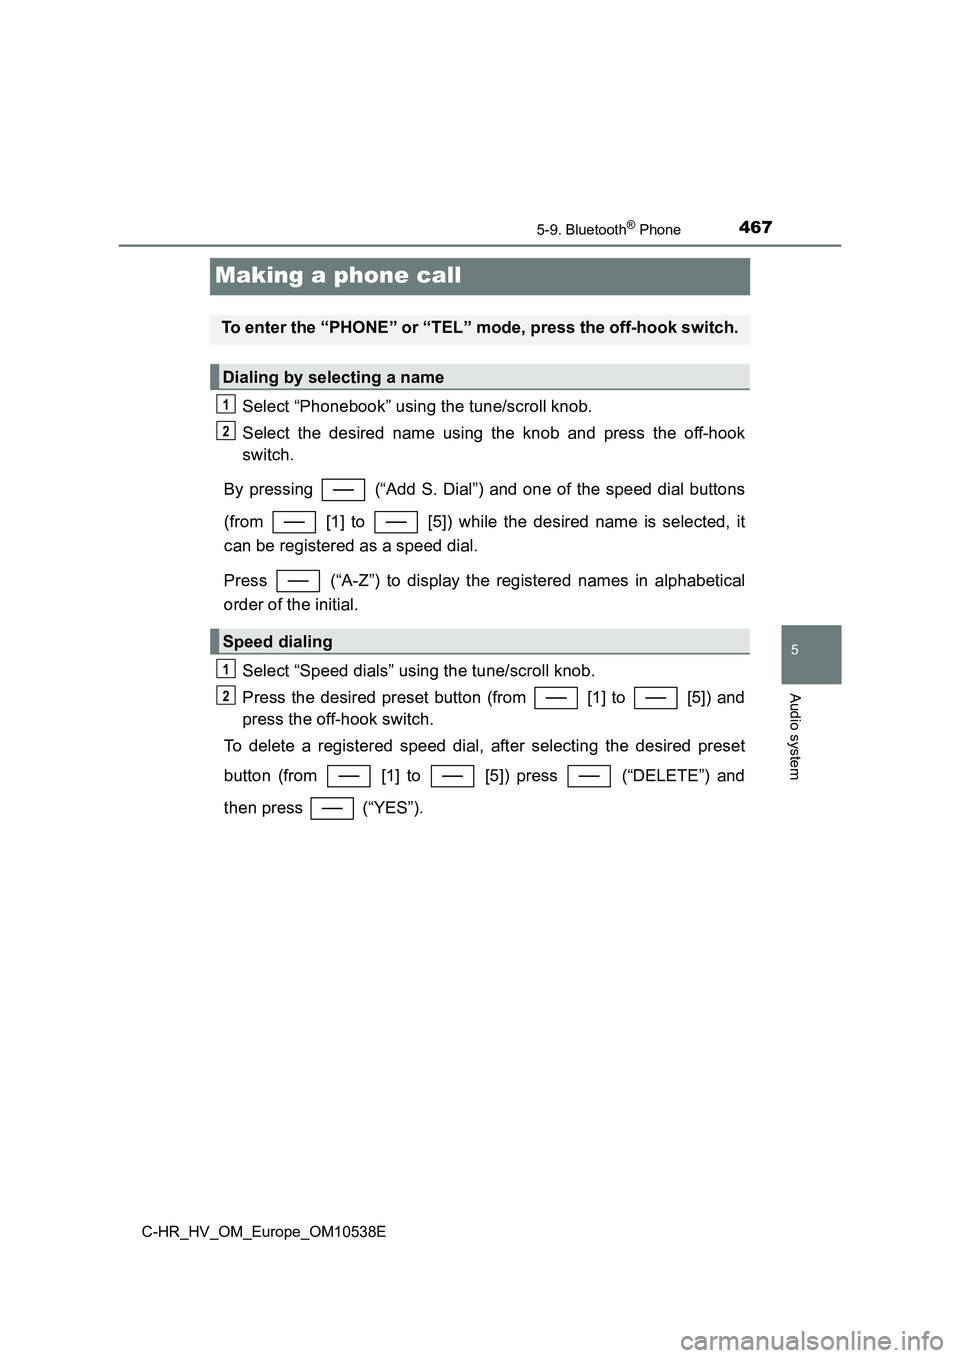
Making a phone call
Select “Phonebook” using the tune/scroll knob.
Select the desired name using the knob and press the off-hook
switch.
By pressing (“Add S. Dial”) and one of the speed dial buttons
(from [1] to [5]) while the desired name is selected, it
can be registered as a speed dial.
Press (“A-Z”) to display the registered names in alphabetical
order of the initial.
Select “Speed dials” using the tune/scroll knob.
Press the desired preset button (from [1] to [5]) and
press the off-hook switch.
To delete a registered speed dial, after selecting the desired preset
button (from [1] to [5]) press (“DELETE”) and
then press (“YES”).
To enter the “PHONE” or “TEL” mode, press the off-hook switch.
Dialing by selecting a name
Speed dialing
1
2
1
2
Page 506 of 712
5066-4. Using the other interior features
C-HR_HV_OM_Europe_OM10538E
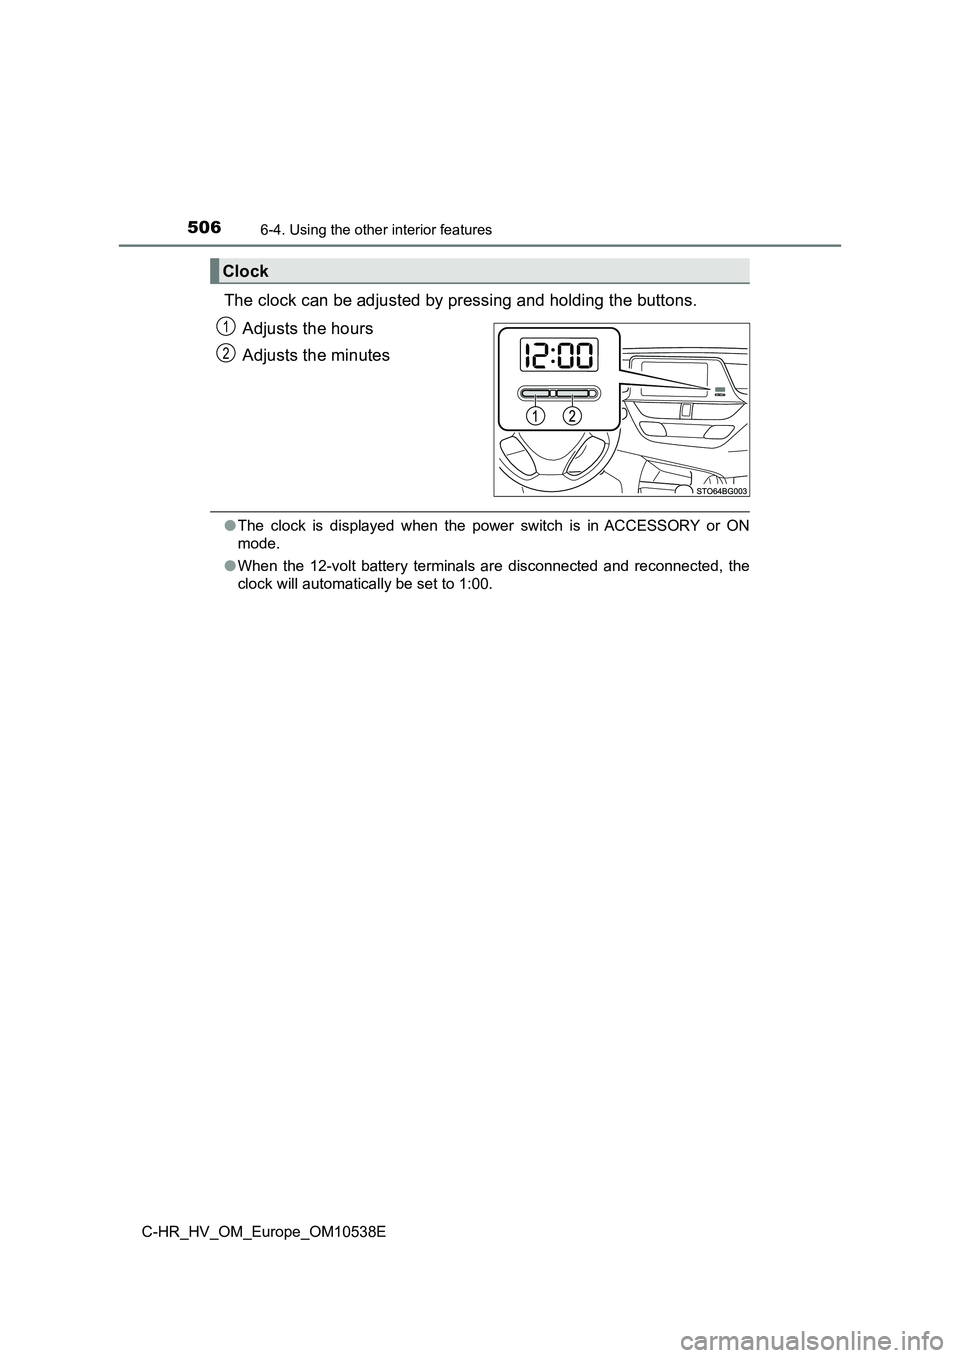
The clock can be adjusted by pressing and holding the buttons.
Adjusts the hours
Adjusts the minutes
● The clock is displayed when the power switch is in ACCESSORY or ON
mode.
● When the 12-volt battery terminals are disconnected and reconnected, the
clock will automatically be set to 1:00.
Clock
1
2