TOYOTA CAMRY 2000 Service Repair Manual
Manufacturer: TOYOTA, Model Year: 2000, Model line: CAMRY, Model: TOYOTA CAMRY 2000Pages: 4770, PDF Size: 86.41 MB
Page 4581 of 4770

Production
Date
Part Number
SINGLE CYLINDER MISFIRE ± EG013±99 December 17, 1999
Page 2 of 2
1. Remove all six fuel injectors for
verification of production information.
Affected injectors will be labeled with
a vendor part number of
ª23250±0A010º and have a
production date code number of ª828ª
or lower (see illustration for number
locations).
2. After determining that one or more of
the injectors are affected, replace all
six injectors with the above applicable
part number.
3. Clear the DTC, if present, and verify
that the vehicle now operates as
designed.
Repair
Procedure
Page 4582 of 4770
Toyota Supports ASE CertificationPage 1 of 1
EG009±99
Title:
M.I.L. ON" DTC P1133
Models:
'97±'99 Camry and '99 Solara: 5S±FE CA Spec.
Technical Service
BULLETIN
October 1, 1999
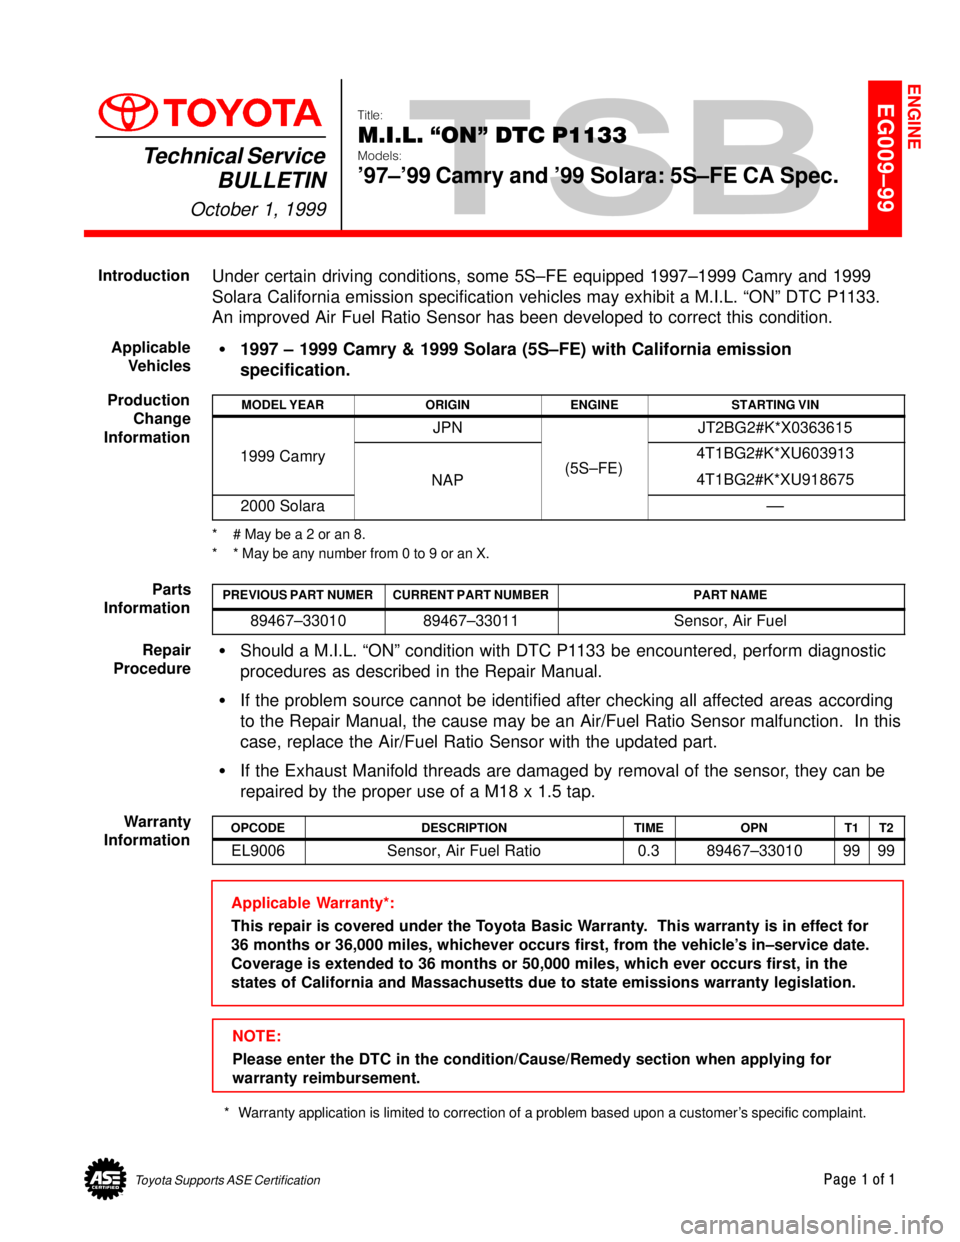
Under certain driving conditions, some 5S±FE equipped 1997±1999 Camry and 1999
Solara California emission specification vehicles may exhibit a M.I.L. ªONº DTC P1133.
An improved Air Fuel Ratio Sensor has been developed to correct this condition.
�1997 ± 1999 Camry & 1999 Solara (5S±FE) with California emission
specification.
MODEL YEARORIGINENGINESTARTING VIN
JPNJT2BG2#K*X0363615
1999 Camry
NAP(5S±FE)4T1BG2#K*XU603913
4T1BG2#K*XU918675
2000 Solara±±
* # May be a 2 or an 8.
* * May be any number from 0 to 9 or an X.
PREVIOUS PART NUMERCURRENT PART NUMBERPART NAME
89467±3301089467±33011Sensor, Air Fuel
�Should a M.I.L. ªONº condition with DTC P1133 be encountered, perform diagnostic
procedures as described in the Repair Manual.
�If the problem source cannot be identified after checking all affected areas according
to the Repair Manual, the cause may be an Air/Fuel Ratio Sensor malfunction. In this
case, replace the Air/Fuel Ratio Sensor with the updated part.
�If the Exhaust Manifold threads are damaged by removal of the sensor, they can be
repaired by the proper use of a M18 x 1.5 tap.
OPCODEDESCRIPTIONTIMEOPNT1T2
EL9006Sensor, Air Fuel Ratio0.389467±330109999
Applicable Warranty*:
This repair is covered under the Toyota Basic Warranty. This warranty is in effect for
36 months or 36,000 miles, whichever occurs first, from the vehicle's in±service date.
Coverage is extended to 36 months or 50,000 miles, which ever occurs first, in the
states of California and Massachusetts due to state emissions warranty legislation.
NOTE:
Please enter the DTC in the condition/Cause/Remedy section when applying for
warranty reimbursement.
* Warranty application is limited to correction of a problem based upon a customer's specific complaint.
ENGINE
Introduction
Applicable
Vehicles
Production
Change
Information
Parts
Information
Repair
Procedure
Warranty
Information
Page 4583 of 4770
Toyota Supports ASE CertificationPage 1 of 2
EL002±98Title:
CIGARETTE LIGHTER SERVICE
Models:
All Models
Technical Service
BULLETIN
Apirl 10, 1998
When receiving customer complaints to repair the lighter or lighter socket, please
carefully investigate the cause of the failure to prevent further occurrences. If the
customer uses the wrong size lighter element or power accessory plug, damage may
occur to the lighter socket. When applicable, instruct the customer to replace the lighter
element with original equipment components or to use an appropriate sized accessory
plug. Dimensional information included within this document will instruct you on
component specifications.
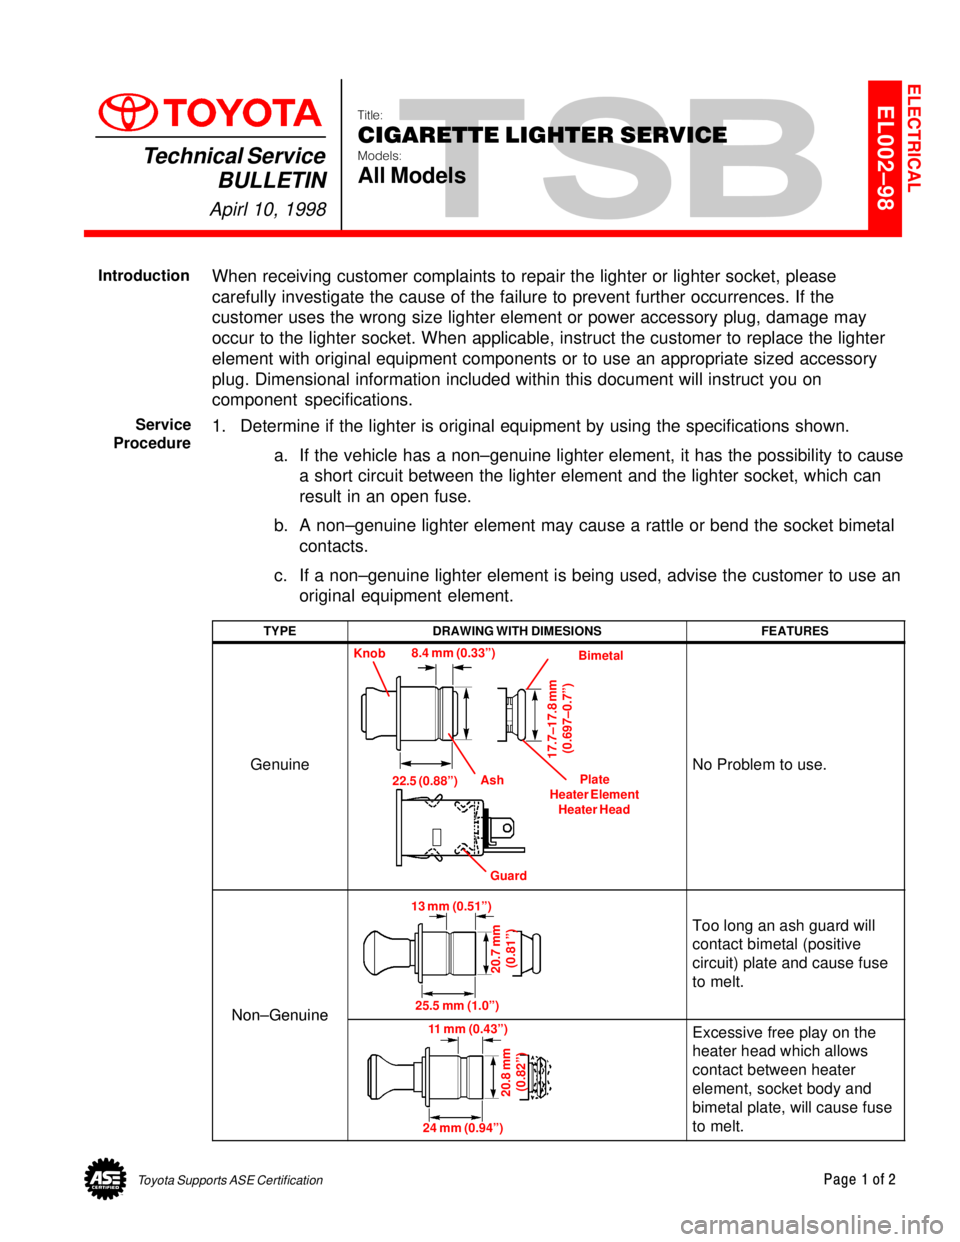
1. Determine if the lighter is original equipment by using the specifications shown.
a. If the vehicle has a non±genuine lighter element, it has the possibility to cause
a short circuit between the lighter element and the lighter socket, which can
result in an open fuse.
b. A non±genuine lighter element may cause a rattle or bend the socket bimetal
contacts.
c. If a non±genuine lighter element is being used, advise the customer to use an
original equipment element.
TYPEDRAWING WITH DIMESIONSFEATURES
Genuine
Knob
Bimetal
Plate
Heater Element
Heater Head
Guard Ash 8.4 mm (0.33º)
17.7±17.8 mm
(0.697±0.7º)
22.5 (0.88º)No Problem to use.
Non±Genuine
13 mm (0.51º)
20.7 mm
(0.81º)
25.5 mm (1.0º)
Too long an ash guard will
contact bimetal (positive
circuit) plate and cause fuse
to melt.
Non±Genuine11 mm (0.43º)
20.8 mm
(0.82º)
24 mm (0.94º)
Excessive free play on the
heater head which allows
contact between heater
element, socket body and
bimetal plate, will cause fuse
to melt.
ELECTRICAL
Introduction
Service
Procedure
Page 4584 of 4770
CIGARETTE LIGHTER SERVICE ± EL002-98 April 10, 1998
Page 2 of 2
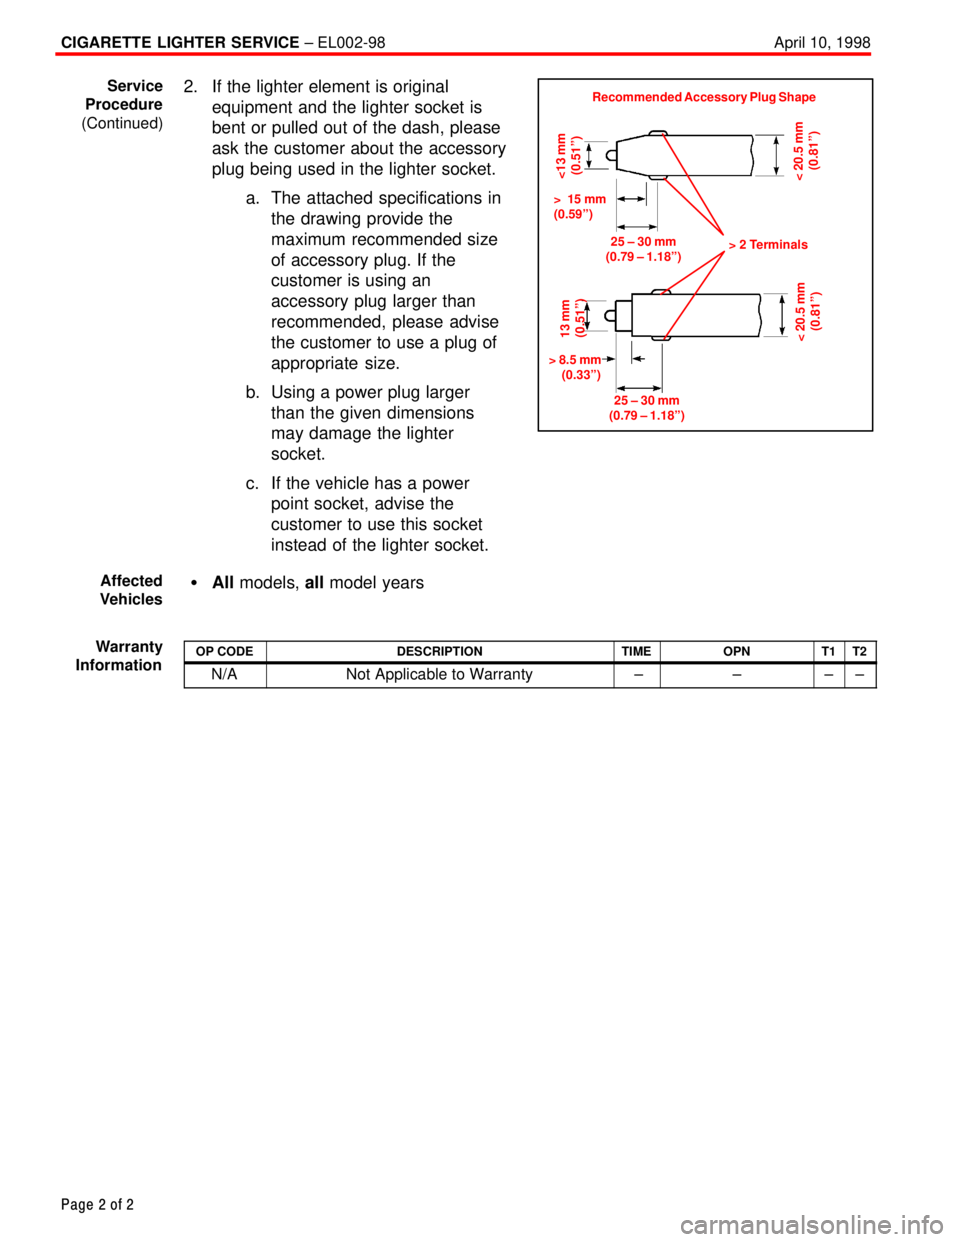
2. If the lighter element is original
equipment and the lighter socket is
bent or pulled out of the dash, please
ask the customer about the accessory
plug being used in the lighter socket.
a. The attached specifications in
the drawing provide the
maximum recommended size
of accessory plug. If the
customer is using an
accessory plug larger than
recommended, please advise
the customer to use a plug of
appropriate size.
b. Using a power plug larger
than the given dimensions
may damage the lighter
socket.
c. If the vehicle has a power
point socket, advise the
customer to use this socket
instead of the lighter socket.
�All models, all model years
OP CODEDESCRIPTIONTIMEOPNT1T2
N/ANot Applicable to Warranty ±±±±
> 2 Terminals
< 20.5 mm
(0.81º)
25 ± 30 mm
(0.79 ± 1.18º)
<13 mm
(0.51º) 13 mm
(0.51º)
25 ± 30 mm
(0.79 ± 1.18º)
< 20.5 mm
(0.81º)
> 8.5 mm
(0.33º)> 15 mm
(0.59º)
Recommended Accessory Plug ShapeService
Procedure
(Continued)
Affected
Vehicles
Warranty
Information
Page 4585 of 4770
Toyota Supports ASE CertificationPage 1 of 2
EL003±00Title:
SPEEDOMETER/TACHOMETER
NEEDLE MOVEMENT
Models:
'99 ± '00 Camry, Corolla, Sienna, & Solara
& '00 Avalon
Technical Service
BULLETIN
February 11, 2000
December 13, 2002
TSB REVISION NOTICE:
The information contained in this TSB was revised on December 13, 2002.
The previous TSB should be discarded.
Some vehicles may experience a slight, intermittent resistance to movement of the
speedometer or tachometer needle near zero during the first few miles of travel. The
condition can be corrected by following the repair method outlined below.
NOTE:
This repair does not apply to speedometers or tachometers which are permanently
inoperative.
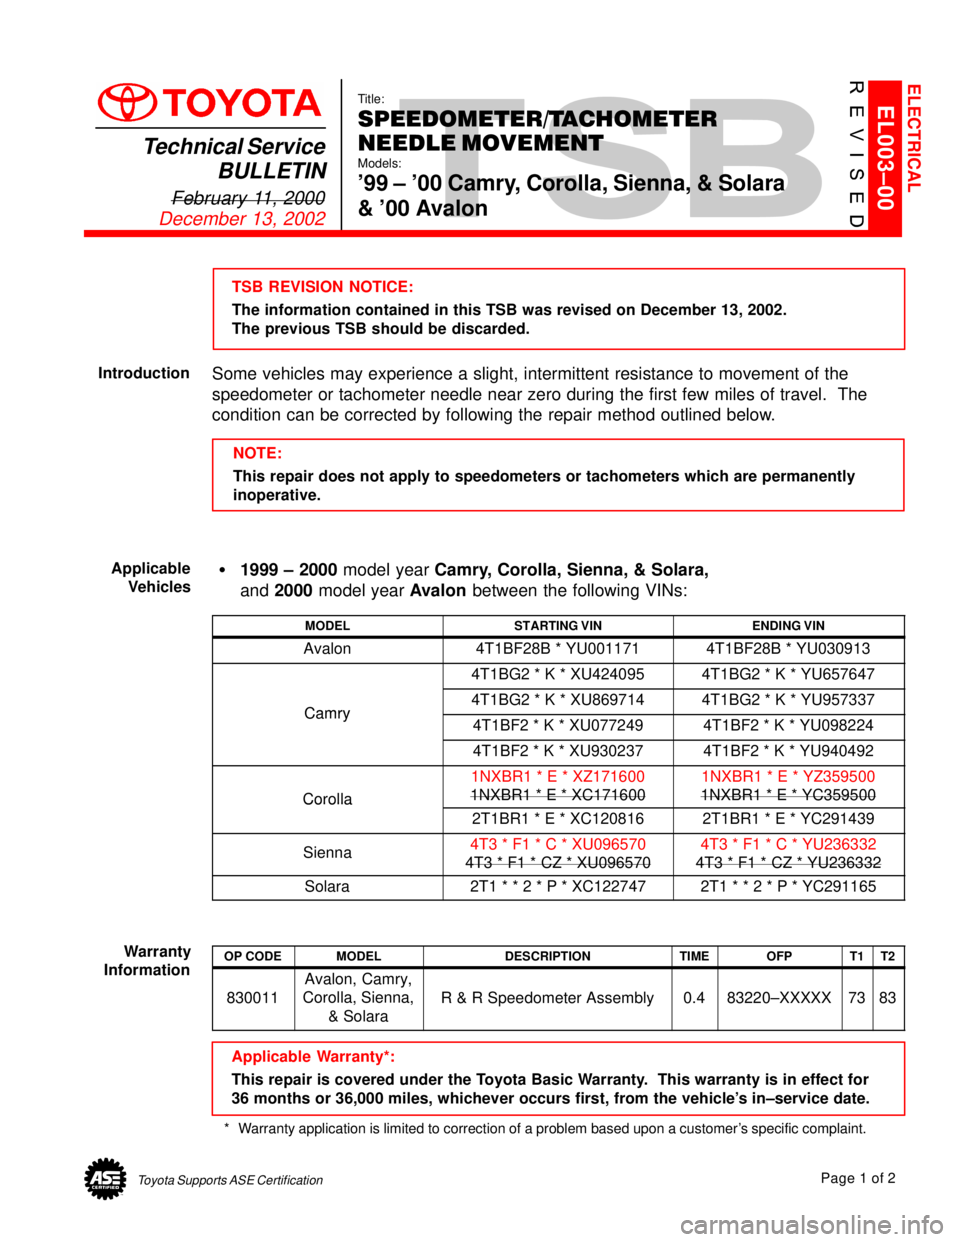
�1999 ± 2000 model year Camry, Corolla, Sienna, & Solara,
and 2000 model year Avalon between the following VINs:
MODELSTARTING VINENDING VIN
Avalon4T1BF28B * YU0011714T1BF28B * YU030913
4T1BG2 * K * XU4240954T1BG2 * K * YU657647
Camry4T1BG2 * K * XU8697144T1BG2 * K * YU957337Camry4T1BF2 * K * XU0772494T1BF2 * K * YU098224
4T1BF2 * K * XU9302374T1BF2 * K * YU940492
Corolla
1NXBR1 * E * XZ171600
1NXBR1 * E * XC1716001NXBR1 * E * YZ359500
1NXBR1 * E * YC359500
Corolla
2T1BR1 * E * XC1208162T1BR1 * E * YC291439
Sienna4T3 * F1 * C * XU096570
4T3 * F1 * CZ * XU0965704T3 * F1 * C * YU236332
4T3 * F1 * CZ * YU236332
Solara2T1 * * 2 * P * XC1227472T1 * * 2 * P * YC291165
OP CODEMODELDESCRIPTIONTIMEOFPT1T2
830011
Avalon, Camry,
Corolla, Sienna,
& Solara
R & R Speedometer Assembly0.483220±XXXXX7383
Applicable Warranty*:
This repair is covered under the Toyota Basic Warranty. This warranty is in effect for
36 months or 36,000 miles, whichever occurs first, from the vehicle's in±service date.
* Warranty application is limited to correction of a problem based upon a customer's specific complaint.
ELECTRICAL
Introduction
Applicable
Vehicles
Warranty
Information
Page 4586 of 4770

SPEEDOMETER/TACHOMETER NEEDLE MOVEMENT ± EL003-02Revised: December 13, 2002 February 11, 2000
Page 2 of 2
PREVIOUS PART NUMBERCURRENT PART NUMBERPART NAME
83220 XXXXXSameSpeedometer83220-XXXXXSameTachometer
TOOLS & MATERIALSQUANTITY
Double Sided Cotton Swab1
Distilled Water1 oz.
1. Remove the combination meter
assembly per repair manual
instructions.
2. Remove the window plate from the
instrument cluster.
3. Clean the entire surface of the needle
and needle stopper as illustrated.
Using one end of a double sided
cotton swab, clean the contact point
between the pointer and the stopper
pin on the speedometer and
tachometer with distilled water.
�Use only a new
, clean cotton
swab.
�Use only distilled
water.
�Use a new swab each time a part
is cleaned (one per speedometer,
one per tachometer).
NOTE:
� After cleaning, do not touch the
pointer needle or stopper pin.
� Do not blow dry the pointer or
stopper pin.
4. Use the opposite (dry) end of the
cotton swab to dry the previously
cleaned area.
5. Reassemble parts and assemble to
vehicle.
6. Confirm proper working condition of
speedometer and tachometer.
�Confirm no foreign material
entered the cluster while the
window plate was removed.
Parts
Information
Required
Tools &
Material
Repair
Procedure
Page 4587 of 4770
Toyota Supports ASE CertificationPage 1 of 1
EL006±99Title:
ENGINE IMMOBILIZER SYSTEM
PRECAUTIONS
Models:
All Models
Technical Service
BULLETIN
October 8, 1999
REVISION NOTICE:
The information contained in this TSB updates EL001±98 dated January 23, 1998.
This bulletin applies to 1998 and newer Toyota vehicles. When using an immobilizer key
containing a transponder chip, observe the following precautions while starting the engine.
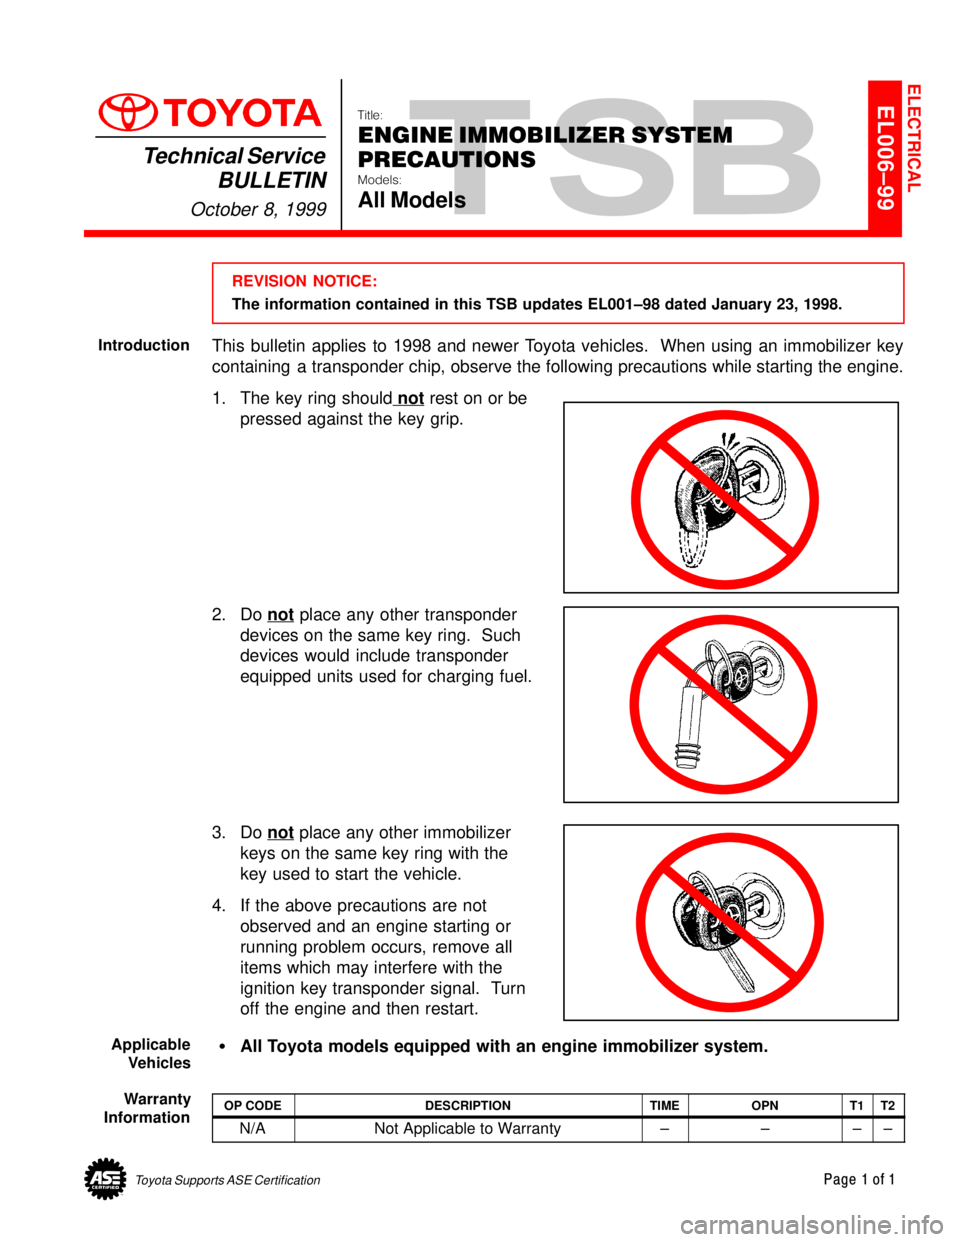
1. The key ring should not
rest on or be
pressed against the key grip.
2. Do not
place any other transponder
devices on the same key ring. Such
devices would include transponder
equipped units used for charging fuel.
3. Do not
place any other immobilizer
keys on the same key ring with the
key used to start the vehicle.
4. If the above precautions are not
observed and an engine starting or
running problem occurs, remove all
items which may interfere with the
ignition key transponder signal. Turn
off the engine and then restart.
�All Toyota models equipped with an engine immobilizer system.
OP CODEDESCRIPTIONTIMEOPNT1T2
N/ANot Applicable to Warranty±±±±
ELECTRICAL
Introduction
Applicable
Vehicles
Warranty
Information
Page 4588 of 4770
Toyota Supports ASE CertificationPage 1 of 4
EL007±00Title:
HEATER CONTROL ASSEMBLY
INSTRUCTIONS
Models:
'97 ± '99 Camry
Technical Service
BULLETIN
April 14, 2000
The attached instructions have been developed to supplement the Repair Manual to
assure corrrect cable routing of the heater control assembly during a service repair.
PUBLICATIONNUMBER
1997 Camry Repair Manual, Vol. 2RM503U2
1998 Camry Repair Manual, Vol. 2RM589U2
1999 Camry Repair Manual, Vol. 2RM654U2
NOTE:
For maximum heater performance the coolant ratio should be 50 to 60 percent.
�1997 ± 1999 model year Camry
OP CODEDESCRIPTIONTIMEOPNT1T2
N/ANot Applicable to Warranty ±±±±
ELECTRICAL
Introduction
Applicable
Vehicles
Warranty
Information
Page 4589 of 4770
POOR HEATER PERFORMANCE ± EL007±00 April 14, 2000
Page 2 of 4
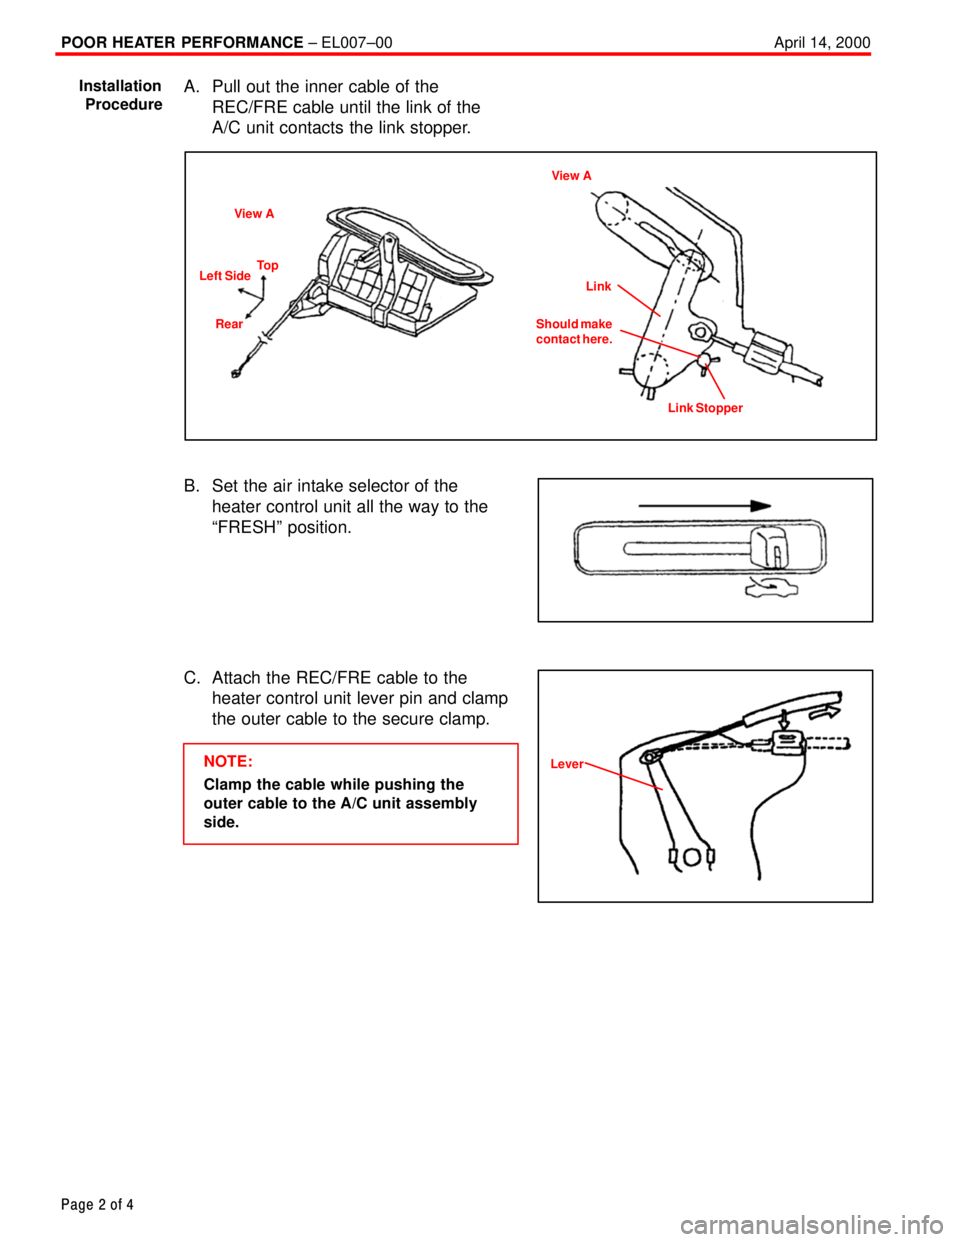
A. Pull out the inner cable of the
REC/FRE cable until the link of the
A/C unit contacts the link stopper.
View A
To p
Left Side
RearView A
Link
Should make
contact here.
Link Stopper
B. Set the air intake selector of the
heater control unit all the way to the
ªFRESHº position.
C. Attach the REC/FRE cable to the
heater control unit lever pin and clamp
the outer cable to the secure clamp.
NOTE:
Clamp the cable while pushing the
outer cable to the A/C unit assembly
side. Installation
ProcedureLever
Page 4590 of 4770
POOR HEATER PERFORMANCE ± EL007±00 April 14, 2000
Page 3 of 4
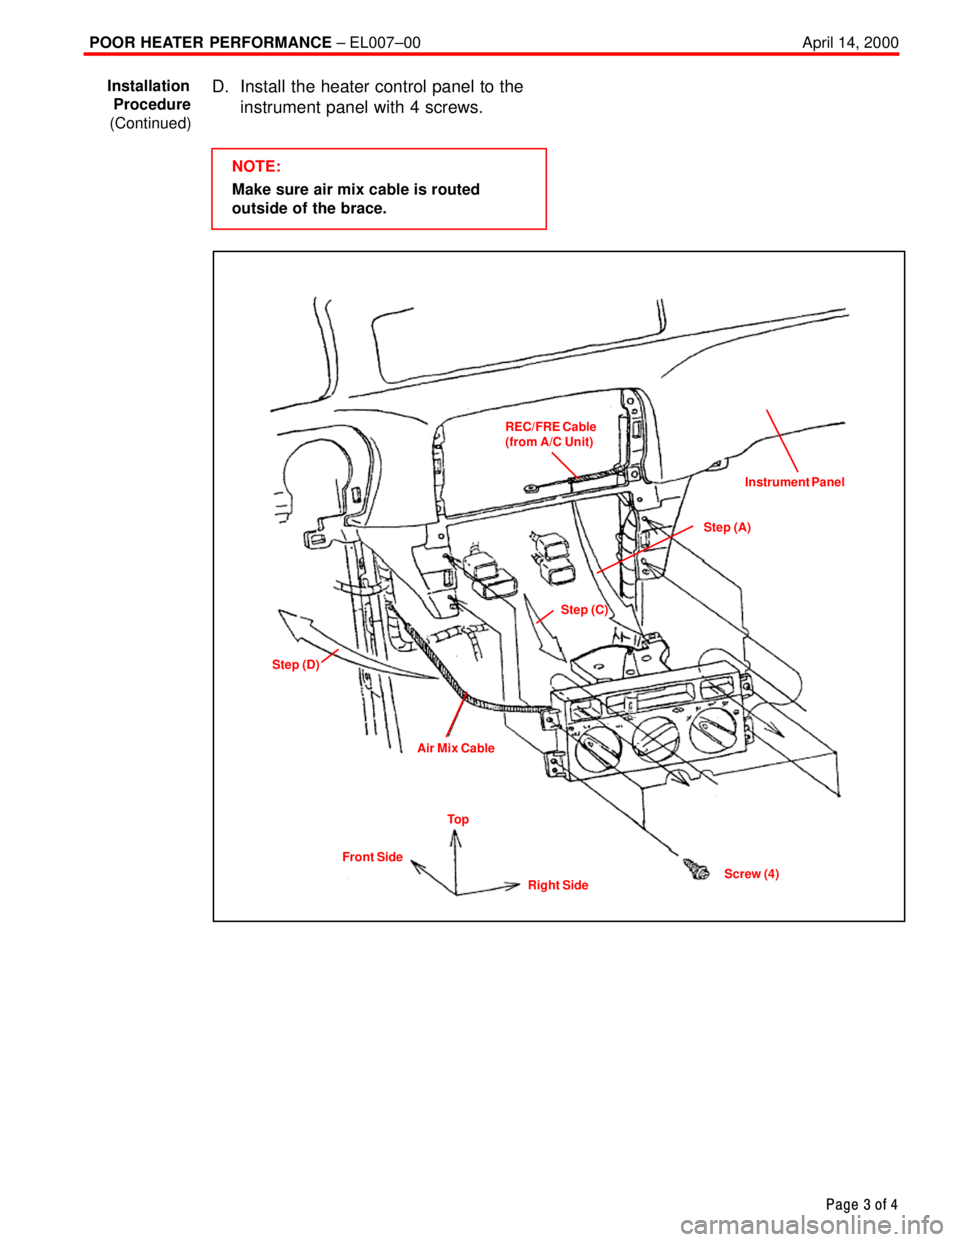
D. Install the heater control panel to the
instrument panel with 4 screws.
NOTE:
Make sure air mix cable is routed
outside of the brace.
REC/FRE Cable
(from A/C Unit)
Step (C)Instrument Panel
Step (A)
Step (D)
Air Mix Cable
Screw (4)
Right Side Front SideTo p
Installation
Procedure
(Continued)