Control engine TOYOTA CAMRY 2008 XV40 / 8.G User Guide
[x] Cancel search | Manufacturer: TOYOTA, Model Year: 2008, Model line: CAMRY, Model: TOYOTA CAMRY 2008 XV40 / 8.GPages: 476, PDF Size: 7.27 MB
Page 134 of 476
134 2-1. Driving procedures
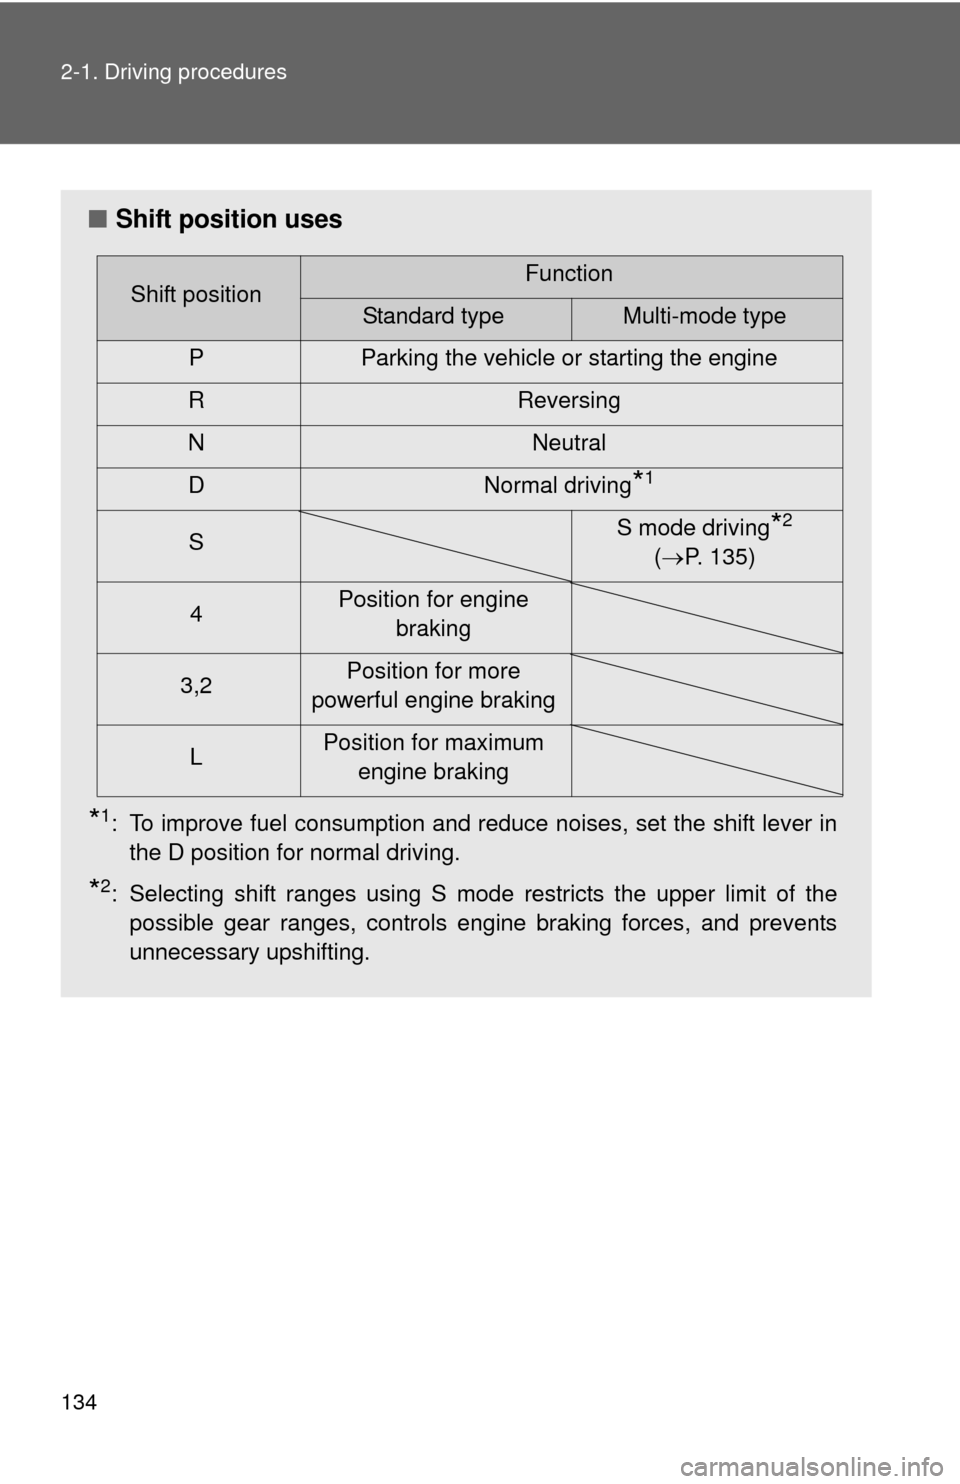
■Shift position uses
*1: To improve fuel consumption and reduce noises, set the shift lever in
the D position for normal driving.
*2: Selecting shift ranges using S mode restricts the upper limit of thepossible gear ranges, controls engine braking forces, and prevents
unnecessary upshifting.
Shift positionFunction
Standard typeMulti-mode type
P Parking the vehicle or starting the engine
R Reversing
N Neutral
D Normal driving
*1
S S mode driving*2
( P. 135)
4 Position for engine
braking
3,2 Position for more
powerful engine braking
L Position for maximum
engine braking
Page 136 of 476
136 2-1. Driving procedures
■Downshifting restrictions
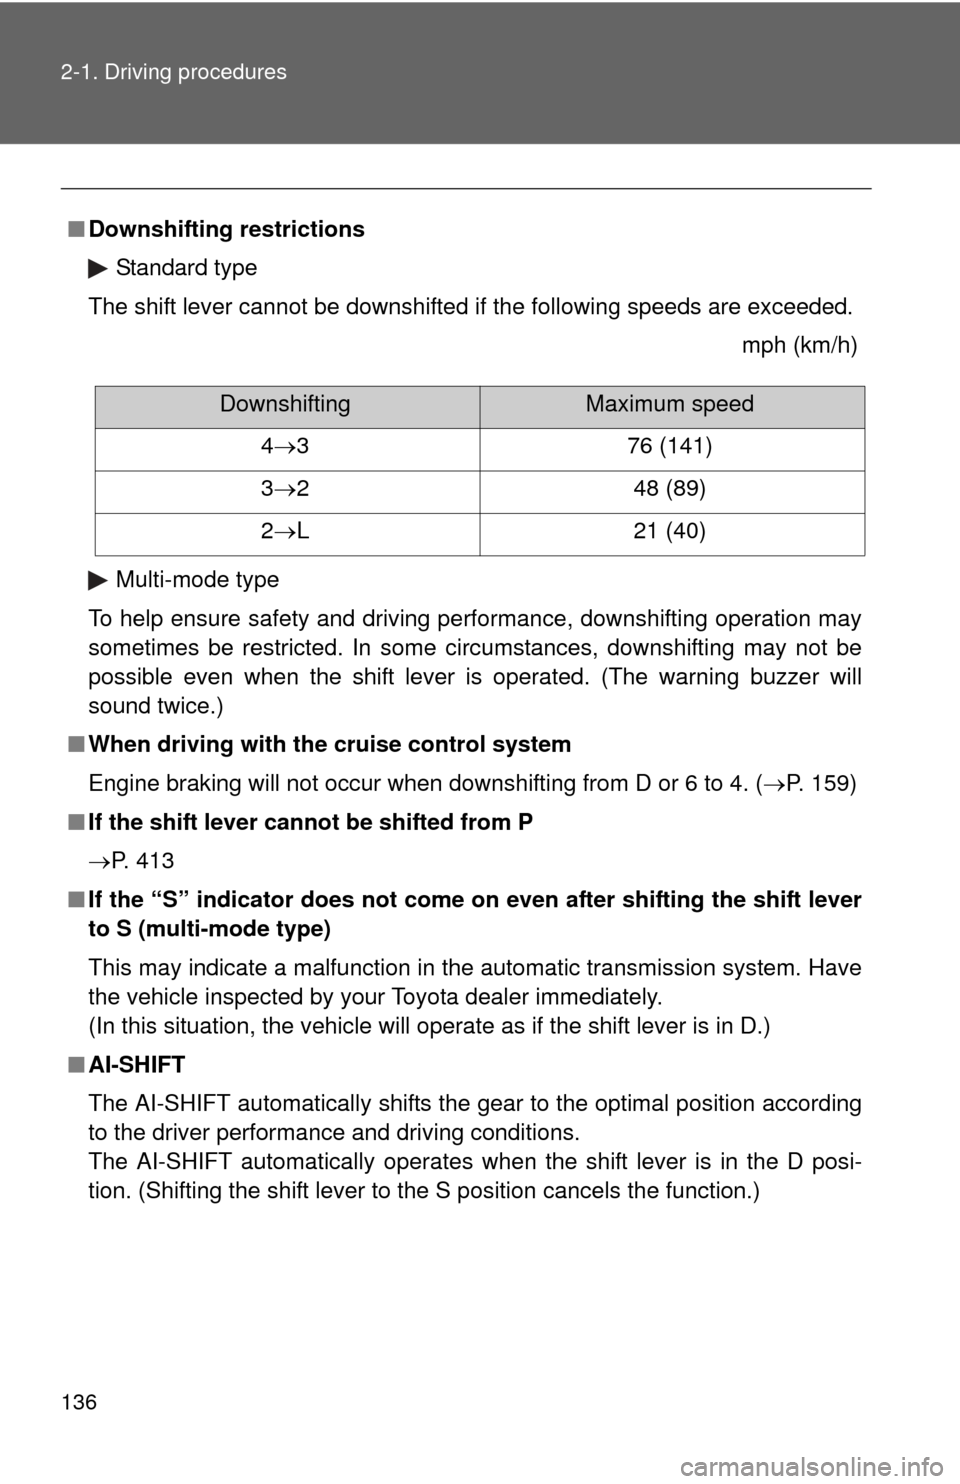
Standard type
The shift lever cannot be downshifted if the following speeds are exceeded.
mph (km/h)
Multi-mode type
To help ensure safety and driving performance, downshifting operation may
sometimes be restricted. In some circumstances, downshifting may not be
possible even when the shift lever is operated. (The warning buzzer will
sound twice.)
■ When driving with the cruise control system
Engine braking will not occur when downshifting from D or 6 to 4. ( P. 159)
■ If the shift lever cannot be shifted from P
P. 413
■ If the “S” indicator does not come on even after shifting the shift lever
to S (multi-mode type)
This may indicate a malfunction in the automatic transmission system. Have
the vehicle inspected by your Toyota dealer immediately.
(In this situation, the vehicle will operate as if the shift lever is in D.)
■ AI-SHIFT
The AI-SHIFT automatically shifts the gear to the optimal position according
to the driver performance and driving conditions.
The AI-SHIFT automatically operates when the shift lever is in the D posi-
tion. (Shifting the shift lever to the S position cancels the function.)
DownshiftingMaximum speed
4 3 76 (141)
3 2 48 (89)
2 L 21 (40)
Page 143 of 476
143
2-2. Instrument cluster
2
When driving
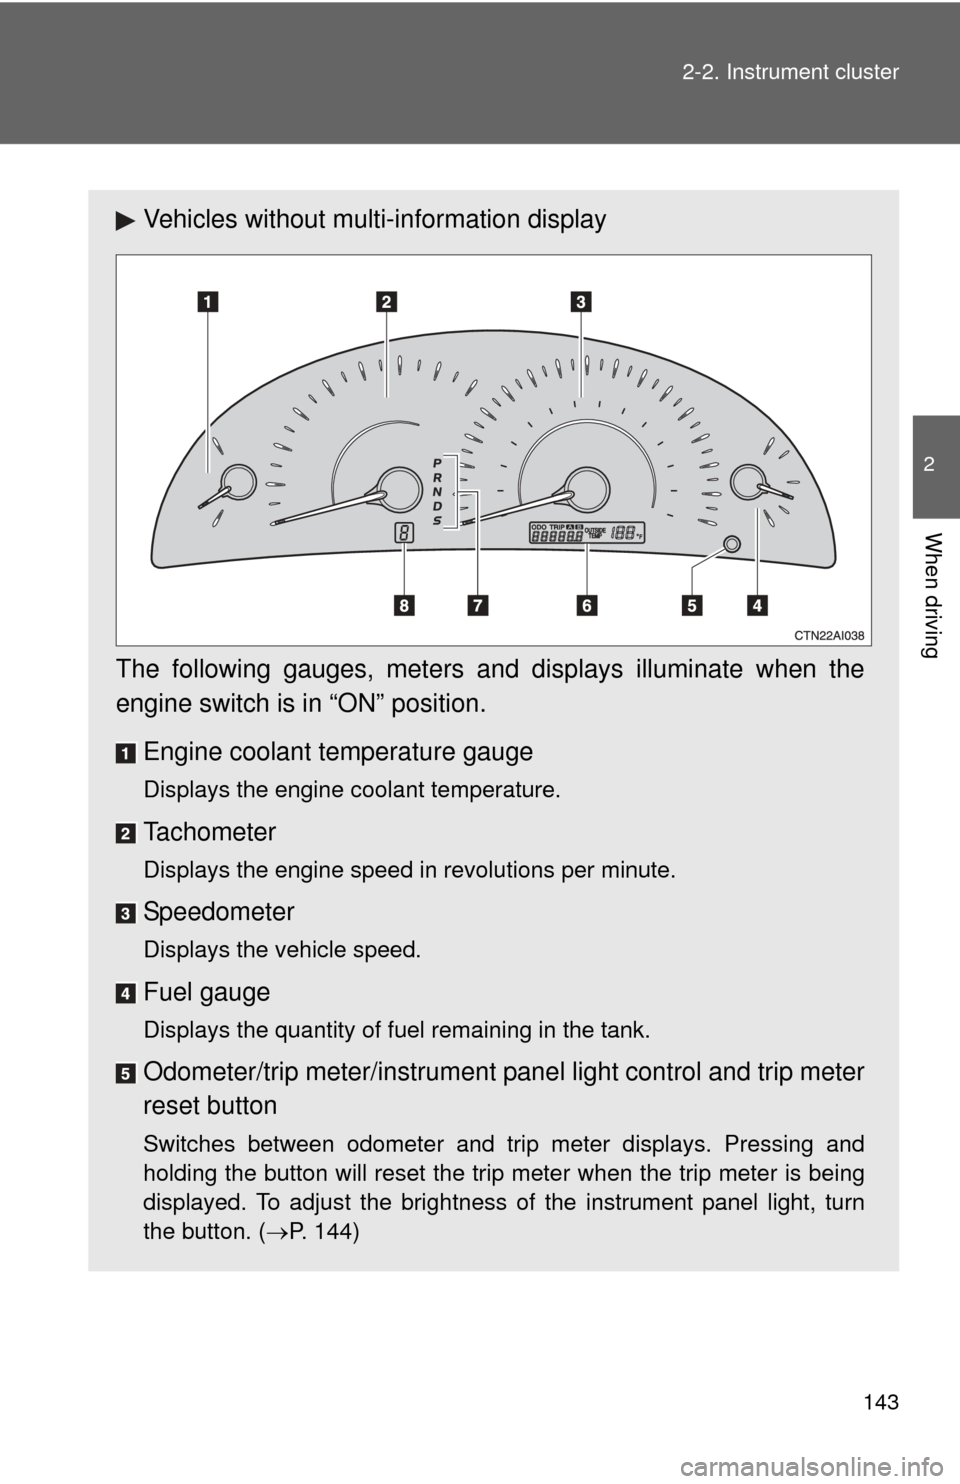
Vehicles without multi-information display
The following gauges, meters and displays illuminate when the
engine switch is in “ON” position.
Engine coolant temperature gauge
Displays the engine coolant temperature.
Tachometer
Displays the engine speed in revolutions per minute.
Speedometer
Displays the vehicle speed.
Fuel gauge
Displays the quantity of fuel remaining in the tank.
Odometer/trip meter/instrument p anel light control and trip meter
reset button
Switches between odometer and trip meter displays. Pressing and
holding the button will reset the trip meter when the trip meter is being
displayed. To adjust the brightness of the instrument panel light, turn
the button. ( P. 144)
Page 144 of 476
144 2-2. Instrument cluster
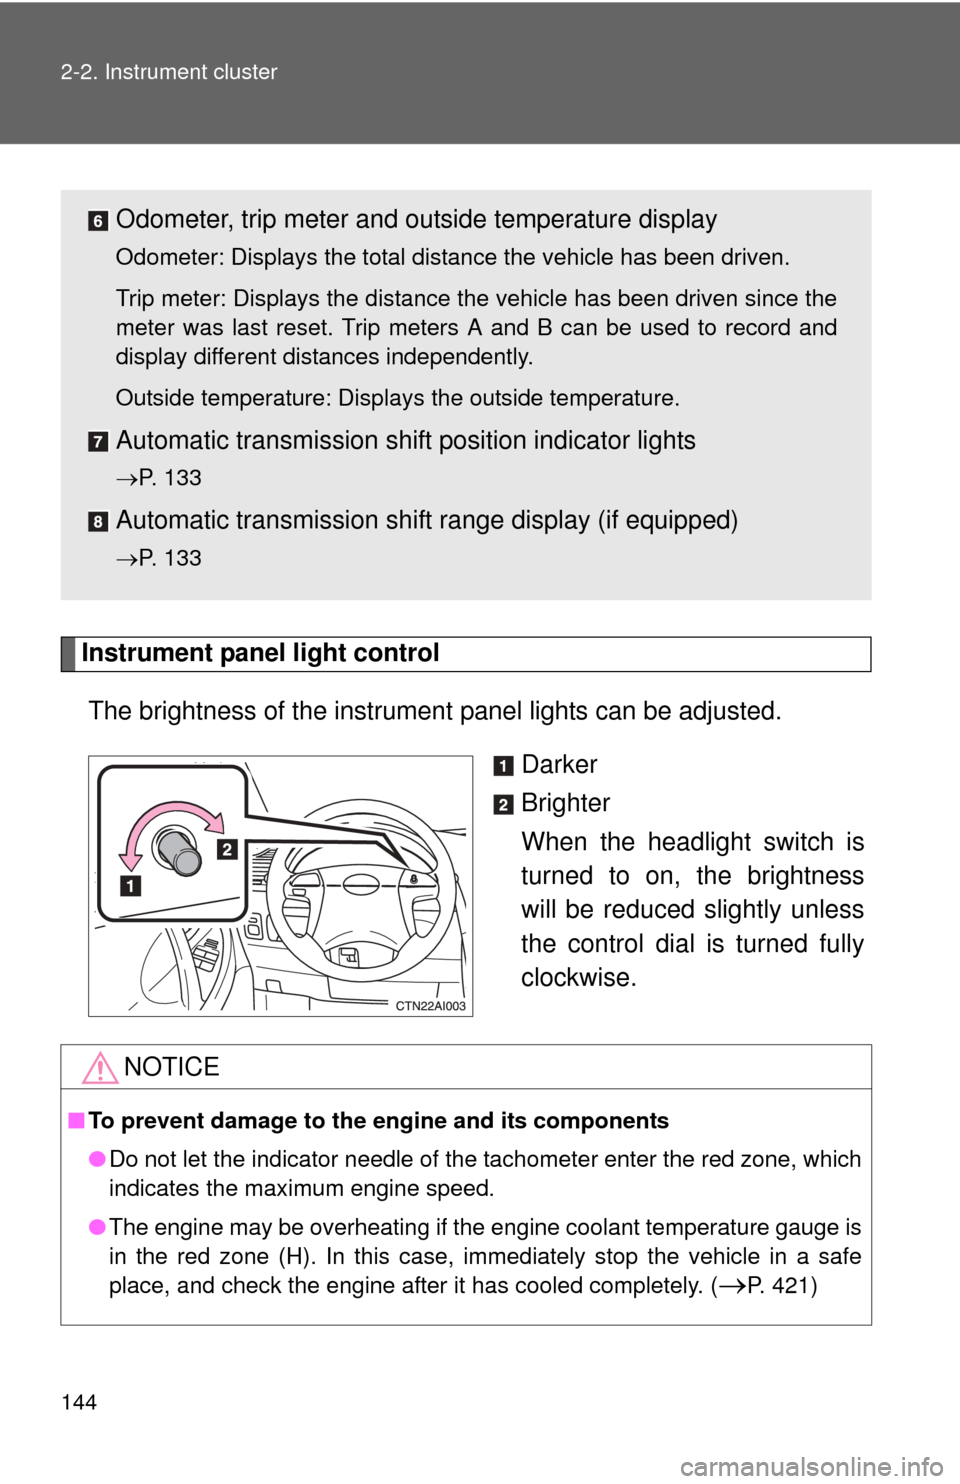
Instrument panel light controlThe brightness of the instrument panel lights can be adjusted.
Darker
Brighter
When the headlight switch is
turned to on, the brightness
will be reduced slightly unless
the control dial is turned fully
clockwise.
Odometer, trip meter and outside temperature display
Odometer: Displays the total distance the vehicle has been driven.
Trip meter: Displays the distance the vehicle has been driven since the
meter was last reset. Trip meters A and B can be used to record and
display different distances independently.
Outside temperature: Displays the outside temperature.
Automatic transmission shift position indicator lights
P. 133
Automatic transmission shift range display (if equipped)
P. 133
NOTICE
■To prevent damage to the engine and its components
●Do not let the indicator needle of the tachometer enter the red zone, which
indicates the maximum engine speed.
● The engine may be overheating if the engine coolant temperature gauge is
in the red zone (H). In this case, immediately stop the vehicle in a safe
place, and check the engine after it has cooled completely. (
P. 421)
Page 147 of 476
147
2-2. Instrument cluster
2
When driving
■
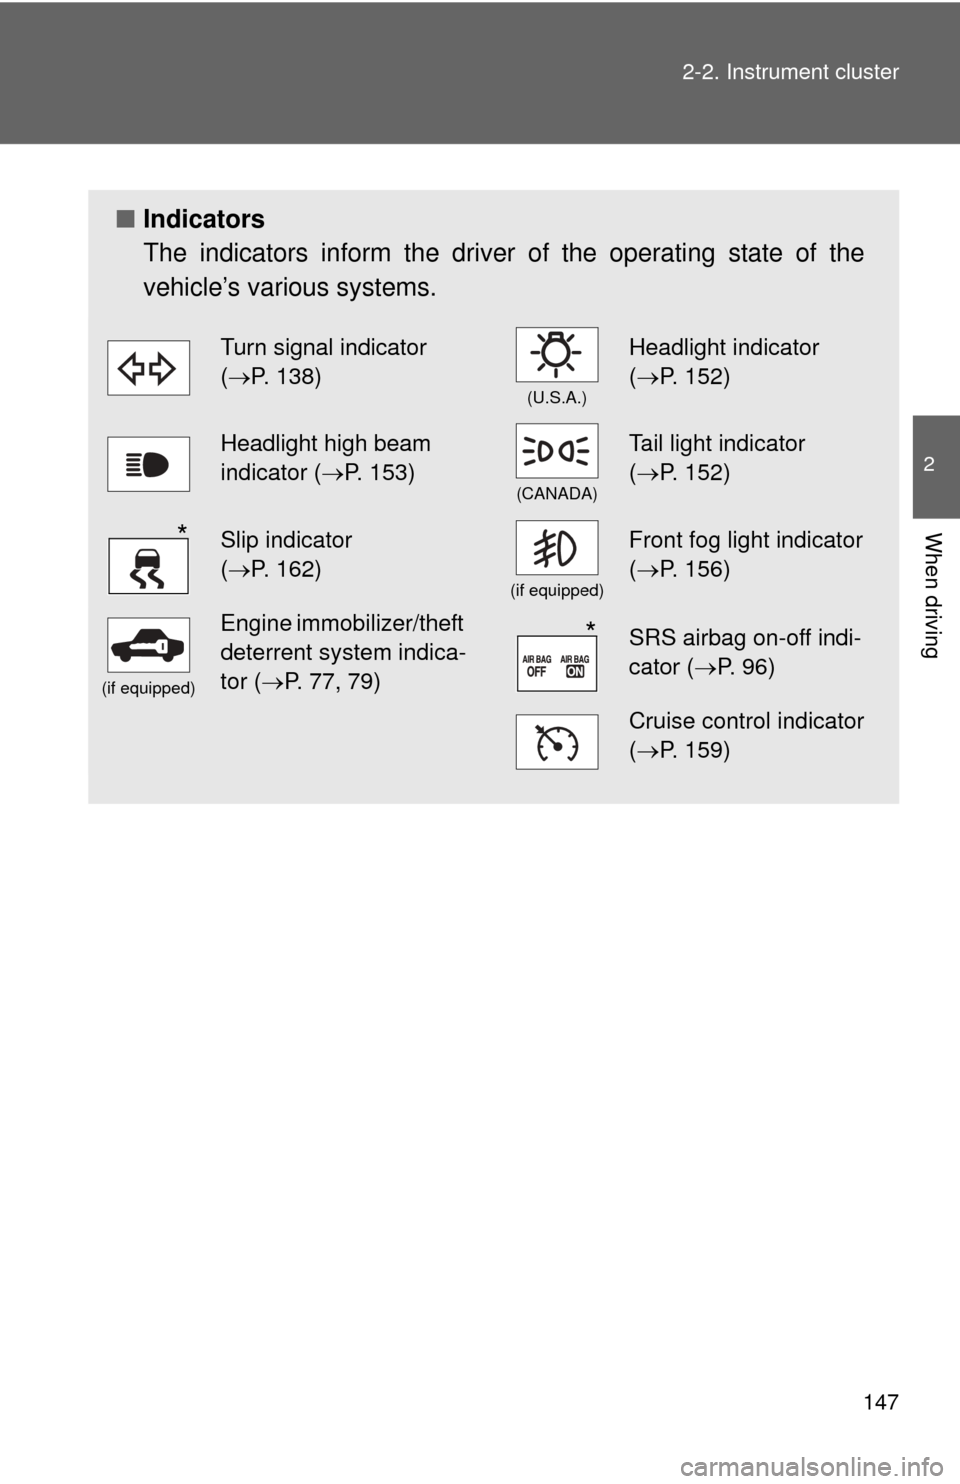
Indicators
The indicators inform the driver of the operating state of the
vehicle’s various systems.
Turn signal indicator
(P. 138)
(U.S.A.)
Headlight indicator
( P. 152)
Headlight high beam
indicator ( P. 153)
(CANADA)
Tail light indicator
(P. 152)
Slip indicator
(P. 162)
(if equipped)
Front fog light indicator
( P. 156)
(if equipped)
Engine immobilizer/theft
deterrent system indica-
tor ( P. 77, 79)SRS airbag on-off indi-
cator (P. 96)
Cruise control indicator
(P. 159)
*
*
Page 154 of 476
154 2-3. Operating the lights and wipers
■The headlights can be oper ated automatically when
Vehicles with smart key system
The “ENGINE START STOP” switch is in IGNITION ON mode.
Vehicles without smart key system
The engine switch is in “ON” position.
■ Daytime running light system
To make your vehicle more visible to other drivers, the headlights turn on
automatically (at a reduced intensity) whenever the engine is started and the
parking brake is released. Daytime running lights are not designed for use at
night.
For U.S.A.: Daytime running lights can be turned off by operating the switch.
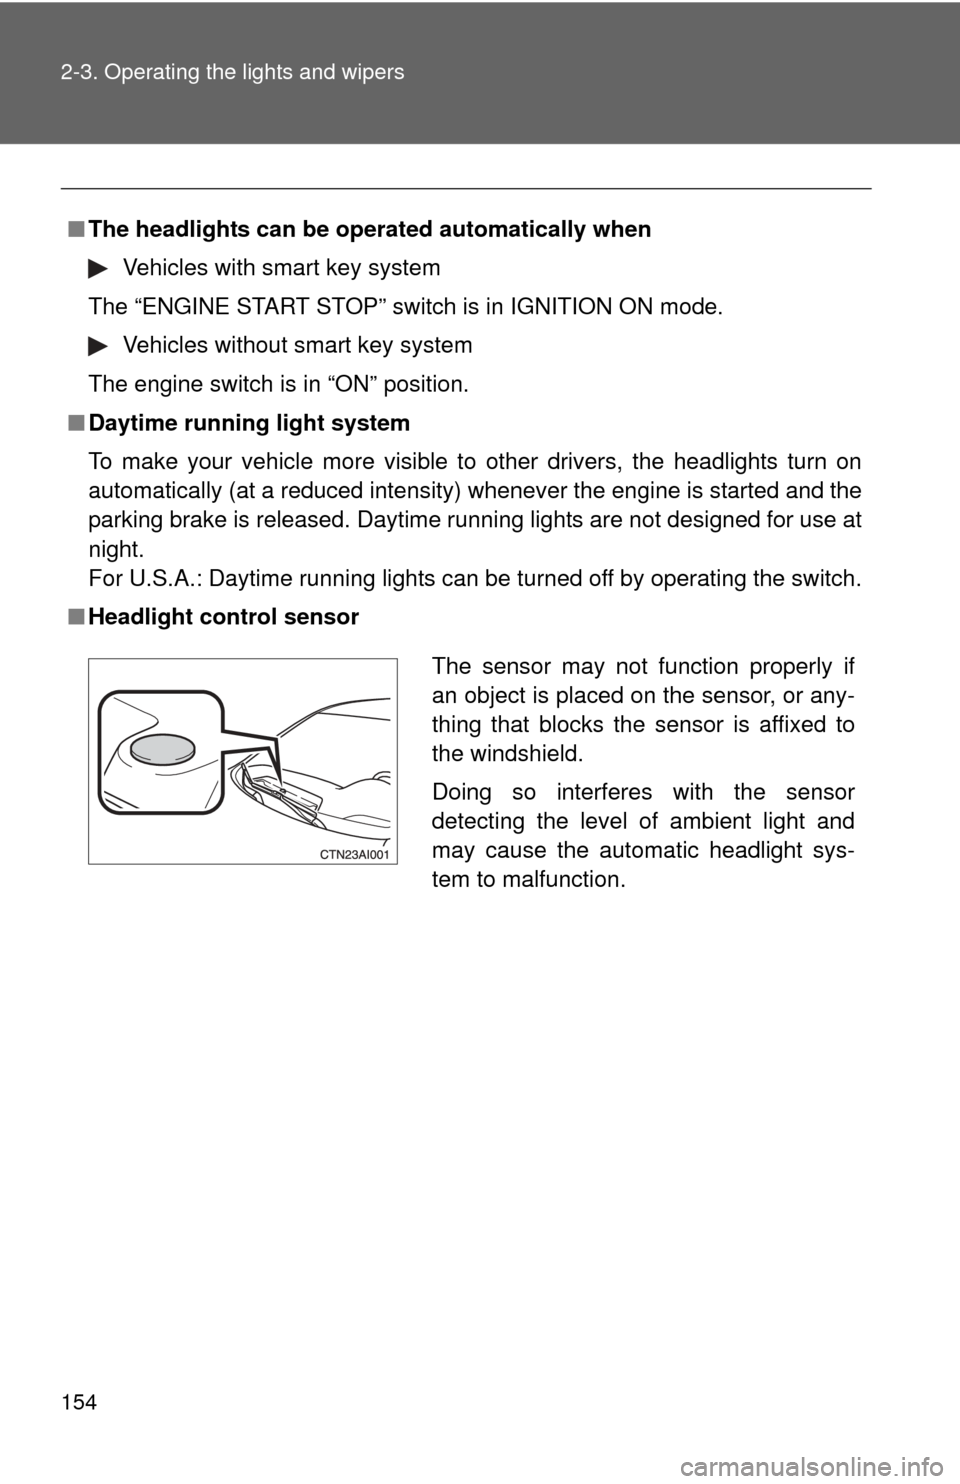
■ Headlight control sensor
The sensor may not function properly if
an object is placed on the sensor, or any-
thing that blocks the sensor is affixed to
the windshield.
Doing so interferes with the sensor
detecting the level of ambient light and
may cause the automatic headlight sys-
tem to malfunction.
Page 163 of 476
163
2-4. Using other
driving systems
2
When driving
■Sounds and vibrations caused by ABS, brake assist, VSC and TRAC
● A sound may be heard from the engine compartment when the engine is
started or just after the vehicle begins to move. This sound does not indi-
cate that a malfunction has occurred in any of these systems.
● Any of the following conditions may occur when the above systems are
operating. None of these indicates that a malfunction has occurred.
• Vibrations may be felt through the vehicle body and steering.
• A motor sound may be heard after the vehicle comes to a stop.
• The brake pedal may pulsate slightly after ABS is activated.
• The brake pedal may move down slightly after ABS is activated.
CAUTION
■ABS does not operate effectively when
●Tires with inadequate gripping ability are used (such as excessively worn
tires on a snow covered road).
● The vehicle hydroplanes while driving at high speed on the wet or slick
road.
■ Stopping distance when ABS is operating on the wet or slick roads
ABS is not designed to shorten the vehicle's stopping distance. Always
maintain a safe distance from the vehicle in front of you in the following situ-
ations.
●When driving on dirt, gravel or snow-covered roads
● When driving with tire chains
● When driving over bumps in the road
● When driving over roads with potholes or uneven roads
■ TRAC may not operate effectively when
Directional control and power may not be achievable while driving on slip-
pery road surfaces, even if the TRAC system is operating.
Do not drive the vehicle in conditions where stability and power may be lost.
Page 169 of 476
169
2-5. Driving information
2
When driving
Winter driving tips
Carry out the necessary preparations and inspections before driving
the vehicle in winter. Always drive the vehicle in a manner appropri-
ate to the prevailing weather conditions.
■ Pre-winter preparations
●Use fluids that are appropriate to the prevailing outside tem-
peratures.
• Engine oil
• Engine coolant
• Washer fluid
● Have a service technician inspect the level and specific grav-
ity of battery electrolyte.
● Have the vehicle fitted with four snow tires or purchase a set
of tire chains for the front tires.
Ensure that all tires are the same size and brand, and that chains
match the size of the tires.
■Before driving the vehicle
Perform the following according to the driving conditions.
●Do not try to forcibly open a window or move a wiper that is
frozen. Pour warm water over the frozen area to melt the ice.
Wipe away the water immediately to prevent it from freezing.
● To ensure proper operation of th e climate control system fan,
remove any snow that has accumulated on the air inlet vents
in front of the windshield.
● Remove any ice that has accumu lated on the vehicle chassis.
● Periodically check for and remove any excess ice or snow
that may have accumulated in the wheel well or on the
brakes.
Page 199 of 476
199
3-1. Using the air conditioning system and defogger
3
Interior features
Rear window and outside rear view mirror defoggers
■Outside rear view mirror defoggers (if equipped)
Turning the rear window defogger on will turn the outside rear view mirror
defoggers on.
■ With manual air conditioning controls only
When any of the following conditions occurs, the indicator light on the switch
may flash and a motor sound may be heard. This does not indicate a mal-
function.
●The engine switch is in “ON” position after the battery is reconnected.
● Engine starting and stopping is repeated at short intervals.
● The engine is started with the low voltage battery.
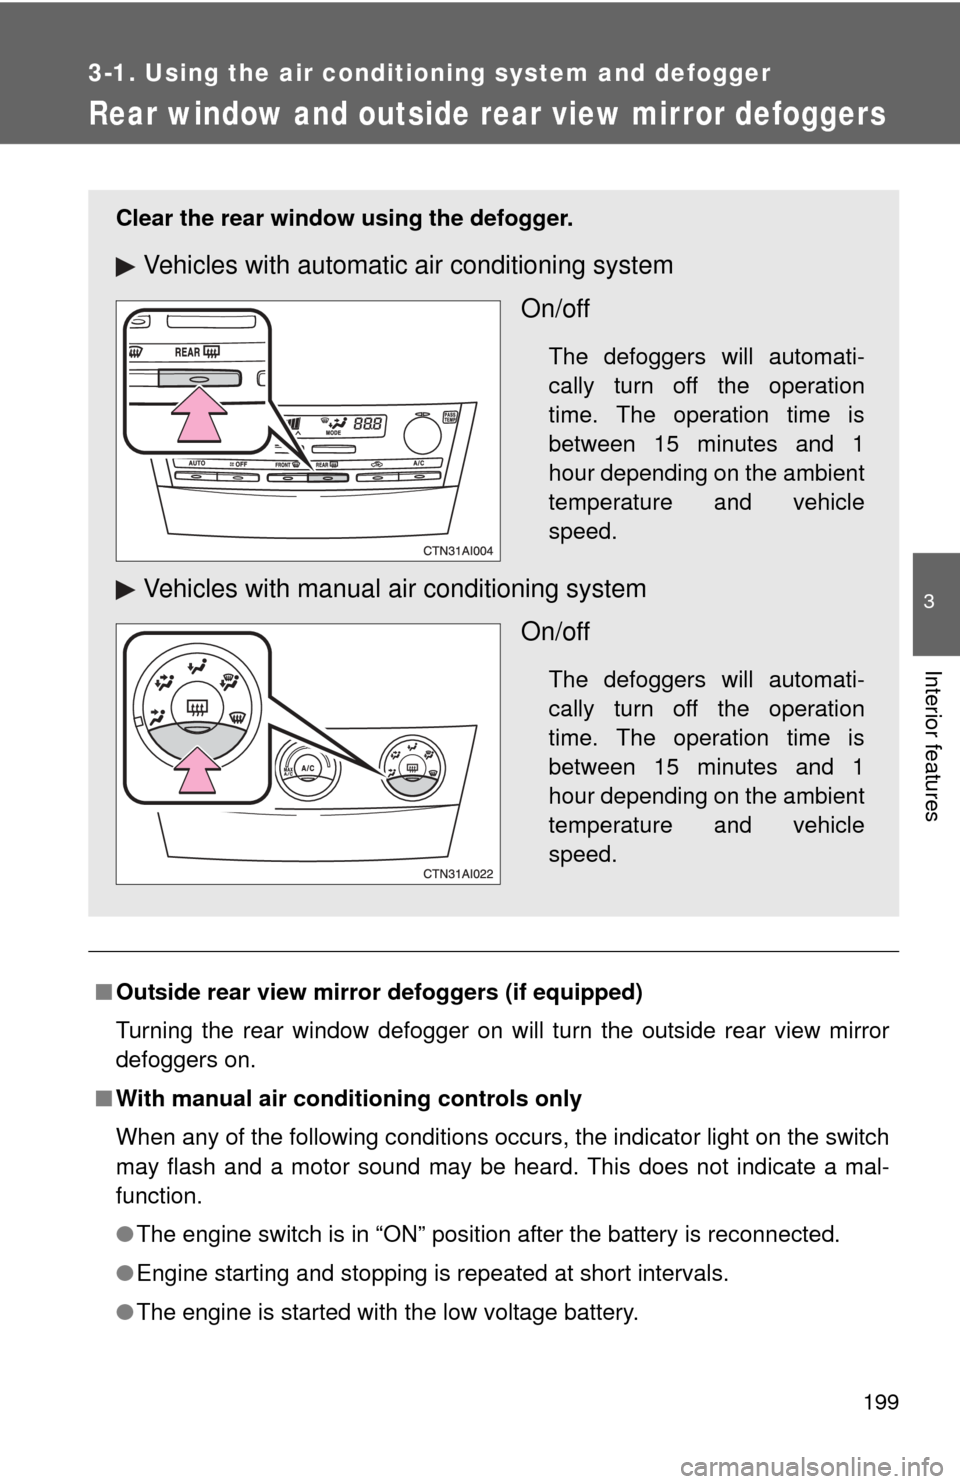
Clear the rear window using the defogger.
Vehicles with automatic air conditioning system
On/off
The defoggers will automati-
cally turn off the operation
time. The operation time is
between 15 minutes and 1
hour depending on the ambient
temperature and vehicle
speed.
Vehicles with manual air conditioning systemOn/off
The defoggers will automati-
cally turn off the operation
time. The operation time is
between 15 minutes and 1
hour depending on the ambient
temperature and vehicle
speed.
Page 308 of 476
308
4-2. Maintenance
Emission inspection and maintenance (I/M) programs
Some states have vehicle emission inspection programs which
include OBD (On Board Diagnostics) checks. The OBD system moni-
tors the operation of th e emission control system.
■If the electronic engine contro l system warning light comes
on
The OBD system determines that a problem exists somewhere
in the emission control system. Your vehicle may not pass the I/
M test and may need to be repaired. Contact your Toyota dealer
to service the vehicle.
■ Your vehicle may not pass the I/M test:
●When the battery is disconnected or discharged
Readiness codes that are se t during ordinary driving are
erased.
Also, depending on your driving habits, the readiness codes
may not be completely set.
● When the fuel tank cap is loose
The electronic engine control system warning light comes on
as a temporary malfunction and your vehicle may not pass the
I/M test.
■ When the electronic engine control system warning light
goes off after several driving trips
The error code in the OBD system will not be cleared unless the
vehicle is driven 40 or more times.
■ If your vehicle does not pass the I/M test
Contact your Toyota dealer to prepare the vehicle for re-testing.