turn signal TOYOTA CAMRY 2010 XV40 / 8.G Owners Manual
[x] Cancel search | Manufacturer: TOYOTA, Model Year: 2010, Model line: CAMRY, Model: TOYOTA CAMRY 2010 XV40 / 8.GPages: 538, PDF Size: 9.22 MB
Page 2 of 538

TABLE OF CONTENTSIndex
2
1-1. Key informationKeys ..................................... 24
1-2. Opening, closing and locking the doors
and trunk
Smart key system................. 27
Wireless remote control ....... 38
Doors.................................... 42
Trunk .................................... 47
1-3. Adjustable components (seats, mirrors,
steering wheel)
Front seats ........................... 51
Rear seats ............................ 53
Head restraints ..................... 55
Seat belts ............................. 57
Steering wheel ..................... 65
Anti-glare inside rear view mirror .................................. 66
Outside rear view mirrors ................................ 68
1-4. Opening and closing the windows
Power windows .................... 70
Moon roof ............................. 72
1-5. Refueling Opening the fuel tank cap ..................................... 76 1-6. Theft deterrent system
Engine immobilizer system ................................ 80
Alarm .................................... 82
Theft prevention labels (for U.S.A.) ......................... 84
1-7. Safety information Correct driving posture ......... 85
SRS airbags ......................... 87
Front passenger occupant classification system ........... 99
Child restraint systems ....... 104
Installing child restraints ..... 108
2-1. Driving procedures Driving the vehicle .............. 120
Engine (ignition) switch (vehicles with smart
key system) ...................... 131
Engine (ignition) switch (vehicles without smart
key system) ...................... 135
Automatic transmission ...... 138
Manual transmission........... 142
Turn signal lever ................. 144
Parking brake ..................... 145
Horn .................................... 146
2-2. Instrument cluster Gauges and meters ............ 147
Indicators and warning lights ................................. 151
Multi-information display ..... 155
1Before driving
2When driving
Page 6 of 538
6
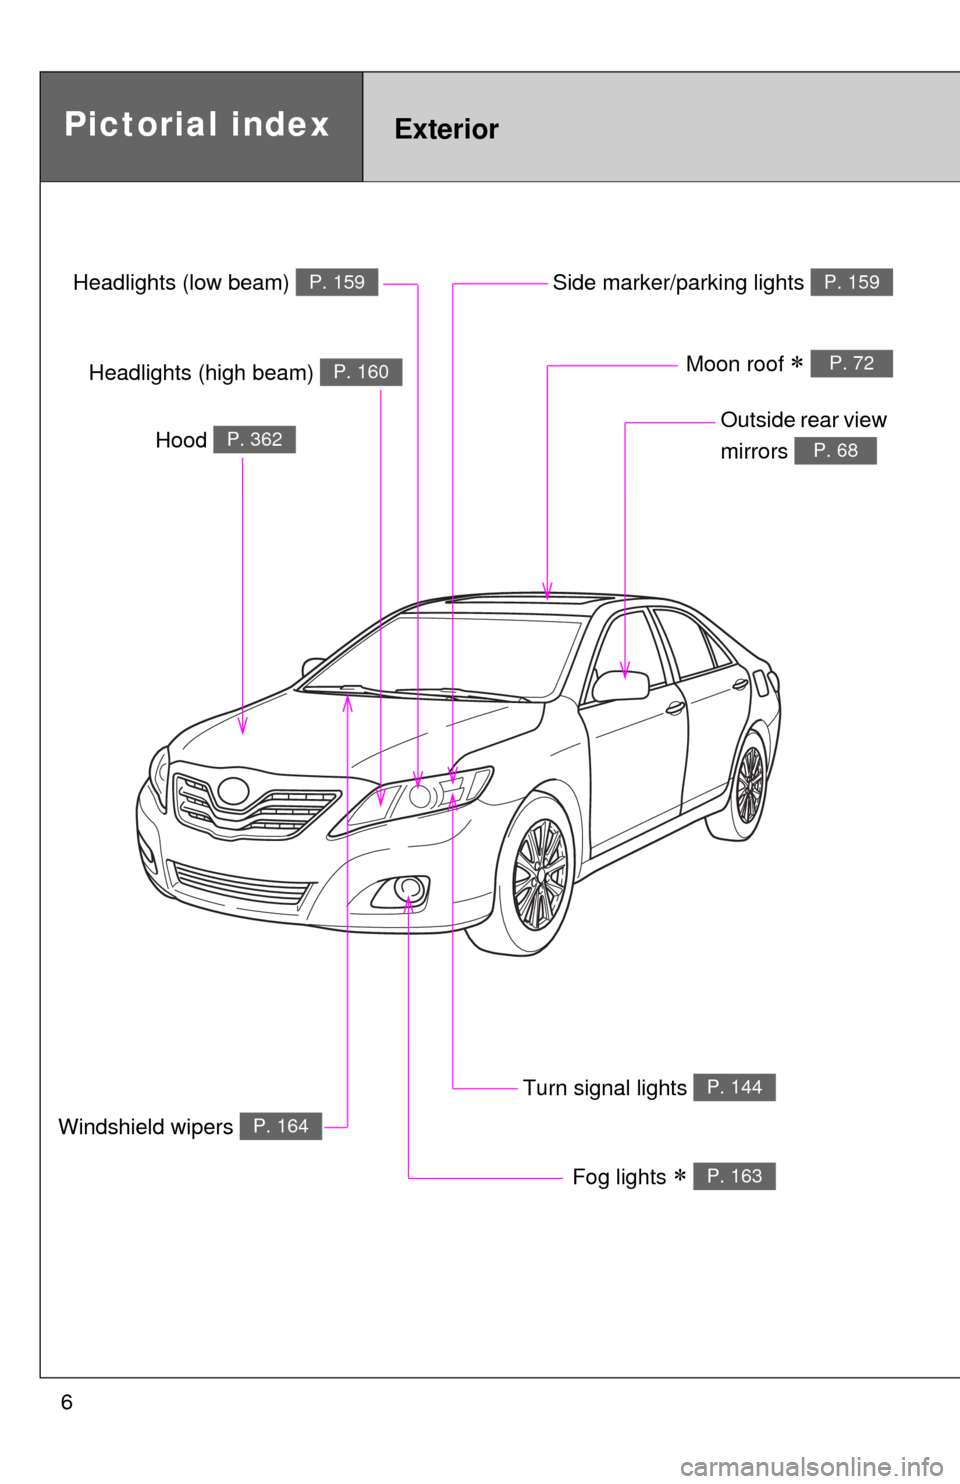
Headlights (low beam) P. 159
Pictorial indexExterior
Fog lights P. 163
Turn signal lights P. 144
Hood P. 362
Windshield wipers P. 164
Outside rear view
mirrors
P. 68
Side marker/parking lights P. 159
Headlights (high beam) P. 160Moon roof P. 72
Page 7 of 538
7
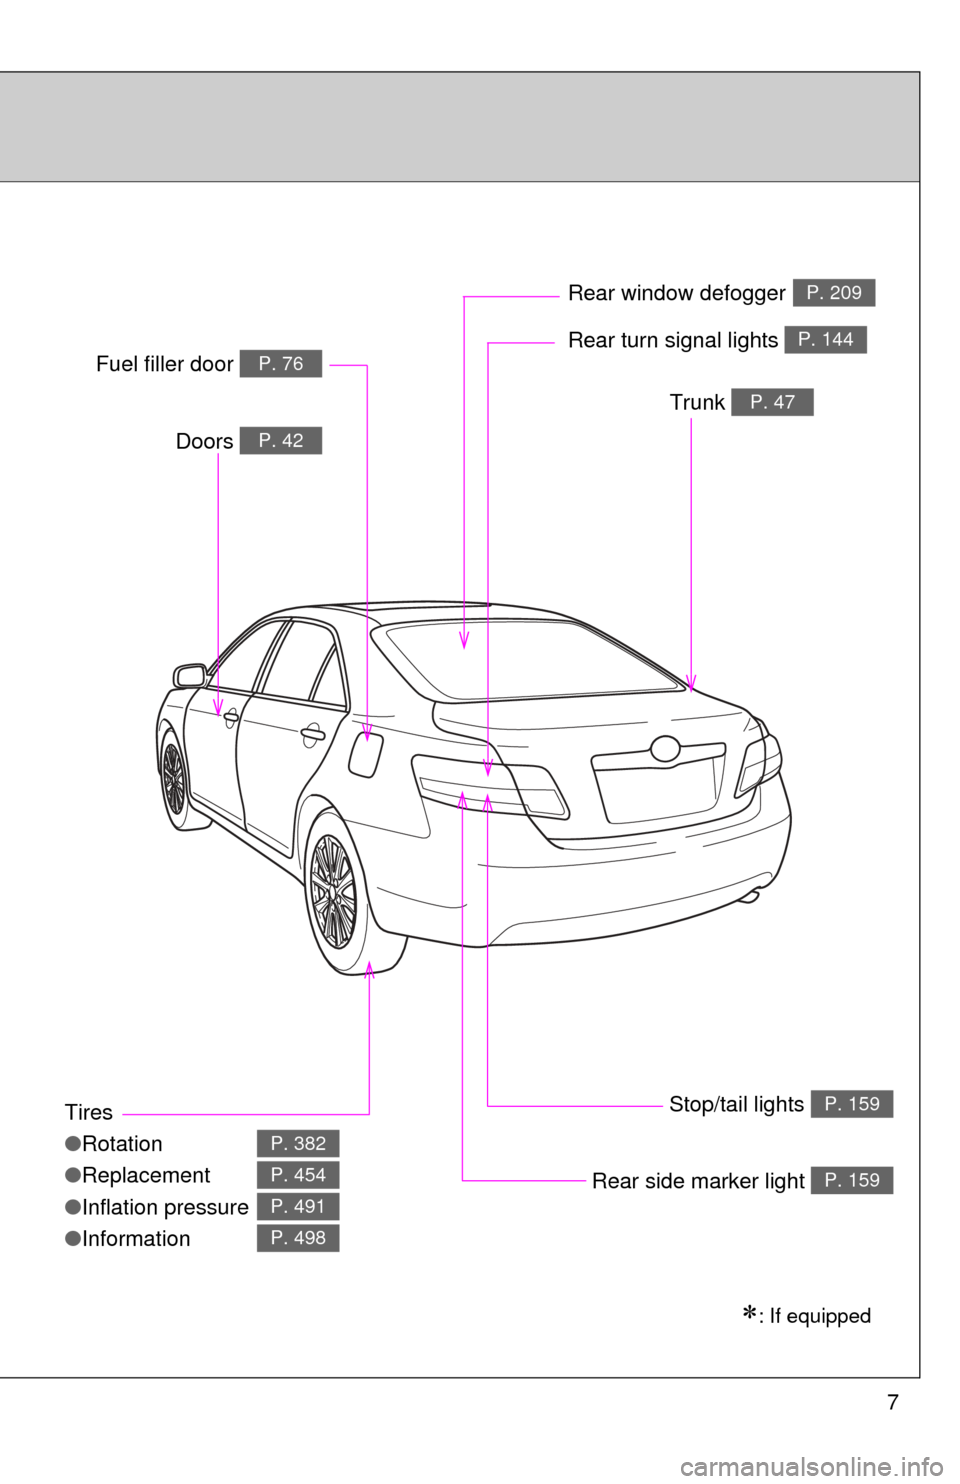
Tires
●Rotation
● Replacement
● Inflation pressure
● Information
P. 382
P. 454
P. 491
P. 498
Trunk P. 47
Doors P. 42
Fuel filler door P. 76Rear turn signal lights P. 144
Rear window defoggerP. 209
Stop/tail lights P. 159
: If equipped
Rear side marker light P. 159
Page 13 of 538
13
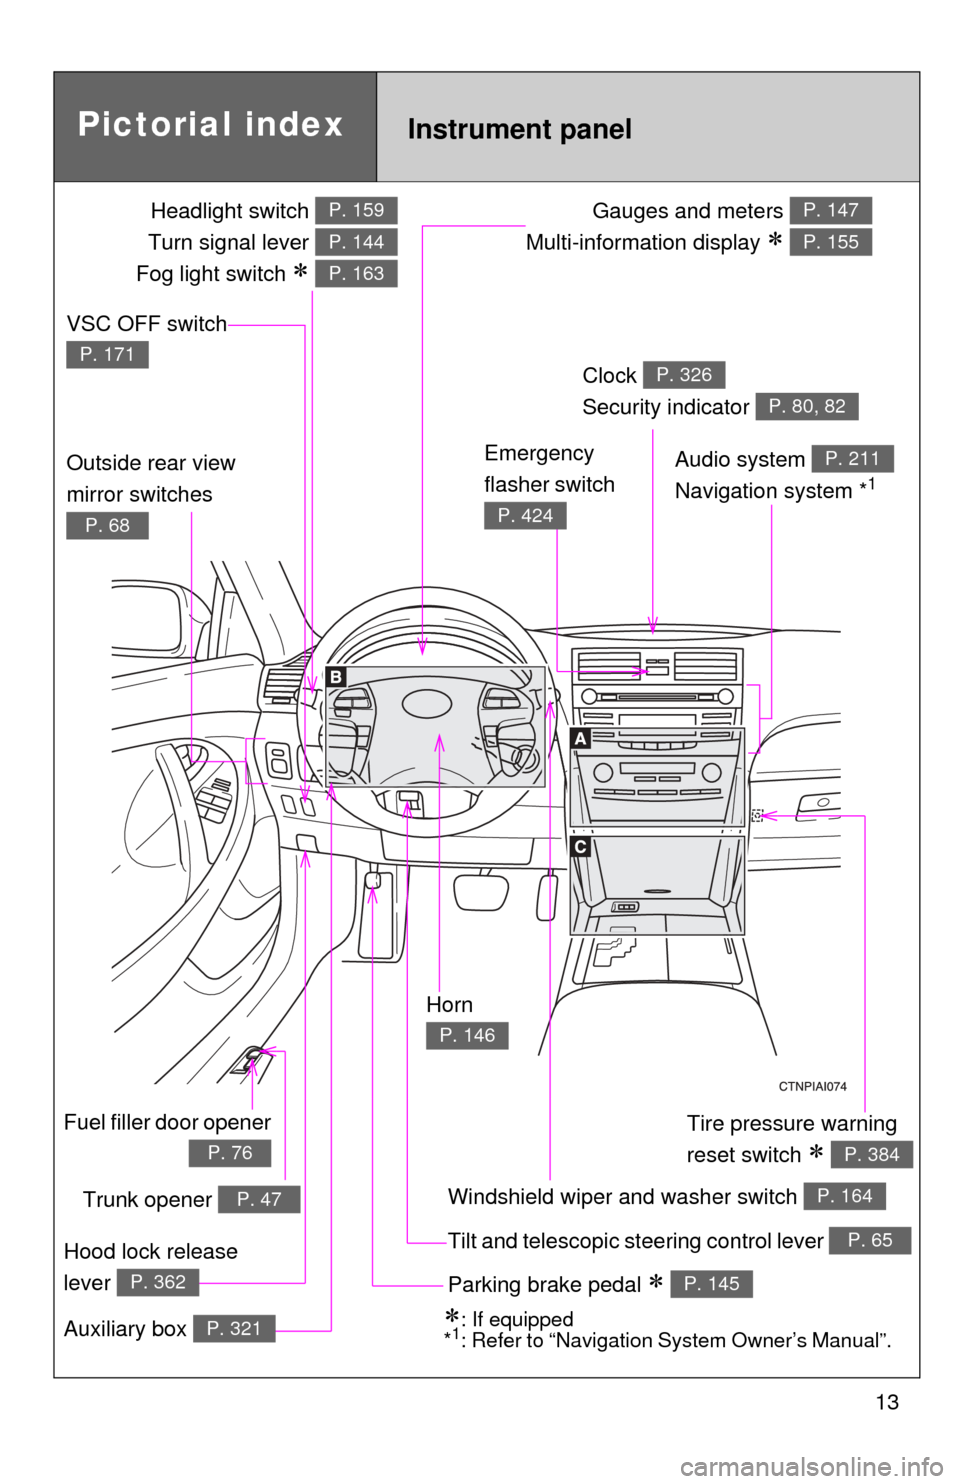
Gauges and meters
Multi-information display
P. 147
P. 155
Tilt and telescopic steering control lever P. 65
Pictorial index
Trunk opener P. 47
Headlight switch
Turn signal lever
Fog light switch
P. 159
P. 144
P. 163
Instrument panel
Audio system
Navigation system *1
P. 211
Windshield wiper and washer switch P. 164
Clock
Security indicator P. 326
P. 80, 82
Outside rear view
mirror switches
P. 68
Tire pressure warning
reset switch
P. 384
Parking brake pedal P. 145
Hood lock release
lever
P. 362
Fuel filler door opener
P. 76
Auxiliary box P. 321: If equipped
*1: Refer to “Navigation System Owner’s Manual”.
Emergency
flasher switch
P. 424
VSC OFF switch
P. 171
Horn
P. 146
Page 119 of 538
When driving2
119
2-1. Driving proceduresDriving the vehicle............ 120
Engine (ignition) switch (vehicles with smart
key system).................... 131
Engine (ignition) switch (vehicles without smart
key system).................... 135
Automatic transmission................... 138
Manual transmission ........ 142
Turn signal lever .............. 144
Parking brake ................... 145
Horn ................................. 146
2-2. Instrument cluster Gauges and meters ......... 147
Indicators and warning lights .............................. 151
Multi-information display............................ 155 2-3. Operating the lights
and wipers
Headlight switch ............... 159
Fog light switch ................ 163
Windshield wipers and washer ........................... 164
2-4. Using other driving systems
Cruise control ................... 166
Driving assist systems ..... 170
2-5. Driving information Cargo and luggage .......... 175
Vehicle load limits ............ 178
Winter driving tips ............ 179
Trailer towing ................... 183
Dinghy towing (automatic transmission) ................. 191
Dinghy towing (manual transmission) ................. 192
Page 144 of 538
144
2-1. Driving procedures
Tur n signal lever
■Turn signals can be operated when
Vehicles with smart key system
The “ENGINE START STOP” switch is in ON mode.
Vehicles without smart key system
The engine switch is in the “ON” position.
■ If the indicators flash faster than usual
Check that a light bulb in the front or rear turn signal lights has not burned
out.
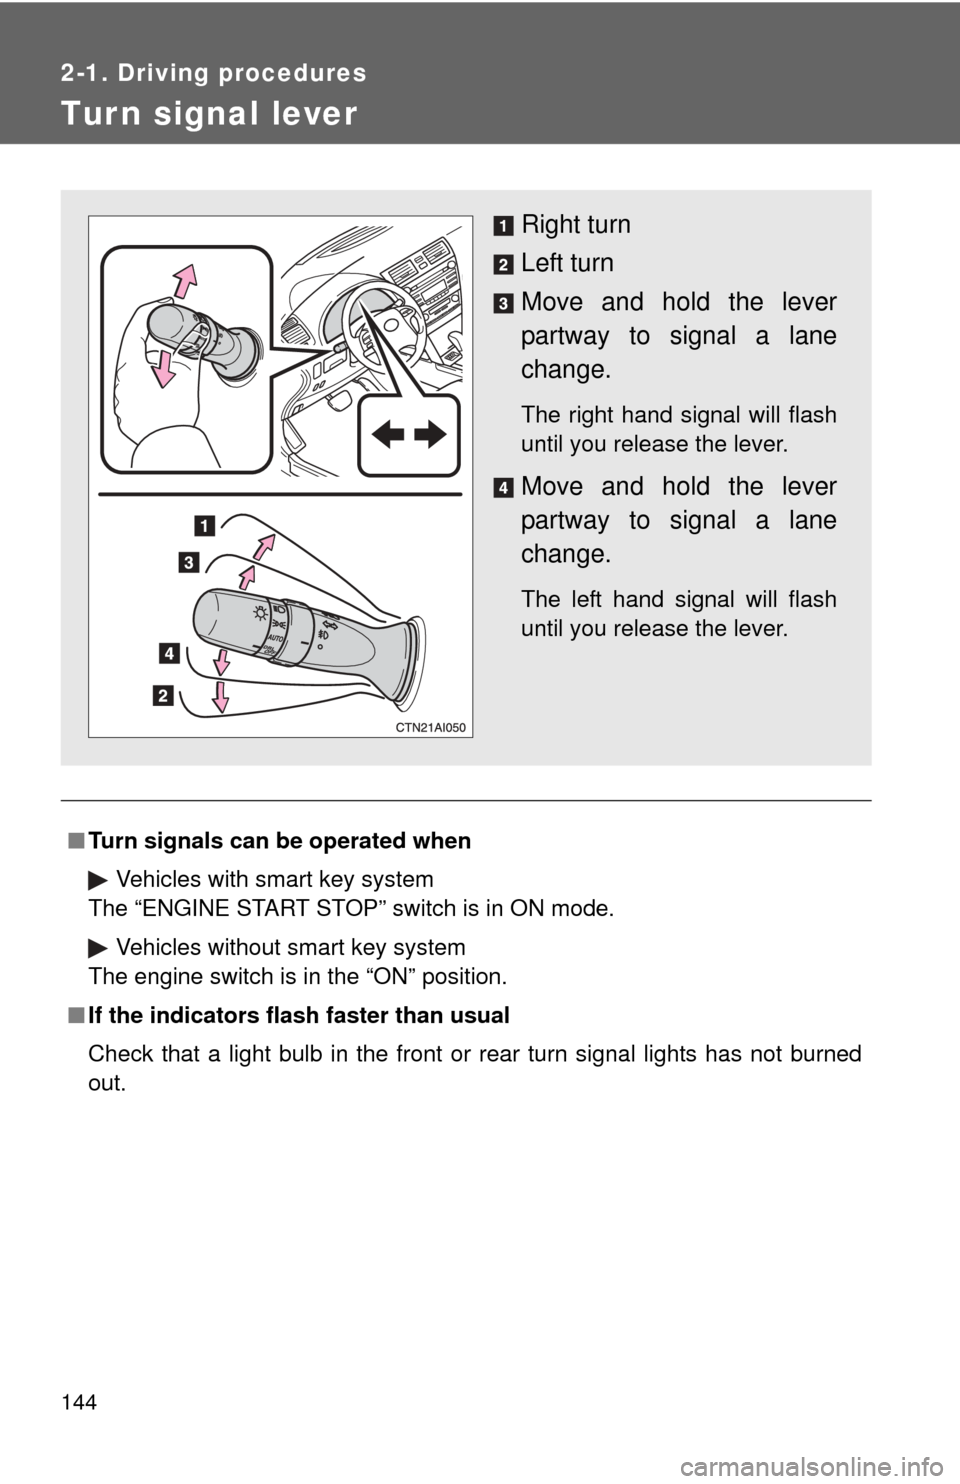
Right turn
Left turn
Move and hold the lever
partway to signal a lane
change.
The right hand signal will flash
until you release the lever.
Move and hold the lever
partway to signal a lane
change.
The left hand signal will flash
until you release the lever.
Page 153 of 538
153
2-2. Instrument cluster
2
When driving
■
Indicators
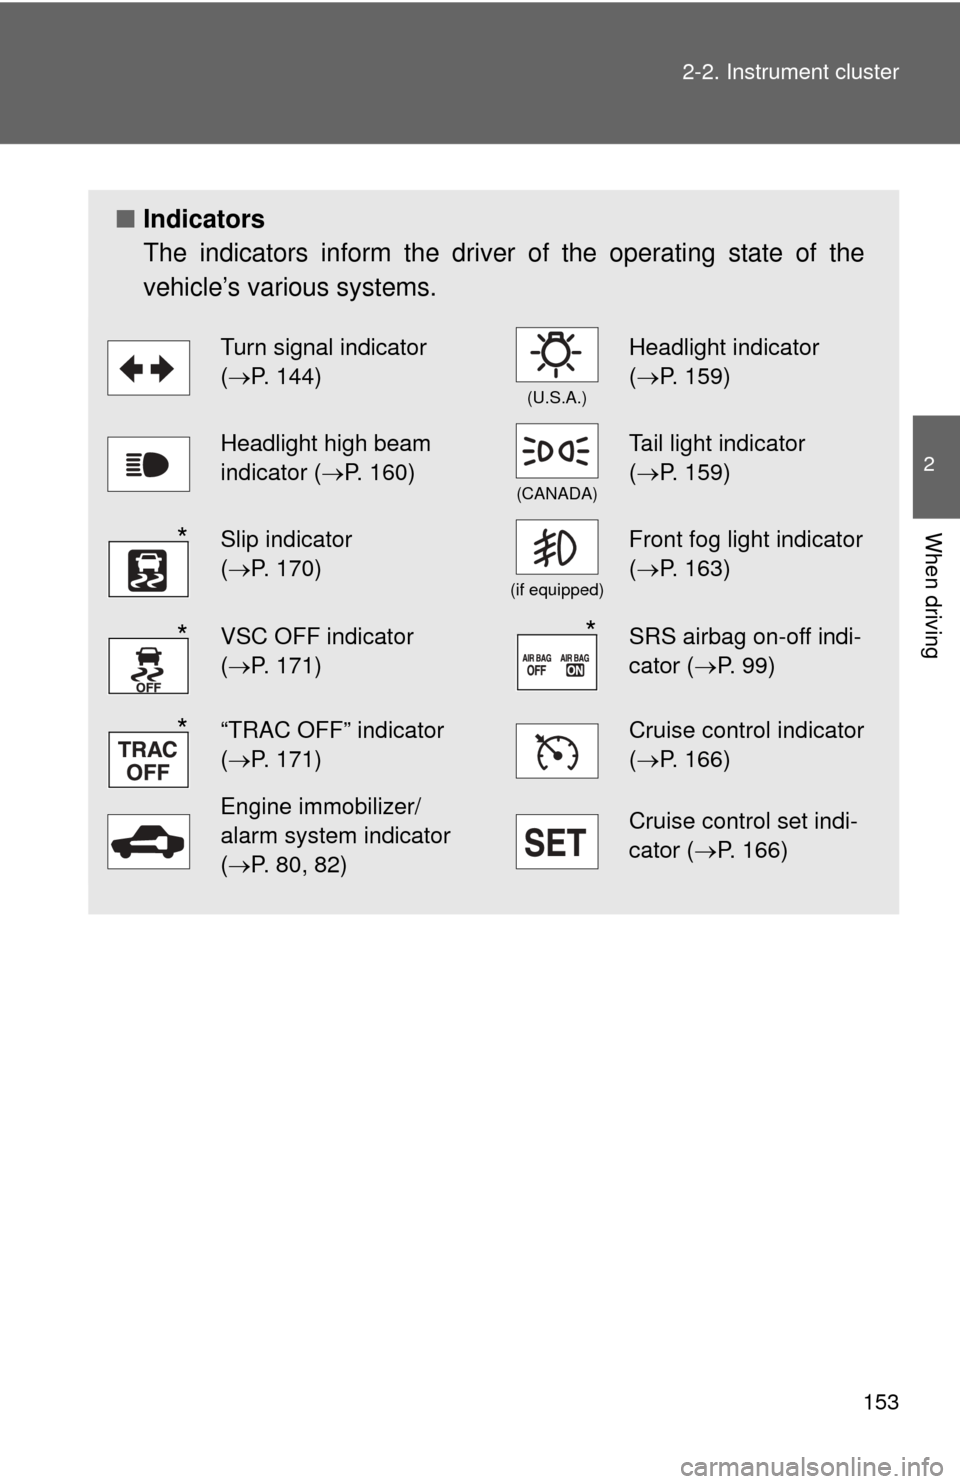
The indicators inform the driver of the operating state of the
vehicle’s various systems.
Turn signal indicator
(P. 144)
(U.S.A.)
Headlight indicator
( P. 159)
Headlight high beam
indicator ( P. 160)
(CANADA)
Tail light indicator
(P. 159)
Slip indicator
(P. 170)
(if equipped)
Front fog light indicator
( P. 163)
VSC OFF indicator
(P. 171)SRS airbag on-off indi-
cator (P. 99)
“TRAC OFF” indicator
(P. 171)Cruise control indicator
( P. 166)
Engine immobilizer/
alarm system indicator
(P. 80, 82)Cruise control set indi-
cator (P. 166)
*
**
*
Page 223 of 538
221
3-2. Using the audio system
3
Interior features
■
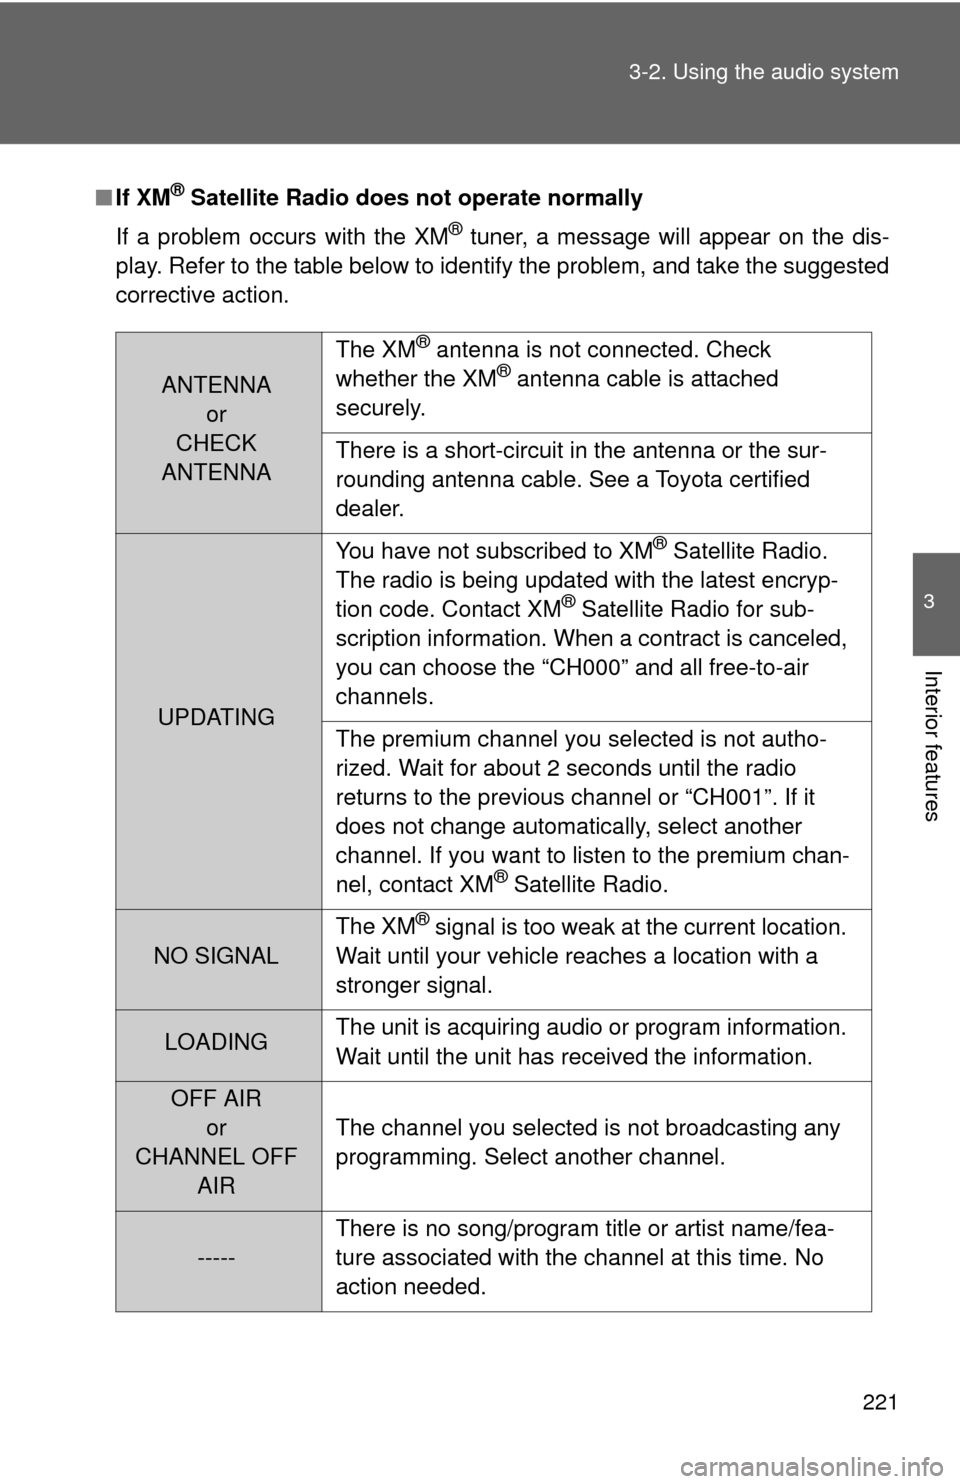
If XM® Satellite Radio does not operate normally
If a problem occurs with the XM
® tuner, a message will appear on the dis-
play. Refer to the table below to identify the problem, and take the suggested
corrective action.
ANTENNA or
CHECK
ANTENNA The XM
® antenna is not connected. Check
whether the XM® antenna cable is attached
securely.
There is a short-circuit in the antenna or the sur-
rounding antenna cable. See a Toyota certified
dealer.
UPDATING You have not subscribed to XM
® Satellite Radio.
The radio is being updated with the latest encryp-
tion code. Contact XM
® Satellite Radio for sub-
scription information. When a contract is canceled,
you can choose the “CH000” and all free-to-air
channels.
The premium channel you selected is not autho-
rized. Wait for about 2 seconds until the radio
returns to the previous channel or “CH001”. If it
does not change automatically, select another
channel. If you want to listen to the premium chan-
nel, contact XM
® Satellite Radio.
NO SIGNAL The XM
® signal is too weak at the current location.
Wait until your vehicle reaches a location with a
stronger signal.
LOADING The unit is acquiring audio or program information.
Wait until the unit has received the information.
OFF AIR
or
CHANNEL OFF AIR The channel you selected is not broadcasting any
programming. Select another channel.
-----
There is no song/program title or artist name/fea-
ture associated with the channel at this time. No
action needed.
Page 343 of 538

341
3-7. Other interior features
3
Interior features
Test the operation of HomeLink by pressing the newly pro-
grammed button. Check to see if the gate/device operates
correctly.
Repeat the steps above to program another device for each of
the remaining HomeLink
buttons.
■ Programming other devices
To program other devices such as home security systems, home
door locks or lighting, contact your authorized Toyota dealer for
assistance.
■ Reprogramming a button
The individual HomeLink
buttons cannot be erased but can be
reprogrammed. To reprogram a bu tton, follow the “Programming”
instructions.
Operating HomeLink
Press the appropriate HomeLink button. The HomeLink indicator
light on the HomeLink transceiver should turn on.
HomeLink continues to send a signal for up to 20 seconds as long as the
button is pressed.
Erasing the entire HomeLink memory (all three programs)
Press and hold down the 2 out-
side buttons for 20 seconds until
the indicator light flashes.
If you sell your vehicle, be sure to
erase the programs stored in the
HomeLink
memory.
STEP5
STEP6
Page 411 of 538
409
4-3. Do-it-yourself maintenance
4
Maintenance and care
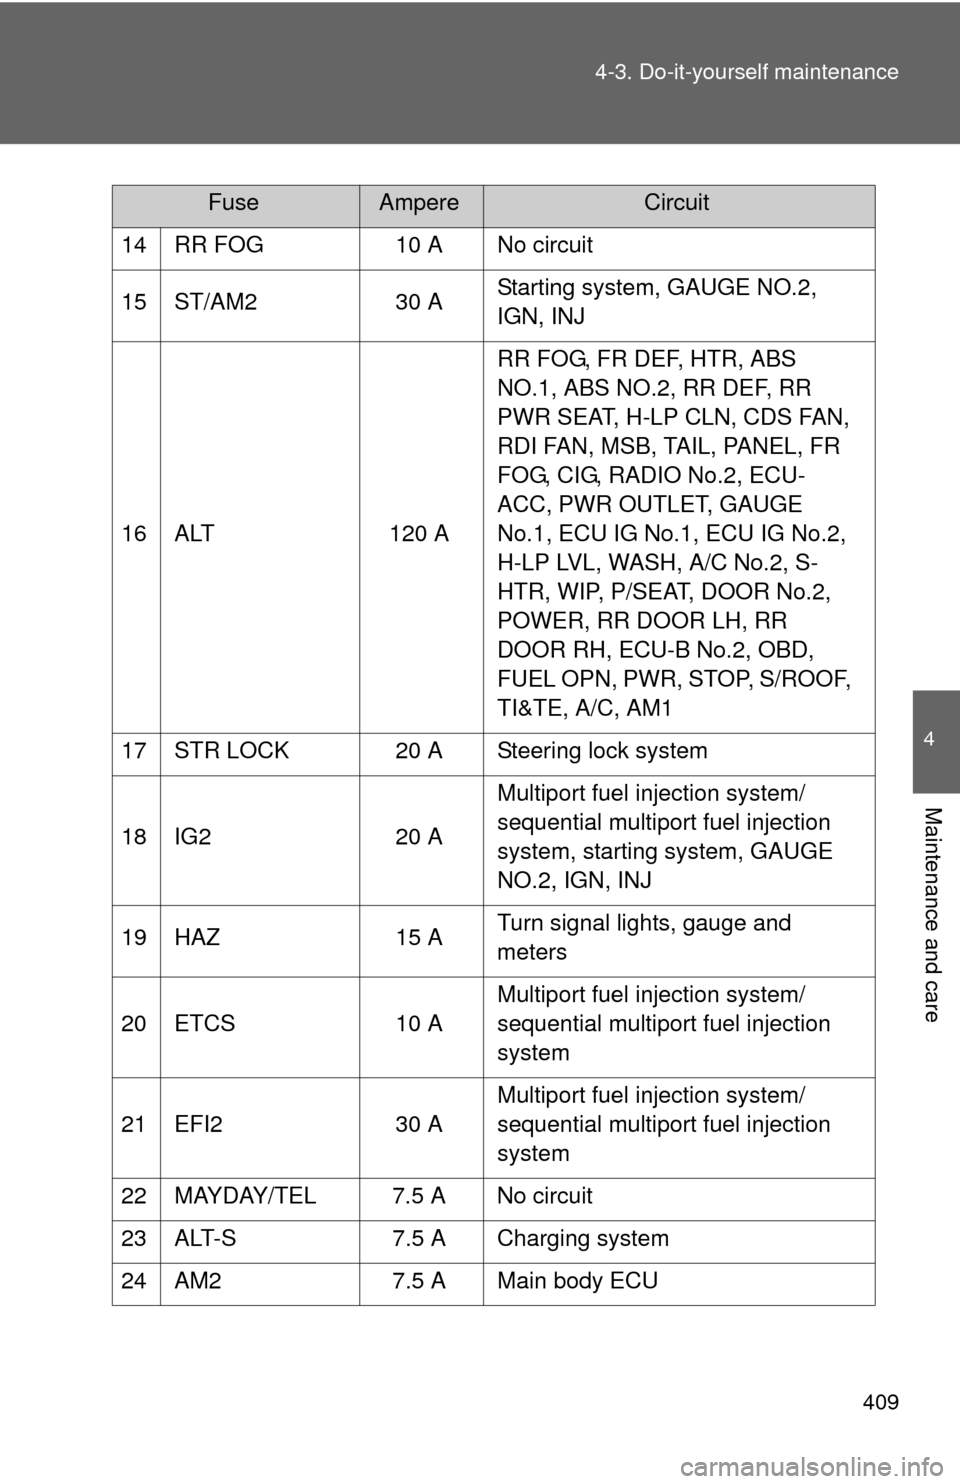
14 RR FOG
10 A No circuit
15 ST/AM2 30 AStarting system, GAUGE NO.2,
IGN, INJ
16 ALT 120 ARR FOG, FR DEF, HTR, ABS
NO.1, ABS NO.2, RR DEF, RR
PWR SEAT, H-LP CLN, CDS FAN,
RDI FAN, MSB, TAIL, PANEL, FR
FOG, CIG, RADIO No.2, ECU-
ACC, PWR OUTLET, GAUGE
No.1, ECU IG No.1, ECU IG No.2,
H-LP LVL, WASH, A/C No.2, S-
HTR, WIP, P/SEAT, DOOR No.2,
POWER, RR DOOR LH, RR
DOOR RH, ECU-B No.2, OBD,
FUEL OPN, PWR, STOP, S/ROOF,
TI&TE, A/C, AM1
17 STR LOCK 20 A Steering lock system
18 IG2 20 AMultiport fuel injection system/
sequential multiport fuel injection
system, starting system, GAUGE
NO.2, IGN, INJ
19 HAZ 15 ATurn signal lights, gauge and
meters
20 ETCS 10 AMultiport fuel injection system/
sequential multiport fuel injection
system
21 EFI2 30 AMultiport fuel injection system/
sequential multiport fuel injection
system
22 MAYDAY/TEL 7.5 A No circuit
23 ALT-S 7.5 A Charging system
24 AM2 7.5 A Main body ECU
FuseAmpereCircuit