buttons TOYOTA CAMRY 2013 XV50 / 9.G Navigation Manual
[x] Cancel search | Manufacturer: TOYOTA, Model Year: 2013, Model line: CAMRY, Model: TOYOTA CAMRY 2013 XV50 / 9.GPages: 336, PDF Size: 7.37 MB
Page 5 of 336
5
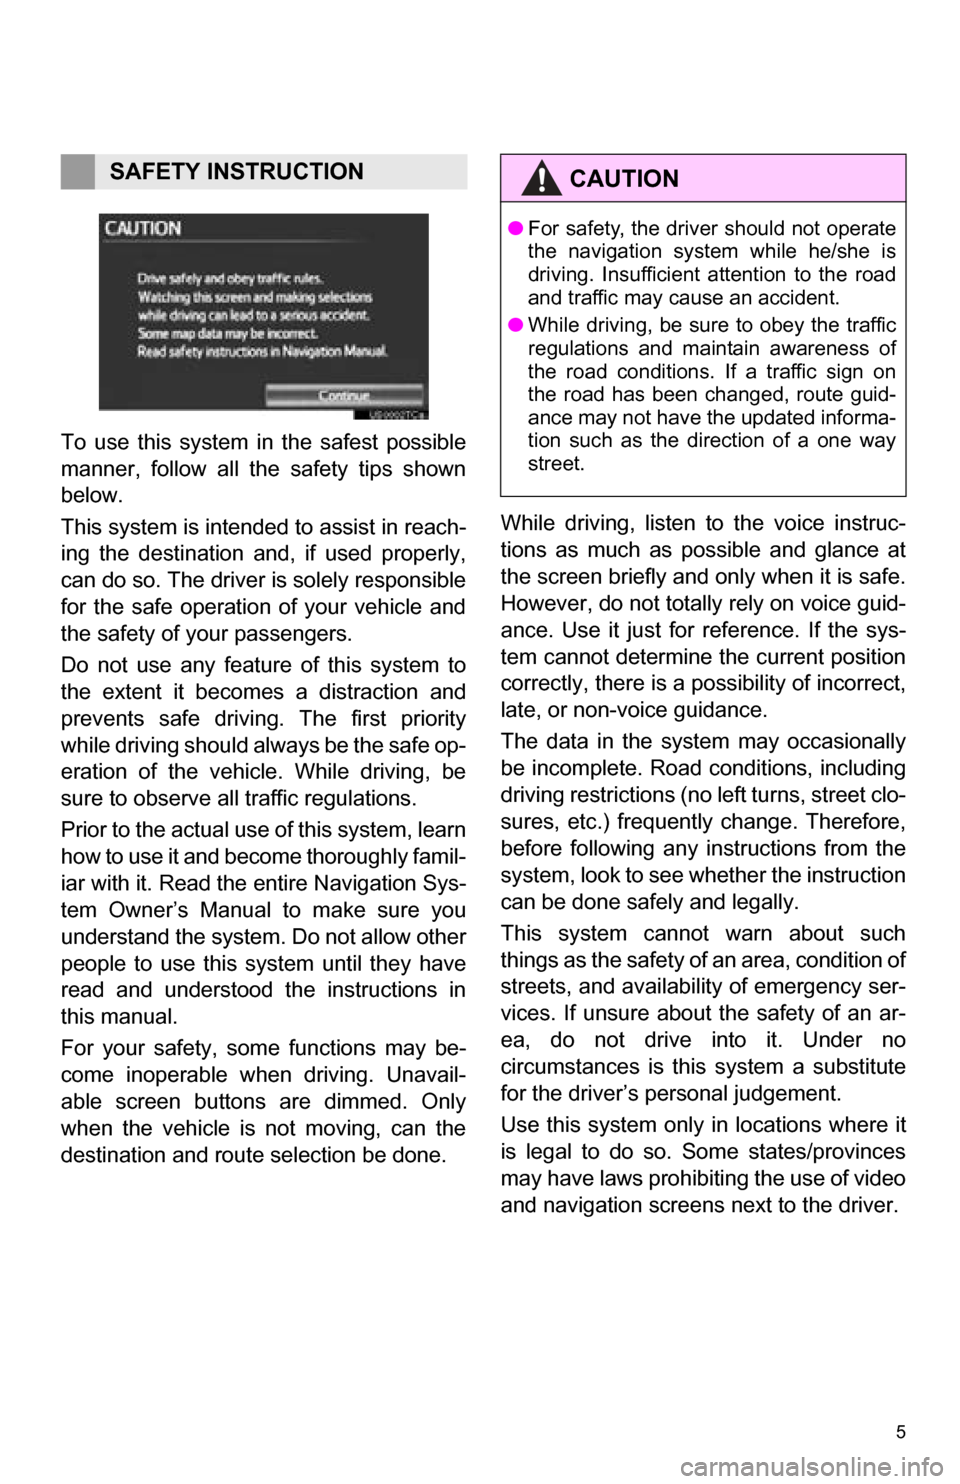
To use this system in the safest possible
manner, follow all the safety tips shown
below.
This system is intended to assist in reach-
ing the destination and, if used properly,
can do so. The driver is solely responsible
for the safe operation of your vehicle and
the safety of your passengers.
Do not use any featur e of this system to
the extent it becom es a distraction and
prevents safe driving. The first priority
while driving should always be the safe op-
eration of the vehicle. While driving, be
sure to observe all traffic regulations.
Prior to the actual us e of this system, learn
how to use it and become thoroughly famil-
iar with it. Read the entire Navigation Sys-
tem Owner’s Manual to make sure you
understand the system. Do not allow other
people to use this system until they have
read and understood the instructions in
this manual.
For your safety, some functions may be-
come inoperable when driving. Unavail-
able screen buttons are dimmed. Only
when the vehicle is not moving, can the
destination and route selection be done. While driving, listen to the voice instruc-
tions as much as possible and glance at
the screen briefly and only when it is safe.
However, do not totally rely on voice guid-
ance. Use it just for reference. If the sys-
tem cannot determine the current position
correctly, there is a po
ssibility of incorrect,
late, or non-voice guidance.
The data in the system may occasionally
be incomplete. Road conditions, including
driving restrictions (no left turns, street clo-
sures, etc.) frequently change. Therefore,
before following any instructions from the
system, look to see whether the instruction
can be done safely and legally.
This system cannot warn about such
things as the safety of an area, condition of
streets, and availability of emergency ser-
vices. If unsure about the safety of an ar-
ea, do not drive into it. Under no
circumstances is this system a substitute
for the driver’s personal judgement.
Use this system only in locations where it
is legal to do so. Some states/provinces
may have laws prohibiting the use of video
and navigation screens next to the driver.
SAFETY INSTRUCTIONCAUTION
● For safety, the driver should not operate
the navigation system while he/she is
driving. Insufficient attention to the road
and traffic may cause an accident.
● While driving, be sure to obey the traffic
regulations and maintain awareness of
the road conditions. If a traffic sign on
the road has been changed, route guid-
ance may not have the updated informa-
tion such as the direction of a one way
street.
Page 14 of 336
14
1. NAVIGATION OPERATION
3. REGISTERING PRESET DESTINATIONS
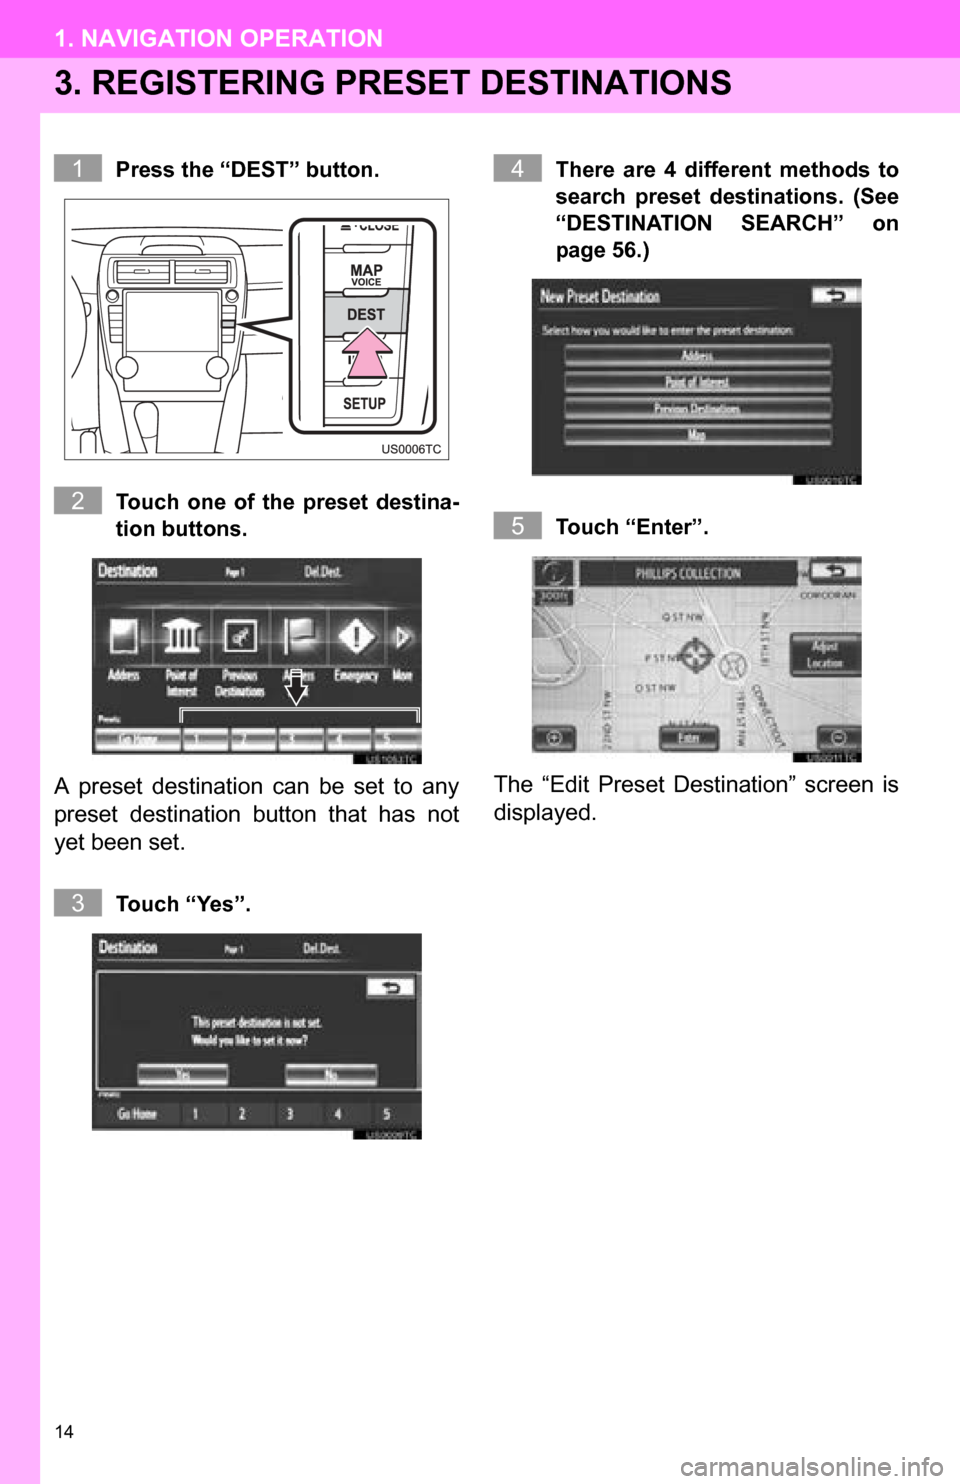
Press the “DEST” button.
Touch one of the preset destina-
tion buttons.
A preset destination can be set to any
preset destination button that has not
yet been set.
Touch “Yes”. There are 4 different methods to
search preset destinations. (See
“DESTINATION SEARCH” on
page 56.)
Touch “Enter”.
The “Edit Preset Destination” screen is
displayed.
1
2
3
4
5
Page 18 of 336
18
2. FUNCTION INDEX
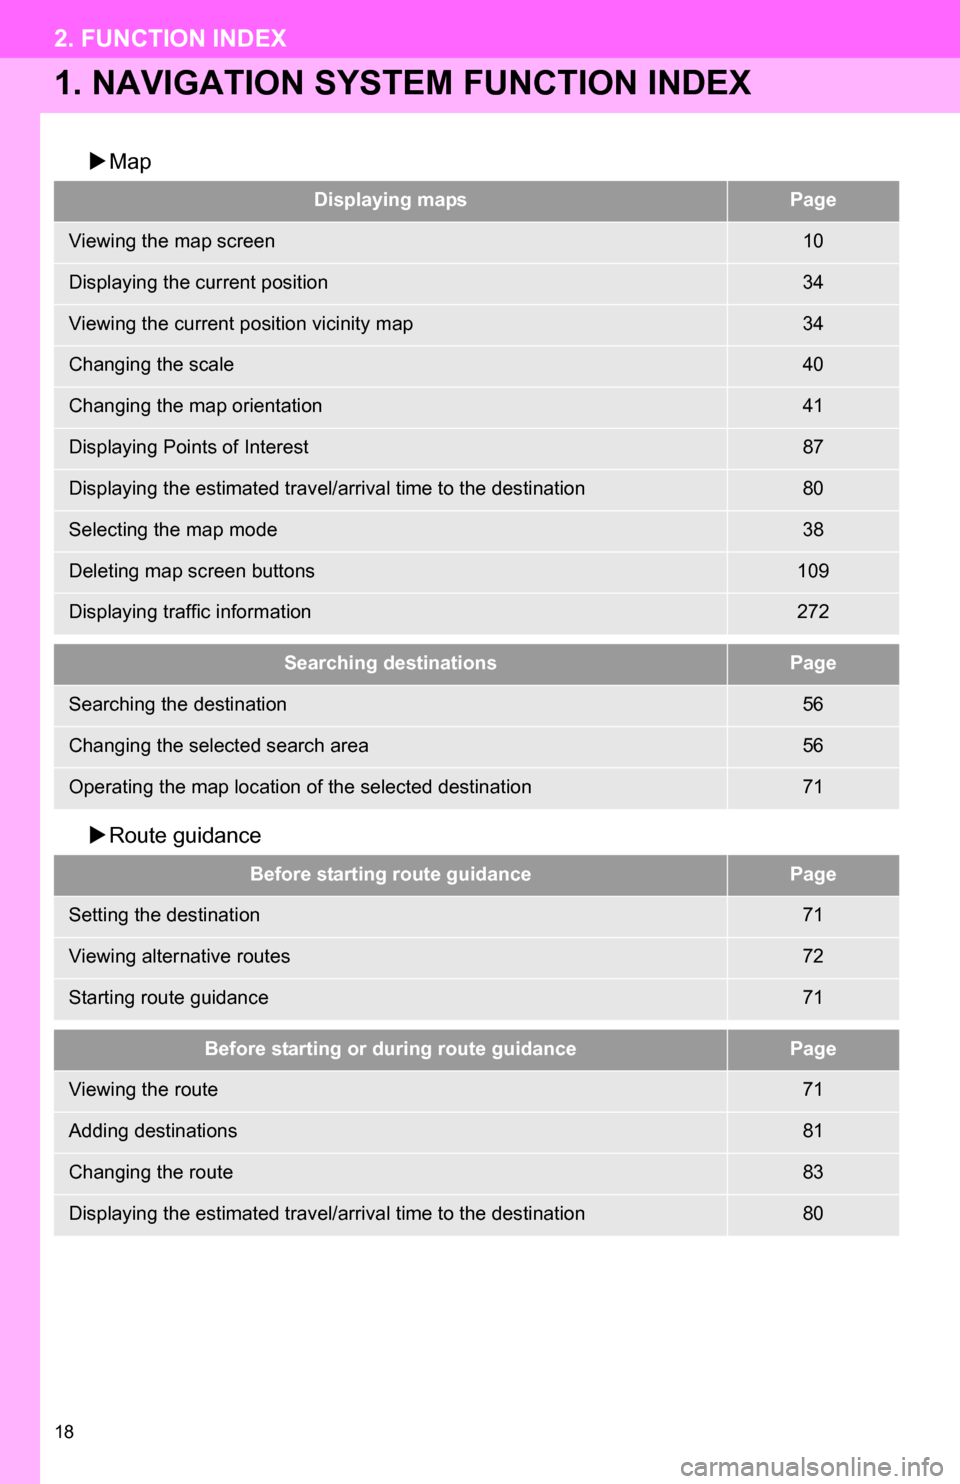
1. NAVIGATION SYSTEM FUNCTION INDEX
Map
Route guidance
Displaying mapsPage
Viewing the map screen10
Displaying the current position34
Viewing the current position vicinity map34
Changing the scale40
Changing the map orientation41
Displaying Points of Interest87
Displaying the estimated travel/arrival time to the destination80
Selecting the map mode38
Deleting map screen buttons109
Displaying traffic information272
Searching destinationsPage
Searching the destination56
Changing the selected search area56
Operating the map location of the selected destination71
Before starting route guidancePage
Setting the destination71
Viewing alternative routes72
Starting route guidance71
Before starting or during route guidancePage
Viewing the route71
Adding destinations81
Changing the route83
Displaying the estimated travel/arrival time to the destination80
Page 21 of 336
21
3. QUICK REFERENCE
1
QUICK GUIDE
“Map”Touch to enable setting a destination by touching
a location on the map screen.69
“Coordinates”Touch to enter latitude and longitude coordinates.69
Preset destina-
tion buttons
Touch to select one of the 5 preset destination
points as a destination. If a preset destination
point has not been registered, a message will be
displayed asking if it is desirable to set a destina-
tion to the preset screen button. (To register a
preset destination, see “REGISTERING PRE-
SET DESTINATIONS” on page 94.)
57
“Go Home”
Touch to select your personal home address
without having to enter the address each time. If
a home address has not been registered, a mes-
sage will be displayed and the setting screen will
automatically appear. (To register home, see
“REGISTERING HOME” on page 92.)
57
No.NameFunctionPage
Page 29 of 336
29
1. BASIC INFORMATION BEFORE OPERATION
2
BASIC FUNCTION
2. TOUCH SCREEN OPERATION
This system is operated mainly by the
buttons on the screen. (Referred to as
screen buttons in this manual.)
When a screen button is touched, a
beep sounds. (To set the beep sound,
see page 42.)
NOTICE
● To prevent damaging the screen, lightly
touch the screen buttons with your fin-
ger.
● Do not use objects other than your finger
to touch the screen.
● Wipe off fingerprints using a glass clean-
ing cloth. Do not use chemical cleaners
to clean the screen, as they may dam-
age the touch screen.
INFORMATION
●If the system does not respond to touch-
ing a screen button, move your finger
away from the screen and then touch it
again.
● Dimmed screen buttons cannot be oper-
ated.
● The displayed image may become
darker and moving images may be
slightly distorted when the screen is
cold.
● In extremely cold conditions, the map
may not be displayed and the data input
by a user may be deleted. Also, the
screen buttons may be harder than
usual to depress.
● When you look at the screen through
polarized material such as polarized
sunglasses, the screen may be dark and
hard to see. If so, look at the screen
from different angles, adjust the screen
settings on the “Display” screen or take
off your sunglasses.
Page 38 of 336
38
1. BASIC INFORMATION BEFORE OPERATION
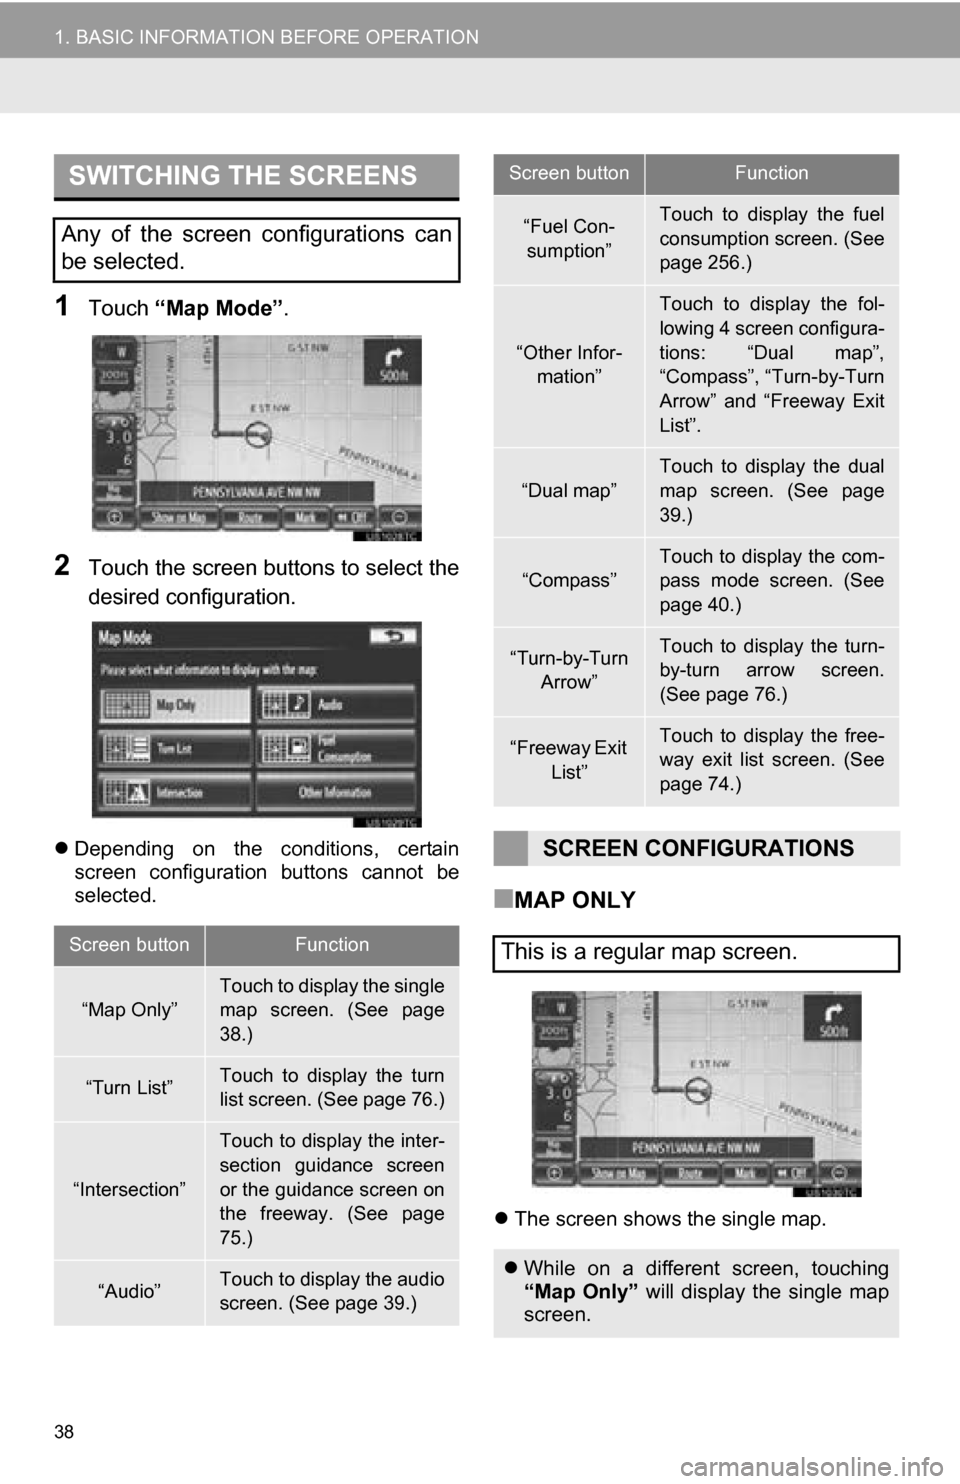
1Touch “Map Mode” .
2Touch the screen buttons to select the
desired configuration.
Depending on the conditions, certain
screen configuration buttons cannot be
selected.
■MAP ONLY
The screen shows the single map.
SWITCHING THE SCREENS
Any of the screen configurations can
be selected.
Screen buttonFunction
“Map Only”Touch to display the single
map screen. (See page
38.)
“Turn List”Touch to display the turn
list screen. (See page 76.)
“Intersection”
Touch to display the inter-
section guidance screen
or the guidance screen on
the freeway. (See page
75.)
“Audio”Touch to display the audio
screen. (See page 39.)
“Fuel Con-
sumption”Touch to display the fuel
consumption screen. (See
page 256.)
“Other Infor- mation”
Touch to display the fol-
lowing 4 screen configura-
tions: “Dual map”,
“Compass”, “Turn-by-Turn
Arrow” and “Freeway Exit
List”.
“Dual map”
Touch to display the dual
map screen. (See page
39.)
“Compass”
Touch to display the com-
pass mode screen. (See
page 40.)
“Turn-by-Turn Arrow”Touch to display the turn-
by-turn arrow screen.
(See page 76.)
“Freeway Exit List”Touch to display the free-
way exit list screen. (See
page 74.)
SCREEN CONFIGURATIONS
This is a regular map screen.
While on a different screen, touching
“Map Only” will display the single map
screen.
Screen buttonFunction
Page 45 of 336
45
2. SETUP
2
BASIC FUNCTION
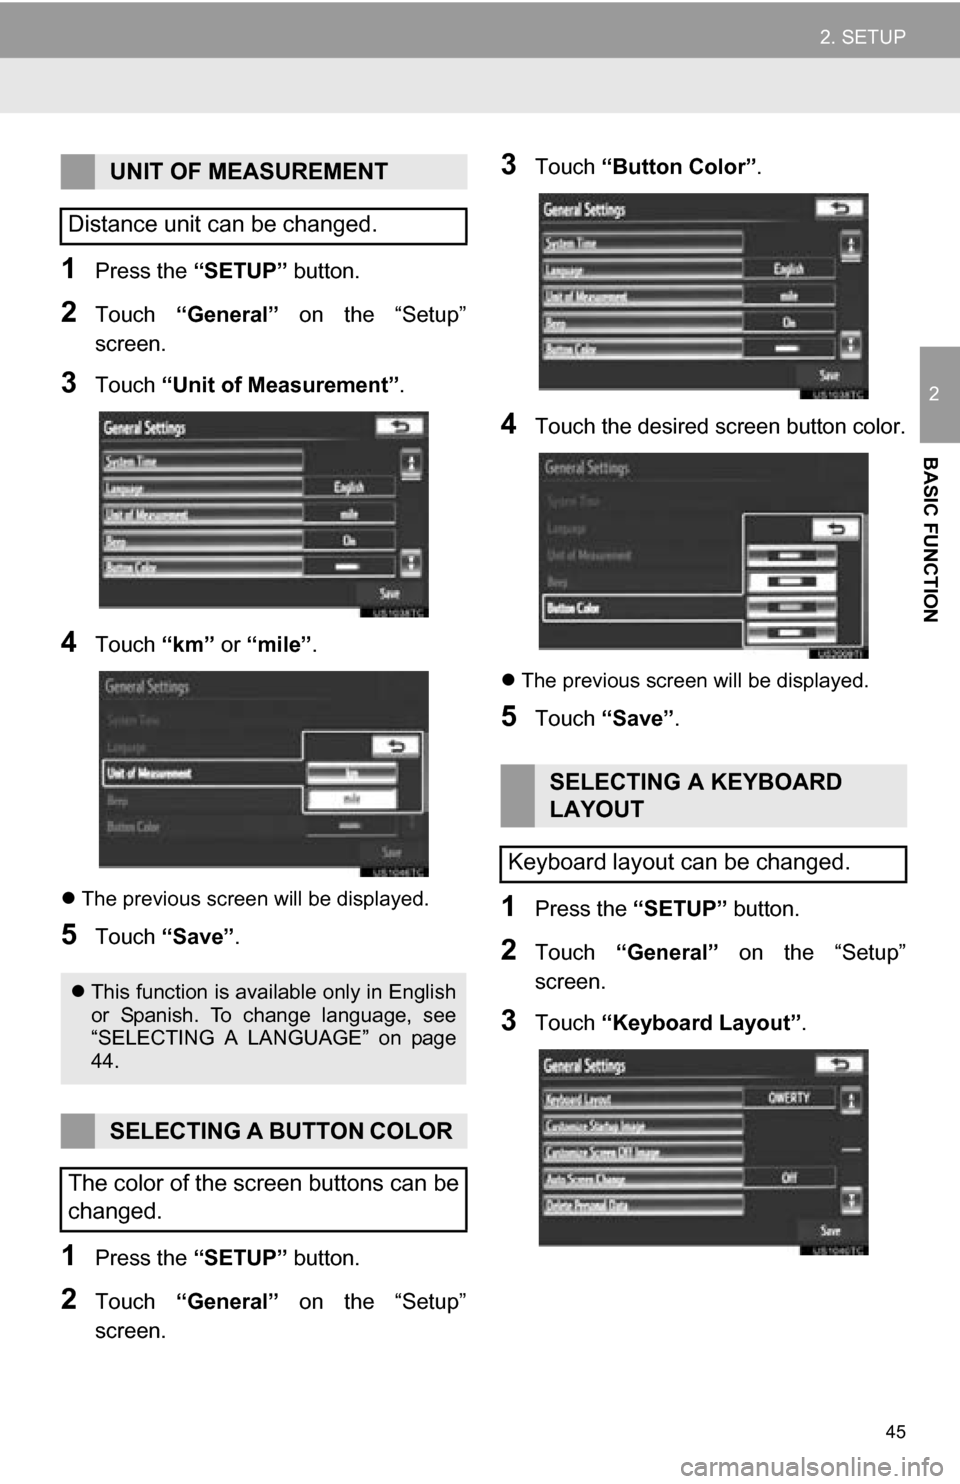
1Press the “SETUP” button.
2Touch “General” on the “Setup”
screen.
3Touch “Unit of Measurement” .
4Touch “km” or “mile” .
The previous screen will be displayed.
5Touch “Save” .
1Press the “SETUP” button.
2Touch “General” on the “Setup”
screen.
3Touch “Button Color” .
4Touch the desired screen button color.
The previous screen will be displayed.
5Touch “Save” .
1Press the “SETUP” button.
2Touch “General” on the “Setup”
screen.
3Touch “Keyboard Layout” .
UNIT OF MEASUREMENT
Distance unit can be changed.
This function is available only in English
or Spanish. To change language, see
“SELECTING A LANGUAGE” on page
44.
SELECTING A BUTTON COLOR
The color of the screen buttons can be
changed.
SELECTING A KEYBOARD
LAYOUT
Keyboard layout can be changed.
Page 57 of 336
57
1. DESTINATION SEARCH
3
NAVIGATION SYSTEM
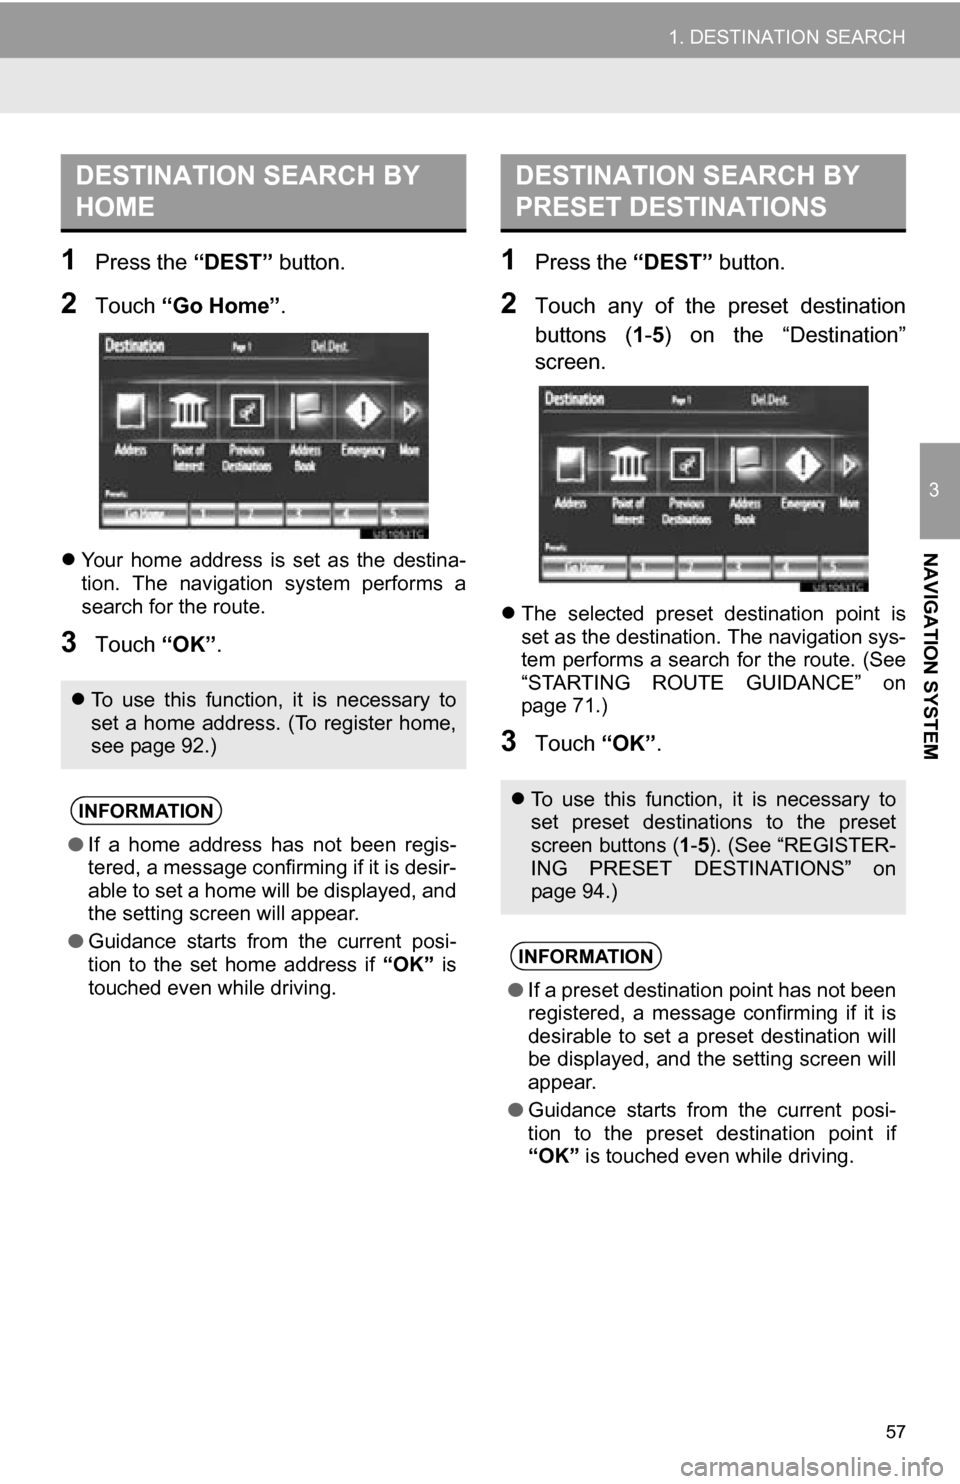
1Press the “DEST” button.
2Touch “Go Home” .
Your home address is set as the destina-
tion. The navigation system performs a
search for the route.
3Touch “OK”.
1Press the “DEST” button.
2Touch any of the preset destination
buttons (1-5 ) on the “Destination”
screen.
The selected preset destination point is
set as the destination. The navigation sys-
tem performs a search for the route. (See
“STARTING ROUTE GUIDANCE” on
page 71.)
3Touch “OK”.
DESTINATION SEARCH BY
HOME
To use this function, it is necessary to
set a home address. (To register home,
see page 92.)
INFORMATION
● If a home address has not been regis-
tered, a message confirming if it is desir-
able to set a home will be displayed, and
the setting screen will appear.
● Guidance starts from the current posi-
tion to the set home address if “OK” is
touched even while driving.
DESTINATION SEARCH BY
PRESET DESTINATIONS
To use this function, it is necessary to
set preset destinations to the preset
screen buttons ( 1-5 ). (See “REGISTER-
ING PRESET DESTINATIONS” on
page 94.)
INFORMATION
● If a preset destination point has not been
registered, a message confirming if it is
desirable to set a preset destination will
be displayed, and the setting screen will
appear.
● Guidance starts from the current posi-
tion to the preset destination point if
“OK” is touched even while driving.
Page 83 of 336
83
2. ROUTE GUIDANCE
3
NAVIGATION SYSTEM
5. SETTING ROUTE
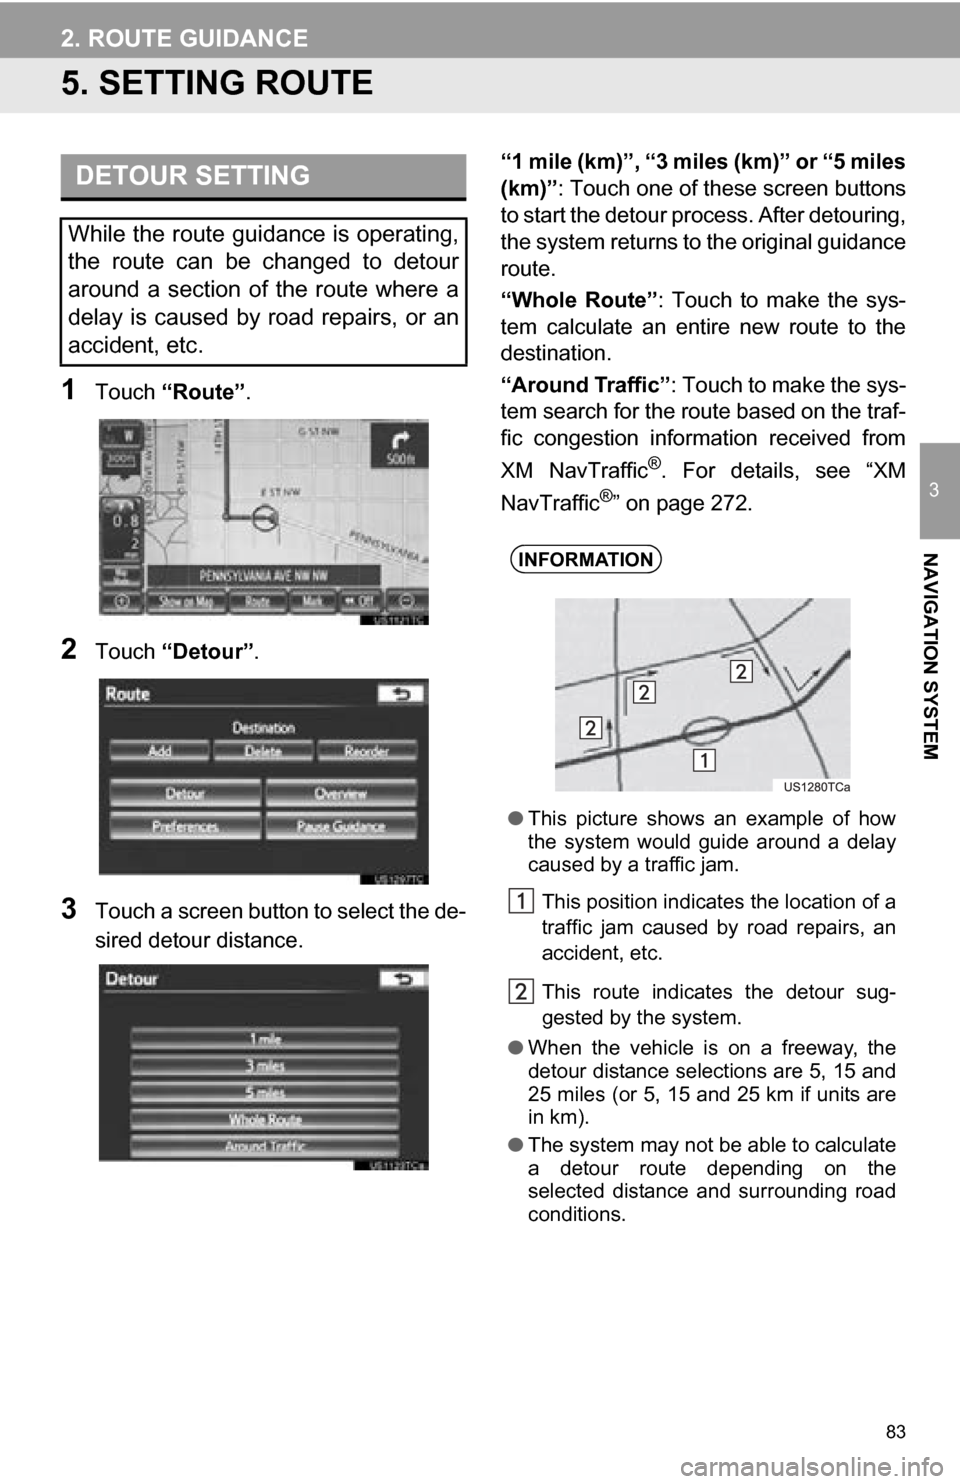
1Touch “Route” .
2Touch “Detour” .
3Touch a screen button to select the de-
sired detour distance. “1 mile (km)”, “3 miles (km)” or “5 miles
(km)”
: Touch one of these screen buttons
to start the detour pr ocess. After detouring,
the system returns to the original guidance
route.
“Whole Route” : Touch to make the sys-
tem calculate an entire new route to the
destination.
“Around Traffic” : Touch to make the sys-
tem search for the route based on the traf-
fic congestion information received from
XM NavTraffic
®. For details, see “XM
NavTraffic®” on page 272.
DETOUR SETTING
While the route guidance is operating,
the route can be changed to detour
around a section of the route where a
delay is caused by road repairs, or an
accident, etc.
INFORMATION
● This picture shows an example of how
the system would guide around a delay
caused by a traffic jam.
This position indicates the location of a
traffic jam caused by road repairs, an
accident, etc.
This route indicates the detour sug-
gested by the system.
● When the vehicle is on a freeway, the
detour distance selections are 5, 15 and
25 miles (or 5, 15 and 25 km if units are
in km).
● The system may not be able to calculate
a detour route depending on the
selected distance and surrounding road
conditions.
Page 99 of 336
99
3. ADDRESS BOOK
3
NAVIGATION SYSTEM
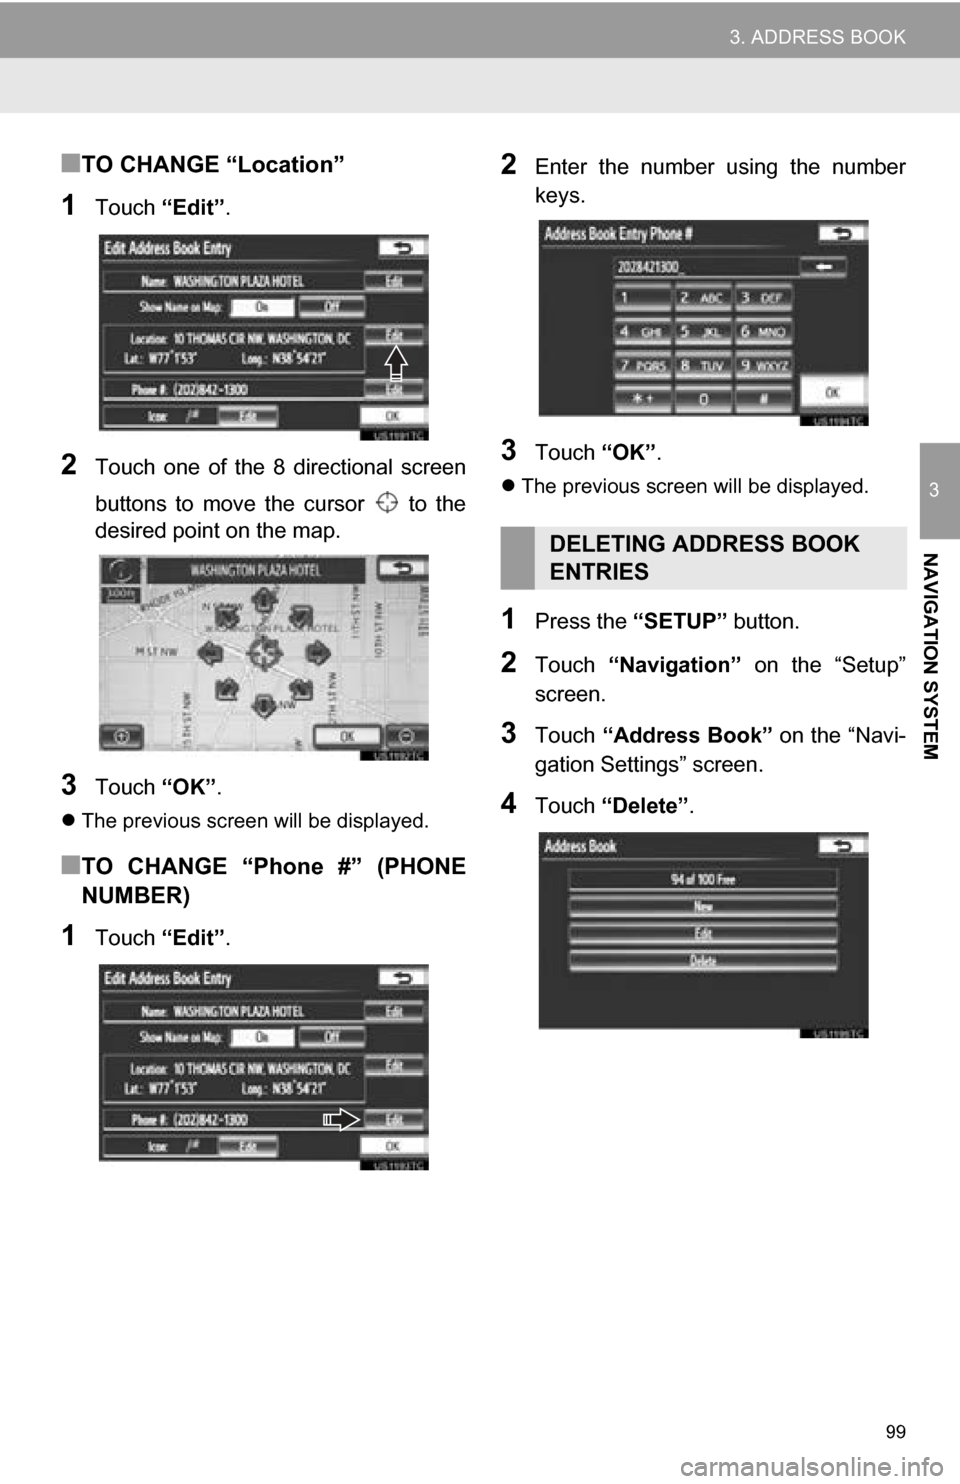
■TO CHANGE “Location”
1Touch “Edit”.
2Touch one of the 8 directional screen
buttons to move the cursor to the
desired point on the map.
3Touch “OK”.
The previous screen will be displayed.
■TO CHANGE “Phone #” (PHONE
NUMBER)
1Touch “Edit”.
2Enter the number using the number
keys.
3Touch “OK”.
The previous screen will be displayed.
1Press the “SETUP” button.
2Touch “Navigation” on the “Setup”
screen.
3Touch “Address Book” on the “Navi-
gation Settings” screen.
4Touch “Delete” .
DELETING ADDRESS BOOK
ENTRIES