Screen TOYOTA CAMRY 2014 XV50 / 9.G Repair Manual
[x] Cancel search | Manufacturer: TOYOTA, Model Year: 2014, Model line: CAMRY, Model: TOYOTA CAMRY 2014 XV50 / 9.GPages: 620, PDF Size: 7.47 MB
Page 341 of 620
341
3-2. Using the audio system
3
Interior features
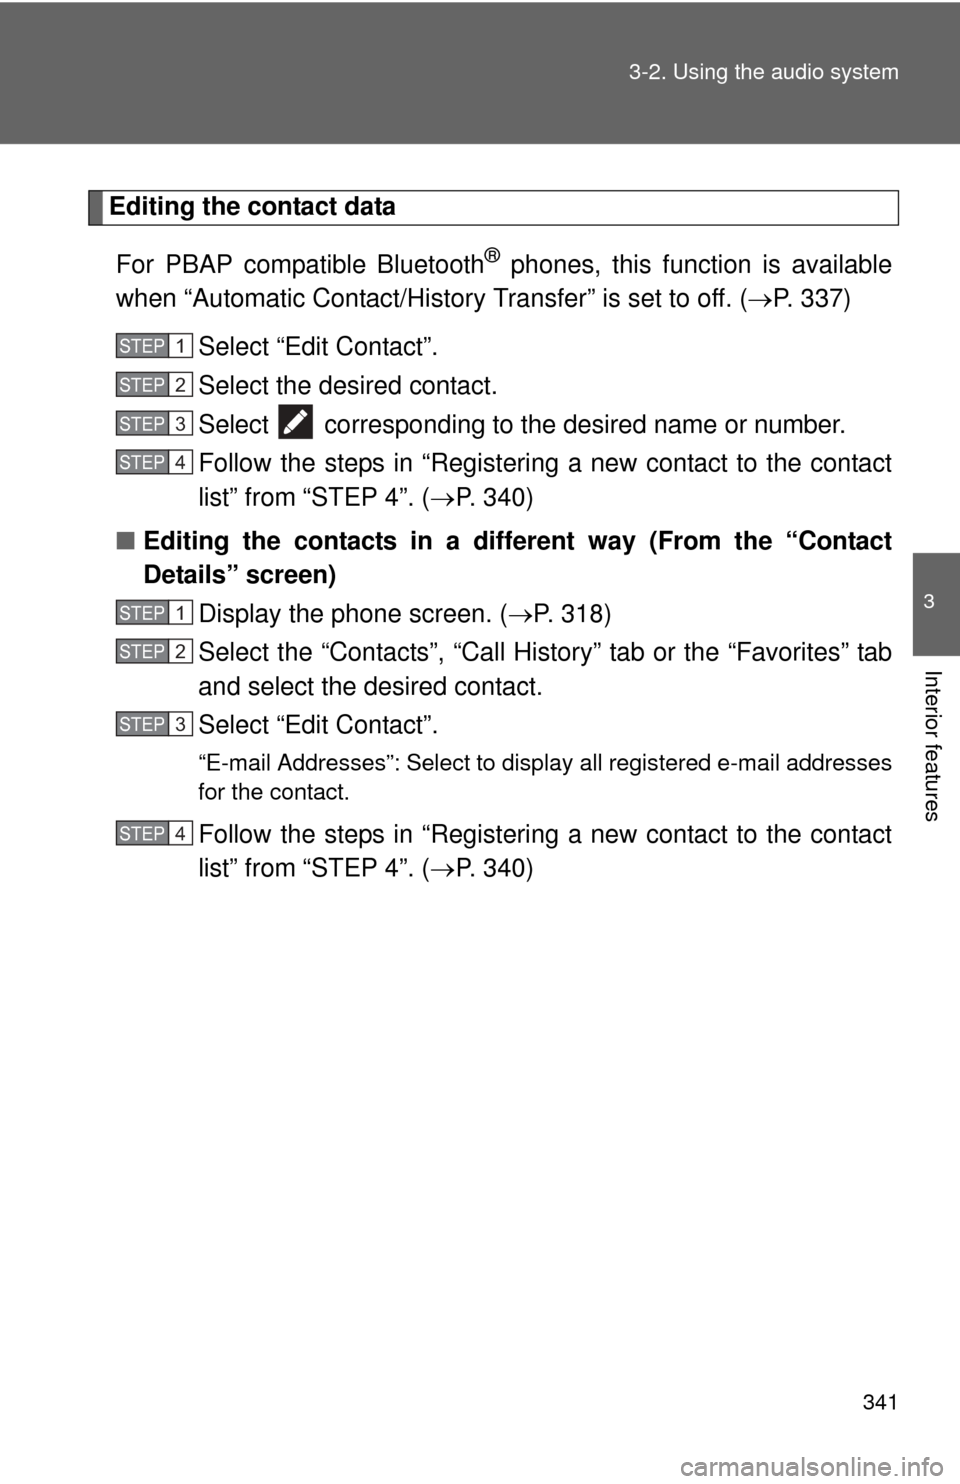
Editing the contact data
For PBAP compatible Bluetooth
® phones, this function is available
when “Automatic Contact/History Transfer” is set to off. ( P. 337)
Select “Edit Contact”.
Select the desired contact.
Select corresponding to the desired name or number.
Follow the steps in “Registering a new contact to the contact
list” from “STEP 4”. ( P. 340)
■ Editing the contacts in a different way (From the “Contact
Details” screen)
Display the phone screen. ( P. 318)
Select the “Contacts”, “Call Hist ory” tab or the “Favorites” tab
and select the desired contact.
Select “Edit Contact”.
“E-mail Addresses”: Select to di splay all registered e-mail addresses
for the contact.
Follow the steps in “Registering a new contact to the contact
list” from “STEP 4”. ( P. 340)
STEP1
STEP2
STEP3
STEP4
STEP1
STEP2
STEP3
STEP4
Page 342 of 620
342 3-2. Using the audio system
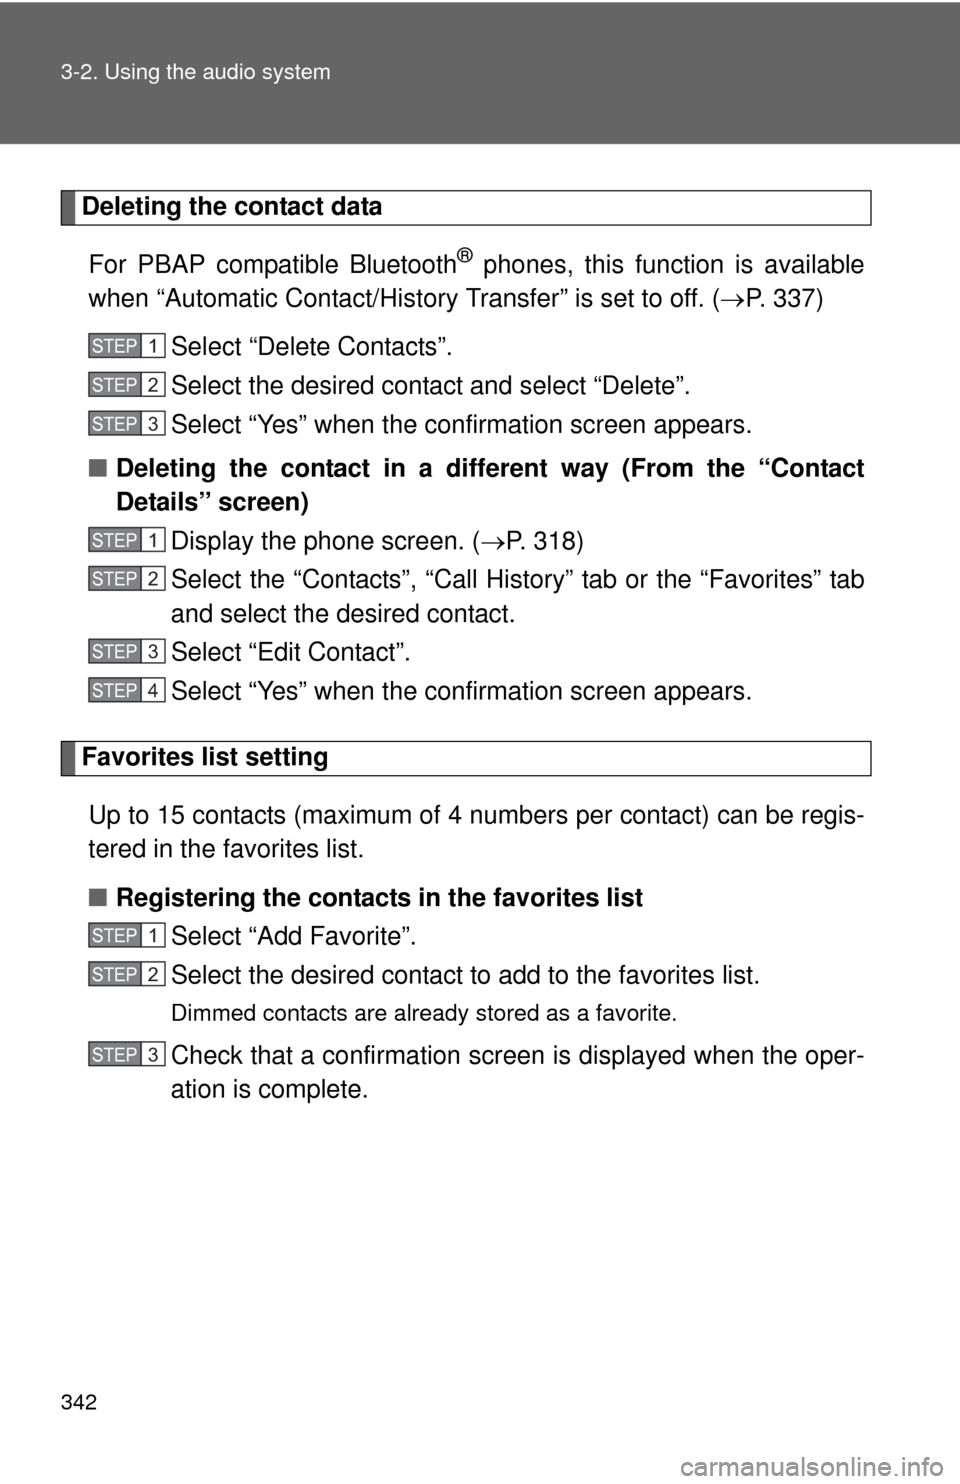
Deleting the contact dataFor PBAP compatible Bluetooth
® phones, this function is available
when “Automatic Contact/History Transfer” is set to off. ( P. 337)
Select “Delete Contacts”.
Select the desired contact and select “Delete”.
Select “Yes” when the confirmation screen appears.
■ Deleting the contact in a different way (From the “Contact
Details” screen)
Display the phone screen. ( P. 318)
Select the “Contacts”, “Call History” tab or the “Favorites” tab
and select the desired contact.
Select “Edit Contact”.
Select “Yes” when the confirmation screen appears.
Favorites list setting
Up to 15 contacts (maximum of 4 numbers per contact) can be regis-
tered in the favorites list.
■ Registering the contacts in the favorites list
Select “Add Favorite”.
Select the desired contact to add to the favorites list.
Dimmed contacts are already stored as a favorite.
Check that a confirmation screen is displayed when the oper-
ation is complete.
STEP1
STEP2
STEP3
STEP1
STEP2
STEP3
STEP4
STEP1
STEP2
STEP3
Page 343 of 620
343
3-2. Using the audio system
3
Interior features
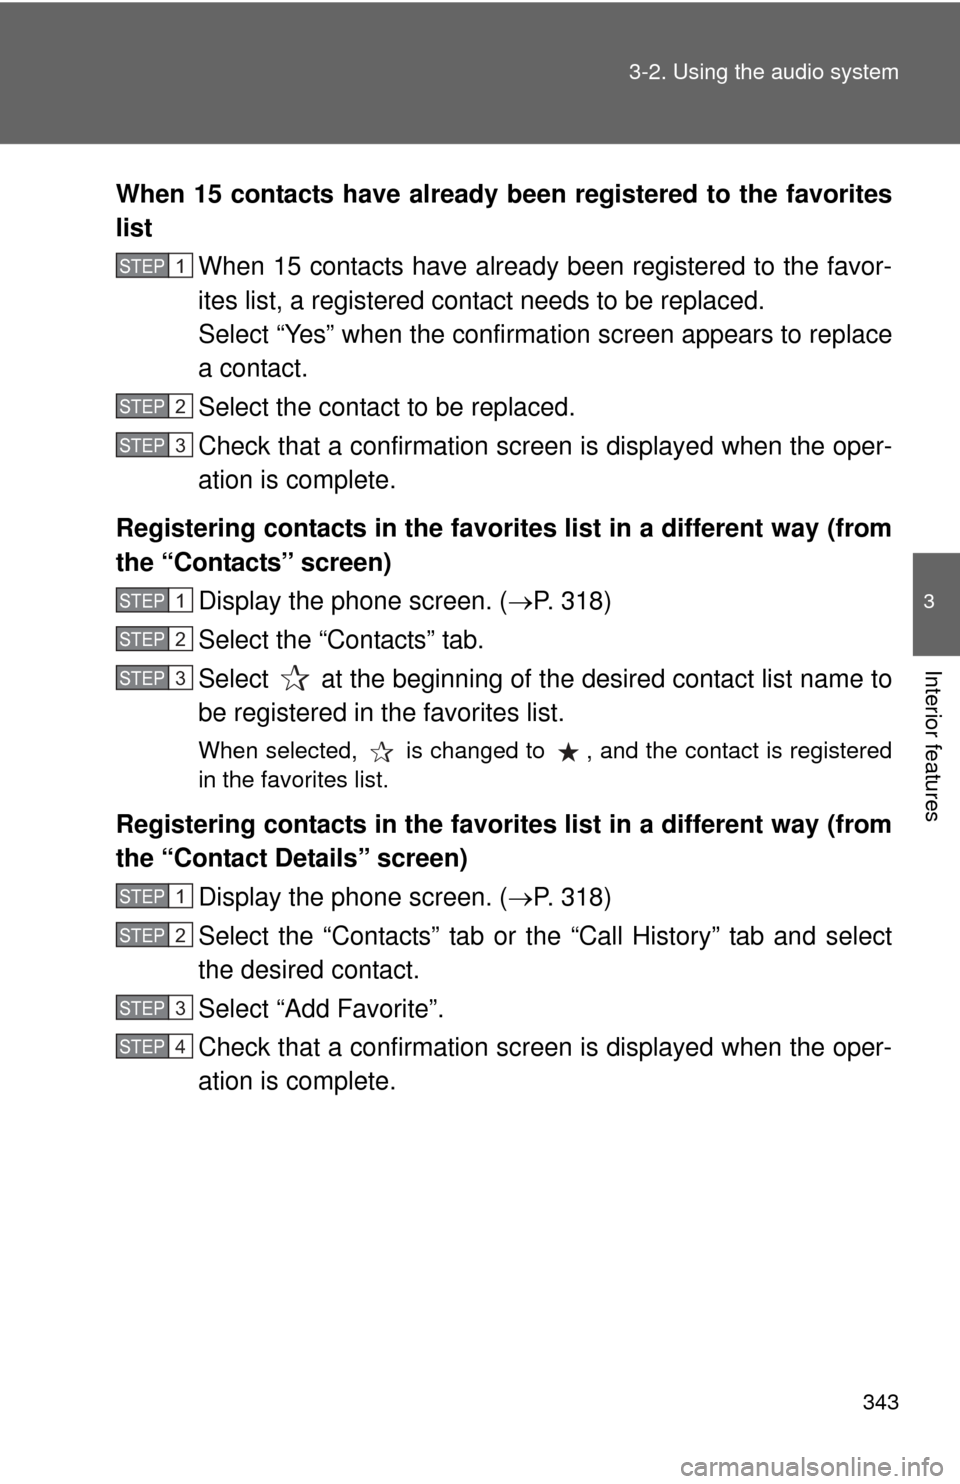
When 15 contacts have already been registered to the favorites
list
When 15 contacts have already been registered to the favor-
ites list, a registered contact needs to be replaced.
Select “Yes” when the confirmation screen appears to replace
a contact.
Select the contact to be replaced.
Check that a confirmation screen is displayed when the oper-
ation is complete.
Registering contacts in the favorites list in a different way (from
the “Contacts” screen) Display the phone screen. ( P. 318)
Select the “Contacts” tab.
Select at the beginning of the desired contact list name to
be registered in the favorites list.
When selected, is changed to , and the contact is registered
in the favorites list.
Registering contacts in the favorites list in a different way (from
the “Contact Details” screen)
Display the phone screen. ( P. 318)
Select the “Contacts” tab or the “Call History” tab and select
the desired contact.
Select “Add Favorite”.
Check that a confirmation screen is displayed when the oper-
ation is complete.
STEP1
STEP2
STEP3
STEP1
STEP2
STEP3
STEP1
STEP2
STEP3
STEP4
Page 344 of 620
344 3-2. Using the audio system
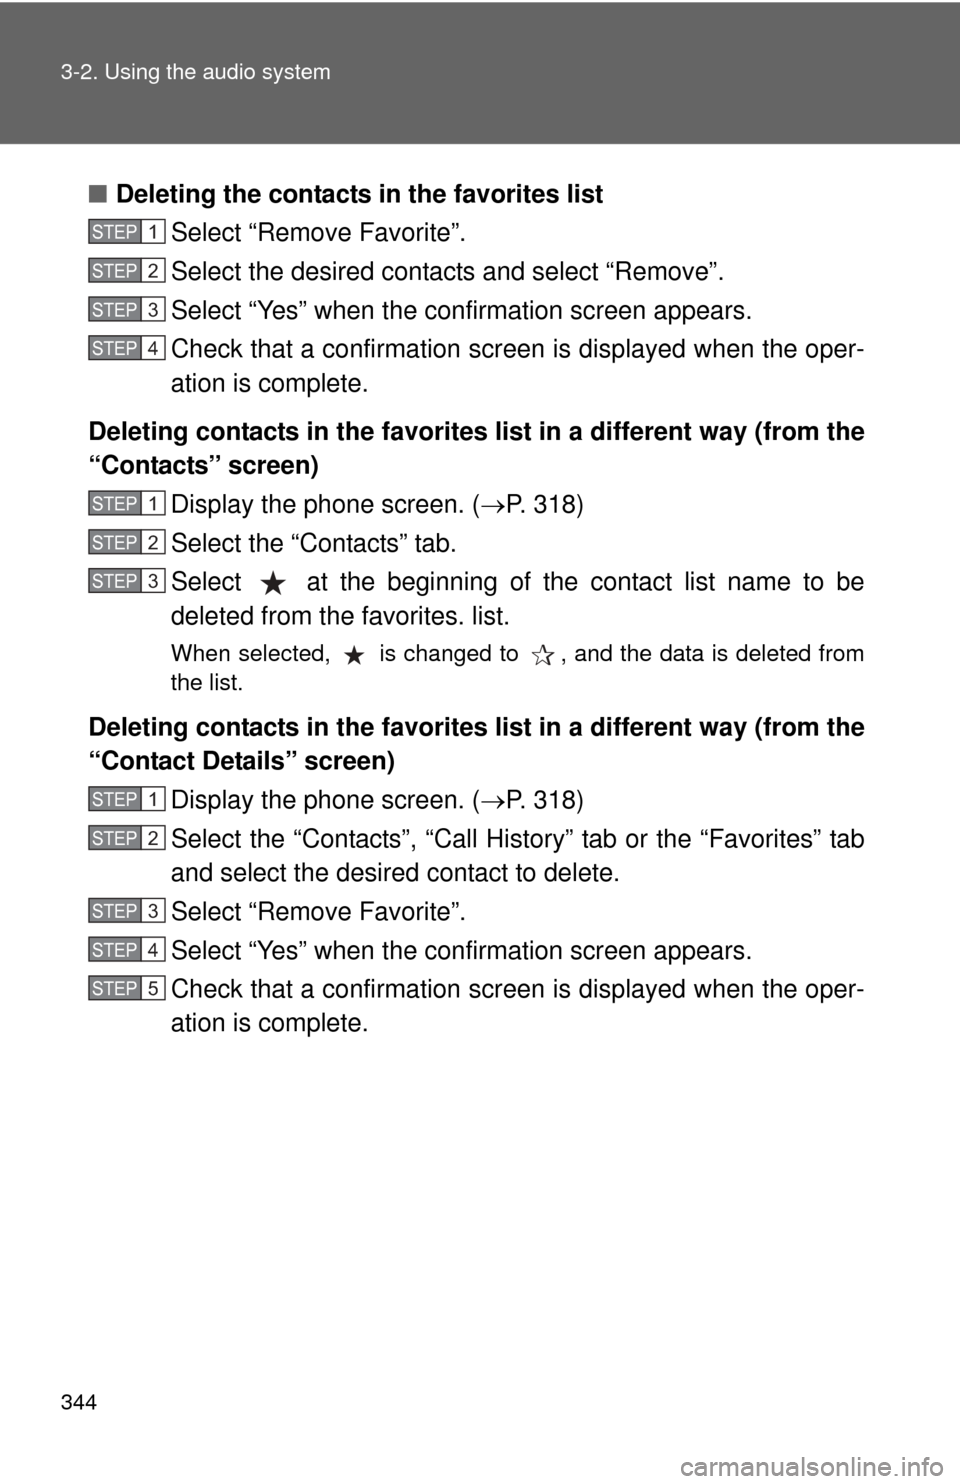
■Deleting the contacts in the favorites list
Select “Remove Favorite”.
Select the desired contacts and select “Remove”.
Select “Yes” when the confirmation screen appears.
Check that a confirmation screen is displayed when the oper-
ation is complete.
Deleting contacts in the favorites list in a different way (from the
“Contacts” screen) Display the phone screen. ( P. 318)
Select the “Contacts” tab.
Select at the beginning of the contact list name to be
deleted from the favorites. list.
When selected, is changed to , and the data is deleted from
the list.
Deleting contacts in the favorites list in a different way (from the
“Contact Details” screen) Display the phone screen. ( P. 318)
Select the “Contacts”, “Call History” tab or the “Favorites” tab
and select the desired contact to delete.
Select “Remove Favorite”.
Select “Yes” when the confirmation screen appears.
Check that a confirmation screen is displayed when the oper-
ation is complete.
STEP1
STEP2
STEP3
STEP4
STEP1
STEP2
STEP3
STEP1
STEP2
STEP3
STEP4
STEP5
Page 345 of 620
345
3-2. Using the audio system
3
Interior features
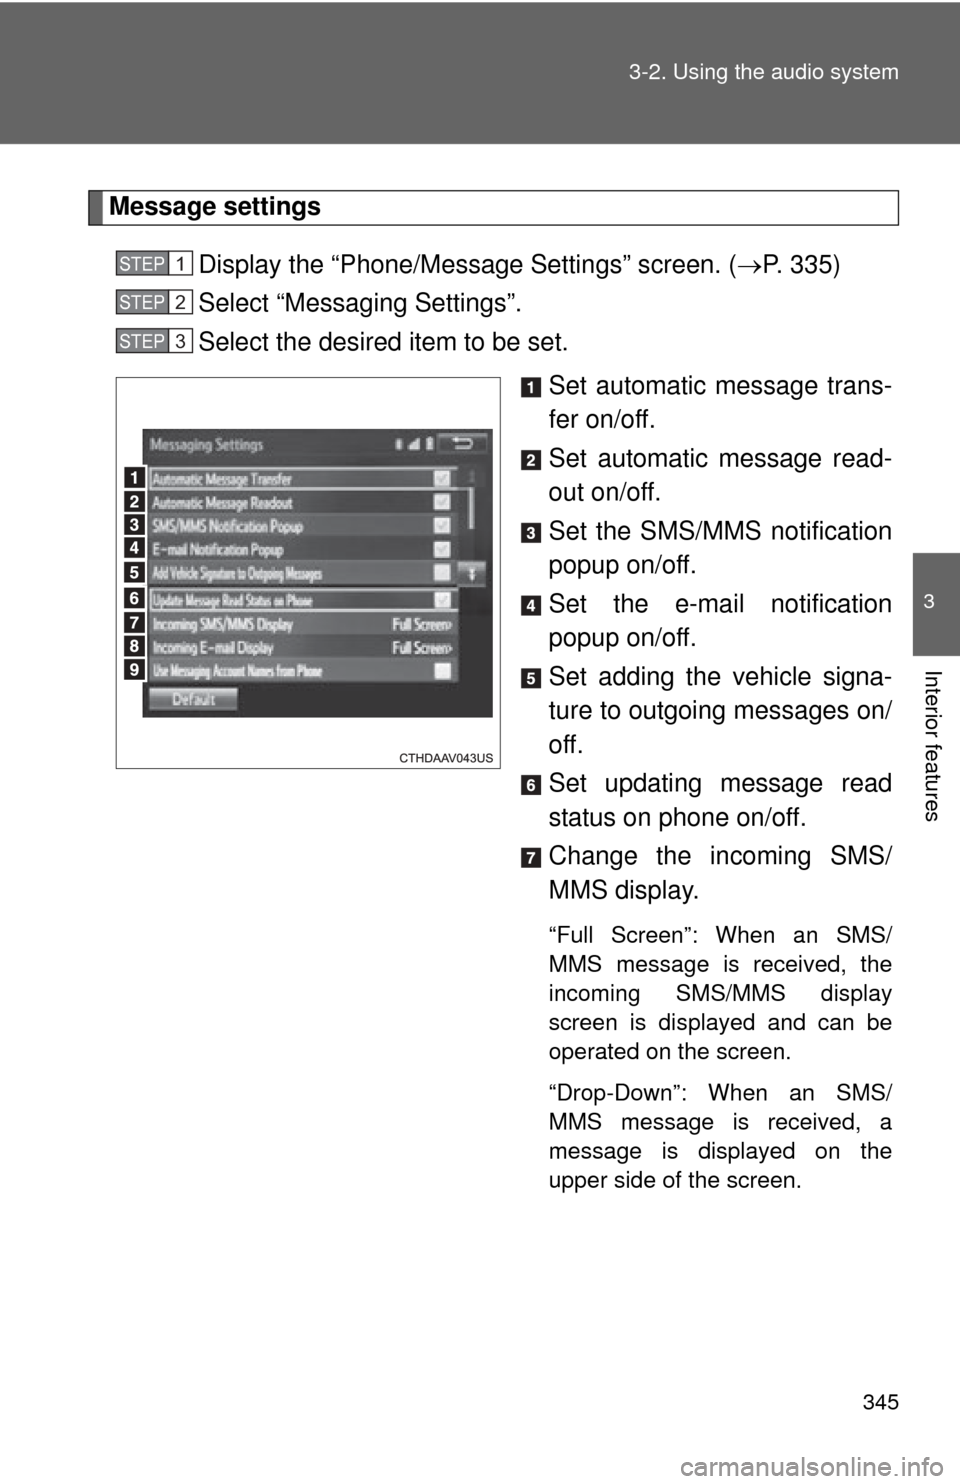
Message settings
Display the “Phone/Message Settings” screen. ( P. 335)
Select “Messaging Settings”.
Select the desired item to be set.
Set automatic message trans-
fer on/off.
Set automatic message read-
out on/off.
Set the SMS/MMS notification
popup on/off.
Set the e-mail notification
popup on/off.
Set adding the vehicle signa-
ture to outgoing messages on/
off.
Set updating message read
status on phone on/off.
Change the incoming SMS/
MMS display.
“Full Screen”: When an SMS/
MMS message is received, the
incoming SMS/MMS display
screen is displayed and can be
operated on the screen.
“Drop-Down”: When an SMS/
MMS message is received, a
message is displayed on the
upper side of the screen.
STEP1
STEP2
STEP3
Page 346 of 620
346 3-2. Using the audio system
Change the incoming e-mail
display.
“Full Screen”: When an e-mail is
received, the incoming e-mail dis-
play screen is the displayed and
can be operated on the screen.
“Drop-Down”: When an e-mail is
received, a message is displayed
on the upper side of the screen.
Set display of messaging
account names on the inbox
tab on/off.
When set to on, messaging
account names used on the cellu-
lar phone will be displayed.
■Displaying the “Messaging Settings ” screen in a different way
Display the phone screen. ( P. 318)
Select .
Select “Settings”.
■ To return to the default volume settings
Select “Default”, and then “Yes”.
STEP1
STEP2
STEP3
Page 347 of 620
347
3-2. Using the audio system
3
Interior features
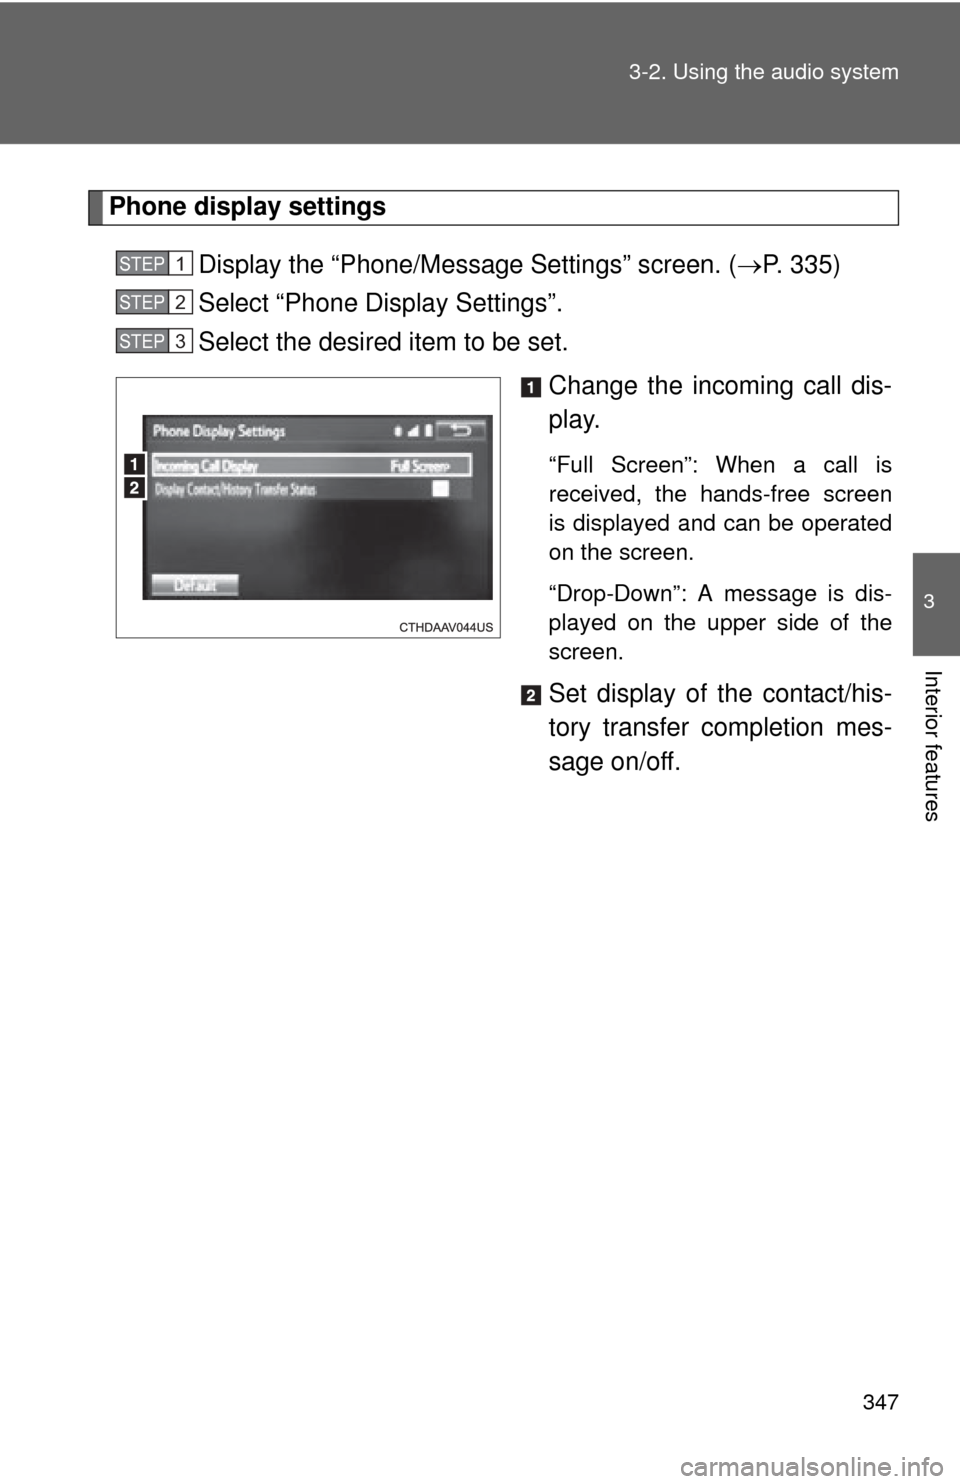
Phone display settings
Display the “Phone/Message Settings” screen. ( P. 335)
Select “Phone Display Settings”.
Select the desired item to be set.
Change the incoming call dis-
play.
“Full Screen”: When a call is
received, the hands-free screen
is displayed and can be operated
on the screen.
“Drop-Down”: A message is dis-
played on the upper side of the
screen.
Set display of the contact/his-
tory transfer completion mes-
sage on/off.
STEP1
STEP2
STEP3
Page 357 of 620
357
3-2. Using the audio system
3
Interior features
Voice command system
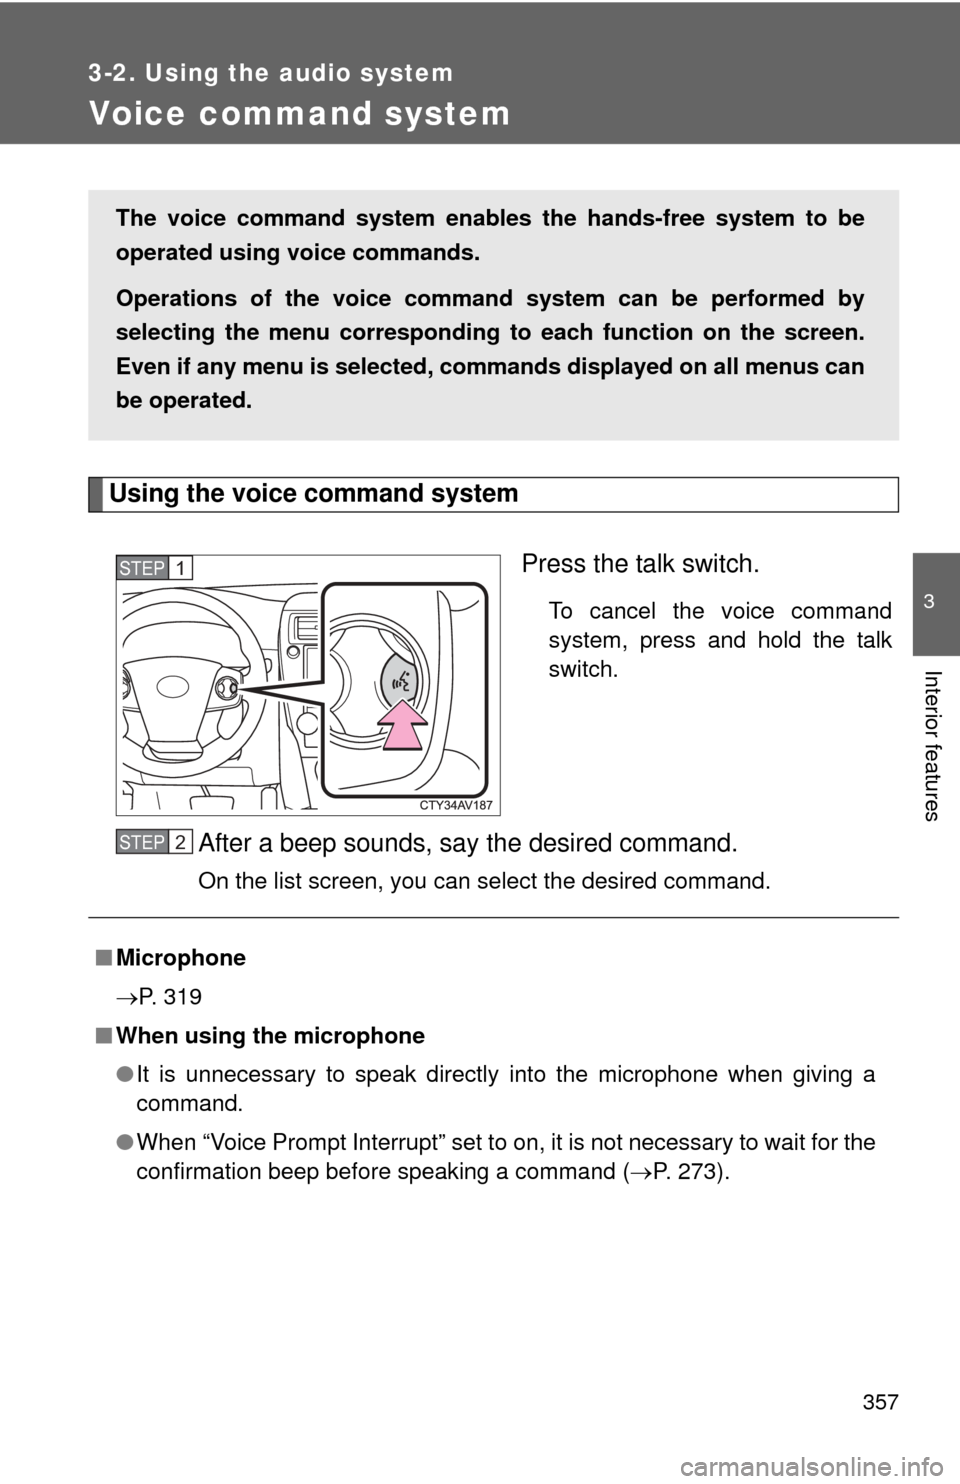
Using the voice command systemPress the talk switch.
To cancel the voice command
system, press and hold the talk
switch.
After a beep sounds, say the desired command.
On the list screen, you can select the desired command.
The voice command system enabl es the hands-free system to be
operated using voice commands.
Operations of the voice command system can be performed by
selecting the menu corr esponding to each function on the screen.
Even if any menu is selected, co mmands displayed on all menus can
be operated.
STEP1
■ Microphone
P. 319
■ When using the microphone
●It is unnecessary to speak directly into the microphone when giving a
command.
● When “Voice Prompt Interrupt” set to on, it is not necessary to wait for the
confirmation beep before speaking a command ( P. 273).
STEP2
Page 359 of 620
359
3-2. Using the audio system
3
Interior features
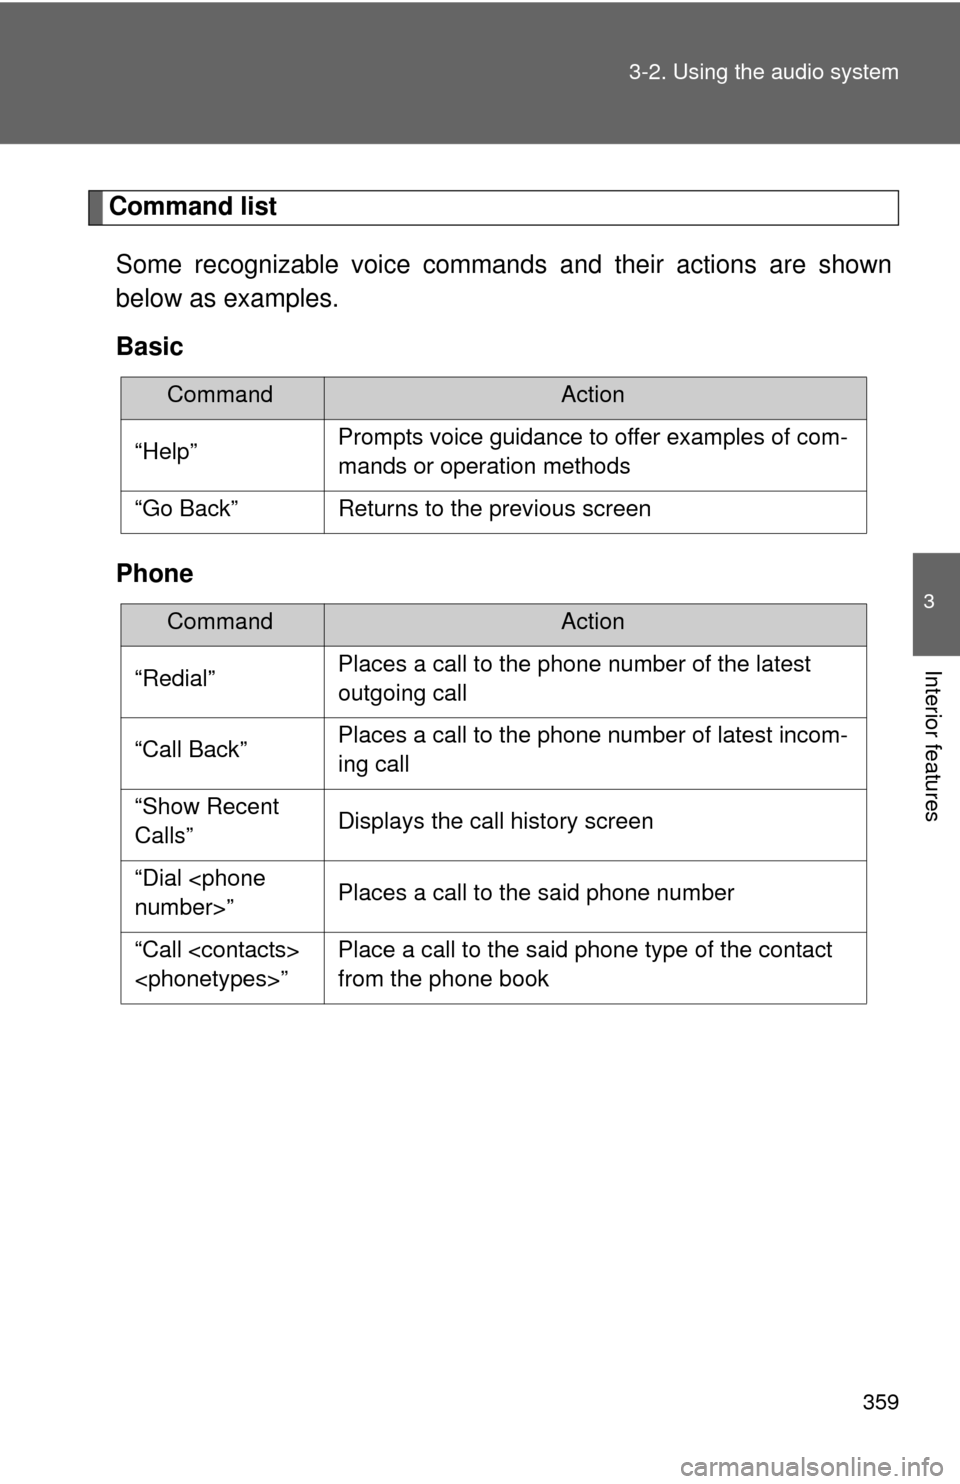
Command list
Some recognizable voice commands and their actions are shown
below as examples.
Basic
Phone
CommandAction
“Help”Prompts voice guidance to offer examples of com-
mands or operation methods
“Go Back”Returns to the previous screen
CommandAction
“Redial”Places a call to the phone number of the latest
outgoing call
“Call Back”Places a call to the phone number of latest incom-
ing call
“Show Recent
Calls”Displays the call history screen
“Dial
“Call
from the phone book
Page 360 of 620
360
3-2. Using the audio system
Rear view monitor system
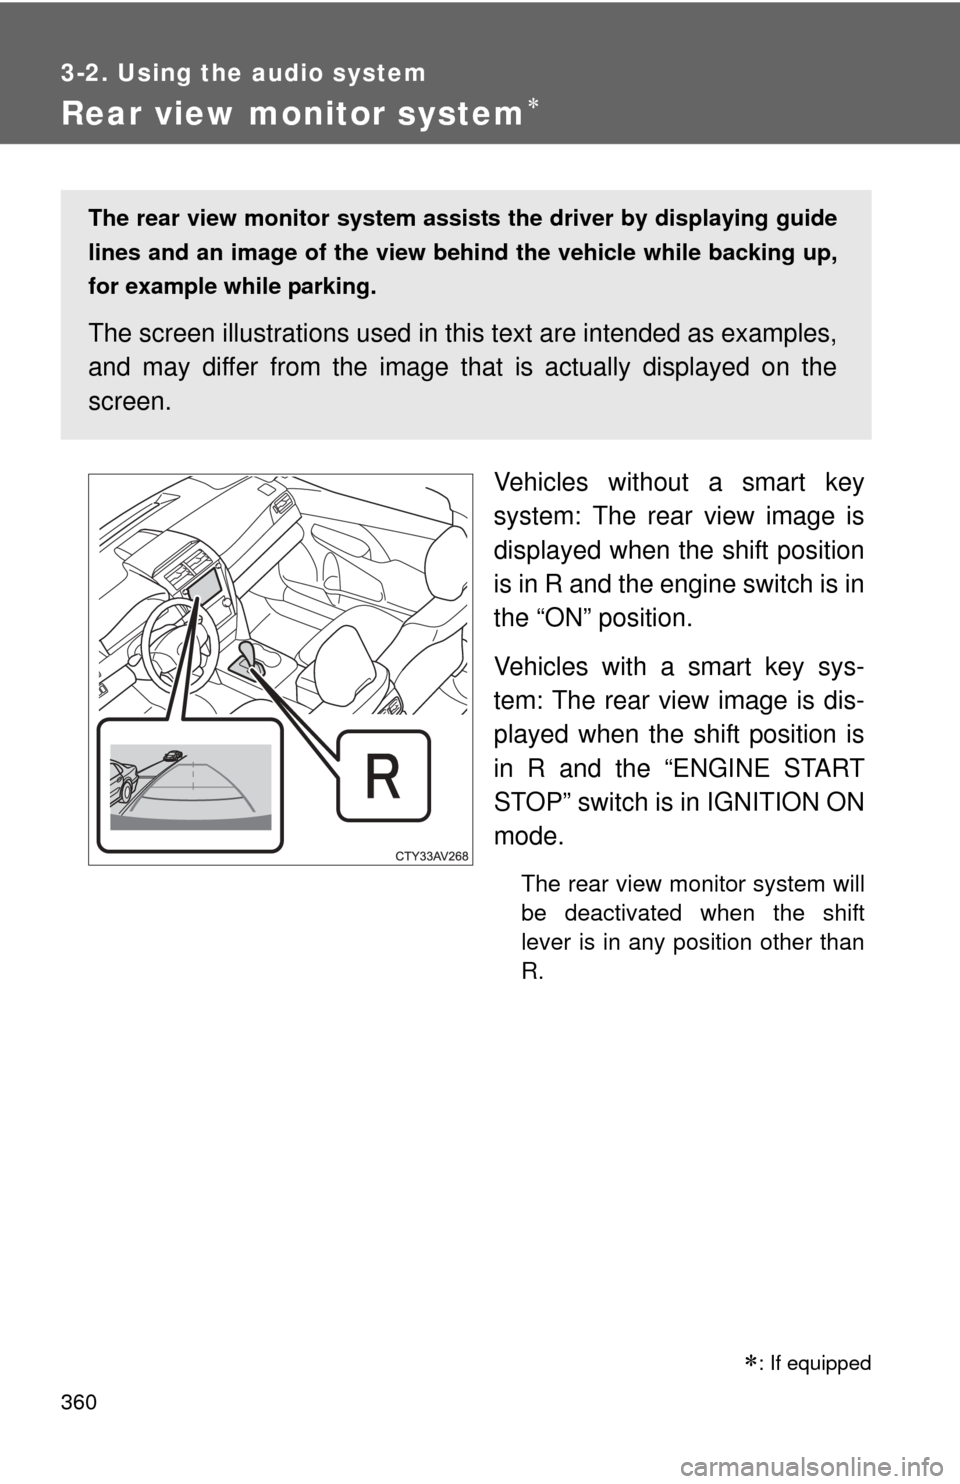
Vehicles without a smart key
system: The rear view image is
displayed when the shift position
is in R and the engine switch is in
the “ON” position.
Vehicles with a smart key sys-
tem: The rear view image is dis-
played when the shift position is
in R and the “ENGINE START
STOP” switch is in IGNITION ON
mode.
The rear view monitor system will
be deactivated when the shift
lever is in any position other than
R.
: If equipped
The rear view monitor system assists the driver by displaying guide
lines and an image of the view behind the vehicle while backing up,
for example while parking.
The screen illustrations used in th is text are intended as examples,
and may differ from the image that is actually displayed on the
screen.