check engine TOYOTA CAMRY HYBRID 2010 XV40 / 8.G User Guide
[x] Cancel search | Manufacturer: TOYOTA, Model Year: 2010, Model line: CAMRY HYBRID, Model: TOYOTA CAMRY HYBRID 2010 XV40 / 8.GPages: 497, PDF Size: 9.63 MB
Page 330 of 497
329
4-2. Maintenance
4
Maintenance and care
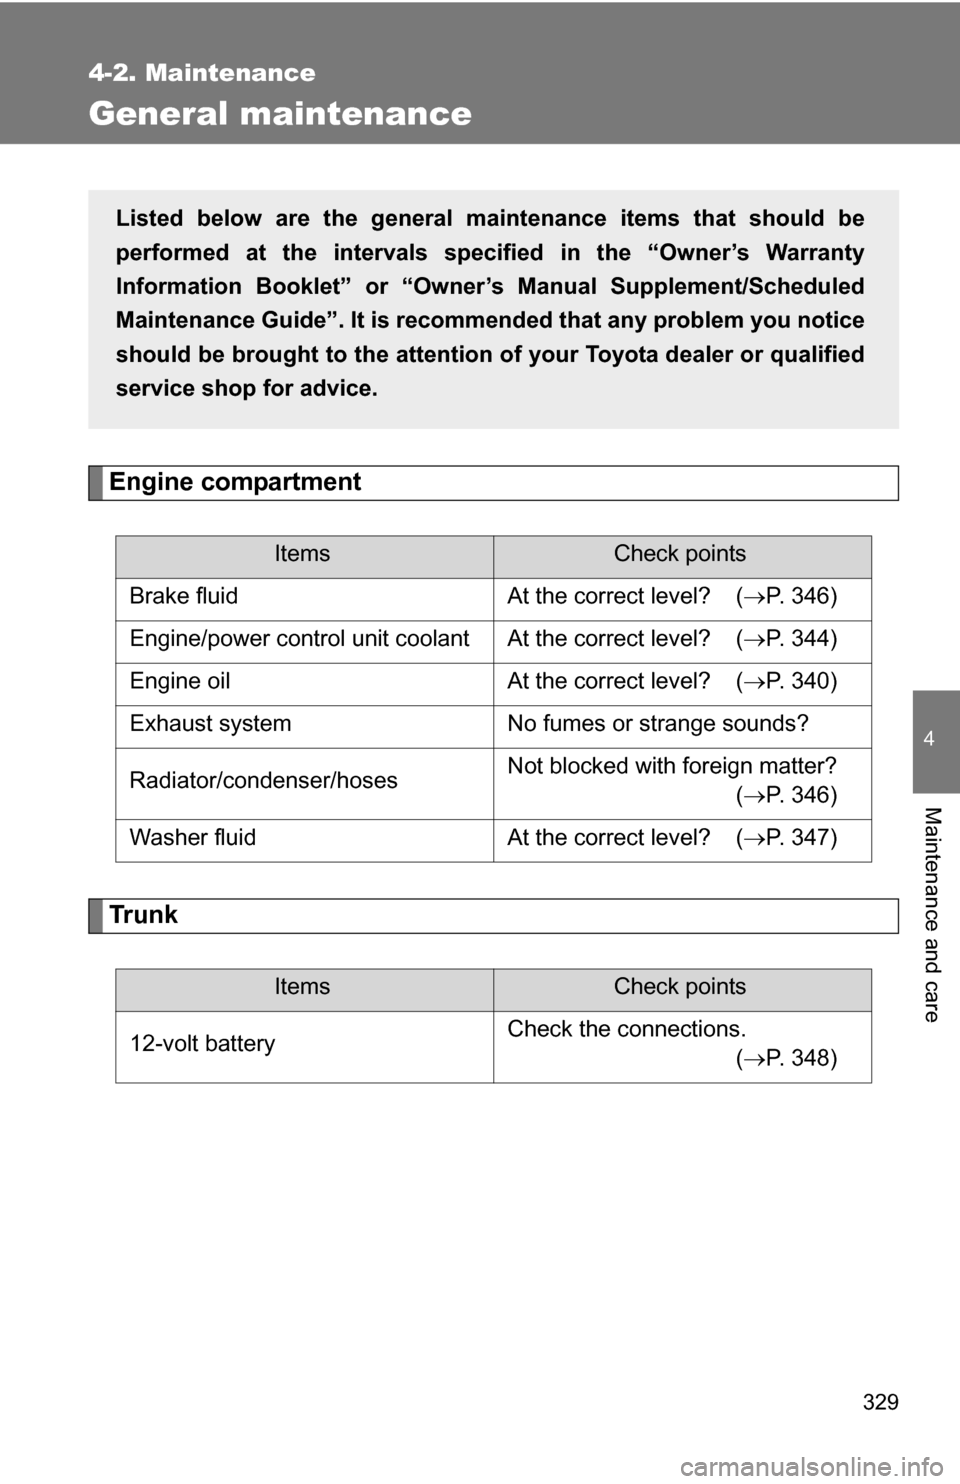
General maintenance
Engine compartment
Trunk
ItemsCheck points
Brake fluid At the correct level? ( P. 346)
Engine/power control unit coolant At the correct level? ( P. 344)
Engine oil At the correct level? ( P. 340)
Exhaust system No fumes or strange sounds?
Radiator/condenser/hoses Not blocked with foreign matter?
(
P. 346)
Washer fluid At the correct level? (P. 347)
ItemsCheck points
12-volt battery Check the connections.
(P. 348)
Listed below are the general maintenance items that should be
performed at the intervals specified in the “Owner’s Warranty
Information Booklet” or “Owner’s Manual Supplement/Scheduled
Maintenance Guide”. It is recomme nded that any problem you notice
should be brought to the attention of your Toyota dealer or qualified
service shop for advice.
Page 332 of 497
331
4-2. Maintenance
4
Maintenance and care
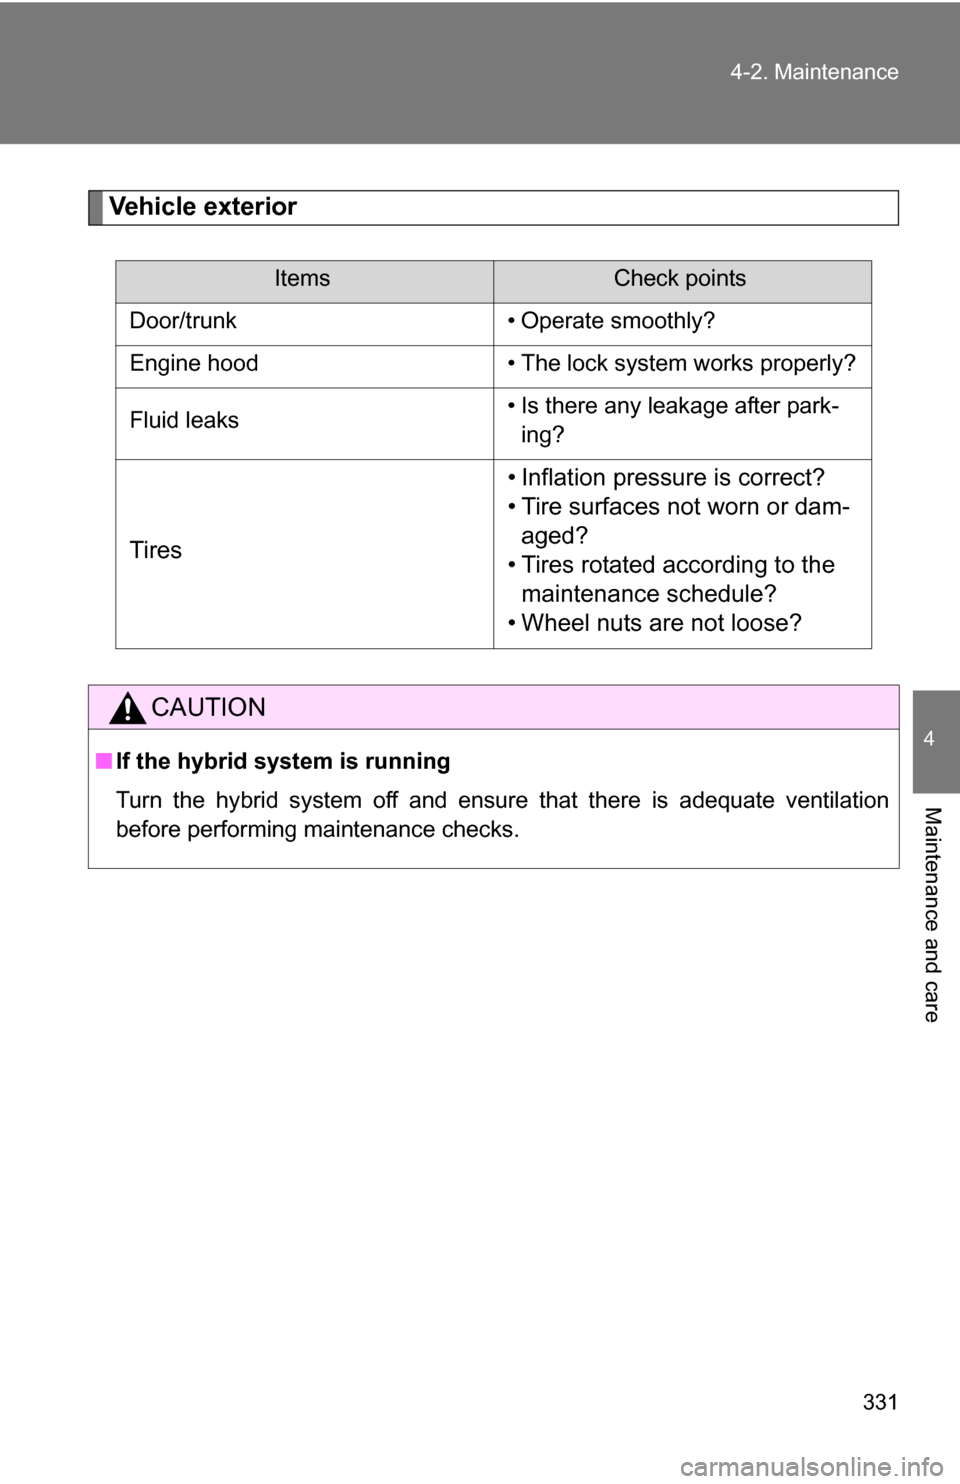
Vehicle exterior
ItemsCheck points
Door/trunk • Operate smoothly?
Engine hood • The lock system works properly?
Fluid leaks • Is there any leakage after park-
ing?
Tires • Inflation pressure is correct?
• Tire surfaces not worn or dam-
aged?
• Tires rotated according to the maintenance schedule?
• Wheel nuts are not loose?
CAUTION
■ If the hybrid system is running
Turn the hybrid system off and ensure that there is adequate ventilation
before performing maintenance checks.
Page 341 of 497
340 4-3. Do-it-yourself maintenance
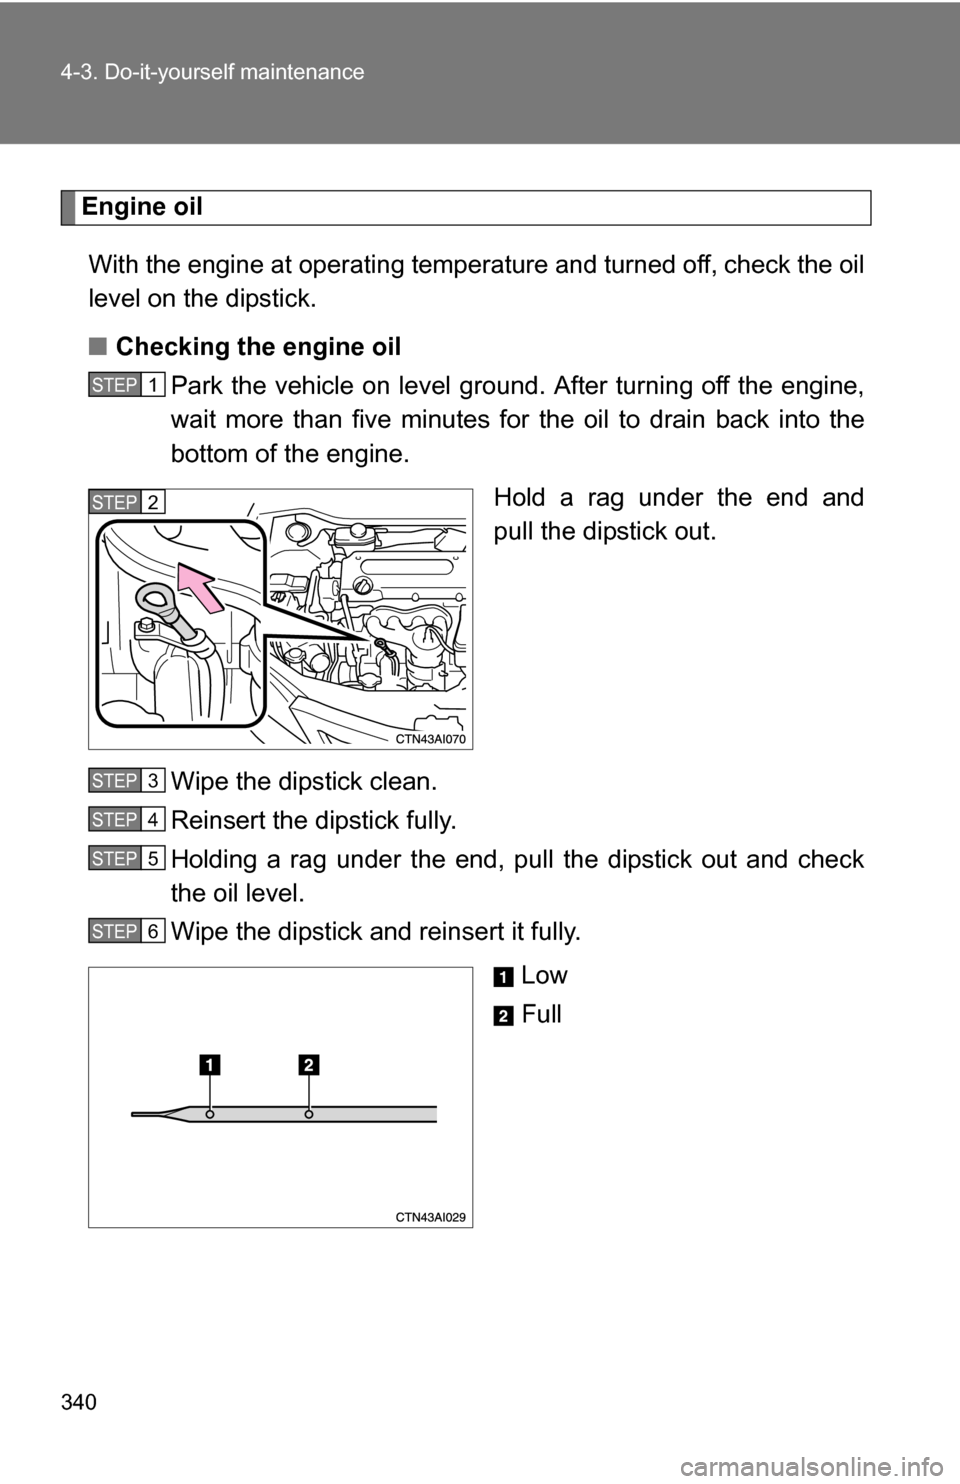
Engine oilWith the engine at operating temperature and turned off, check the oil
level on the dipstick.
■ Checking the engine oil
Park the vehicle on level gro und. After turning off the engine,
wait more than five minutes for the oil to drain back into the
bottom of the engine.
Hold a rag under the end and
pull the dipstick out.
Wipe the dipstick clean.
Reinsert the dipstick fully.
Holding a rag under the end, pull the dipstick out and check
the oil level.
Wipe the dipstick and reinsert it fully. Low
Full
STEP1
STEP2
STEP3
STEP4
STEP5
STEP6
Page 342 of 497
341
4-3. Do-it-yourself maintenance
4
Maintenance and care
■
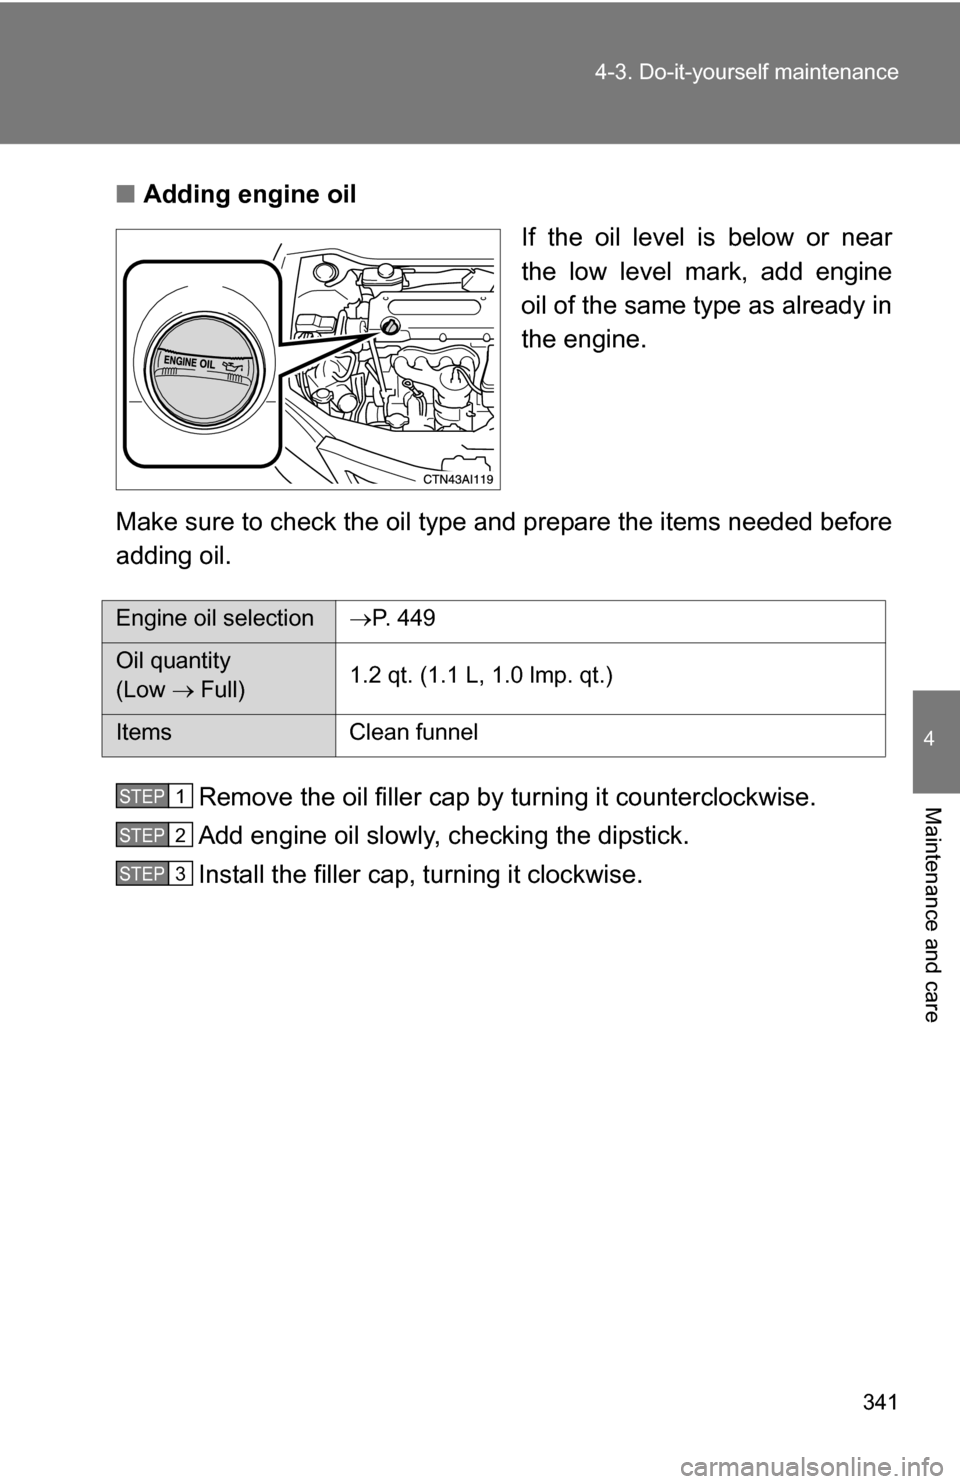
Adding engine oil
If the oil level is below or near
the low level mark, add engine
oil of the same type as already in
the engine.
Make sure to check the oil type and prepare the items needed before
adding oil.
Remove the oil filler cap by turning it counterclockwise.
Add engine oil slowly, checking the dipstick.
Install the filler cap, turning it clockwise.
Engine oil selection P. 449
Oil quantity
(Low Full) 1.2 qt. (1.1 L, 1.0 lmp. qt.)
Items
Clean funnel
STEP1
STEP2
STEP3
Page 344 of 497
343
4-3. Do-it-yourself maintenance
4
Maintenance and care
CAUTION
■
Used engine oil
●Used engine oil contains potentially harmful contaminants which may
cause skin disorders such as inflammation or skin cancer, so care should
be taken to avoid prolonged and repeated contact. To remove used engine
oil from your skin, wash thoroughly with soap and water.
● Dispose of used oil and filters only in a safe and acceptable manner. Do
not dispose of used oil and filters in household trash, in sewers or onto the
ground. Call your Toyota dealer, service station or auto parts store for
information concerning recycling or disposal.
● Do not leave used engine oil within the reach of children.
NOTICE
■To prevent serious engine damage
Check the oil level on a regular basis.
■ When replacing the engine oil
●Be careful not to spill engine oil on the vehicle components.
● Avoid overfilling, as the engine could be damaged.
● Check the oil level on the dipstick every time you refill the vehicle.
● Be sure the engine oil filler cap is properly tightened.
Page 374 of 497
373
4-3. Do-it-yourself maintenance
4
Maintenance and care
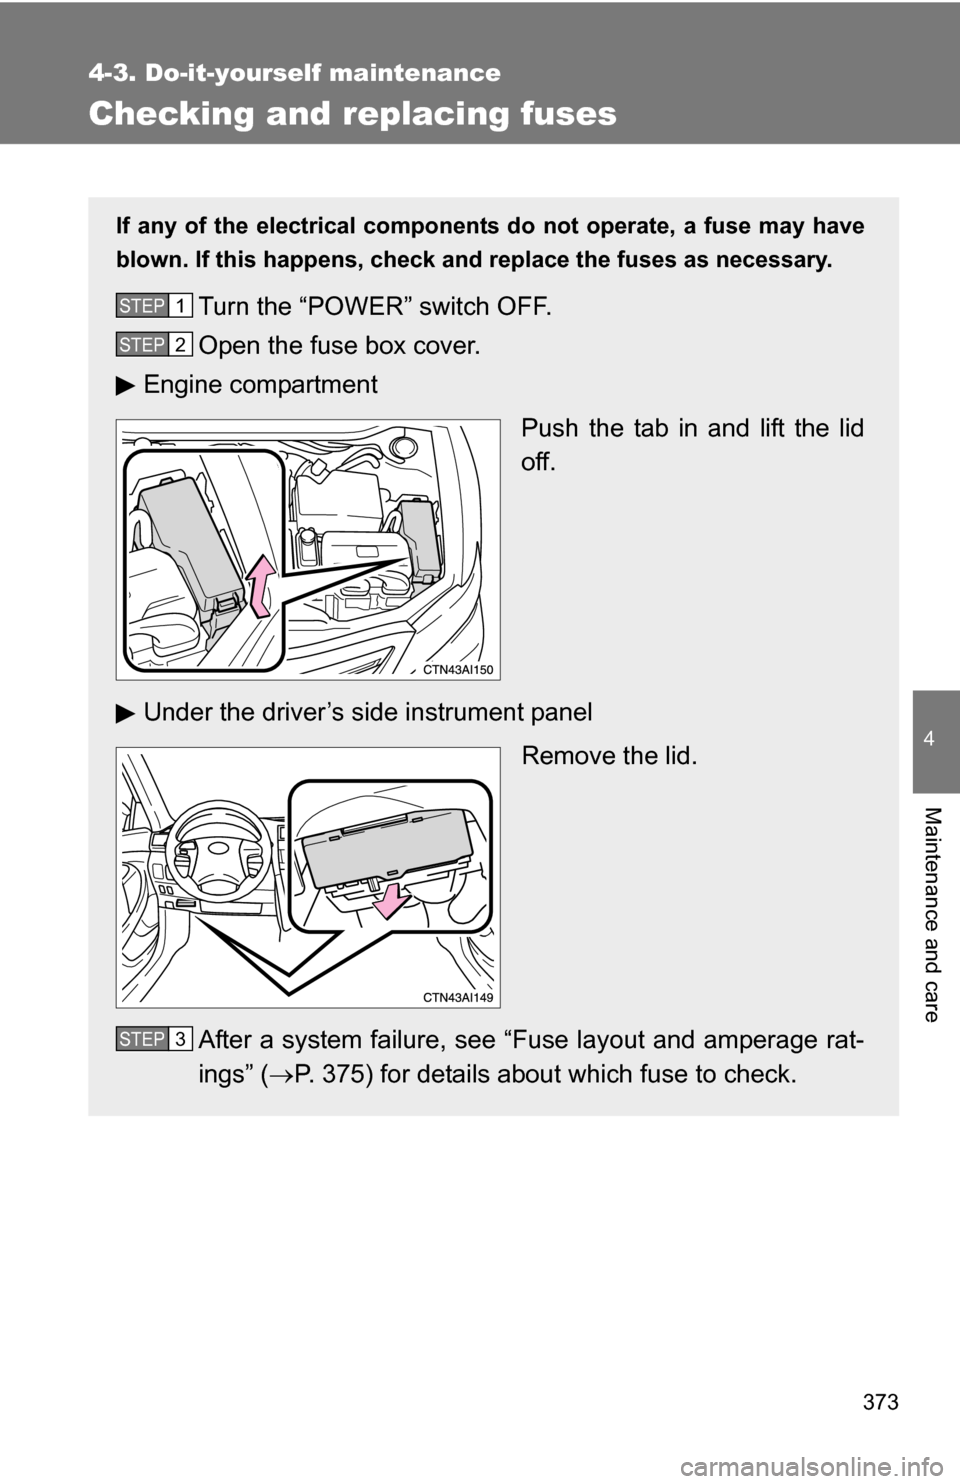
Checking and replacing fuses
If any of the electrical components do not operate, a fuse may have
blown. If this happens, check and replace the fuses as necessary.
Turn the “POWER” switch OFF.
Open the fuse box cover.
Engine compartment
Push the tab in and lift the lid
off.
Under the driver’s side instrument panel Remove the lid.
After a system failure, see “Fuse layout and amperage rat-
ings” ( P. 375) for details about which fuse to check.STEP1
STEP2
STEP3
Page 411 of 497
410 5-2. Steps to take in an emergency
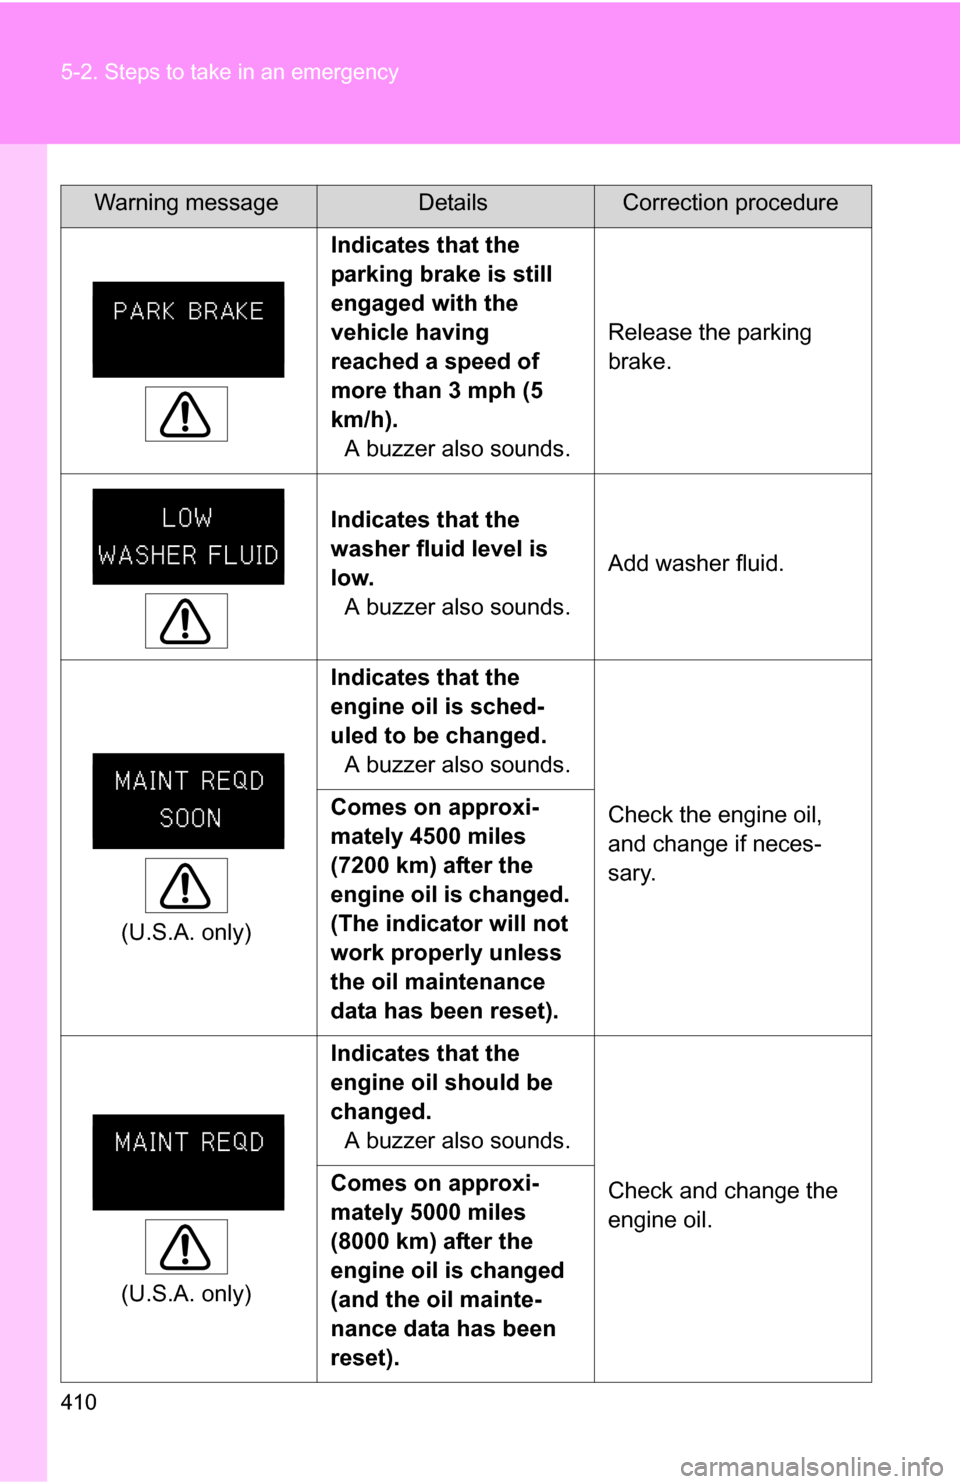
Indicates that the
parking brake is still
engaged with the
vehicle having
reached a speed of
more than 3 mph (5
km/h).
A buzzer also sounds. Release the parking
brake.
Indicates that the
washer fluid level is
low.
A buzzer also sounds. Add washer fluid.
(U.S.A. only) Indicates that the
engine oil is sched-
uled to be changed.
A buzzer also sounds.
Check the engine oil,
and change if neces-
sary.
Comes on approxi-
mately 4500 miles
(7200 km) after the
engine oil is changed.
(The indicator will not
work properly unless
the oil maintenance
data has been reset).
(U.S.A. only) Indicates that the
engine oil should be
changed.
A buzzer also sounds.
Check and change the
engine oil.
Comes on approxi-
mately 5000 miles
(8000 km) after the
engine oil is changed
(and the oil mainte-
nance data has been
reset).
Warning messageDetailsCorrection procedure
Page 413 of 497
412 5-2. Steps to take in an emergency
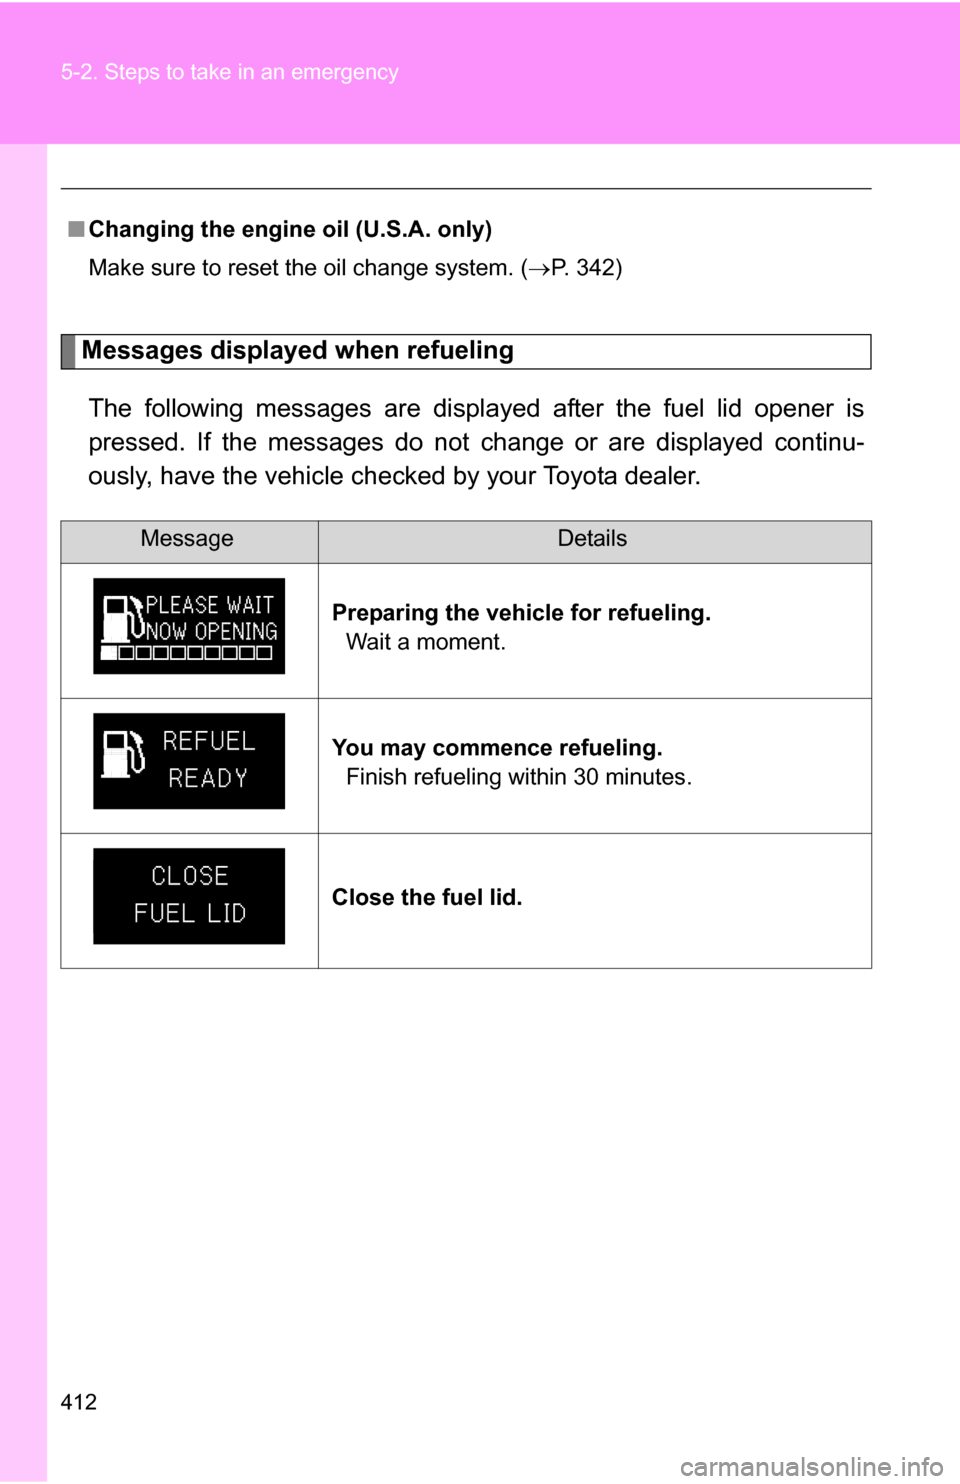
Messages displayed when refuelingThe following messages are displayed after the fuel lid opener is
pressed. If the messages do not change or are displayed continu-
ously, have the vehicle check ed by your Toyota dealer.
■Changing the engine oil (U.S.A. only)
Make sure to reset the oil change system. ( P. 342)
MessageDetails
Preparing the vehicle for refueling. Wait a moment.
You may commence refueling. Finish refueling within 30 minutes.
Close the fuel lid.
Page 436 of 497
5
When trouble arises
435
5-2. Steps to take in an emergency
■
Avoiding a discharged 12-volt battery
●Turn off the headlights and the audio system while the hybrid system is
turned off.
● Turn off any unnecessary electrical components when the vehicle is run-
ning at a low speed for an extended period, such as in heavy traffic, etc.
■ When the 12-volt battery is removed or discharged
The hybrid system may not start. ( P. 349)
■ Starting the hybrid system when the 12-volt battery is discharged
The hybrid system cannot be started by push-starting.
Start the engine of the seco nd vehicle. Increase the gaso-
line engine speed slightly and maintain at that level for
approximately 5 minutes to recharge the 12-volt battery of
your vehicle.
Open and close any of the doors with the “POWER” switch
OFF.
Maintain the engine speed of the second vehicle and turn
the “POWER” switch to ON mode, then start the hybrid sys-
tem.
Make sure the “READY” indicator comes on. If the indicator
does not comes on, contact your Toyota dealer.
Once the hybrid system has started, remove the jumper
cables in the exact reverse order in which they were con-
nected.
Once the hybrid system starts, have the vehicle checked at your
Toyota dealer as soon as possible.STEP3
STEP4
STEP5
STEP6
Page 439 of 497
438
5-2. Steps to take in an emergency
If your vehicle overheats
Correction procedures■ If “WATER TEMP” is shown on the multi-information display
Stop the vehicle in a safe place and turn off the air condition-
ing system.
Check to see if steam is coming out from under the hood.
If you see steam: Stop the hybrid system. Carefully lift the hood after the
steam subsides and then restart the hybrid system.
If you do not see steam: Leave the hybrid system operating and carefully lift the
hood.
Check to see if the cooling fan is operating.
If the fans are operating: Wait until the temperature of the engine (shown on the
instrument cluster) begins to fall and then stop the hybrid
system.
If the fans are not operating: Stop the hybrid system immediately and call your Toyota
dealer.
The following may indicate that your vehicle is overheating:
●“WATER TEMP” is shown on th e multi-information display:
The engine may be overheating.
● “HYBRID SYSTEM OVER HEAT” is shown on the multi-informa-
tion display:
The power control unit may be overheating.
Follow the correction procedure as described below.
STEP1
STEP2
STEP3