ECU TOYOTA CAMRY HYBRID 2014 XV50 / 9.G Service Manual
[x] Cancel search | Manufacturer: TOYOTA, Model Year: 2014, Model line: CAMRY HYBRID, Model: TOYOTA CAMRY HYBRID 2014 XV50 / 9.GPages: 612, PDF Size: 7.26 MB
Page 464 of 612

464 4-3. Do-it-yourself maintenance
13 R/B NO.250 A IGCT-MAIN, INV W/PMP
14 EPS 80 A Electric power steering
15 S-HORN 7.5 A S-HORN
16 DEICER 15 A No circuit
17 HORN 10 A Horns
18 EFI NO.2 15 AMultiport fuel injection system/
sequential multiport fuel injection
system
19 EFI NO.3 7.5 AMultiport fuel injection system/
sequential multiport fuel injection
system
20 INJ 7.5 AMultiport fuel injection system/
sequential multiport fuel injection
system
21 ECU-IG2 NO.3 7.5 A Multiport fuel injection system/
sequential multiport fuel injection
system, steering lock system,
hybrid system
22 IGN 15 A Starter system
23 D/L-AM2 20 A No circuit
24 IG2-MAIN 25 AIGN, INJ, METER-IG2, ECU-IG2
NO.3, A/B, ECU-IG2 NO.2, ECU-
IG2 NO.1
25 DC/DC-S 7.5 A Hybrid system
26 MAYDAY 5 A MAYDAY
27 TURN&HAZ 15 A Turn signal lights, emergency
flashers, gauge and meters
28 STRG LOCK 10 A Steering lock system
29 AMP 15 A Audio system
30 H-LP LH-LO 15 A
*1
Left-hand headlight (low beam)
20 A*2
FuseAmpereCircuit
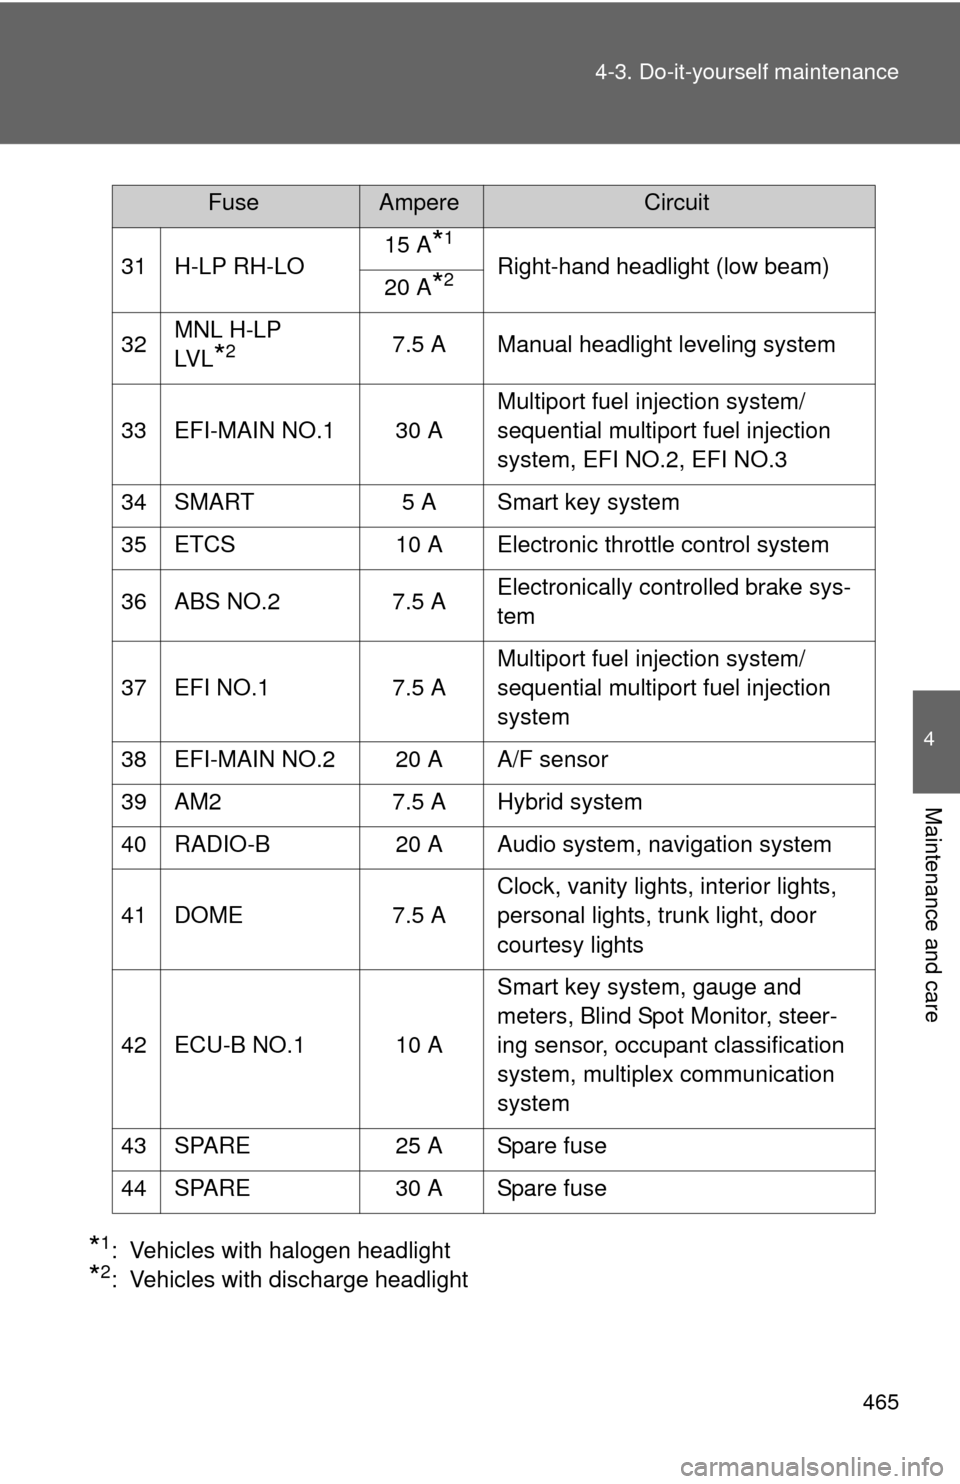
Page 465 of 612
465
4-3. Do-it-yourself maintenance
4
Maintenance and care
*1: Vehicles with halogen headlight
*2: Vehicles with discharge headlight
31 H-LP RH-LO
15 A
*1
Right-hand headlight (low beam)
20 A*2
32 MNL H-LP
LV L*27.5 A Manual headlight leveling system
33 EFI-MAIN NO.1 30 A Multiport fuel injection system/
sequential multiport fuel injection
system, EFI NO.2, EFI NO.3
34 SMART 5 A Smart key system
35 ETCS 10 A Electronic throttle control system
36 ABS NO.2 7.5 A Electronically controlled brake sys-
tem
37 EFI NO.1 7.5 A Multiport fuel injection system/
sequential multiport fuel injection
system
38 EFI-MAIN NO.2 20 A A/F sensor
39 AM2 7.5 A Hybrid system
40 RADIO-B 20 A Audio system, navigation system
41 DOME 7.5 A Clock, vanity lights, interior lights,
personal lights, trunk light, door
courtesy lights
42 ECU-B NO.1 10 A Smart key system, gauge and
meters, Blind Spot Monitor, steer-
ing sensor, occupant classification
system, multiplex communication
system
43 SPARE 25 A Spare fuse
44 SPARE 30 A Spare fuse
FuseAmpereCircuit
Page 467 of 612
467
4-3. Do-it-yourself maintenance
4
Maintenance and care
■
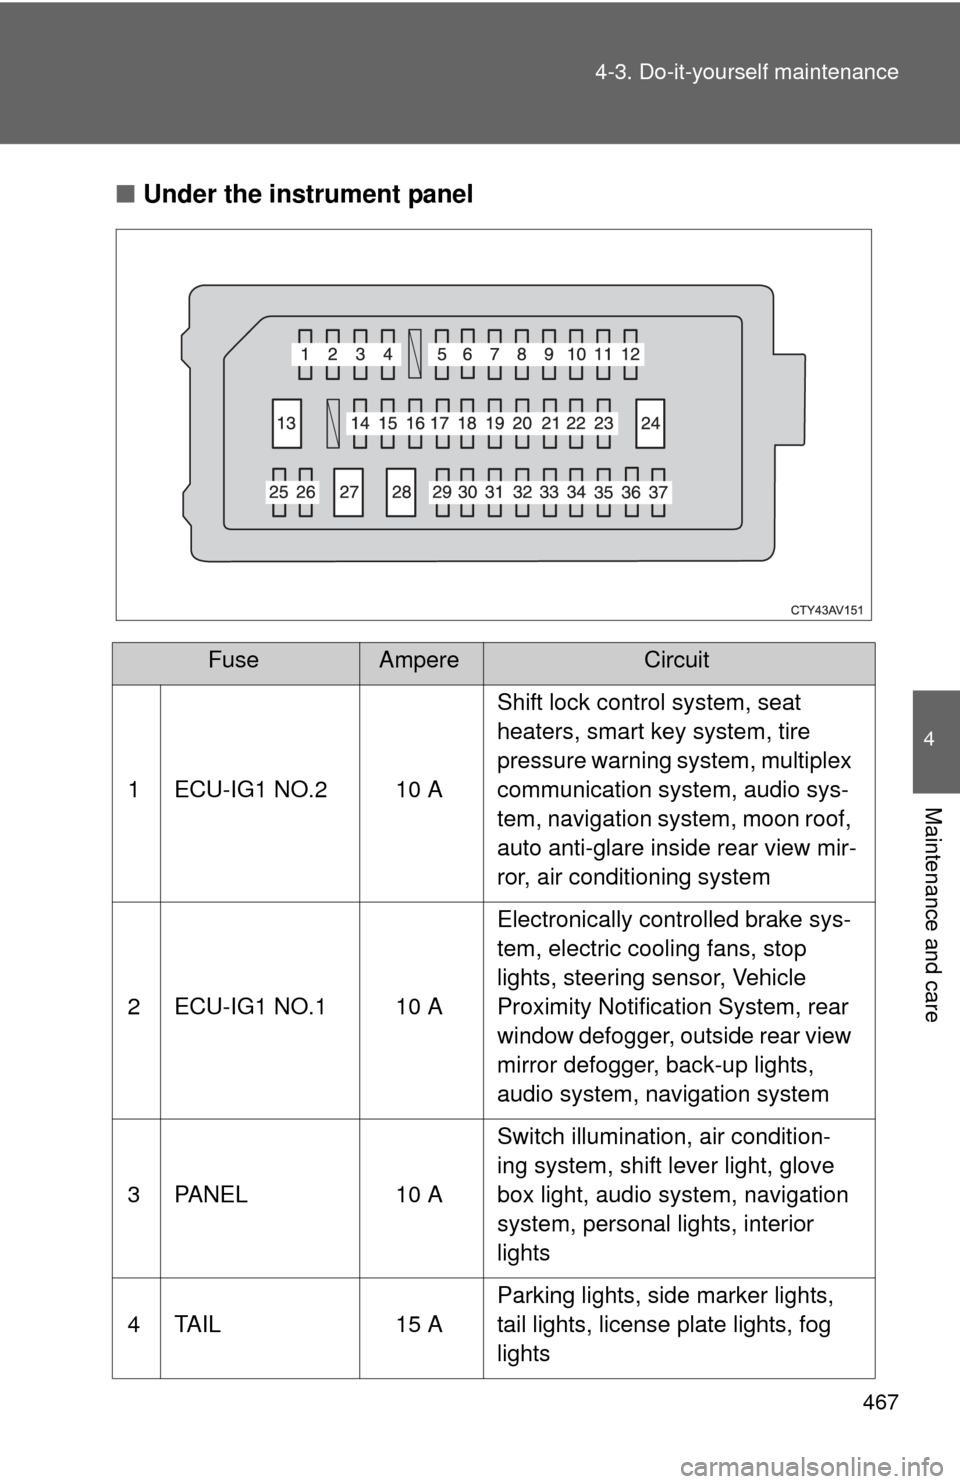
Under the instrument panel
FuseAmpereCircuit
1 ECU-IG1 NO.2 10 A Shift lock control system, seat
heaters, smart key system, tire
pressure warning system, multiplex
communication system, audio sys-
tem, navigation system, moon roof,
auto anti-glare inside rear view mir-
ror, air conditioning system
2 ECU-IG1 NO.1 10 A Electronically controlled brake sys-
tem, electric cooling fans, stop
lights, steering sensor, Vehicle
Proximity Notification System, rear
window defogger, outside rear view
mirror defogger, back-up lights,
audio system, navigation system
3 PANEL 10 A Switch illumination, air condition-
ing system, shift lever light, glove
box light, audio system, navigation
system, personal lights, interior
lights
4 TAIL 15 A Parking lights, side marker lights,
tail lights, license plate lights, fog
lights
Page 468 of 612

468 4-3. Do-it-yourself maintenance
5 EPS-IG17.5 A Electric power steering
6 ECU-IG1 NO.3 7.5 A Blind Spot Monitor
7 S/HTR&FAN
F/L 10 A Seat heaters
8 H-LP LVL 7.5 A No circuit
9 WASHER 10 A Windshield wipers and washer
10 A/C-IG1 7.5 AAir conditioning system, PTC
heater
11 WIPER 25 A Windshield wipers and washer
12 BKUP LP 7.5 A No circuit
13 DOOR NO.1 30 A Power windows
14 WIPER-S 5 A No circuit
15 P/OUTLET RR 20 A Power outlet
16 SFT LOCK-
ACC 5 A No circuit
17 DOOR R/R 20 A Rear right-hand power windows
18 DOOR R/L 20 A Rear left-hand power windows
19 OBD 10 A On-board diagnosis system
20 ECU-B NO.2 10 A Smart key system, tire pressure
warning system
21 DOOR NO.2 20 A Power windows
22 AM1 7.5 A No circuit
23 STOP 7.5 ATail lights, electronically controlled
brake system, high mounted stop-
light, shift lock control system,
hybrid system, Vehicle Proximity
Notification System
24 P/SEAT RR 30 A No circuit
25 A/C-B 7.5 A Air conditioning system
FuseAmpereCircuit
Page 469 of 612
469
4-3. Do-it-yourself maintenance
4
Maintenance and care
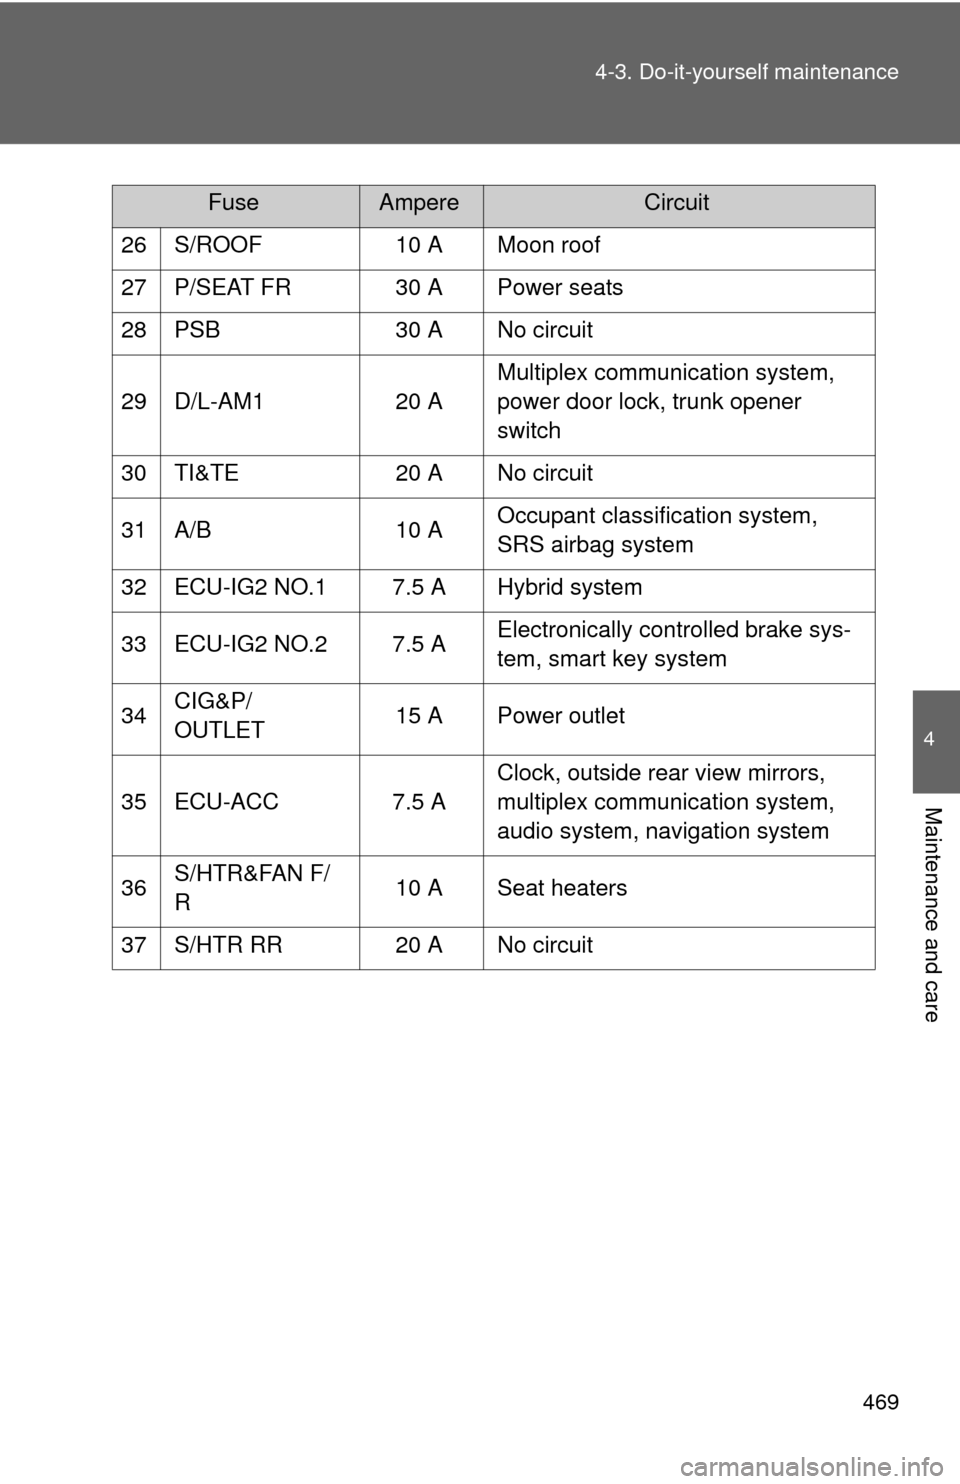
26 S/ROOF
10 A Moon roof
27 P/SEAT FR 30 A Power seats
28 PSB 30 A No circuit
29 D/L-AM1 20 AMultiplex communication system,
power door lock, trunk opener
switch
30 TI&TE 20 A No circuit
31 A/B 10 AOccupant classification system,
SRS airbag system
32 ECU-IG2 NO.1 7.5 A Hybrid system
33 ECU-IG2 NO.2 7.5 A Electronically controlled brake sys-
tem, smart key system
34 CIG&P/
OUTLET 15 A Power outlet
35 ECU-ACC 7.5 A Clock, outside rear view mirrors,
multiplex communication system,
audio system, navigation system
36 S/HTR&FAN F/
R 10 A Seat heaters
37 S/HTR RR 20 A No circuit
FuseAmpereCircuit
Page 480 of 612
480 4-3. Do-it-yourself maintenance
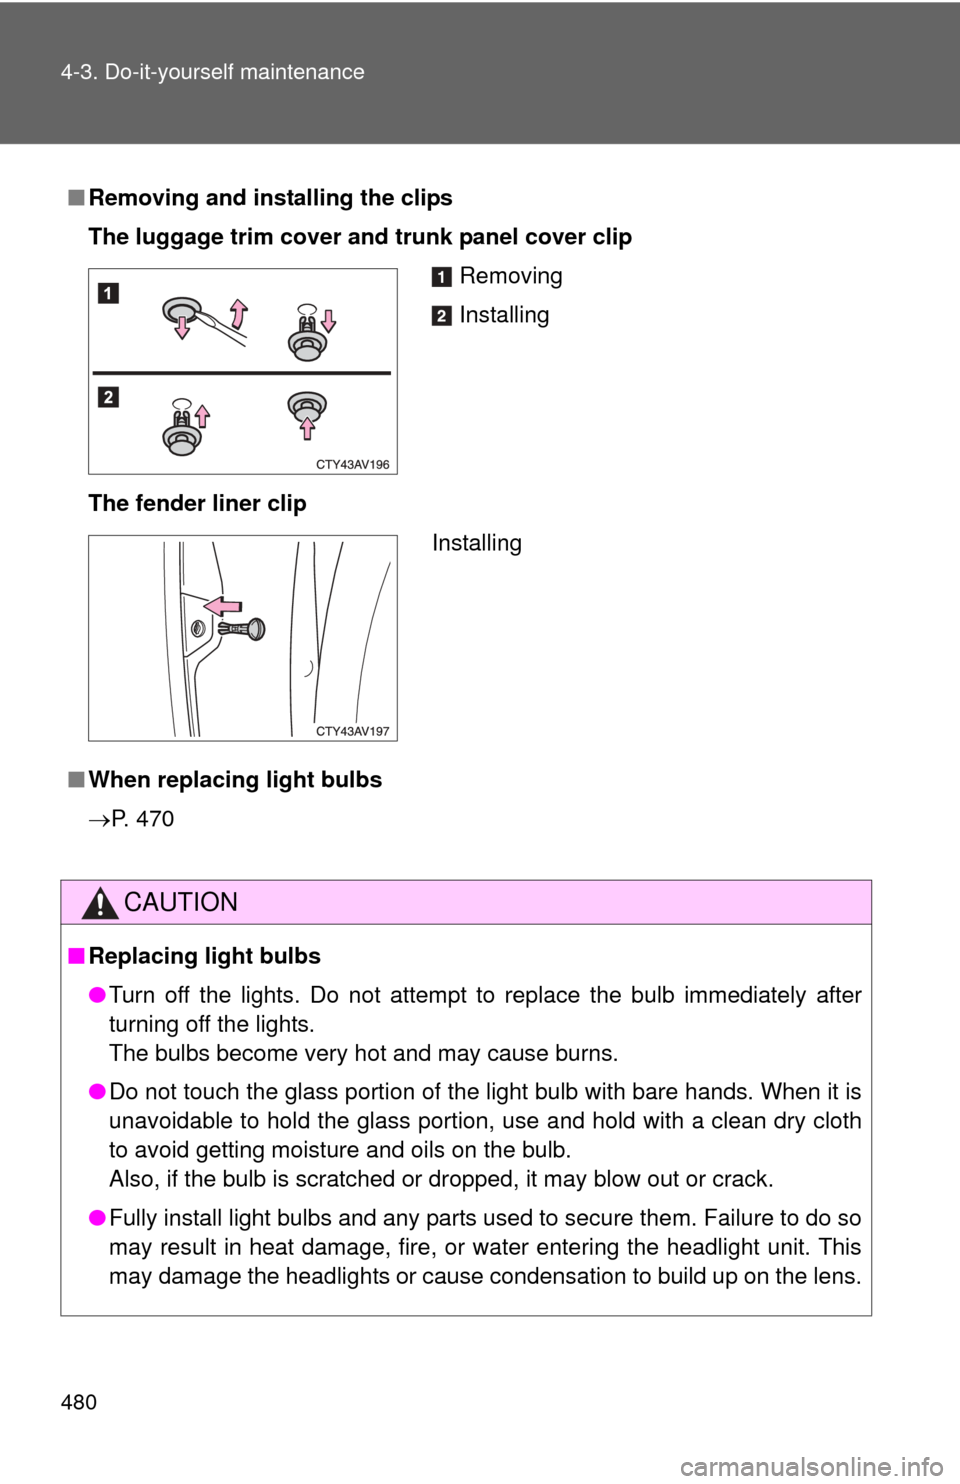
■Removing and installing the clips
The luggage trim cover and trunk panel cover clip
The fender liner clip
■ When replacing light bulbs
P. 470
CAUTION
■Replacing light bulbs
●Turn off the lights. Do not attempt to replace the bulb immediately after
turning off the lights.
The bulbs become very hot and may cause burns.
● Do not touch the glass portion of the light bulb with bare hands. When i\
t is
unavoidable to hold the glass portion, use and hold with a clean dry cloth
to avoid getting moisture and oils on the bulb.
Also, if the bulb is scratched or dropped, it may blow out or crack.
● Fully install light bulbs and any parts used to secure them. Failure to do so
may result in heat damage, fire, or water entering the headlight unit. This
may damage the headlights or cause condensation to build up on the lens.
Removing
Installing
Installing
Page 495 of 612

5
When trouble arises
495
5-2. Steps to take in an emergency
■
SRS warning light
This warning light system monitors the airbag sensor assembly, front airbag
sensors, side and curtain shield airbag sensors, curtain shield airbag sen-
sors, driver's seat belt buckle switch, front passenger occupant classification
system (ECU and sensors), “AIR BAG ON” indicator light, “AIR BAG OFF”
indicator light, front passenger's seat belt buckle switch, seat belt preten-
sioner assemblies, airbags, interc onnecting wiring and power sources.
( P. 113)
■ Front passenger detection sensor, passenger seat belt reminder and
warning buzzer
● If luggage is placed on the front passenger seat, the front passenger
detection sensor may cause the warning light to flash and the warning
buzzer to sound even if a passenger is not sitting in the seat.
● If a cushion is placed on the seat, the sensor may not detect a passen-
ger, and the warning light may not operate properly.
■ If the malfunction indicator lamp comes on while driving
First check the following:
● Is the fuel tank empty?
If it is, fill the fuel tank immediately.
● Is the fuel tank cap loose?
If it is, tighten it securely.
The malfunction indicator lamp will go off after several driving trips.
If the malfunction indicator lamp does not go off even after several trips, con-
tact your Toyota dealer as soon as possible.
■
The tire pressure warning light may come on due to natural causes
(vehicles with a tire pressure warning system)
The tire pressure warning light may come on due to natural causes such
as natural air leaks and tire inflat ion pressure changes caused by tem-
perature. In this case, adjusting the tire inflation pressure will turn off the
warning light (after a few minutes).
Page 515 of 612
5
When trouble arises
515
5-2. Steps to take in an emergency
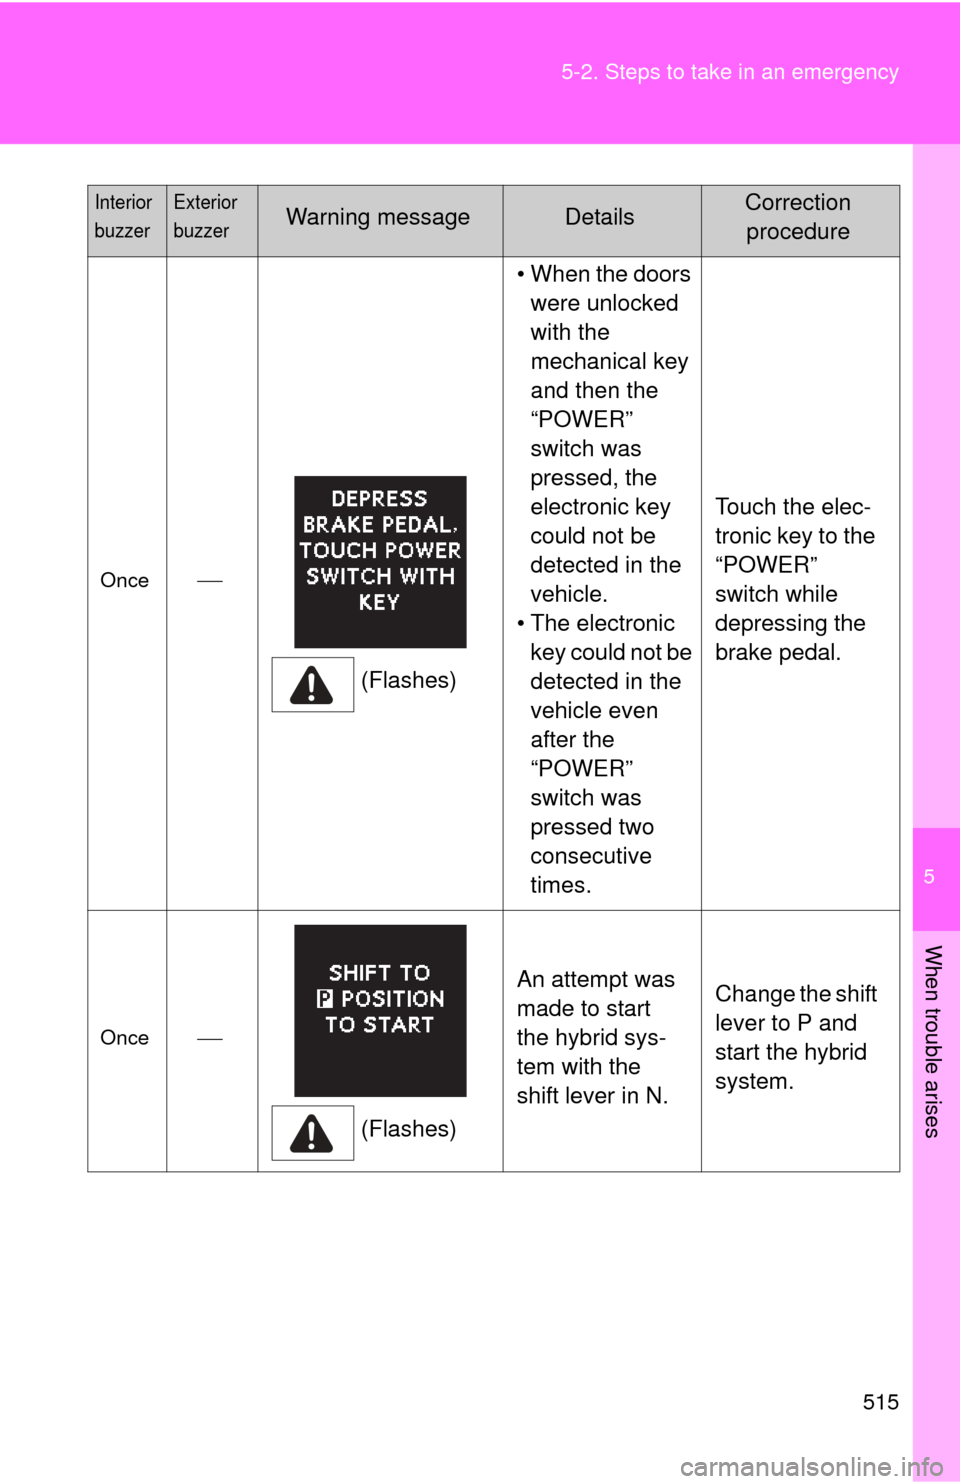
Once
(Flashes)• When the doors
were unlocked
with the
mechanical key
and then the
“POWER”
switch was
pressed, the
electronic key
could not be
detected in the
vehicle.
• The electronic key could not be
detected in the
vehicle even
after the
“POWER”
switch was
pressed two
consecutive
times. Touch the elec-
tronic key to the
“POWER”
switch while
depressing the
brake pedal.
Once
(Flashes)An attempt was
made to start
the hybrid sys-
tem with the
shift lever in N.
Change the shift
lever to P and
start the hybrid
system.
Interior
buzzerExterior
buzzerWarning messageDetailsCorrection
procedure
Page 520 of 612
520 5-2. Steps to take in an emergency
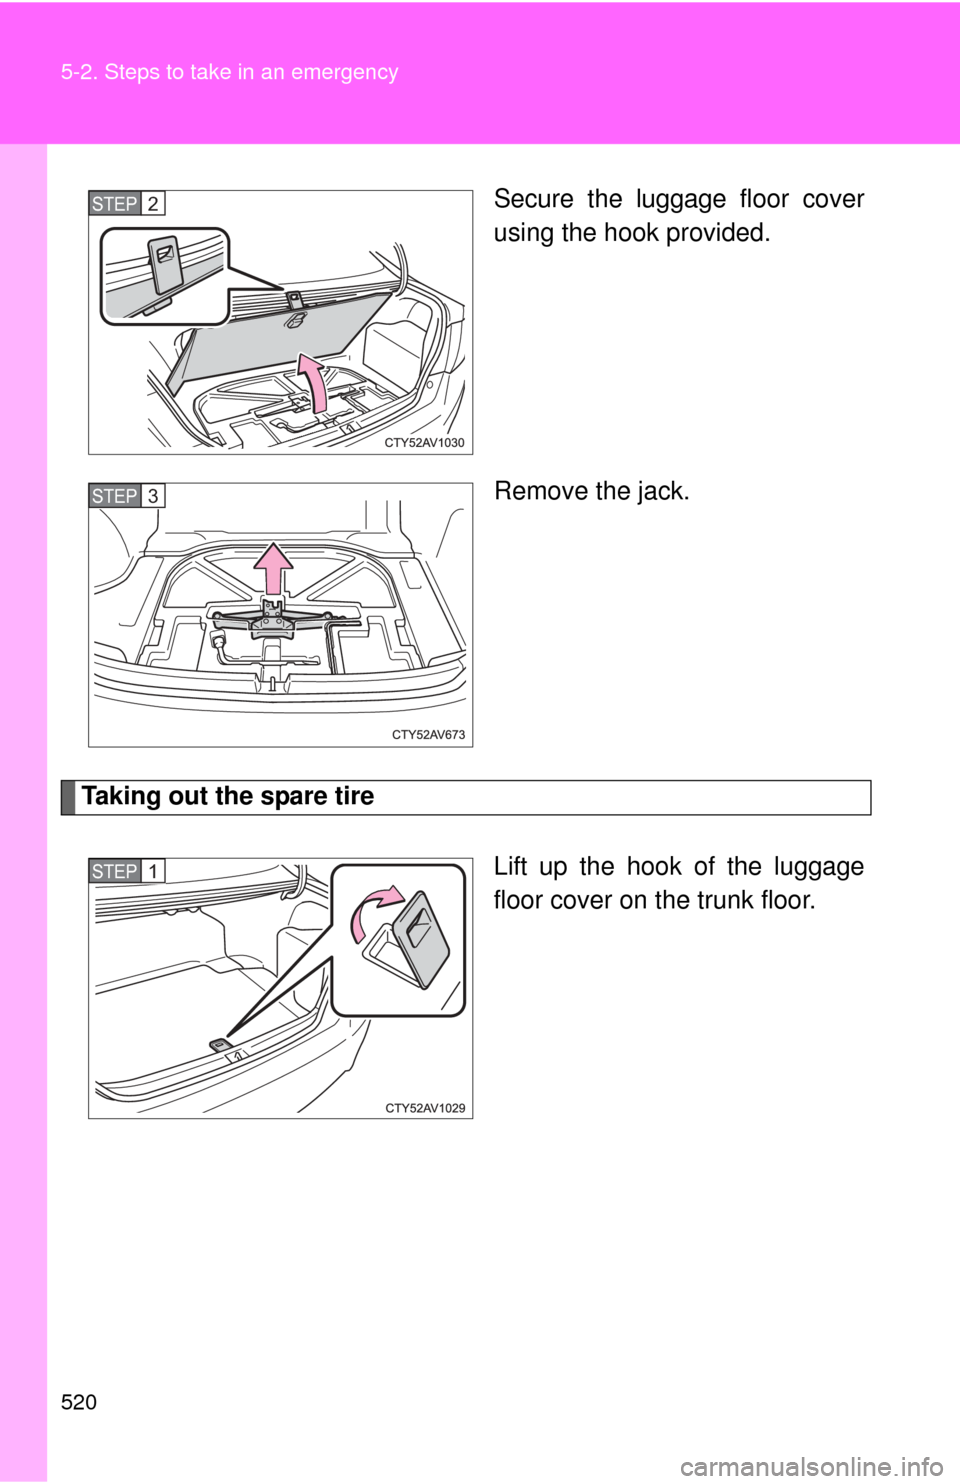
Secure the luggage floor cover
using the hook provided.
Remove the jack.
Taking out the spare tireLift up the hook of the luggage
floor cover on the trunk floor.
STEP2
STEP3
STEP1
Page 521 of 612
5
When trouble arises
521
5-2. Steps to take in an emergency
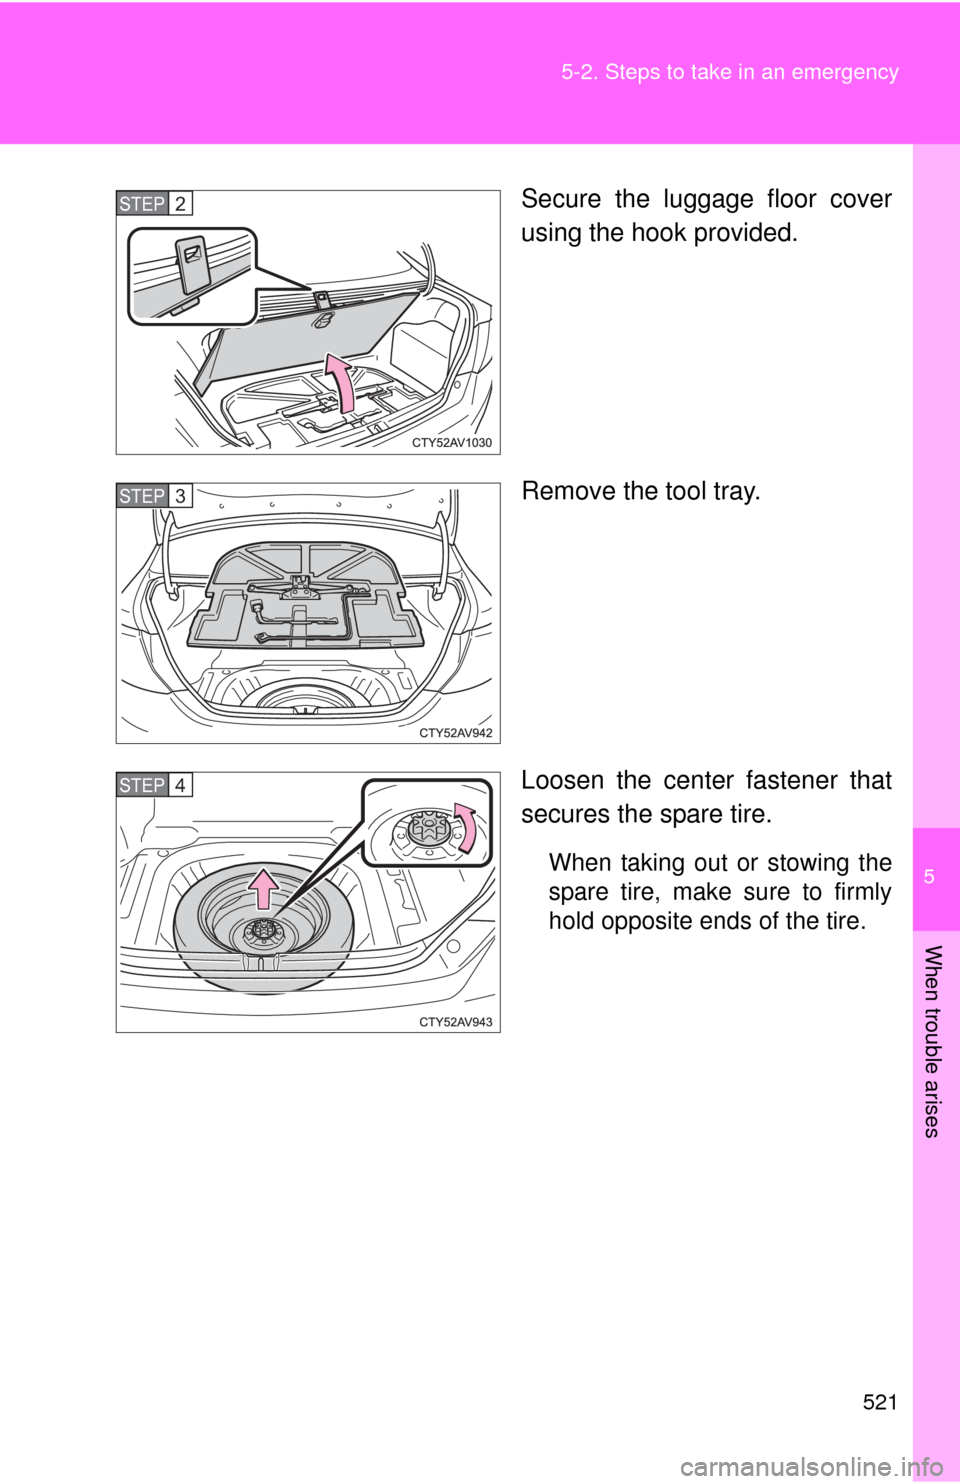
Secure the luggage floor cover
using the hook provided.
Remove the tool tray.
Loosen the center fastener that
secures the spare tire.
When taking out or stowing the
spare tire, make sure to firmly
hold opposite ends of the tire.
STEP2
STEP3
STEP4