ECU TOYOTA CAMRY HYBRID 2014 XV50 / 9.G Owner's Guide
[x] Cancel search | Manufacturer: TOYOTA, Model Year: 2014, Model line: CAMRY HYBRID, Model: TOYOTA CAMRY HYBRID 2014 XV50 / 9.GPages: 612, PDF Size: 7.26 MB
Page 300 of 612
300
3-2. Using the audio system
Registering a Bluetooth® device
How to register a Bluetooth® device
Display the “Bluetooth* Setup” screen. ( P. 297)
*:Bluetooth is a registered trademark of Bluetooth SIG, Inc.
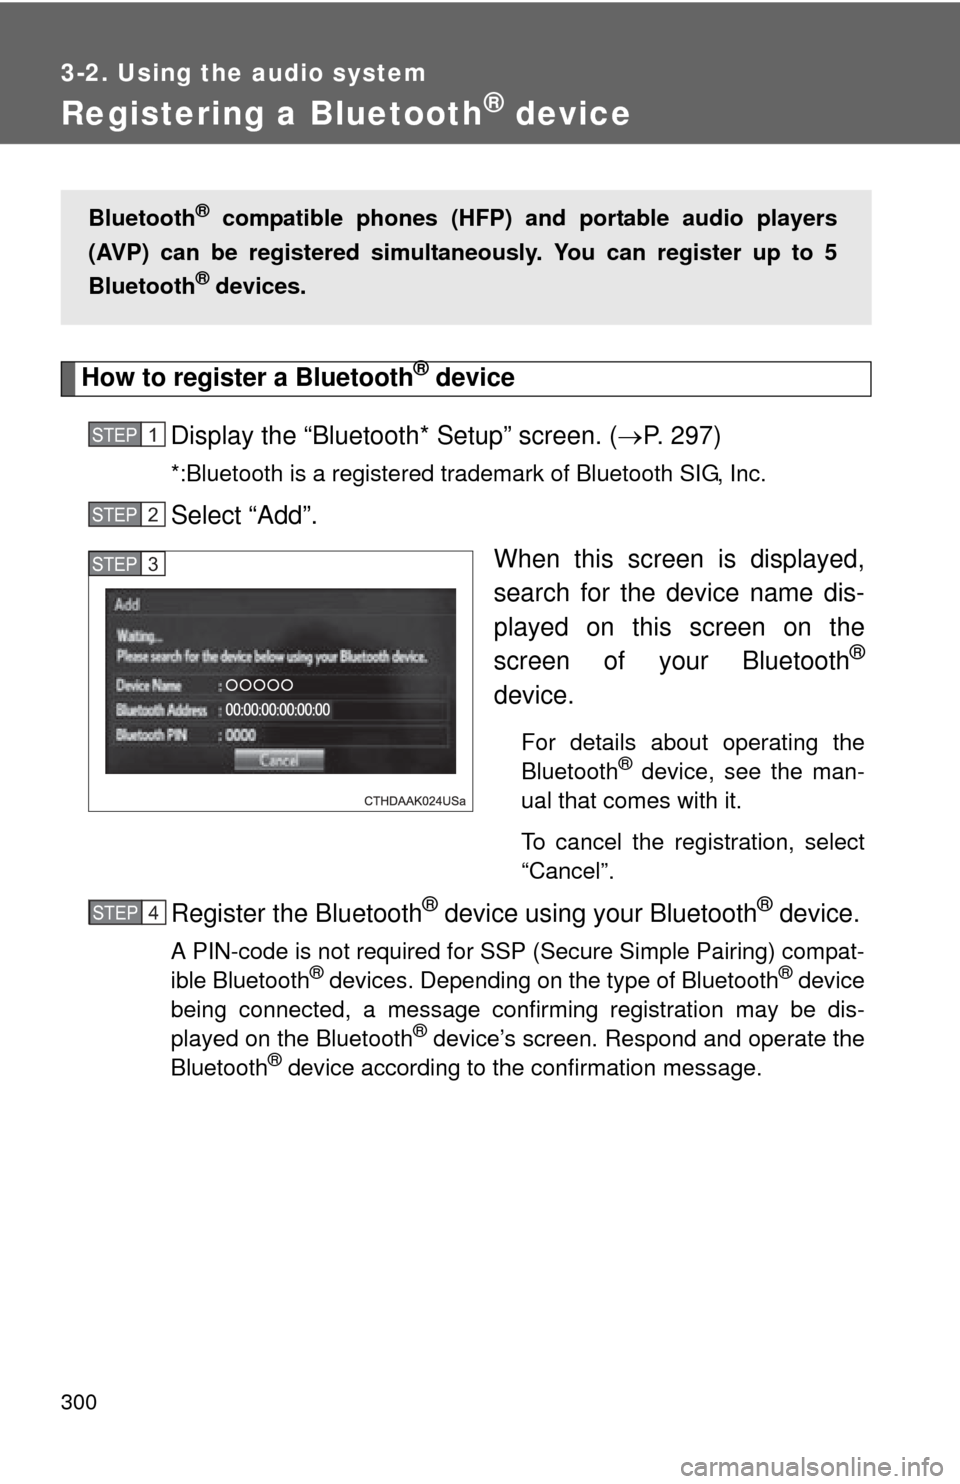
Select “Add”.
When this screen is displayed,
search for the device name dis-
played on this screen on the
screen of your Bluetooth
®
device.
For details about operating the
Bluetooth® device, see the man-
ual that comes with it.
To cancel the registration, select
“Cancel”.
Register the Bluetooth® device using your Bluetooth® device.
A PIN-code is not required for SSP (Secure Simple Pairing) compat-
ible Bluetooth® devices. Depending on the type of Bluetooth® device
being connected, a message confirming registration may be dis-
played on the Bluetooth
® device’s screen. Respond and operate the
Bluetooth® device according to the confirmation message.
Bluetooth® compatible phones (HFP) and portable audio players
(AVP) can be registered simultane ously. You can register up to 5
Bluetooth
® devices.
STEP1
STEP2
STEP3
STEP1STEP4
Page 345 of 612

345
3-2. Using the audio system
3
Interior features
In other situations
Even though all conceivable measures have been taken, the symptom status
does not change.
The cellular phone is not close enough to this system.
Bring the cellular phone closer to this system.
The cellular phone is the most likely cause of the symptom.
Turn the cellular phone off, remove and reinstall the battery pack,
and then restart the cellular phone.
Enable the cellular phone’s Bluetooth
® connection.
Stop the cellular phone’s security software and close all applica-
tions.
Before using an application installed on the cellular phone, carefully
check its source and how its operati on might affect this system.
Page 388 of 612
388
3-5. Other interior features
Floor mat
Use only floor mats designed specifically for vehicles of the same
model and model year as your vehicle. Fix them securely in place
onto the carpet.
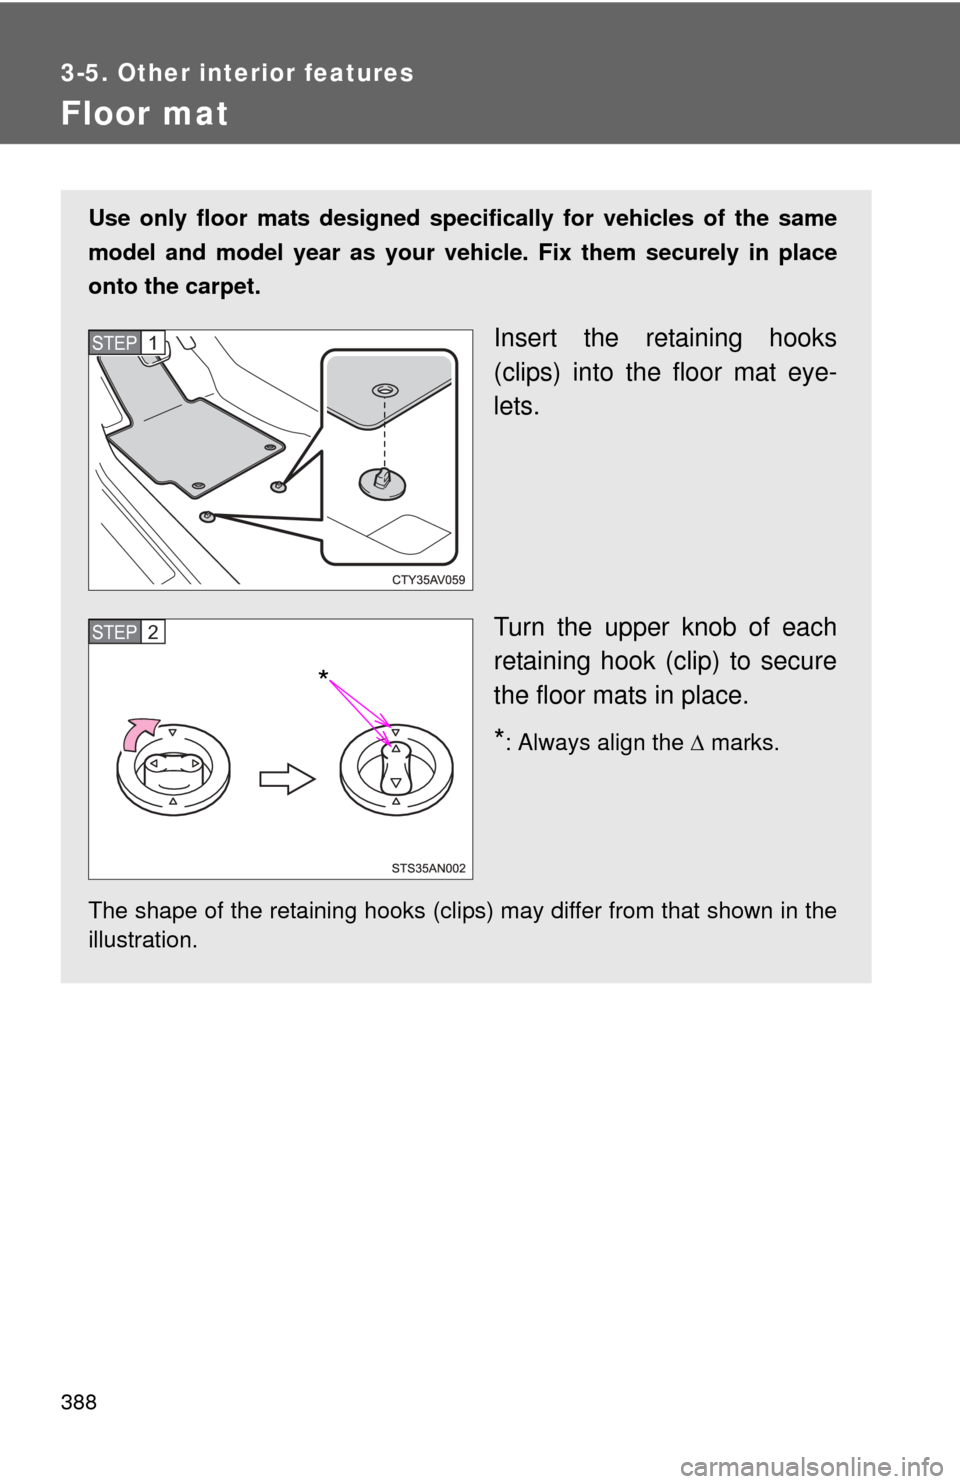
Insert the retaining hooks
(clips) into the floor mat eye-
lets.
Turn the upper knob of each
retaining hook (clip) to secure
the floor mats in place.
*: Always align the marks.
The shape of the retaining hooks (clips) may differ from that shown in the
illustration.
STEP1
*
STEP2
Page 389 of 612
389
3-5. Other interior features
3
Interior features
CAUTION
Observe the following precautions.
Failure to do so may cause the driver's floor mat to slip, possibly interfering
with the pedals while driving. An unexpectedly high speed may result or it may
become difficult to stop the vehicle, leading to a serious accident.
■
When installing the driver's floor mat
●Do not use floor mats designed for other models or different model year
vehicles, even if they are Toyota Genuine floor mats.
● Only use floor mats designed for the driver's seat.
● Always install the floor mat securely using the retaining hooks (clips) pro-
vided.
● Do not use two or more floor mats on top of each other.
● Do not place the floor mat bottom-side up or upside-down.
■ Before driving
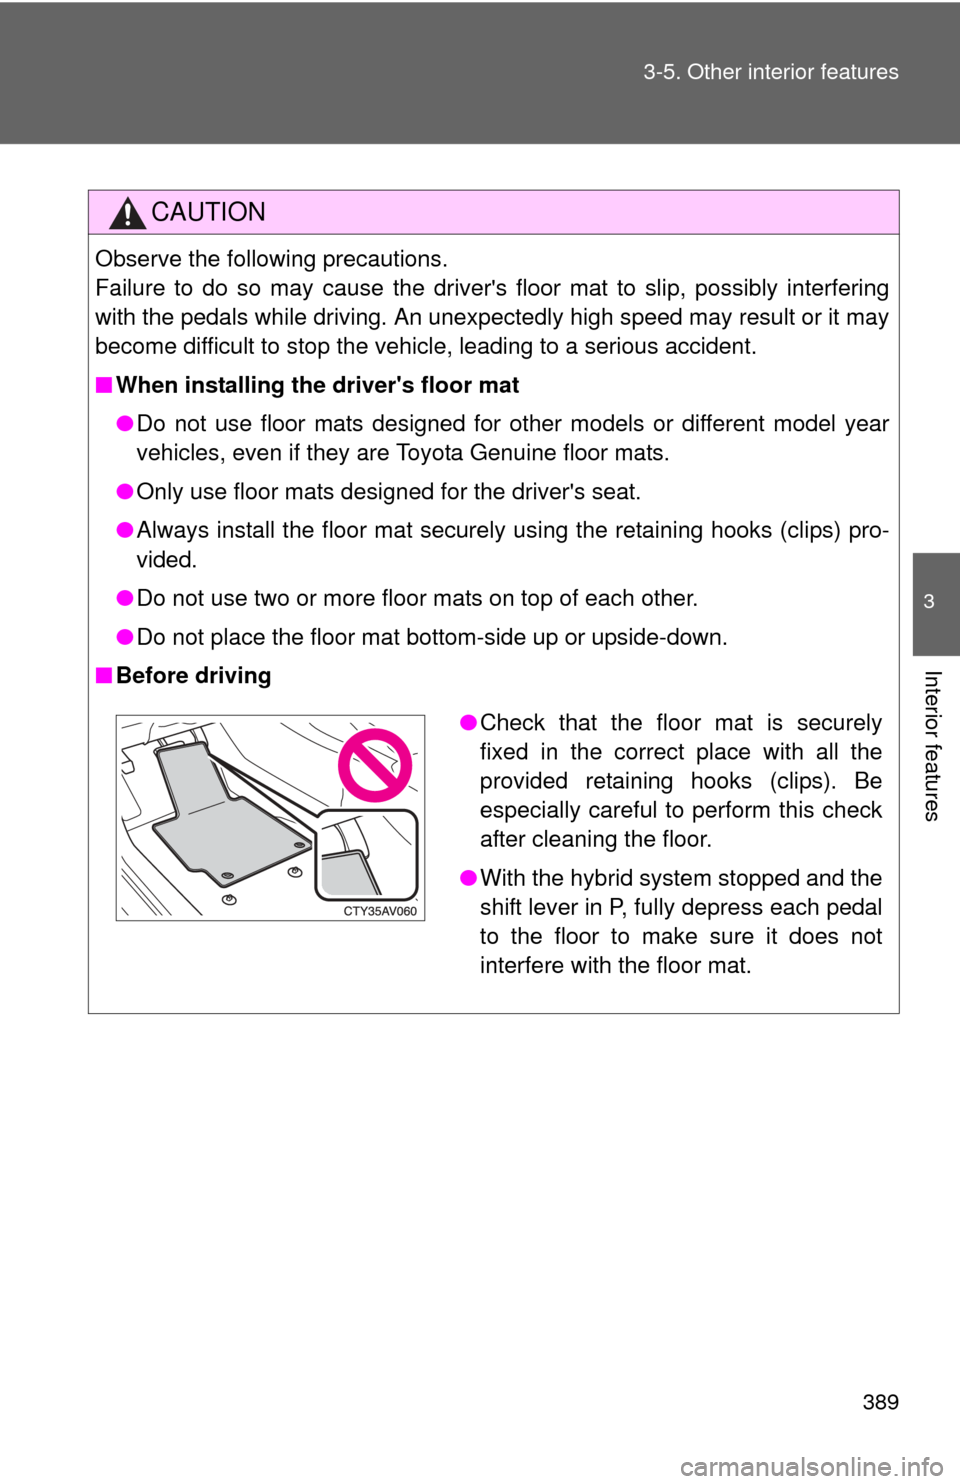
●Check that the floor mat is securely
fixed in the correct place with all the
provided retaining hooks (clips). Be
especially careful to perform this check
after cleaning the floor.
● With the hybrid system stopped and the
shift lever in P, fully depress each pedal
to the floor to make sure it does not
interfere with the floor mat.
Page 391 of 612
391
3-5. Other interior features
3
Interior features
Garage door opener
The garage door opener (HomeLink Universal Transceiver) is manufac-
tured under license from HomeLink.
Programming HomeLink (for U.S. owners)
The HomeLink
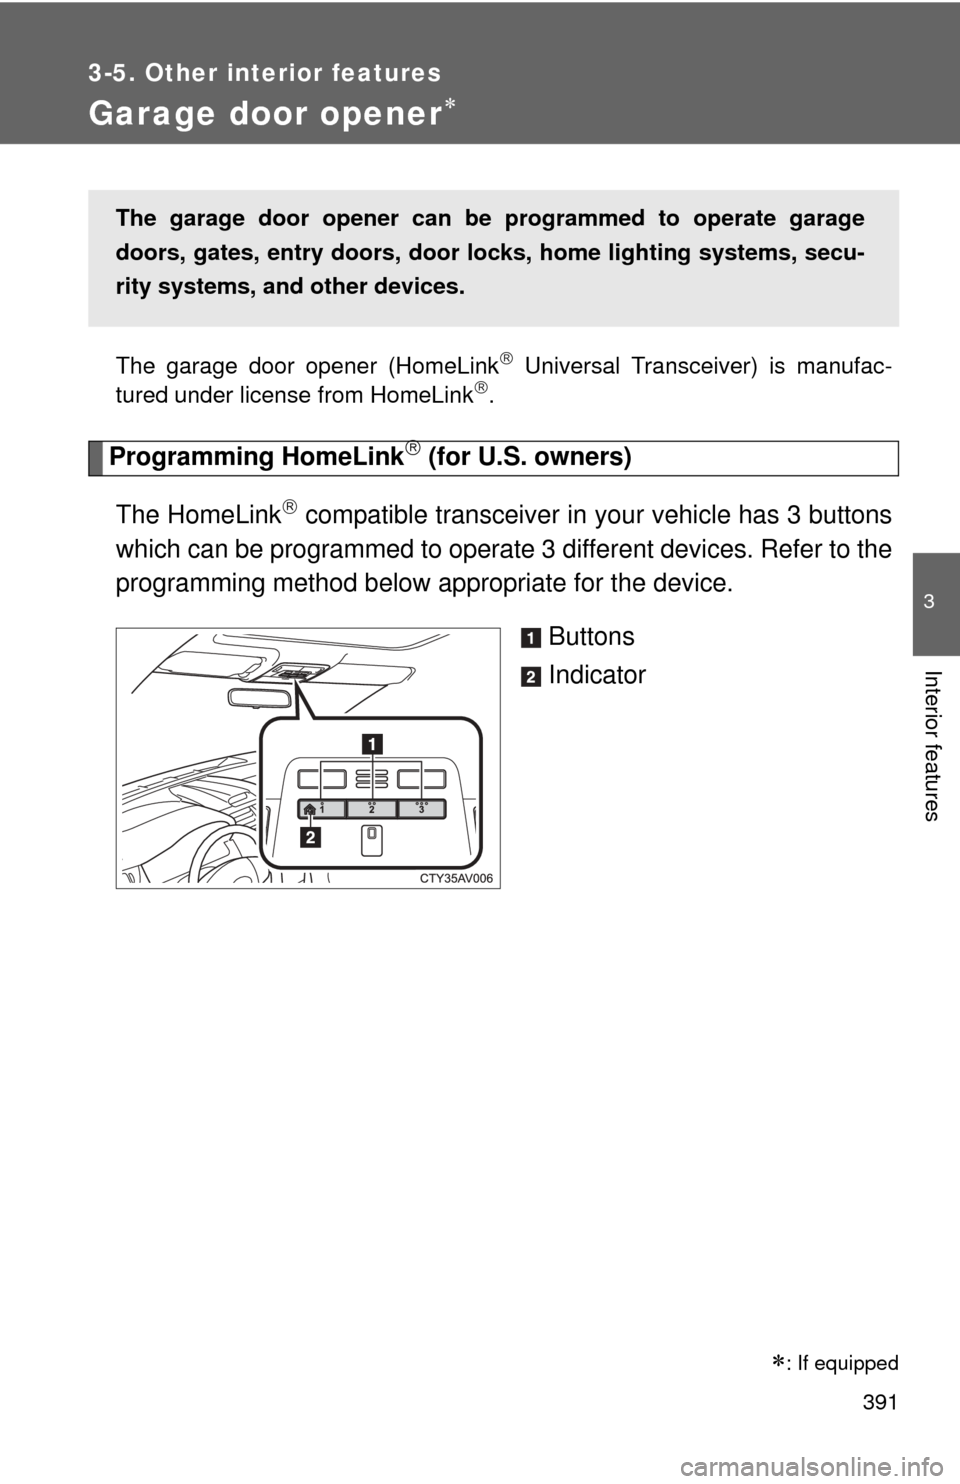
compatible transceiver in your vehicle has 3 buttons
which can be programmed to operate 3 different devices. Refer to the
programming method below appropriate for the device.
Buttons
Indicator
The garage door opener can be programmed to operate garage
doors, gates, entry doors, door locks, home lighting systems, secu-
rity systems, and other devices.
: If equipped
Page 394 of 612

394 3-5. Other interior features
Press and hold the vehicle’s programmed HomeLink button
for 2 seconds and then releas e it. Repeat this step once
again. The garage door may open.
If the garage door opens, the programming process is complete. If
the door does not open, press and release the button a third time.
This third press and release will complete the programming process
by opening the garage door.
The ceiling mounted garage door opener motor should now recog-
nize the HomeLink
signal and operate the garage door.
Repeat the steps above to prog ram another rolling code sys-
tem for any of the remaining HomeLink buttons.
■ Programming an entry gate (for U.S. owners)/Programming a
device in the Canadian market
Place the remote control transmitter 1 to 3 in. (25 to 75 mm)
away from the HomeLink
buttons.
Keep the HomeLink indicator light in view while programming.
Press and hold the selected HomeLink button.
Repeatedly press and release (cycle) the remote control
transmitter for 2 seconds each until step 4 is completed.
When the HomeLink
indicator light starts to flash rapidly,
release the buttons.
Test the HomeLink
operation by pressing the newly pro-
grammed button. Check to see if the gate/device operates
correctly.
Repeat the steps above to program another device for any of
the remaining HomeLink
buttons.
■ Programming other devices
To program other devices such as home security systems, home
door locks or lighting, contact y our Toyota dealer for assistance.
■ Reprogramming a button
The individual HomeLink
buttons cannot be erased but can be
reprogrammed. To reprogram a button, follow the “Reprogramming
a HomeLink
button” instructions.
STEP3
STEP4
STEP1
STEP2
STEP3
STEP4
STEP5
STEP6
Page 401 of 612

401
3-5. Other interior features
3
Interior features
CAUTION
■
While driving the vehicle
Do not adjust the display. Adjust the display only when the vehicle is
stopped.
■ When doing the circling calibration
Secure a wide space, and watch out for people and vehicles in the vicinity.
Do not violate any local traffic rules while performing circling calibration.
NOTICE
■To avoid compass malfunctions
Do not place magnets or any metal objects near the inside rear view mirror.
Doing this may cause the compass sensor to malfunction.
■ To ensure normal operation of the compass
●Do not perform a circling calibration of the compass in a place where the
earth's magnetic field is subject to interference by artificial magnetic fields.
● During calibration, do not operate electric systems (moon roof, power win-
dows, etc.) as they may interfere with the calibration.
Page 402 of 612
402
3-5. Other interior features
Safety Connect
Safety Connect is a subscription-based telematics service that uses
Global Positioning System (GPS) data and embedded cellular tech-
nology to provide safety and security features to subscribers. Safety
Connect is supported by Toyota ’s designated response center,
which operates 24 hours per day, 7 days per week.
Safety Connect service is available by subscription on select,
telematics hardware-equipped vehicles.
By using the Safety Connect servi ce, you are agreeing to be bound
by the Telematics Subscription Serv ice Agreement and its Terms and
Conditions, as in effect and amende d from time to time, a current
copy of which is available at Toyota.com. All use of the Safety Con-
nect service is subject to such then-applicable Terms and Condi-
tions.
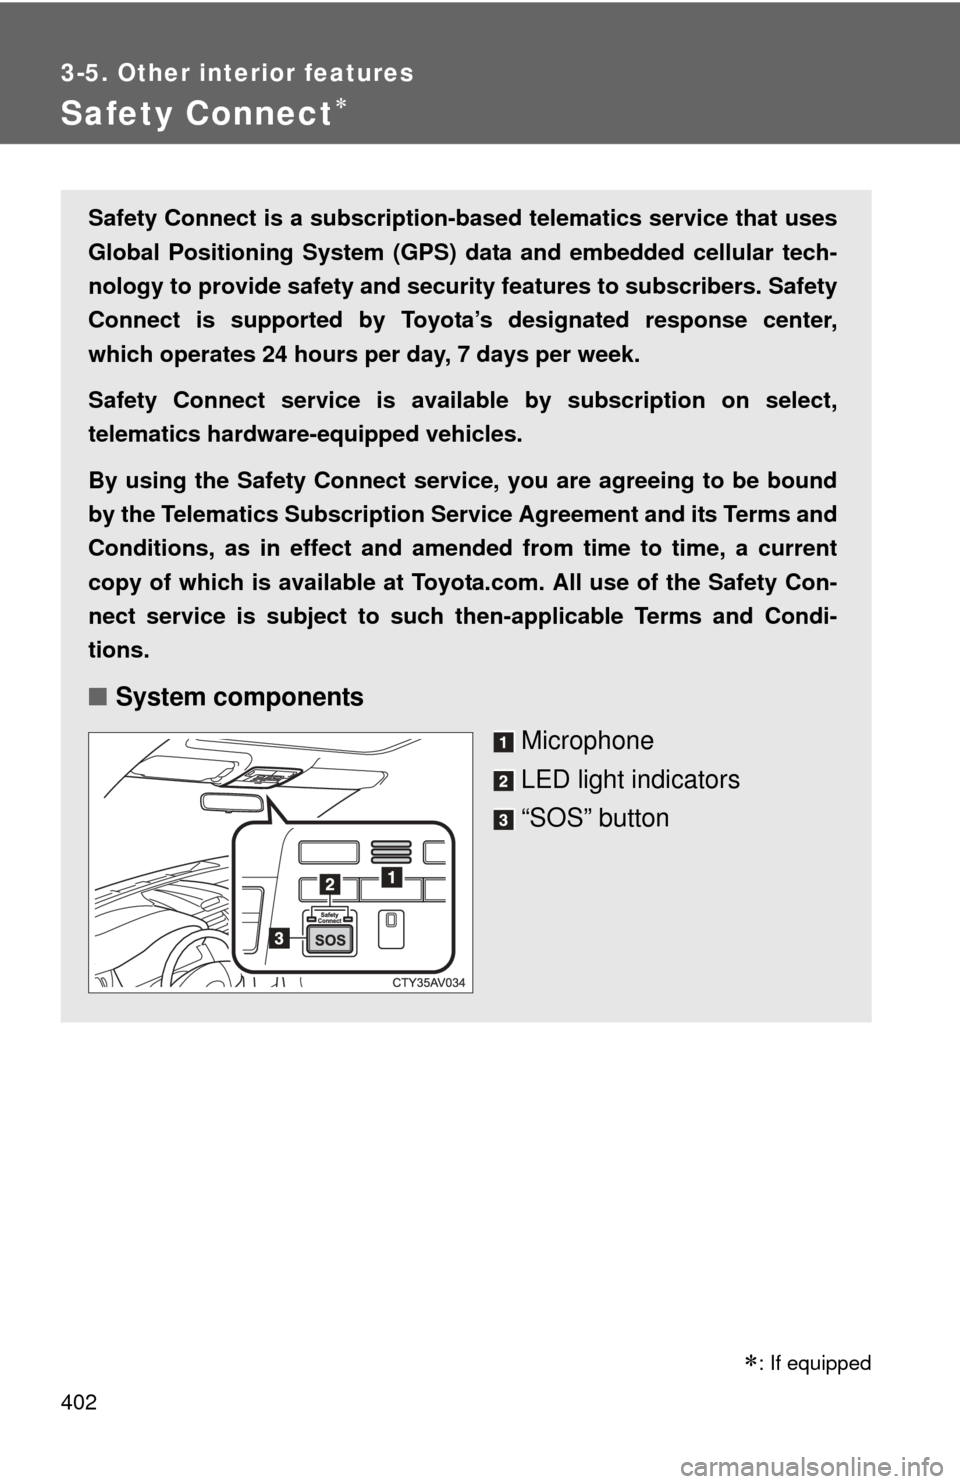
■ System components
Microphone
LED light indicators
“SOS” button
�
: If equipped
Page 419 of 612

419
4-2. Maintenance
4
Maintenance and care
Vehicle interior
ItemsCheck points
Accelerator pedal • The accelerator pedal should
move smoothly (without uneven
pedal effort or catching).
Brake pedal • Does the brake pedal move
smoothly?
• Does the brake pedal have appro- priate clearance from the floor? (P. 557)
• Does the brake pedal have the correct amount of free play? (P. 557)
Brakes • The vehicle should not pull to one
side when the brakes are applied.
• The brakes should work effec- tively.
• The brake pedal should not feel spongy.
• The brake pedal should not get too close to the floor when the
brakes are applied.
Head restraints (front seat) • Do the head restraints move
smoothly and lock securely?
Hybrid transmission “Park” mech-
anism • When parked on a slope and the
parking brake is on, is the vehicle
securely stopped?
Indicators/buzzers • Do the indicators and buzzers
function properly?
Lights • Do all the lights come on?
Parking brake • Does the parking brake pedal
move smoothly?
• When parked on a slope and the parking brake is on, is the vehicle
securely stopped?
Page 439 of 612
439
4-3. Do-it-yourself maintenance
4
Maintenance and care
12-volt batter y
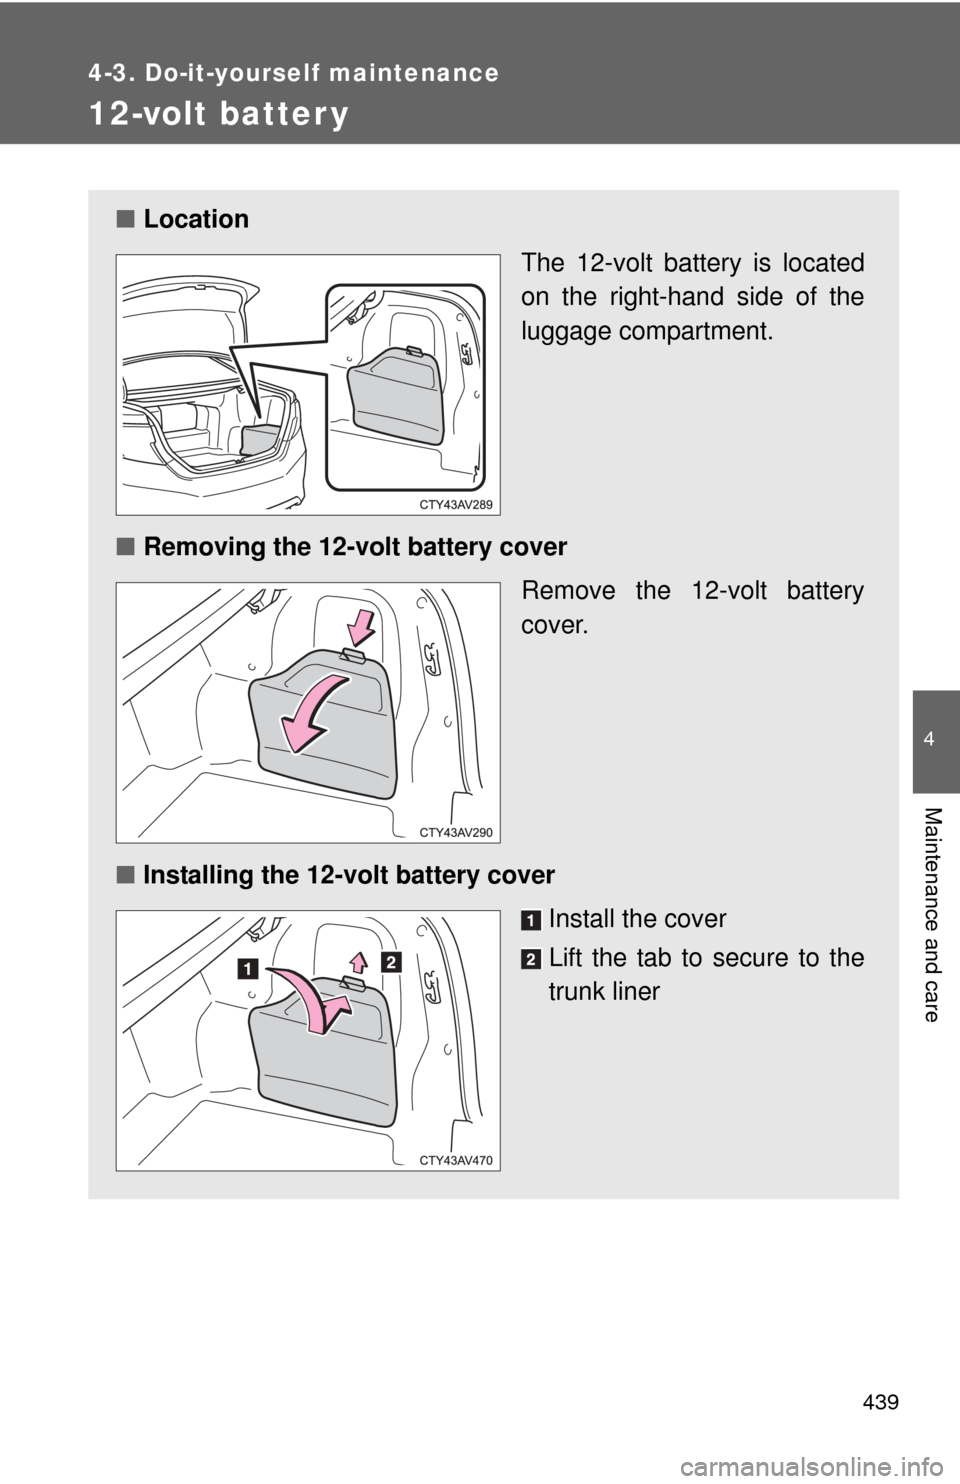
■Location
The 12-volt battery is located
on the right-hand side of the
luggage compartment.
■ Removing the 12-volt battery cover
Remove the 12-volt battery
cover.
■ Installing the 12-volt battery cover
Install the cover
Lift the tab to secure to the
trunk liner