reset TOYOTA CAMRY HYBRID 2018 Accessories, Audio & Navigation (in English)
[x] Cancel search | Manufacturer: TOYOTA, Model Year: 2018, Model line: CAMRY HYBRID, Model: TOYOTA CAMRY HYBRID 2018Pages: 340, PDF Size: 7.43 MB
Page 224 of 340
224
2. SETUP
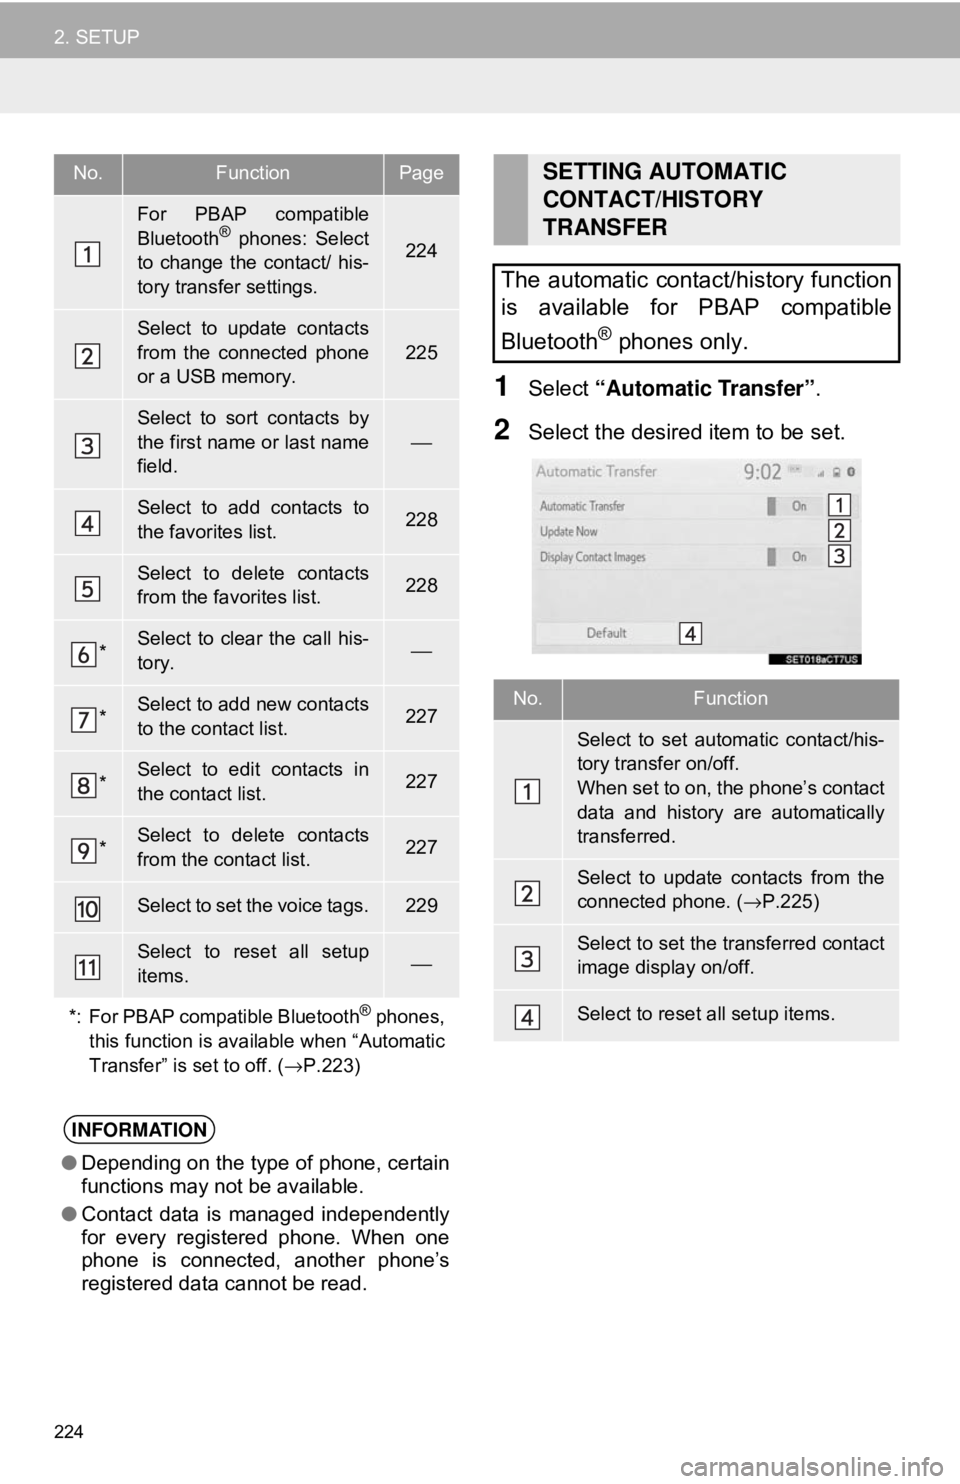
1Select “Automatic Transfer” .
2Select the desired item to be set.
No.FunctionPage
For PBAP compatible
Bluetooth® phones: Select
to change the contact/ his-
tory transfer settings.224
Select to update contacts
from the connected phone
or a USB memory.
225
Select to sort contacts by
the first name or last name
field.
⎯
Select to add contacts to
the favorites list. 228
Select to delete contacts
from the favorites list. 228
*Select to clear the call his-
tory.⎯
*Select to add new contacts
to the contact list.227
*Select to edit contacts in
the contact list.227
*Select to delete contacts
from the contact list.227
Select to set the voice tags.229
Select to reset all setup
items.⎯
*: For PBAP compatible Bluetooth
® phones,
this function is available when “Automatic
Transfer” is set to off. ( →P.223)
INFORMATION
● Depending on the type of phone, certain
functions may not be available.
● Contact data is managed independently
for every registered phone. When one
phone is connected, another phone’s
registered data cannot be read.
SETTING AUTOMATIC
CONTACT/HISTORY
TRANSFER
The automatic contact/history function
is available for PBAP compatible
Bluetooth
® phones only.
No.Function
Select to set automatic contact/his-
tory transfer on/off.
When set to on, the phone’s contact
data and history are automatically
transferred.
Select to update contacts from the
connected phone. ( →P.225)
Select to set the transferred contact
image display on/off.
Select to reset all setup items.
Page 230 of 340
230
2. SETUP
1Display the phone settings screen.
(→P.221)
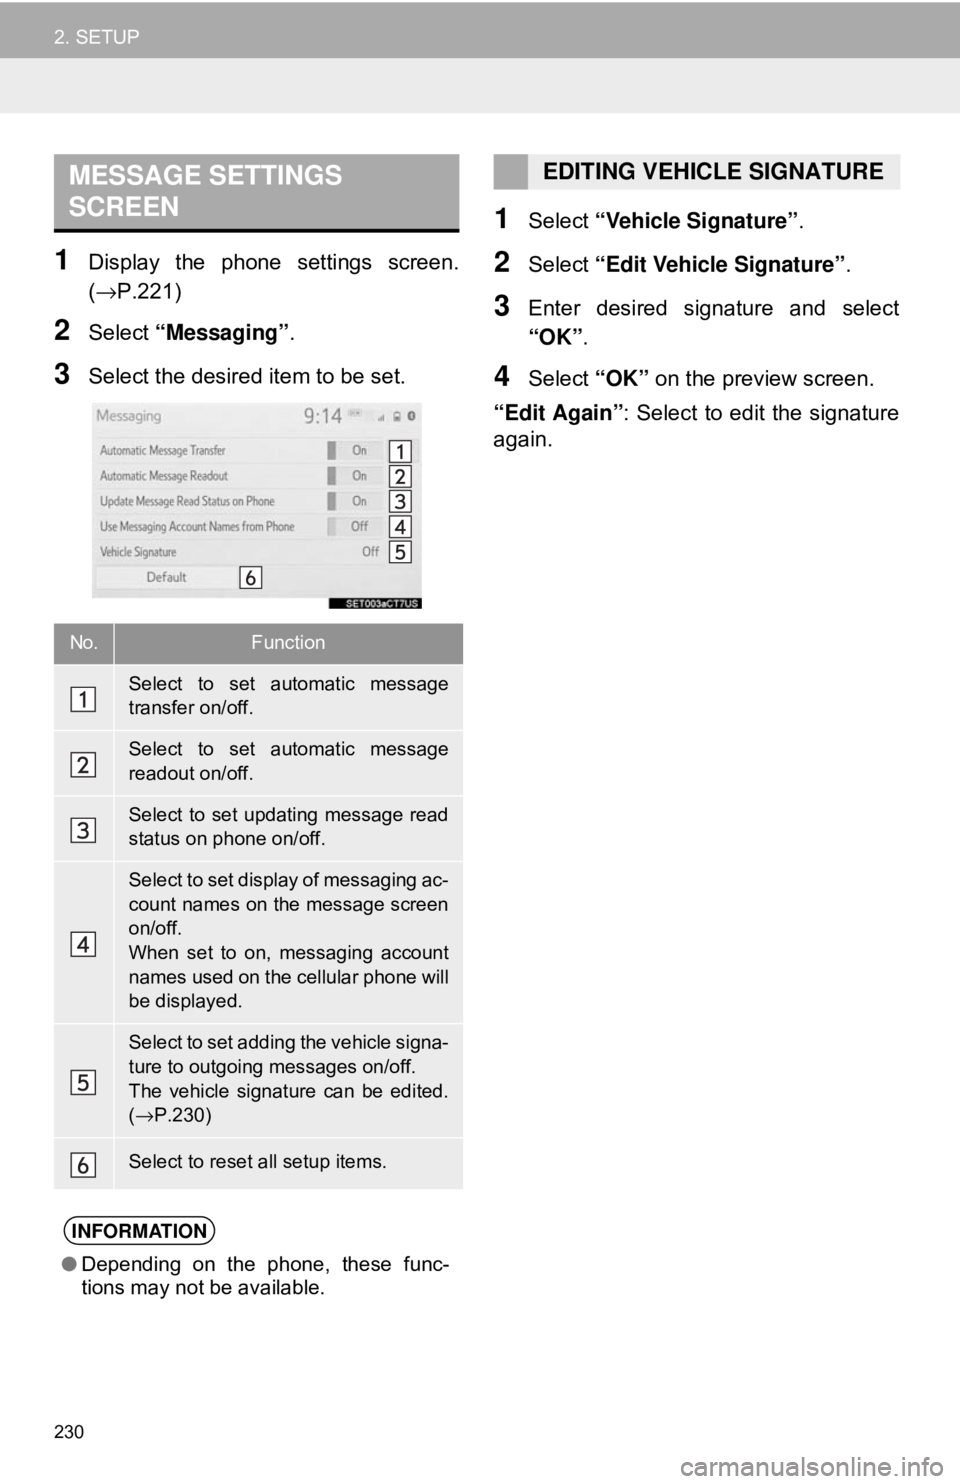
2Select “Messaging” .
3Select the desired item to be set.
1Select “Vehicle Signature”.
2Select “Edit Vehicle Signature” .
3Enter desired signature and select
“OK”.
4Select “OK” on the preview screen.
“Edit Again” : Select to edit the signature
again.
MESSAGE SETTINGS
SCREEN
No.Function
Select to set automatic message
transfer on/off.
Select to set automatic message
readout on/off.
Select to set updating message read
status on phone on/off.
Select to set display of messaging ac-
count names on the message screen
on/off.
When set to on, messaging account
names used on the cellular phone will
be displayed.
Select to set adding the vehicle signa-
ture to outgoing messages on/off.
The vehicle signature can be edited.
( → P.230)
Select to reset all setup items.
INFORMATION
● Depending on the phone, these func-
tions may not be available.
EDITING VEHICLE SIGNATURE
Page 261 of 340
261
2. DESTINATION SEARCH
NAVIGATION SYSTEM
8
Vehicles without a smart key system
1Turn the engine switch to the “ACC” or
“ON” position.
Vehicles with a smart key system
1Turn the engine
CESSORY or IGNITION ON
mode.
2Press the “MAP” button.
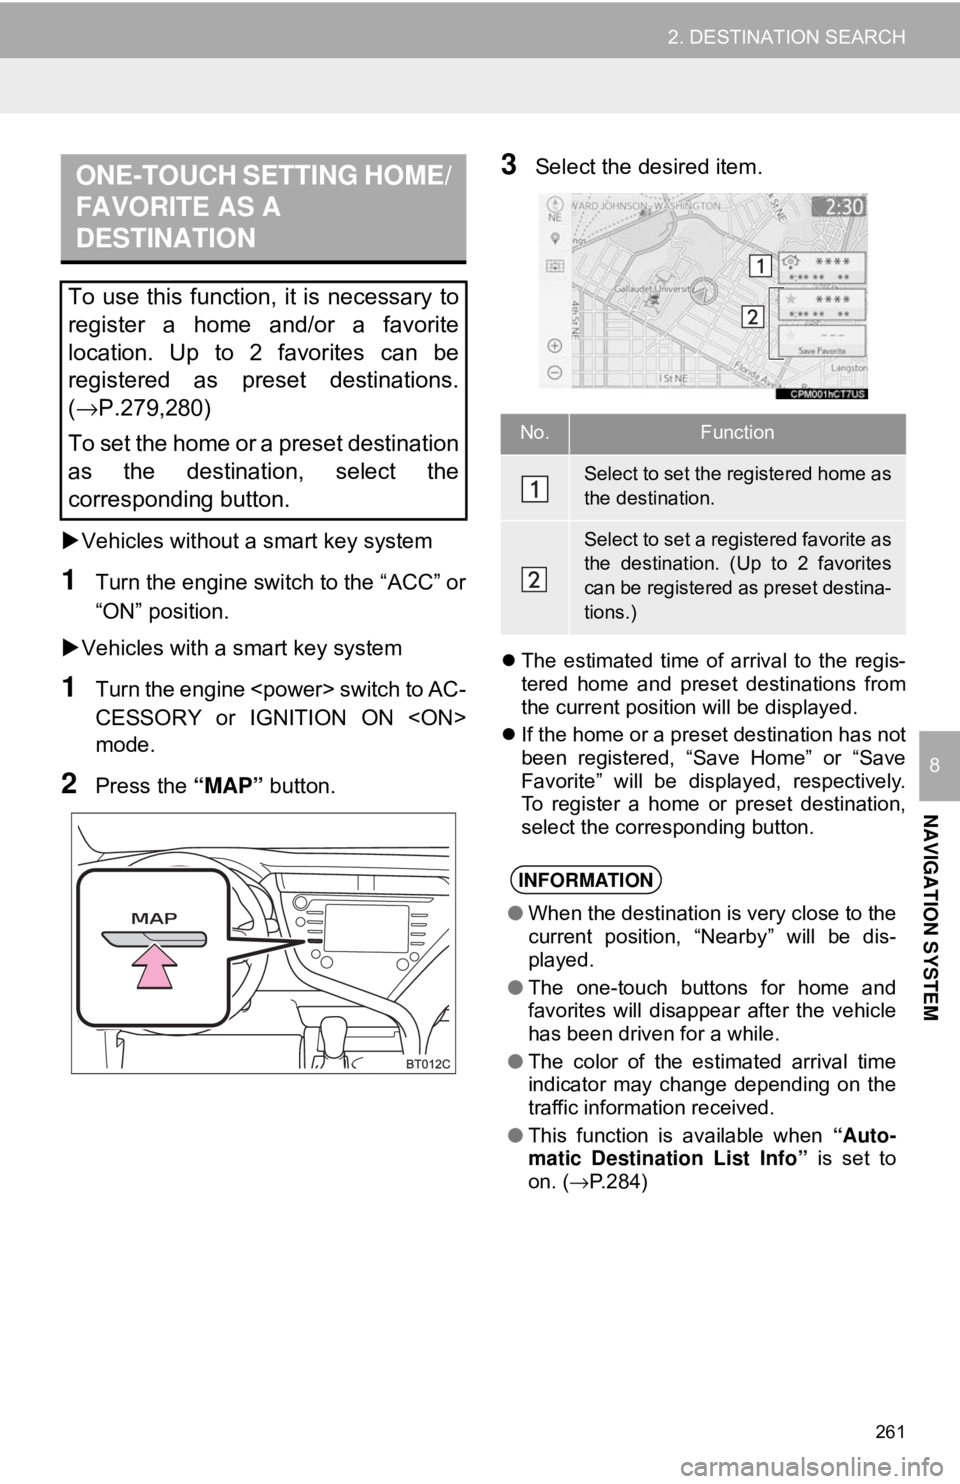
3Select the desired item.
The estimated time of arrival to the regis-
tered home and preset destinations from
the current position will be displayed.
If the home or a preset destination has not
been registered, “Save Home” or “Save
Favorite” will be displayed, respectively.
To register a home or preset destination,
select the corresponding button.
ONE-TOUCH SETTING HOME/
FAVORITE AS A
DESTINATION
To use this function, it is necessary to
register a home and/or a favorite
location. Up to 2 favorites can be
registered as preset destinations.
(→P.279,280)
To set the home or a preset destination
as the destination, select the
corresponding button.
No.Function
Select to set the registered home as
the destination.
Select to set a registered favorite as
the destination. (Up to 2 favorites
can be registered as preset destina-
tions.)
INFORMATION
● When the destination is very close to the
current position, “Nearby” will be dis-
played.
● The one-touch buttons for home and
favorites will disappear after the vehicle
has been driven for a while.
● The color of the estimated arrival time
indicator may change depending on the
traffic information received.
● This function is available when “Auto-
matic Destination List Info” is set to
on. ( →P.284)
Page 280 of 340
280
4. MEMORY POINTS
1Display the navigation settings screen.
(→P.278)
2Select “Favorites” .
3Select the desired item.
1Select “New”.
2Select the desired item to search for
the location. ( →P.253)
3Select “Enter” when the setting map
screen appears.
4Select “OK” when the edit favorites
entry screen appears. ( →P.280)
1Select “Edit”.
2Select the desired favorites list entry.
Each time a star icon is selected, its color
will change. Colored star icons indicate
that the favorite is registered to the corre-
sponding preset destination button. Up to
2 entries can be registered as quick favor-
ite destinations. ( →P.261)
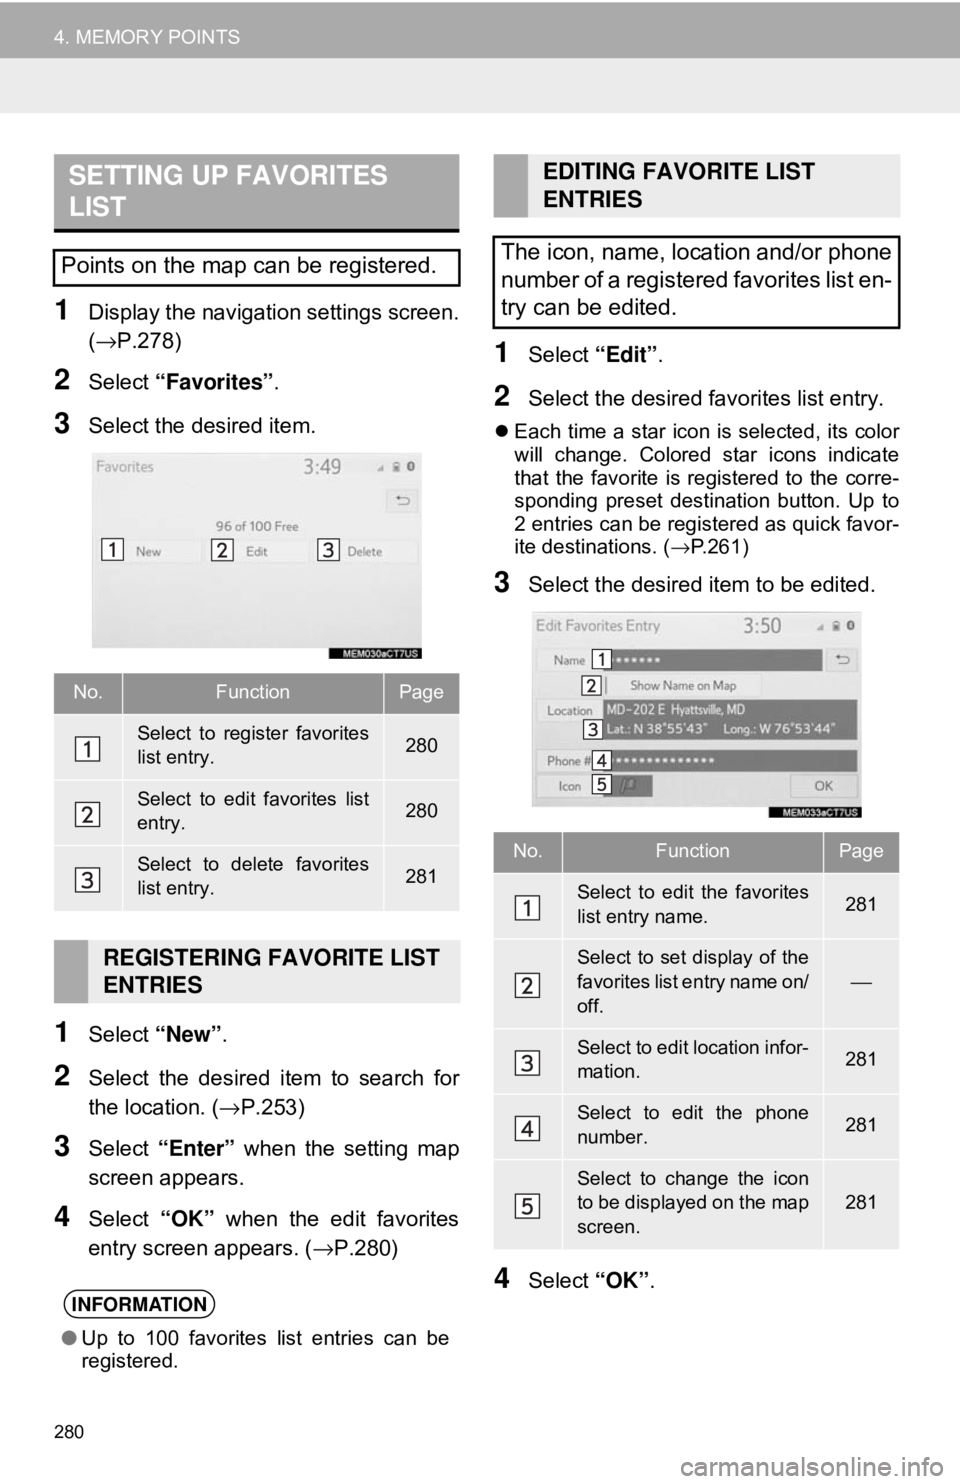
3Select the desired item to be edited.
4Select “OK”.
SETTING UP FAVORITES
LIST
Points on the map can be registered.
No.FunctionPage
Select to register favorites
list entry.280
Select to edit favorites list
entry.280
Select to delete favorites
list entry.281
REGISTERING FAVORITE LIST
ENTRIES
INFORMATION
●Up to 100 favorites list entries can be
registered.
EDITING FAVORITE LIST
ENTRIES
The icon, name, location and/or phone
number of a registered favorites list en-
try can be edited.
No.FunctionPage
Select to edit the favorites
list entry name.281
Select to set display of the
favorites list entry name on/
off.
⎯
Select to edit location infor-
mation.281
Select to edit the phone
number.281
Select to change the icon
to be displayed on the map
screen.
281
Page 285 of 340
285
5. SETUP
NAVIGATION SYSTEM
8
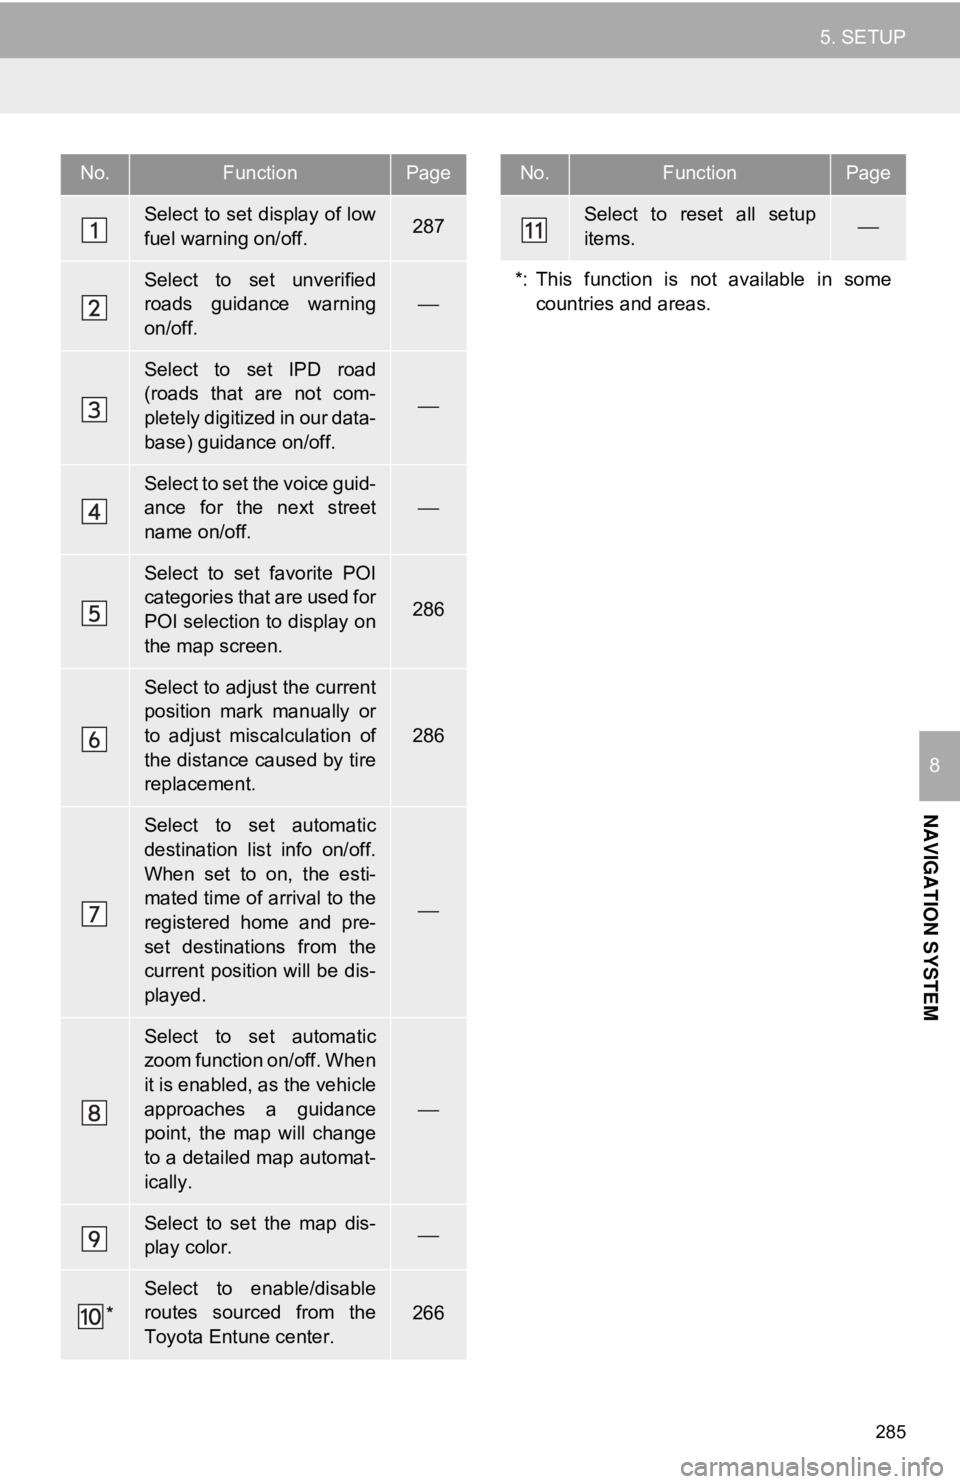
No.FunctionPage
Select to set display of low
fuel warning on/off.287
Select to set unverified
roads guidance warning
on/off.
⎯
Select to set IPD road
(roads that are not com-
pletely digitized in our data-
base) guidance on/off.
⎯
Select to set the voice guid-
ance for the next street
name on/off.
⎯
Select to set favorite POI
categories that are used for
POI selection to display on
the map screen.
286
Select to adjust the current
position mark manually or
to adjust miscalculation of
the distance caused by tire
replacement.
286
Select to set automatic
destination list info on/off.
When set to on, the esti-
mated time of arrival to the
registered home and pre-
set destinations from the
current position will be dis-
played.
⎯
Select to set automatic
zoom function on/off. When
it is enabled, as the vehicle
approaches a guidance
point, the map will change
to a detailed map automat-
ically.
⎯
Select to set the map dis-
play color. ⎯
*
Select to enable/disable
routes sourced from the
Toyota Entune center.266
Select to reset all setup
items.⎯
*: This function is not available in some countries and areas.
No.FunctionPage
Page 288 of 340
288
5. SETUP
2. TRAFFIC SETTINGS*
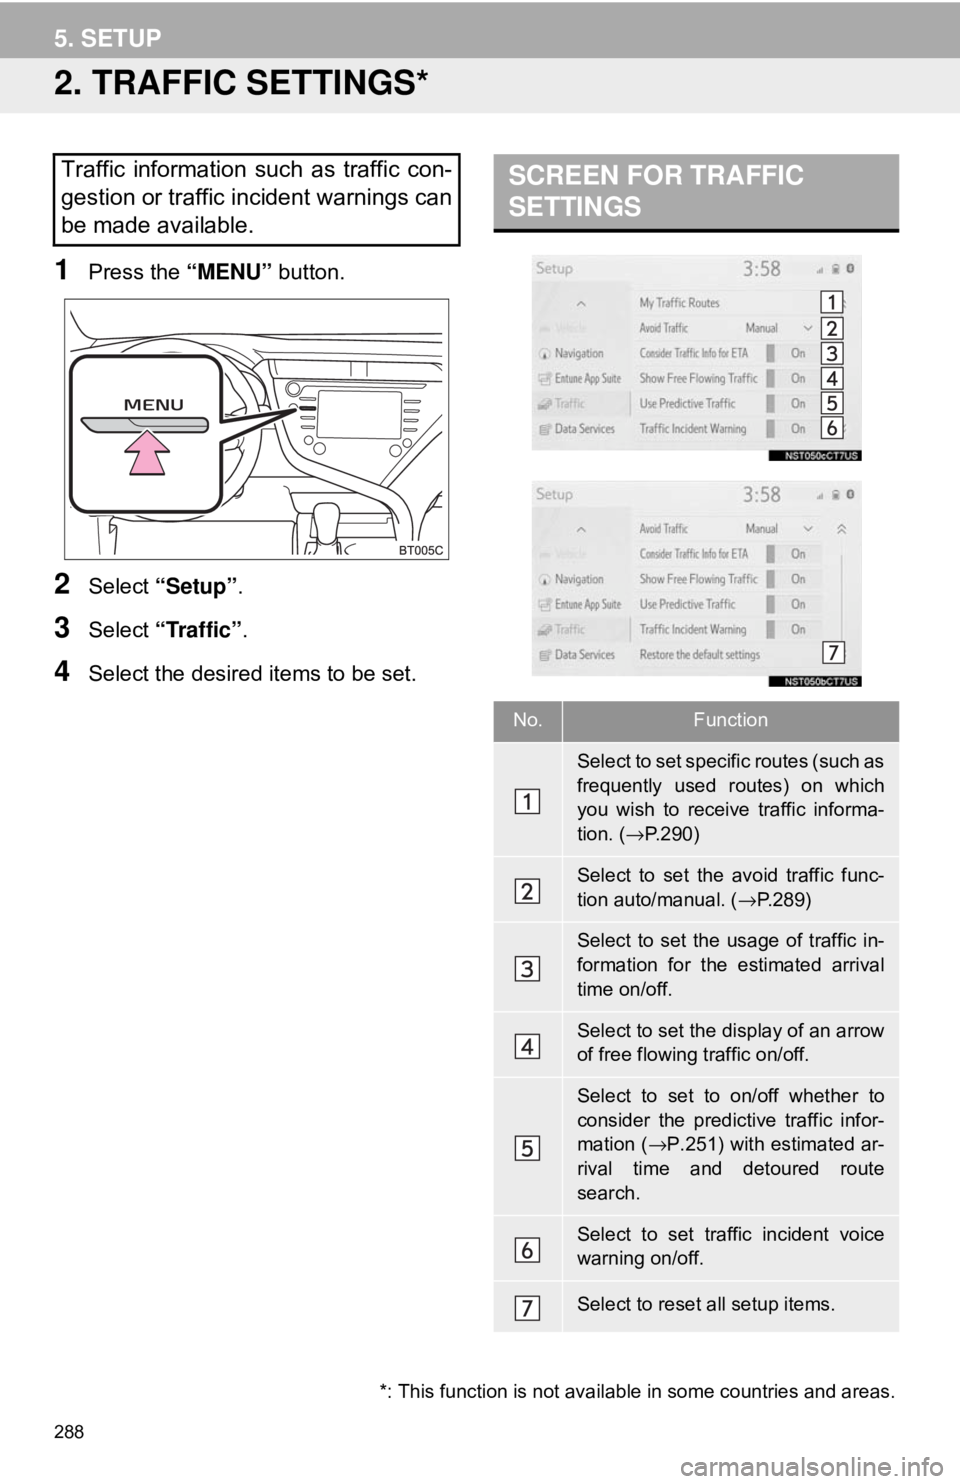
1Press the “MENU” button.
2Select “Setup” .
3Select “Traffic”.
4Select the desired items to be set.
Traffic information such as traffic con-
gestion or traffic incident warnings can
be made available. SCREEN FOR TRAFFIC
SETTINGS
No.Function
Select to set specific routes (such as
frequently used routes) on which
you wish to receive traffic informa-
tion. (→P.290)
Select to set the avoid traffic func-
tion auto/manual. ( →P.289)
Select to set the usage of traffic in-
formation for the estimated arrival
time on/off.
Select to set the display of an arrow
of free flowing traffic on/off.
Select to set to on/off whether to
consider the predictive traffic infor-
mation ( →P.251) with estimated ar-
rival time and detoured route
search.
Select to set traffic incident voice
warning on/off.
Select to reset all setup items.
*: This function is not avail able in some countries and areas.
Page 301 of 340
301
1. Toyota Entune-OVERVIEW
Toyota Entune
9
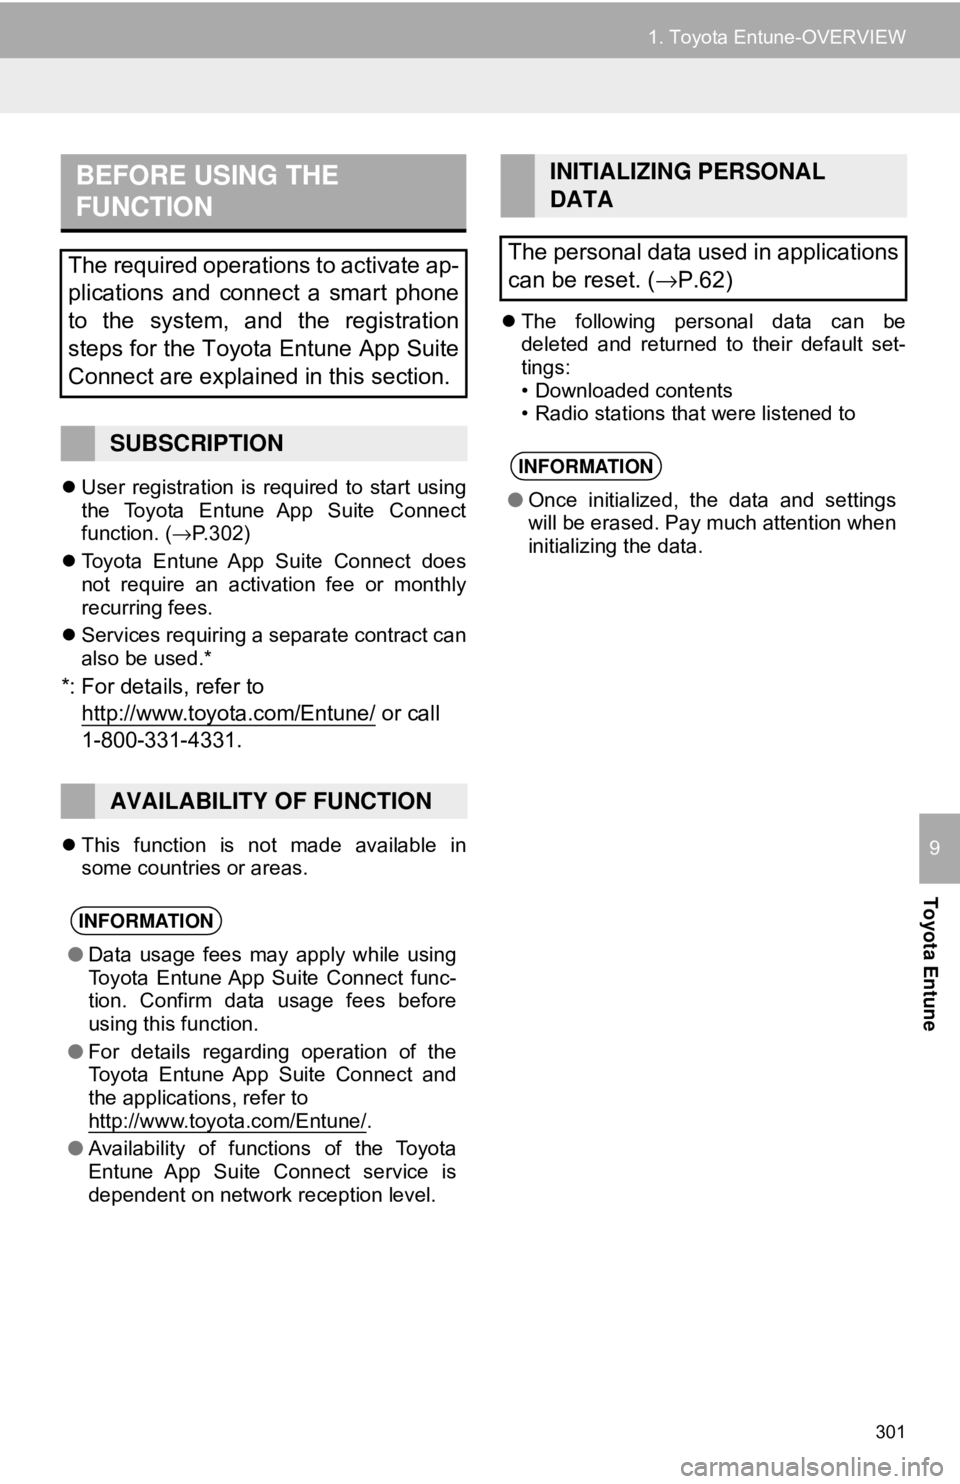
User registration is required to start using
the Toyota Entune App Suite Connect
function. ( →P.302)
Toyota Entune App Suite Connect does
not require an activation fee or monthly
recurring fees.
Services requiring a separate contract can
also be used.*
*: For details, refer to
http://www.toy ota.com/Entune/
or call
1-800-331-4331.
This function is not made available in
some countries or areas.
The following personal data can be
deleted and returned to their default set-
tings:
• Downloaded contents
• Radio stations that were listened to
BEFORE USING THE
FUNCTION
The required operations to activate ap-
plications and connect a smart phone
to the system, and the registration
steps for the Toyota Entune App Suite
Connect are explained in this section.
SUBSCRIPTION
AVAILABILITY OF FUNCTION
INFORMATION
● Data usage fees may apply while using
Toyota Entune App Suite Connect func-
tion. Confirm data usage fees before
using this function.
● For details regarding operation of the
Toyota Entune App Suite Connect and
the applications, refer to
http://www.toyota.com/Entune/
.
● Availability of functions of the Toyota
Entune App Suite Connect service is
dependent on network reception level.
INITIALIZING PERSONAL
DATA
The personal data used in applications
can be reset. ( →P.62)
INFORMATION
●Once initialized, the data and settings
will be erased. Pay much attention when
initializing the data.
Page 313 of 340
313
Toyota Entune
9
3. SETUP
1. Toyota Entune App Suite Connect SETTINGS
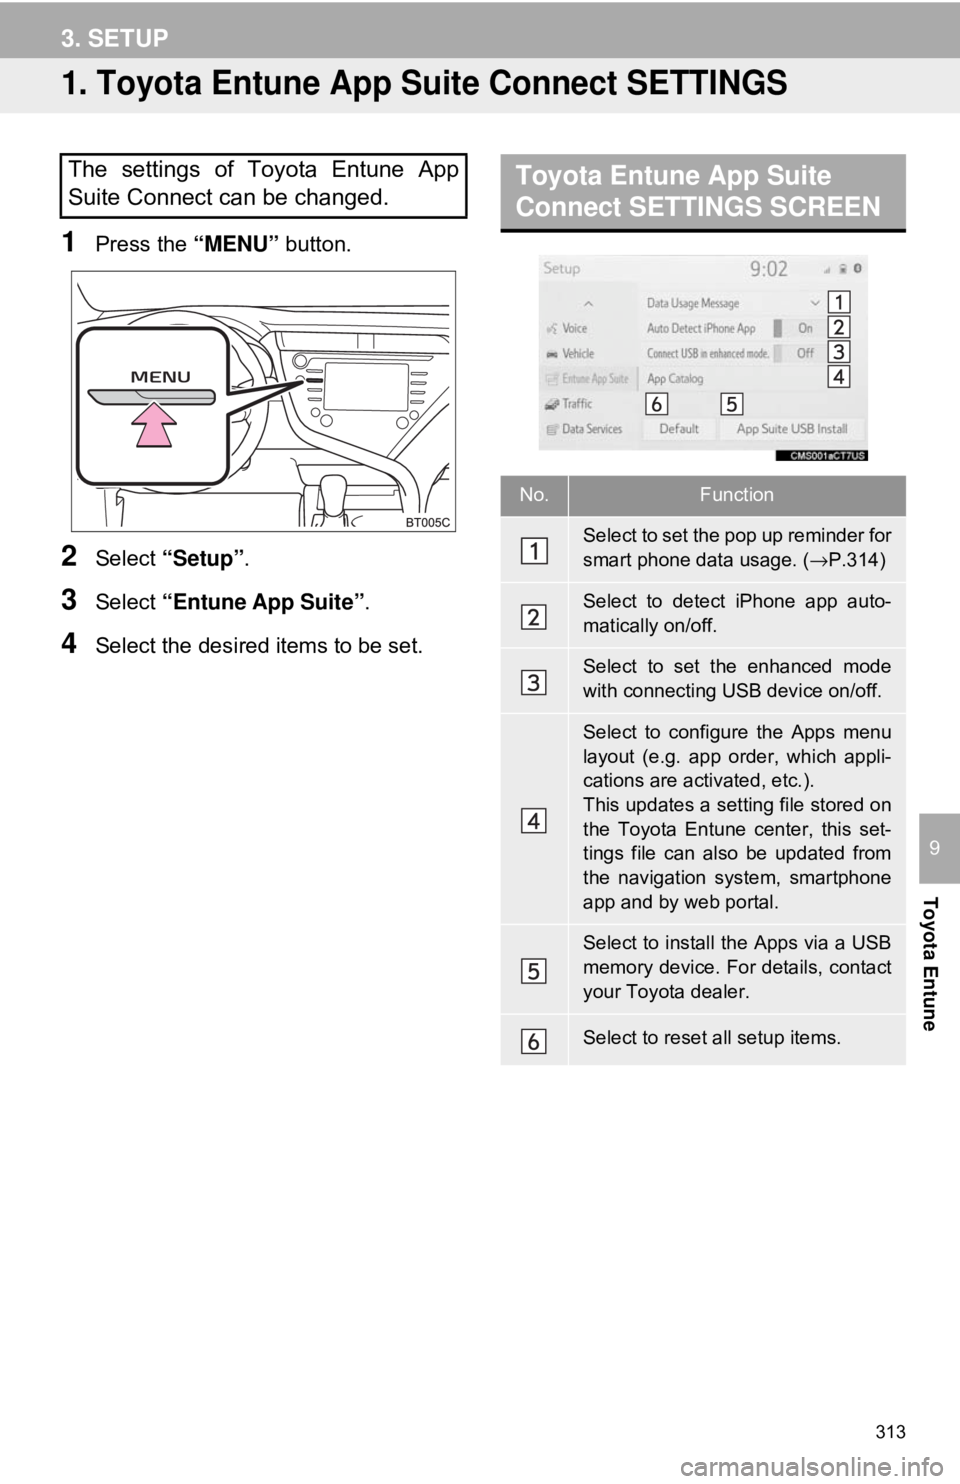
1Press the “MENU” button.
2Select “Setup” .
3Select “Entune App Suite” .
4Select the desired items to be set.
The settings of Toyota Entune App
Suite Connect can be changed.Toyota Entune App Suite
Connect SETTINGS SCREEN
No.Function
Select to set the pop up reminder for
smart phone data usage. ( →P.314)
Select to detect iPhone app auto-
matically on/off.
Select to set the enhanced mode
with connecting USB device on/off.
Select to configure the Apps menu
layout (e.g. app order, which appli-
cations are activated, etc.).
This updates a setting file stored on
the Toyota Entune center, this set-
tings file can also be updated from
the navigation system, smartphone
app and by web portal.
Select to install the Apps via a USB
memory device. For details, contact
your Toyota dealer.
Select to reset all setup items.
Page 339 of 340

339
Phone settings ........................................ 221Contact/call history settings screen ................................ 223
Message settings screen .................... 230
Notification settings screen ................. 222
Phone settings screen......................... 221
Sound settings screen......................... 221
Phone ..................................................... 204
POI category ........................... 248, 258, 286
Point of interest ....................................... 248
Predictive traffic data .............................. 251
PWR·VOL knob ........................................ 12
R
Radio ........................................................ 80
Available HD Radio™ technology ......... 87
Caching a radio program....................... 83
Displaying the radio ID .......................... 91
HD Radio™ troubleshooting guide........ 88
How to subscribe to SiriusXM satellite radio ..................................... 89
If the satellite radio tuner malfunctions ...................................... 92
Presetting a station ............................... 83
Radio broadcast data system................ 86
Radio options ........................................ 86
Selecting a station from the list ............. 85
Using HD Radio™ technology .............. 87
Rear view monitor system ...................... 146
Camera ............................................... 148
Screen description .............................. 147
Things you should know...................... 153
Receiving on the Bluetooth
® phone........ 213
Incoming calls ..................................... 213
Registering favorite destinations ........................... 23, 256, 261
Registering home.............................. 22, 279 Registering/connecting
Bluetooth
® device.................................. 42
Profiles .................................................. 45
Reordering destinations .......................... 274
Route guidance ....................................... 262
Route guidance screen ........................... 267
Arrow screen ....................................... 272
Freeway............................................... 269
Intersection .......................................... 271
Turn list screen .................................... 271
Route information bar ............................. 267
Route options .......................................... 274
Adjacent road ...................................... 277
Detour.................................................. 276
Reordering destinations ...................... 274
Route overview.................................... 263
Route preferences ............................... 275
Route type ........................................... 275
Route overview ....................................... 263
Route preferences .................................. 265
Route trace ............................................. 249
Route type............................................... 275
S
Safety Connect ....................................... 306
Scale ....................................................... 242
Screen adjustment .................................... 39
Screen change button ............................. 240
Scrolling the map .................................... 244
Search area ............................................ 255
SEEK/TRACK button ................................ 12
Setup screen ............................................. 20
Single map .............................................. 246
SiriusXM (SXM) ........................................ 80
Steering switches .................................... 111