set clock TOYOTA CAMRY HYBRID 2019 Accessories, Audio & Navigation (in English)
[x] Cancel search | Manufacturer: TOYOTA, Model Year: 2019, Model line: CAMRY HYBRID, Model: TOYOTA CAMRY HYBRID 2019Pages: 354, PDF Size: 8.08 MB
Page 17 of 354
17
1. BASIC FUNCTION
QUICK GUIDE
1No.FunctionPage
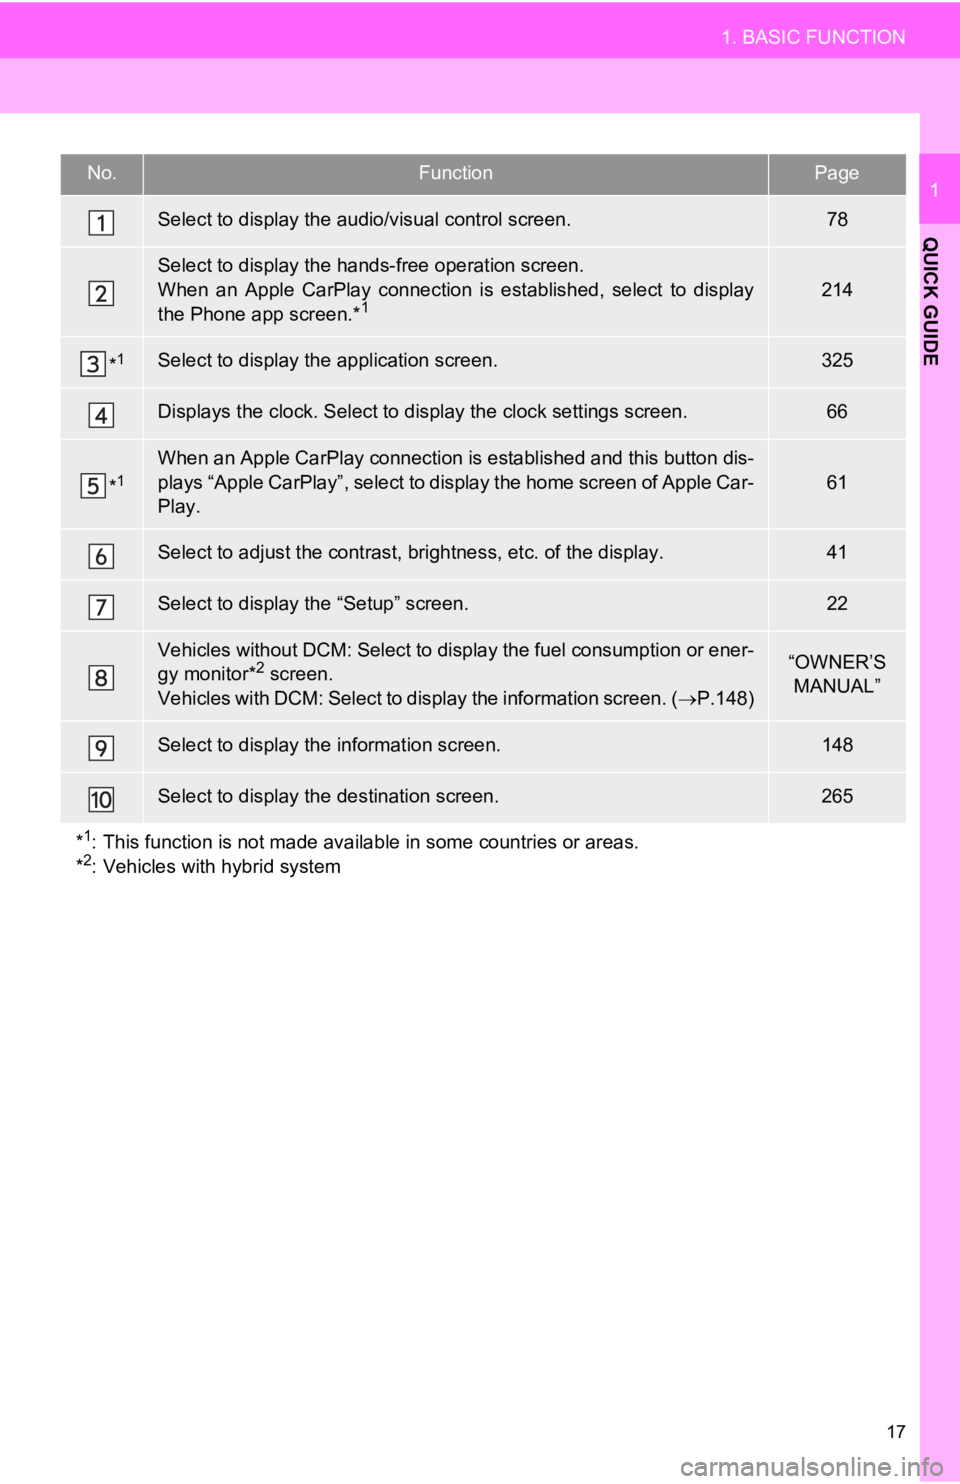
Select to display the audio/visual control screen.78
Select to display the hands-free operation screen.
When an Apple CarPlay connection is established, select to display
the Phone app screen.*
1214
*1Select to display the application screen.325
Displays the clock. Select to display the clock settings screen.66
*1When an Apple CarPlay connection is established and this button dis-
plays “Apple CarPlay”, select to display the home screen of App le Car-
Play.
61
Select to adjust the contrast, brightness, etc. of the display.41
Select to display the “Setup” screen.22
Vehicles without DCM: Select to display the fuel consumption or ener-
gy monitor*2 screen.
Vehicles with DCM: Select to display the information screen. ( P.148)“OWNER’S
MANUAL”
Select to display the information screen.148
Select to display the destination screen.265
*
1: This function is not made available in some countries or areas.
*2: Vehicles with hybrid system
Page 18 of 354
18
1. BASIC FUNCTION
3. HOME SCREEN
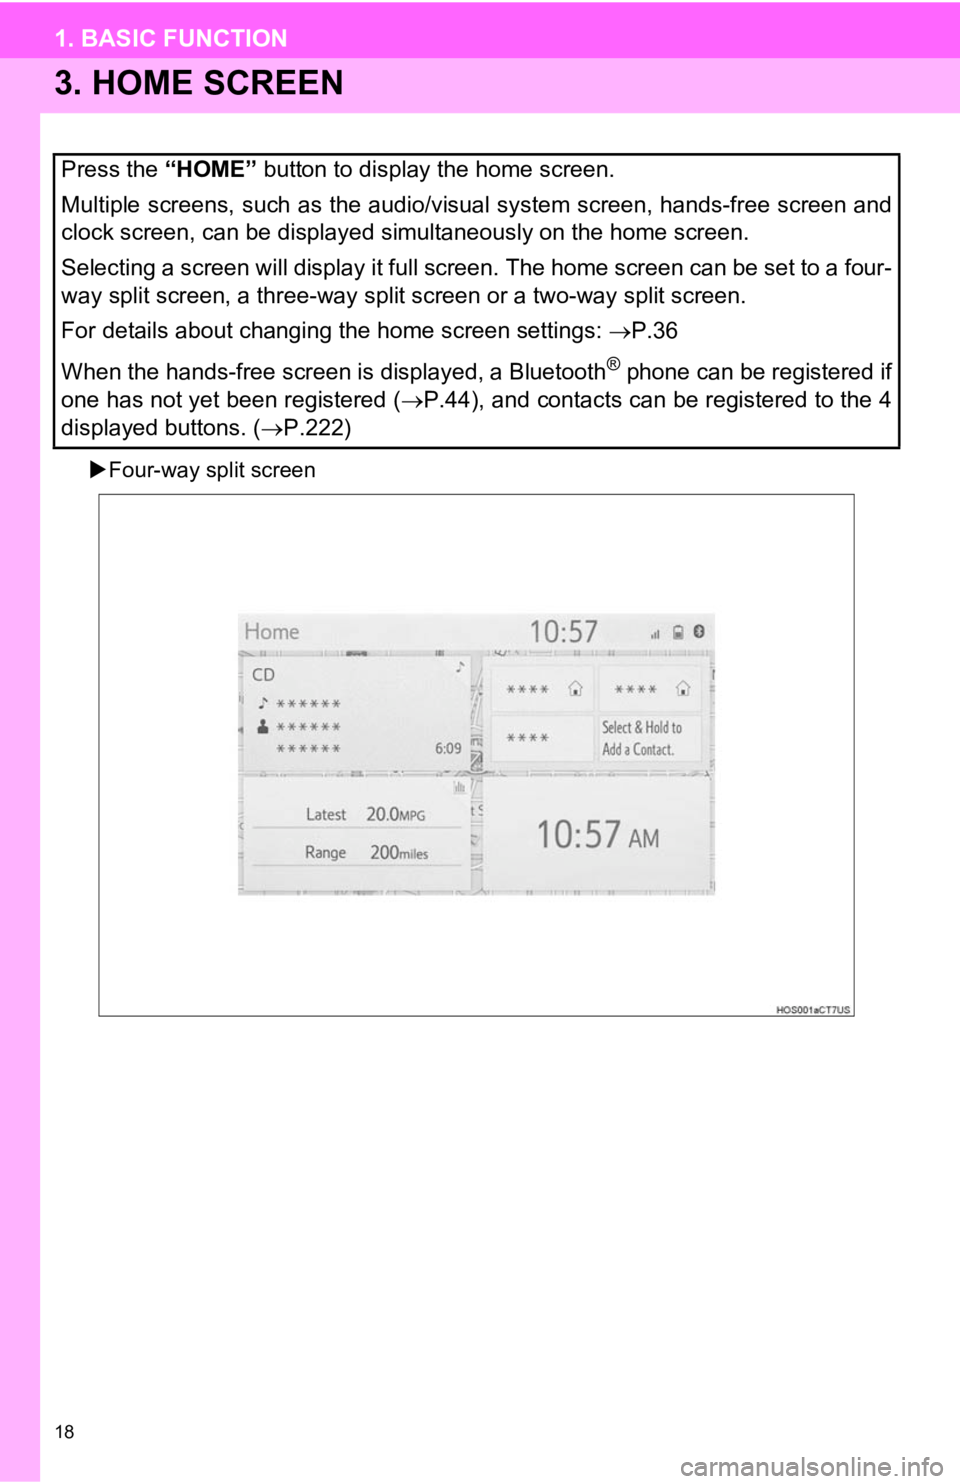
Four-way split screen
Press the “HOME” button to display the home screen.
Multiple screens, such as the audio/visual system screen, hands -free screen and
clock screen, can be displayed simultaneously on the home scree n.
Selecting a screen will display it full screen. The home screen can be set to a four-
way split screen, a three-way split screen or a two-way split s creen.
For details about changing the home screen settings: P.36
When the hands-free screen is displayed, a Bluetooth
® phone can be registered if
one has not yet been registered ( P.44), and contacts can be registered to the 4
displayed buttons. ( P.222)
Page 36 of 354
36
1. BASIC INFORMATION BEFORE OPERATION
4. HOME SCREEN OPERATION
1Press the “HOME” button.
2Check that the home screen is dis-
played.
Selecting a screen will display it full
screen.
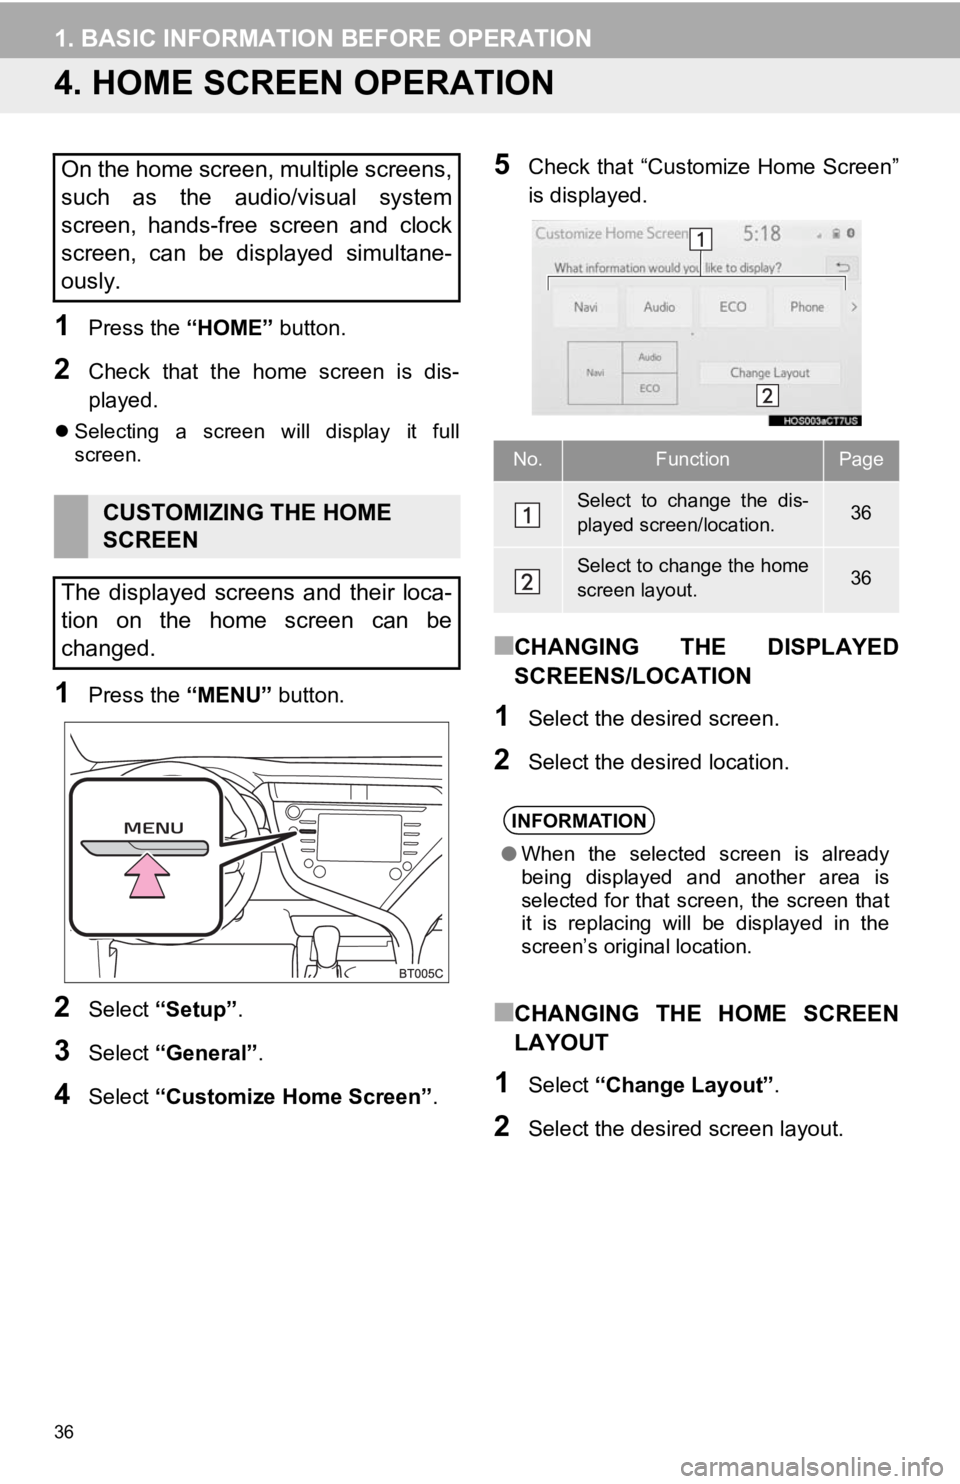
1Press the “MENU” button.
2Select “Setup” .
3Select “General” .
4Select “Customize Home Screen” .
5Check that “Customize Home Screen”
is displayed.
■CHANGING THE DISPLAYED
SCREENS/LOCATION
1Select the desired screen.
2Select the desired location.
■CHANGING THE HOME SCREEN
LAYOUT
1Select “Change Layout” .
2Select the desired screen layout.
On the home screen, multiple screens,
such as the audio/visual system
screen, hands-free screen and clock
screen, can be displayed simultane-
ously.
CUSTOMIZING THE HOME
SCREEN
The displayed screens and their loca-
tion on the home screen can be
changed.
No.FunctionPage
Select to change the dis-
played screen/location.36
Select to change the home
screen layout.36
INFORMATION
● When the selected screen is already
being displayed and another area is
selected for that screen, the screen that
it is replacing will be displayed in the
screen’s original location.
Page 64 of 354
64
3. OTHER SETTINGS
1. GENERAL SETTINGS
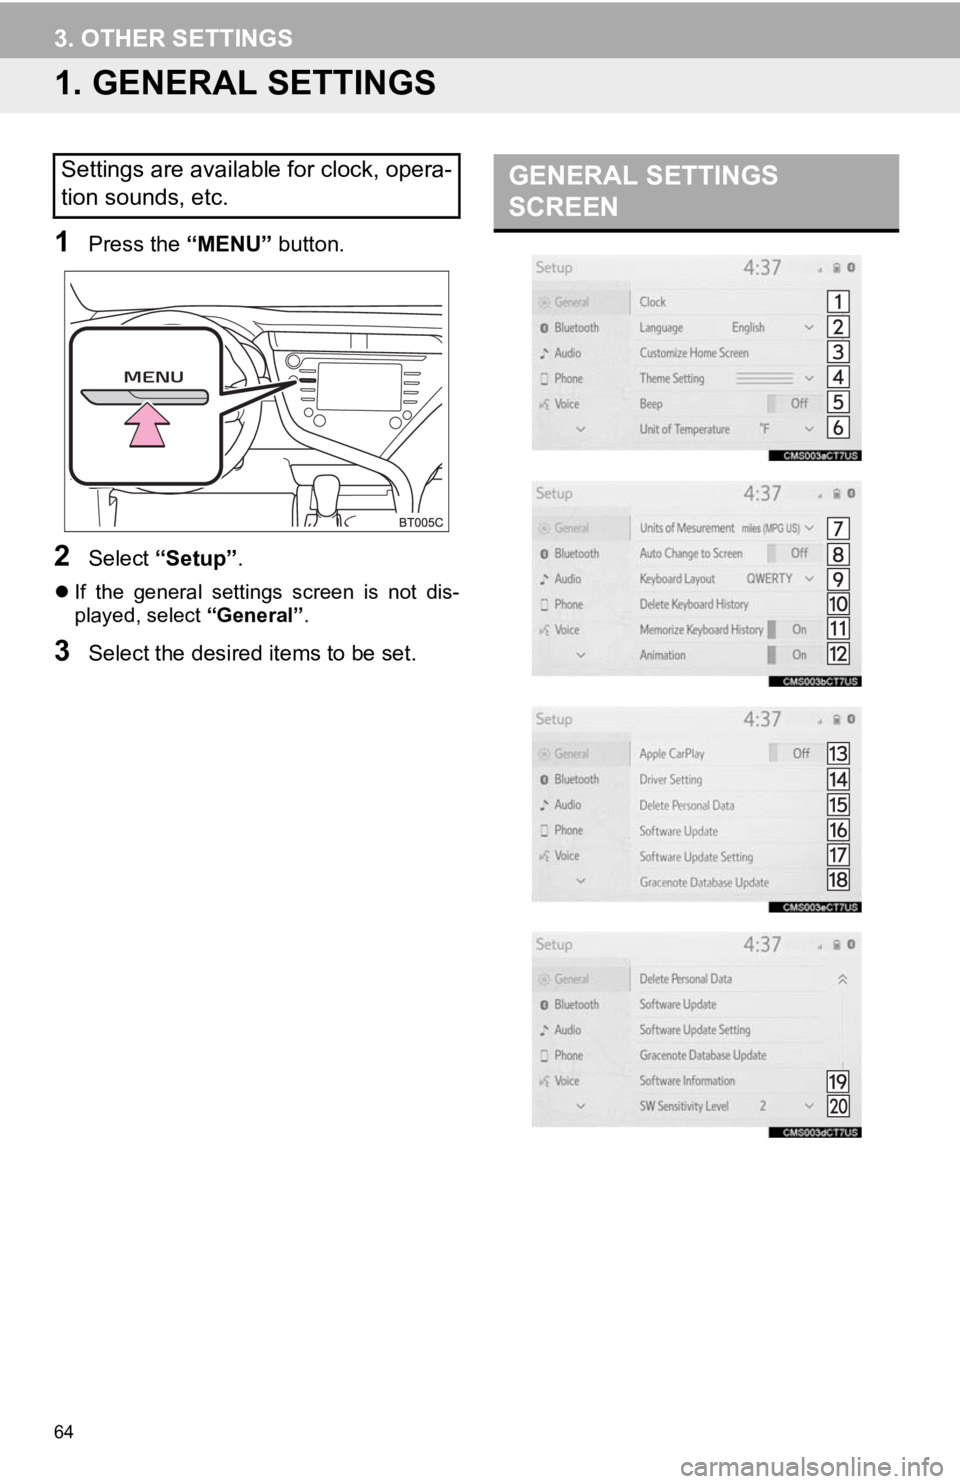
1Press the “MENU” button.
2Select “Setup” .
If the general settings screen is not dis-
played, select “General”.
3Select the desired items to be set.
Settings are available for clock, opera-
tion sounds, etc.GENERAL SETTINGS
SCREEN
Page 65 of 354
65
3. OTHER SETTINGS
BASIC FUNCTION
2
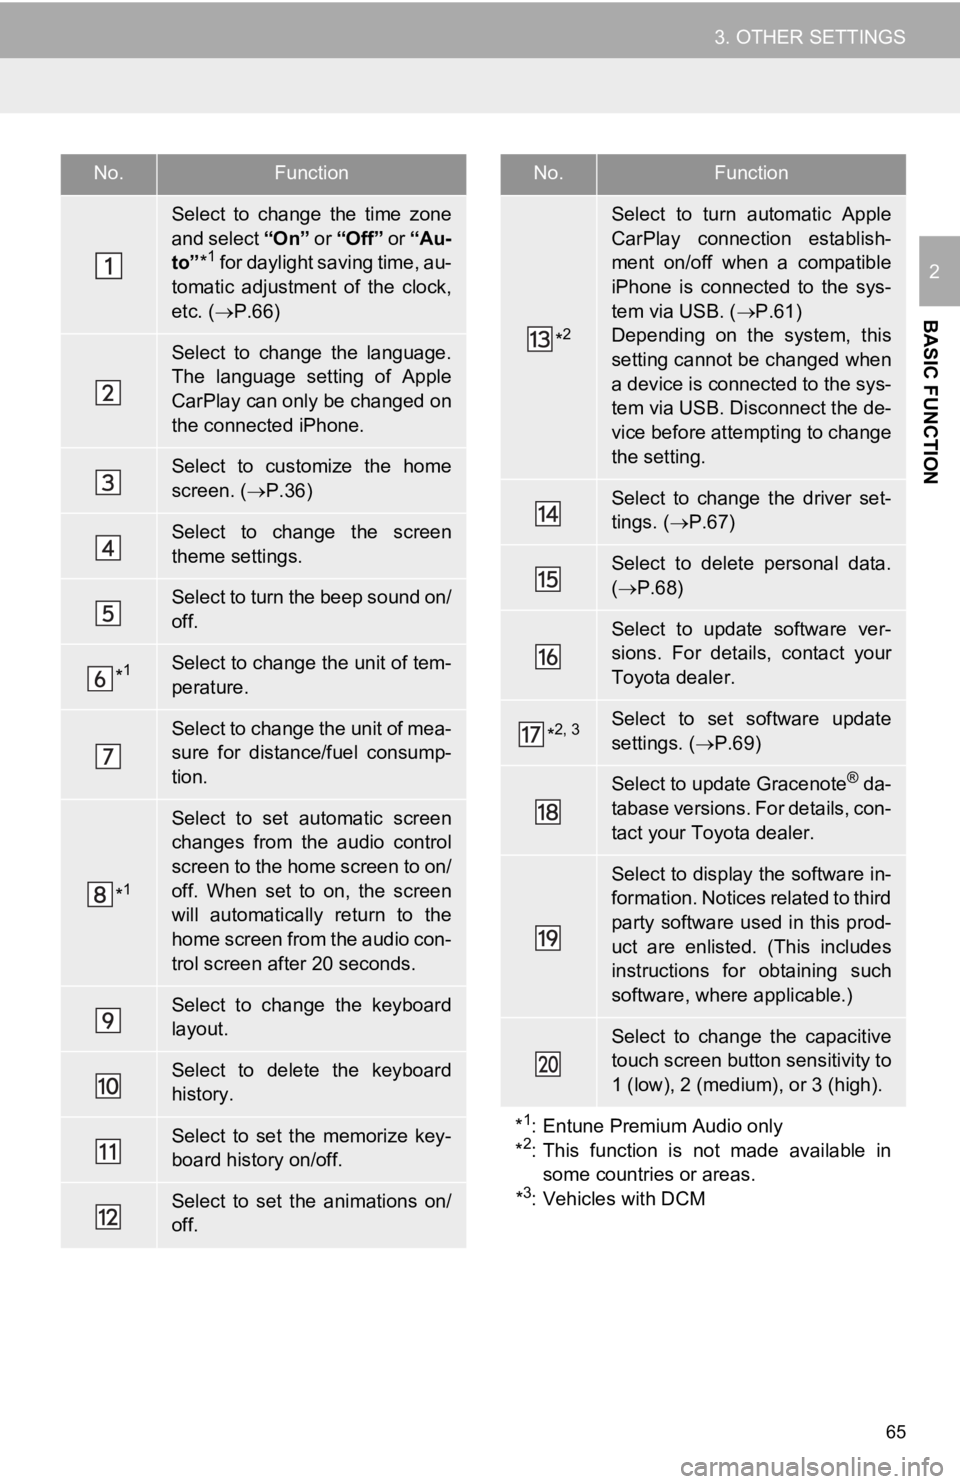
No.Function
Select to change the time zone
and select “On ” or “Off” or “Au-
to” *
1 for daylight saving time, au-
tomatic adjustment of the clock,
etc. ( P.66)
Select to change the language.
The language setting of Apple
CarPlay can only be changed on
the connected iPhone.
Select to customize the home
screen. ( P.36)
Select to change the screen
theme settings.
Select to turn the beep sound on/
off.
*1Select to change the unit of tem-
perature.
Select to change the unit of mea-
sure for distance/fuel consump-
tion.
*1
Select to set automatic screen
changes from the audio control
screen to the home screen to on/
off. When set to on, the screen
will automatically return to the
home screen from the audio con-
trol screen after 20 seconds.
Select to change the keyboard
layout.
Select to delete the keyboard
history.
Select to set the memorize key-
board history on/off.
Select to set the animations on/
off.
*2
Select to turn automatic Apple
CarPlay connection establish-
ment on/off when a compatible
iPhone is connected to the sys-
tem via USB. ( P.61)
Depending on the system, this
setting cannot be changed when
a device is connected to the sys-
tem via USB. Disconnect the de-
vice before attempting to change
the setting.
Select to change the driver set-
tings. ( P.67)
Select to delete personal data.
( P.68)
Select to update software ver-
sions. For details, contact your
Toyota dealer.
*2, 3Select to set software update
settings. ( P.69)
Select to update Gracenote® da-
tabase versions. For details, con-
tact your Toyota dealer.
Select to display the software in-
formation. Notices related to third
party software used in this prod-
uct are enlisted. (This includes
instructions for obtaining such
software, where applicable.)
Select to change the capacitive
touch screen button sensitivity to
1 (low), 2 (medium), or 3 (high).
*
1: Entune Premium Audio only
*2: This function is not made available in
some countries or areas.
*
3: Vehicles with DCM
No.Function
Page 66 of 354
66
3. OTHER SETTINGS
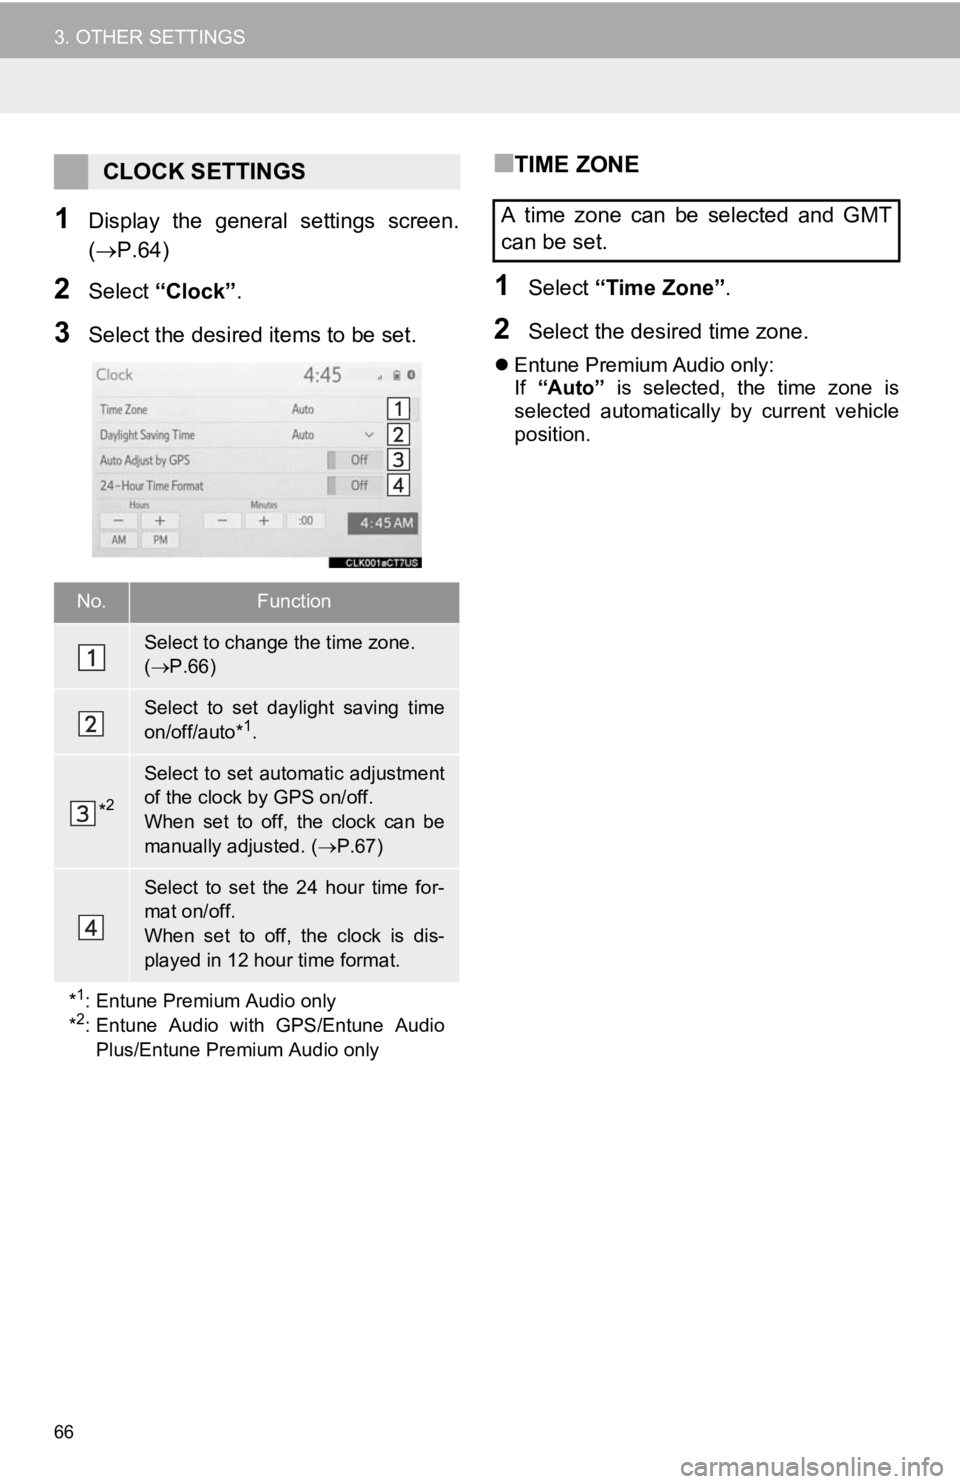
1Display the general settings screen.
(P.64)
2Select “Clock”.
3Select the desired items to be set.
■TIME ZONE
1Select “Time Zone” .
2Select the desired time zone.
Entune Premium Audio only:
If “Auto” is selected, the time zone is
selected automatically by current vehicle
position.
CLOCK SETTINGS
No.Function
Select to change the time zone.
( P.66)
Select to set daylight saving time
on/off/auto*1.
*2
Select to set automatic adjustment
of the clock by GPS on/off.
When set to off, the clock can be
manually adjusted. ( P.67)
Select to set the 24 hour time for-
mat on/off.
When set to off, the clock is dis-
played in 12 hour time format.
*
1: Entune Premium Audio only
*2: Entune Audio with GPS/Entune Audio Plus/Entune Premium Audio only
A time zone can be selected and GMT
can be set.
Page 67 of 354
67
3. OTHER SETTINGS
BASIC FUNCTION
2
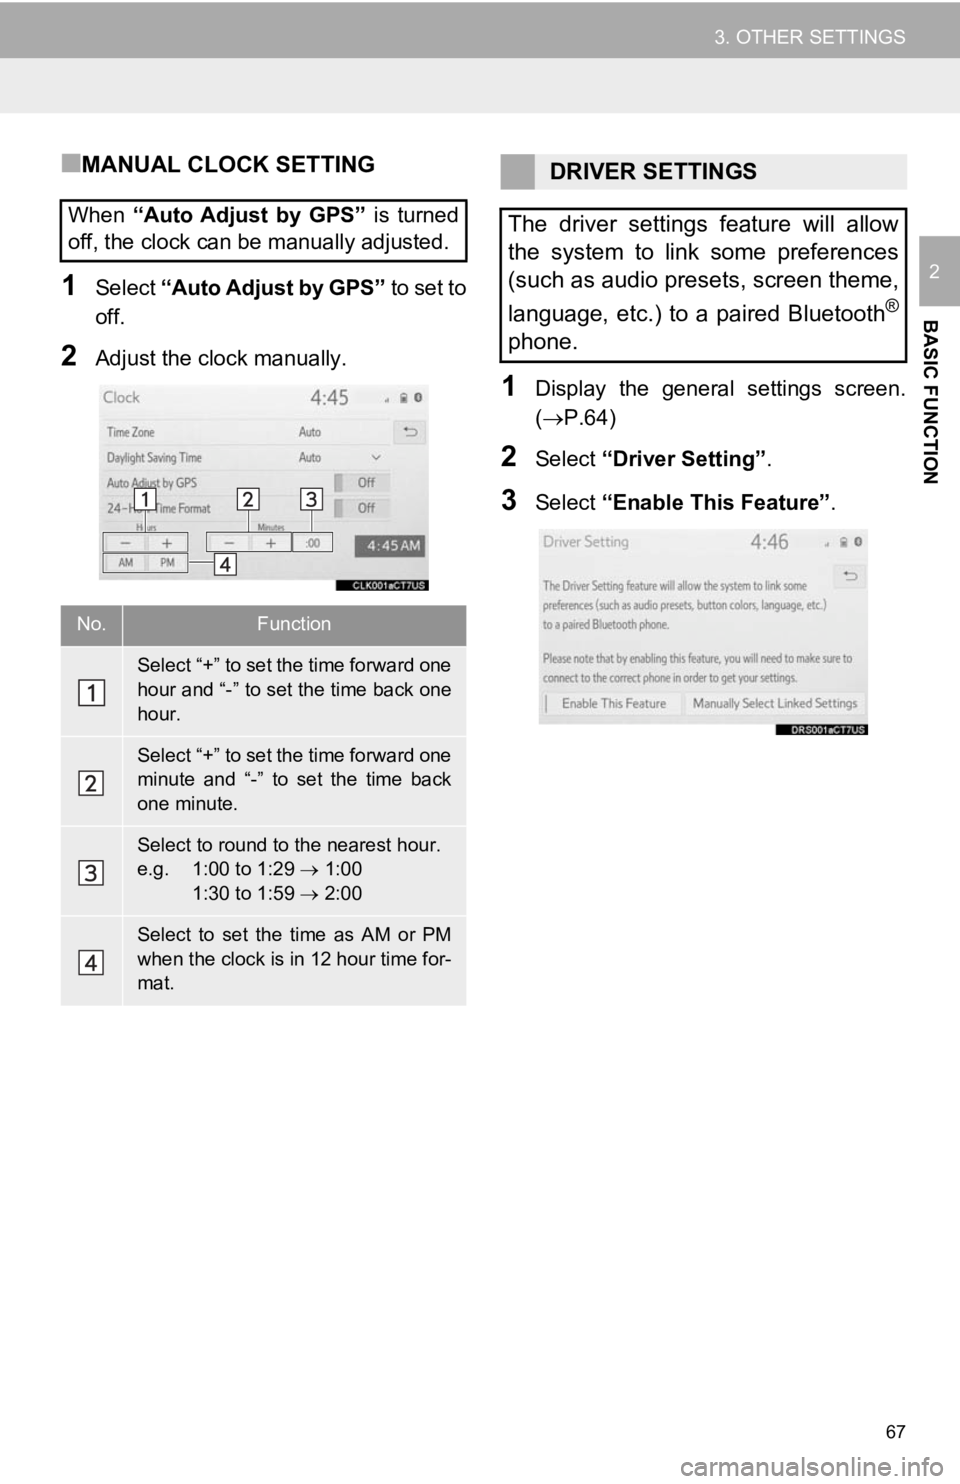
■MANUAL CLOCK SETTING
1Select “Auto Adjust by GPS” to set to
off.
2Adjust the clock manually.
1Display the general settings screen.
(P.64)
2Select “Driver Setting” .
3Select “Enable This Feature” .
When
“Auto Adjust by GPS” is turned
off, the clock can be manually adjusted.
No.Function
Select “+” to set the time forward one
hour and “-” to set the time back one
hour.
Select “+” to set the time forward one
minute and “-” to set the time back
one minute.
Select to round to the nearest hour.
e.g. 1:00 to 1:29 1:00
1:30 to 1:59 2:00
Select to set the time as AM or PM
when the clock is in 12 hour time for-
mat.
DRIVER SETTINGS
The driver settings feature will allow
the system to link some preferences
(such as audio presets, screen theme,
language, etc.) to a paired Bluetooth
®
phone.
Page 350 of 354
350
ALPHABETICAL INDEX
A
AAC................................................... 99, 126
Adding destinations................................. 279
Address ................................................... 269
Adjacent road .......................................... 290
AM.............................................................86
Apple CarPlay ........................................... 61
Applications..................................... 314, 325
APPS button ............................................. 14
Area to avoid ........................................... 295
Arrival time .............................................. 280
AUDIO button............................................ 14
Audio settings ......................................... 119
Audio/visual system .................................. 80
Audio screen adjustment ....................... 84
Disc slot ................................................. 81
Screen adjustment ................................ 85
Selecting an audio source ..................... 80
Sound settings....................................... 82
Turning the system on and off ............... 80
USB/AUX port ....................................... 82
Voice command system ... ..................... 85
AUX......................................................... 114
AUX port ................................................... 82
Avoid traffic ............................................. 302
B
Bluetooth® audio .....................................109
Registering/connecting a Bluetooth
® device ............................113
Bluetooth® phone ....................................215
About the contacts in the contact list ........................................218
Registering/connecting a Bluetooth
® phone.............................216
Using the phone switch/microphone ...........................216
Voice command system ..... .................217
When selling or disposing of the vehicle....................218
Bluetooth
® settings ...................................48
Connecting a Bluetooth® device............49
Deleting a Bluetooth® device.................51
Editing the Bluetooth®
device information ..............................52
Registering a Bluetooth
® device............51
Setting Bluetooth® system.....................53
Buttons overview .......................................14
C
Calibration ...............................................299
Calling on the Bluetooth® phone .............219
By call history ......................................219
By contacts list.....................................220
By favorites list ....................................220
By home screen...................................222
By keypad ............................................222
Camera switch ........................................181
CD ............................................................. 99
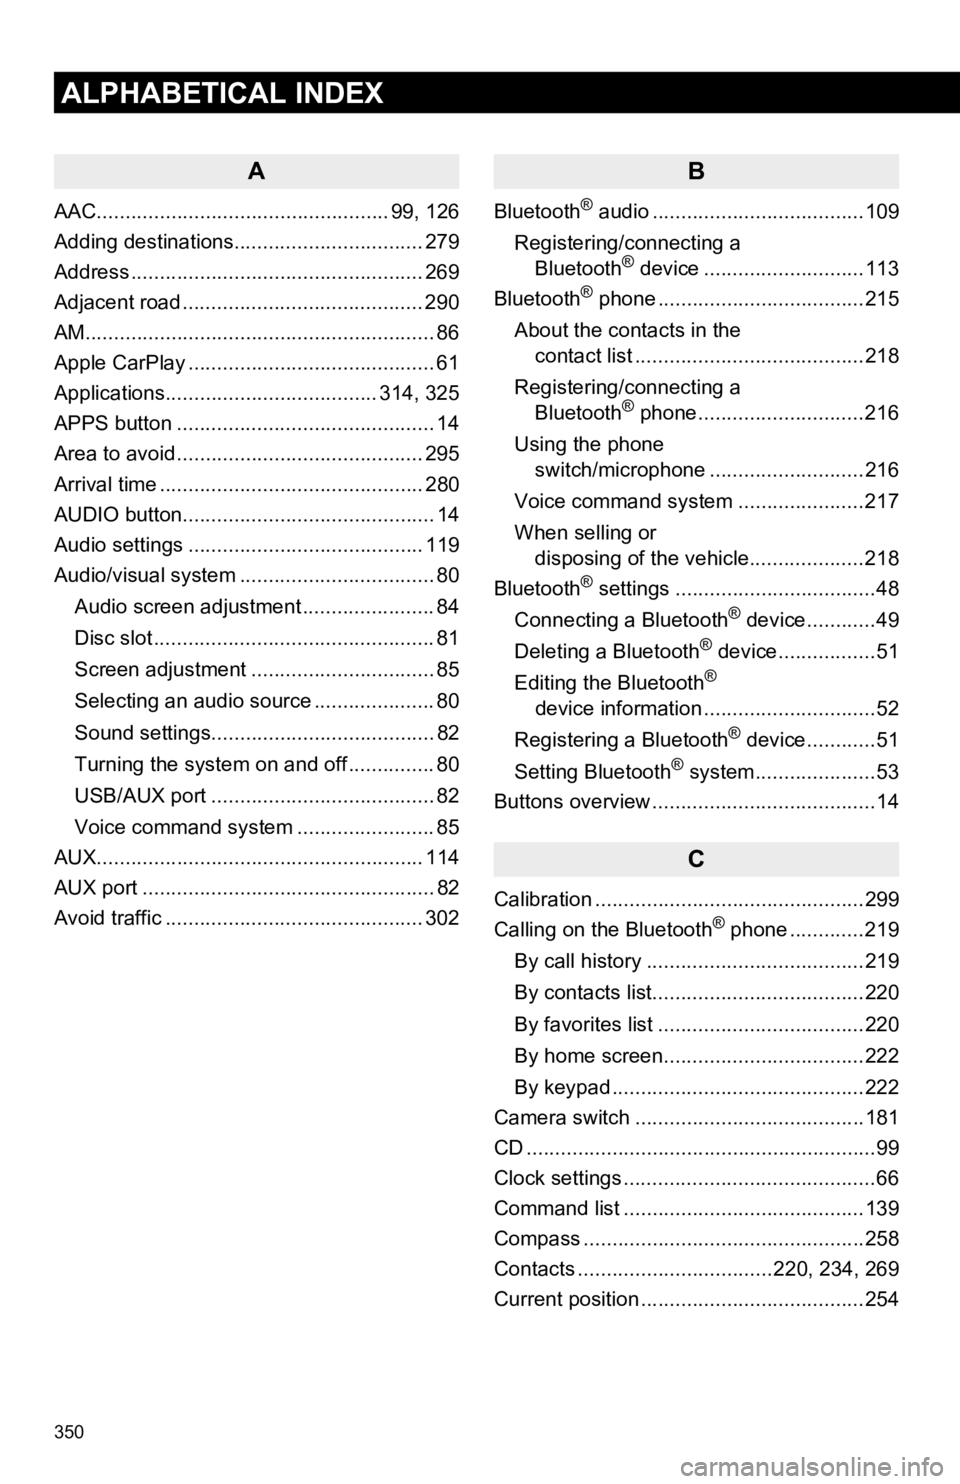
Clock settings ............................................66
Command list ..........................................139
Compass .................................................258
Contacts ..................................220, 234, 269
Current position .......................................254