turn signal TOYOTA CAMRY HYBRID 2020 (in English) User Guide
[x] Cancel search | Manufacturer: TOYOTA, Model Year: 2020, Model line: CAMRY HYBRID, Model: TOYOTA CAMRY HYBRID 2020Pages: 592, PDF Size: 12.13 MB
Page 295 of 592
2954-5. Using the driving support systems
4
Driving
The Blind Spot Monitor is a system that has 2 functions;
● The BSM (Blind Spot Monitor) function
Assists the driver in making a decision when changing lanes
● The RCTA (Rear Cross T raffic Alert) function
Assists the driver when backing up
These functions use same sensors.
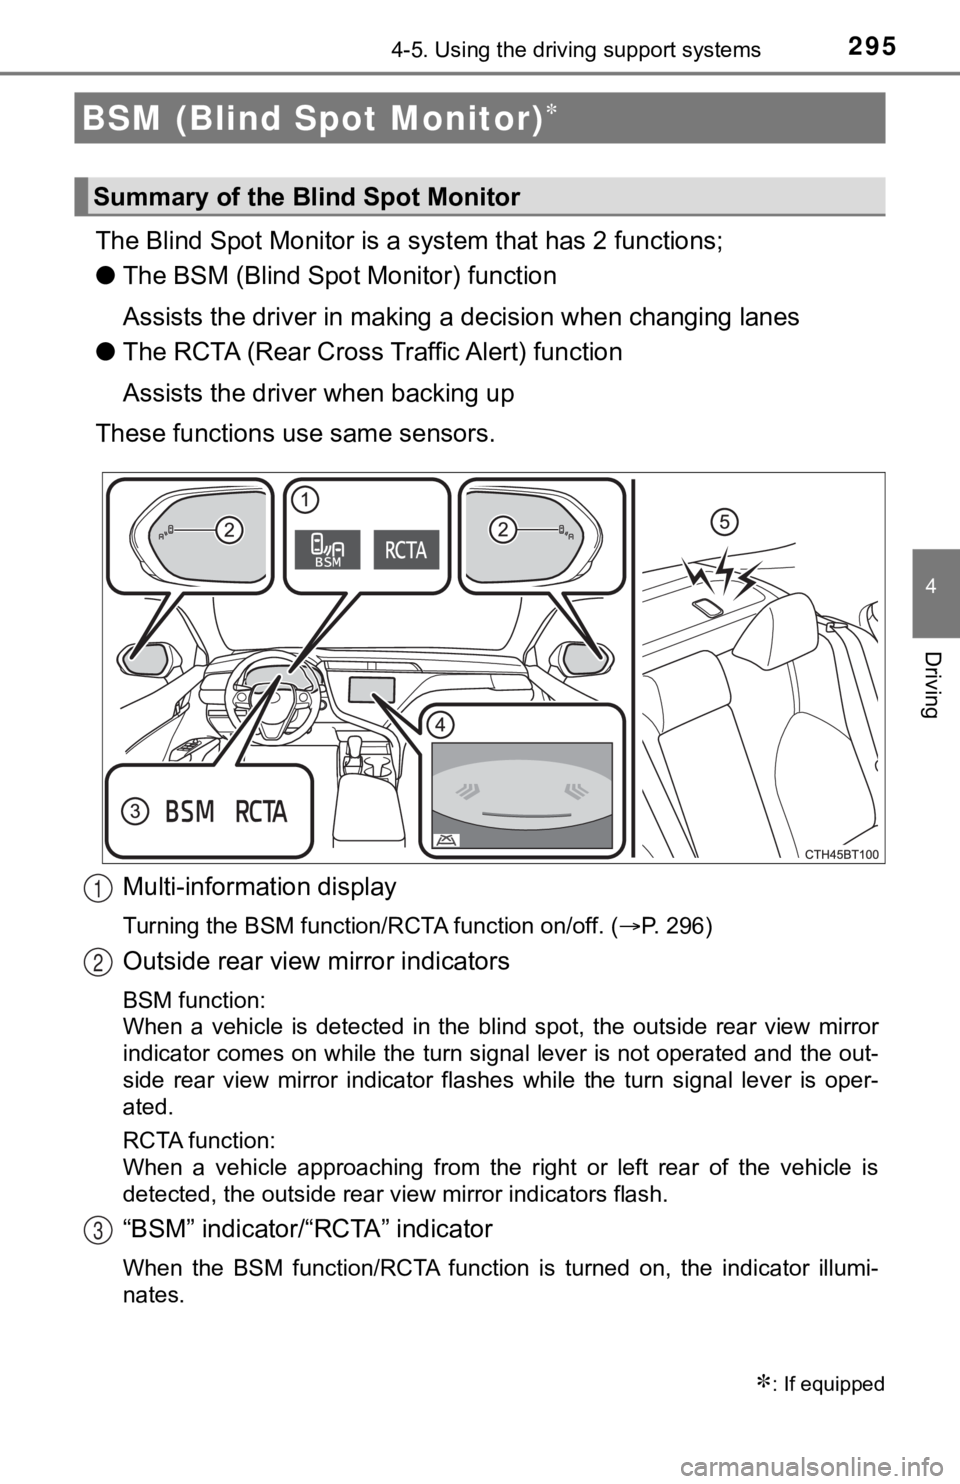
Multi-information display
Turning the BSM function/RCTA function on/off. ( P. 296)
Outside rear view mirror indicators
BSM function:
When a vehicle is detected in the blind spot, the outside rear view mirror
indicator comes on while the turn signal lever is not operated and the out-
side rear view mirror indicator flashes while the turn signal l ever is oper-
ated.
RCTA function:
When a vehicle approaching from the right or left rear of the v ehicle is
detected, the outside rear view mirror indicators flash.
“BSM” indicator/“RCTA” indicator
When the BSM function/RCTA function is turned on, the indicator illumi-
nates.
BSM (Blind Spot Monitor)
: If equipped
Summary of the Blind Spot Monitor
1
2
3
Page 388 of 592
3885-4. Other interior features
■Reprogramming a single HomeLink® button
When the following procedure is performed, buttons which alread y
have devices registered to them can be overwritten:
With one hand, press and hold the desired HomeLink
® button.
When the HomeLink
® indicator starts flashing orange, continue
to hold the HomeLink® button and perform “Programming the
HomeLink®” (it takes 20 seconds for the HomeLink® indicator
to start flashing).
Press the appropriate HomeLink
® button. The HomeLink® indicator
light should turn on.
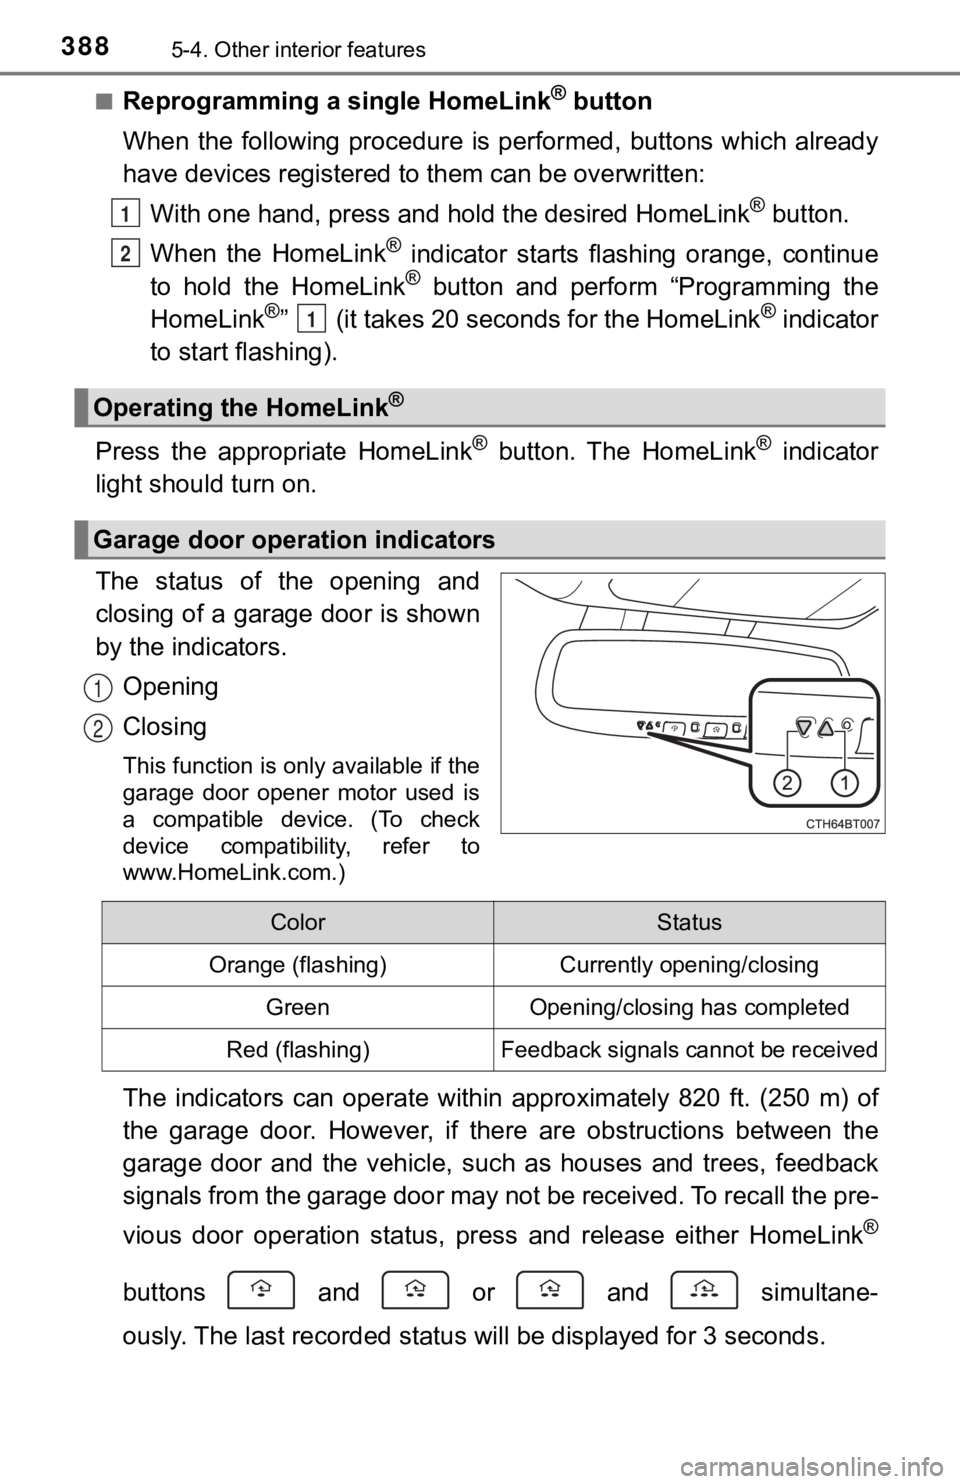
The status of the opening and
closing of a garage door is shown
by the indicators.
Opening
Closing
This function is only available if the
garage door opener motor used is
a compatible device. (To check
device compatibility, refer to
www.HomeLink.com.)
The indicators can operate within approximately 820 ft. (250 m) of
the garage door. However, if there are obstructions between the
garage door and the vehicle, such as houses and trees, feedback
signals from the garage door may not be received. To recall the pre-
vious door operation status, pres s and release either HomeLink
®
buttons and or and simultane-
ously. The last recorded status will be displayed for 3 seconds .
Operating the HomeLink®
Garage door operation indicators
1
2
1
1
2
ColorStatus
Orange (flashing)Currently opening/closing
GreenOpening/closing has completed
Red (flashing)Feedback signals cannot be received
Page 430 of 592

4306-3. Do-it-yourself maintenance
■Situations in which the tire pressure warning system may not oper-
ate properly
●In the following situations, the tire pressure warning system m ay not
operate properly.
• If non-genuine Toyota wheels are used.
• If a tire has been replaced with a tire that is not an OE (Ori ginal
Equipment) tire.
• If a tire has been replaced with a tire that is not of the spe cified size.
• If tire chains, e tc. are installed.
• If a window tint that affects r adio wave signals is installed.
• If there is a lot of snow or ice on the vehicle, particularly around the
wheels or wheel housings.
• If the tire inflation pressure is much higher than the specifi ed level.
• If wheels not equipped with tire pressure warning valve and tr ansmit-
ter are used.
• If the ID codes of the tire pre ssure warning valve and transmi tters are
not registered in the tire pressure warning computer.
●Performance may be affected in the following situations.
• When driving near a TV tower, electric power plant, gas statio n, radio
station, large display, airport or other facilit y that generates strong
radio waves or electrical noise
• When carrying a portable radio, cellular phone, cordless phone or
other wireless communication device
Vehicles with a tire inflation pressure display function: If ti re position
information is not correctly displayed due to the radio wave co nditions,
the display may be corrected by changing the location of the ve hicle as
the radio wave conditions may change.
●When the vehicle is stopped, the time taken for the warning to start or
turn off may be longer.
●When the inflation pressure of a tire drops rapidly, for exampl e when a
tire has burst, the warning may not operate.
Page 454 of 592
4546-3. Do-it-yourself maintenance
Check the wattage of the light bulb to be replaced. ( P. 530)
Light bulbs
You may replace the following bu lbs yourself. The difficulty level
of replacement varies depending on the bulb. If necessary bulb
replacement seems difficult to perform, contact your Toyota
dealer.
For more information about replacing other light bulbs, contact
your Toyota dealer.
Preparing for light bulb replacement
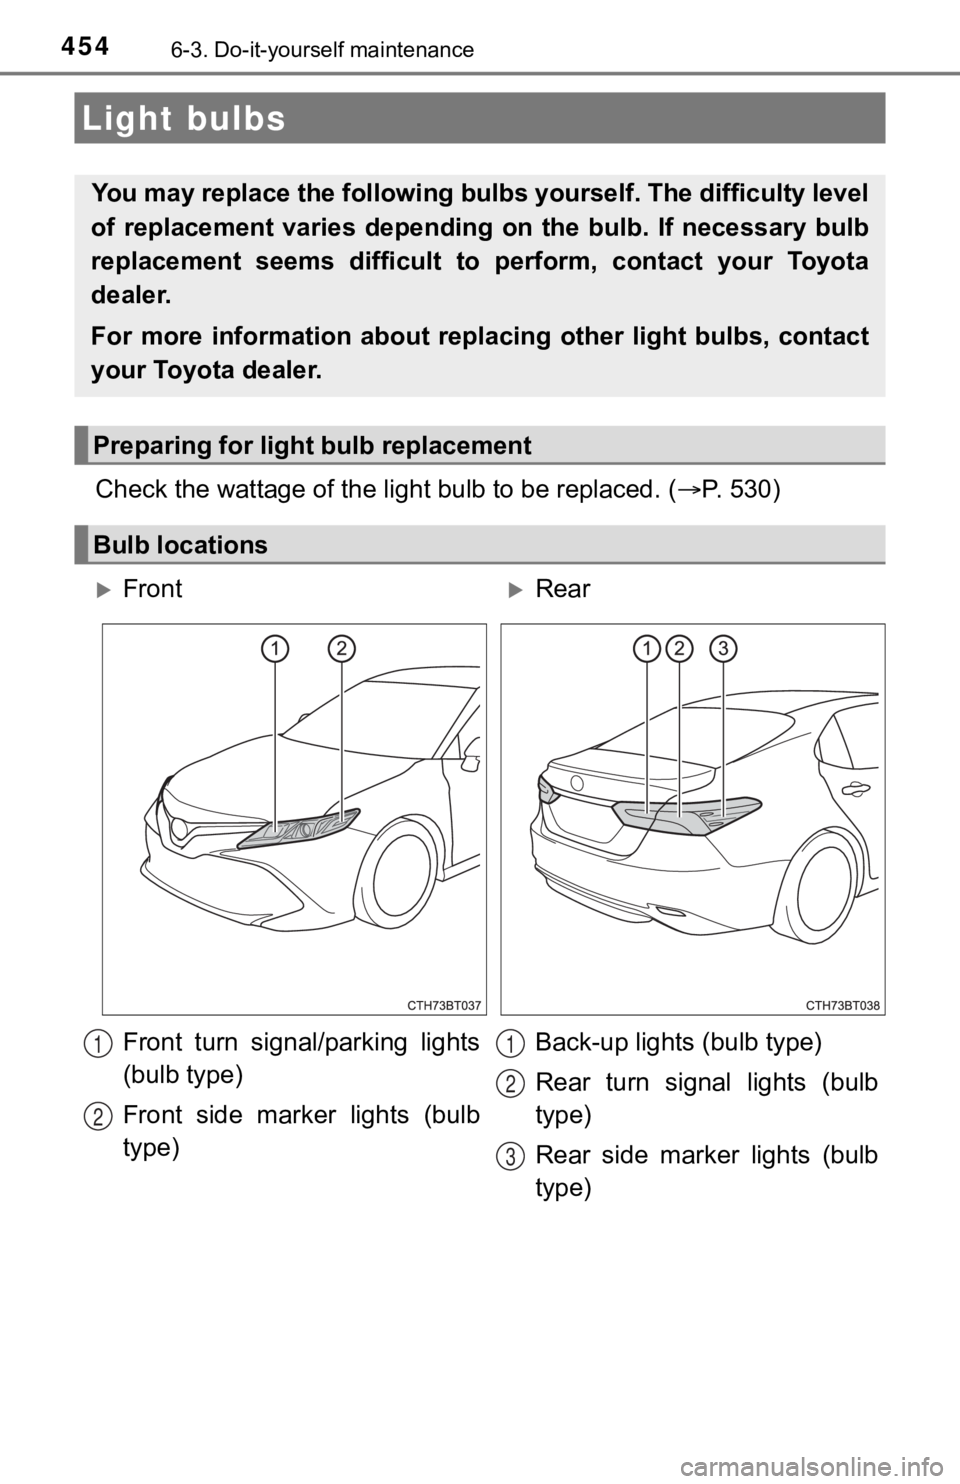
Bulb locations
FrontRear
Front turn signal/parking lights
(bulb type)
Front side marker lights (bulb
type) Back-up lights (bulb type)
Rear turn signal lights (bulb
type)
Rear side marker lights (bulb
type)
1
2
1
2
3
Page 455 of 592
4556-3. Do-it-yourself maintenance
6
Maintenance and care
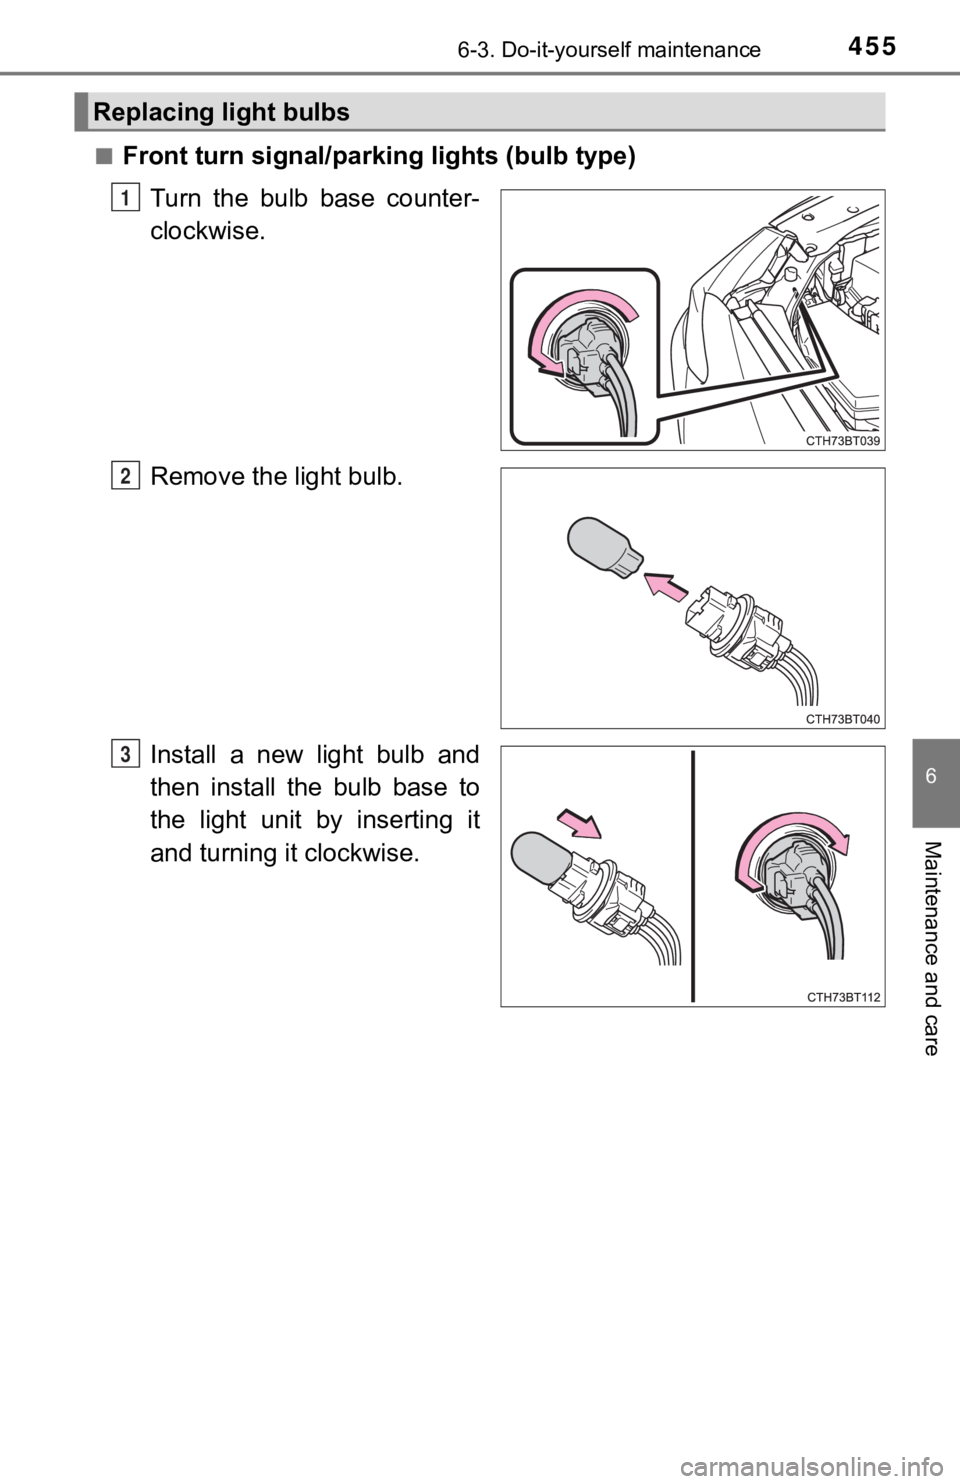
■Front turn signal/parking lights (bulb type)
Turn the bulb base counter-
clockwise.
Remove the light bulb.
Install a new light bulb and
then install the bulb base to
the light unit by inserting it
and turning it clockwise.
Replacing light bulbs
1
2
3
Page 461 of 592
4616-3. Do-it-yourself maintenance
6
Maintenance and care
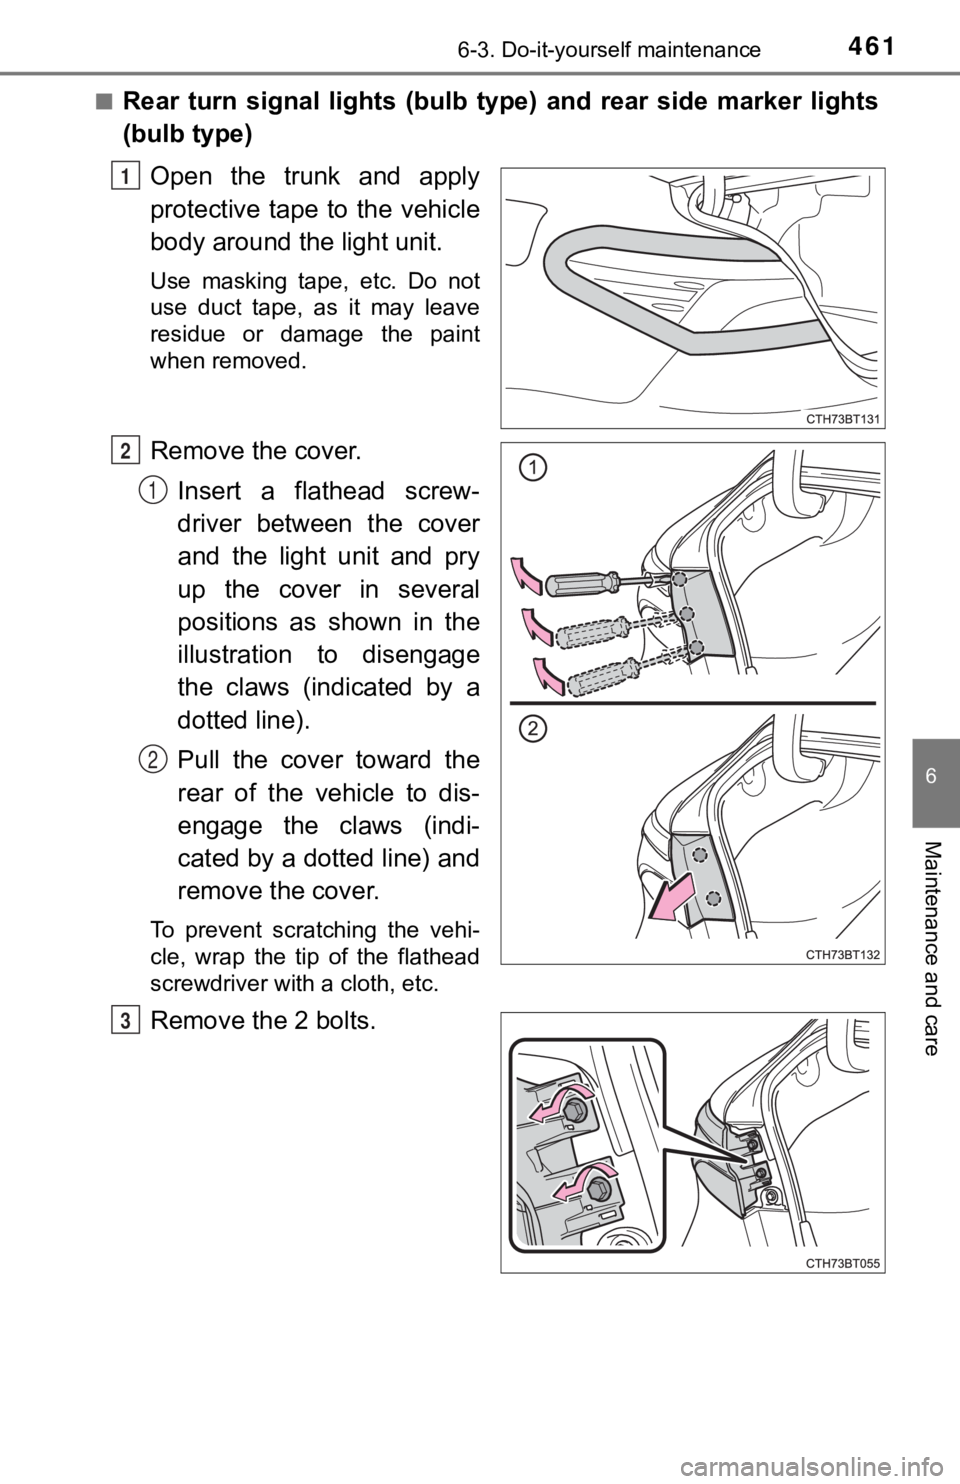
■Rear turn signal lights (bulb type) and rear side marker lights
(bulb type)Open the trunk and apply
protective tape to the vehicle
body around the light unit.
Use masking tape, etc. Do not
use duct tape, as it may leave
residue or damage the paint
when removed.
Remove the cover.Insert a flathead screw-
driver between the cover
and the light unit and pry
up the cover in several
positions as shown in the
illustration to disengage
the claws (indicated by a
dotted line).
Pull the cover toward the
rear of the vehicle to dis-
engage the claws (indi-
cated by a dotted line) and
remove the cover.
To prevent scratching the vehi-
cle, wrap the tip of the flathead
screwdriver with a cloth, etc.
Remove the 2 bolts.
1
2
1
2
3
Page 462 of 592
4626-3. Do-it-yourself maintenance
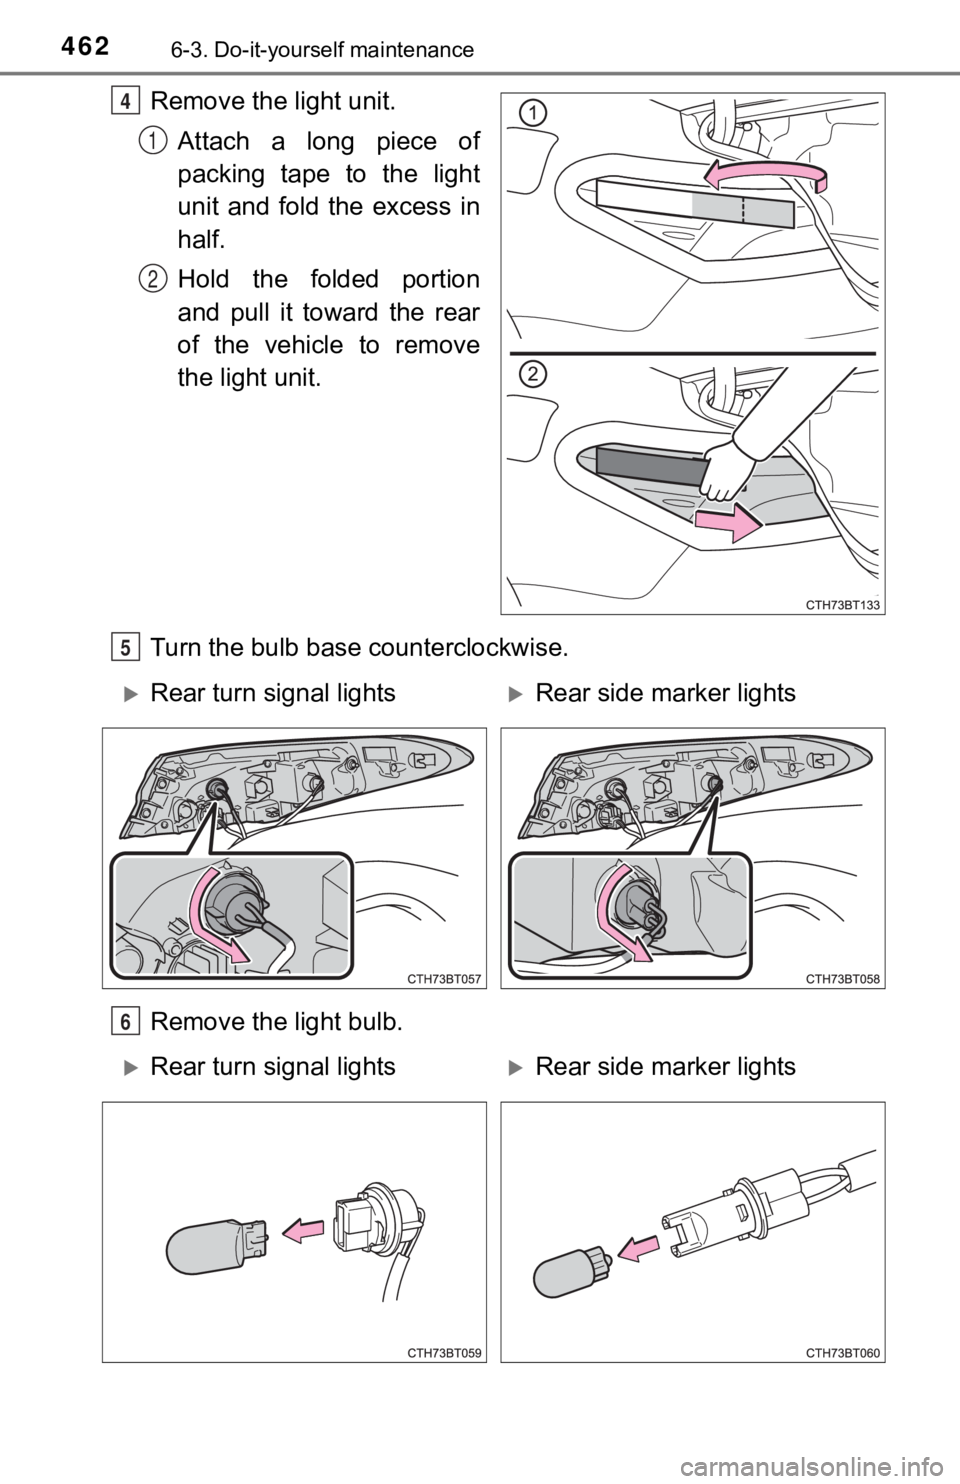
Remove the light unit.Attach a long piece of
packing tape to the light
unit and fold the excess in
half.
Hold the folded portion
and pull it toward the rear
of the vehicle to remove
the light unit.
Turn the bulb base counterclockwise.
Remove the light bulb.4
1
2
5
Rear turn signal lightsRear side ma rker lights
6
Rear turn signal lightsRear side marker lights
Page 463 of 592
4636-3. Do-it-yourself maintenance
6
Maintenance and care
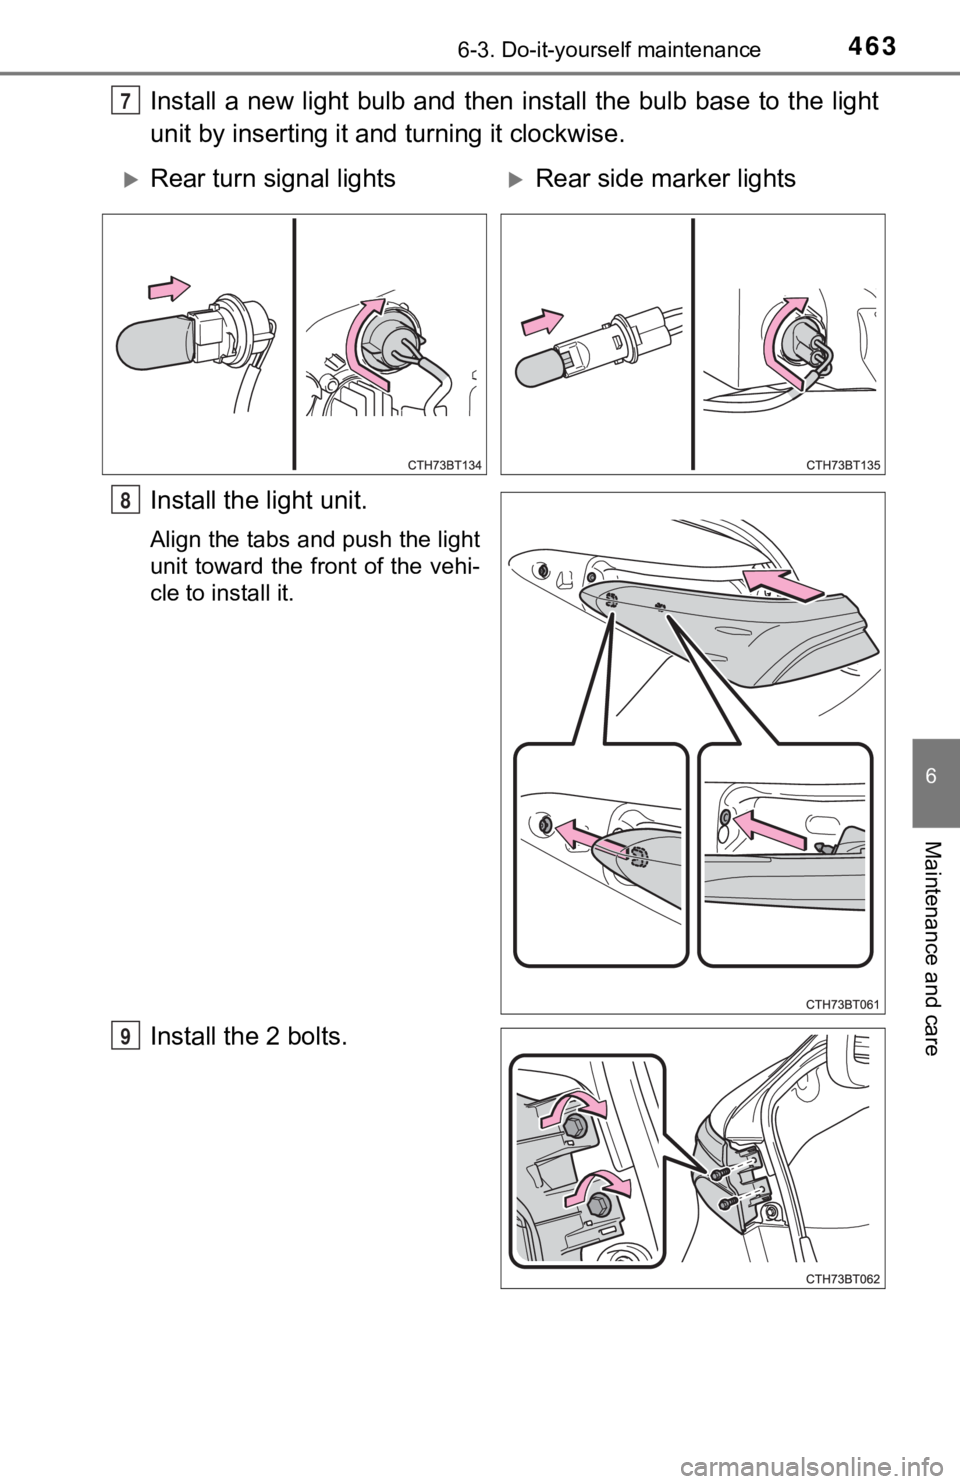
Install a new light bulb and then install the bulb base to the light
unit by inserting it and turning it clockwise.
Install the light unit.
Align the tabs and push the light
unit toward the front of the vehi-
cle to install it.
Install the 2 bolts.
7
Rear turn signal lightsRear side ma rker lights
8
9
Page 464 of 592
4646-3. Do-it-yourself maintenance
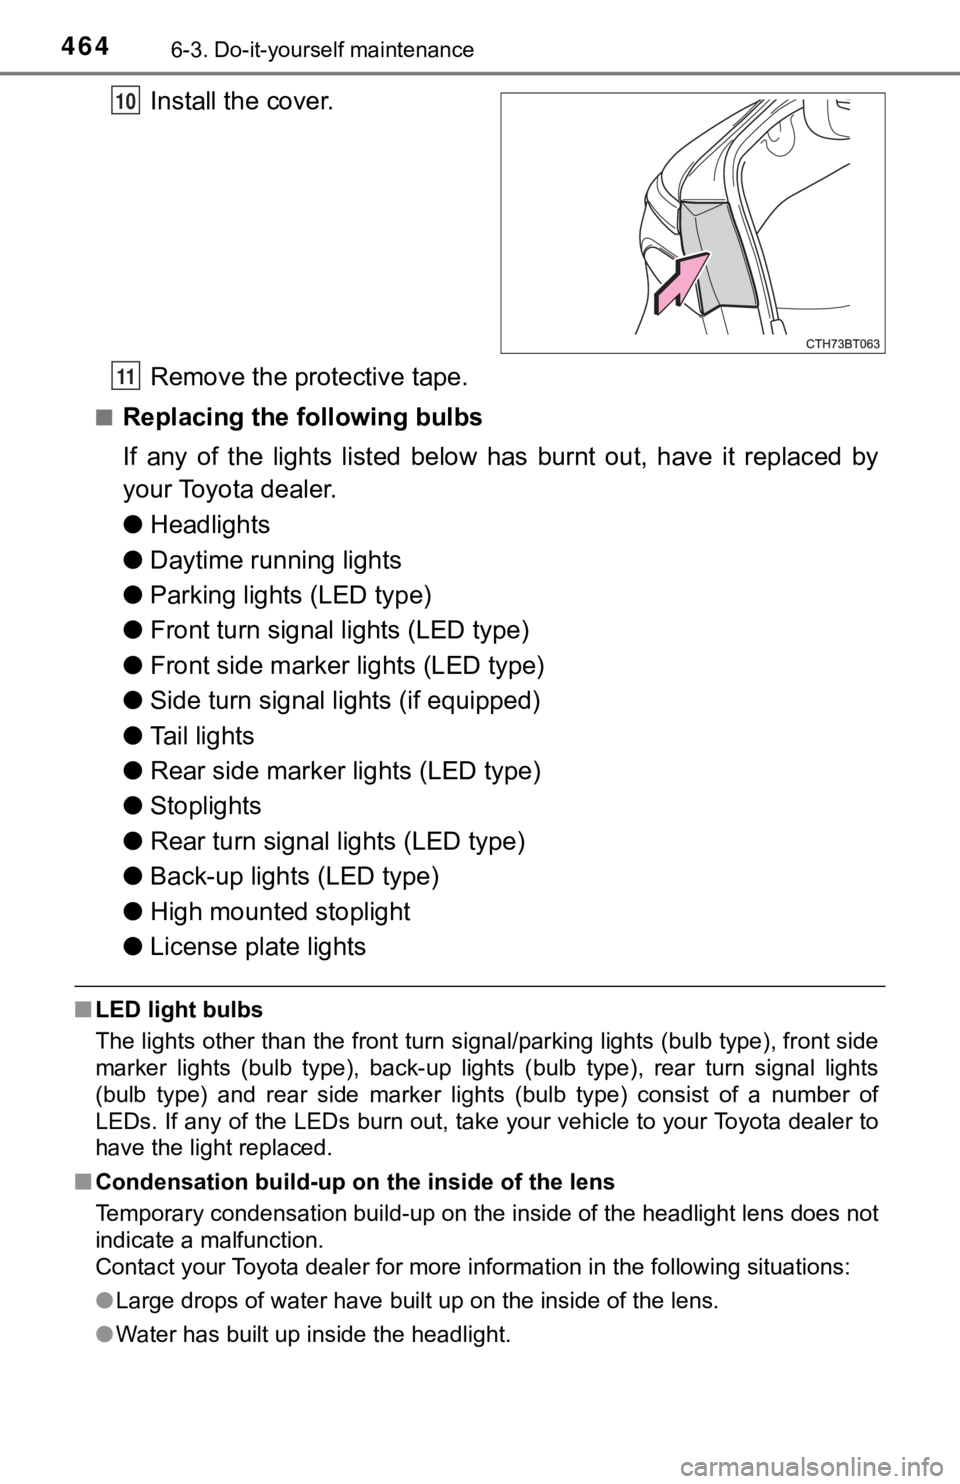
Install the cover.
Remove the protective tape.
■Replacing the following bulbs
If any of the lights listed below has burnt out, have it replaced by
your Toyota dealer.
● Headlights
● Daytime running lights
● Parking lights (LED type)
● Front turn signal lights (LED type)
● Front side marker lights (LED type)
● Side turn signal lights (if equipped)
● Tail lights
● Rear side marker lights (LED type)
● Stoplights
● Rear turn signal lights (LED type)
● Back-up lights (LED type)
● High mounted stoplight
● License plate lights
■LED light bulbs
The lights other than the front turn signal/parking lights (bulb type), front side
marker lights (bulb type), back-up lights (bulb type), rear tur n signal lights
(bulb type) and rear side marker lights (bulb type) consist of a number of
LEDs. If any of the LEDs burn out, take your vehicle to your To yota dealer to
have the light replaced.
■ Condensation build-up on the inside of the lens
Temporary condensation build-up on the inside of the headlight lens does not
indicate a malfunction.
Contact your Toyota dealer for more information in the followin g situations:
● Large drops of water have built up on the inside of the lens.
● Water has built up inside the headlight.
10
11
Page 468 of 592
4687-1. Essential information
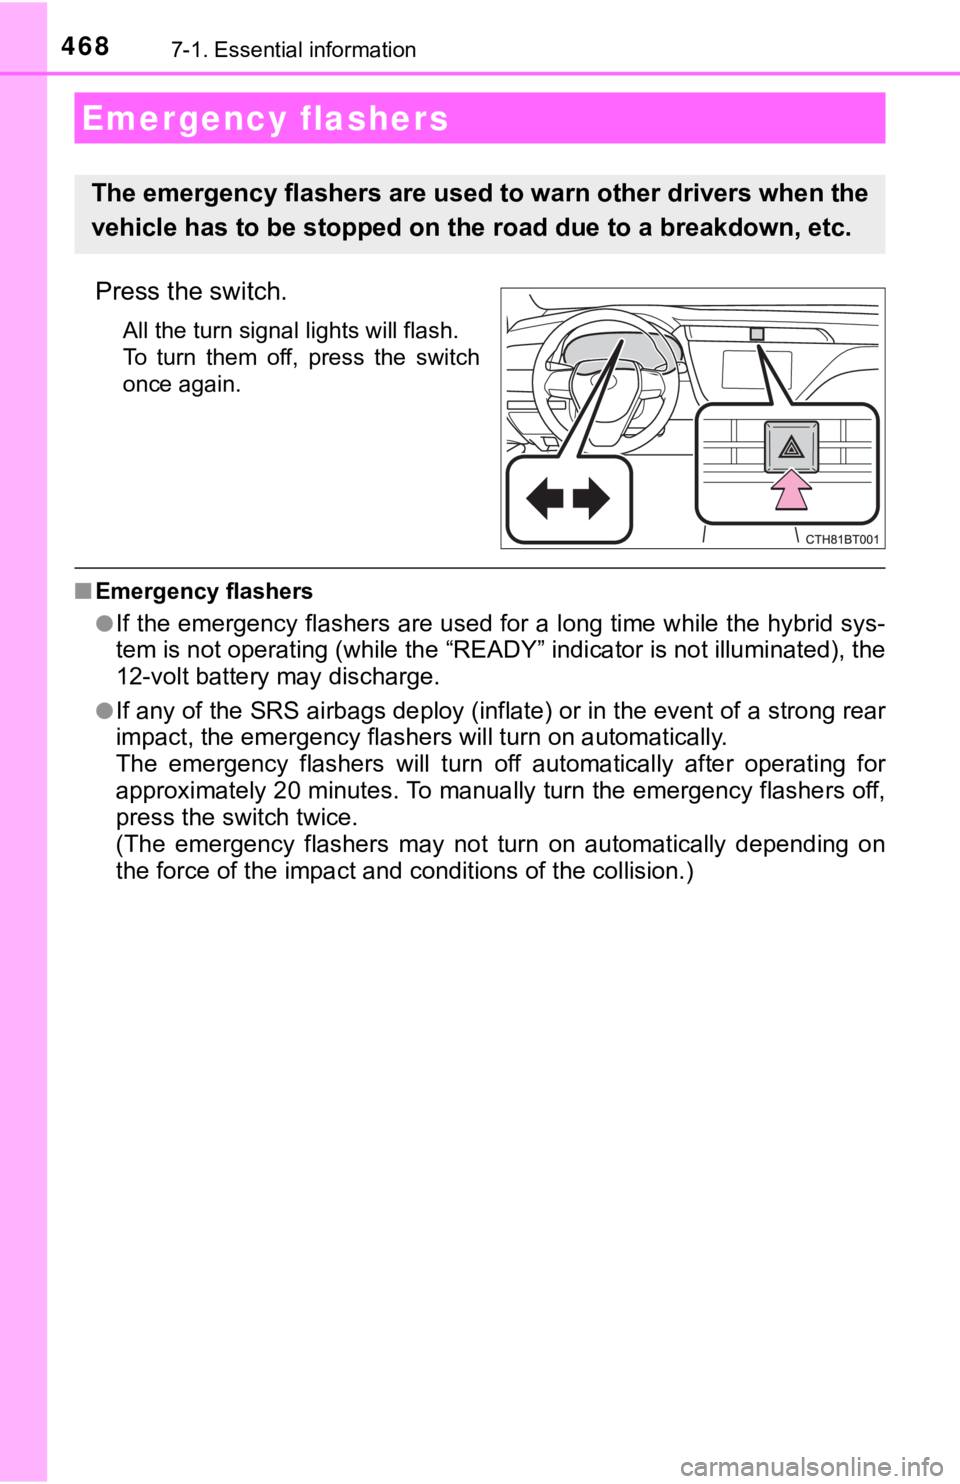
Press the switch.
All the turn signal lights will flash.
To turn them off, press the switch
once again.
■Emergency flashers
●
If the emergency flashers are used for a long time while the hy brid sys-
tem is not operating (while the “READY” indicator is not illuminated), the
12-volt battery may discharge.
●If any of the SRS airbags deploy (inflate) or in the event of a strong rear
impact, the emergency flashers will turn on automatically.
The emergency flashers will turn off automatically after operating for
approximately 20 minutes. To manually turn the emergency flashe rs off,
press the switch twice.
(The emergency flashers may not turn on automatically depending on
the force of the impact and c onditions of the collision.)
Emergency flashers
The emergency flashers are used to warn other drivers when the
vehicle has to be stopped on the road due to a breakdown, etc.