TOYOTA CAMRY HYBRID 2020 Owners Manual (in English)
Manufacturer: TOYOTA, Model Year: 2020, Model line: CAMRY HYBRID, Model: TOYOTA CAMRY HYBRID 2020Pages: 592, PDF Size: 12.13 MB
Page 241 of 592
2414-3. Operating the lights and wipers
4
Driving
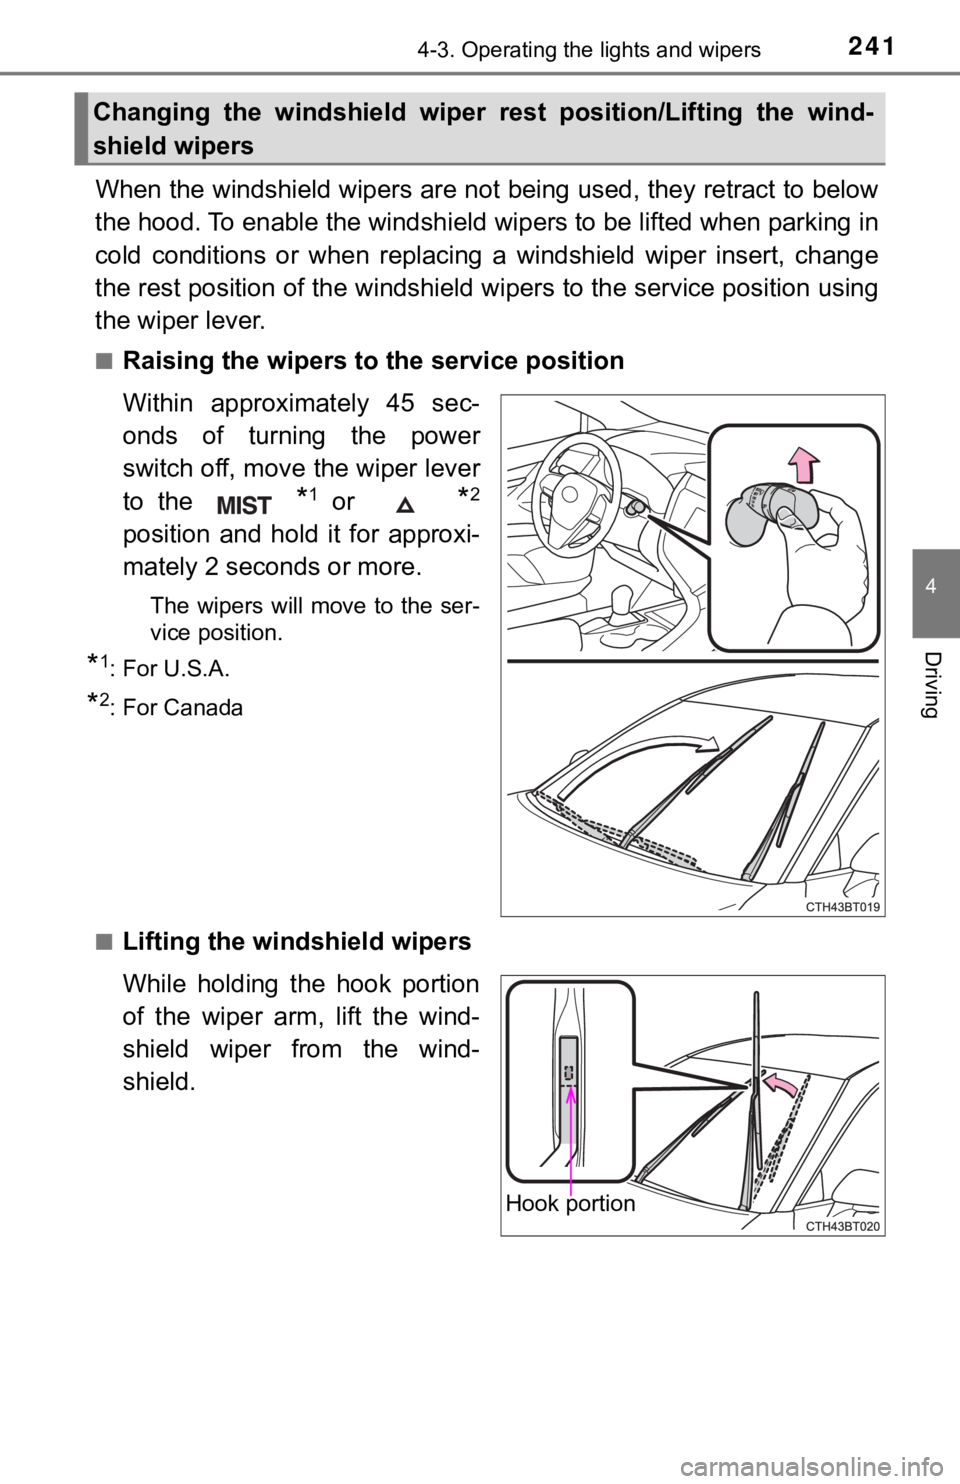
When the windshield wipers are not being used, they retract to below
the hood. To enable the windshie ld wipers to be lifted when parking in
cold conditions or when replacing a windshield wiper insert, ch ange
the rest position of the windshiel d wipers to the service position using
the wiper lever.
■Raising the wipers to the service position
Within approximately 45 sec-
onds of turning the power
switch off, move the wiper lever
to the
*1 or *2
position and hold it for approxi-
mately 2 seconds or more.
The wipers will move to the ser-
vice position.
*1: For U.S.A.
*2: For Canada
■
Lifting the winds hield wipers
While holding the hook portion
of the wiper arm, lift the wind-
shield wiper from the wind-
shield.
Changing the windshield wiper rest position/Lifting the wind-
shield wipers
Hook portion
Page 242 of 592
2424-3. Operating the lights and wipers
■Lowering the windshield wipers to the retracted position
With the windshield wipers placed on the windshield, turn the p ower switch to
ON mode and then move the wiper lever to an operating position. When the
wiper switch is turned off, the windshield wipers will stop at the retracted posi-
tion.
NOTICE
■ When lifting the windshield wipers
● Do not lift the windshield wipers when they are in the retracted position
below the hood. Otherwise, they may contact the hood, possibly resulting
in damage to a windshield wiper and/or the hood.
● Do not operate the wiper lever when the windshield wipers are l ifted. Oth-
erwise, the windshield wipers may contact the hood, possibly re sulting in
damage to the windshield wipers and/or hood.
Page 243 of 592
243
4
Driving
4-4. Refueling
●Close all the doors and windows, and turn the power switch off.
● Confirm the type of fuel.
■Fuel types
P. 531
■ Fuel tank opening for unleaded gasoline
To help prevent incorrect fueling, your vehicle has a fuel tank opening that
only accommodates the special nozzle on unleaded fuel pumps.
Opening the fuel tank cap
The fuel tank of your vehicle h as a special structure, which
requires a reduction in fuel tank pressure before refueling. After
the opener switch has been pressed, it will take several second s
until the vehicle is r eady for refueling.
Before refueling the vehicle
WARNING
■When refueling the vehicle
Observe the following precautions while refueling the vehicle. Failure to do
so may result in death or serious injury.
● After exiting the vehicle and before opening the fuel door, tou ch an
unpainted metal surface to discharge any static electricity. It is important to
discharge static electricity before refueling because sparks re sulting from
static electricity can cause fuel vapors to ignite while refuel ing.
● Always hold the grips on the fuel tank cap and turn it slowly to remove it.
A whooshing sound may be heard when the fuel tank cap is loosen ed.
Wait until the sound cannot be heard before fully removing the cap. In hot
weather, pressurized fuel may spray out the filler neck and cause injury.
● Do not allow anyone that has not discharged static electricity from their
body to come close to an open fuel tank.
● Do not inhale vaporized fuel.
Fuel contains substances that are harmful if inhaled.
● Do not smoke while refueling the vehicle.
Doing so may cause the fuel to ignite and cause a fire.
● Do not return to the vehicle or touch any person or object that is statically
charged.
This may cause static electricity to build up, resulting in a p ossible ignition
hazard.
Page 244 of 592
2444-4. Refueling
WARNING
■When refueling
Observe the following precautions to prevent fuel overflowing f rom the fuel
tank:
● Securely insert the fuel nozzle into the fuel filler neck.
● Stop filling the tank after the fuel nozzle automatically click s off.
● Do not top off the fuel tank.
NOTICE
■Refueling
● Finish refueling within 30 minutes. If more than 30 minutes pas ses, the
internal valve closes. In this condition, fuel may overflow dur ing the refuel-
ing process.
Press the fuel filler door opener switch again.
● Do not spill fuel during refueling.
Doing so may damage the vehicle, such as causing the emission c ontrol
system to operate abnormally or damaging fuel system components or the
vehicle’s painted surface.
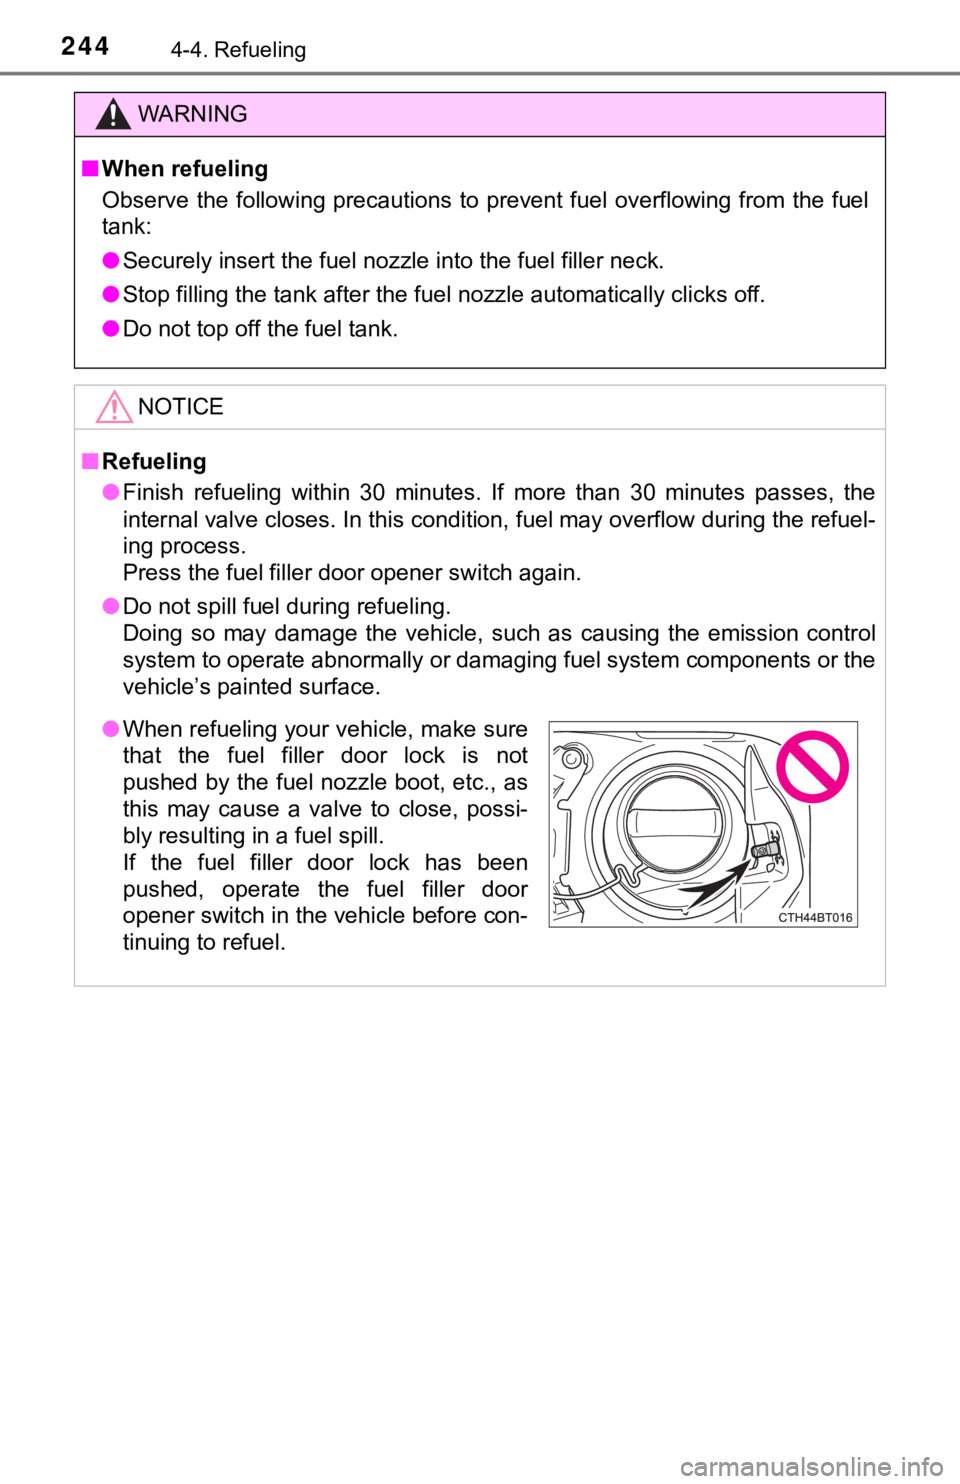
● When refueling your vehicle, make sure
that the fuel filler door lock is not
pushed by the fuel nozzle boot, etc., as
this may cause a valve to close, possi-
bly resulting in a fuel spill.
If the fuel filler door lock has been
pushed, operate the fuel filler door
opener switch in the vehicle before con-
tinuing to refuel.
Page 245 of 592
2454-4. Refueling
4
Driving
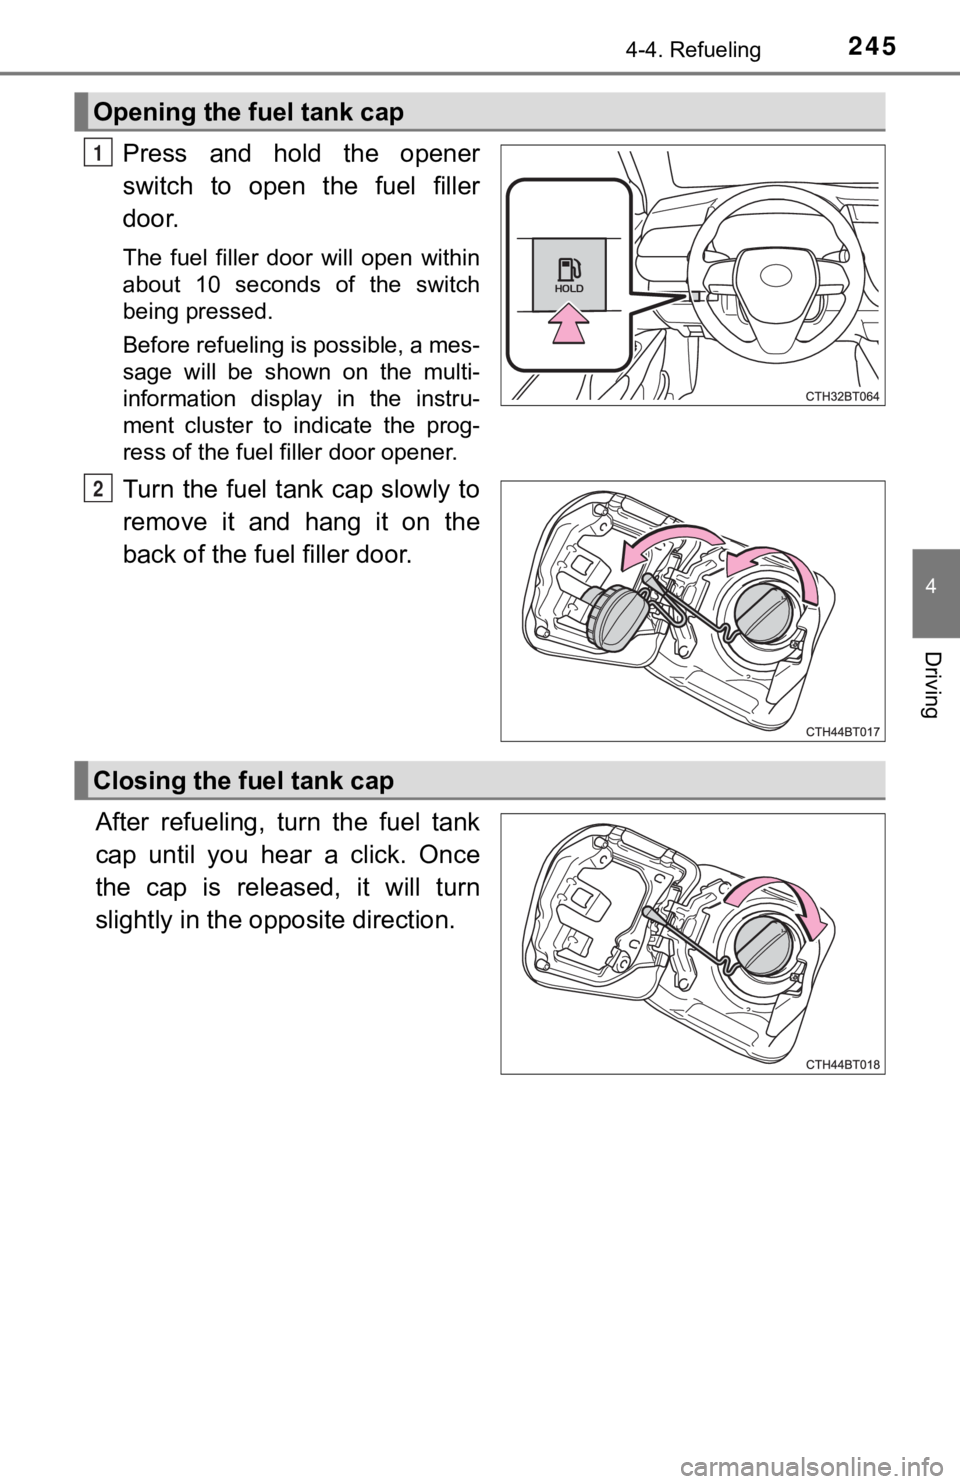
Press and hold the opener
switch to open the fuel filler
door.
The fuel filler door will open within
about 10 seconds of the switch
being pressed.
Before refueling is possible, a mes-
sage will be shown on the multi-
information display in the instru-
ment cluster to indicate the prog-
ress of the fuel filler door opener.
Turn the fuel tank cap slowly to
remove it and hang it on the
back of the fuel filler door.
After refueling, turn the fuel tank
cap until you hear a click. Once
the cap is released, it will turn
slightly in the opposite direction.
Opening the fuel tank cap
1
2
Closing the fuel tank cap
Page 246 of 592
2464-4. Refueling
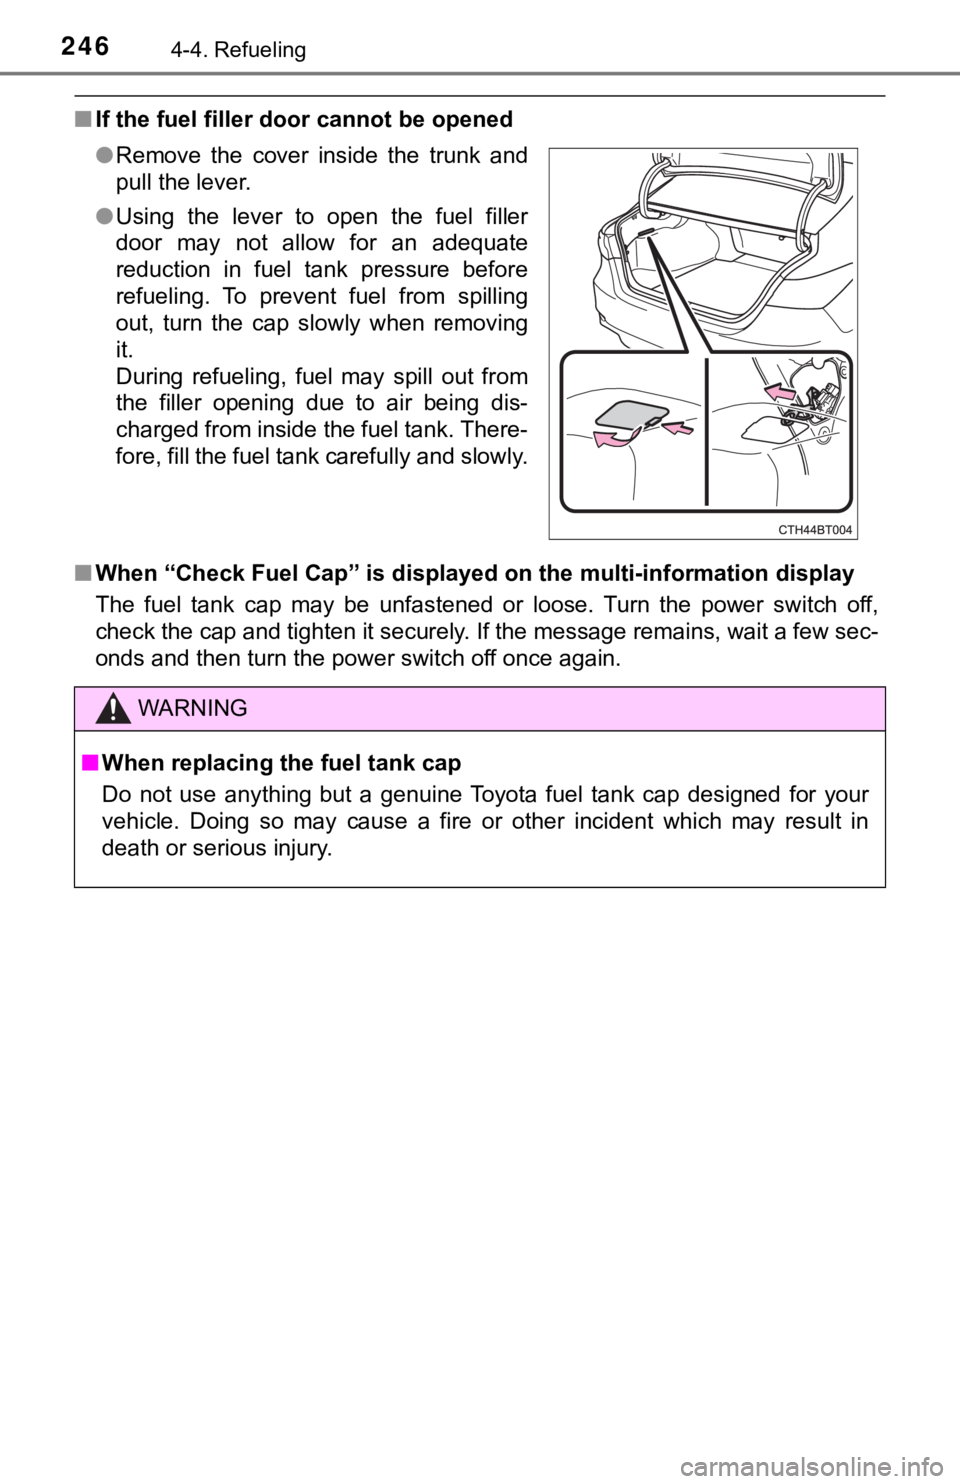
■If the fuel filler door cannot be opened
■ When “Check Fuel Cap” is displayed on the multi-information display
The fuel tank cap may be unfastened or loose. Turn the power sw itch off,
check the cap and tighten it securely. If the message remains, wait a few sec-
onds and then turn the power switch off once again. ● Remove the cover inside the trunk and
pull the lever.
● Using the lever to open the fuel filler
door may not allow for an adequate
reduction in fuel tank pressure before
refueling. To prevent fuel from spilling
out, turn the cap slowly when removing
it.
During refueling, fuel may spill out from
the filler opening due to air being dis-
charged from inside the fuel tank. There-
fore, fill the fuel tank carefully and slowly.
WARNING
■When replacing the fuel tank cap
Do not use anything but a genuine Toyota fuel tank cap designed for your
vehicle. Doing so may cause a fire or other incident which may result in
death or serious injury.
Page 247 of 592
247
4
Driving
4-5. Using the driving support systems
◆PCS (Pre-Collision System)
P. 2 5 3
◆LDA (Lane Departure Aler t with steering control)
P. 2 6 4
◆Automatic High Beam
P. 2 3 5
◆Dynamic radar cruise cont rol with full-speed range
P. 2 7 4
Toyota Safety Sense P
The Toyota Safety Sense P consists of the following drive assis t
systems and contributes to a safe and comfortable driving expe-
rience:
WARNING
■ Toyota Safety Sense P
The Toyota Safety Sense P is designed to operate under the assu mption
that the driver will drive safely, and is designed to help redu ce the impact to
the occupants and the vehicle in the case of a collision or ass ist the driver in
normal driving conditions.
As there is a limit to the degree of recognition accuracy and control perfor-
mance that this system can provide, do not overly rely on this system. The
driver is always responsible for paying attention to the vehicl e's surround-
ings and driving safely.
Page 248 of 592
2484-5. Using the driving support systems
The pre-collision system is equipped with a sophisticated compu ter
that will record certain data, such as: • Accelerator status
• Brake status
• Vehicle speed
• Operation status of the pre-collision system functions
• Information (such as the dist ance and relative speed between y our
vehicle and the vehicle ahead or other objects)
• Images from the camera sensor (available only when the pre-col li-
sion braking function or the pre-collision brake assist functio n was
operating)
The pre-collision system does not record con versations, sounds or
images of the inside of the vehicle.
● Data usage
Toyota may use the data recorded in this computer to diagnose
malfunctions, conduct research and development, and improve
quality.
Toyota will not disclose the recorded data to a third party exc ept:
• With the consent of the vehicle owner or with the consent of t he
lessee if the vehicle is leased
• In response to an official request by the police, a court of l aw or a
government agency
• For use by Toyota in a lawsuit
• For research purposes where the data is not tied to a specific vehicle or vehicle owner
● Recorded images can be erased using a specialized device.
The image recording function can be disabled. However, if the f unc-
tion is disabled, data from when the pre-collision system opera tes
will not be available.
Vehicle data recording
Page 249 of 592
2494-5. Using the driving support systems
4
Driving
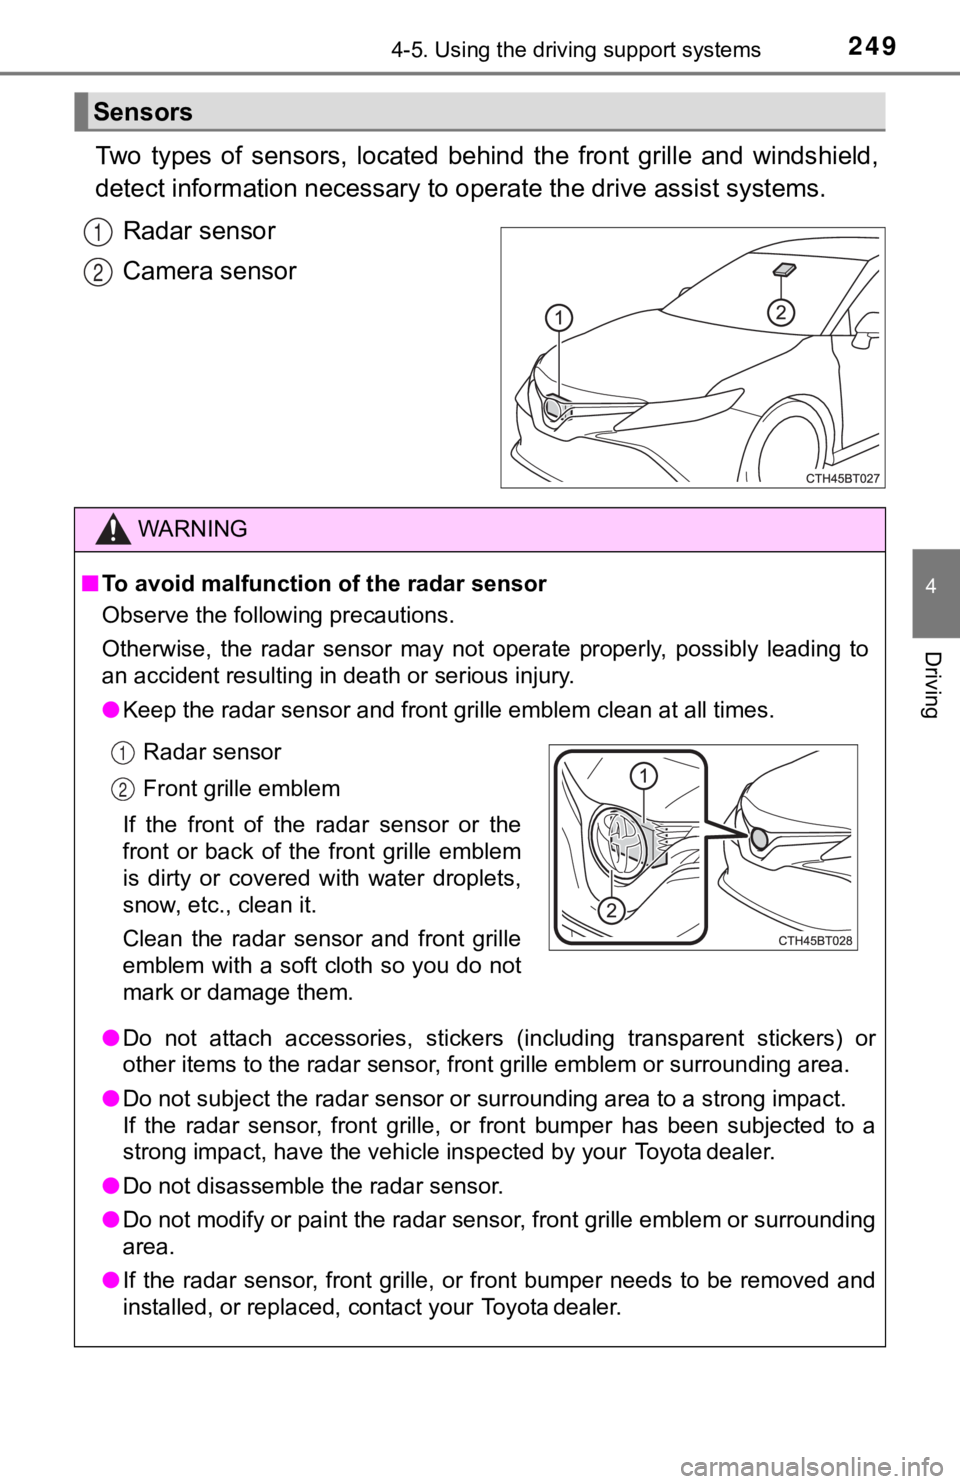
Two types of sensors, located behind the front grille and winds hield,
detect information necessary to operate the drive assist systems.
Radar sensor
Camera sensor
Sensors
1
2
WARNING
■ To avoid malfunction of the radar sensor
Observe the following precautions.
Otherwise, the radar sensor may not operate properly, possibly leading to
an accident resulting in death or serious injury.
● Keep the radar sensor and front grille emblem clean at all time s.
● Do not attach accessories, stickers (including transparent stic kers) or
other items to the radar sensor, front grille emblem or surroun ding area.
● Do not subject the radar sensor or surrounding area to a strong impact.
If the radar sensor, front grille, or front bumper has been subjected to a
strong impact, have the vehicle inspected by your Toyota dealer .
● Do not disassemble the radar sensor.
● Do not modify or paint the radar sensor, front grille emblem or surrounding
area.
● If the radar sensor, front grille, or front bumper needs to be removed and
installed, or replaced, contact your Toyota dealer.
Radar sensor
Front grille emblem
If the front of the radar sensor or the
front or back of the front grille emblem
is dirty or covered with water droplets,
snow, etc., clean it.
Clean the radar sensor and front grille
emblem with a soft cloth so you do not
mark or damage them.1
2
Page 250 of 592
2504-5. Using the driving support systems
WARNING
■To avoid malfunction of the camera sensor
Observe the following precautions.
Otherwise, the camera sensor may not operate properly, possibly leading to
an accident resulting in death or serious injury.
● Keep the windshield clean at all times.
• If the windshield is dirty or covered with an oily film, water droplets,
snow, etc., clear the windshield.
• If a glass coating agent is applied to the windshield, it will still be neces-
sary to use the windshield wipers to remove water droplets, etc . from
the area of the windshield in front of the camera sensor.
• If the inner side of the windshield where the camera sensor is installed
is dirty, contact your Toyota dealer.
● If the part of the windshield in front of the camera sensor is fogged up or
covered with condensation or ice, use the windshield defogger t o remove
the fog, condensation or ice. ( P. 352)
● If water droplets cannot be properly removed from the area of t he wind-
shield in front of the camera sensor by the windshield wipers, replace the
wiper insert or wiper blade.
If the wiper inserts or wiper blades need to be replaced, contact your Toy-
ota dealer.
● Do not attach window tinting to the windshield.
● Replace the windshield if it is damaged or cracked.
If the windshield needs to be replaced, contact your Toyota dea ler.
● Do not get the camera sensor wet.
● Do not allow bright lights to shine into the camera sensor.
● Do not dirty or damage the camera sensor.
When cleaning the inside of the windshield, do not allow glass cleaner to
contact the lens. Also, do not touch the lens.
If the lens is dirty or damaged, contact your Toyota dealer.
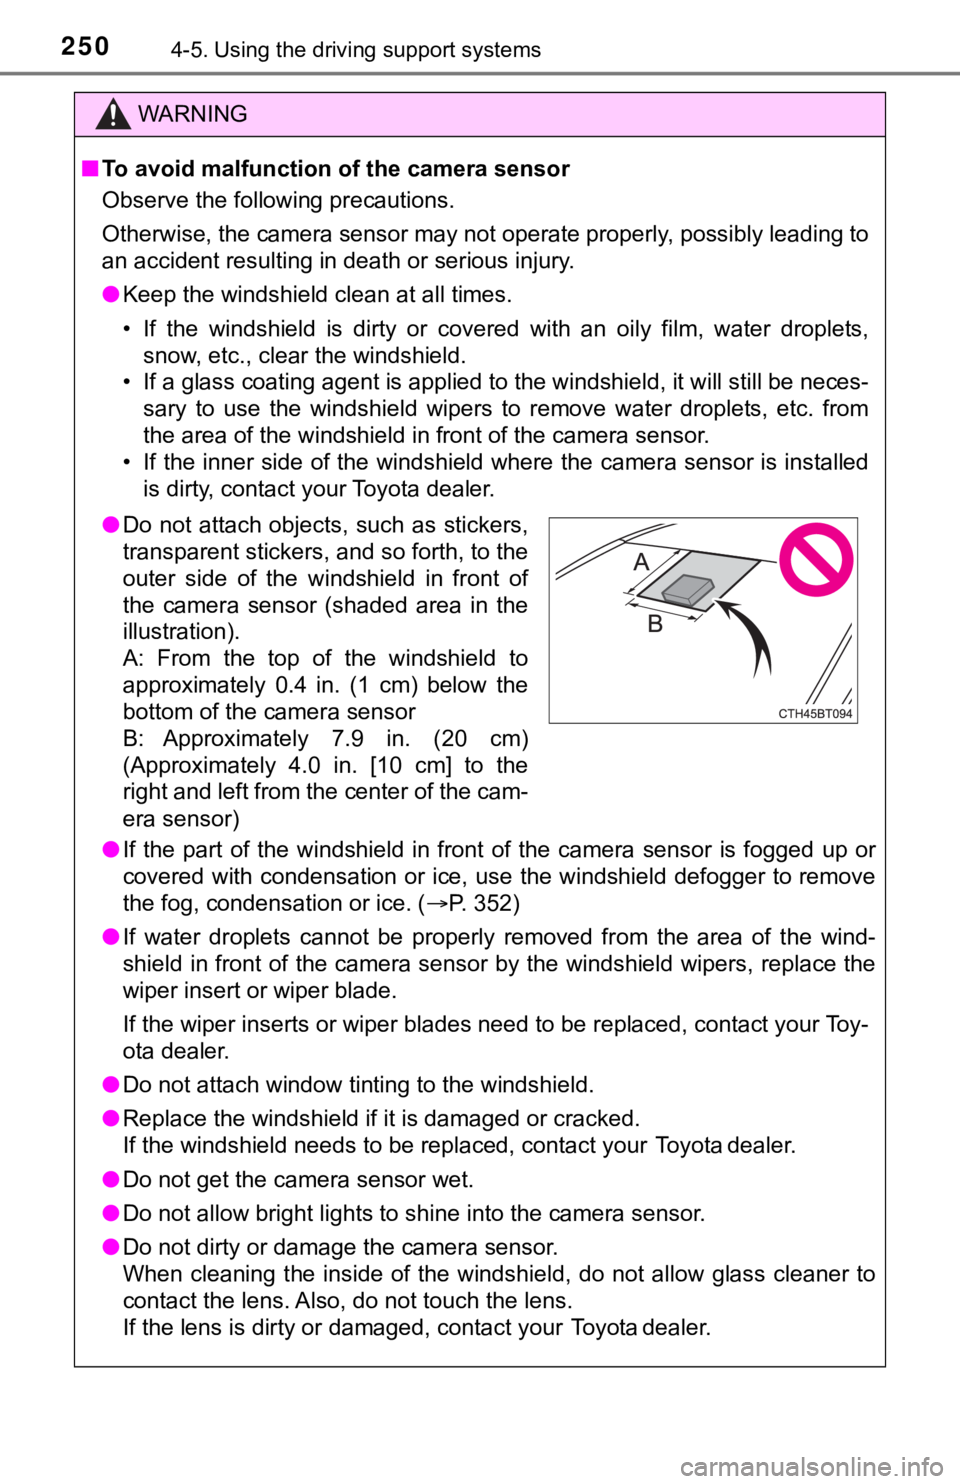
● Do not attach objects, such as stickers,
transparent stickers, and so forth, to the
outer side of the windshield in front of
the camera sensor (shaded area in the
illustration).
A: From the top of the windshield to
approximately 0.4 in. (1 cm) below the
bottom of the camera sensor
B: Approximately 7.9 in. (20 cm)
(Approximately 4.0 in. [10 cm] to the
right and left from the center of the cam-
era sensor)