remote control TOYOTA CAMRY HYBRID 2021 (in English) User Guide
[x] Cancel search | Manufacturer: TOYOTA, Model Year: 2021, Model line: CAMRY HYBRID, Model: TOYOTA CAMRY HYBRID 2021Pages: 624, PDF Size: 15.98 MB
Page 165 of 624
1653-2. Opening, closing and locking the doors
3
Operation of each component
■Trunk light
The trunk light turns on when the trunk is opened.
■ Function to prevent th e trunk being locked w ith the electronic key inside
● When all doors are locked, closing the trunk lid with the elect ronic key left
inside the trunk will sound an alarm.
In this case, the trunk lid can be opened by pressing the trunk release but-
ton on the trunk lid.
● If the spare electronic key is put in the trunk with all the doors locked, the
key confinement prevention function is activated so the trunk can be
opened. In order to prevent theft, take all electronic keys wit h you when
leaving the vehicle.
● If the electronic key is put in the trunk with all the doors lo cked, the key may
not be detected depending on the location of the key and the su rrounding
radio wave conditions. In this case, the key confinement preven tion function
cannot be activated, causing the doors to lock when the trunk i s closed.
Make sure to check where the key is before closing the trunk.
● The key confinement prevention function cannot be activated if any one of
the doors is unlocked. In this case, open the trunk using the t runk opener.
■ Open trunk warning buzzer
If the vehicle reaches a speed of 3 mph (5 km/h), the master warning light
flashes and a buzzer sounds to indicate that the trunk is not yet fully closed.
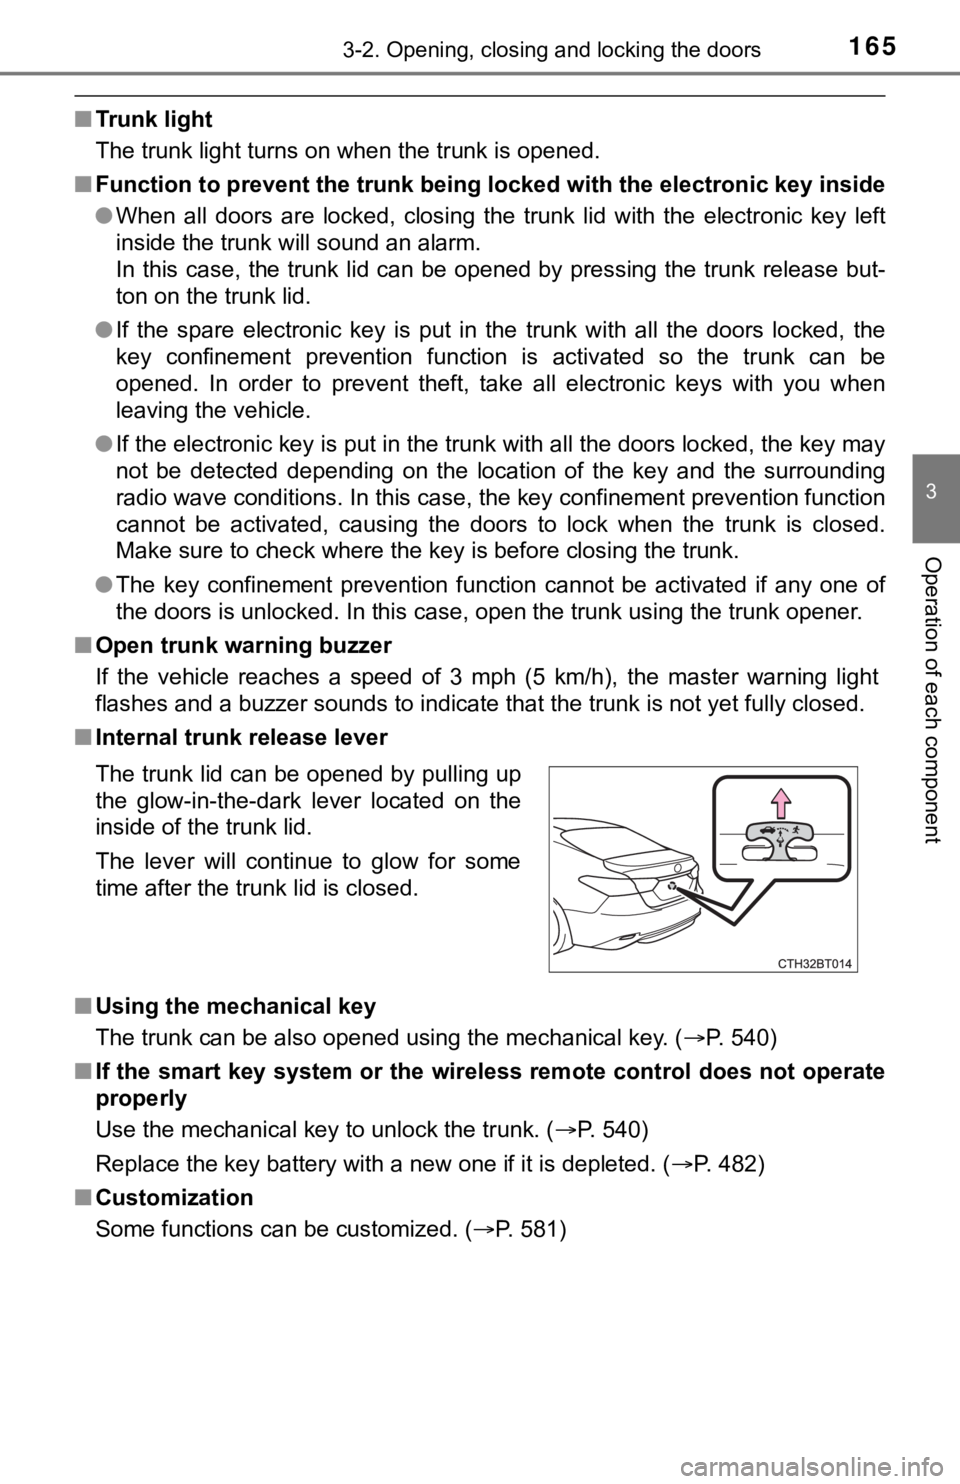
■ Internal trunk release lever
■ Using the mechanical key
The trunk can be also opened using the mechanical key. ( P. 540)
■ If the smart key system or the wireless remote control does not operate
properly
Use the mechanical key to unlock the trunk. ( P. 540)
Replace the key battery with a new one if it is depleted. ( P. 482)
■ Customization
Some functions can be customized. ( P. 581)
The trunk lid can be opened by pulling up
the glow-in-the-dark lever located on the
inside of the trunk lid.
The lever will continue to glow for some
time after the trunk lid is closed.
Page 171 of 624

1713-2. Opening, closing and locking the doors
3
Operation of each component
■Conditions affecting operation
The smart key system, wireless remote control and immobilizer s ystem use
weak radio waves. In the following situations, the communication between
the electronic key and the vehicle may be affected, preventing the smart key
system, wireless remote control and immobilizer system from operating prop-
erly. (Ways of coping: P. 539)
● When the electronic key battery is depleted
● Near a TV tower, electric power plant, gas station, radio stati on, large dis-
play, airport or other facility that generates strong radio wav es or electrical
noise
● When the electronic key is in contact with, or is covered by th e following
metallic objects
• Cards to which aluminum foil is attached
• Cigarette boxes that have aluminum foil inside
• Metallic wallets or bags
• Coins
• Hand warmers made of metal
• Media such as CDs and DVDs
● When other wireless keys (that emit radio waves) are being used nearby
● When carrying the electronic key together with the following devices that
emit radio waves
• Portable radio, cellular phone, cordless phone or other wirele ss commu-
nication devices
• Another vehicle’s electronic key, another electronic key of yo ur vehicle, or
a wireless key that emits radio waves
• Personal computers or personal digital assistants (PDAs)
• Digital audio players
• Portable game systems
● If window tint with a metallic content or metallic objects are attached to the
rear window
● When the electronic key is placed near a battery charger or ele ctronic
devices
● When the vehicle is parked in a pay parking spot where radio wa ves are
emitted.
Page 172 of 624

1723-2. Opening, closing and locking the doors
■Note for the entry function
●Even when the electronic key is within the effective range (detection areas),
the system may not operate properly in the following cases:
• The electronic key is too close to the window or outside door handle, near
the ground, or in a high place when the doors are locked or unl ocked.
• The electronic key is near the ground or in a high place, or t oo close to
the rear bumper center when the trunk is opened.
• The electronic key is on the instrument panel, rear package tray or floor, or in the door pockets or glove box when the hybrid system is s tarted or
power switch modes are changed.
● Do not leave the electronic key on top of the instrument panel or near the
door pockets when exiting the vehicle. Depending on the radio w ave recep-
tion conditions, it may be detected by the antenna outside the cabin and the
door will become lockable from the outside, possibly trapping the electronic
key inside the vehicle.
● As long as the electronic key is within the effective range, th e doors may be
locked or unlocked by anyone. However, only the doors detecting the elec-
tronic key can be used to unlock the vehicle.
● Even if the electronic key is not inside the vehicle, it may be possible to start
the hybrid system if the electronic key is near the window.
● The doors may unlock or lock if a large amount of water splashes on the
door handle, such as in the rain or in a car wash, when the electronic key is
within the effective range. (The doors will automatically be lo cked after
approximately 60 seconds if the doors are not opened and closed.)
● If the wireless remote control is used to lock the doors when t he electronic
key is near the vehicle, there is a possibility that the door m ay not be
unlocked by the entry function. (Use the wireless remote contro l to unlock
the doors.)
● Touching the door lock sensor while wearing gloves may delay or prevent
lock operation. Remove the gloves and touch the lock sensor aga in.
● When the lock operation is performed using the lock sensor, rec ognition sig-
nals will be shown up to two consecutive times. After this, no recognition
signals will be given.
*
● If the door handle becomes wet while the electronic key is with in the effec-
tive range, the door may lock and unlock repeatedly. In this case, follow the
following correction procedures to wash the vehicle:
• Place the electronic key in a location 6 ft. (2 m) or more awa y from the
vehicle. (Take care to ensure that the key is not stolen.)
• Set the electronic key to battery-saving mode to disable the s mart key
system. ( P. 170)
● If the electronic key is inside the vehicle and a door handle b ecomes wet
during a car wash, a message may be shown on the multi-informat ion dis-
play and a buzzer will sound outside the vehicle. To turn off t he alarm, lock
all the doors.
Page 173 of 624

1733-2. Opening, closing and locking the doors
3
Operation of each component
●The lock sensor may not work properly if it comes into contact with ice,
snow, mud, etc. Clean the lock sensor and attempt to operate it again.
● A sudden approach to the effective range or door handle may prevent the
doors from being unlocked. In this case, return the door handle to the origi-
nal position and check that the doors unlock before pulling the door handle
again.
● If there is another electronic key in the detection area, it ma y take slightly
longer to unlock the doors after the door handle is gripped.
● Fingernails may scrape against the door during operation of the door han-
dle. Be careful not to injure fingernails or damage the surface of the door.
*: This setting can be customized at your Toyota dealer.
■ When the vehicle is not driven for extended periods
●To prevent theft of the vehicle, do not leave the electronic ke y within 6 ft. (2
m) of the vehicle.
● The smart key system can be deactivated in advance. ( P. 581)
● Setting the electronic key to battery-saving mode helps to redu ce key bat-
tery depletion. ( P. 170)
■ To operate the system properly
Make sure to carry the electronic key when operating the system. Do not get
the electronic key too close to the vehicle when operating the system from the
outside of the vehicle.
Depending on the position and holding condition of the electron ic key, the key
may not be detected correctly and the system may not operate pr operly. (The
alarm may go off accidentally, or the door lock prevention func tion may not
operate.)
■ If the smart key system does not operate properly
●Locking and unlocking the doors and trunk: Use the mechanical k ey.
( P. 539)
● Starting the hybrid system: P. 540
■ Customization
Some functions can be customized. ( P. 581)
■ If the smart key system has been d eactivated in a customized setting
● Locking and unlocking the doors and opening the trunk:
Use the wireless remote control or mechanical key. ( P. 158, 164, 539)
● Starting the hybrid system and changing power switch modes: P. 540
● Stopping the hybrid system: P. 213
Page 190 of 624

1903-5. Opening and closing the windows
■When the window cannot be opened or closed
When the jam protection function or catch protection function o perates
unusually and the door window cannot be opened or closed, perfo rm the fol-
lowing operations with the power window switch of that door.
● Stop the vehicle. With the power switch in ON mode, within 4 seconds of the
jam protection function or catch protection function activating , continuously
operate the power window switch in the one-touch closing direct ion or one-
touch opening direction so that the door window can be opened a nd closed.
● If the door window cannot be opened and closed even when perfor ming the
above operations, perform the foll owing procedure for function initialization.
Turn the power switch to ON mode.
Pull and hold the power window switch in the one-touch closing direction
and completely close the door window.
Release the power window switch for a moment, resume pulling the
switch in the one-touch closing direction, and hold it there for approxi-
mately 6 seconds or more.
Press and hold the power window switch in the one-touch opening direc-
tion. After the door window is completely opened, continue hold ing the
switch for an additional 1 second or more.
Release the power window switch for a moment, resume pushing th e
switch in the one-touch opening direction, and hold it there fo r approxi-
mately 4 seconds or more.
Pull and hold the power window switch in the one-touch closing direction
again. After the door window is completely closed, continue holding the
switch for a further 1 second or more.
If you release the switch while the window is moving, start aga in from the
beginning.
If the window reverses and cannot be fully closed or opened, have the vehicle
inspected by your Toyota dealer.
■ Door lock linked window operation
●The power windows can be opened and closed using the mechanical key.
*
(P. 539)
● The power windows can be opened using the wireless remote control.
*
(P. 158)
*: These settings must be customized at your Toyota dealer.
■ Alarm
The alarm may be triggered if the alarm is set and a power window is closed
using the door lock linked power window operation function. ( P. 93)
■ Power windows open warning buzzer
A buzzer sounds and a message is shown on the multi-information display in
the instrument cluster when the power switch is turned off and the driver’s
door is opened with the power windows open.
1
2
3
4
5
6
Page 191 of 624
1913-5. Opening and closing the windows
3
Operation of each component
■Customization
Some functions can be customized. ( P. 581)
WARNING
Observe the following precautions.
Failure to do so may result in death or serious injury.
■Closing the windows
● The driver is responsible for all the power window operations, including the
operation for the passengers. In order to prevent accidental op eration,
especially by a child, do not let a child operate the power windows. It is
possible for children and other passengers to have body parts c aught in
the power window. Also, when riding with a child, it is recommended to use
the window lock switch. ( P. 189)
● When using the wireless remote control or mechanical key and op erating
the power windows, operate the power window after checking to m ake
sure that there is no possibility of any passenger having any o f their body
parts caught in the window. Also do not let a child operate window by the
wireless remote control or mechanical key. It is possible for c hildren and
other passengers to get caught in the power window.
● When exiting the vehicle, turn the power switch off, carry the key and exit
the vehicle along with the child. There may be accidental operation, due to
mischief, etc., that may possibly lead to an accident.
■ Jam protection function
● Never use any part of your body to intentionally activate the jam protection
function.
● The jam protection function may not work if something gets jammed just
before the window is fully closed. Be careful not to get any pa rt of your
body jammed in the window.
■ Catch protection function
● Never use any part of your body or clothing to intentionally ac tivate the
catch protection function.
● The catch protection function may not work if something gets caught just
before the window is fully opened. Be careful not to get any part of your
body or clothing caught in the window.
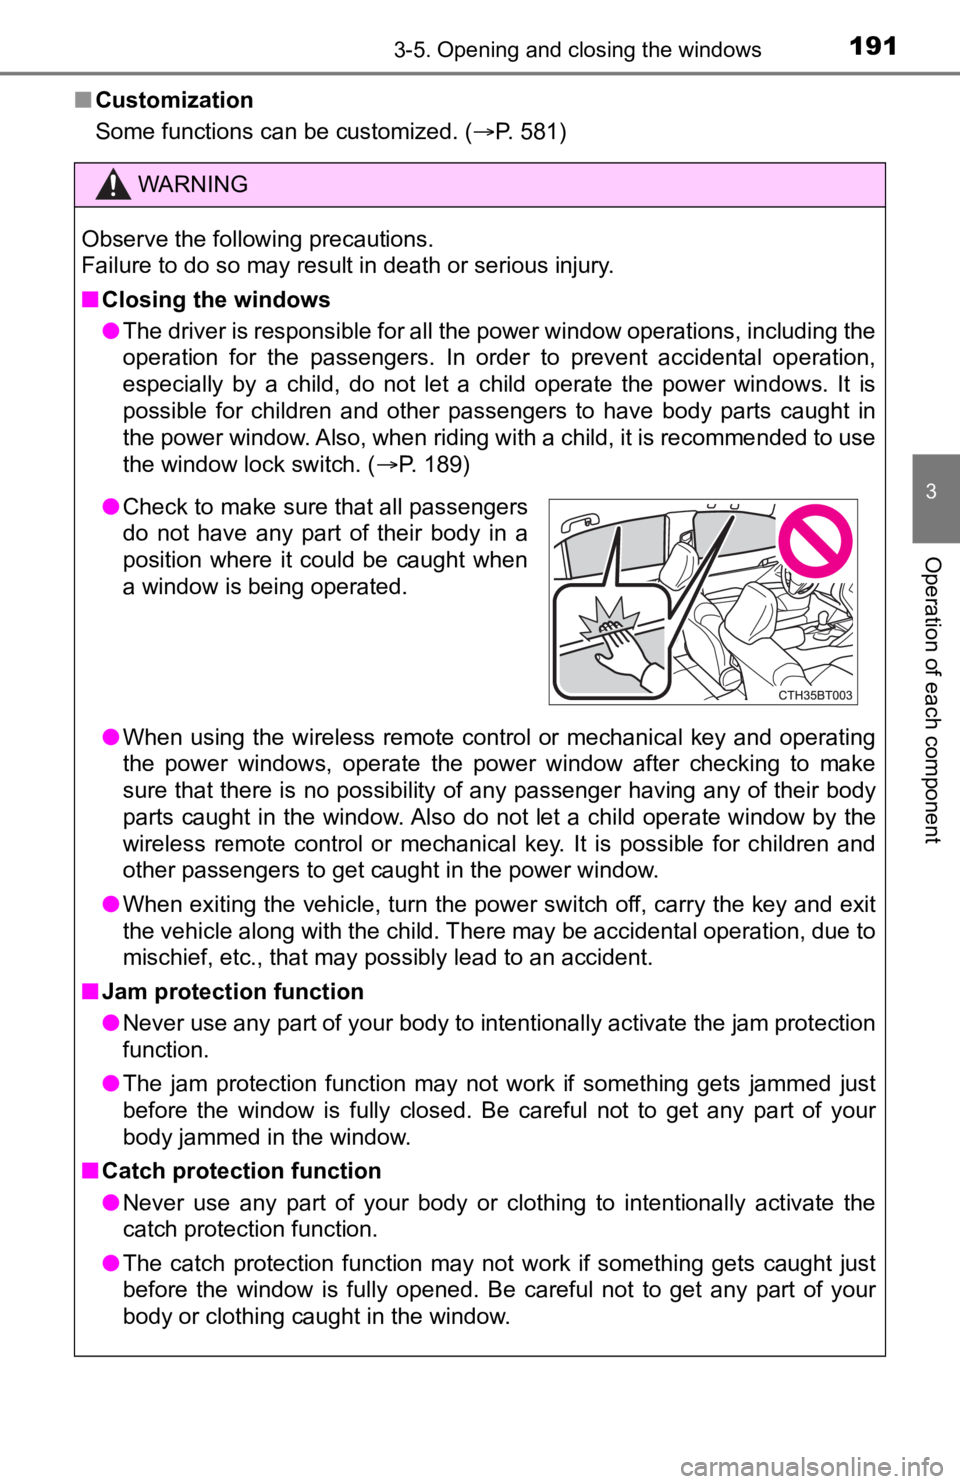
●Check to make sure that all passengers
do not have any part of their body in a
position where it could be caught when
a window is being operated.
Page 193 of 624

1933-5. Opening and closing the windows
3
Operation of each component
■The moon roof can be operated when
The power switch is in ON mode.
■ Operating the moon roof after turning th e hybrid system off
The moon roof can be operated for approximately 45 seconds afte r the power
switch is turned to ACCESSORY mode or turned off. It cannot, ho wever, be
operated once either front door is opened.
■ Jam protection function
If an object is detected between the moon roof and the frame wh ile the moon
roof is closing or tilting down, travel is stopped and the moon roof opens
slightly.
■ Sunshade
The sunshade can be opened and closed manually. However, the su nshade
will open automatically when the moon roof is opened.
■ Door lock linked moon roof operation
●The moon roof can be opened and closed using the mechanical key .
*
( P. 539)
● The moon roof can be opened using the wireless remote control.
*
( P. 158)
*: These settings must be customized at your Toyota dealer.
Page 195 of 624
1953-5. Opening and closing the windows
3
Operation of each component
WARNING
Observe the following precautions.
Failure to do so may cause death or serious injury.
■Opening the moon roof
● Do not allow any passengers to put their hands or heads outside the vehi-
cle while it is moving.
● Do not sit on top of the moon roof.
■ Closing the moon roof
● The driver is responsible for moon roof opening and closing operations.
In order to prevent accidental operation, especially by a child, do not let a
child operate the moon roof. It is possible for children and other passen-
gers to have body parts caught in the moon roof.
● When exiting the vehicle, turn the power switch off, carry the key and exit
the vehicle along with the child. There may be accidental operation, due to
mischief, etc., that may possibly lead to an accident.
■ Jam protection function
● Never use any part of your body to intentionally activate the jam protection
function.
● The jam protection function may not work if something gets caught just
before the moon roof is fully closed. Also, the jam protection function is not
designed to operate while the switch is being pressed. Take care so that
your fingers, etc. do not get caught.
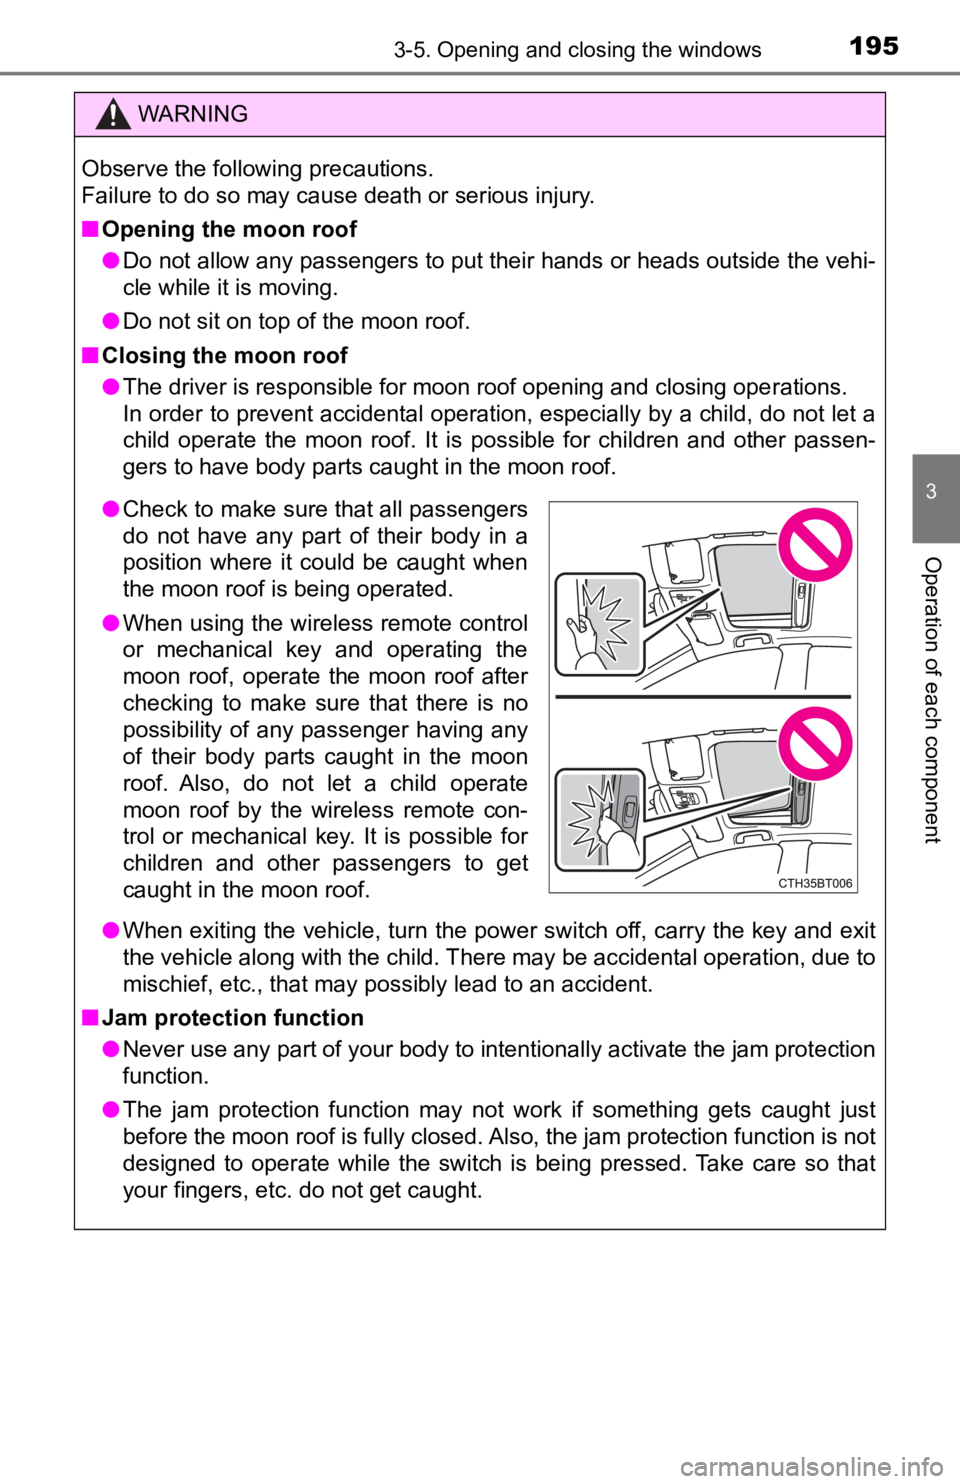
●Check to make sure that all passengers
do not have any part of their body in a
position where it could be caught when
the moon roof is being operated.
● When using the wireless remote control
or mechanical key and operating the
moon roof, operate the moon roof after
checking to make sure that there is no
possibility of any passenger having any
of their body parts caught in the moon
roof. Also, do not let a child operate
moon roof by the wireless remote con-
trol or mechanical key. It is possible for
children and other passengers to get
caught in the moon roof.
Page 415 of 624
4155-4. Other interior features
5
Interior features
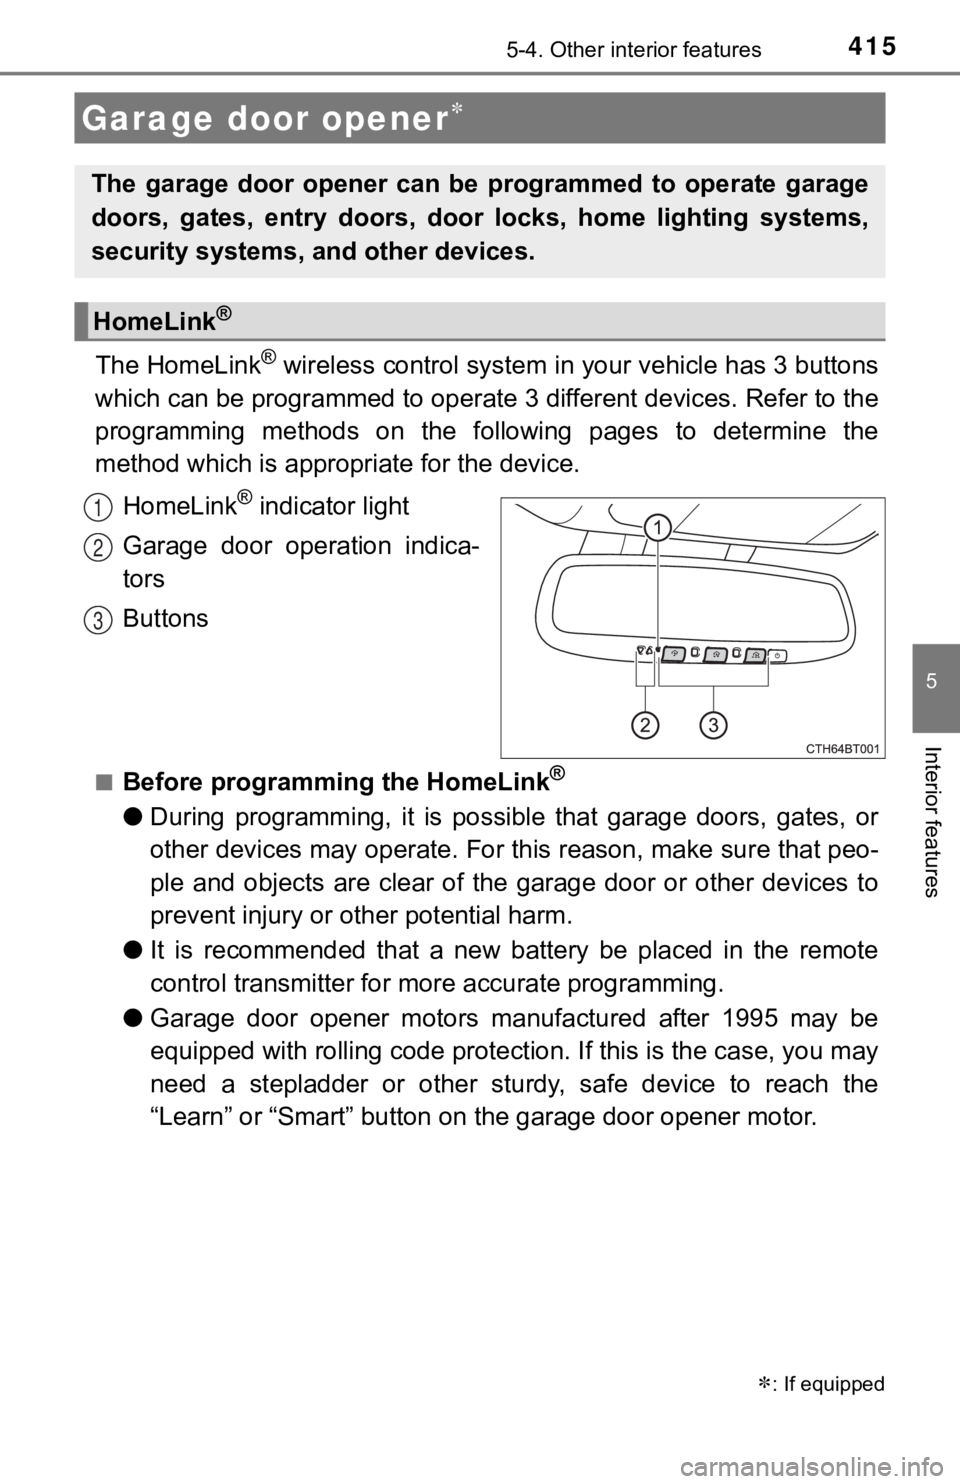
The HomeLink® wireless control system in your vehicle has 3 buttons
which can be programmed to operate 3 different devices. Refer to the
programming methods on the following pages to determine the
method which is approp riate for the device.
HomeLink
® indicator light
Garage door operation indica-
tors
Buttons
■Before programming the HomeLink®
● During programming, it is possible that garage doors, gates, or
other devices may operate. For this reason, make sure that peo-
ple and objects are clear of the garage door or other devices t o
prevent injury or other potential harm.
● It is recommended that a new battery be placed in the remote
control transmitter for mo re accurate programming.
● Garage door opener motors manufactured after 1995 may be
equipped with rolling code pro tection. If this is the case, you may
need a stepladder or other sturdy, safe device to reach the
“Learn” or “Smart” button on the garage door opener motor.
Garage door opener
: If equipped
The garage door opener can be programmed to operate garage
doors, gates, entry doors, door locks, home lighting systems,
security systems, and other devices.
HomeLink®
1
2
3
Page 416 of 624
4165-4. Other interior features
■Programming the HomeLink®
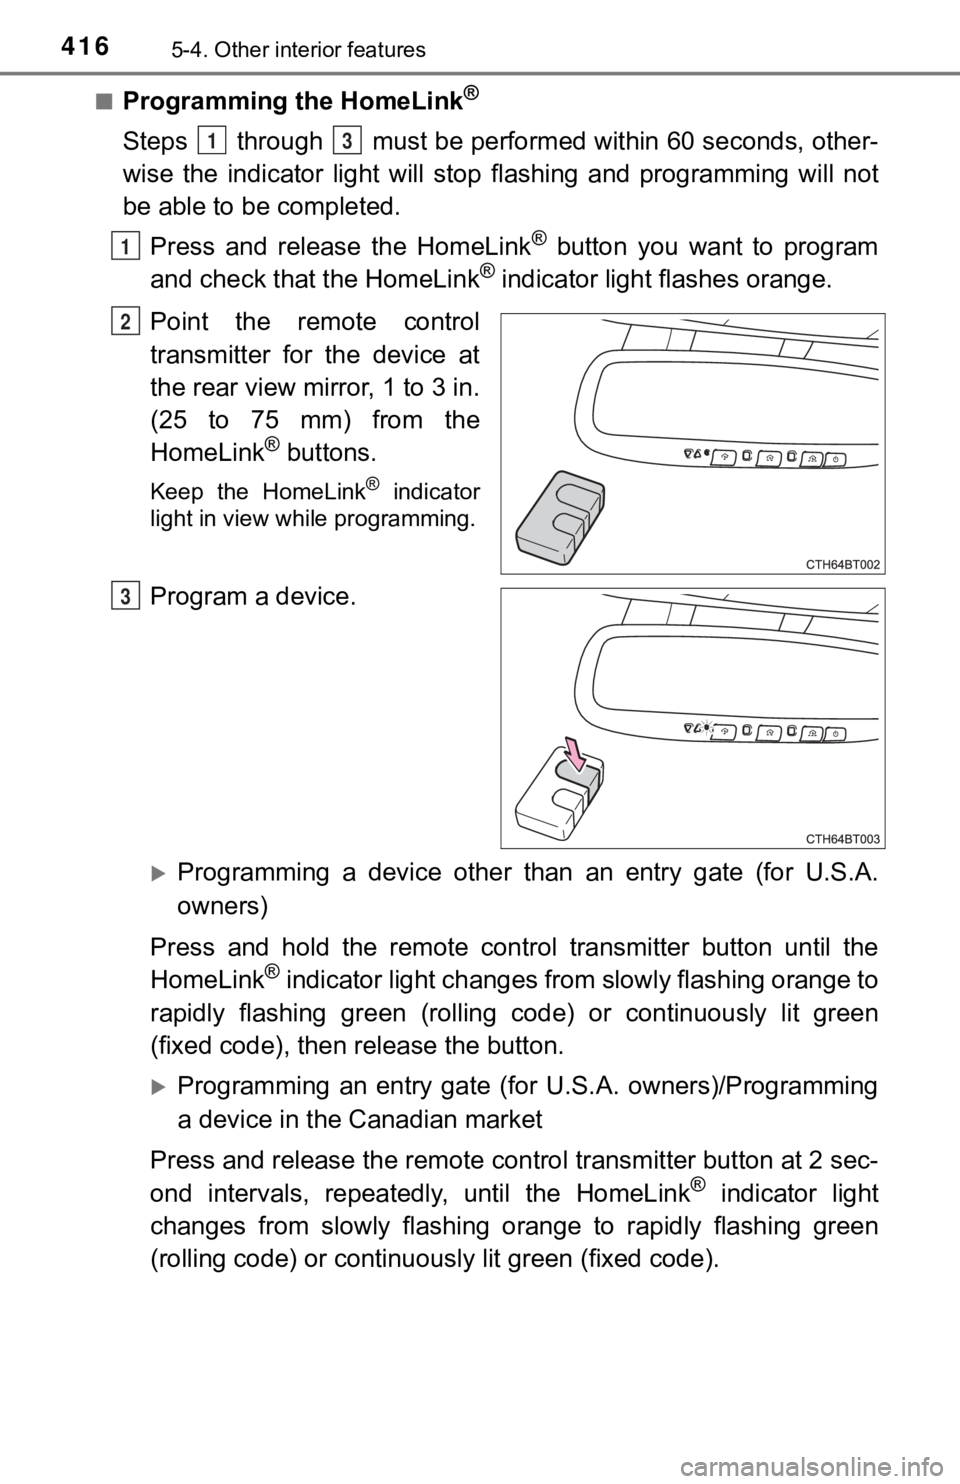
Steps through must be performed within 60 seconds, other-
wise the indicator light will st op flashing and programming wil l not
be able to be completed.
Press and release the HomeLink
® button you want to program
and check that the HomeLink® indicator light flashes orange.
Point the remote control
transmitter for the device at
the rear view mirror, 1 to 3 in.
(25 to 75 mm) from the
HomeLink
® buttons.
Keep the HomeLink® indicator
light in view while programming.
Program a device.
Programming a device other than an entry gate (for U.S.A.
owners)
Press and hold the remote control transmitter button until the
HomeLink
® indicator light changes from slowly flashing orange to
rapidly flashing gre en (rolling code) or continuously lit green
(fixed code), then release the button.
Programming an entry gate (for U.S.A. owners)/Programming
a device in the Canadian market
Press and release the remote con trol transmitter button at 2 sec-
ond intervals, repeatedly, until the HomeLink
® indicator light
changes from slowly flashing orange to rapidly flashing green
(rolling code) or continuous ly lit green (fixed code).
13
1
2
3