display TOYOTA CAMRY HYBRID 2022 Manual PDF
[x] Cancel search | Manufacturer: TOYOTA, Model Year: 2022, Model line: CAMRY HYBRID, Model: TOYOTA CAMRY HYBRID 2022Pages: 624, PDF Size: 13.76 MB
Page 219 of 624
2194-2. Driving procedures
4
Driving
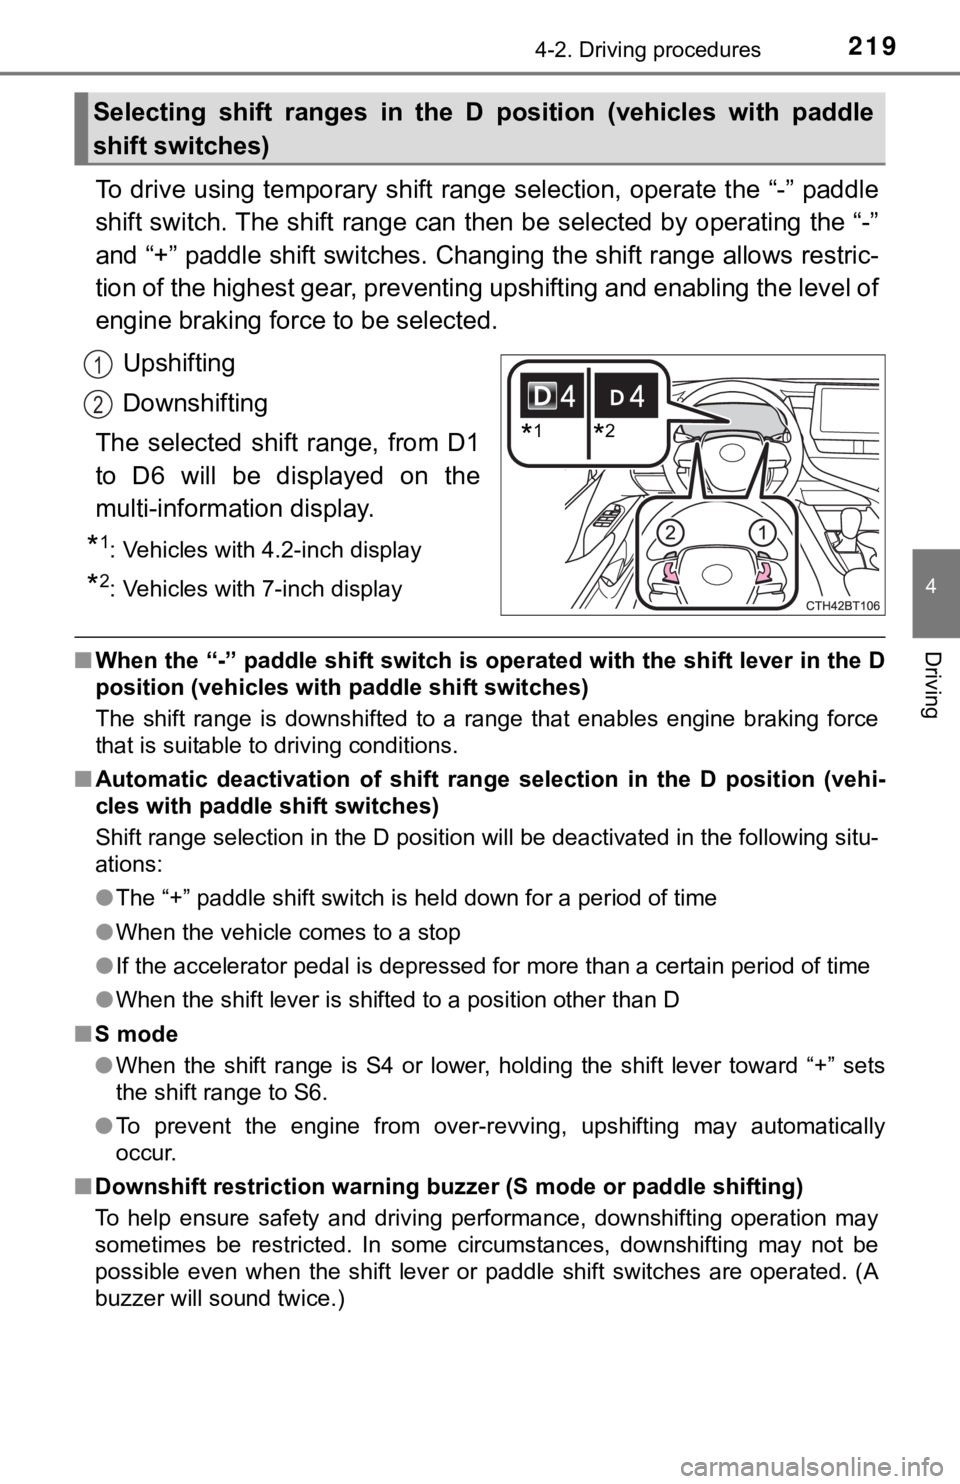
To drive using temporary shift range selection, operate the “-” paddle
shift switch. The shift range can then be selected by operating the “-”
and “+” paddle shift switches. Changing the shift range allows restric-
tion of the highest gear, preventing upshifting and enabling the level of
engine braking force to be selected.
Upshifting
Downshifting
The selected shift range, from D1
to D6 will be displayed on the
multi-information display.
*1: Vehicles with 4.2-inch display
*2: Vehicles with 7-inch display
■When the “-” paddle shift switch is operated with the shift lever in the D
position (vehicles with paddle shift switches)
The shift range is downshifted to a range that enables engine braking force
that is suitable to driving conditions.
■Automatic deactivation of shift range selection in the D position (vehi-
cles with paddle shift switches)
Shift range selection in the D position will be deactivated in the following situ-
ations:
●The “+” paddle shift switch is held down for a period of time
●When the vehicle comes to a stop
●If the accelerator pedal is depressed for more than a certain period of time
●<003a004b0048005100030057004b004800030056004b004c004900570003004f00480059004800550003004c005600030056004b004c0049005700480047000300570052000300440003005300520056004c0057004c00520051000300520057004b004800
5500030057004b0044005100030027[
■S mode
●When the shift range is S4 or lower, holding the shift lever toward “+” sets
the shift range to S6.
●To prevent the engine from over-revving, upshifting may automatically
occur.
■Downshift restriction warning buzzer (S mode or paddle shifting)
To help ensure safety and driving performance, downshifting operation may
sometimes be restricted. In some circumstances, downshifting may not be
possible even when the shift lever or paddle shift switches are operated. (A
buzzer will sound twice.)
Selecting shift ranges in the D position (vehicles with paddle
shift switches)
*1*2
1
2
Page 221 of 624
2214-2. Driving procedures
4
Driving
■If the S indicator does not come on or the D indicator is displayed even
after shifting the shift lever to S
This may indicate a malfunction in the automatic transmission system. Have
the vehicle inspected by your Toyota dealer immediately.
(In this situation, the transmission will operate in the same manner as when
the shift lever is in D.)
WARNING
■When driving on slippery road surfaces
Do not accelerate or shift gears suddenly.
Sudden changes in engine braking may cause the vehicle to spin or skid,
resulting in an accident.
■To prevent an accident when releasing the shift lock
Before pressing the shift lock override button, make sure to set the parking
brake and depress the brake pedal.
If the accelerator pedal is accidentally depressed instead of the brake pedal
when the shift lock override button is pressed and the shift lever is shifted
out of P, the vehicle may suddenly start, possibly leading to an accident
resulting in death or serious injury.
NOTICE
■Hybrid battery (traction battery) charge precaution
If the shift lever is in N, the hybrid battery (traction battery) will not be
charged even when the engine is running. Therefore, if the vehicle is left
with the shift lever in N for a certain amount of time, the hybrid battery (trac-
tion battery) will discharge, and this may result in the vehicle not being able
to start.
Page 223 of 624
2234-2. Driving procedures
4
Driving
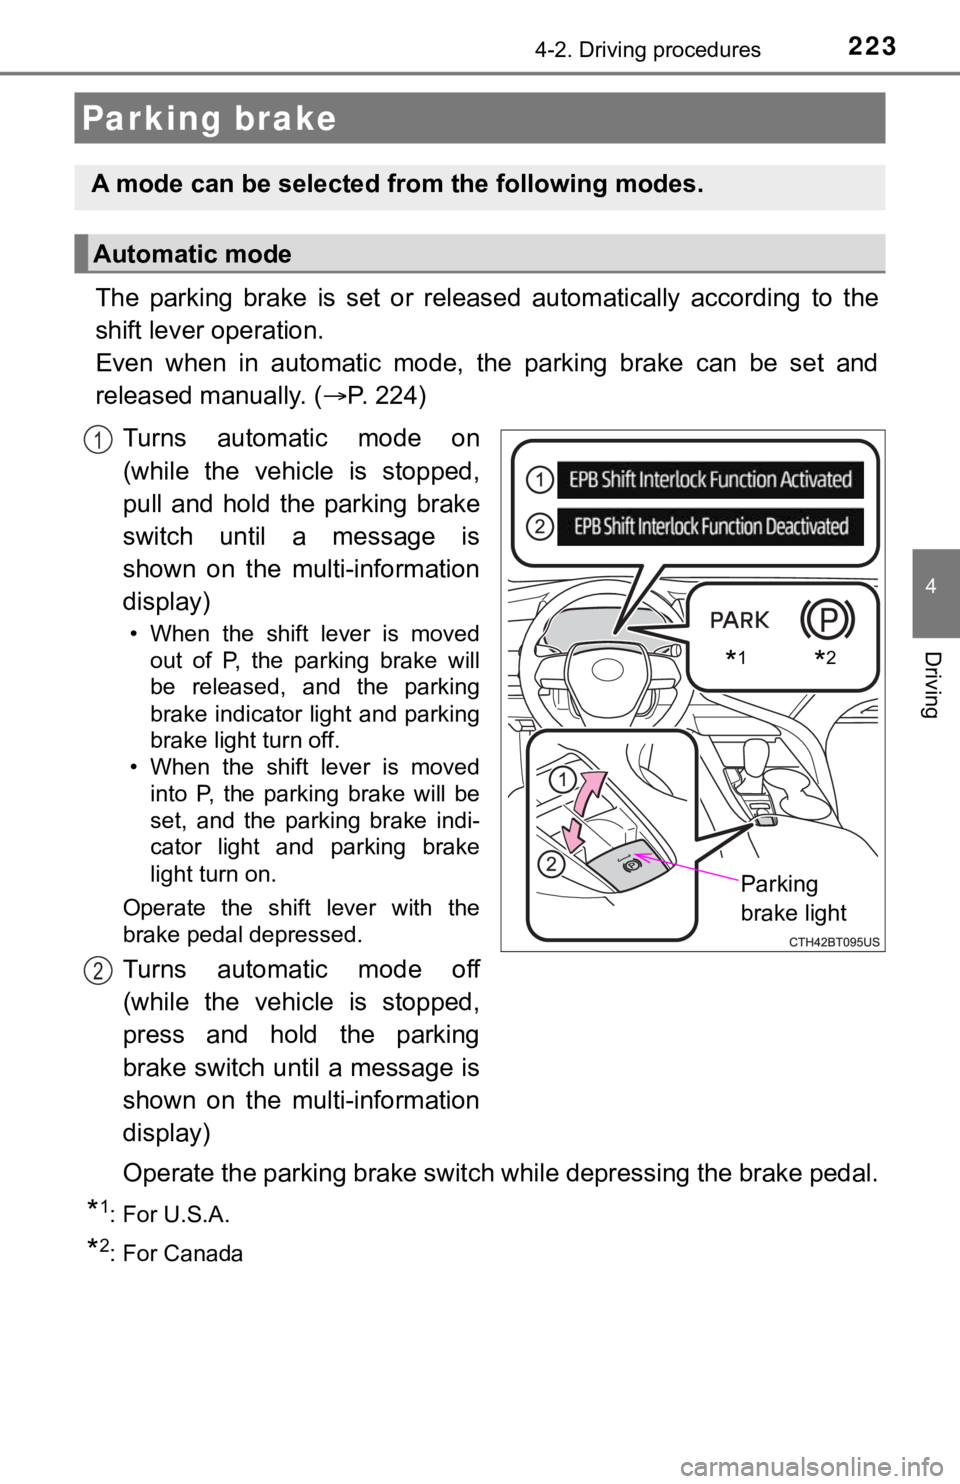
The parking brake is set or released automatically according to the
shift lever operation.
Even when in automatic mode, the parking brake can be set and
released manually. (P. 224)
Turns automatic mode on
(while the vehicle is stopped,
pull and hold the parking brake
switch until a message is
shown on the multi-information
display)
• When the shift lever is moved
out of P, the parking brake will
be released, and the parking
brake indicator light and parking
brake light turn off.
• When the shift lever is moved
into P, the parking brake will be
set, and the parking brake indi-
cator light and parking brake
light turn on.
Operate the shift lever with the
brake pedal depressed.
Turns automatic mode off
(while the vehicle is stopped,
press and hold the parking
brake switch until a message is
shown on the multi-information
display)
Operate the parking brake switch while depressing the brake pedal.
*1: For U.S.A.
*2: For Canada
Parking brake
A mode can be selected from the following modes.
Automatic mode
*1*2
Parking
brake light
1
2
Page 225 of 624

2254-2. Driving procedures
4
Driving
■Parking the vehicle
P. 192
■Parking brake operation
●When the power switch is not in ON mode, the parking brake cannot be
released using the parking brake switch.
●When the power switch is not in ON mode, automatic mode (automatic
brake setting and releasing) is not available.
■Automatic release function
The parking brake is automatically released when slowly depress the acceler-
ator pedal.
The parking brake will be released automatically under the following condi-
tions:
●The driver’s door is closed.
●The driver’s seatbelt is fastened.
●Shift the shift lever is in a forward or reverse position.
●The malfunction indicator lamp or brake system warning light is not illumi-
nated.
If the automatic release function does not operate, manually release the park-
ing brake.
■If “Parking Brake Temporarily Unavailable” is displayed on the multi-
information display
If the parking brake is operated repeatedly over a short period of time, the
system may restrict operation to prevent overheating. If this happens, refrain
from operating the parking brake. Normal operation will return after about 1
minute.
■If “Parking Brake Unavailable” is displayed on the multi-information dis-
play
Operate the parking brake switch. If the message does not disappear after
operating the switch several times, the system may be malfunctioning. Have
the vehicle inspected by your Toyota dealer immediately.
■Parking brake operation sound
When the parking brake operates, a motor sound (whirring sound) may be
heard. This does not indicate a malfunction.
■Parking brake indicator light and parking brake light
●Depending on the power switch mode, the parking brake indicator light and
<005300440055004e004c0051004a0003004500550044004e00480003004f004c004a004b00570003005a004c004f004f0003005700580055005100030052005100030044005100470003005600570044005c00030052005100030044005600030047004800
5600460055004c004500480047000300450048004f0052005a[:
ON mode: Comes on until the parking brake is released.
Not in ON mode: Stays on for approximately 15 seconds.
●When the power switch is turned off with the parking brake set, the parking
brake indicator light and parking brake light will stay on for about 15 sec-
onds. This does not indicate a malfunction.
Page 226 of 624
2264-2. Driving procedures
■Parking brake engaged warning buzzer
A buzzer will sound if the vehicle is driven with the parking brake engaged.
“Release Parking Brake” is displayed on the multi-information display.
■Warning messages and buzzers
Warning messages and buzzers are used to indicate a system malfunction or
to inform the driver of the need for caution. If a warning message is shown on
the multi-information display, read the message and follow the instructions.
■If the brake system warning light comes on
P. 497
■Usage in winter time
P. 360
WARNING
■When parking the vehicle
Do not leave a child in the vehicle alone. The parking brake may be
released unintentionally and there is the danger of the vehicle moving that
may lead to an accident resulting in death or serious injury.
■Parking brake switch
Do not set any objects near the parking brake switch. Objects may interfere
with the switch and may lead the parking brake to unexpectedly operate.
NOTICE
■When parking the vehicle
Before you leave the vehicle, shift the shift lever to P, set the parking brake
and make sure that the vehicle does not move.
■When the system malfunctions
<003600570052005300030057004b0048000300590048004b004c0046004f00480003004c0051000300440003005600440049004800030053004f004400460048000300440051004700030046004b00480046004e00030057004b00480003005a0044005500
51004c0051004a000300500048005600560044004a00480056[.
■When the parking brake cannot be released due to a malfunction
Driving the vehicle with the parking brake set will lead to brake components
overheating, which may affect braking performance and increase brake
wear. Contact your Toyota dealer immediately if this occurs.
Page 227 of 624
2274-2. Driving procedures
4
Driving
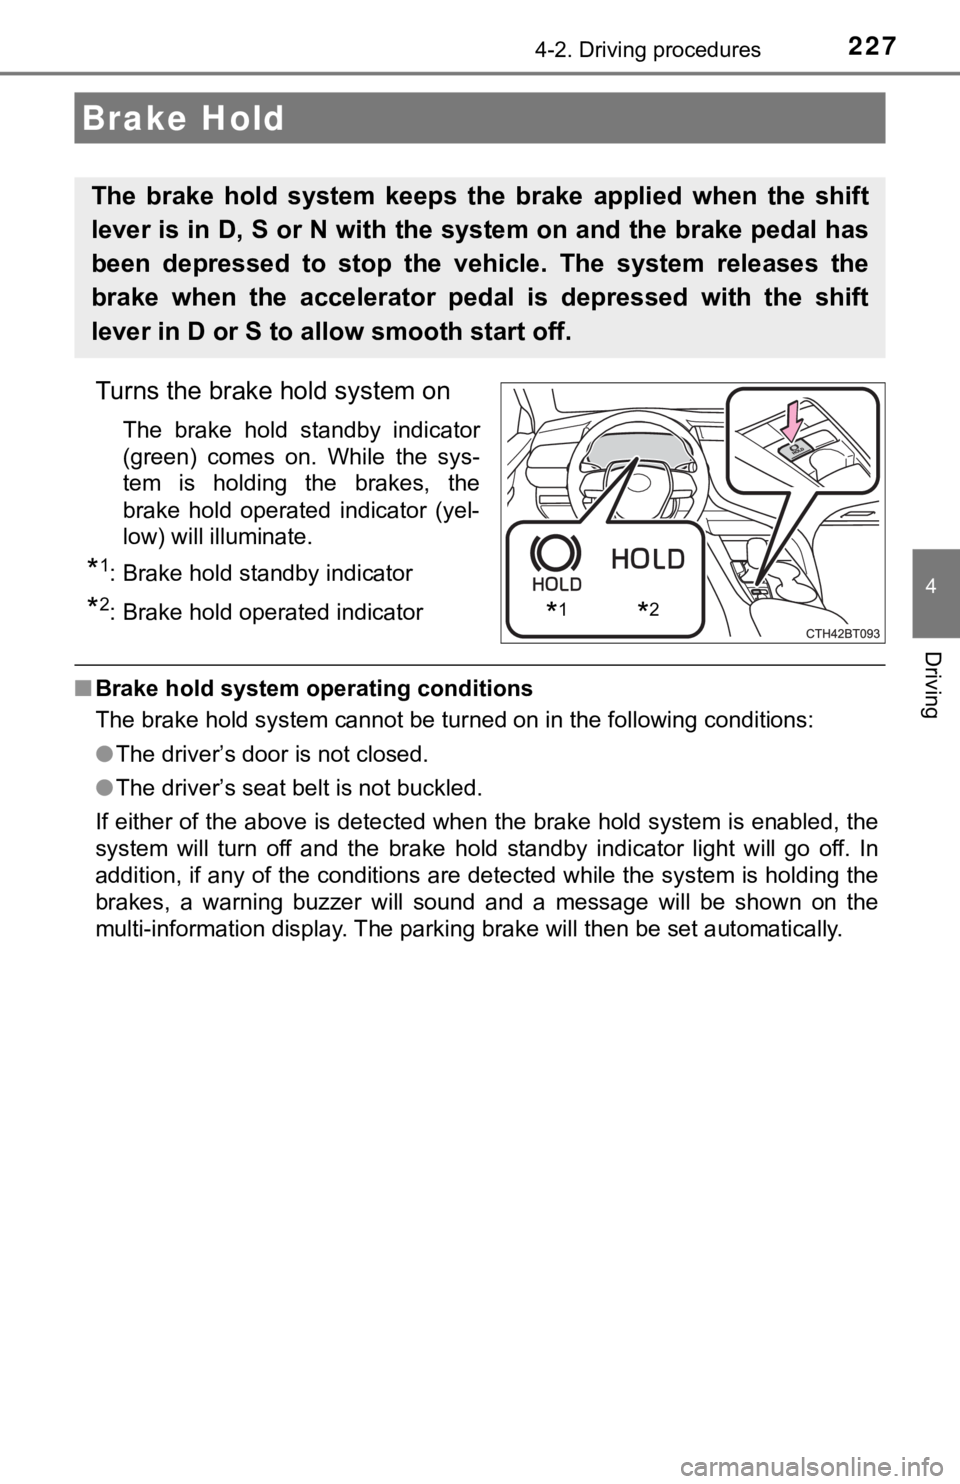
Turns the brake hold system on
The brake hold standby indicator
(green) comes on. While the sys-
tem is holding the brakes, the
brake hold operated indicator (yel-
low) will illuminate.
*1: Brake hold standby indicator
*2: Brake hold operated indicator
■Brake hold system operating conditions
The brake hold system cannot be turned on in the following conditions:
●The driver’s door is not closed.
●The driver’s seat belt is not buckled.
If either of the above is detected when the brake hold system is enabled, the
system will turn off and the brake hold standby indicator light will go off. In
addition, if any of the conditions are detected while the system is holding the
brakes, a warning buzzer will sound and a message will be shown on the
multi-information display. The parking brake will then be set automatically.
Brake Hold
The brake hold system keeps the brake applied when the shift
lever is in D, S or N with the system on and the brake pedal has
been depressed to stop the vehicle. The system releases the
brake when the accelerator pedal is depressed with the shift
lever in D or S to allow smooth start off.
*1*2
Page 228 of 624

2284-2. Driving procedures
■Brake hold function
●If the brake pedal is left released for a period of about 3 minutes after the
system has started holding the brakes, the parking brake will be set auto-
matically. In this case, a warning buzzer sounds and a message is shown on
the multi-information display.
●To turn the system off while the system is holding the brakes, firmly depress
the brake pedal and press the switch again.
●The brake hold function may not hold the vehicle when the vehicle is on a
steep incline. In this situation, it may be necessary for the driver to apply the
brakes. A warning buzzer will sound and the multi-information display will
inform the driver of this situation. If a warning message is shown on the
multi-information display, read the message and follow the instructions.
■When the parking brake is set automatically while the system is holding
the brakes
Perform any of the following operations to release the parking brake.
●Depress the accelerator pedal. (The parking brake will not be released auto-
matically if the seat belt is not fastened.)
●Operate the parking brake switch with the brake pedal depressed.
Make sure that the parking brake indicator light goes off. (P. 223)
■When an inspection at your Toyota dealer is necessary
When the brake hold standby indicator (green) does not illuminate even when
the brake hold switch is pressed with the brake hold system operating condi-
tions met, the system may be malfunctioning. Have the vehicle inspected at
your Toyota dealer.
■Warning messages and buzzers
Warning messages and buzzers are used to indicate a system malfunction or
to inform the driver of the need for caution. If a warning message is shown on
the multi-information display, read the message and follow the instructions.
■If the brake hold operated indicator flashes
P. 498
Page 244 of 624
2444-4. Refueling
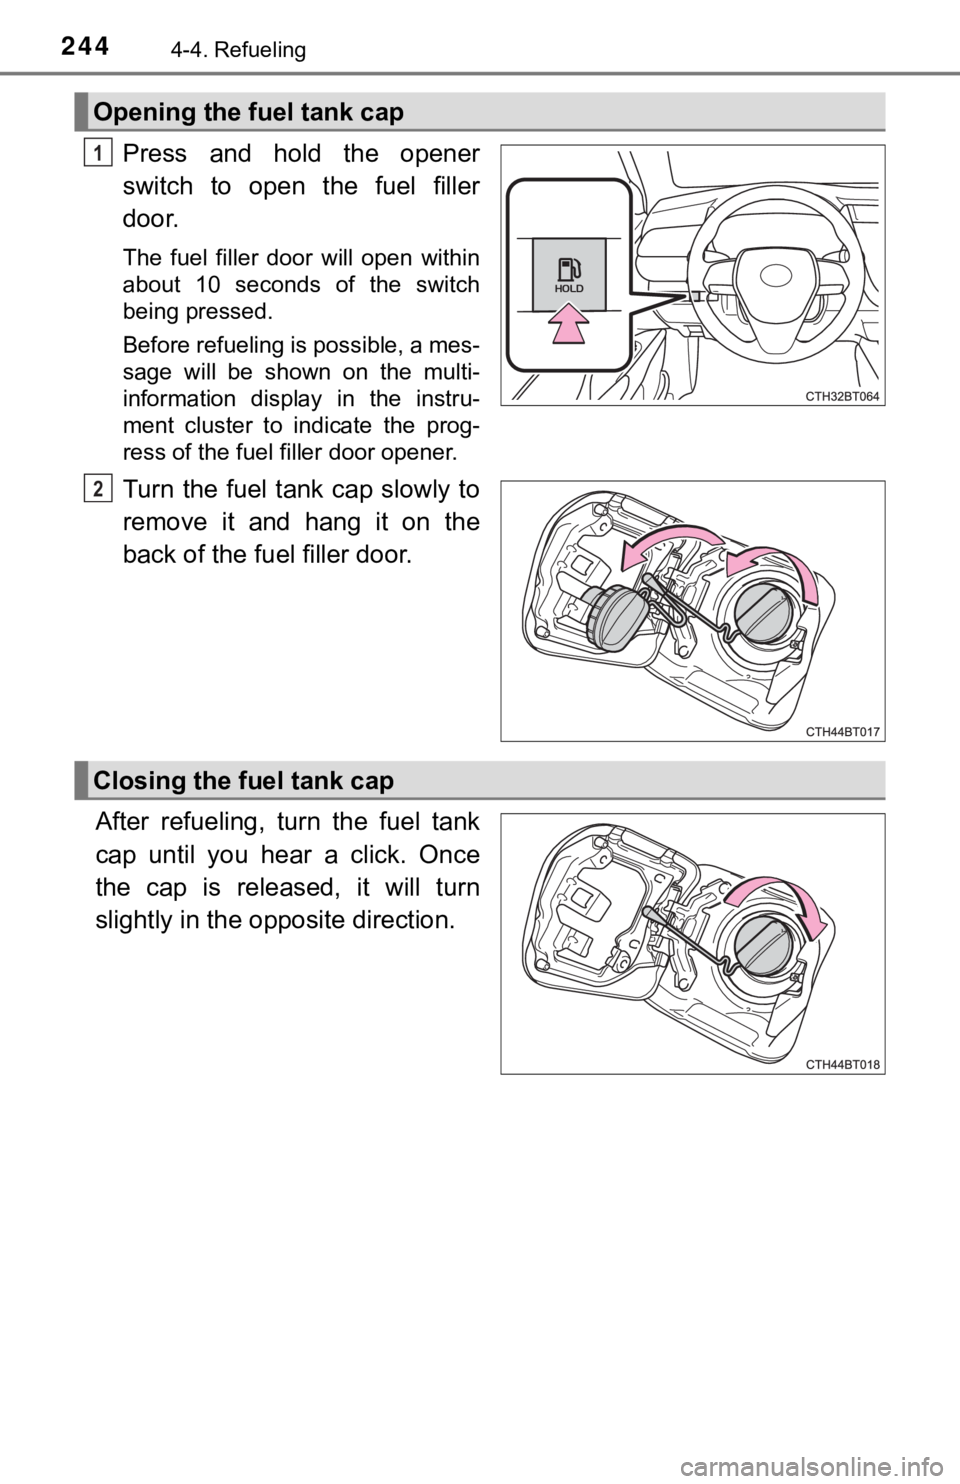
Press and hold the opener
switch to open the fuel filler
door.
The fuel filler door will open within
about 10 seconds of the switch
being pressed.
Before refueling is possible, a mes-
sage will be shown on the multi-
information display in the instru-
ment cluster to indicate the prog-
ress of the fuel filler door opener.
Turn the fuel tank cap slowly to
remove it and hang it on the
back of the fuel filler door.
After refueling, turn the fuel tank
cap until you hear a click. Once
the cap is released, it will turn
slightly in the opposite direction.
Opening the fuel tank cap
1
2
Closing the fuel tank cap
Page 245 of 624
2454-4. Refueling
4
Driving
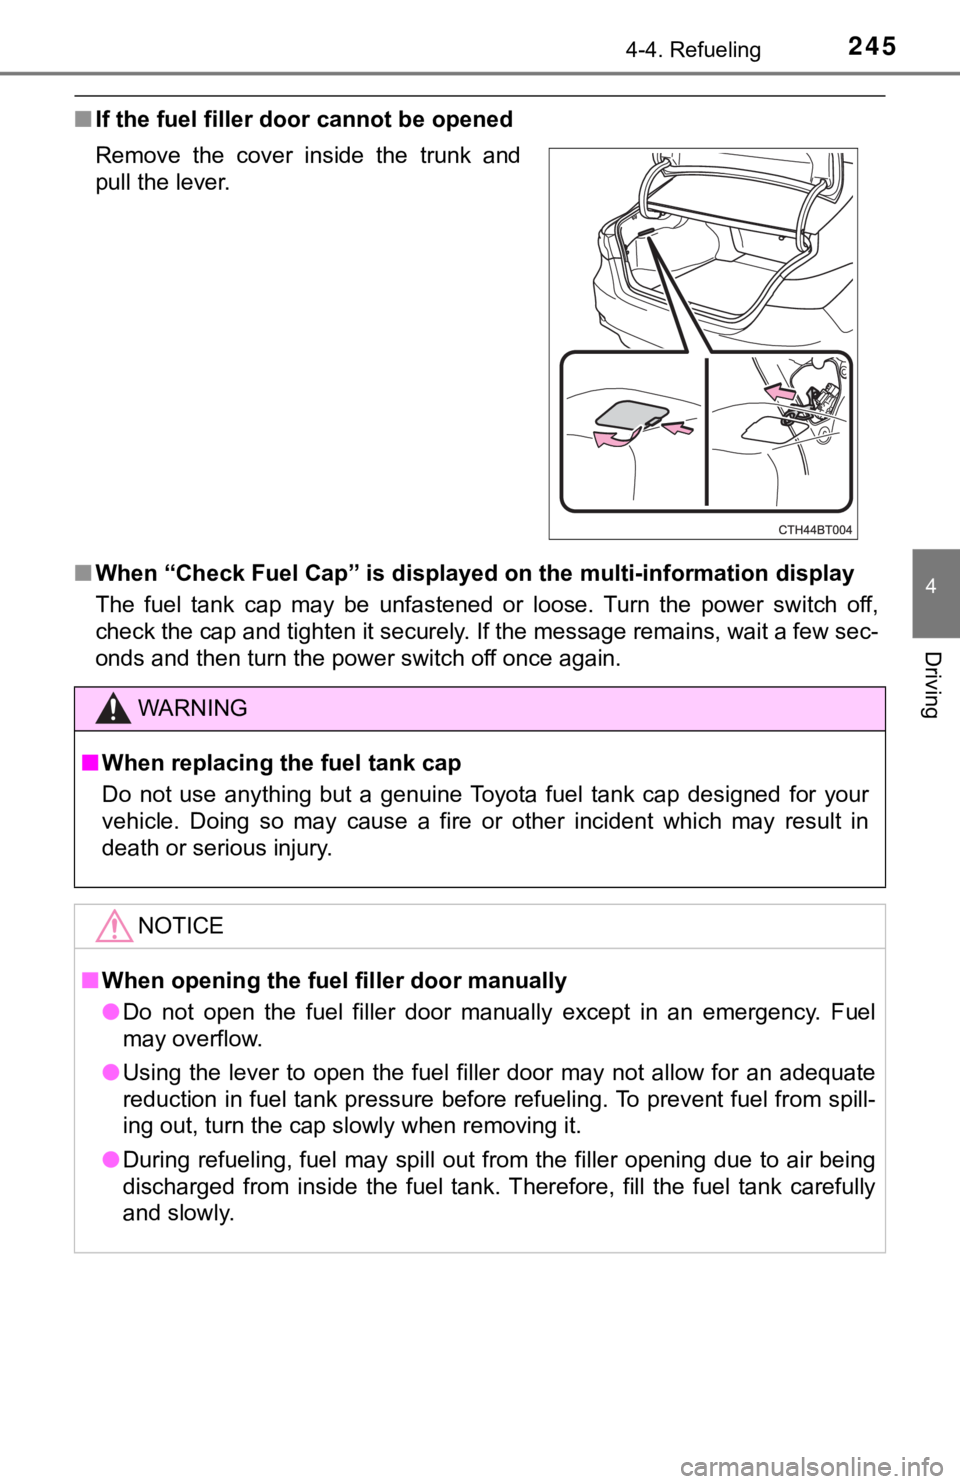
■If the fuel filler door cannot be opened
■When “Check Fuel Cap” is displayed on the multi-information display
The fuel tank cap may be unfastened or loose. Turn the power switch off,
check the cap and tighten it securely. If the message remains, wait a few sec-
onds and then turn the power switch off once again. Remove the cover inside the trunk and
pull the lever.
WARNING
■When replacing the fuel tank cap
Do not use anything but a genuine Toyota fuel tank cap designed for your
vehicle. Doing so may cause a fire or other incident which may result in
death or serious injury.
NOTICE
■When opening the fuel filler door manually
●Do not open the fuel filler door manually except in an emergency. Fuel
may overflow.
●Using the lever to open the fuel filler door may not allow for an adequate
reduction in fuel tank pressure before refueling. To prevent fuel from spill-
ing out, turn the cap slowly when removing it.
●During refueling, fuel may spill out from the filler opening due to air being
discharged from inside the fuel tank. Therefore, fill the fuel tank carefully
and slowly.
Page 250 of 624
2504-5. Using the driving support systems
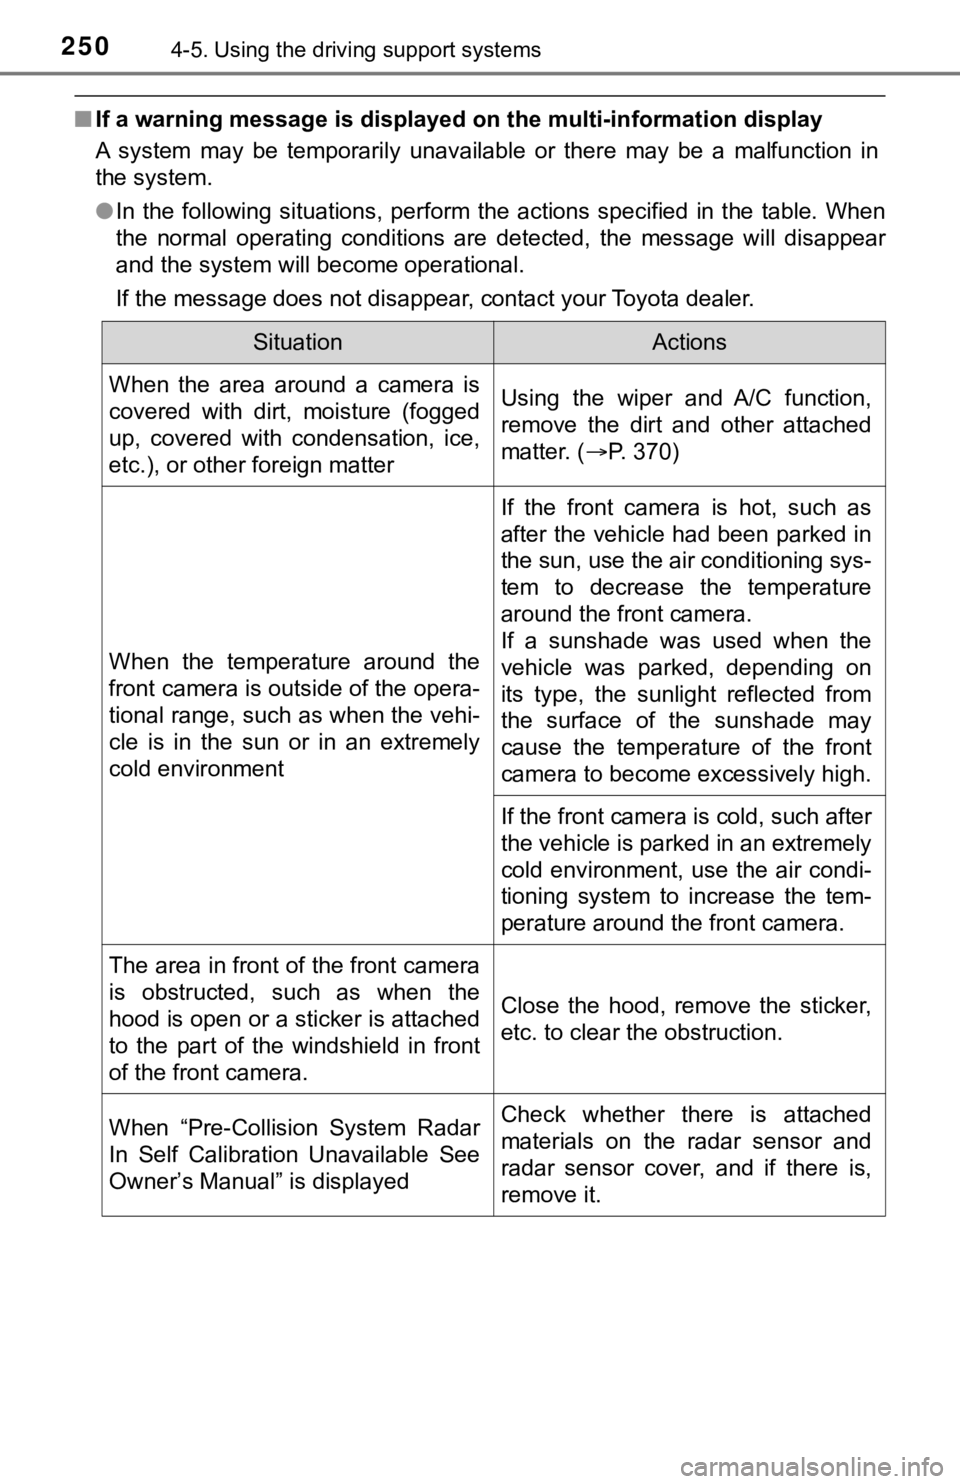
■If a warning message is displayed on the multi-information display
A system may be temporarily unavailable or there may be a malfunction in
the system.
●In the following situations, perform the actions specified in the table. When
the normal operating conditions are detected, the message will disappear
and the system will become operational.
If the message does not disappear, contact your Toyota dealer.
SituationActions
When the area around a camera is
covered with dirt, moisture (fogged
up, covered with condensation, ice,
etc.), or other foreign matterUsing the wiper and A/C function,
remove the dirt and other attached
matter. (P. 370)
When the temperature around the
front camera is outside of the opera-
tional range, such as when the vehi-
cle is in the sun or in an extremely
cold environment
If the front camera is hot, such as
after the vehicle had been parked in
the sun, use the air conditioning sys-
tem to decrease the temperature
around the front camera.
If a sunshade was used when the
vehicle was parked, depending on
its type, the sunlight reflected from
the surface of the sunshade may
cause the temperature of the front
camera to become excessively high.
If the front camera is cold, such after
the vehicle is parked in an extremely
cold environment, use the air condi-
tioning system to increase the tem-
perature around the front camera.
The area in front of the front camera
is obstructed, such as when the
hood is open or a sticker is attached
to the part of the windshield in front
of the front camera.Close the hood, remove the sticker,
etc. to clear the obstruction.
When “Pre-Collision System Radar
In Self Calibration Unavailable See
Owner’s Manual” is displayedCheck whether there is attached
materials on the radar sensor and
radar sensor cover, and if there is,
remove it.