ac relay replace TOYOTA CAMRY V20 1986 Service Information
[x] Cancel search | Manufacturer: TOYOTA, Model Year: 1986, Model line: CAMRY V20, Model: TOYOTA CAMRY V20 1986Pages: 2389, PDF Size: 84.44 MB
Page 216 of 2389
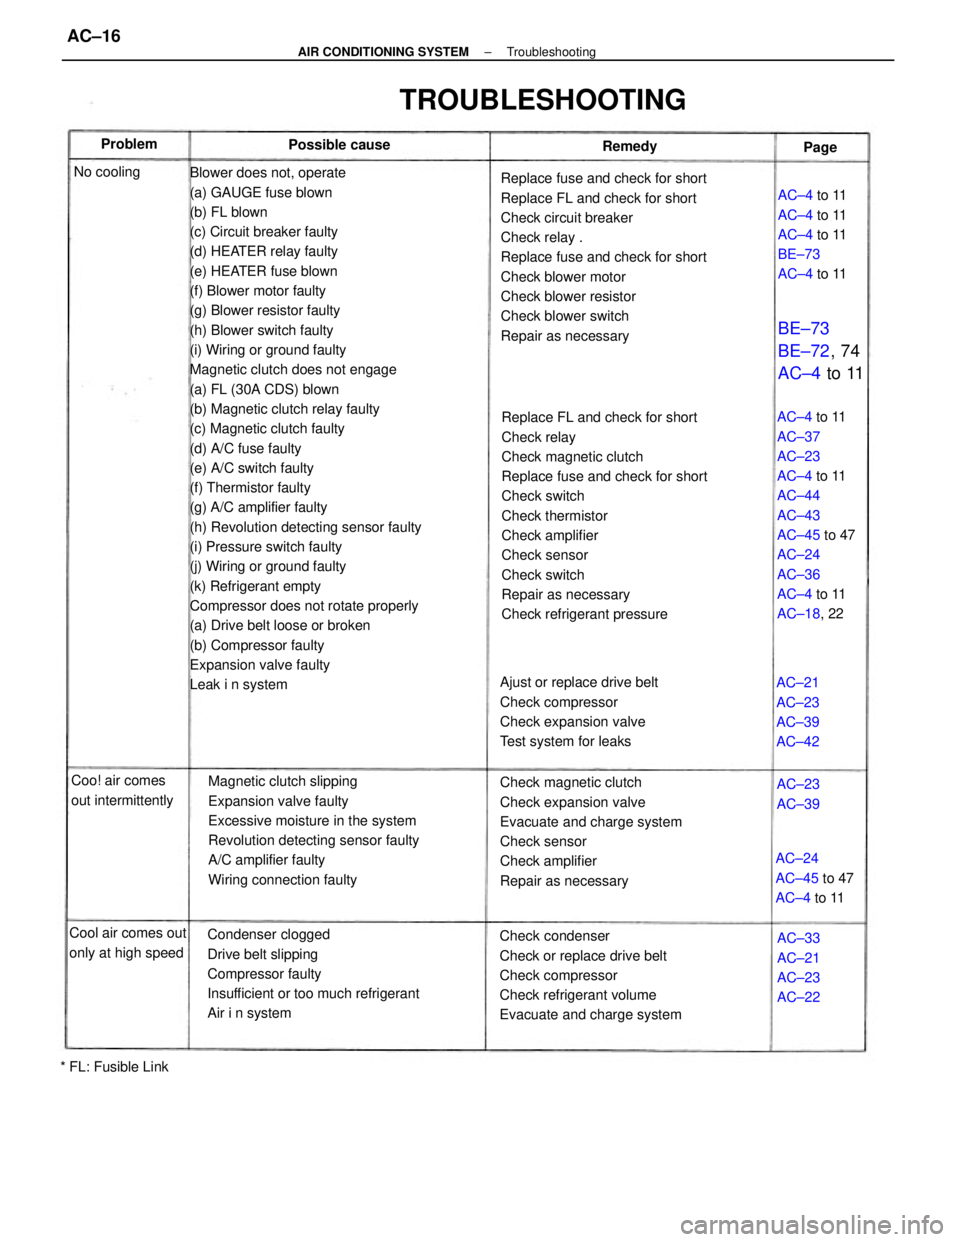
Blower does not, operate
(a) GAUGE fuse blown
(b) FL blown
(c) Circuit breaker faulty
(d) HEATER relay faulty
(e) HEATER fuse blown
(f) Blower motor faulty
(g) Blower resistor faulty
(h) Blower switch faulty
(i) Wiring or ground faulty
Magnetic clutch does not engage
(a) FL (30A CDS) blown
(b) Magnetic clutch relay faulty
(c) Magnetic clutch faulty
(d) A/C fuse faulty
(e) A/C switch faulty
(f) Thermistor faulty
(g) A/C amplifier faulty
(h) Revolution detecting sensor faulty
(i) Pressure switch faulty
(j) Wiring or ground faulty
(k) Refrigerant empty
Compressor does not rotate properly
(a) Drive belt loose or broken
(b) Compressor faulty
Expansion valve faulty
Leak i n systemReplace FL and check for short
Check relay
Check magnetic clutch
Replace fuse and check for short
Check switch
Check thermistor
Check amplifier
Check sensor
Check switch
Repair as necessary
Check refrigerant pressure Replace fuse and check for short
Replace FL and check for short
Check circuit breaker
Check relay .
Replace fuse and check for short
Check blower motor
Check blower resistor
Check blower switch
Repair as necessary
Magnetic clutch slipping
Expansion valve faulty
Excessive moisture in the system
Revolution detecting sensor faulty
A/C amplifier faulty
Wiring connection faulty
Condenser clogged
Drive belt slipping
Compressor faulty
Insufficient or too much refrigerant
Air i n systemCheck magnetic clutch
Check expansion valve
Evacuate and charge system
Check sensor
Check amplifier
Repair as necessary
Check condenser
Check or replace drive belt
Check compressor
Check refrigerant volume
Evacuate and charge systemAC±4 to 11
AC±37
AC±23
AC±4 to 11
AC±44
AC±43
AC±45 to 47
AC±24
AC±36
AC±4 to 11
AC±18, 22
Ajust or replace drive belt
Check compressor
Check expansion valve
Test system for leaks
TROUBLESHOOTING
AC±4 to 11
AC±4 to 11
AC±4 to 11
BE±73
AC±4 to 11
Cool air comes out
only at high speedAC±24
AC±45 to 47
AC±4 to 11 Coo! air comes
out intermittently
BE±73
BE±72, 74
AC±4 to 11
AC±33
AC±21
AC±23
AC±22 AC±21
AC±23
AC±39
AC±42
* FL: Fusible LinkPossible cause
AC±23
AC±39 No coolingRemedy Problem
Page
± AIR CONDITIONING SYSTEMTroubleshootingAC±16
Page 240 of 2389
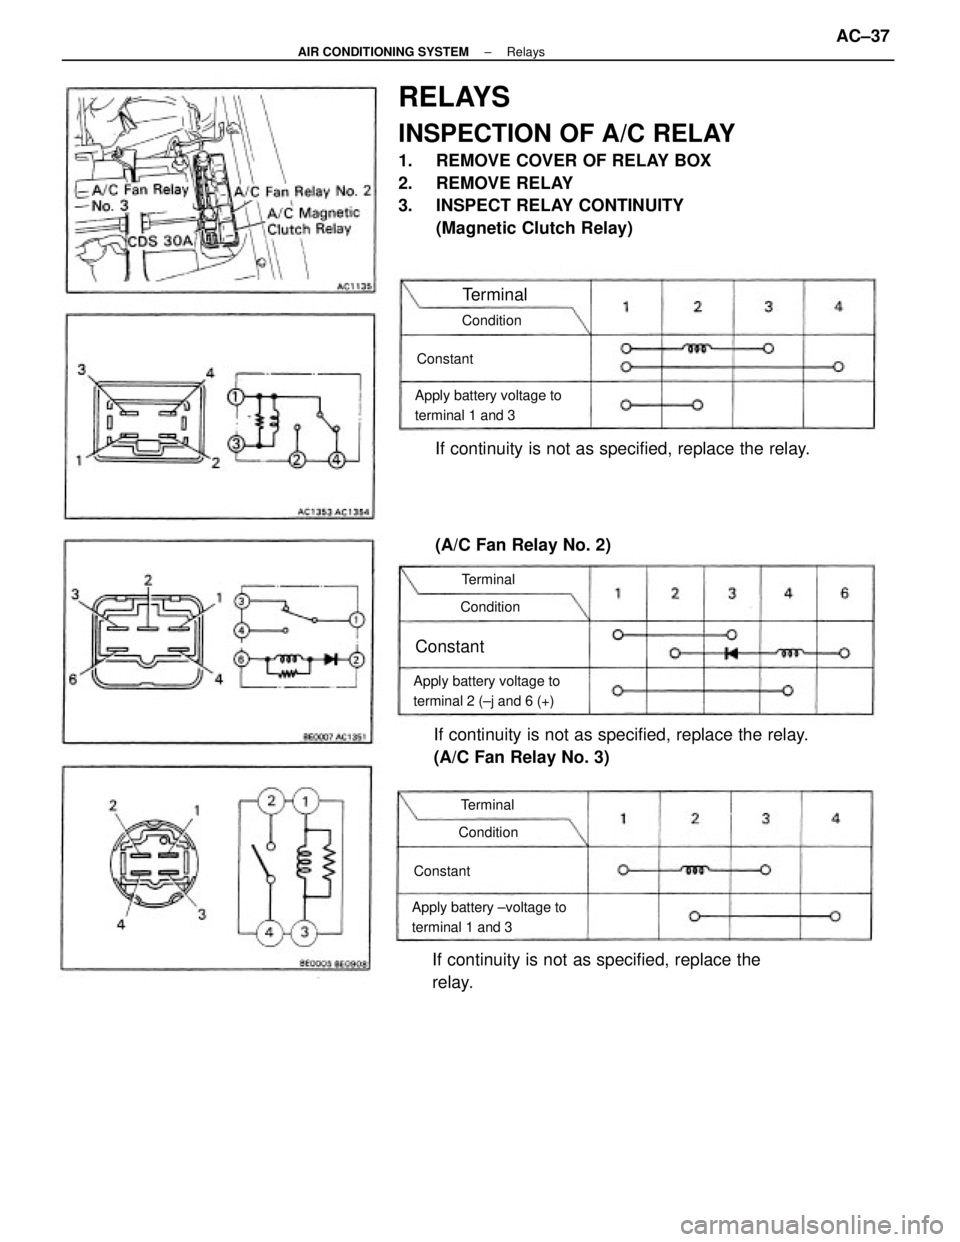
RELAYS
INSPECTION OF A/C RELAY
1. REMOVE COVER OF RELAY BOX
2. REMOVE RELAY
3. INSPECT RELAY CONTINUITY
(Magnetic Clutch Relay)
If continuity is not as specified, replace the relay.
(A/C Fan Relay No. 3)If continuity is not as specified, replace the relay.
If continuity is not as specified, replace the
relay.
Apply battery voltage to
terminal 2 (±j and 6 (+)Apply battery voltage to
terminal 1 and 3
Apply battery ±voltage to
terminal 1 and 3
(A/C Fan Relay No. 2)
Condition
ConditionCondition
Terminal
Terminal
Terminal
Constant
ConstantConstant
± AIR CONDITIONING SYSTEMRelaysAC±37
Page 241 of 2389

WATER TEMPERATURE SWITCH
All±Trae/4WD Model
INSPECT SWITCH CONTINUITY
Inspect the switch continuity.
If detective, replace the water temperature
switch.If continuity is not as specified, replace the
relay. All±Trac/4WD Model
(A/C Cut Relay)
Apply battery voltage to
terminal 1 and 2Terminals
Condition
Constant
± AIR CONDITIONING SYSTEMRelaysAC±38
Page 242 of 2389
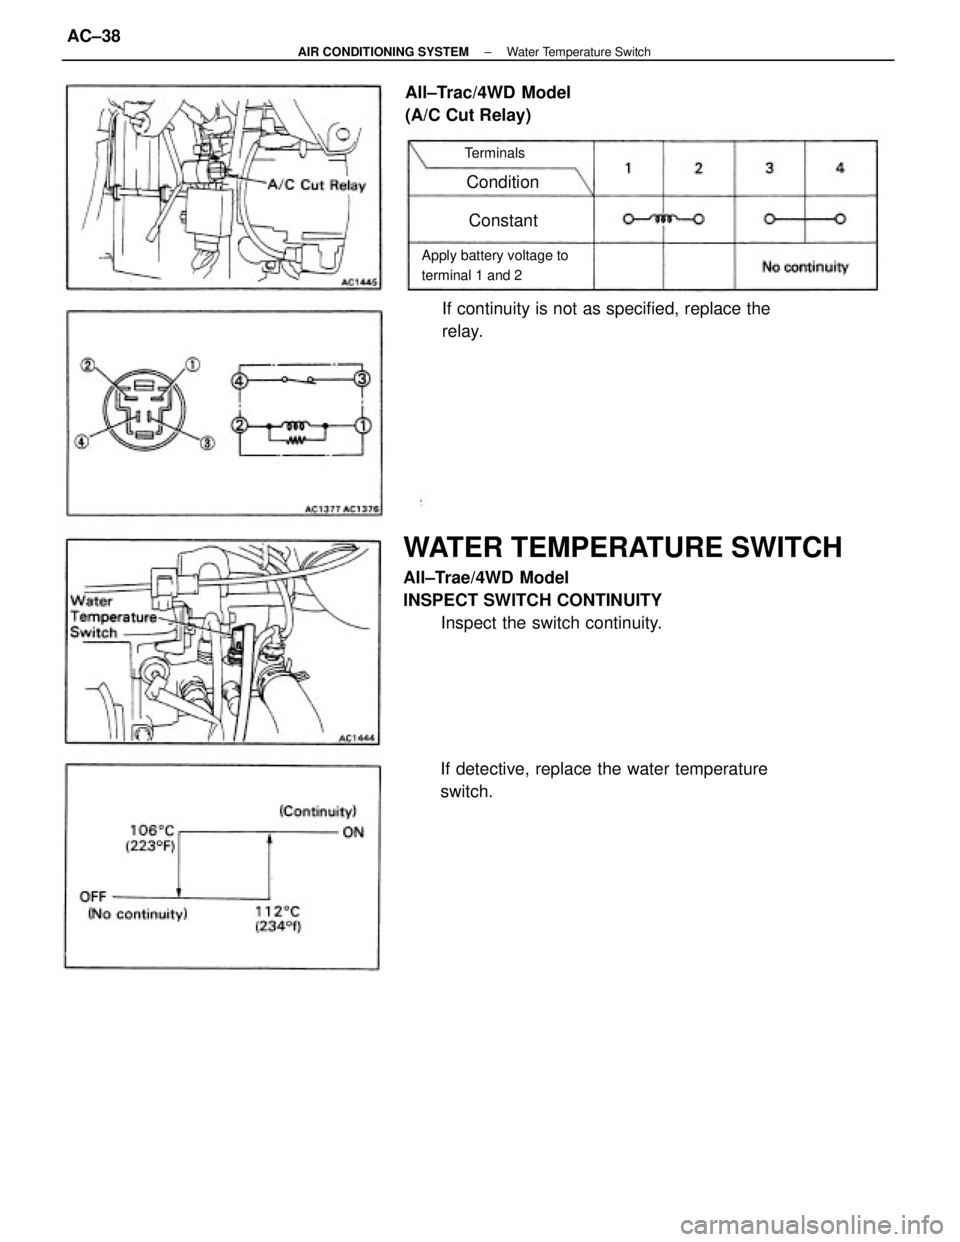
WATER TEMPERATURE SWITCH
All±Trae/4WD Model
INSPECT SWITCH CONTINUITY
Inspect the switch continuity.
If detective, replace the water temperature
switch.If continuity is not as specified, replace the
relay. All±Trac/4WD Model
(A/C Cut Relay)
Apply battery voltage to
terminal 1 and 2Terminals
Condition
Constant
± AIR CONDITIONING SYSTEMWater Temperature SwitchAC±38
Page 760 of 2389
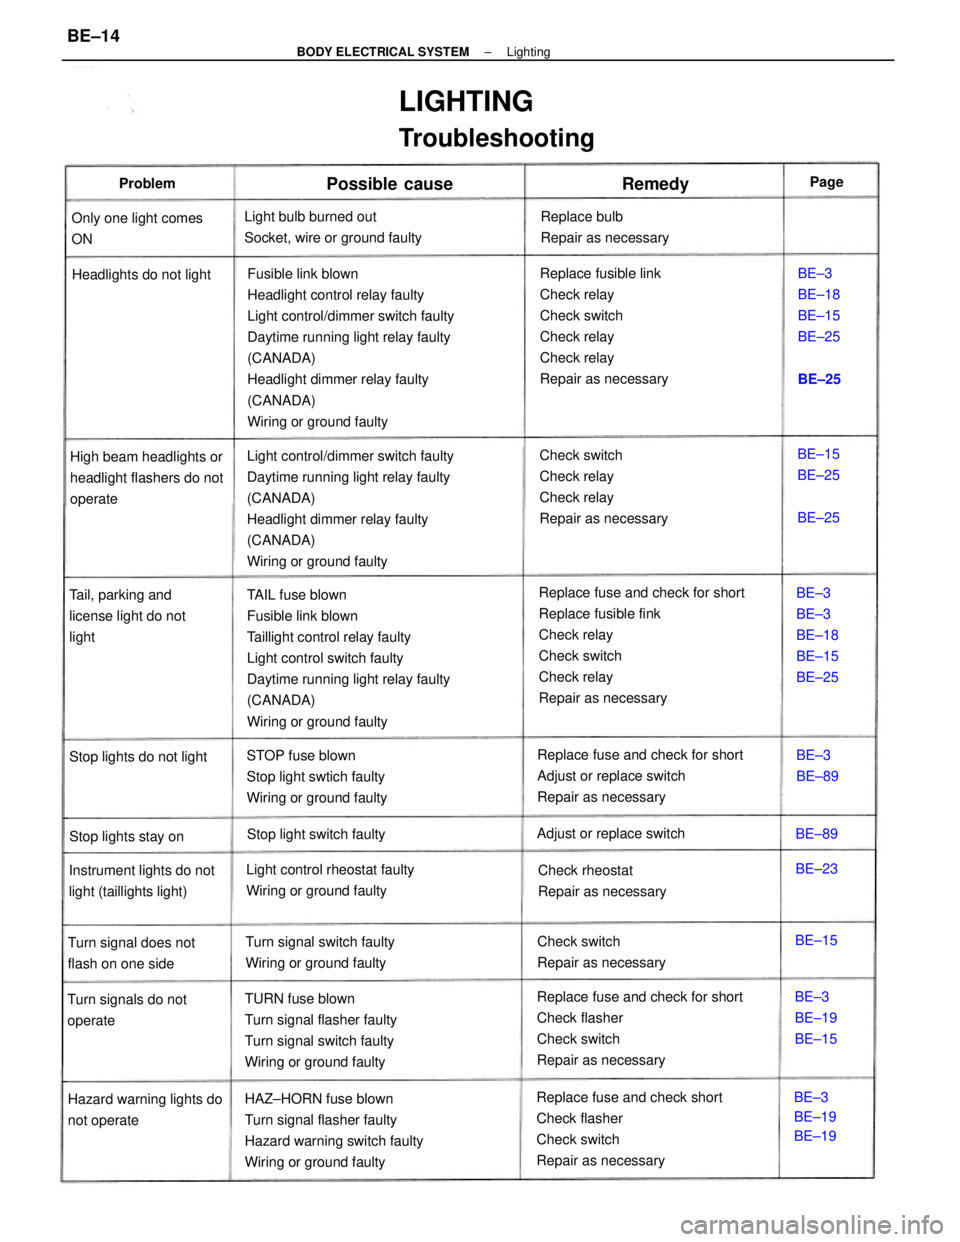
Fusible link blown
Headlight control relay faulty
Light control/dimmer switch faulty
Daytime running light relay faulty
(CANADA)
Headlight dimmer relay faulty
(CANADA)
Wiring or ground faulty
Replace fuse and check for short
Replace fusible fink
Check relay
Check switch
Check relay
Repair as necessary TAIL fuse blown
Fusible link blown
Taillight control relay faulty
Light control switch faulty
Daytime running light relay faulty
(CANADA)
Wiring or ground faulty Light control/dimmer switch faulty
Daytime running light relay faulty
(CANADA)
Headlight dimmer relay faulty
(CANADA)
Wiring or ground faultyReplace fusible link
Check relay
Check switch
Check relay
Check relay
Repair as necessary
Replace fuse and check for short
Check flasher
Check switch
Repair as necessary
Replace fuse and check short
Check flasher
Check switch
Repair as necessary HAZ±HORN fuse blown
Turn signal flasher faulty
Hazard warning switch faulty
Wiring or ground faultyCheck switch
Check relay
Check relay
Repair as necessary
Replace fuse and check for short
Adjust or replace switch
Repair as necessary
TURN fuse blown
Turn signal flasher faulty
Turn signal switch faulty
Wiring or ground faulty
LIGHTING
Troubleshooting
STOP fuse blown
Stop light swtich faulty
Wiring or ground faulty Light bulb burned out
Socket, wire or ground faulty
High beam headlights or
headlight flashers do not
operate
Light control rheostat faulty
Wiring or ground faulty Instrument lights do not
light (taillights light)Tail, parking and
license light do not
light
Turn signal switch faulty
Wiring or ground faulty
Hazard warning lights do
not operateReplace bulb
Repair as necessary
Headlights do not light
Check switch
Repair as necessaryCheck rheostat
Repair as necessary Only one light comes
ON
Turn signal does not
flash on one side
Turn signals do not
operateBE±3
BE±3
BE±18
BE±15
BE±25
Adjust or replace switch
Stop light switch faultyBE±3
BE±18
BE±15
BE±25
Stop lights do not light
Stop lights stay on
BE±3
BE±19
BE±19BE±3
BE±19
BE±15
Possible cause
BE±15
BE±25
BE±3
BE±89
RemedyProblem
BE±15BE±23 BE±89BE±25
BE±25Page
± BODY ELECTRICAL SYSTEMLightingBE±14
Page 764 of 2389
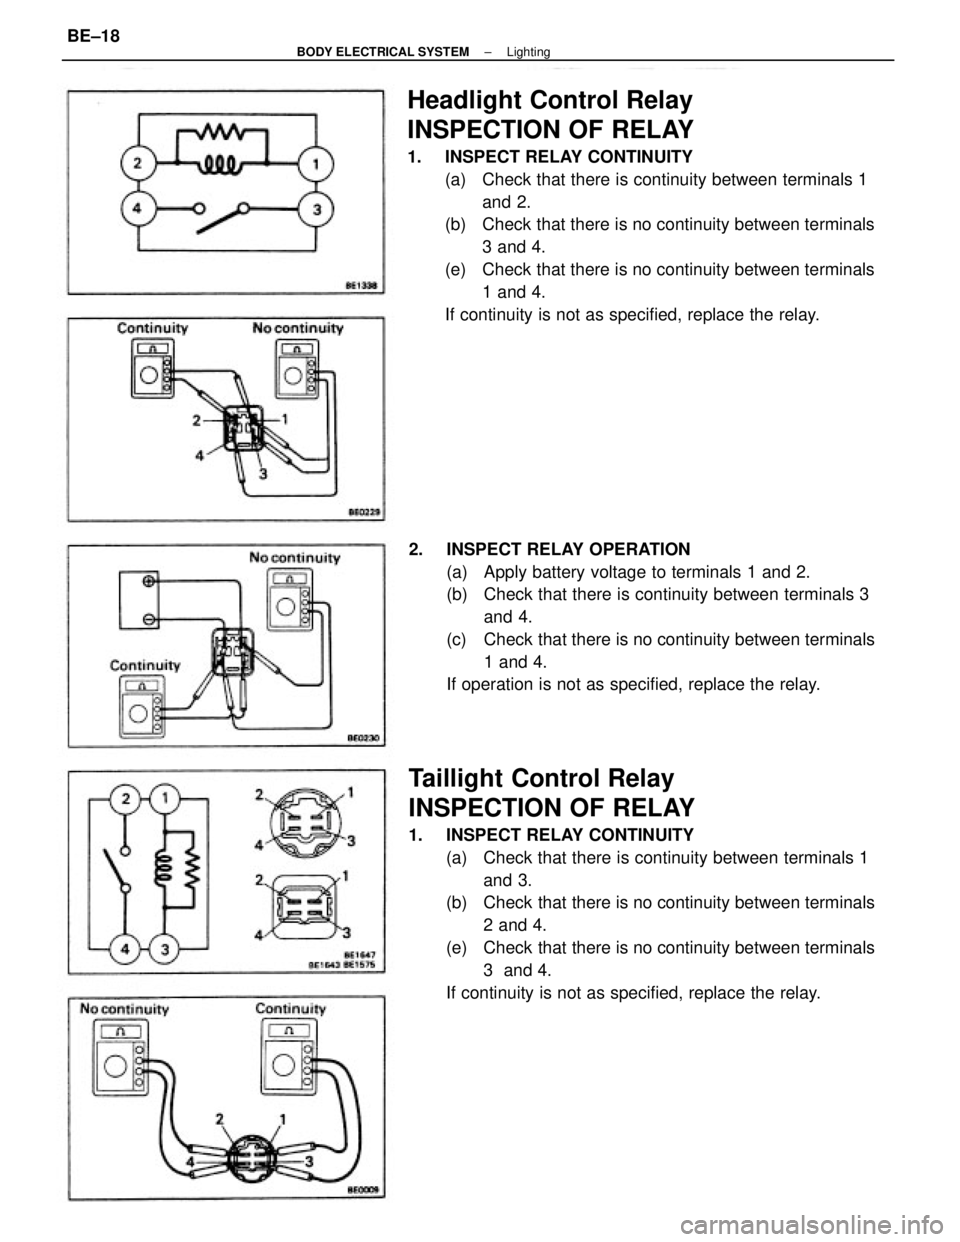
Taillight Control Relay
INSPECTION OF RELAY
1. INSPECT RELAY CONTINUITY
(a) Check that there is continuity between terminals 1
and 3.
(b) Check that there is no continuity between terminals
2 and 4.
(e) Check that there is no continuity between terminals
3 and 4.
If continuity is not as specified, replace the relay.
Headlight Control Relay
INSPECTION OF RELAY
1. INSPECT RELAY CONTINUITY
(a) Check that there is continuity between terminals 1
and 2.
(b) Check that there is no continuity between terminals
3 and 4.
(e) Check that there is no continuity between terminals
1 and 4.
If continuity is not as specified, replace the relay.
2. INSPECT RELAY OPERATION
(a) Apply battery voltage to terminals 1 and 2.
(b) Check that there is continuity between terminals 3
and 4.
(c) Check that there is no continuity between terminals
1 and 4.
If operation is not as specified, replace the relay.
± BODY ELECTRICAL SYSTEMLightingBE±18
Page 765 of 2389
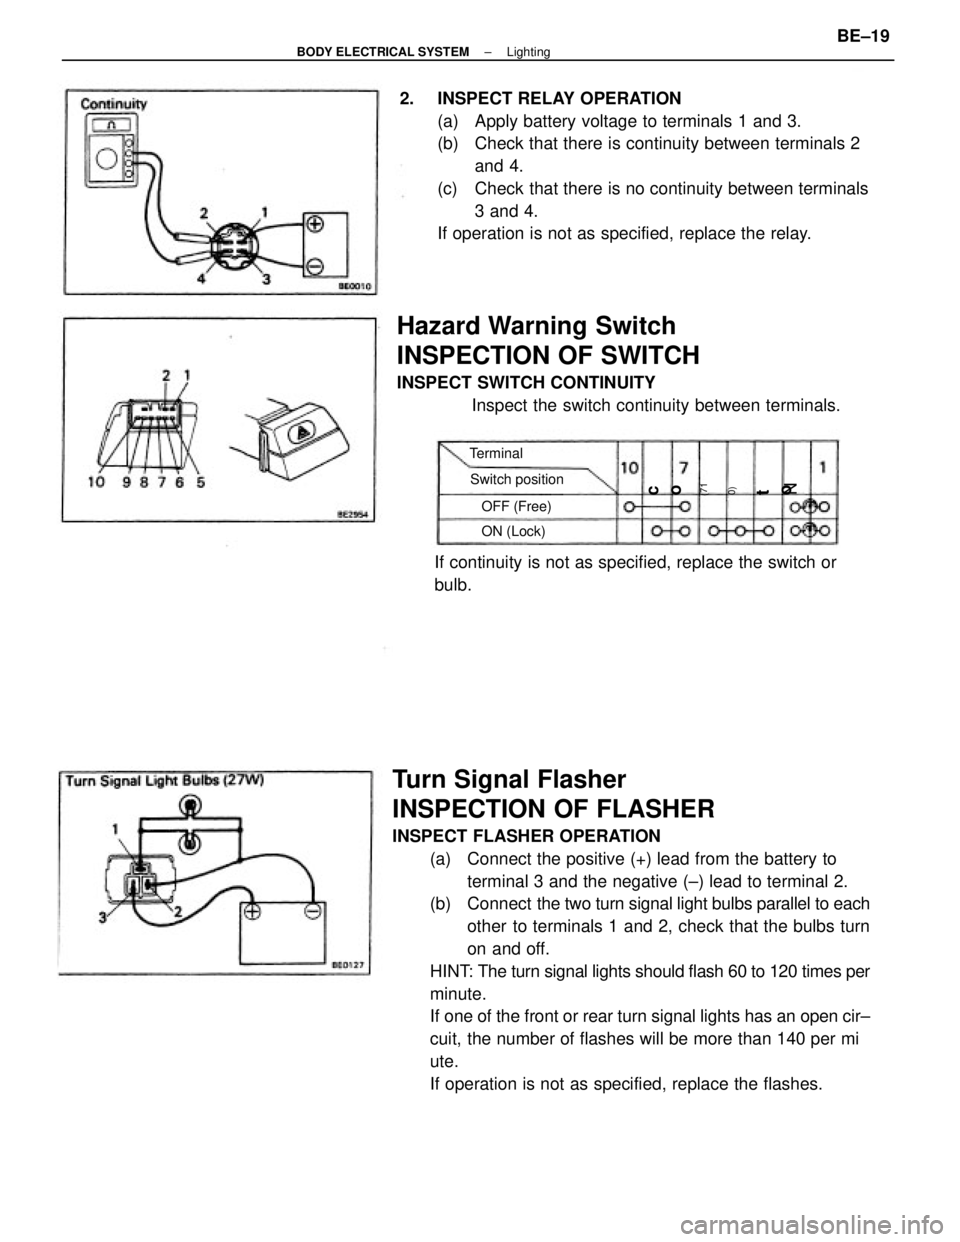
Turn Signal Flasher
INSPECTION OF FLASHER
INSPECT FLASHER OPERATION
(a) Connect the positive (+) lead from the battery to
terminal 3 and the negative (±) lead to terminal 2.
(b) Connect the two turn signal light bulbs parallel to each
other to terminals 1 and 2, check that the bulbs turn
on and off.
HINT: The turn signal lights should flash 60 to 120 times per
minute.
If one of the front or rear turn signal lights has an open cir±
cuit, the number of flashes will be more than 140 per mi
ute.
If operation is not as specified, replace the flashes. 2. INSPECT RELAY OPERATION
(a) Apply battery voltage to terminals 1 and 3.
(b) Check that there is continuity between terminals 2
and 4.
(c) Check that there is no continuity between terminals
3 and 4.
If operation is not as specified, replace the relay.
Hazard Warning Switch
INSPECTION OF SWITCH
INSPECT SWITCH CONTINUITY
Inspect the switch continuity between terminals.
If continuity is not as specified, replace the switch or
bulb.
Switch position
OFF (Free)
ON (Lock) Terminal0)c
o
N t
o(71
± BODY ELECTRICAL SYSTEMLightingBE±19
Page 766 of 2389
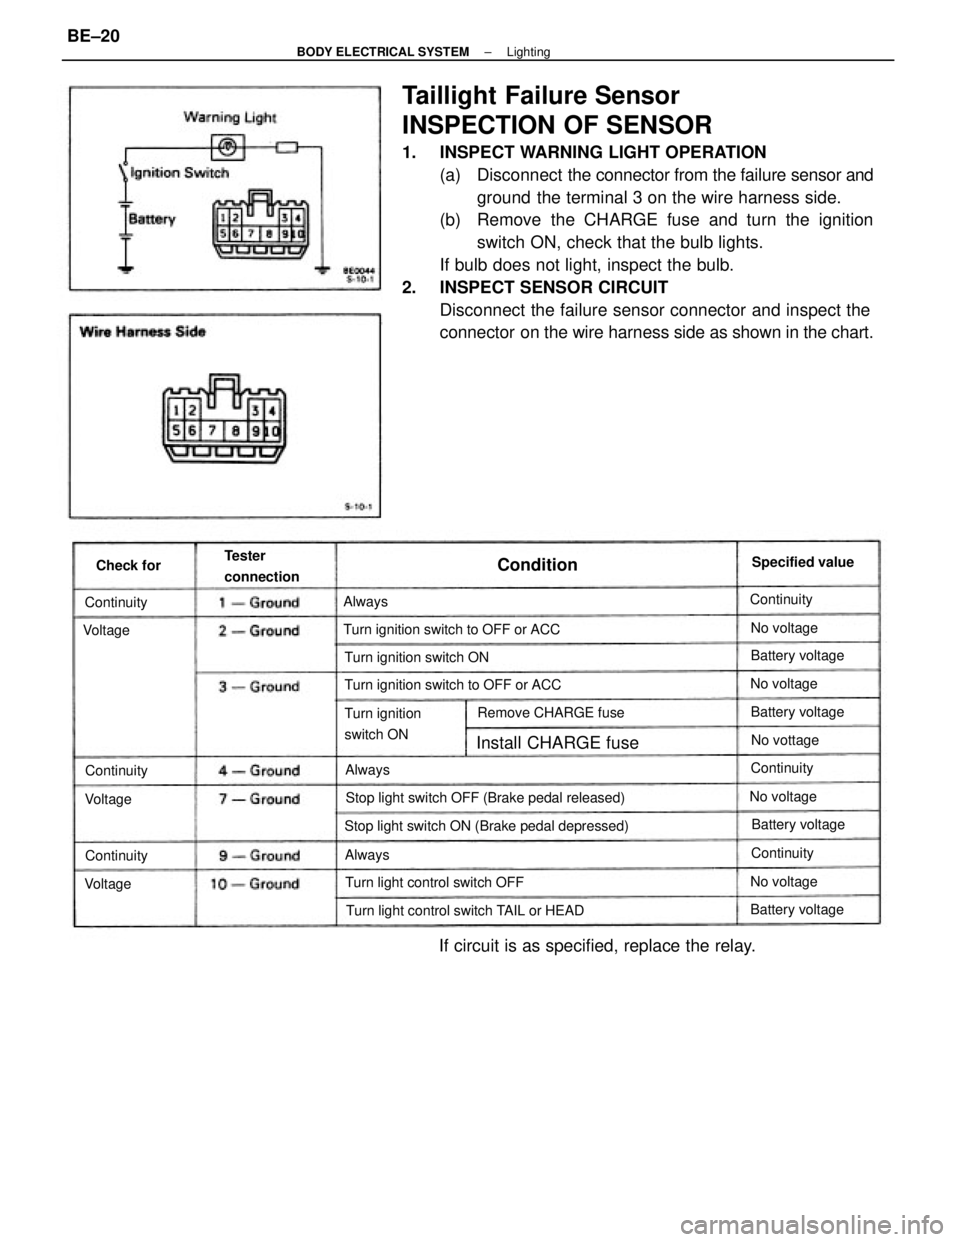
Taillight Failure Sensor
INSPECTION OF SENSOR
1. INSPECT WARNING LIGHT OPERATION
(a) Disconnect the connector from the failure sensor and
ground the terminal 3 on the wire harness side.
(b) Remove the CHARGE fuse and turn the ignition
switch ON, check that the bulb lights.
If bulb does not light, inspect the bulb.
2. INSPECT SENSOR CIRCUIT
Disconnect the failure sensor connector and inspect the
connector on the wire harness side as shown in the chart.
If circuit is as specified, replace the relay.
Stop light switch ON (Brake pedal depressed)Stop light switch OFF (Brake pedal released)
Turn light control switch TAIL or HEAD Turn ignition switch to OFF or ACC Turn ignition switch to OFF or ACC
Turn light control switch OFF Turn ignition switch ON
Remove CHARGE fuse
Turn ignition
switch ON
Install CHARGE fuse
Tester
connectionSpecified value
Battery voltage
Battery voltage
Battery voltageBattery voltage
No voltage Continuity
No voltageContinuityNo vottage No voltage Continuity
ContinuityNo voltage
Continuity ContinuityConditionCheck for
Voltage Voltage
VoltageAlways
AlwaysAlways
± BODY ELECTRICAL SYSTEMLightingBE±20
Page 768 of 2389
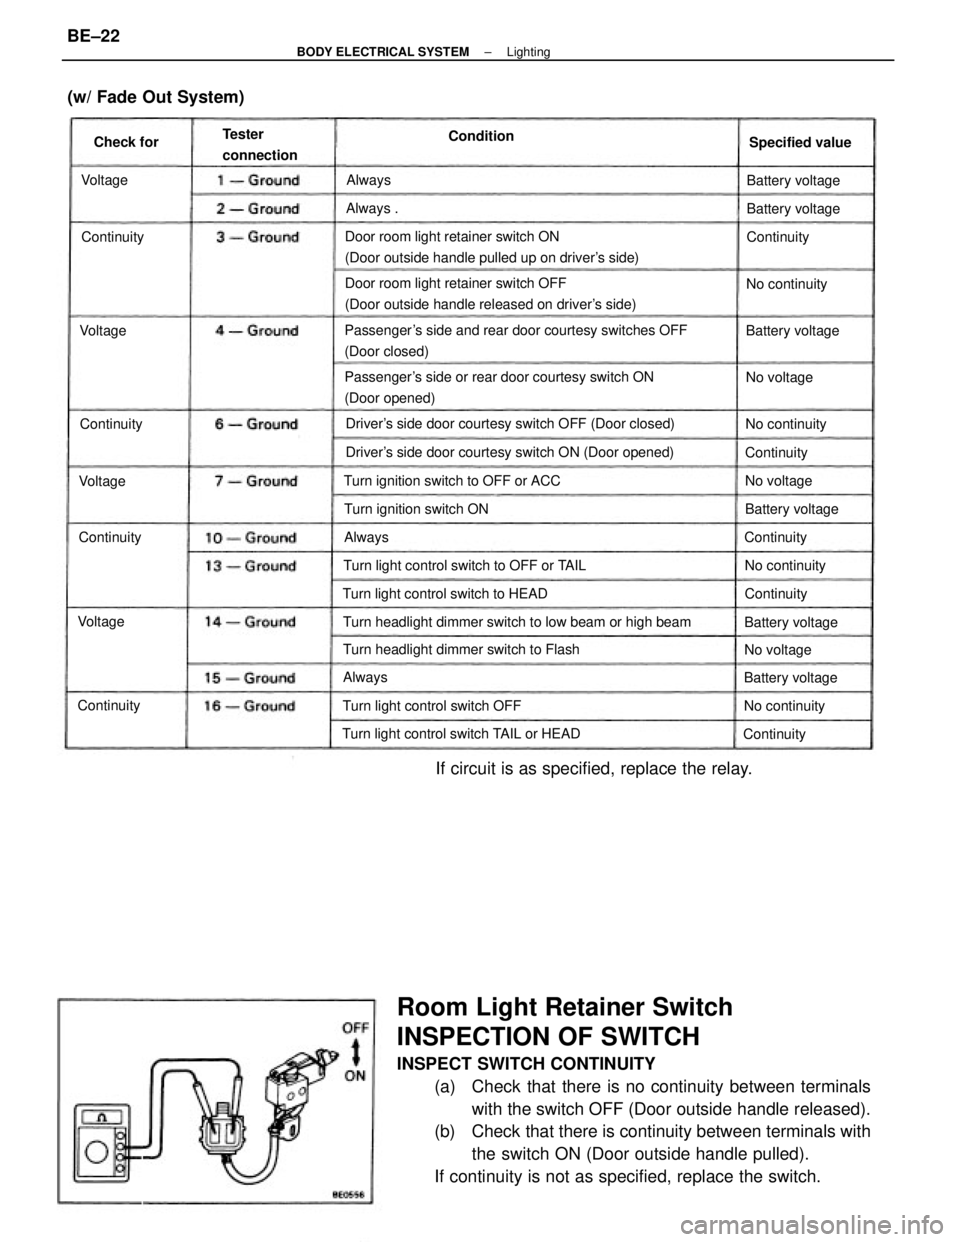
Room Light Retainer Switch
INSPECTION OF SWITCH
INSPECT SWITCH CONTINUITY
(a) Check that there is no continuity between terminals
with the switch OFF (Door outside handle released).
(b) Check that there is continuity between terminals with
the switch ON (Door outside handle pulled).
If continuity is not as specified, replace the switch.
Passenger's side and rear door courtesy switches OFF
(Door closed)
Passenger's side or rear door courtesy switch ON
(Door opened)Door room light retainer switch ON
(Door outside handle pulled up on driver's side)
Door room light retainer switch OFF
(Door outside handle released on driver's side)
Turn headlight dimmer switch to low beam or high beamDriver's side door courtesy switch ON (Door opened) Driver's side door courtesy switch OFF (Door closed)
If circuit is as specified, replace the relay.
Turn light control switch to OFF or TAIL
Turn light control switch TAIL or HEADTurn headlight dimmer switch to FlashTurn ignition switch to OFF or ACC
Turn light control switch to HEAD
Turn light control switch OFF
(w/ Fade Out System)
Condition
Turn ignition switch ON Tester
connectionSpecified value
Battery voltage
Battery voltageBattery voltage
Battery voltageBattery voltage
Battery voltageNo continuity
No continuity
No continuityNo continuity
No voltage
No voltageNo voltage
ContinuityContinuity
Continuity ContinuityContinuity
Continuity Continuity
ContinuityContinuity Always . Check for
Voltage
VoltageVoltage
Voltage
Always
AlwaysAlways
± BODY ELECTRICAL SYSTEMLightingBE±22
Page 769 of 2389
Current is led from the battery to terminal 12 of the running light relay.
Operation examples of the switch are shown below.
1. IGNITION SWITCH ºONº AND LIGHT CONTROL SWITCH ºOFFº
When the switches are set, current is led from the battery to terminal 1 of the running light relay. Also,
because continuity is made between terminal 3 and the body ground, and 5 and the body ground of
the running light relay, the taillight control relay and headlight control relay are turned on.
Then the taillights and headlights light up.
HINT: Because terminal 14 of the running light relay is not grounded at all times, the headlight dimmer
relay is off, so that the headlights light up at the low beam.
2. LIGHT CONTROL SWITCH IN ºHEADº
When the switch is set, continuity is made between terminal 4 and the body ground, and 2 and the body
ground of the running light relay. Also, because the continuity is made between terminal 5 and the body
ground, and 3 and the body ground of the running light relay at all times, the taillights and headlights
light up.
HINT: When the headlight dimmer switch is set to ºHIGHº, continuity is made between terminal 13 of
the running light relay and the body ground. Also, because continuity is made between terminal 14 of
the running light relay and the body ground, the headlight dimmer relay is turned on. Then the head-
lights go on at the high beam.
3. HEADLIGHT DIMMER SWITCH IN ºFLASHº
When the switch is set, continuity is made between terminal 6 and the body ground, and 13 and the
body ground of the running light relay. Also, because the continuity is made between terminal 5 and
the body ground, and 14 and the body ground of the running light relay, the headlights flash.
4. ENGINE STOPS (IGNITION SWITCH ºONº)
When the engine is stopped, because the continuity between terminal 5 and terminal 10 of the running
light relay remains, so the running lights also remain.
HINT: If ignition switch is turned to ºOFFº, running lights will go off because the continuity between termi-
nal 5 and terminal 10 of the running light relay is cut off.
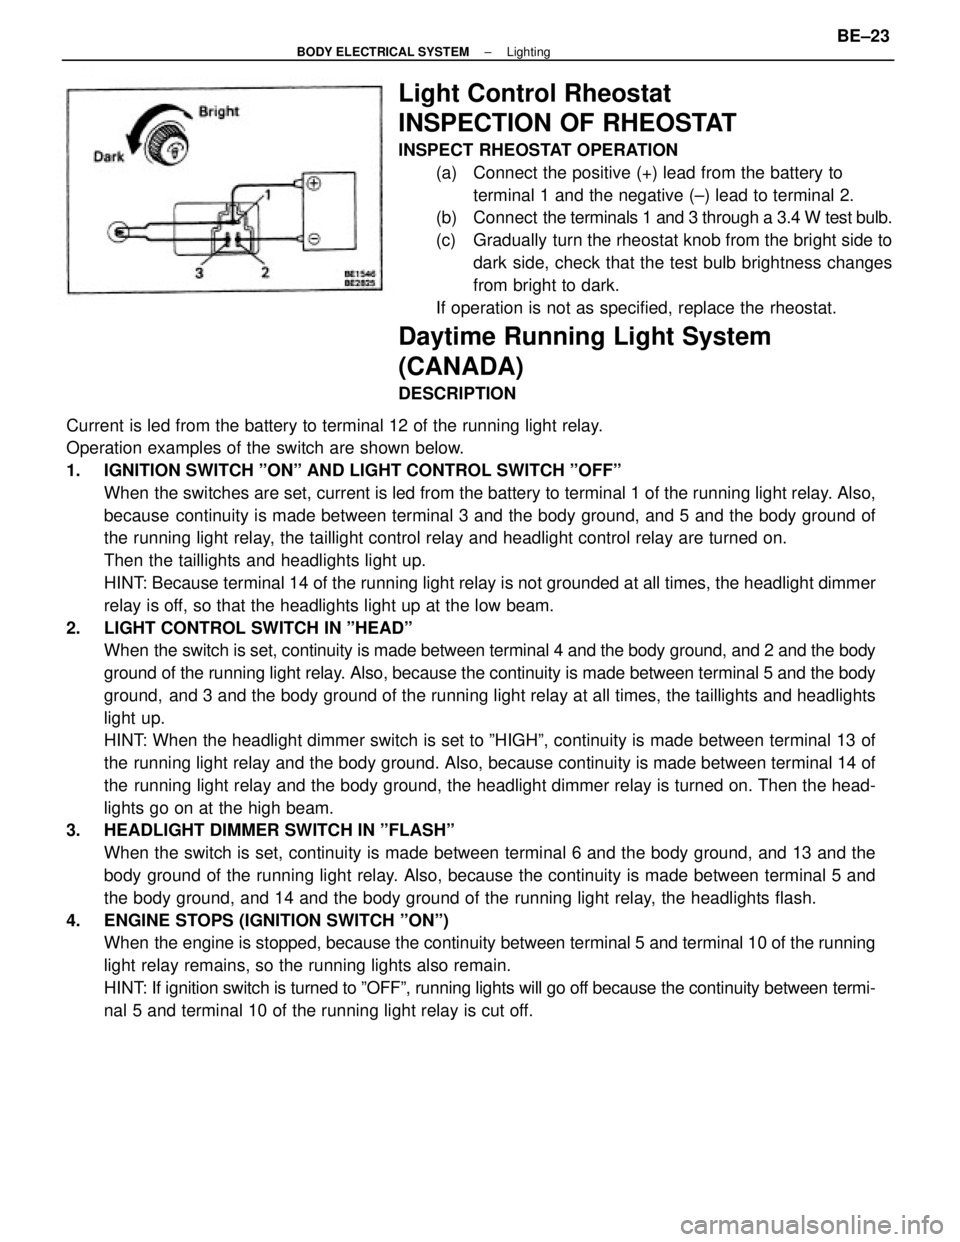
Light Control Rheostat
INSPECTION OF RHEOSTAT
INSPECT RHEOSTAT OPERATION
(a) Connect the positive (+) lead from the battery to
terminal 1 and the negative (±) lead to terminal 2.
(b) Connect the terminals 1 and 3 through a 3.4 W test bulb.
(c) Gradually turn the rheostat knob from the bright side to
dark side, check that the test bulb brightness changes
from bright to dark.
If operation is not as specified, replace the rheostat.
Daytime Running Light System
(CANADA)
DESCRIPTION
± BODY ELECTRICAL SYSTEMLightingBE±23