Button TOYOTA COROLLA 2014 11.G Owners Manual
[x] Cancel search | Manufacturer: TOYOTA, Model Year: 2014, Model line: COROLLA, Model: TOYOTA COROLLA 2014 11.GPages: 612, PDF Size: 12.58 MB
Page 20 of 612
20Pictorial index
COROLLA_TMMMS_TMMC_U (OM12F00U)
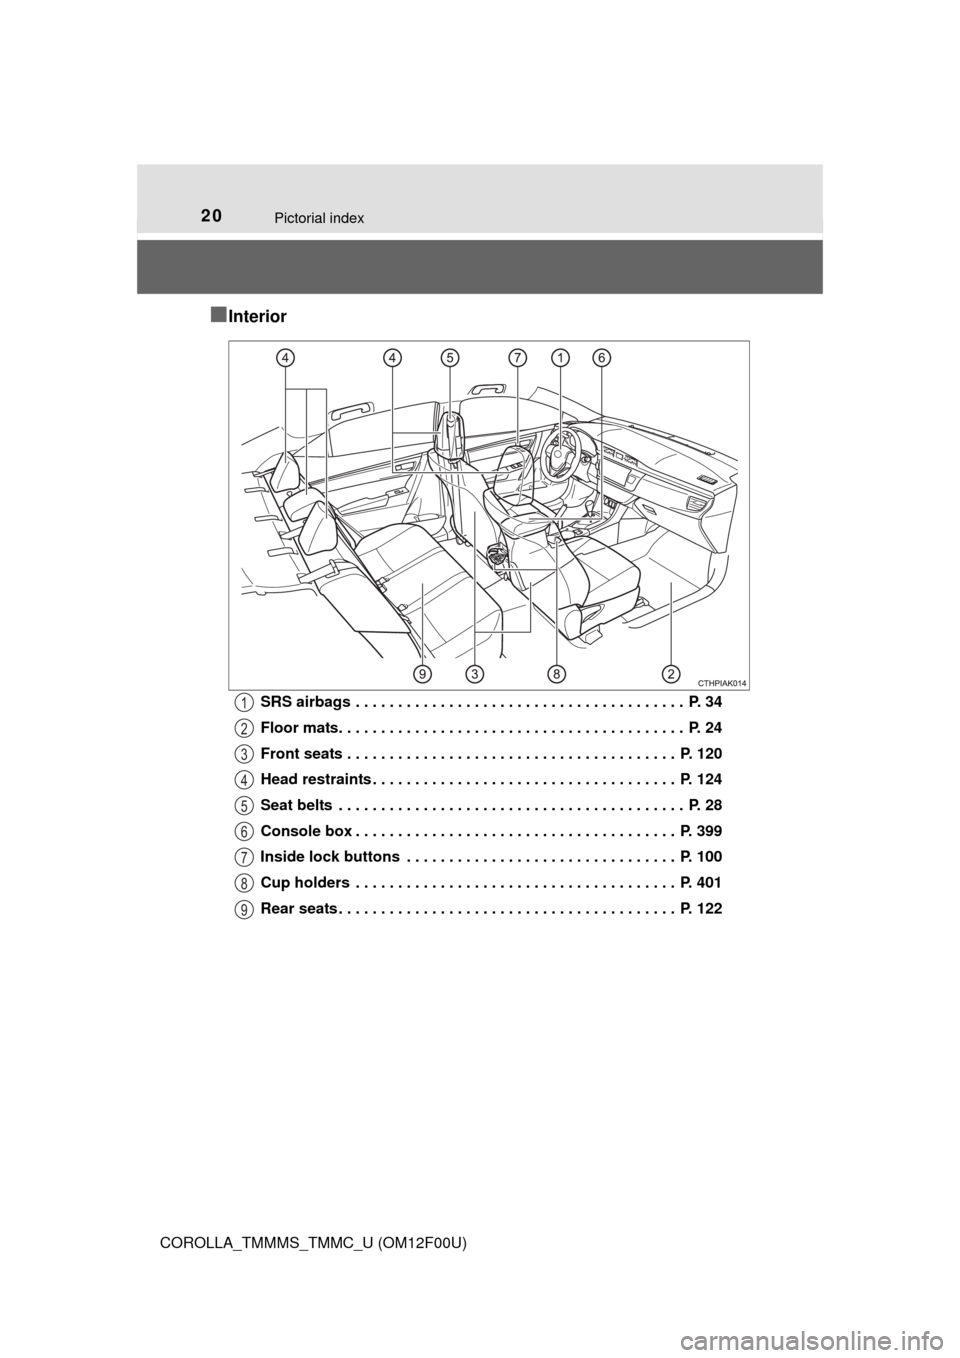
■Interior
SRS airbags . . . . . . . . . . . . . . . . . . . . . . . . . . . . . . . . . . . . . . . P. 34
Floor mats. . . . . . . . . . . . . . . . . . . . . . . . . . . . . . . . . . . . . . . . . P. 24
Front seats . . . . . . . . . . . . . . . . . . . . . . . . . . . . . . . . . . . . . . . P. 120
Head restraints . . . . . . . . . . . . . . . . . . . . . . . . . . . . . . . . . . . . P. 124
Seat belts . . . . . . . . . . . . . . . . . . . . . . . . . . . . . . . . . . . . . . . . . P. 28
Console box . . . . . . . . . . . . . . . . . . . . . . . . . . . . . . . . . . . . . . P. 399
Inside lock buttons . . . . . . . . . . . . . . . . . . . . . . . . . . . . . . . . P. 100
Cup holders . . . . . . . . . . . . . . . . . . . . . . . . . . . . . . . . . . . . . . P. 401
Rear seats . . . . . . . . . . . . . . . . . . . . . . . . . . . . . . . . . . . . . . . . P. 1221
2
3
4
5
6
7
8
9
Page 28 of 612
281-1. For safe use
COROLLA_TMMMS_TMMC_U (OM12F00U)
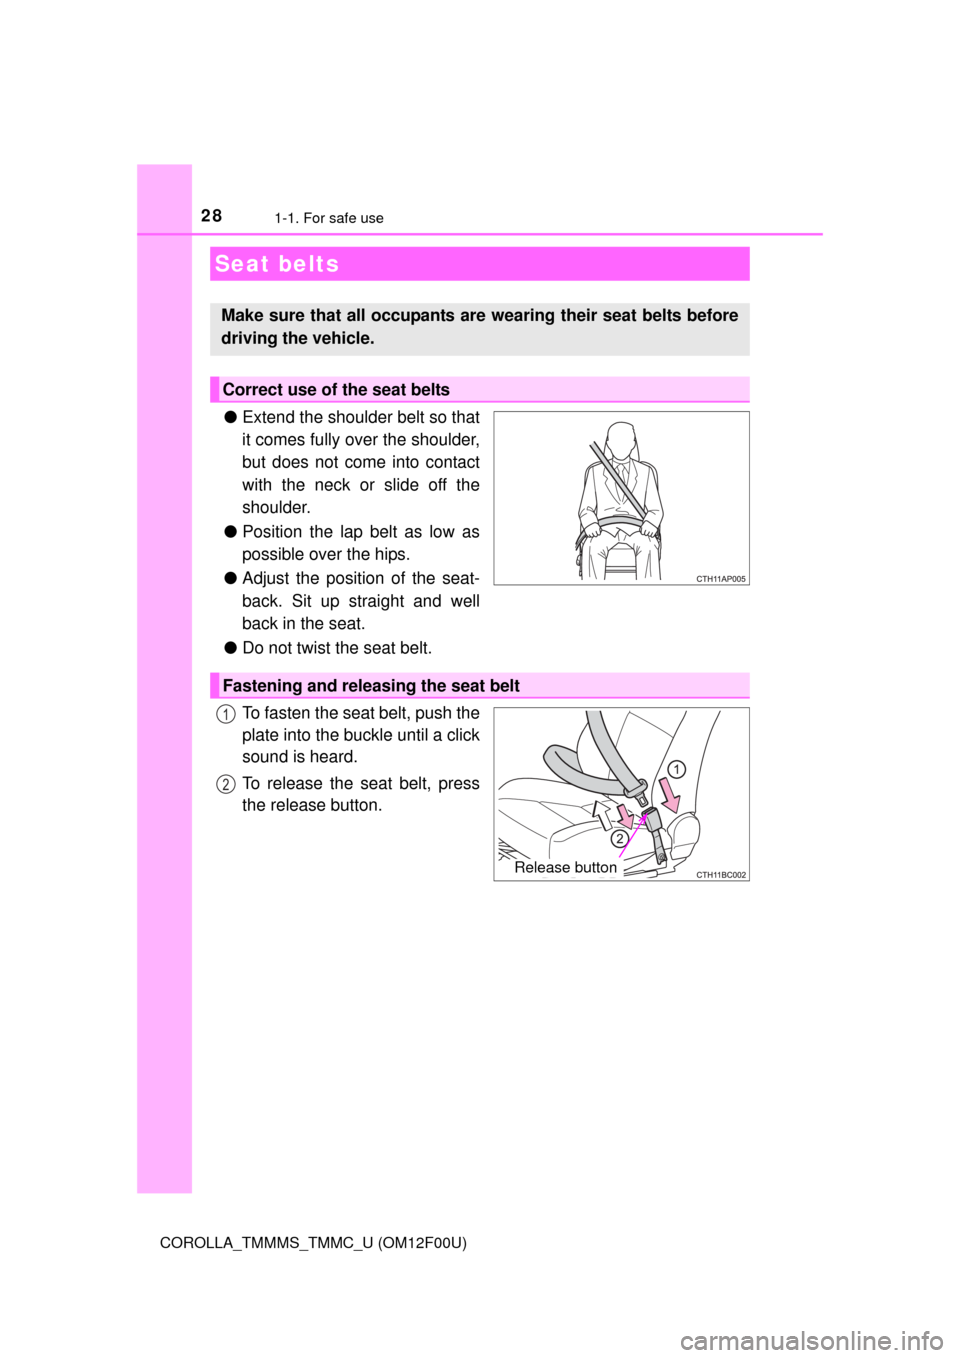
●Extend the shoulder belt so that
it comes fully over the shoulder,
but does not come into contact
with the neck or slide off the
shoulder.
●Position the lap belt as low as
possible over the hips.
●Adjust the position of the seat-
back. Sit up straight and well
back in the seat.
●Do not twist the seat belt.
To fasten the seat belt, push the
plate into the buckle until a click
sound is heard.
To release the seat belt, press
the release button.
Seat belts
Make sure that all occupants are wearing their seat belts before
driving the vehicle.
Correct use of the seat belts
Fastening and releasing the seat belt
Release button
1
2
Page 29 of 612
291-1. For safe use
1
For safety and security
COROLLA_TMMMS_TMMC_U (OM12F00U)
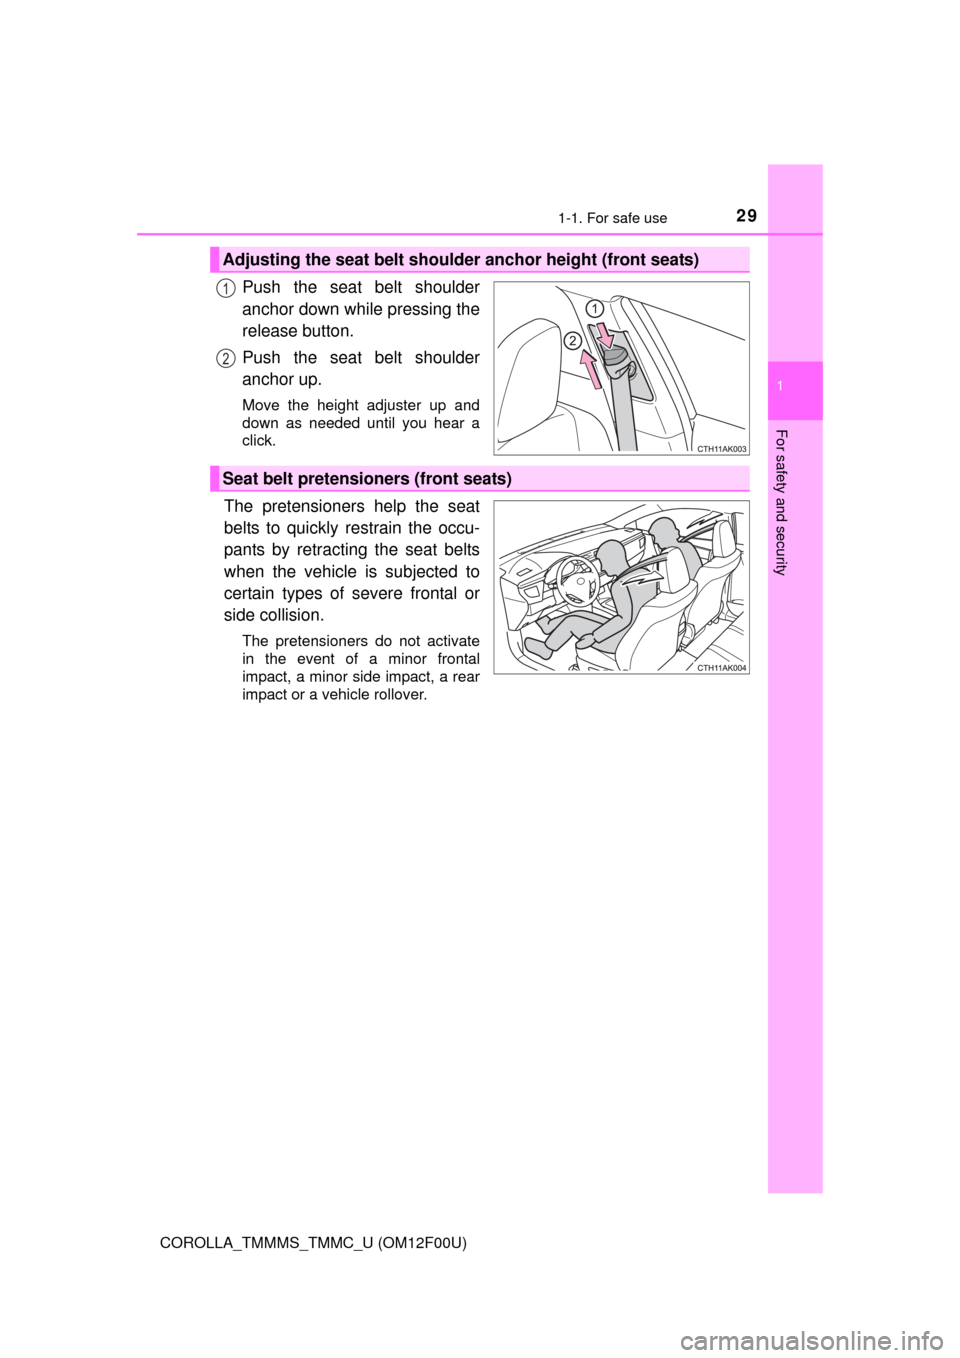
Push the seat belt shoulder
anchor down while pressing the
release button.
Push the seat belt shoulder
anchor up.
Move the height adjuster up and
down as needed until you hear a
click.
The pretensioners help the seat
belts to quickly restrain the occu-
pants by retracting the seat belts
when the vehicle is subjected to
certain types of severe frontal or
side collision.
The pretensioners do not activate
in the event of a minor frontal
impact, a minor side impact, a rear
impact or a vehicle rollover.
Adjusting the seat belt shoulder anchor height (front seats)
1
2
Seat belt pretensioners (front seats)
Page 33 of 612
331-1. For safe use
1
For safety and security
COROLLA_TMMMS_TMMC_U (OM12F00U)
CAUTION
■Using a seat belt extender
●Do not wear the seat belt extender if you can fasten the seat belt without
the extender.
●Do not use the seat belt extender when installing a child restraint system
because the belt will not securely hold the child restraint system, increas-
ing the risk of death or serious injury in the event of an accident.
●The personalized extender may not be safe on another vehicle, when
used by another person, or at a different seating position other than the
one originally intended.
NOTICE
■When using a seat belt extender
When releasing the seat belt, press on the buckle release button on the
extender, not on the seat belt.
This helps prevent damage to the vehicle interior and the extender itself.
Page 57 of 612
571-1. For safe use
1
For safety and security
COROLLA_TMMMS_TMMC_U (OM12F00U)
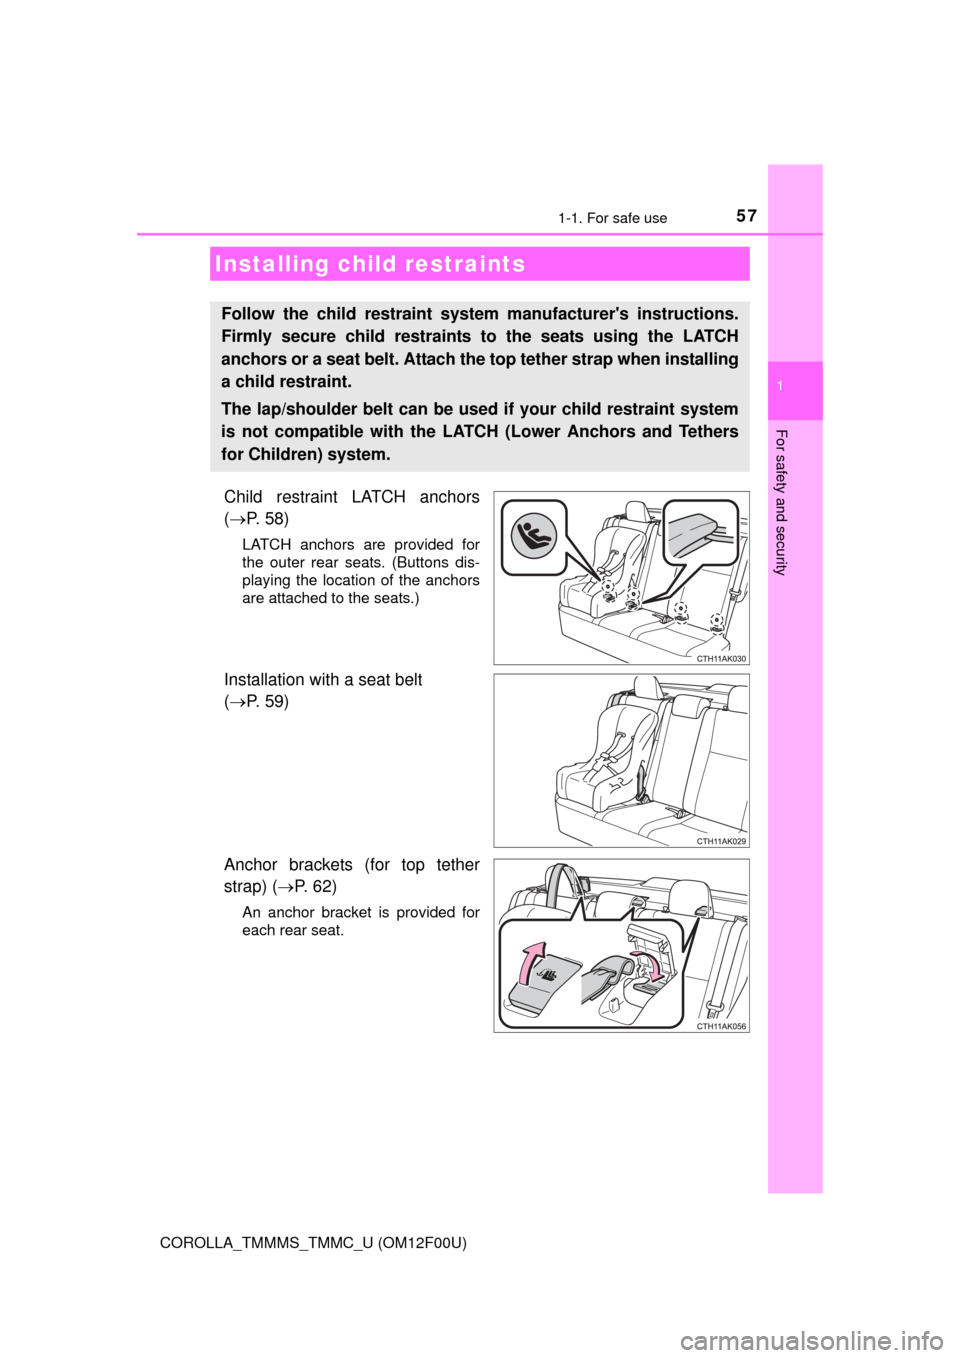
Child restraint LATCH anchors
(P. 58)
LATCH anchors are provided for
the outer rear seats. (Buttons dis-
playing the location of the anchors
are attached to the seats.)
Installation with a seat belt
(P. 59)
Anchor brackets (for top tether
strap) (P. 6 2 )
An anchor bracket is provided for
each rear seat.
Installing child restraints
Follow the child restraint system manufacturer's instructions.
Firmly secure child restraints to the seats using the LATCH
anchors or a seat belt. Attach the top tether strap when installing
a child restraint.
The lap/shoulder belt can be used if your child restraint system
is not compatible with the LATCH (Lower Anchors and Tethers
for Children) system.
Page 61 of 612
611-1. For safe use
1
For safety and security
COROLLA_TMMMS_TMMC_U (OM12F00U)■
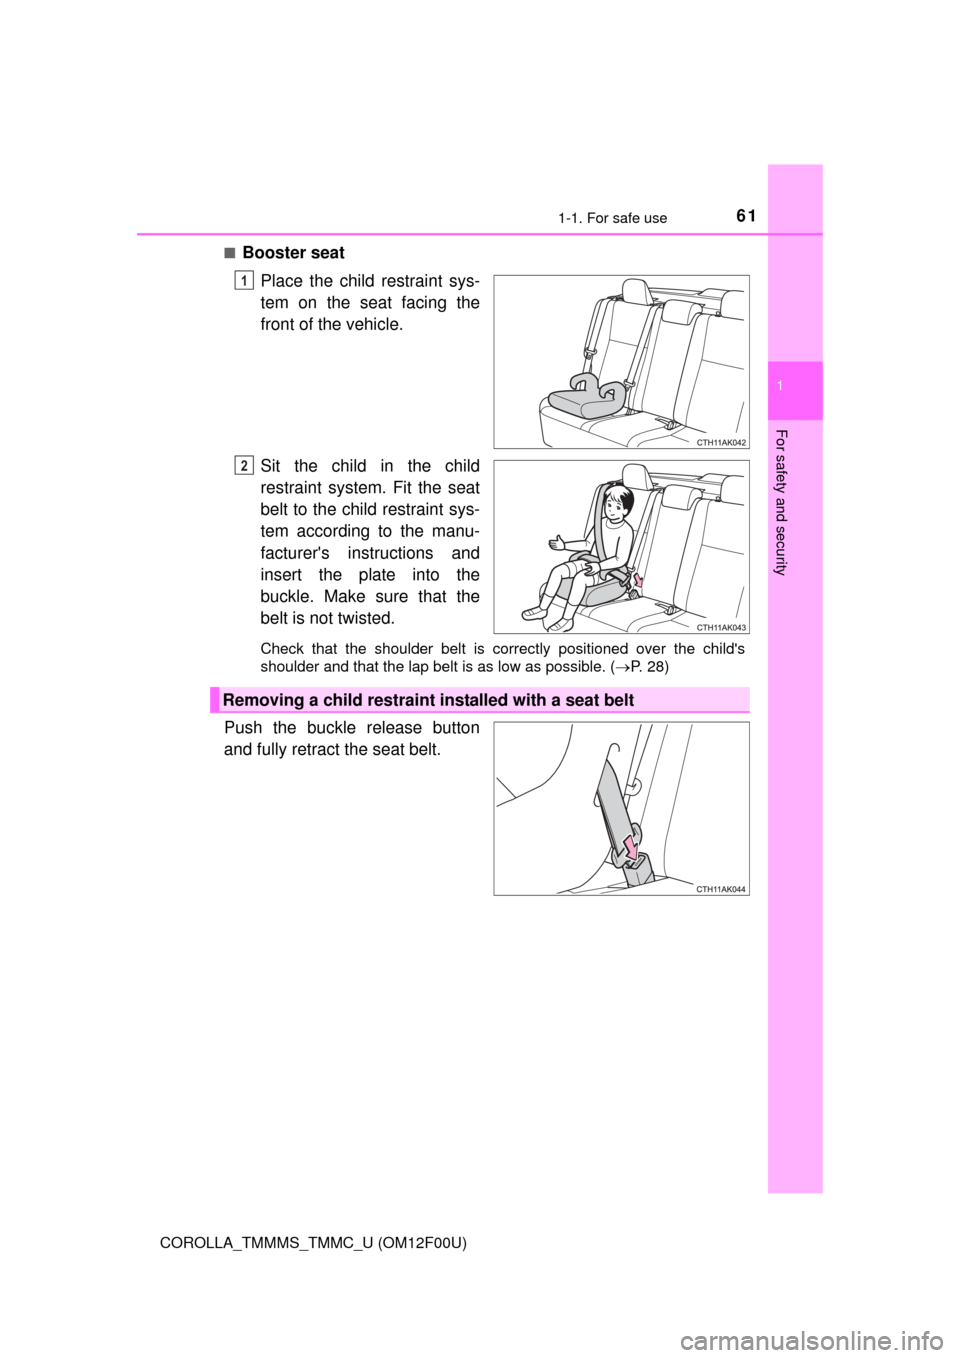
Booster seat
Place the child restraint sys-
tem on the seat facing the
front of the vehicle.
Sit the child in the child
restraint system. Fit the seat
belt to the child restraint sys-
tem according to the manu-
facturer's instructions and
insert the plate into the
buckle. Make sure that the
belt is not twisted.
Check that the shoulder belt is correctly positioned over the child's
shoulder and that the lap belt is as low as possible. (P. 28)
Push the buckle release button
and fully retract the seat belt.
1
2
Removing a child restraint installed with a seat belt
Page 69 of 612
691-2. Theft deterrent system
1
For safety and security
COROLLA_TMMMS_TMMC_U (OM12F00U)
■System maintenance
The vehicle has a maintenance-free type alarm system.
■Items to check before locking the vehicle
To prevent unexpected triggering of the alarm and vehicle theft, make sure of
the following:
●Nobody is in the vehicle.
●The windows and moon roof are closed before the alarm is set.
●No valuables or other personal items are left in the vehicle.
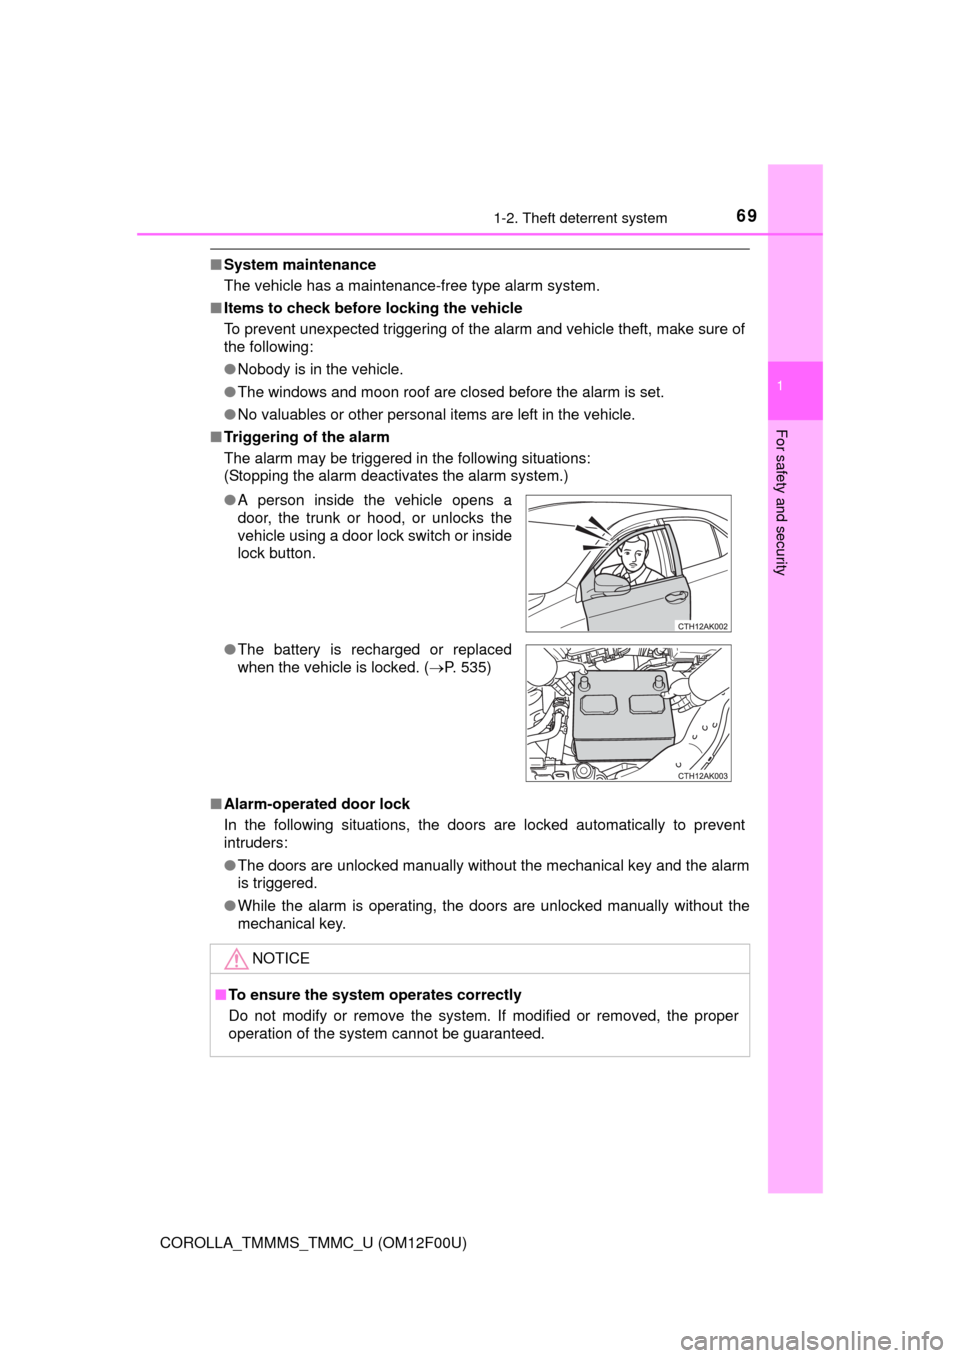
■Triggering of the alarm
The alarm may be triggered in the following situations:
(Stopping the alarm deactivates the alarm system.)
■Alarm-operated door lock
In the following situations, the doors are locked automatically to prevent
intruders:
●The doors are unlocked manually without the mechanical key and the alarm
is triggered.
●While the alarm is operating, the doors are unlocked manually without the
mechanical key. ●A person inside the vehicle opens a
door, the trunk or hood, or unlocks the
vehicle using a door lock switch or inside
lock button.
●The battery is recharged or replaced
when the vehicle is locked. (P. 535)
NOTICE
■To ensure the system operates correctly
Do not modify or remove the system. If modified or removed, the proper
operation of the system cannot be guaranteed.
Page 82 of 612
822. Instrument cluster
COROLLA_TMMMS_TMMC_U (OM12F00U)
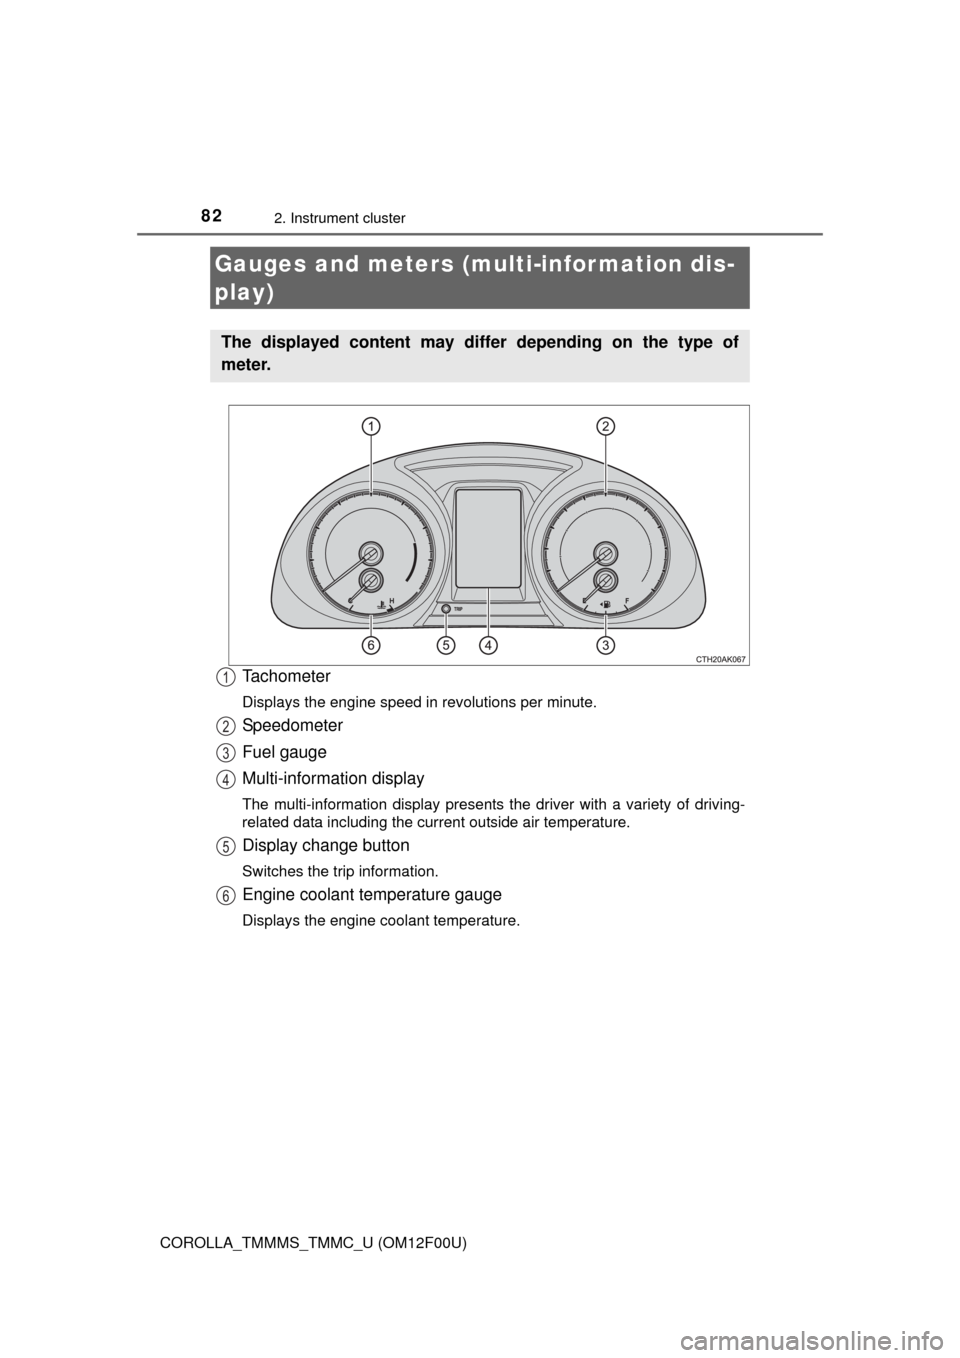
Tachometer
Displays the engine speed in revolutions per minute.
Speedometer
Fuel gauge
Multi-information display
The multi-information display presents the driver with a variety of driving-
related data including the current outside air temperature.
Display change button
Switches the trip information.
Engine coolant temperature gauge
Displays the engine coolant temperature.
Gauges and meters (multi-information dis-
play)
The displayed content may differ depending on the type of
meter.
1
2
3
4
5
6
Page 84 of 612
842. Instrument cluster
COROLLA_TMMMS_TMMC_U (OM12F00U)■
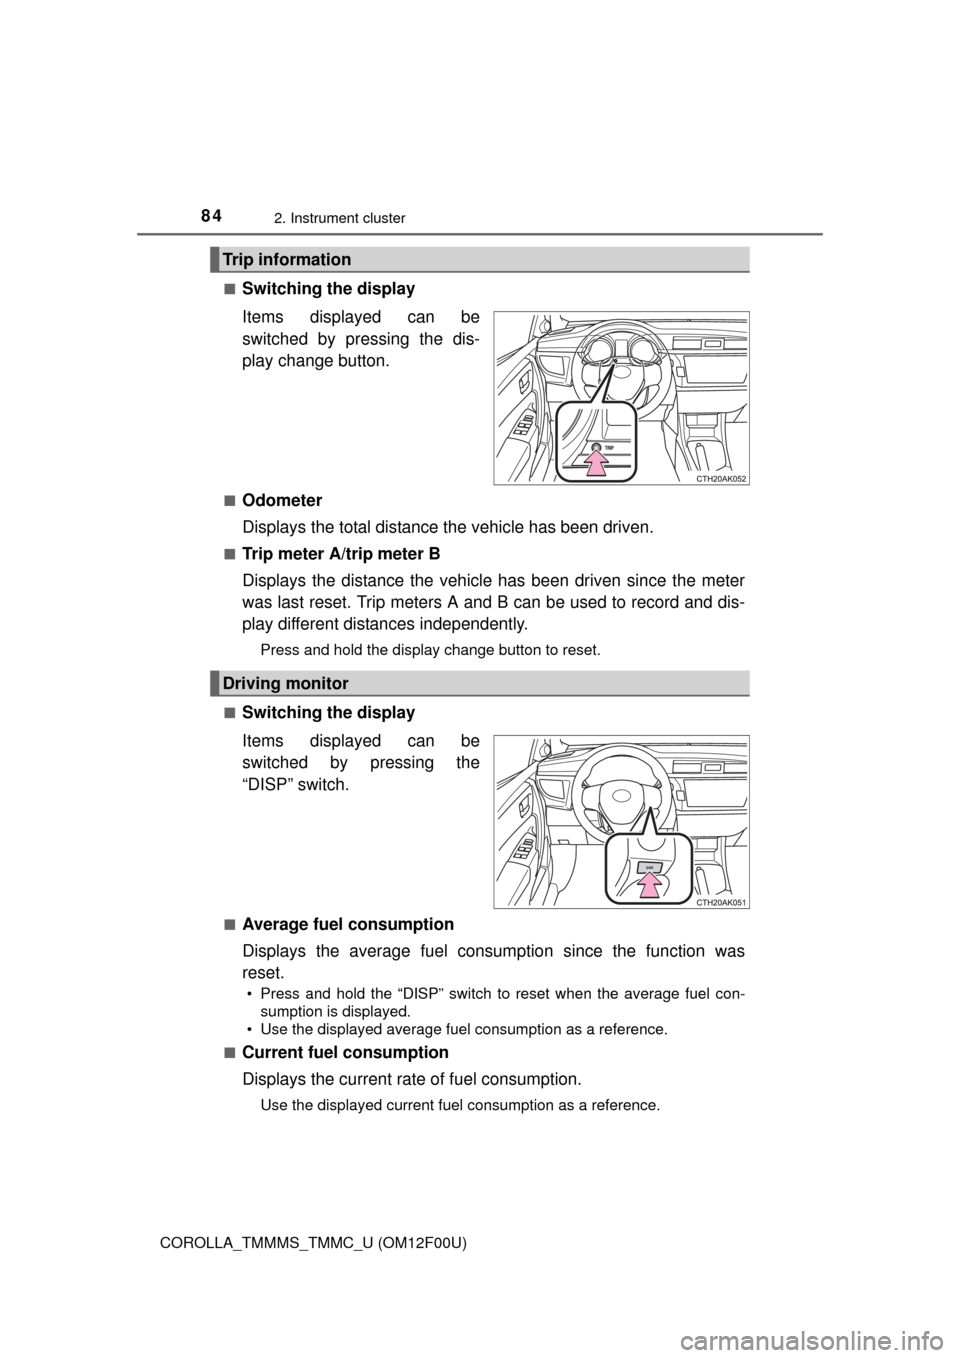
Switching the display
Items displayed can be
switched by pressing the dis-
play change button.
■Odometer
Displays the total distance the vehicle has been driven.
■Trip meter A/trip meter B
Displays the distance the vehicle has been driven since the meter
was last reset. Trip meters A and B can be used to record and dis-
play different distances independently.
Press and hold the display change button to reset.
■
Switching the display
Items displayed can be
switched by pressing the
“DISP” switch.
■Average fuel consumption
Displays the average fuel consumption since the function was
reset.
• Press and hold the “DISP” switch to reset when the average fuel con-
sumption is displayed.
• Use the displayed average fuel consumption as a reference.
■
Current fuel consumption
Displays the current rate of fuel consumption.
Use the displayed current fuel consumption as a reference.
Trip information
Driving monitor
Page 93 of 612
933-1. Key information
3
Operation of each component
COROLLA_TMMMS_TMMC_U (OM12F00U)
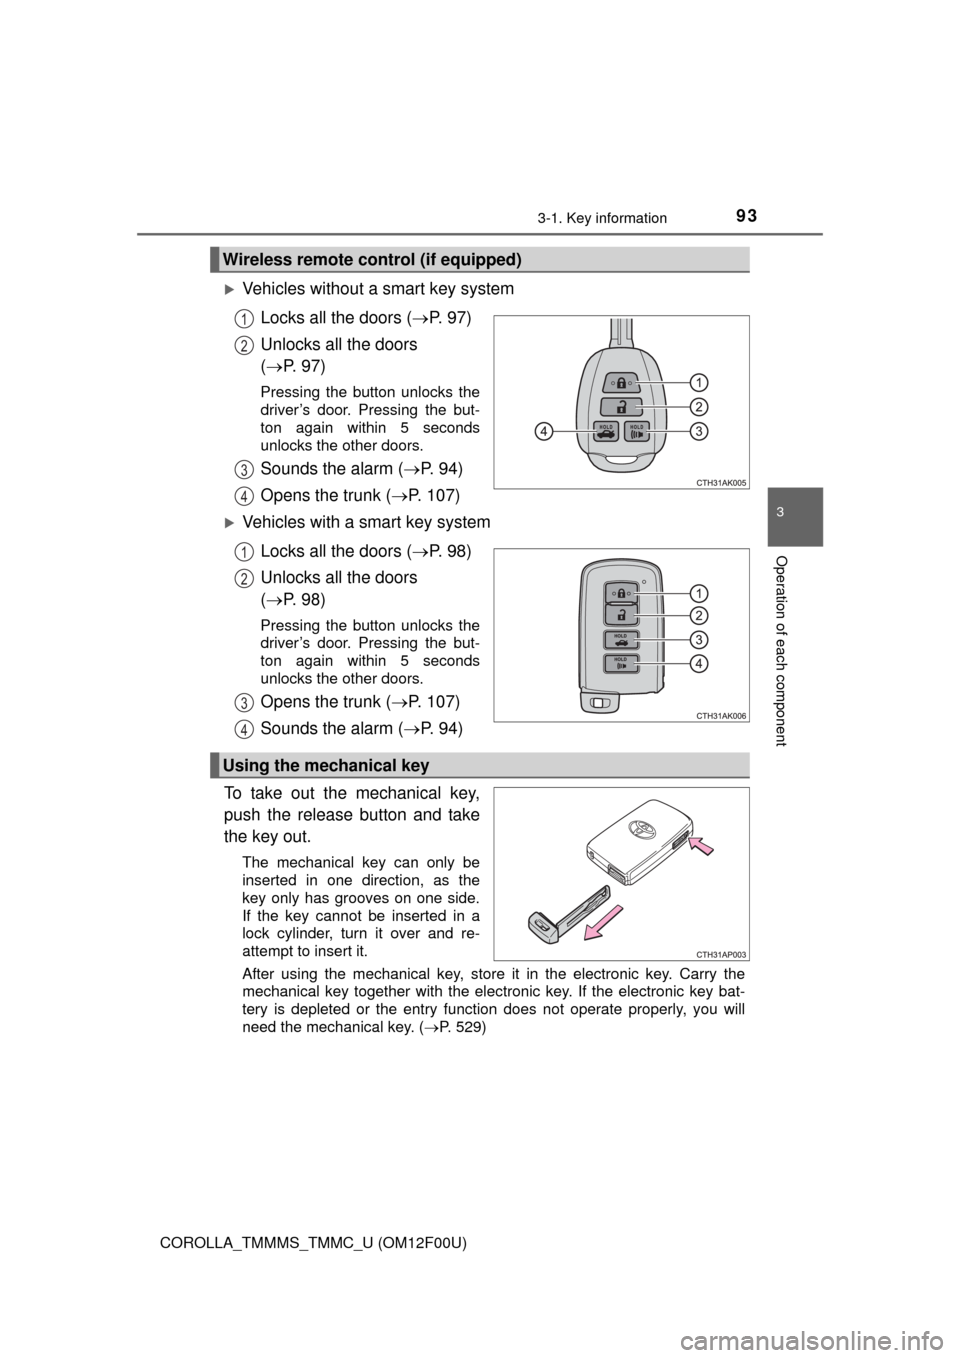
Vehicles without a smart key system
Locks all the doors (P. 9 7 )
Unlocks all the doors
(P. 97)
Pressing the button unlocks the
driver’s door. Pressing the but-
ton again within 5 seconds
unlocks the other doors.
Sounds the alarm (P. 9 4 )
Opens the trunk (P. 107)
Vehicles with a smart key system
Locks all the doors (P. 9 8 )
Unlocks all the doors
(P. 98)
Pressing the button unlocks the
driver’s door. Pressing the but-
ton again within 5 seconds
unlocks the other doors.
Opens the trunk (P. 107)
Sounds the alarm (P. 9 4 )
To take out the mechanical key,
push the release button and take
the key out.
The mechanical key can only be
inserted in one direction, as the
key only has grooves on one side.
If the key cannot be inserted in a
lock cylinder, turn it over and re-
attempt to insert it.
After using the mechanical key, store it in the electronic key. Carry the
mechanical key together with the electronic key. If the electronic key bat-
tery is depleted or the entry function does not operate properly, you will
need the mechanical key. (P. 529)
Wireless remote control (if equipped)
1
2
3
4
1
2
3
4
Using the mechanical key