set clock TOYOTA COROLLA 2021 Owners Manual (in English)
[x] Cancel search | Manufacturer: TOYOTA, Model Year: 2021, Model line: COROLLA, Model: TOYOTA COROLLA 2021Pages: 624, PDF Size: 20.3 MB
Page 93 of 624
932-1. Instrument cluster
2
Vehicle status information and indicators
COROLLA_Udifferent distances independently.
To reset, display the desired trip
meter and press and hold the dis-
play change button.
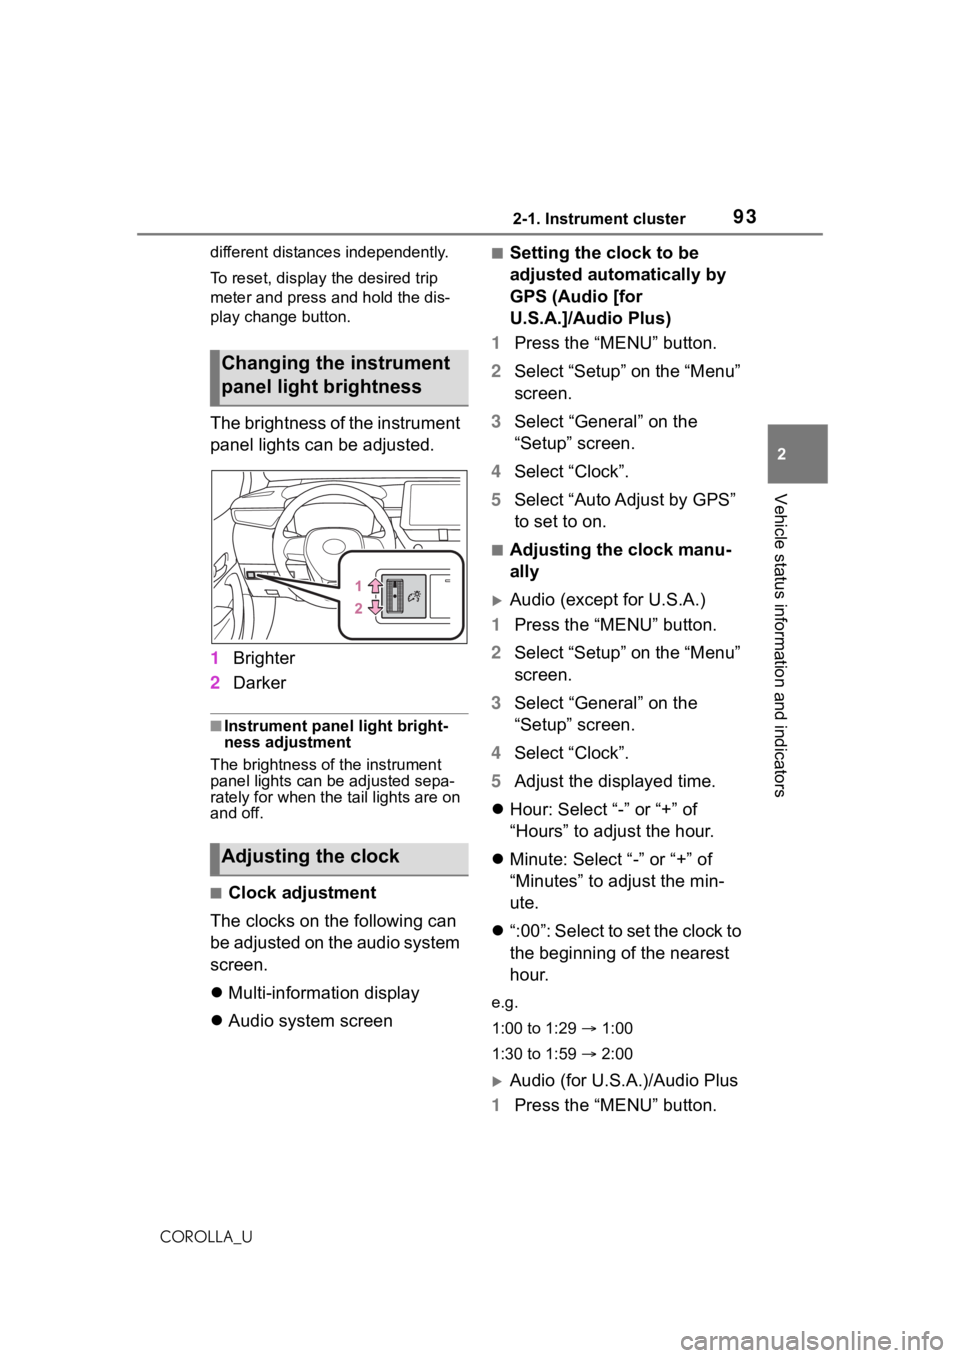
The brightness of the instrument
panel lights can be adjusted.
1
Brighter
2 Darker
■Instrument panel light bright-
ness adjustment
The brightness of the instrument
panel lights can be adjusted sepa-
rately for when the tail lights are on
and off.
■Clock adjustment
The clocks on the following can
be adjusted on the audio system
screen.
Multi-information display
Audio system screen
■Setting the clock to be
adjusted automatically by
GPS (Audio [for
U.S.A.]/Audio Plus)
1 Press the “MENU” button.
2 Select “Setup” on the “Menu”
screen.
3 Select “General” on the
“Setup” screen.
4 Select “Clock”.
5 Select “Auto Adjust by GPS”
to set to on.
■Adjusting the clock manu-
ally
Audio (except for U.S.A.)
1 Press the “MENU” button.
2 Select “Setup” on the “Menu”
screen.
3 Select “General” on the
“Setup” screen.
4 Select “Clock”.
5 Adjust the displayed time.
Hour: Select “-” or “+” of
“Hours” to adjust the hour.
Minute: Select “-” or “+” of
“Minutes” to adjust the min-
ute.
“:00”: Select to set the clock to
the beginning of the nearest
hour.
e.g.
1:00 to 1:29 1:00
1:30 to 1:59 2:00
Audio (for U.S.A.)/Audio Plus
1 Press the “MENU” button.
Changing the instrument
panel light brightness
Adjusting the clock
Page 94 of 624
942-1. Instrument cluster
COROLLA_U
2Select “Setup” on the “Menu”
screen.
3 Select “General” on the
“Setup” screen.
4 Select “Clock”.
5 Select “Auto Adjust by GPS”
to set to off.
6 Adjust the displayed time.
Hour: Select “-” or “+” of
“Hours” to adjust the hour.
Minute: Select “-” or “+” of
“Minutes” to adjust the min-
ute.
“:00”: Select to set the clock to
the beginning of the nearest
hour.
e.g.
1:00 to 1:29 1:00
1:30 to 1:59 2:00
■Setting the time zone
(Audio [for U.S.A.]/Audio
Plus)
1 Press the “MENU” button.
2 Select “Setup” on the “Menu”
screen.
3 Select “General” on the
“Setup” screen.
4 Select “Clock”.
5 Select “Time Zone”.
Select the desired time zone.
■Setting daylight saving time
(Audio [for U.S.A.]/Audio
Plus)
1 Press the “MENU” button. 2
Select “Setup” on the “Menu”
screen.
3 Select “General” on the
“Setup” screen.
4 Select “Clock”.
5 Select “Daylight Saving
Time” then on/off.
■Changing the clock
between 12-hour/24-hour
format
1 Press the “MENU” button.
2 Select “Setup” on the “Menu”
screen.
3 Select “General” on the
“Setup” screen.
4 Select “Clock”.
5 Select “24-Hour Time For-
mat” and then on/off.
When set to off, the clock is dis-
played in 12 hour time format.
■Clock settings screen (Audio
[for U.S.A.]/Audio Plus)
If “Clock : 00” is displayed when
is selected on the multi-information
display, the system may be malfunc-
tioning. Have the vehicle inspected
by your Toyota dealer.
Page 98 of 624
982-1. Instrument cluster
COROLLA_Udifferent distances independently.
To reset, display the desired trip
meter and press and hold the dis-
play change button.
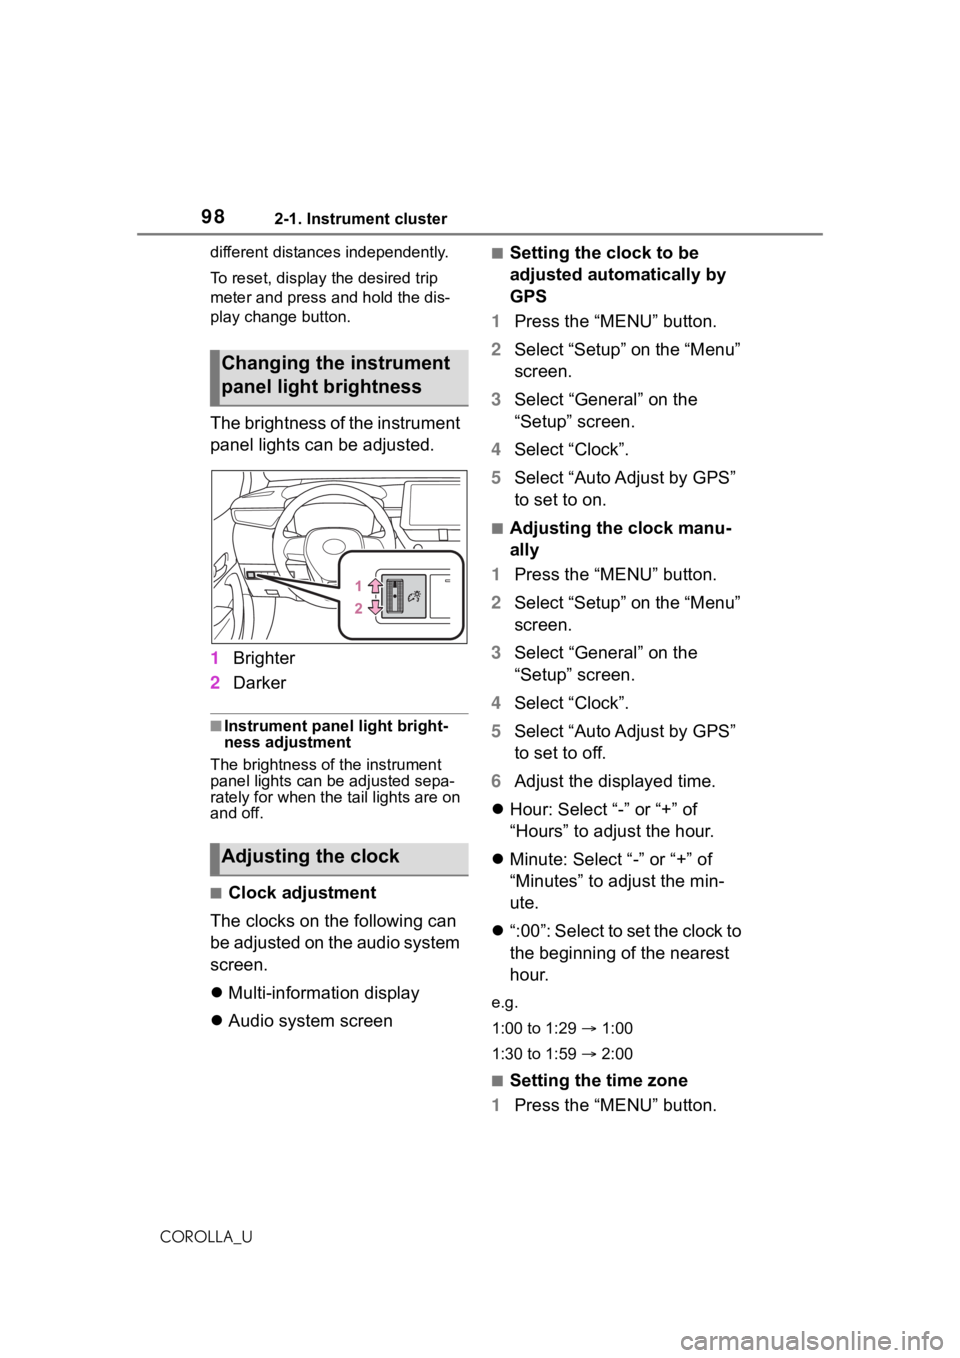
The brightness of the instrument
panel lights can be adjusted.
1
Brighter
2 Darker
■Instrument panel light bright-
ness adjustment
The brightness of the instrument
panel lights can be adjusted sepa-
rately for when the tail lights are on
and off.
■Clock adjustment
The clocks on the following can
be adjusted on the audio system
screen.
Multi-information display
Audio system screen
■Setting the clock to be
adjusted automatically by
GPS
1 Press the “MENU” button.
2 Select “Setup” on the “Menu”
screen.
3 Select “General” on the
“Setup” screen.
4 Select “Clock”.
5 Select “Auto Adjust by GPS”
to set to on.
■Adjusting the clock manu-
ally
1 Press the “MENU” button.
2 Select “Setup” on the “Menu”
screen.
3 Select “General” on the
“Setup” screen.
4 Select “Clock”.
5 Select “Auto Adjust by GPS”
to set to off.
6 Adjust the displayed time.
Hour: Select “-” or “+” of
“Hours” to adjust the hour.
Minute: Select “-” or “+” of
“Minutes” to adjust the min-
ute.
“:00”: Select to set the clock to
the beginning of the nearest
hour.
e.g.
1:00 to 1:29 1:00
1:30 to 1:59 2:00
■Setting the time zone
1 Press the “MENU” button.
Changing the instrument
panel light brightness
Adjusting the clock
Page 99 of 624
992-1. Instrument cluster
2
Vehicle status information and indicators
COROLLA_U
2Select “Setup” on the “Menu”
screen.
3 Select “General” on the
“Setup” screen.
4 Select “Clock”.
5 Select “Time Zone”.
Select the desired time zone.
Premium Audio only:
If “Auto” is selected, the time zone
is selected automatically by current
vehicle position.
■Setting daylight saving time
1 Press the “MENU” button.
2 Select “Setup” on the “Menu”
screen.
3 Select “General” on the
“Setup” screen.
4 Select “Clock”.
5 Select “Daylight Saving
Time” then on/off/auto
*.
*: Premium Audio only
■Changing the clock
between 12-hour/24-hour
format
1 Press the “MENU” button.
2 Select “Setup” on the “Menu”
screen.
3 Select “General” on the
“Setup” screen.
4 Select “Clock”.
5 Select “24-Hour Time For-
mat” and then on/off.
When set to off, the clock is dis-
played in 12 hour time format.
■Clock settings screen
If “Clock : 00” is displayed when
is selected on the multi-information
display, the system may be malfunc-
tioning. Have the vehicle inspected
by your Toyota dealer.
Page 285 of 624
2855-1. Basic function
5
Audio
COROLLA_U
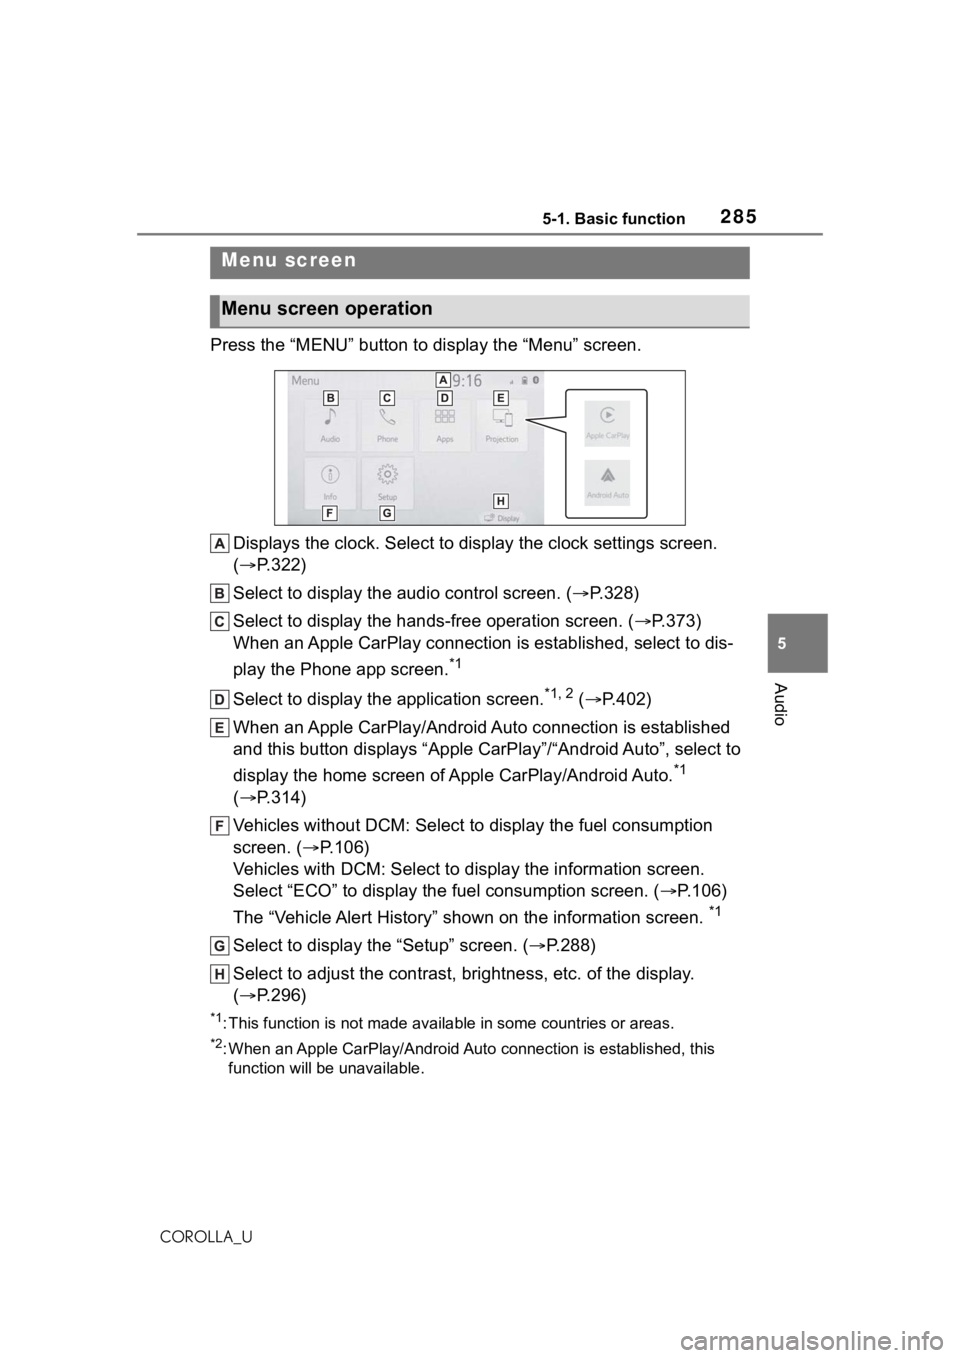
Press the “MENU” button to display the “Menu” screen.
Displays the clock. Select to display the clock settings screen.
( P.322)
Select to display the audio control screen. ( P.328)
Select to display the hands-free operation screen. ( P.373)
When an Apple CarPlay connection is established, select to dis-
play the Phone app screen.
*1
Select to display the application screen.*1, 2 ( P.402)
When an Apple CarPlay/Android Auto connection is established
and this button displays “Apple CarPlay”/“Android Auto”, select to
display the home screen of Apple CarPlay/Android Auto.
*1
( P.314)
Vehicles without DCM: Select to d isplay the fuel consumption
screen. ( P.106)
Vehicles with DCM: Select to display the information screen.
Select “ECO” to display the fuel consumption screen. ( P.106)
The “Vehicle Alert History” shown on the information screen.
*1
Select to display the “Setup” screen. ( P.288)
Select to adjust the contrast, brightness, etc. of the display.
( P.296)
*1: This function is not made available in some countries or areas .
*2: When an Apple CarPlay/Android Auto connection is established, this
function will be unavailable.
Menu screen
Menu screen operation
Page 292 of 624
2925-2. Basic information before operation
COROLLA_U
ACC or ON, or restart the sys-
tem by press and hold the
“POWER VOLUME” knob for
3 seconds or more.
Capacitive touch screen button sen-
sor sensitivity can be adjusted.
( P.321)
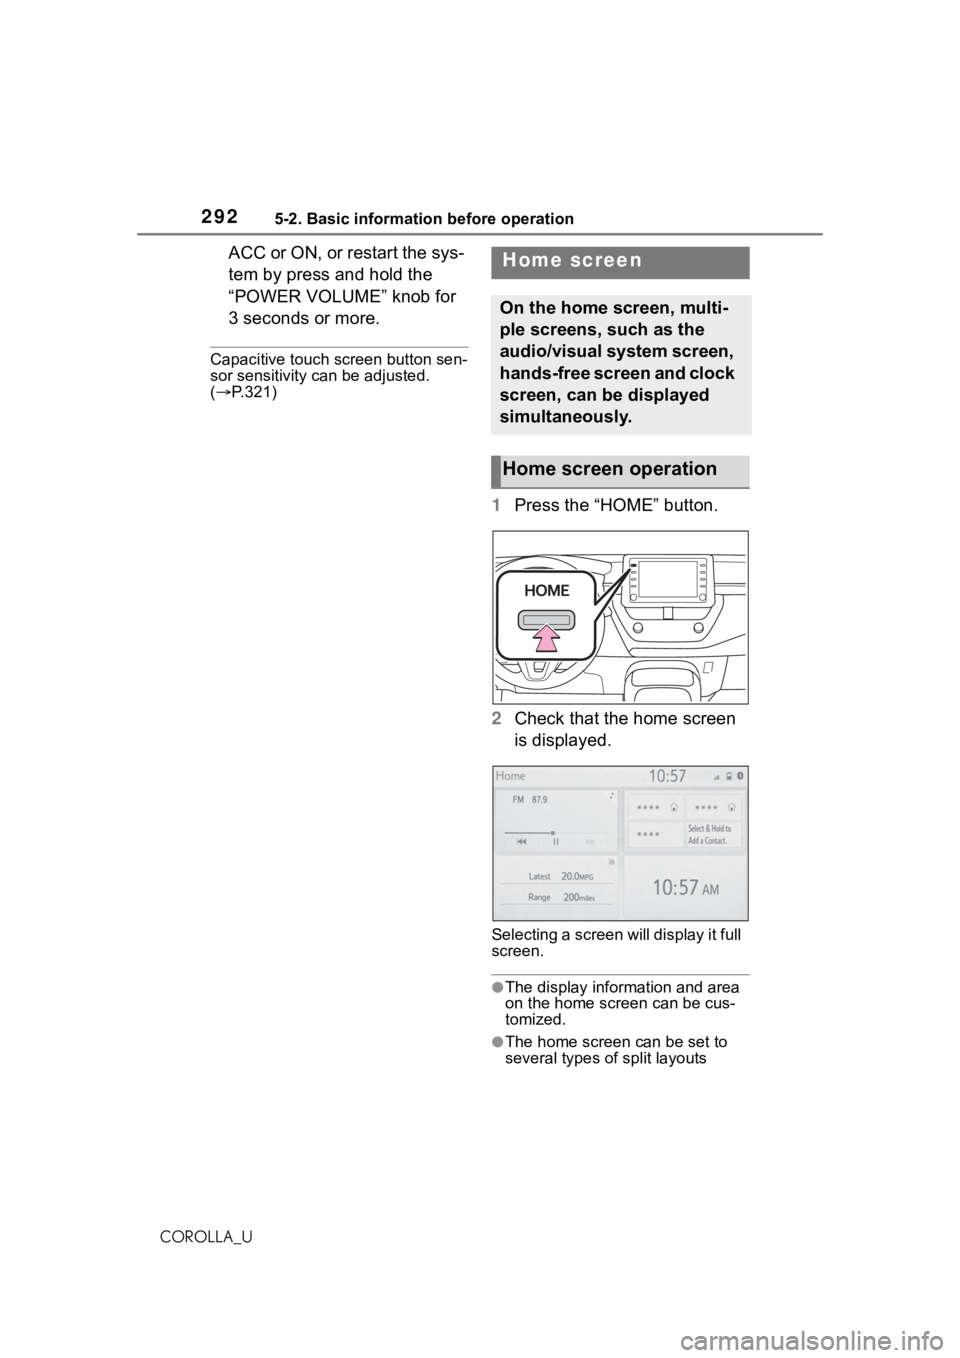
1 Press the “HOME” button.
2 Check that the home screen
is displayed.
Selecting a screen will display it full
screen.
●The display information and area
on the home screen can be cus-
tomized.
●The home screen can be set to
several types of split layouts
Home screen
On the home screen, multi-
ple screens, such as the
audio/visual system screen,
hands-free screen and clock
screen, can be displayed
simultaneously.
Home screen operation
Page 321 of 624
3215-4. Other settings
5
Audio
COROLLA_U
5-4.Other settings
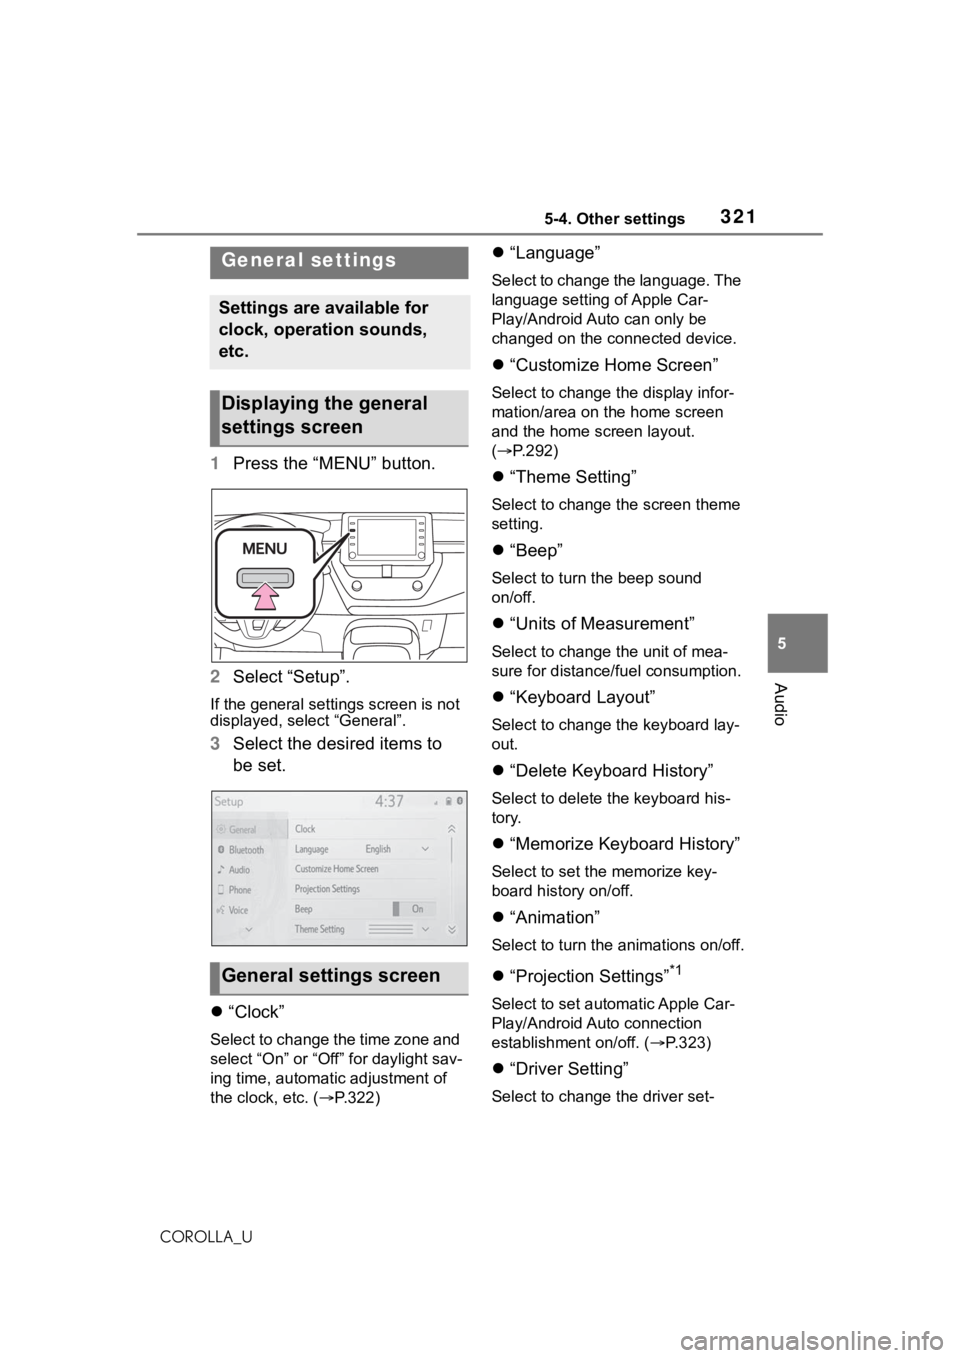
1Press the “MENU” button.
2 Select “Setup”.
If the general settings screen is not
displayed, select “General”.
3Select the desired items to
be set.
“Clock”
Select to change the time zone and
select “On” or “Off” for daylight sav-
ing time, automatic adjustment of
the clock, etc. ( P.322)
“Language”
Select to change the language. The
language setting of Apple Car-
Play/Android Auto can only be
changed on the connected device.
“Customize Home Screen”
Select to change the display infor-
mation/area on the home screen
and the home screen layout.
( P.292)
“Theme Setting”
Select to change the screen theme
setting.
“Beep”
Select to turn the beep sound
on/off.
“Units of Measurement”
Select to change the unit of mea-
sure for distance/fuel consumption.
“Keyboard Layout”
Select to change the keyboard lay-
out.
“Delete Keyboard History”
Select to delete the keyboard his-
tory.
“Memorize Keyboard History”
Select to set the memorize key-
board history on/off.
“Animation”
Select to turn the animations on/off.
“Projection Settings”*1
Select to set automatic Apple Car-
Play/Android Auto connection
establishment on/off. ( P.323)
“Driver Setting”
Select to change the driver set-
General settings
Settings are available for
clock, operation sounds,
etc.
Displaying the general
settings screen
General settings screen
Page 322 of 624
3225-4. Other settings
COROLLA_Utings. (
P.323)
“Delete Personal Data”
Select to delete personal data.
( P.324)
“Software Update”
Select to update software versions.
For details, contact your Toyota
dealer.
“Software Update Setting”*2
Select to set software update set-
ting. ( P.324)
“Gracenote Database
Update”
Select to update Gracenote® data-
base versions. For details, contact
your Toyota dealer.
“Software Information”
Select to display the software infor-
mation. Notices related to third
party software used in this product
are enlisted. (This includes instruc-
tions for obtaining such software,
where applicable.)
“SW Sensitivity Level”
Select to change the capacitive
touch screen button sensitivity to 1
(low), 2 (medium), or 3 (high).
*1: This function is not made avail- able in some countries or areas.
*2: If equipped
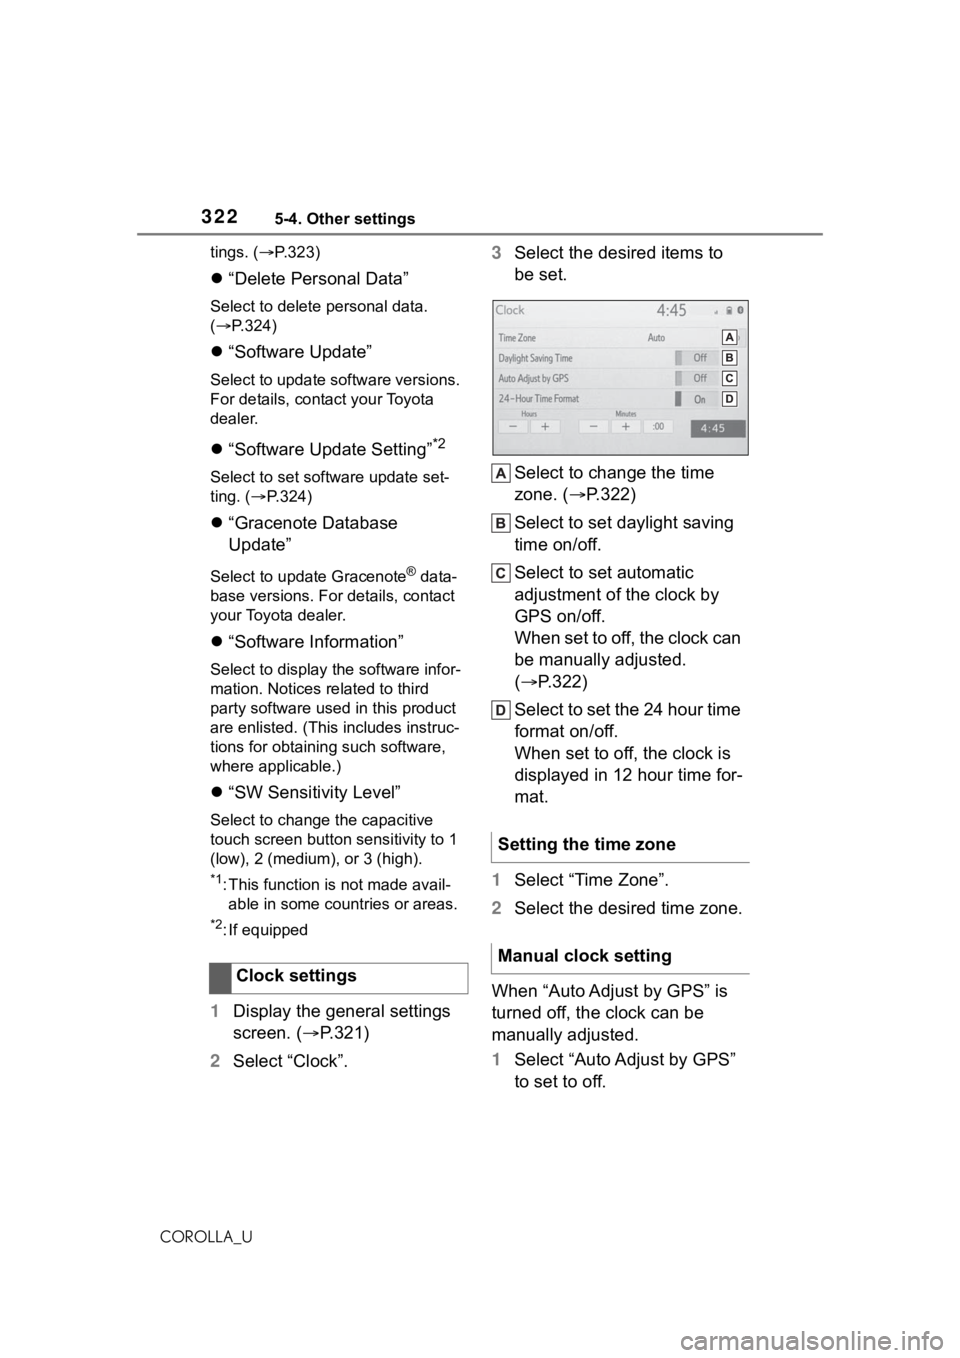
1 Display the general settings
screen. ( P.321)
2 Select “Clock”. 3
Select the desired items to
be set.
Select to change the time
zone. ( P.322)
Select to set daylight saving
time on/off.
Select to set automatic
adjustment of the clock by
GPS on/off.
When set to off, the clock can
be manually adjusted.
( P.322)
Select to set the 24 hour time
format on/off.
When set to off, the clock is
displayed in 12 hour time for-
mat.
1 Select “Time Zone”.
2 Select the desired time zone.
When “Auto Adjust by GPS” is
turned off, the clock can be
manually adjusted.
1 Select “Auto Adjust by GPS”
to set to off.
Clock settings
Setting the time zone
Manual clock setting
Page 323 of 624
3235-4. Other settings
5
Audio
COROLLA_U
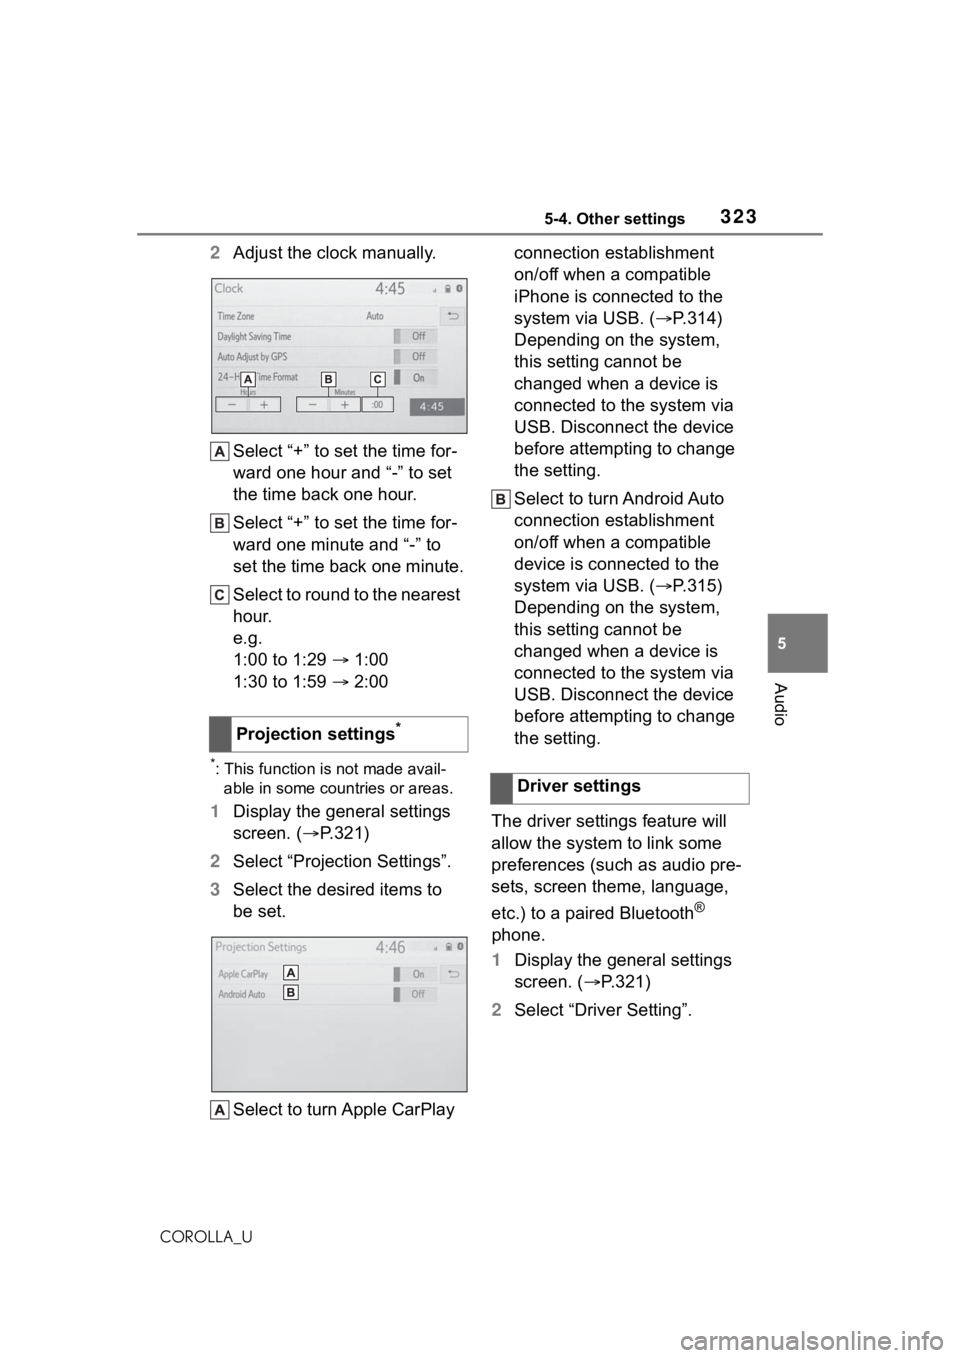
2Adjust the clock manually.
Select “+” to set the time for-
ward one hour and “-” to set
the time back one hour.
Select “+” to set the time for-
ward one minute and “-” to
set the time back one minute.
Select to round to the nearest
hour.
e.g.
1:00 to 1:29 1:00
1:30 to 1:59 2:00
*: This function is not made avail-
able in some countries or areas.
1 Display the general settings
screen. ( P.321)
2 Select “Projection Settings”.
3 Select the desired items to
be set.
Select to turn Apple CarPlay connection establishment
on/off when a compatible
iPhone is connected to the
system via USB. (
P.314)
Depending on the system,
this setting cannot be
changed when a device is
connected to the system via
USB. Disconnect the device
before attempting to change
the setting.
Select to turn Android Auto
connection establishment
on/off when a compatible
device is connected to the
system via USB. ( P.315)
Depending on the system,
this setting cannot be
changed when a device is
connected to the system via
USB. Disconnect the device
before attempting to change
the setting.
The driver settings feature will
allow the system to link some
preferences (such as audio pre-
sets, screen theme, language,
etc.) to a paired Bluetooth
®
phone.
1 Display the general settings
screen. ( P.321)
2 Select “Driver Setting”.
Projection settings
*
Driver settings
Page 416 of 624
4166-1. Using the air conditioning system and defogger
COROLLA_U
6-1.Using the air conditioning system and defogger
*: If equipped
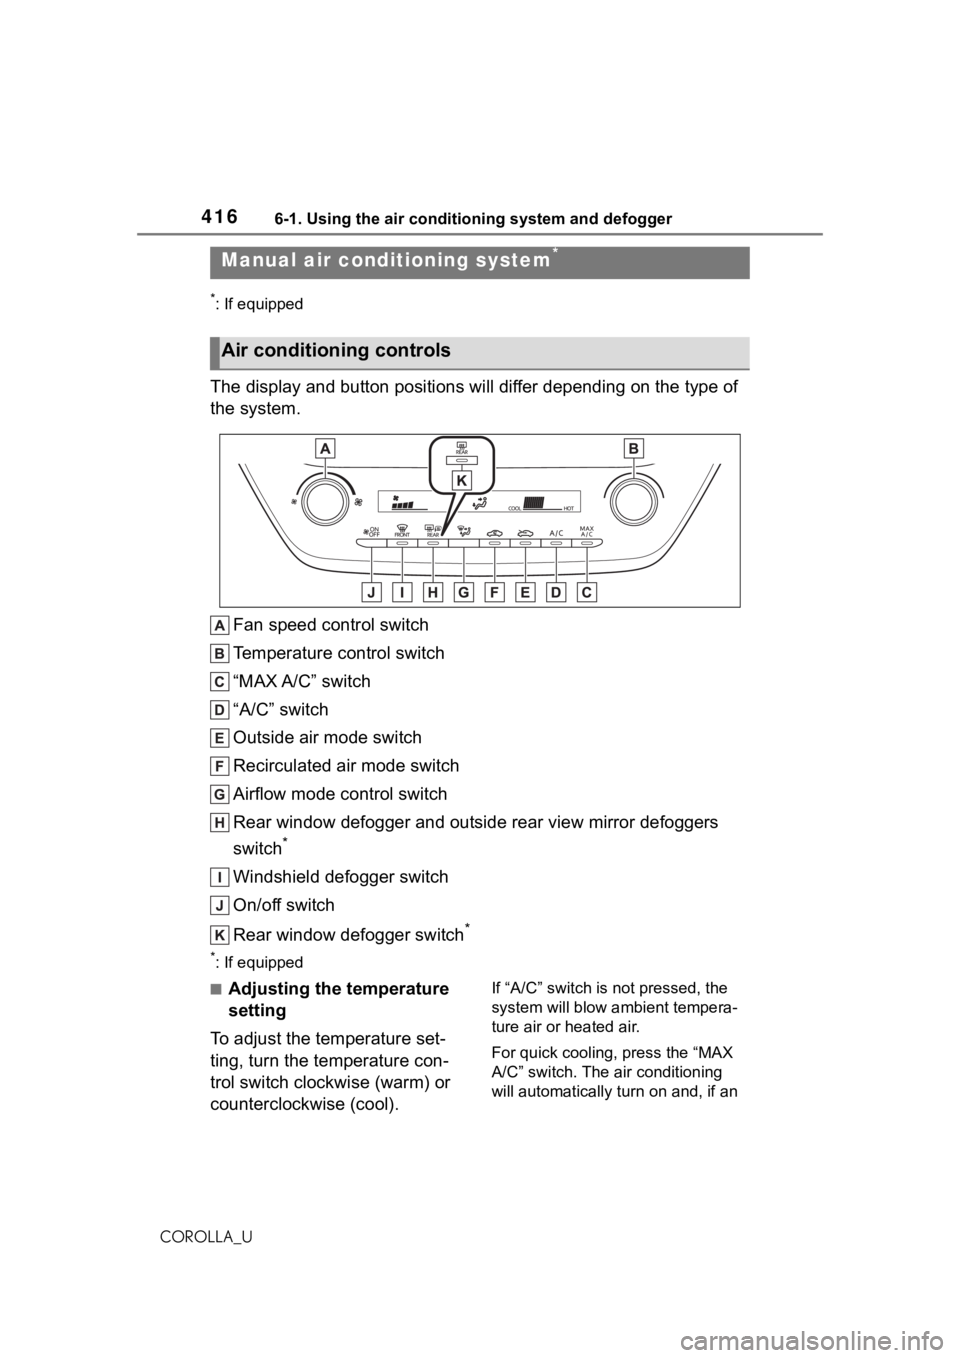
The display and button positions will differ depending on the type of
the system.
Fan speed control switch
Temperature control switch
“MAX A/C” switch
“A/C” switch
Outside air mode switch
Recirculated air mode switch
Airflow mode control switch
Rear window defogger and outside rear view mirror defoggers
switch
*
Windshield defogger switch
On/off switch
Rear window defogger switch
*
*: If equipped
■Adjusting the temperature
setting
To adjust the temperature set-
ting, turn the temperature con-
trol switch clockwise (warm) or
counterclockwise (cool).If “A/C” switch is not pressed, the
system will blow ambient tempera-
ture air or heated air.
For quick cooling, press the “MAX
A/C” switch. The air conditioning
will automatically turn on and, if an
Manual air conditioning system*
Air conditioning controls