flat tire TOYOTA COROLLA 2022 (in English) Service Manual
[x] Cancel search | Manufacturer: TOYOTA, Model Year: 2022, Model line: COROLLA, Model: TOYOTA COROLLA 2022Pages: 678, PDF Size: 147.24 MB
Page 498 of 678

4968-2. Steps to take in an emergency
2 Check that the air pressure indicator
shows the specified air pressure.
If the air pressure is under the desig-
nated pressure, turn the compressor
switch on (type A) or (on) (type B)
again and repeat the inflation procedure
until the specified air pressure is
reached.
■After a tire is repaired with the emergency tire puncture repair kit
●The tire pressure warning valve and transmitter should be replaced.
●Even if the tire inflation pressure is at the recommended level, the tire pres-
sure warning light may come on/flash.
WA R N I N G
■Do not drive the vehicle with a
flat tire
Do not continue driving with a flat tire.
Driving even a short distance with a
flat tire can damage the tire and the wheel beyond repair.
Driving with a flat tire may cause a cir-
cumferential groove on the side wall. In such a case, t he tire may explode
when using a repair kit.
■When fixing the flat tire
●Stop your vehicle in a safe and flat
area.
●Do not touch the wheels or the area
around the brakes immediately after the vehicle has been driven.
After the vehicle has been driven,
the wheels and the area around the brakes may be extremely hot.
Touching these areas with hands,
feet or other body parts may result in burns.
●Connect the valve and hose securely with the tire installed on
the vehicle. If the hose is not prop-
erly connected to the valve, air leakage may occur as sealant may
be sprayed out.
●If the hose comes off the valve while inflating the tire, there is a risk
that the hose will move abruptly due
to air pressure.
●After inflation of the tire has com-
pleted, the sealant may splatter when the hose is disconnected or
some air is let out of the tire.
●Follow the operation procedure to
repair the tire. If the procedures not
followed, the sealant may spray out.
●Keep back from the tire while it is
being repaired, as there is a chance of it bursting while the repair opera-
tion is being performed. If you
notice any cracks or deformation of
the tire, turn off (type A) or (off)
(type B) the compressor switch and
stop the repair operation immedi- ately.
●The repair kit may overheat if oper-ated for a long period of time. Do
not operate the repair kit continu-
ously for more than 40 minutes.
●Parts of the repair kit become hot
during operation. Be careful when handling the repair kit during and
after operation. Do not touch the
metal part around the connecting area between the bottle and com-
pressor. It will be extremely hot.
●Do not attach the vehicle speed
warning sticker to an area other
than the one indicated. If the sticker is attached to an area where an
SRS airbag is located, such as the
pad of the steering wheel, it may
prevent the SRS airbag from oper- ating properly.
Page 499 of 678

497
8
8-2. Steps to take in an emergency
When trouble arises
WA R N I N G
●To avoid risk of burst or severe
leakage, do not drop or damage the
bottle. Visually inspect the bottle before use. Do not use a bottle with
shock, crack, scratch, leakage or
any other damage. In such case, immediately replace.
■Driving to spread the liquid seal-
ant evenly
Observe the following precautions to
reduce the risk of accidents.
Failing to do so may result in a loss of vehicle control and cause death or
serious injury.
●Drive the vehicle carefully at a low
speed. Be especially careful when
turning and cornering.
●If the vehicle does not drive straight
or you feel a pull through the steer- ing wheel, stop the vehicle and
check the following.
• Tire condition. The tire may have separated from the wheel.
• Tire inflation pressure. If the tire inflation pressure is 130 kPa (1.3
kgf/cm2 or bar, 19 psi) or less, the
tire may be severely damaged.
NOTICE
■When performing an emergency repair
●A tire should only be repaired with
the emergency tire puncture repair kit if the damage is caused by a
sharp object such as nail or screw
passing through the tire tread. Do not remove the sharp object
from the tire. Removing the object
may widen the opening and disenable emergency repair with
the repair kit.
●The repair kit is not waterproof. Make sure that the repair kit is not
exposed to water, such as when it
is being used in the rain.
●Do not put the repair kit directly
onto dusty ground such as sand at the side of the road. If the repair kit
vacuums up dust etc., a malfunc-
tion may occur.
●Do not turn the bottle upside down
when using it, as doing so may cause damage to the compressor.
■Precautions for the emergency tire puncture repair kit
●The repair kit power source should
be 12 V DC suitable for vehicle use. Do not connect the repair kit to any
other source.
●If fuel splatters on the repair kit, the
repair kit may deteriorate. Take
care not to allow fuel to contact it.
●Place the repair kit in a storage to
prevent it from being exposed to dirt or water.
●Store the repair kit in the tool tray under the deck mat out of reach of
children.
●Do not disassemble or modify the
repair kit. Do not subject parts such
as the air pressure indicator to impacts. This may cause a malfunc-
tion.
Page 500 of 678
4988-2. Steps to take in an emergency
Stop the vehicle in a safe place
on a hard, flat surface.
Set the parking brake.
Shift the shift lever to P
(Multidrive) or R (manual trans-
mission).
Stop the engine.
Turn on the emergency flashers.
NOTICE
■To avoid damage to the tire pres-
sure warning valves and trans-
mitters
When a tire is repaired with liquid
sealants, the tire pressure warning
valve and transmitter may not operate properly. If a liquid sealant is used,
contact any authorized Toyota retailer
or Toyota authorized repairer, or any
reliable repairer or other qualified ser- vice shop as soon as possible. After
use of liquid sealant, make sure to
replace the tire pressure warning valve and transmitter when repairing
or replacing the tire. ( P.441)
If you have a flat tire
(vehicles with a spare
tire)
Your vehicle is equipped with a
spare tire. The flat tire can be
replaced with the spare tire.
For details about tires: P. 4 2 9
WA R N I N G
■If you have a flat tire
Do not continue driving with a flat tire. Driving even a short distance with a
flat tire can damage the tire and the
wheel beyond repair, which could result in an accident.
Before jacking up the vehi-
cle
Page 502 of 678
5008-2. Steps to take in an emergency
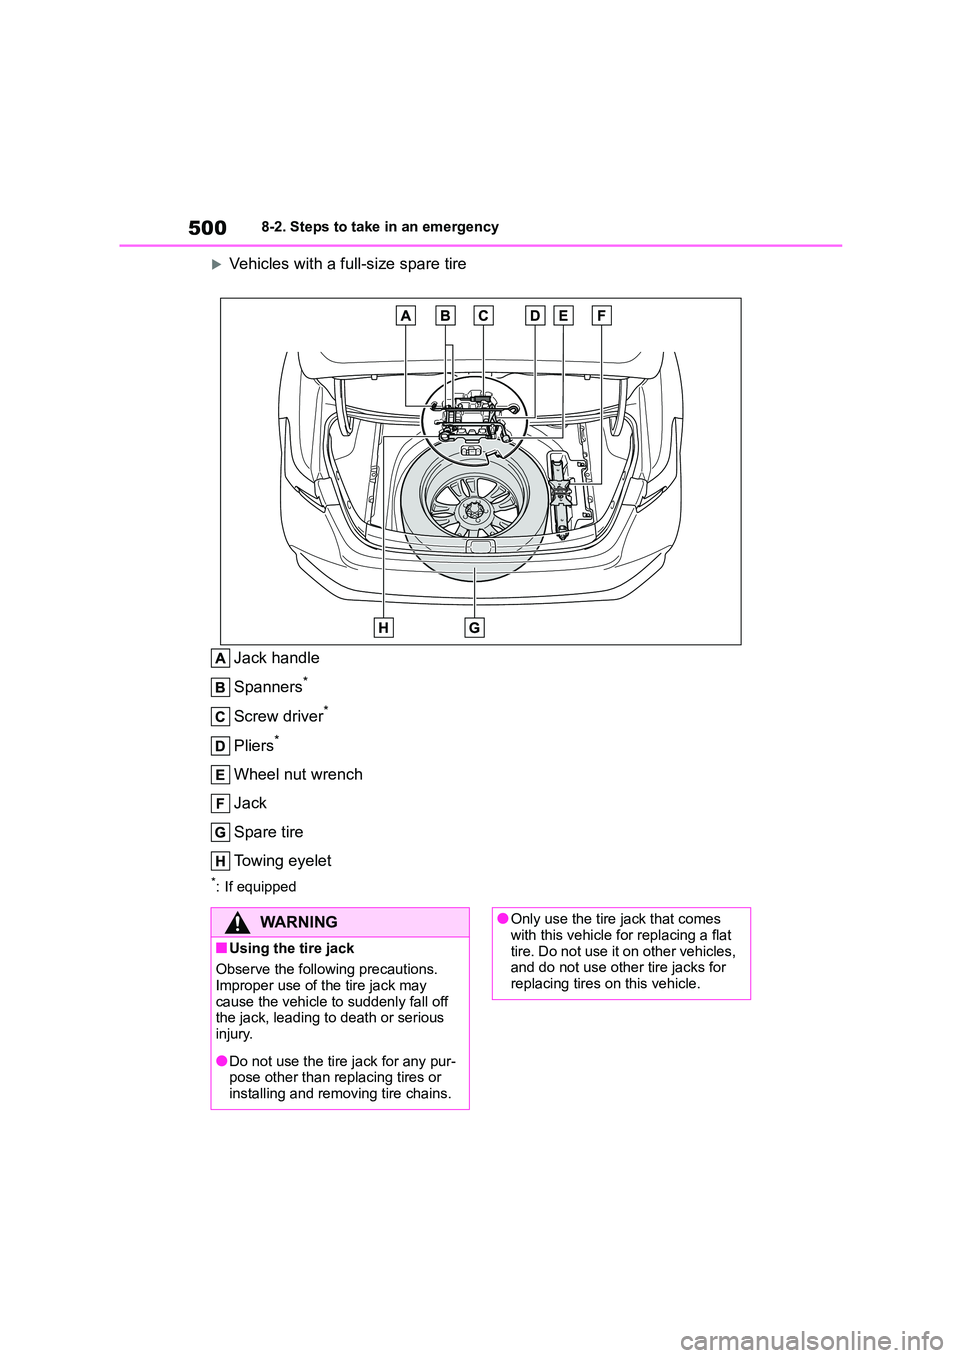
Vehicles with a full-size spare tire
Jack handle
Spanners*
Screw driver*
Pliers*
Wheel nut wrench
Jack
Spare tire
Towing eyelet
*: If equipped
WA R N I N G
■Using the tire jack
Observe the following precautions.
Improper use of the tire jack may
cause the vehicle to suddenly fall off the jack, leading to death or serious
injury.
●Do not use the tire jack for any pur-
pose other than replacing tires or
installing and removing tire chains.
●Only use the tire jack that comes with this vehicle for replacing a flat
tire. Do not use it on other vehicles,
and do not use other tire jacks for replacing tires on this vehicle.
Page 504 of 678

5028-2. Steps to take in an emergency
1Remove the deck mat. (P.501)
2 Remove the tool tray.
Vehicles with a compact spare tire:
Vehicles with a full-size spare tire:
3 Loosen the center fastener that
secures the spare tire.
1 Chock the tires.
2 Vehicles with a steel wheel:
Remove the wheel ornament (if
equipped) using the wrench.
To protect the wheel ornament, place a
rag between the wrench and the wheel
Taking out the spare tireWA R N I N G
■When storing the spare tire
Be careful not to catch fingers or
other body parts between the spare tire and the body of the vehicle.
Replacing a flat tire
Flat tireWheel chock posi-
tions
Front left-hand
side
Behind the rear
right-hand side tire
Front right-hand
side
Behind the rear
left-hand side tire
Rear left-hand sideIn front of the front
right-hand side tire
Rear right-hand
side
In front of the front
left-hand side tire
Page 506 of 678

5048-2. Steps to take in an emergency
1Remove any dirt or foreign mat-
ter from the wheel contact sur-
face.
If foreign matter is on the wheel contact
surface, the wheel nuts may loosen while the vehicle is in motion, causing
the tire to come off.
2 Install the tire and loosely
tighten each wheel nut by hand
by approximately the same
amount.
When replacing a steel wheel with a
steel wheel (including a compact spare
tire), tighten the wheel nuts until the
tapered portion comes into loose
contact with the disc wheel seat .
When replacing an aluminum wheel
with a steel wheel (including a compact
WA R N I N G
■Replacing a flat tire
●Do not touch the disc wheels or the
area around the brakes immedi- ately after the vehicle has been
driven. After the vehicle has been
driven the disc wheels and the area around the brakes will be extremely
hot. Touching these areas with
hands, feet or other body parts
while changing a tire, etc. may result in burns.
●Failure to follow these precautions could cause the wheel nuts to
loosen and the tire to fall off, result-
ing in death or serious injury.
• Never use oil or grease on the
wheel bolts or wheel nuts.
Oil and grease may cause the wheel nuts to be excessively tight-
ened, leading to bolt or disc wheel
damage. In addition, the oil or grease can cause the wheel nuts to
loosen and the wheel may fall off,
causing an accident and resulting in death or serious injury. Remove any
oil or grease from the wheel bolts or
wheel nuts.
• Have the wheel nuts tightened with
a torque wrench to 103 N•m (10.5 kgf•m, 76 ft•lbf) as soon as possible
after changing wheels.
• Do not attach a heavily damaged
wheel ornament, as it may fly off the
wheel while the vehicle is moving.
• When installing a tire, only use
wheel nuts that have been specifi- cally designed for that wheel.
• If there are any cracks or deforma- tions in the bolt screws, nut threads
or bolt holes of the wheel, have the
vehicle inspected by any authorized Toyota retailer or Toyota authorized
repairer, or any reliable repairer.
• When installing the wheel nuts, be sure to install them with the tapered
ends facing inward.
Installing the spare tire
Page 507 of 678
505
8
8-2. Steps to take in an emergency
When trouble arises
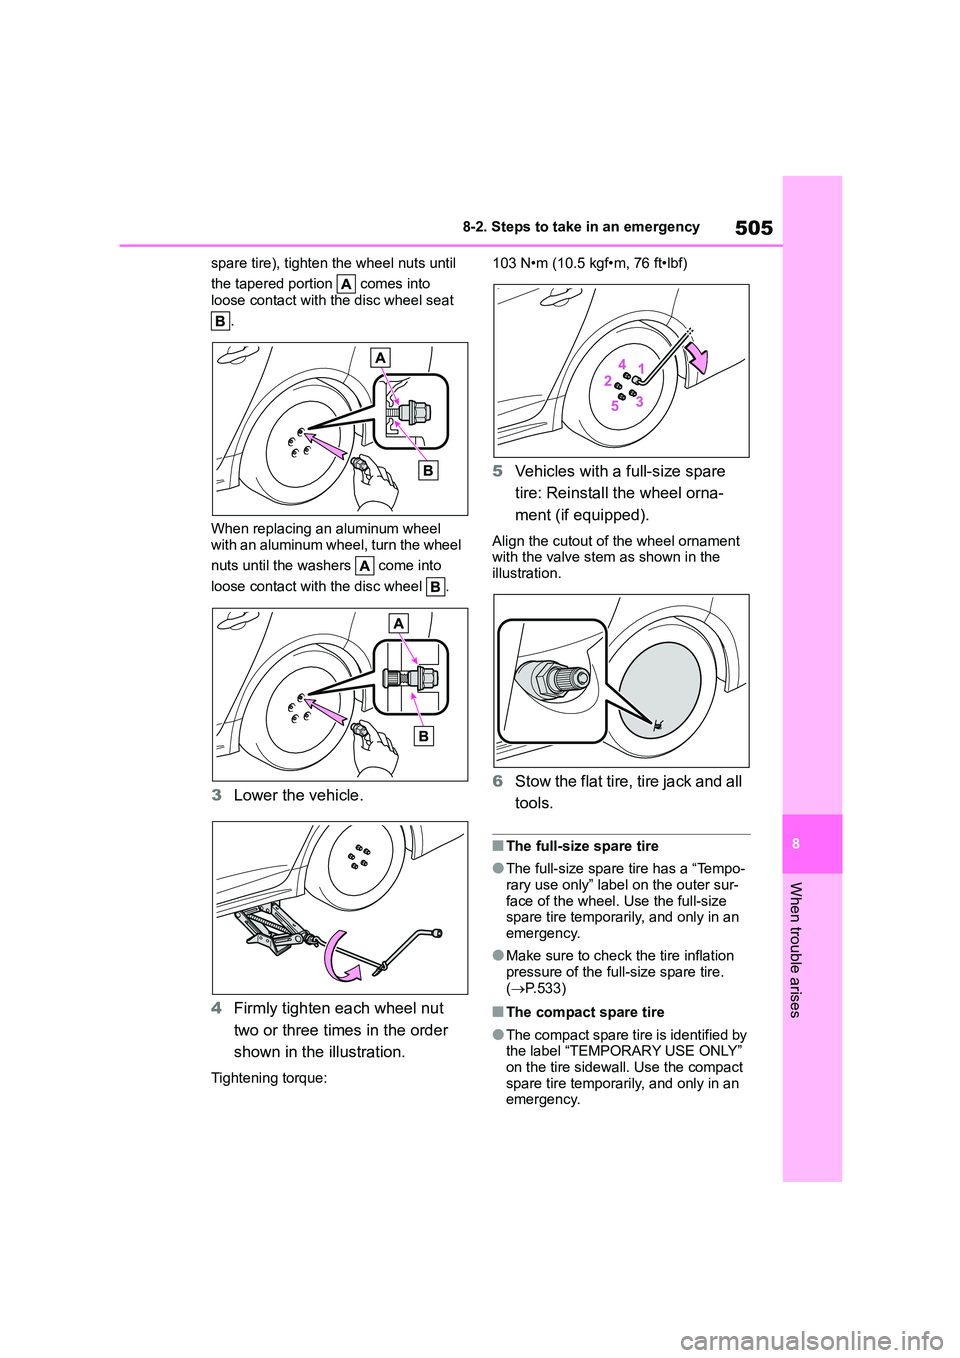
spare tire), tighten the wheel nuts until
the tapered portion comes into
loose contact with the disc wheel seat
.
When replacing an aluminum wheel
with an aluminum wheel, turn the wheel
nuts until the washers come into
loose contact with the disc wheel .
3 Lower the vehicle.
4 Firmly tighten each wheel nut
two or three times in the order
shown in the illustration.
Tightening torque:
103 N•m (10.5 kgf•m, 76 ft•lbf)
5 Vehicles with a full-size spare
tire: Reinstall the wheel orna-
ment (if equipped).
Align the cutout of the wheel ornament
with the valve stem as shown in the
illustration.
6 Stow the flat tire, tire jack and all
tools.
■The full-size spare tire
●The full-size spare tire has a “Tempo-
rary use only” label on the outer sur-
face of the wheel. Use the full-size spare tire temporarily, and only in an
emergency.
●Make sure to check the tire inflation
pressure of the full-size spare tire.
( P.533)
■The compact spare tire
●The compact spare tire is identified by
the label “TEMPORARY USE ONLY” on the tire sidewall. Use the compact
spare tire temporarily, and only in an
emergency.
Page 508 of 678
5068-2. Steps to take in an emergency
●Make sure to check the tire inflation
pressure of the compact spare tire. ( P.533)
■When the compact spare tire is
equipped
The vehicle becomes lower when driv- ing with the compact spare tire com-
pared to when driving with standard
tires.
■After completing the tire change
The tire pressure warning system must
be reset. ( P.442)
■When using the spare tire
As the spare tire is not equipped with a tire pressure warning valve and trans-
mitter, low inflation pressure of the spare
tire will not be indicated by the tire pres- sure warning system. Also, if you
replace the spare tire after the tire pres-
sure warning light comes on, the light remains on.
■If you have a flat front tire on a road
covered with snow or ice
Install the compact spare tire on one of the rear wheels of the vehicle. Perform
the following steps and fit tire chains to
the front tires:
1 Replace a rear tire with the compact spare tire.
2 Replace the flat front tire with the tire
removed from the rear of the vehicle.
3 Fit tire chains to the front tires.
Page 535 of 678
533
9
9-1. Specifications
Vehicle specifications
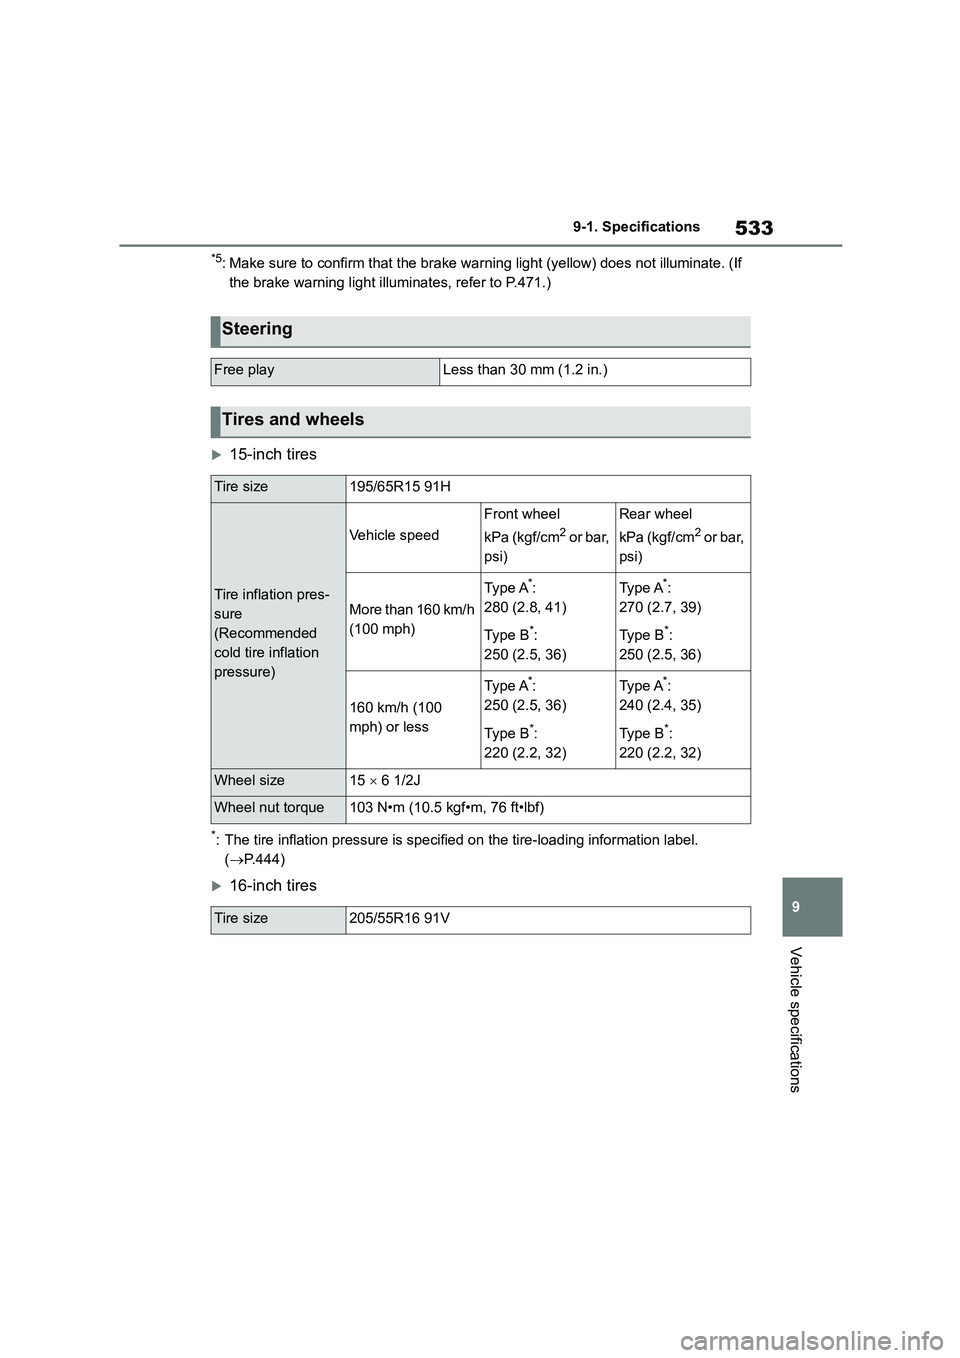
*5: Make sure to confirm that the brake warning light (yellow) does not illuminate. (If
the brake warning light illuminates, refer to P.471.)
15-inch tires
*: The tire inflation pressure is specified on the tire-loading information label.
( P.444)
16-inch tires
Steering
Free playLess than 30 mm (1.2 in.)
Tires and wheels
Tire size195/65R15 91H
Tire inflation pres-
sure
(Recommended
cold tire inflation
pressure)
Vehicle speed
Front wheel
kPa (kgf/cm2 or bar,
psi)
Rear wheel
kPa (kgf/cm2 or bar,
psi)
More than 160 km/h
(100 mph)
Typ e A*:
280 (2.8, 41)
Typ e B*:
250 (2.5, 36)
Ty p e A*:
270 (2.7, 39)
Ty p e B*:
250 (2.5, 36)
160 km/h (100
mph) or less
Typ e A*:
250 (2.5, 36)
Typ e B*:
220 (2.2, 32)
Ty p e A*:
240 (2.4, 35)
Ty p e B*:
220 (2.2, 32)
Wheel size15 6 1/2J
Wheel nut torque103 N•m (10.5 kgf•m, 76 ft•lbf)
Tire size205/55R16 91V
Page 536 of 678
5349-1. Specifications
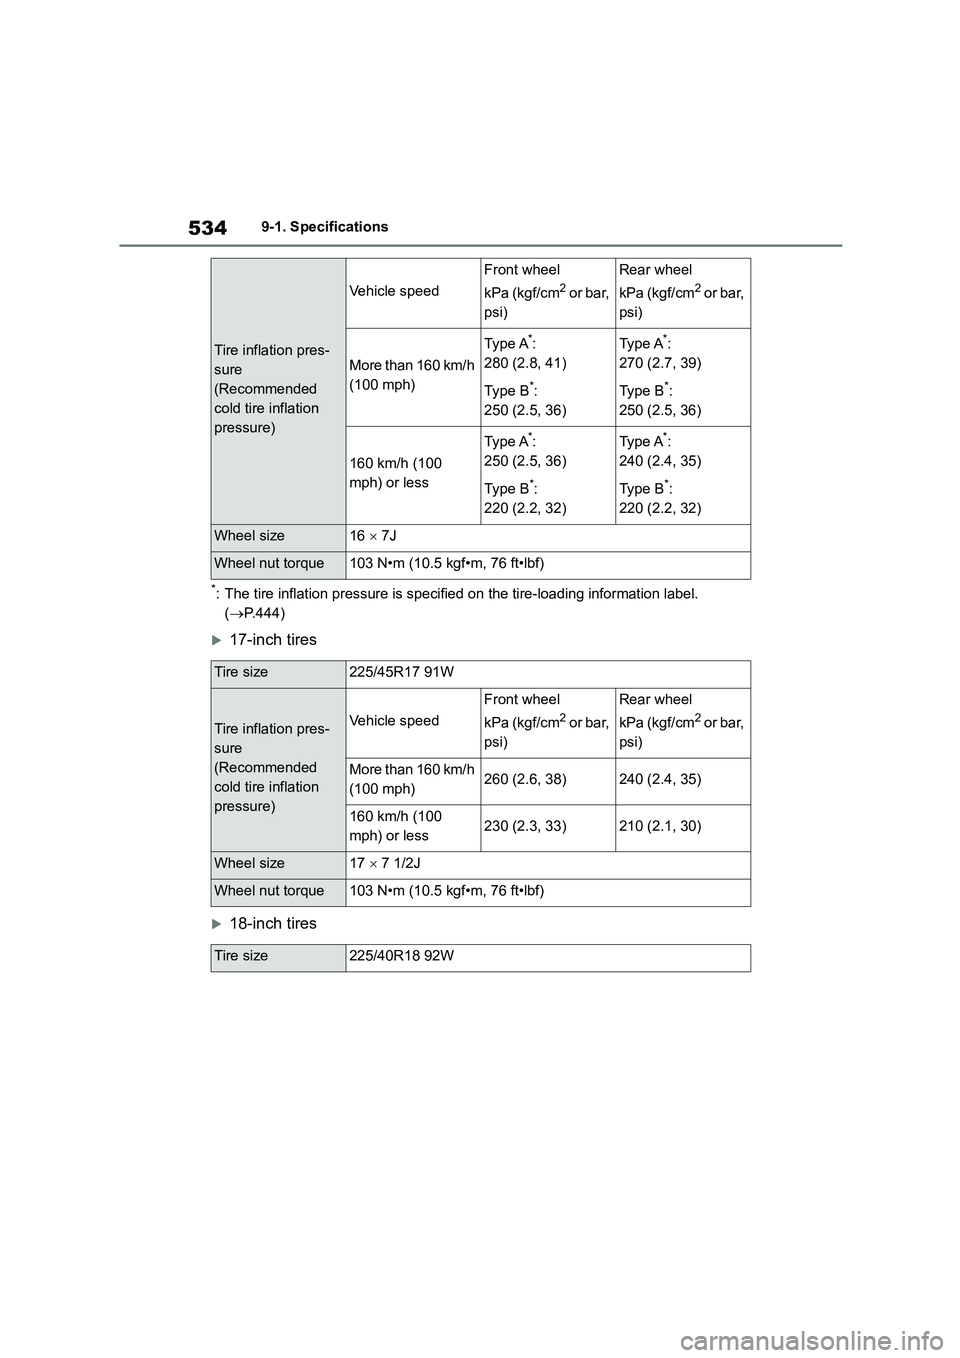
*: The tire inflation pressure is specified on the tire-loading information label.
( P.444)
17-inch tires
18-inch tires
Tire inflation pres-
sure
(Recommended
cold tire inflation
pressure)
Vehicle speed
Front wheel
kPa (kgf/cm2 or bar,
psi)
Rear wheel
kPa (kgf/cm2 or bar,
psi)
More than 160 km/h
(100 mph)
Typ e A*:
280 (2.8, 41)
Typ e B*:
250 (2.5, 36)
Ty p e A*:
270 (2.7, 39)
Ty p e B*:
250 (2.5, 36)
160 km/h (100
mph) or less
Typ e A*:
250 (2.5, 36)
Typ e B*:
220 (2.2, 32)
Ty p e A*:
240 (2.4, 35)
Ty p e B*:
220 (2.2, 32)
Wheel size16 7J
Wheel nut torque103 N•m (10.5 kgf•m, 76 ft•lbf)
Tire size225/45R17 91W
Tire inflation pres-
sure
(Recommended
cold tire inflation
pressure)
Vehicle speed
Front wheel
kPa (kgf/cm2 or bar,
psi)
Rear wheel
kPa (kgf/cm2 or bar,
psi)
More than 160 km/h
(100 mph)260 (2.6, 38)240 (2.4, 35)
160 km/h (100
mph) or less230 (2.3, 33)210 (2.1, 30)
Wheel size17 7 1/2J
Wheel nut torque103 N•m (10.5 kgf•m, 76 ft•lbf)
Tire size225/40R18 92W