TOYOTA COROLLA 2022 (in English) Workshop Manual
Manufacturer: TOYOTA, Model Year: 2022, Model line: COROLLA, Model: TOYOTA COROLLA 2022Pages: 678, PDF Size: 147.24 MB
Page 51 of 678
49
1
1-2. Child safety
For safety and security
■When installing a child
restraint system to a front pas-
senger seat
For the safety of a child, install a
child restraint system to a rear seat.
When installing a child restraint
system to a front passenger seat is
unavoidable, adjust the seat as fol-
lows and install t he child restraint
system:
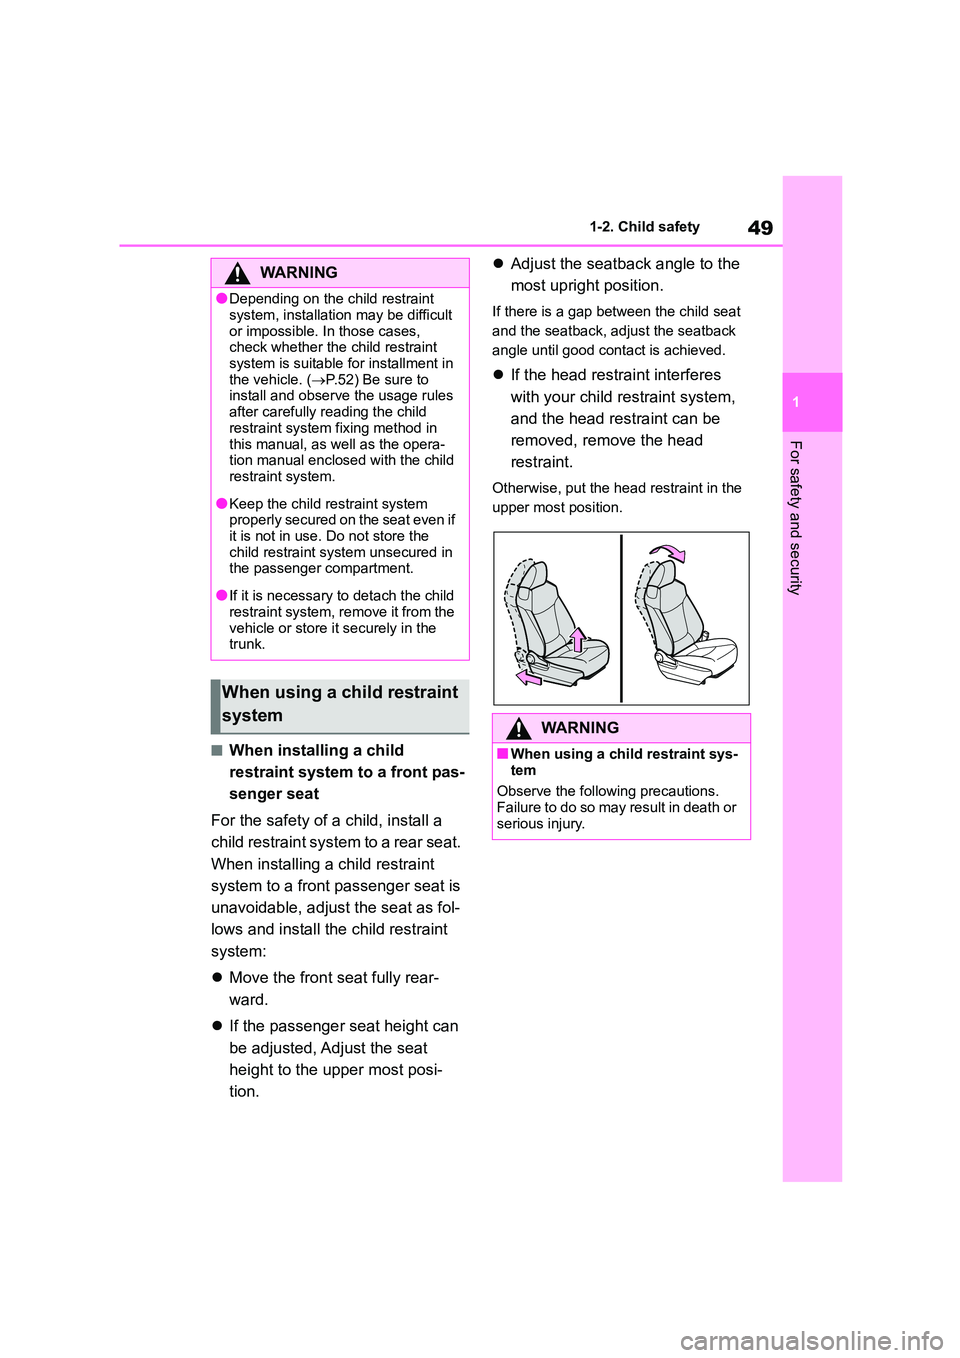
Move the front seat fully rear-
ward.
If the passenger seat height can
be adjusted, Adjust the seat
height to the upper most posi-
tion.
Adjust the seatback angle to the
most upright position.
If there is a gap between the child seat
and the seatback, adjust the seatback
angle until good contact is achieved.
If the head restraint interferes
with your child restraint system,
and the head restraint can be
removed, remove the head
restraint.
Otherwise, put the head restraint in the
upper most position.
WA R N I N G
●Depending on the child restraint
system, installation may be difficult
or impossible. In those cases, check whether the child restraint
system is suitable for installment in
the vehicle. ( P.52) Be sure to install and observe the usage rules
after carefully reading the child
restraint system fixing method in
this manual, as well as the opera- tion manual enclosed with the child
restraint system.
●Keep the child re straint system
properly secured on the seat even if
it is not in use. Do not store the child restraint system unsecured in
the passenger compartment.
●If it is necessary to detach the child
restraint system, remove it from the
vehicle or store it securely in the trunk.
When using a child restraint
systemWA R N I N G
■When using a child restraint sys-
tem
Observe the following precautions. Failure to do so may result in death or
serious injury.
Page 52 of 678
501-2. Child safety
WA R N I N G
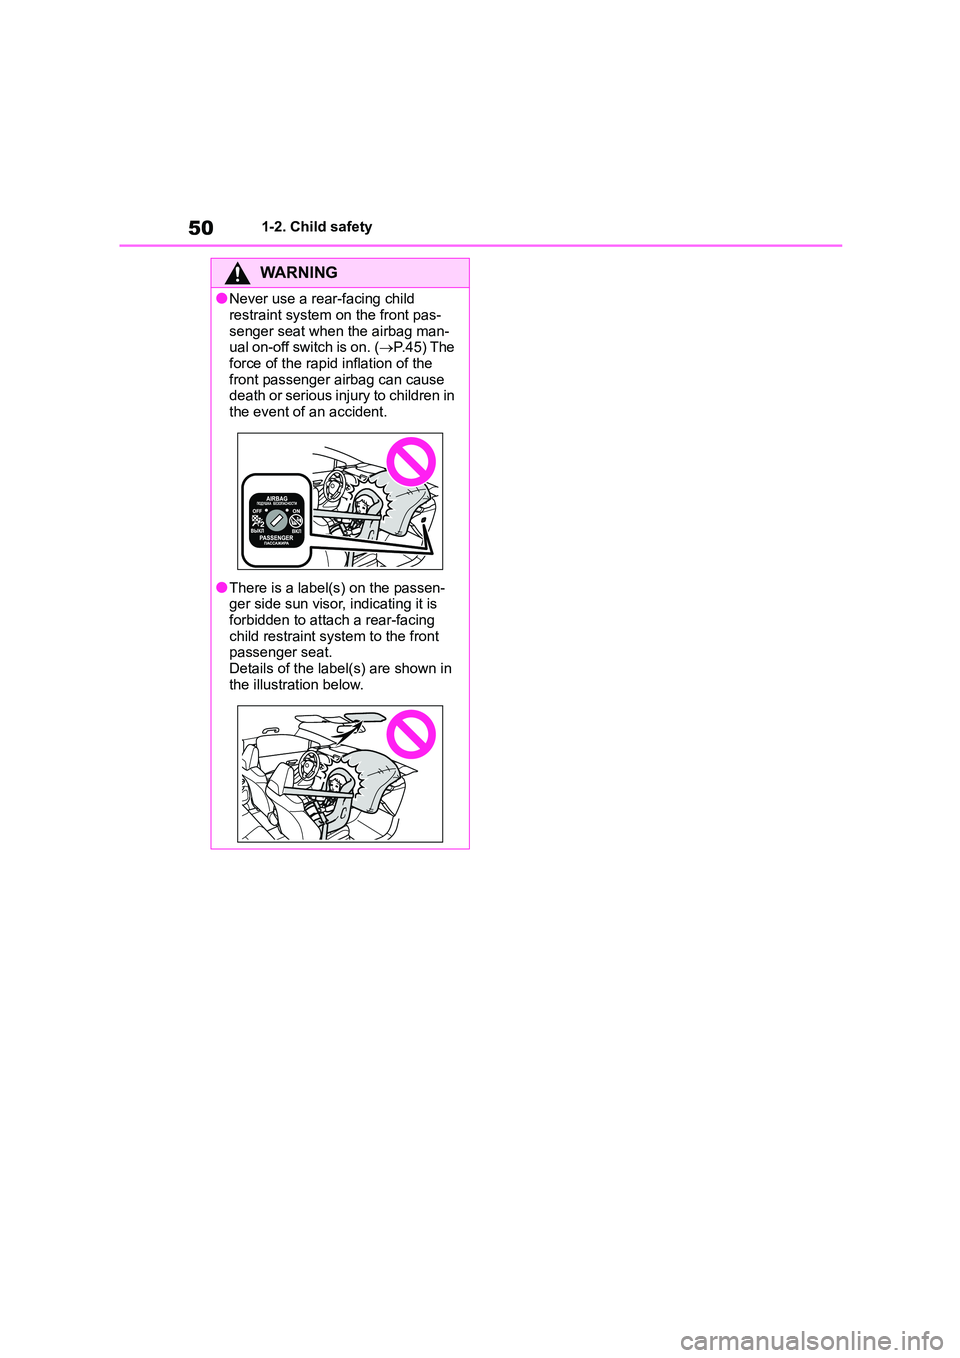
●Never use a rear-facing child
restraint system on the front pas-
senger seat when the airbag man- ual on-off switch is on. ( P.45) The
force of the rapid inflation of the
front passenger airbag can cause death or serious injury to children in
the event of an accident.
●There is a label(s) on the passen- ger side sun visor, indicating it is
forbidden to attach a rear-facing
child restraint system to the front passenger seat.
Details of the label(s) are shown in
the illustration below.
Page 53 of 678
51
1
1-2. Child safety
For safety and security
WA R N I N G
WA R N I N G
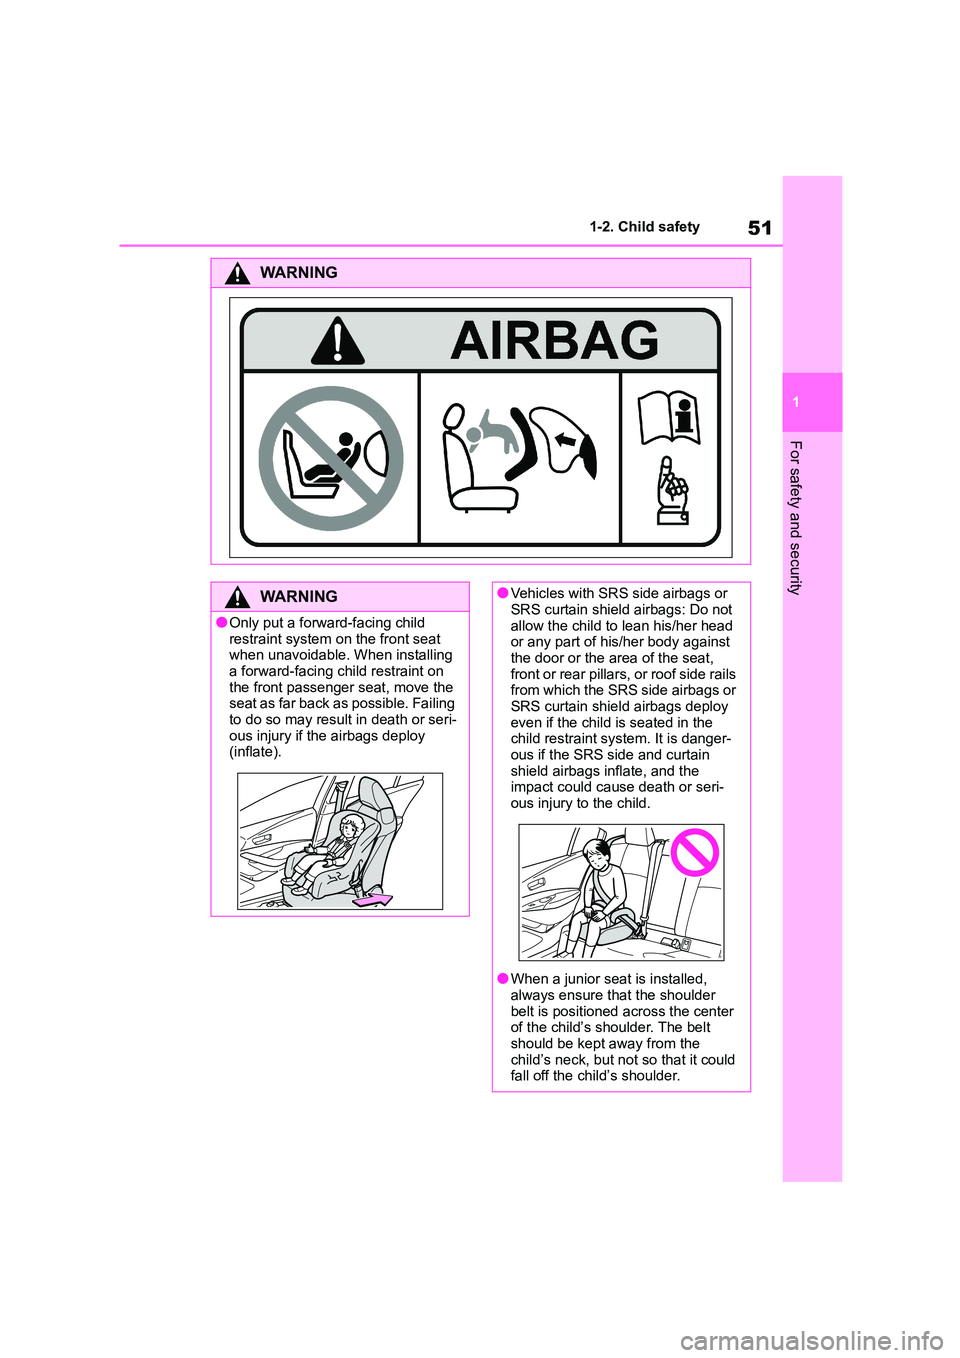
●Only put a forward-facing child
restraint system on the front seat
when unavoidable. When installing a forward-facing child restraint on
the front passenger seat, move the
seat as far back as possible. Failing to do so may result in death or seri-
ous injury if the airbags deploy
(inflate).
●Vehicles with SRS side airbags or
SRS curtain shield airbags: Do not
allow the child to lean his/her head or any part of his/her body against
the door or the area of the seat,
front or rear pillars, or roof side rails
from which the SRS side airbags or SRS curtain shield airbags deploy
even if the child is seated in the
child restraint system. It is danger- ous if the SRS side and curtain
shield airbags inflate, and the
impact could cause death or seri- ous injury to the child.
●When a junior seat is installed, always ensure that the shoulder
belt is positioned across the center
of the child’s shoulder. The belt should be kept away from the
child’s neck, but not so that it could
fall off the child’s shoulder.
Page 54 of 678
521-2. Child safety
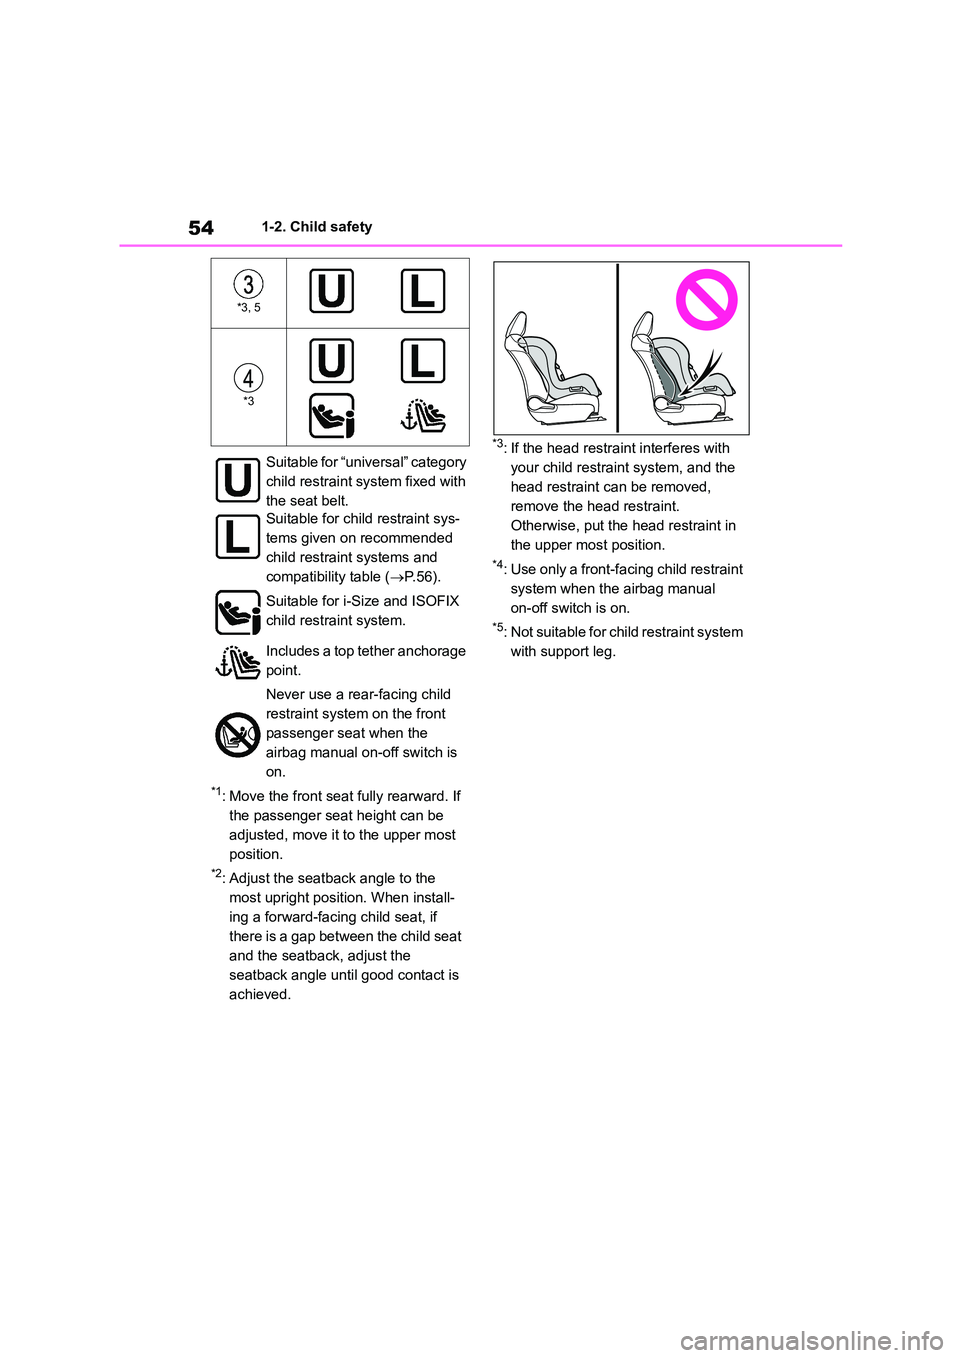
■Child restraint system compat-
ibility for each seating posi-
tion
Compatibility of eac h seating posi-
tion with child restraint systems
( P.53) displays the type of child
restraint systems that can be used
and possible seating positions for
installation using symbols.
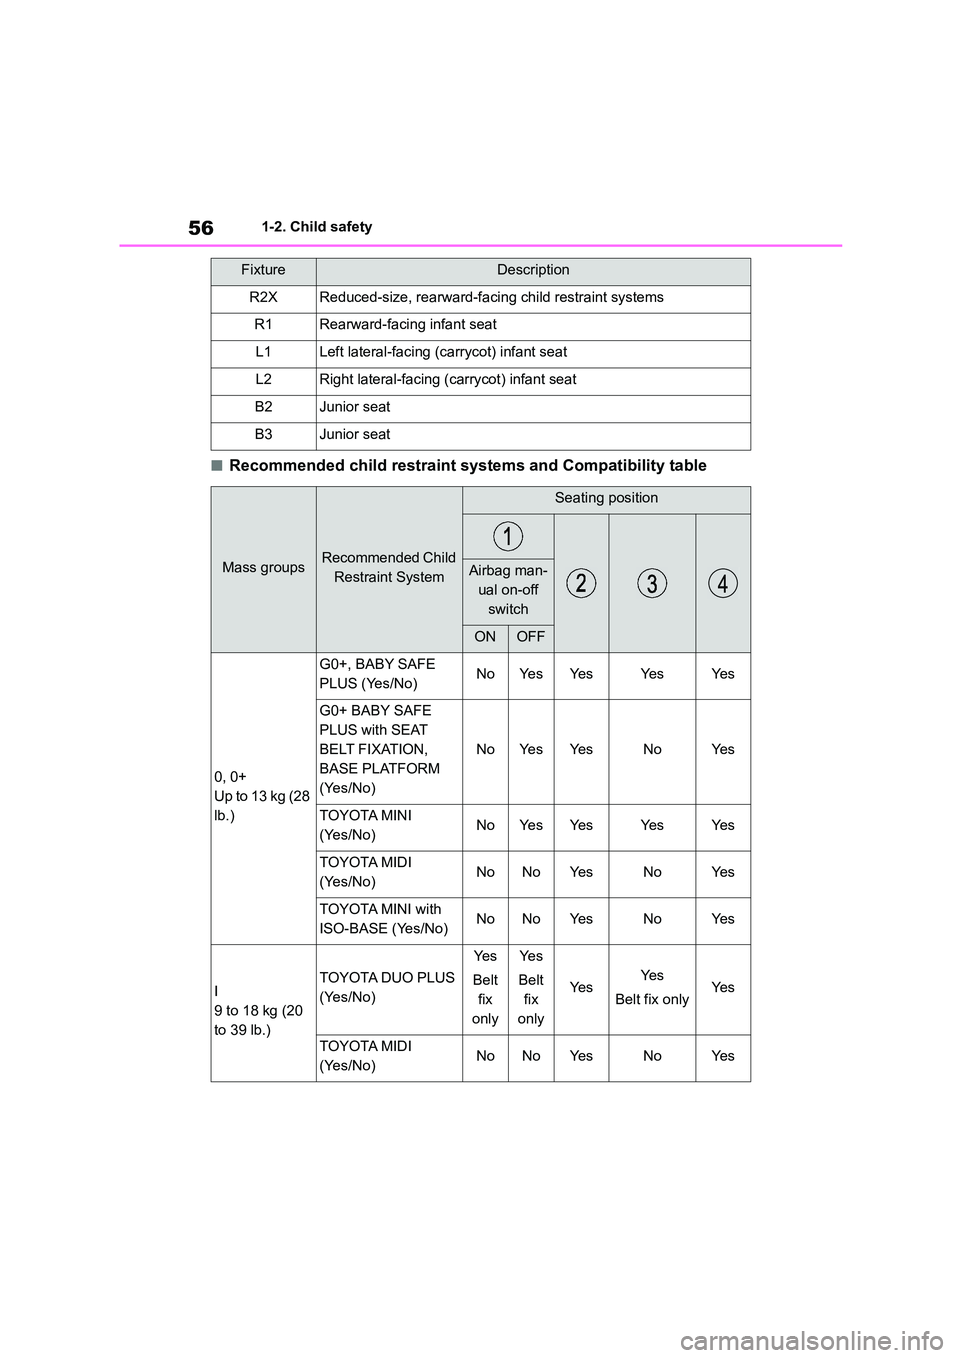
Also, the recommended child
restraint system that is suitable for
your child can be selected.
Otherwise, check [Recommended
child restraint systems and Com-
patibility table] for recommended
child restraint systems. ( P. 5 6 )
Check the selected child restraint
system together with the following
[Before confirming the compatibility
of each seating position with child
restraint systems].
■Before confirming the compat-
ibility of each seating position
with child restraint systems
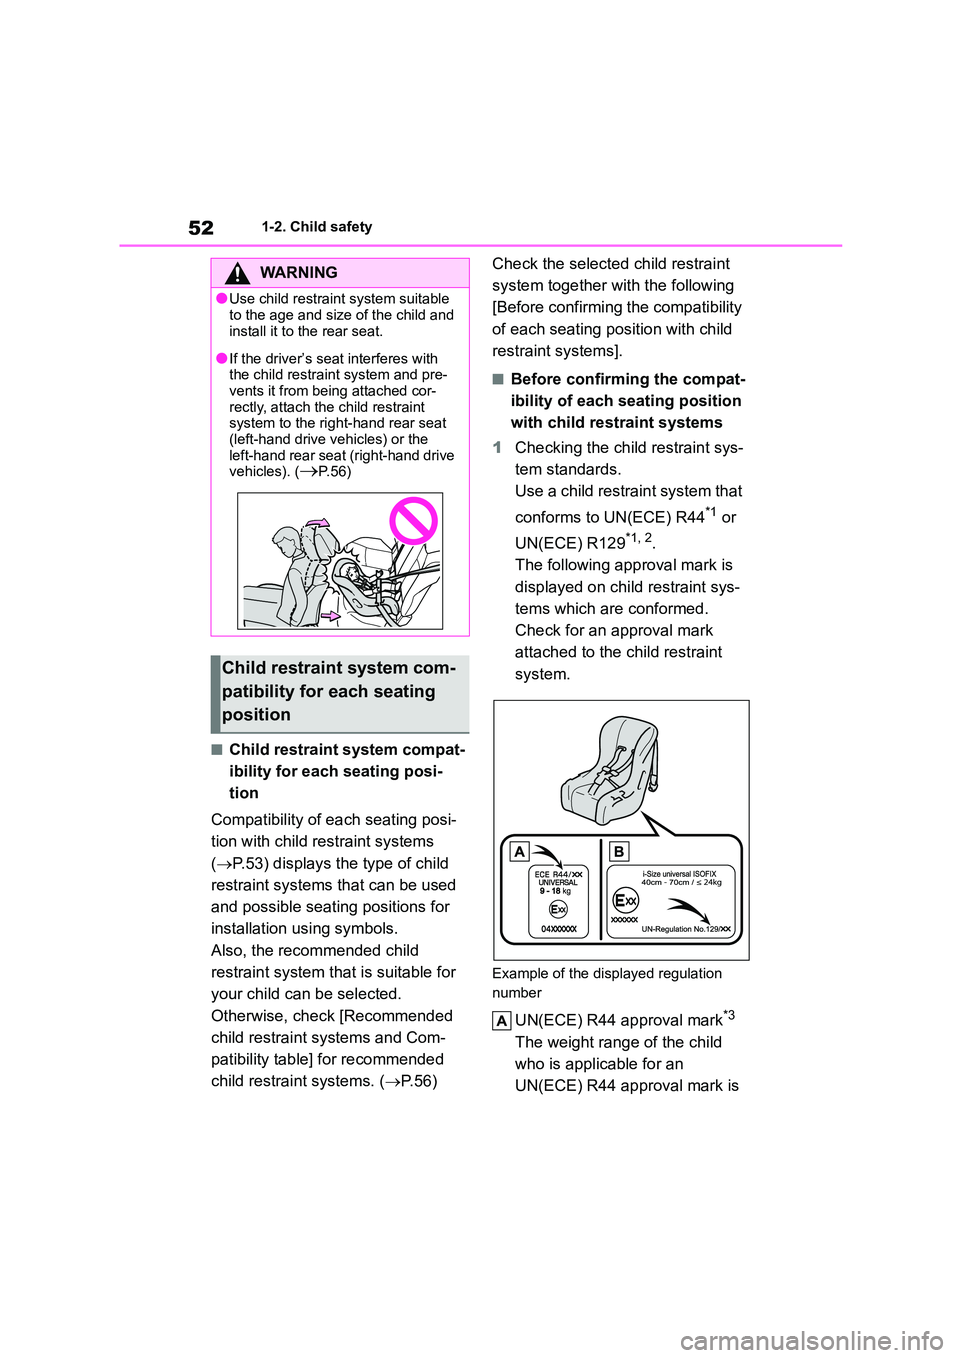
1 Checking the child restraint sys-
tem standards.
Use a child restraint system that
conforms to UN(ECE) R44*1 or
UN(ECE) R129*1, 2.
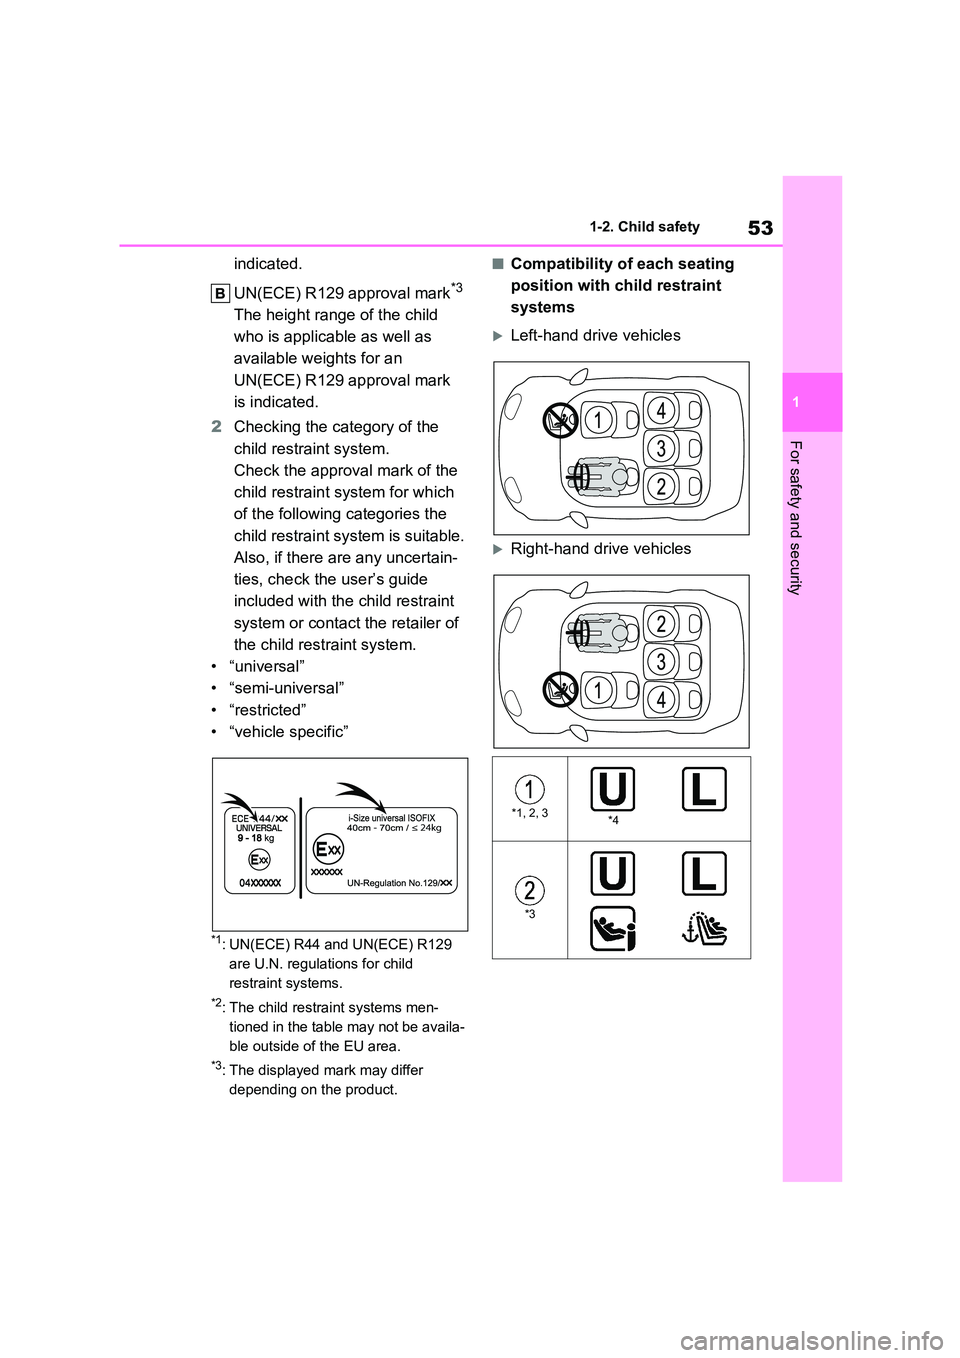
The following approval mark is
displayed on child restraint sys-
tems which are conformed.
Check for an approval mark
attached to the child restraint
system.
Example of the displayed regulation
number
UN(ECE) R44 approval mark*3
The weight range of the child
who is applicable for an
UN(ECE) R44 approval mark is
WA R N I N G
●Use child restraint system suitable
to the age and size of the child and
install it to the rear seat.
●If the driver’s seat interferes with
the child restraint system and pre- vents it from being attached cor-
rectly, attach the child restraint
system to the righ t-hand rear seat
(left-hand drive vehicles) or the left-hand rear seat (right-hand drive
vehicles). (P. 5 6 )
Child restraint system com-
patibility for each seating
position
Page 55 of 678
53
1
1-2. Child safety
For safety and security
indicated.
UN(ECE) R129 approval mark*3
The height range of the child
who is applicable as well as
available weights for an
UN(ECE) R129 approval mark
is indicated.
2 Checking the category of the
child restraint system.
Check the approval mark of the
child restraint system for which
of the following categories the
child restraint system is suitable.
Also, if there are any uncertain-
ties, check the user’s guide
included with th e child restraint
system or contact the retailer of
the child rest raint system.
• “universal”
• “semi-universal”
• “restricted”
• “vehicle specific”
*1: UN(ECE) R44 and UN(ECE) R129
are U.N. regulations for child
restraint systems.
*2: The child restraint systems men-
tioned in the table may not be availa-
ble outside of the EU area.
*3: The displayed mark may differ
depending on the product.
■Compatibility of each seating
position with child restraint
systems
Left-hand drive vehicles
Right-hand drive vehicles
*1, 2, 3*4
*3
Page 56 of 678
541-2. Child safety
*1: Move the front seat fully rearward. If
the passenger seat height can be
adjusted, move it to the upper most
position.
*2: Adjust the seatback angle to the
most upright position. When install-
ing a forward-facing child seat, if
there is a gap between the child seat
and the seatback, adjust the
seatback angle until good contact is
achieved.
*3: If the head restraint interferes with
your child restra int system, and the
head restraint can be removed,
remove the head restraint.
Otherwise, put the head restraint in
the upper most position.
*4: Use only a front-fa cing child restraint
system when the airbag manual
on-off switch is on.
*5: Not suitable for ch ild restraint system
with support leg.
*3, 5
*3
Suitable for “universal” category
child restraint syst em fixed with
the seat belt.
Suitable for child restraint sys-
tems given on recommended
child restraint systems and
compatibility table ( P. 5 6 ) .
Suitable for i-Size and ISOFIX
child restraint system.
Includes a top tether anchorage
point.
Never use a rear-facing child
restraint system on the front
passenger seat when the
airbag manual on-off switch is
on.
Page 57 of 678
55
1
1-2. Child safety
For safety and security
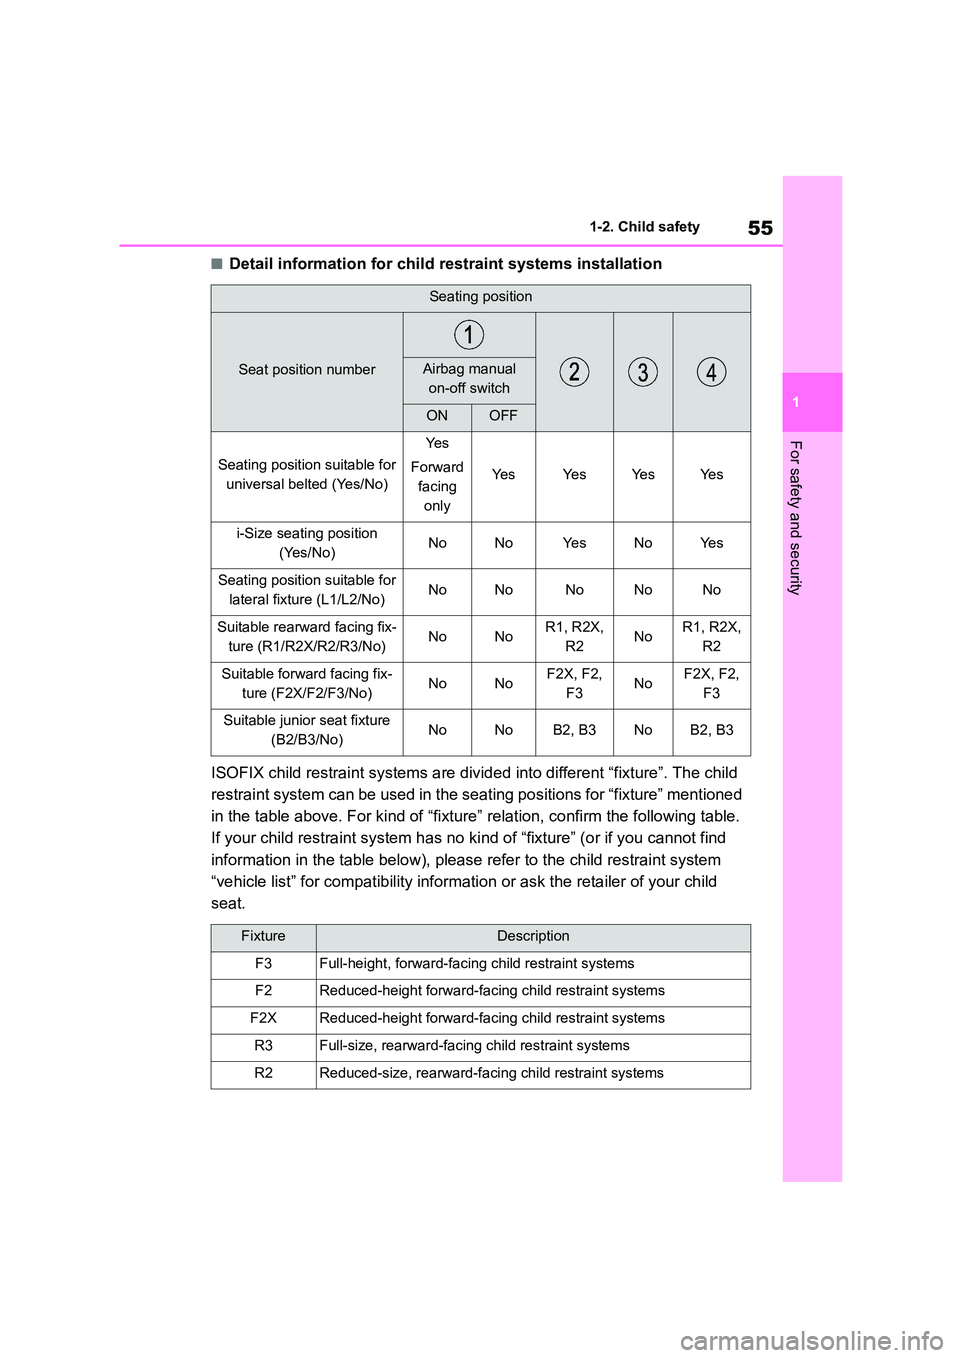
■Detail information for child restraint systems installation
ISOFIX child restraint systems are divid ed into different “fixture”. The child
restraint system can be used in the se ating positions for “fixture” mentioned
in the table above. For kind of “fixtu re” relation, confirm the following table.
If your child restraint system has no ki nd of “fixture” (or if you cannot find
information in the table below), please refer to the child restraint system
“vehicle list” for compatib ility information or ask the retailer of your child
seat.
Seating position
Seat position numberAirbag manual
on-off switch
ONOFF
Seating position suitable for
universal belted (Yes/No)
Ye s
Forward
facing
only
Ye sYe sYe sYe s
i-Size seating position
(Yes/No)NoNoYe sNoYe s
Seating position suitable for
lateral fixture (L1/L2/No)NoNoNoNoNo
Suitable rearward facing fix-
ture (R1/R2X/R2/R3/No)NoNoR1, R2X,
R2NoR1, R2X,
R2
Suitable forward facing fix-
ture (F2X/F2/F3/No)NoNoF2X, F2,
F3NoF2X, F2,
F3
Suitable junior seat fixture
(B2/B3/No)NoNoB2, B3NoB2, B3
FixtureDescription
F3Full-height, forward-faci ng child restraint systems
F2Reduced-height forward-facing child restraint systems
F2XReduced-height forward-facing child restraint systems
R3Full-size, rearward-facing child restraint systems
R2Reduced-size, rearward-facing child restraint systems
Page 58 of 678
561-2. Child safety
■Recommended child restraint systems and Compatibility table
R2XReduced-size, rearward-facing child restraint systems
R1Rearward-facing infant seat
L1Left lateral-facing (carrycot) infant seat
L2Right lateral-facing (carrycot) infant seat
B2Junior seat
B3Junior seat
Mass groupsRecommended Child
Restraint System
Seating position
Airbag man-
ual on-off
switch
ONOFF
0, 0+
Up to 13 kg (28
lb.)
G0+, BABY SAFE
PLUS (Yes/No)NoYe sYe sYe sYe s
G0+ BABY SAFE
PLUS with SEAT
BELT FIXATION,
BASE PLATFORM
(Yes/No)
NoYe sYe sNoYe s
TOYOTA MINI
(Yes/No)NoYe sYe sYe sYe s
TOYOTA MIDI
(Yes/No)NoNoYe sNoYe s
TOYOTA MINI with
ISO-BASE (Yes/No)NoNoYe sNoYe s
I
9 to 18 kg (20
to 39 lb.)
TOYOTA DUO PLUS
(Yes/No)
Ye s
Belt
fix
only
Ye s
Belt
fix
only
Ye sYe s
Belt fix onlyYe s
TOYOTA MIDI
(Yes/No)NoNoYe sNoYe s
FixtureDescription
Page 59 of 678
57
1
1-2. Child safety
For safety and security
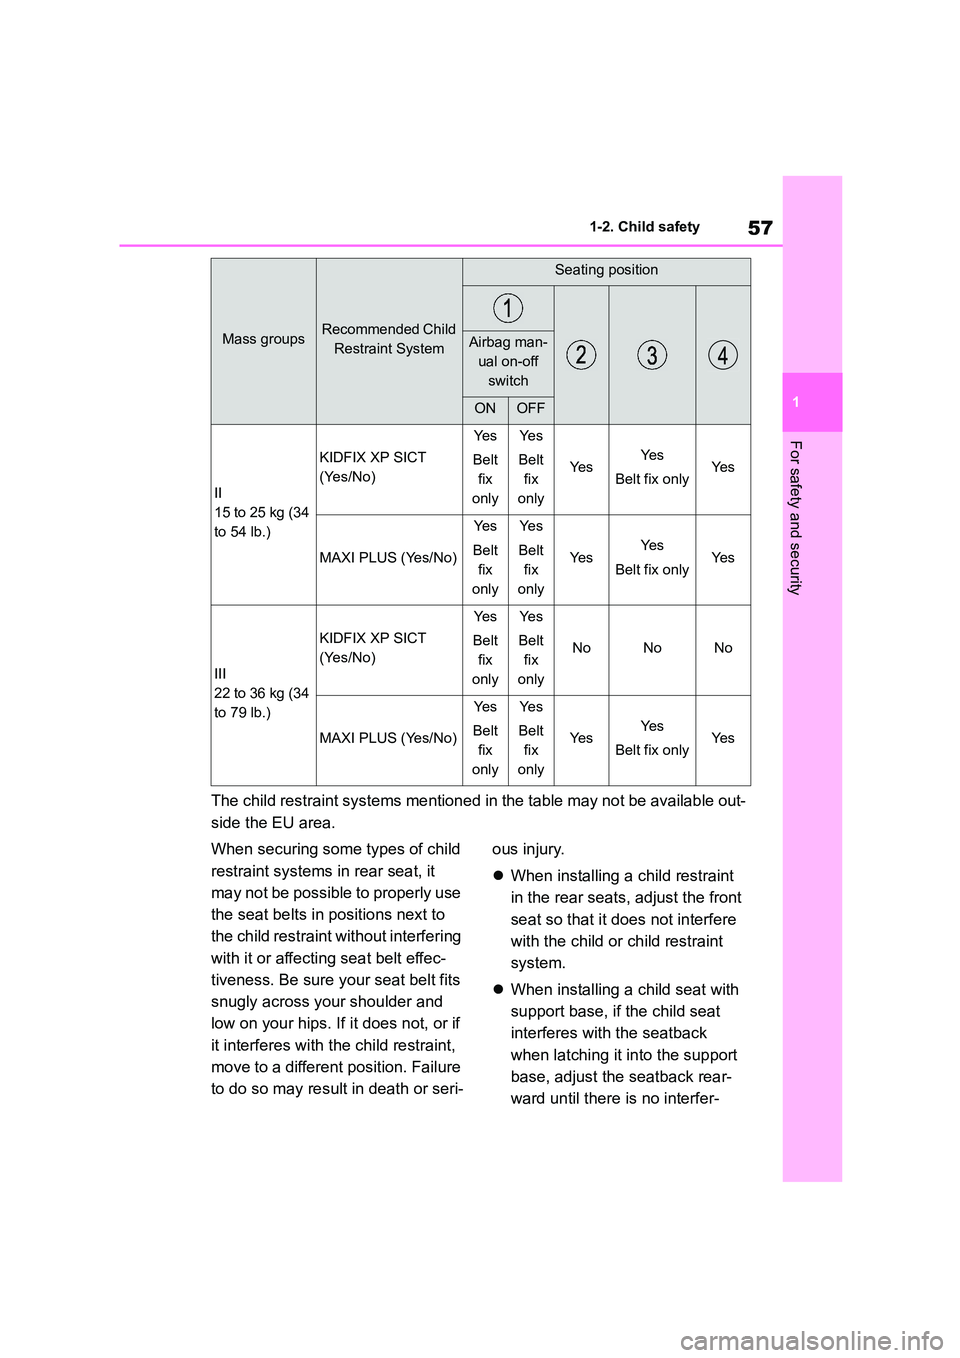
The child restraint systems mentioned in the table may not be available out-
side the EU area.
When securing some types of child
restraint systems in rear seat, it
may not be possible to properly use
the seat belts in positions next to
the child restraint without interfering
with it or affecting seat belt effec-
tiveness. Be sure your seat belt fits
snugly across your shoulder and
low on your hips. If it does not, or if
it interferes with the child restraint,
move to a different position. Failure
to do so may result in death or seri-
ous injury.
When installing a child restraint
in the rear seats, adjust the front
seat so that it does not interfere
with the child or child restraint
system.
When installing a child seat with
support base, if the child seat
interferes with the seatback
when latching it into the support
base, adjust the seatback rear-
ward until there is no interfer-
II
15 to 25 kg (34
to 54 lb.)
KIDFIX XP SICT
(Yes/No)
Ye s
Belt
fix
only
Ye s
Belt
fix
only
Ye sYe s
Belt fix onlyYe s
MAXI PLUS (Yes/No)
Ye s
Belt
fix
only
Ye s
Belt
fix
only
Ye sYe s
Belt fix onlyYe s
III
22 to 36 kg (34
to 79 lb.)
KIDFIX XP SICT
(Yes/No)
Ye s
Belt
fix
only
Ye s
Belt
fix
only
NoNoNo
MAXI PLUS (Yes/No)
Ye s
Belt
fix
only
Ye s
Belt
fix
only
Ye sYe s
Belt fix onlyYe s
Mass groupsRecommended Child
Restraint System
Seating position
Airbag man-
ual on-off
switch
ONOFF
Page 60 of 678
581-2. Child safety
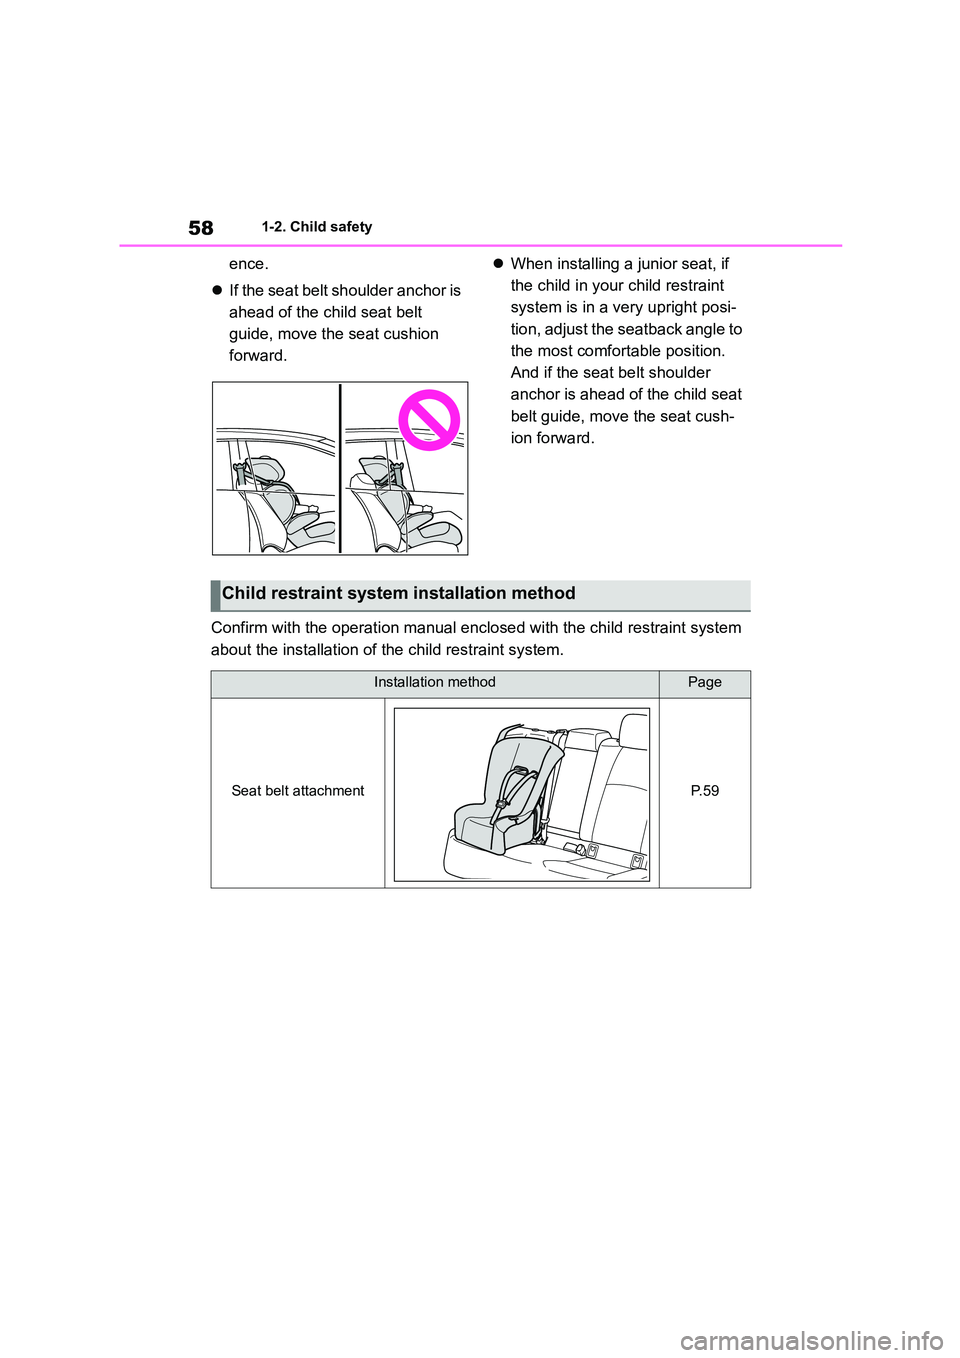
ence.
If the seat belt shoulder anchor is
ahead of the child seat belt
guide, move the seat cushion
forward.
When installing a junior seat, if
the child in your child restraint
system is in a very upright posi-
tion, adjust the seatback angle to
the most comfortable position.
And if the seat belt shoulder
anchor is ahead of the child seat
belt guide, move the seat cush-
ion forward.
Confirm with the operati on manual enclosed with the child restraint system
about the installation of the child restraint system.
Child restraint system installation method
Installation methodPage
Seat belt attachmentP. 5 9