CD player TOYOTA COROLLA CROSS 2022 Owners Manual
[x] Cancel search | Manufacturer: TOYOTA, Model Year: 2022, Model line: COROLLA CROSS, Model: TOYOTA COROLLA CROSS 2022Pages: 612, PDF Size: 17.18 MB
Page 39 of 612
391-1. For safe use
1
For safety and security
WARNING
●Do not use seat accessories
which cover the parts where the
SRS side airbags inflate as they
may interfere with inflation of
the SRS airbags. Such acces-
sories may prevent the side air-
bags from activating correctly,
disable the system or cause the
side airbags to inflate acciden-
tally, resulting in death or seri-
ous injury.
●Do not strike or apply significant
levels of force to the area of the
SRS airbag components or the
front doors.
Doing so can cause the SRS
airbags to malfunction.
●Do not touch any of the compo-
nent parts immediately after the
SRS airbags have deployed
(inflated) as they may be hot.
●If breathing becomes difficult
after the SRS airbags have
deployed, open a door or win-
dow to allow fresh air in, or
leave the vehicle if it is safe to
do so. Wash off any residue as
soon as possible to prevent skin
irritation.
●If the areas where the SRS air-
bags are stored, such as the
steering wheel pad and front
and rear pillar garnishes, are
damaged or cracked, have
them replaced by your Toyota
dealer.
●Do not place anything, such as
a cushion, on the front passen-
ger’s seat. Doing so will
disperse the passenger’s
weight, which prevents the sen-
sor from detecting the passen-
ger’s weight properly. As a
result, the SRS front airbags for
the front passenger may not
deploy in the event of a colli-
sion.
■Modification and disposal of
SRS airbag system compo-
nents
Do not dispose of your vehicle or
perform any of the following modi-
fications without consulting your
Toyota dealer. The SRS airbags
may malfunction or deploy
(inflate) accidentally, causing
death or serious injury.
●Installation, removal, disassem-
bly and repair of the SRS air-
bags
●Repairs, modifications, removal
or replacement of the steering
wheel, instrument panel, dash-
board, seats or seat upholstery,
front, side and rear pillars, roof
side rails, front door panels,
front door trims or front door
speakers
●Modifications to the front door
panel (such as making a hole in
it)
●Repairs or modifications of the
front fender, front bumper, or
side of the occupant compart-
ment
●Installation of a grille guard (bull
bars, kangaroo bar, etc.), snow
plows, winches or roof luggage
carrier
●Modifications to the vehicle’s
suspension system
●Installation of electronic devices
such as mobile two-way radios
and CD players
●Modifications to your vehicle for
a person with a physical disabil-
ity
Page 121 of 612
1213-2. Opening, closing and locking the doors
3
Before driving
●When carrying the electronic key
together with the following devices
that emit radio waves
• Another vehicle’s electronic key or a wireless key that emits radio
waves
• Personal computers or personal digital assistants (PDAs)
• Digital audio players
• Portable game systems
●If window tint with a metallic con-
tent or metallic objects are
attached to the rear window
●When the electronic key is placed
near a battery charger or elec-
tronic devices
●When the vehicle is parked in a
pay parking spot where radio
waves are emitted
If the doors cannot be
locked/unlocked using the smart key
system, lock/unlock the doors by
performing any of the following:
●Bring the electronic key close to
either front door handle and oper-
ate the entry function.
●Operate the wireless remote con-
trol.
If the doors cannot be
locked/unlocked using the above
methods, use the mechanical key.
( P.530)
If the engine cannot be started using
the smart key system, refer to
P.531.
■Note for the entry function
●Even when the electronic key is
within the effective range (detec-
tion areas), the system may not
operate properly in the following
cases:
• The electronic key is too close to the window or outside door han-
dle, near the ground, or in a high
place when the doors are locked
or unlocked.
• The electronic key is on the instru-
ment panel, luggage compartment
or floor, or in the door pockets or
glove box when the engine is started or engine switch modes
are changed.
●Do not leave the electronic key on
top of the instrument panel or near
the door pockets when exiting the
vehicle. Depending on the radio
wave reception conditions, it may
be detected by the antenna out-
side the cabin and the door will
become lockable from the outside,
possibly trapping the electronic
key inside the vehicle.
●As long as the electronic key is
within the effective range, the
doors may be locked or unlocked
by anyone. However, only the
doors detecting the electronic key
can be used to unlock the vehicle.
●Even if the electronic key is not
inside the vehicle, it may be possi-
ble to start the engine if the elec-
tronic key is near the window.
●The doors may unlock or lock if a
large amount of water splashes on
the door handle, such as in the
rain or in a car wash when the
electronic key is within the effec-
tive range. (The
doors will auto-
matically be locked after
approximately 60 seconds if the
doors are not opened and closed.)
●If the wireless remote control is
used to lock the doors when the
electronic key is near the vehicle,
there is a possibilit y that the door
may not be unlocked by the entry
function. (Use the wireless remote
control to unlock the doors.)
●If the doors have been locked
from outside of the vehicle and are
then not unlocked using the wire-
less remote control or smart key
system, the engine cannot be
started using the smart key sys-
tem. (However, if the doors have
been locked from inside the vehi-
cle, the engine can be started
using the smart key system.)
If it is necessary to start the
engine, it can be started using the
procedure in “If the electronic key
dose not operate properly”
Page 298 of 612
2985-3. Connectivity settings
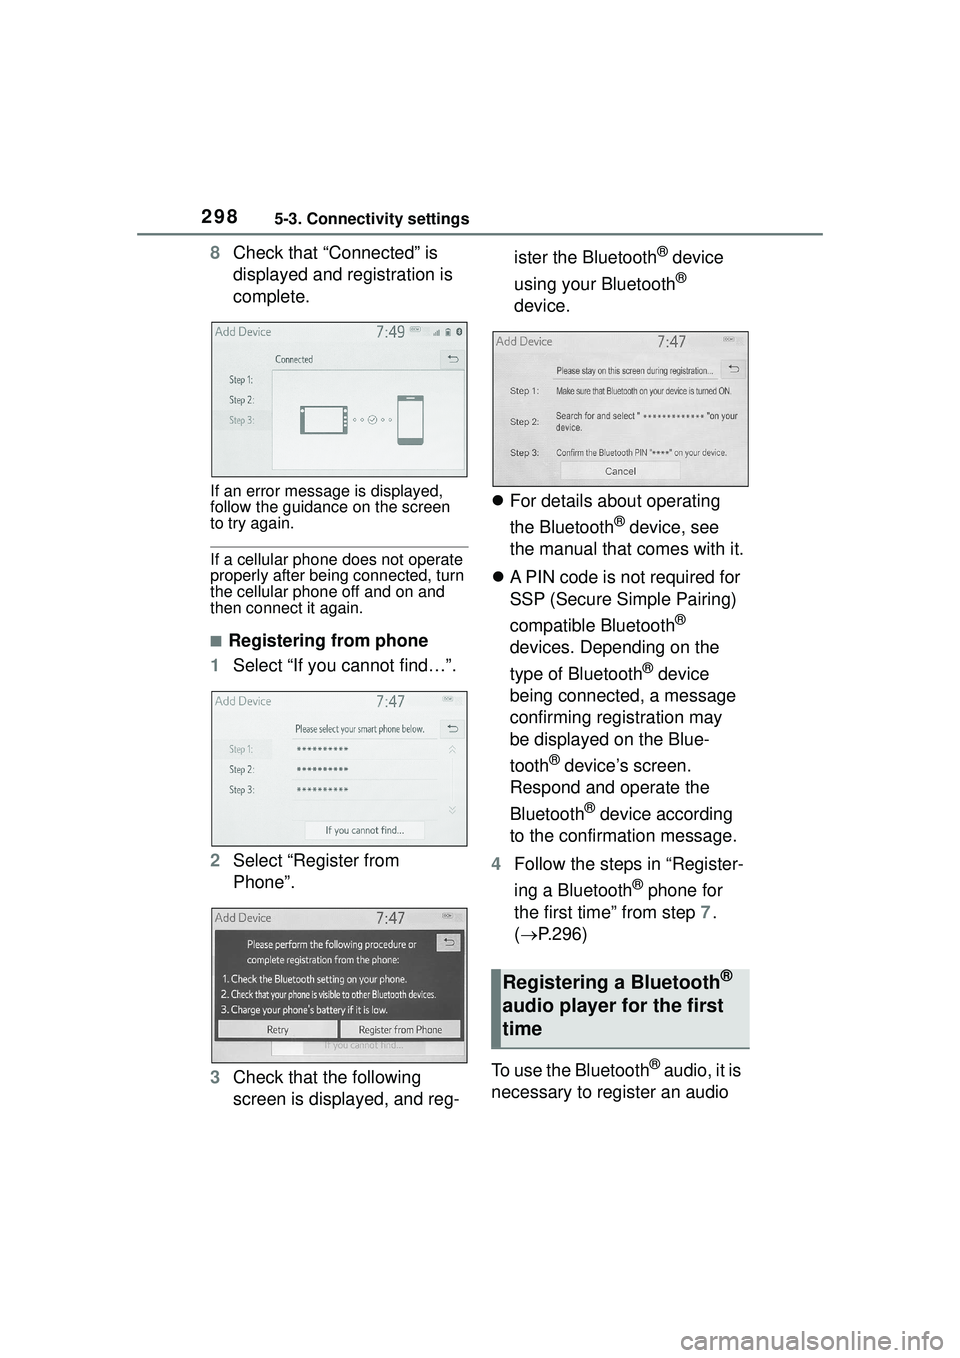
8Check that “Connected” is
displayed and registration is
complete.
If an error message is displayed,
follow the guidance on the screen
to try again.
If a cellular phone does not operate
properly after being connected, turn
the cellular phone off and on and
then connect it again.
■Registering from phone
1 Select “If you cannot find…”.
2 Select “Register from
Phone”.
3 Check that the following
screen is displayed, and reg- ister the Bluetooth
® device
using your Bluetooth
®
device.
For details about operating
the Bluetooth
® device, see
the manual that comes with it.
A PIN code is not required for
SSP (Secure Simple Pairing)
compatible Bluetooth
®
devices. Depending on the
type of Bluetooth
® device
being connected, a message
confirming registration may
be displayed on the Blue-
tooth
® device’s screen.
Respond and operate the
Bluetooth
® device according
to the confirmation message.
4 Follow the steps in “Register-
ing a Bluetooth
® phone for
the first time” from step 7.
( P.296)
To use the Bluetooth
® audio, it is
necessary to register an audio
Registering a Bluetooth®
audio player for the first
time
Page 299 of 612
2995-3. Connectivity settings
5
Audio
player with the system.
Once the player has been regis-
tered, it is possible to use the
Bluetooth
® audio.
This operation cannot be per-
formed while driving.
For details about registering a
Bluetooth
® device: P.296
1 Turn the Bluetooth
® connec-
tion setting of your audio
player on.
This function is not available when
the Bluetooth® connection setting
of your audio player is set to off.
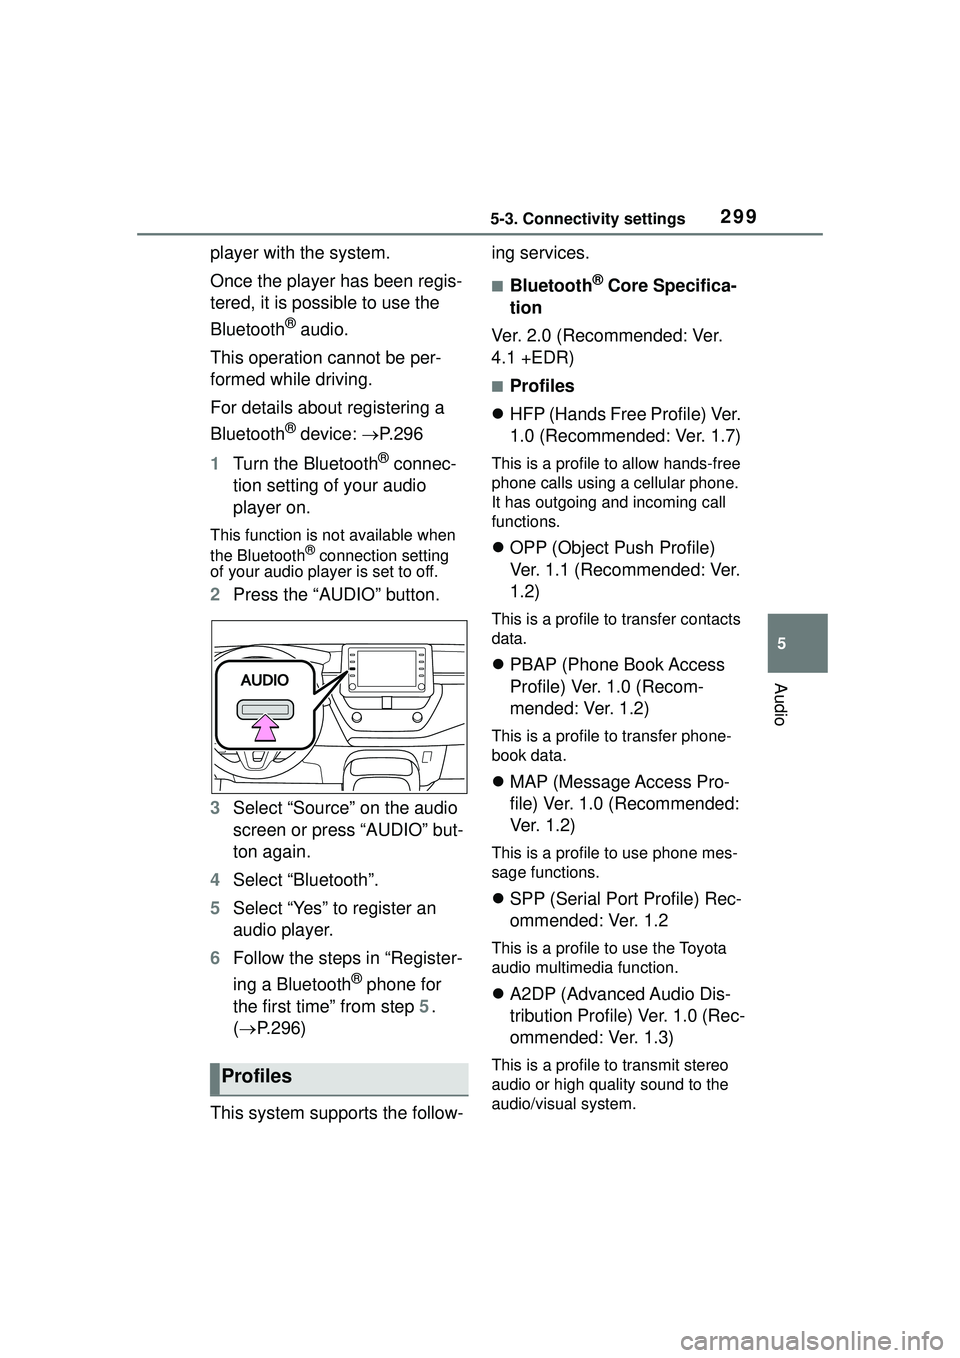
2 Press the “AUDIO” button.
3 Select “Source” on the audio
screen or press “AUDIO” but-
ton again.
4 Select “Bluetooth”.
5 Select “Yes” to register an
audio player.
6 Follow the steps in “Register-
ing a Bluetooth
® phone for
the first time” from step 5.
( P.296)
This system supports the follow- ing services.
■Bluetooth® Core Specifica-
tion
Ver. 2.0 (Recommended: Ver.
4.1 +EDR)
■Profiles
HFP (Hands Free Profile) Ver.
1.0 (Recommended: Ver. 1.7)
This is a profile to allow hands-free
phone calls using a cellular phone.
It has outgoing and incoming call
functions.
OPP (Object Push Profile)
Ver. 1.1 (Recommended: Ver.
1.2)
This is a profile to transfer contacts
data.
PBAP (Phone Book Access
Profile) Ver. 1.0 (Recom-
mended: Ver. 1.2)
This is a profile to transfer phone-
book data.
MAP (Message Access Pro-
file) Ver. 1.0 (Recommended:
Ve r. 1 . 2 )
This is a profile to use phone mes-
sage functions.
SPP (Serial Port Profile) Rec-
ommended: Ver. 1.2
This is a profile to use the Toyota
audio multimedia function.
A2DP (Advanced Audio Dis-
tribution Profile) Ver. 1.0 (Rec-
ommended: Ver. 1.3)
This is a profile to transmit stereo
audio or high quality sound to the
audio/visual system.Profiles
Page 301 of 612

3015-3. Connectivity settings
5
Audio
4Select the desired item to be
set.
Connecting a Bluetooth
®
device and editing the Blue-
tooth
®device information
( P.301, 304)
Registering a Bluetooth
®
device ( P.303)
Deleting a Bluetooth
® device
( P.303)
Setting the Bluetooth
® sys-
tem ( P.305)
Up to 5 Bluetooth
® devices
(Phones (HFP) and audio play-
ers (AVP)) can be registered.
If more than 1 Bluetooth
® device has been registered, select
which device to connect to.
1
Display the Bluetooth
® set-
tings screen. ( P.300)
2 Select “Registered Device”.
3 Select the device to be con-
nected.
: Phone
: Audio player
: Phone/Toyota apps services
The profile icon for a currently
connected device will be dis-
played in color.
Selecting a profile icon which
is not currently connected will
switch the connection to the
function.
If the desired Bluetooth
®
device is not on the list, select
“Add New Device” to register
the device. ( P.303)
Bluetooth® setup screen
Connecting a Bluetooth®
device
Page 303 of 612
3035-3. Connectivity settings
5
Audio
1Display the Bluetooth® set-
tings screen. ( P.300)
2 Follow the steps in “Connect-
ing a Bluetooth
® device” from
step 2. (P.301)
■Reconnecting the Blue-
tooth
® phone
If a Bluetooth
® phone is discon-
nected due to poor reception
from the Bluetooth
® network
when the engine switch is in
ACC or ON, the system auto-
matically reconnects the Blue-
tooth
® phone.
Up to 5 Bluetooth
® devices can
be registered.
Bluetooth
® compatible phones
(HFP) and audio players (AVP)
can be registered simultane-
ously.
This operation cannot be per-
formed while driving.
1 Display the Bluetooth
® set-
tings screen. ( P.300)
2 Select “Add New Device”.
When another Bluetooth®
device is connected
To disconnect the Bluetooth®
device, select “Yes”.
When 5 Bluetooth® devices
have already been registered
A registered device needs to be
replaced. Select “Yes”, and select
the device to be replaced.
3 Follow the steps in “Register-
ing a Bluetooth
® phone for
the first time” from step 5.
( P.296)
This operation cannot be per-
formed while driving.
1 Display the Bluetooth
® set-
tings screen. ( P.300)
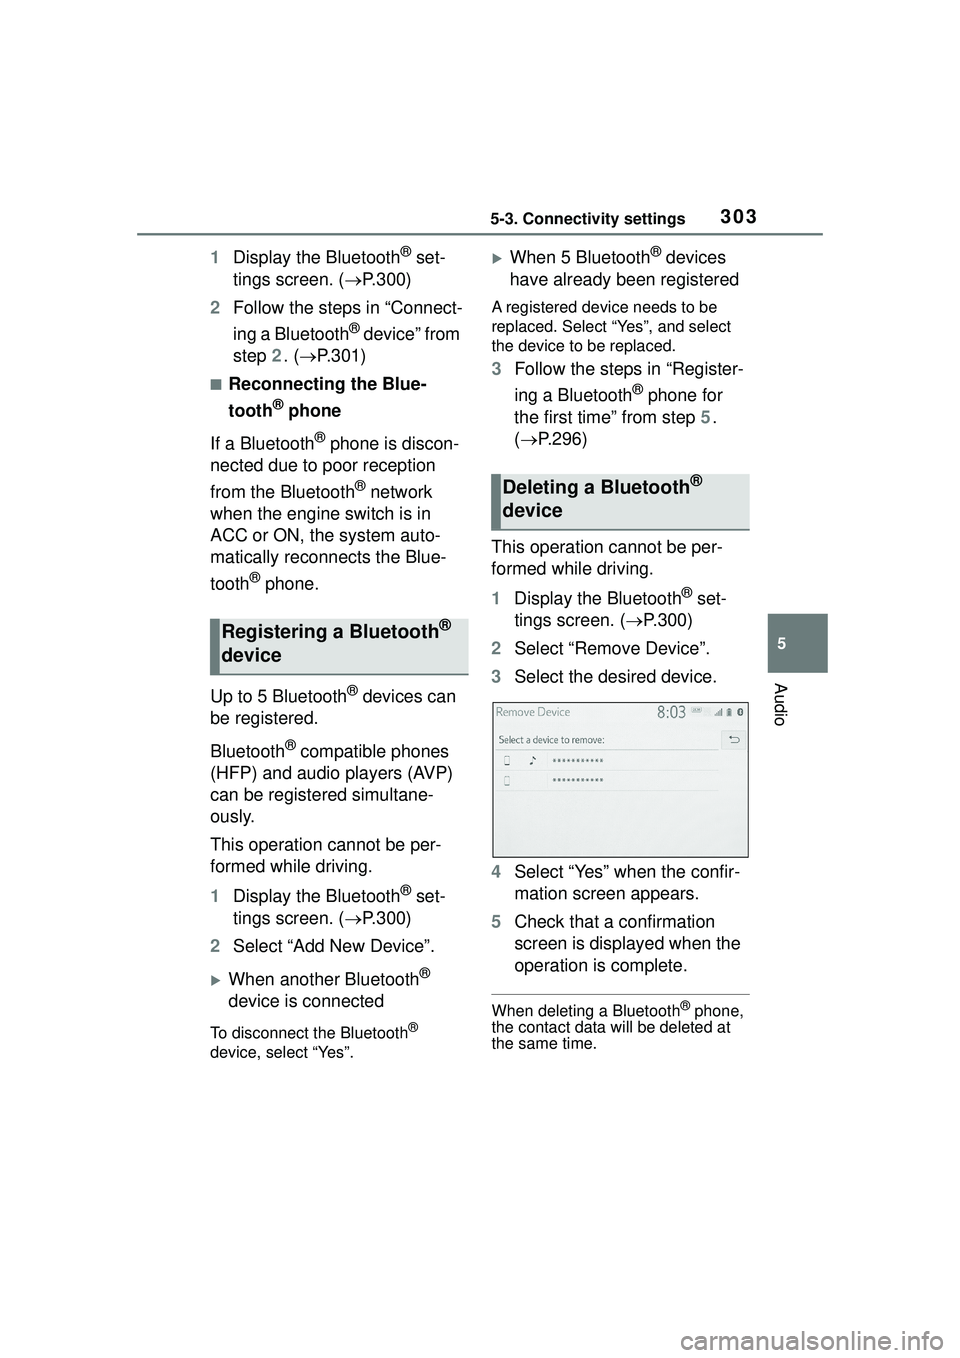
2 Select “Remove Device”.
3 Select the desired device.
4 Select “Yes” when the confir-
mation screen appears.
5 Check that a confirmation
screen is displayed when the
operation is complete.
When deleting a Bluetooth® phone,
the contact data will be deleted at
the same time.
Registering a Bluetooth®
device
Deleting a Bluetooth®
device
Page 304 of 612

3045-3. Connectivity settings
The Bluetooth® device’s infor-
mation can be displayed on the
screen. The displayed informa-
tion can be edited.
This operation cannot be per-
formed while driving.
1 Display the Bluetooth
® set-
tings screen. ( P.300)
2 Select “Registered Device”.
3 Select the desired device to
be edited.
4 Select “Device Info”. 5
Confirm and change the
Bluetooth
® device informa-
tion.
The name of the Bluetooth
®
device is displayed. It can be
changed to a desired name.
( P.305)
Select to set the Bluetooth
®
audio player connection
method. ( P.305)
Device address is unique to
the device and cannot be
changed.
Phone number is unique to
the Bluetooth
® phone and
cannot be changed.
Compatibility profile is unique
to the Bluetooth
® device and
cannot be changed.
Select to reset all setup
items.
Editing the Bluetooth®
device information
Page 305 of 612
3055-3. Connectivity settings
5
Audio
●If 2 Bluetooth® devices have been
registered with the same device
name, the devices can be distin-
guished referring to the device’s
address.
●Depending on the type of Blue-
tooth® phone, some information
may not be displayed.
1 Select “Device Name”.
2 Enter the name and select
“OK”.
Even if the device name is changed,
the name registered in your Blue-
tooth
® device does not change.
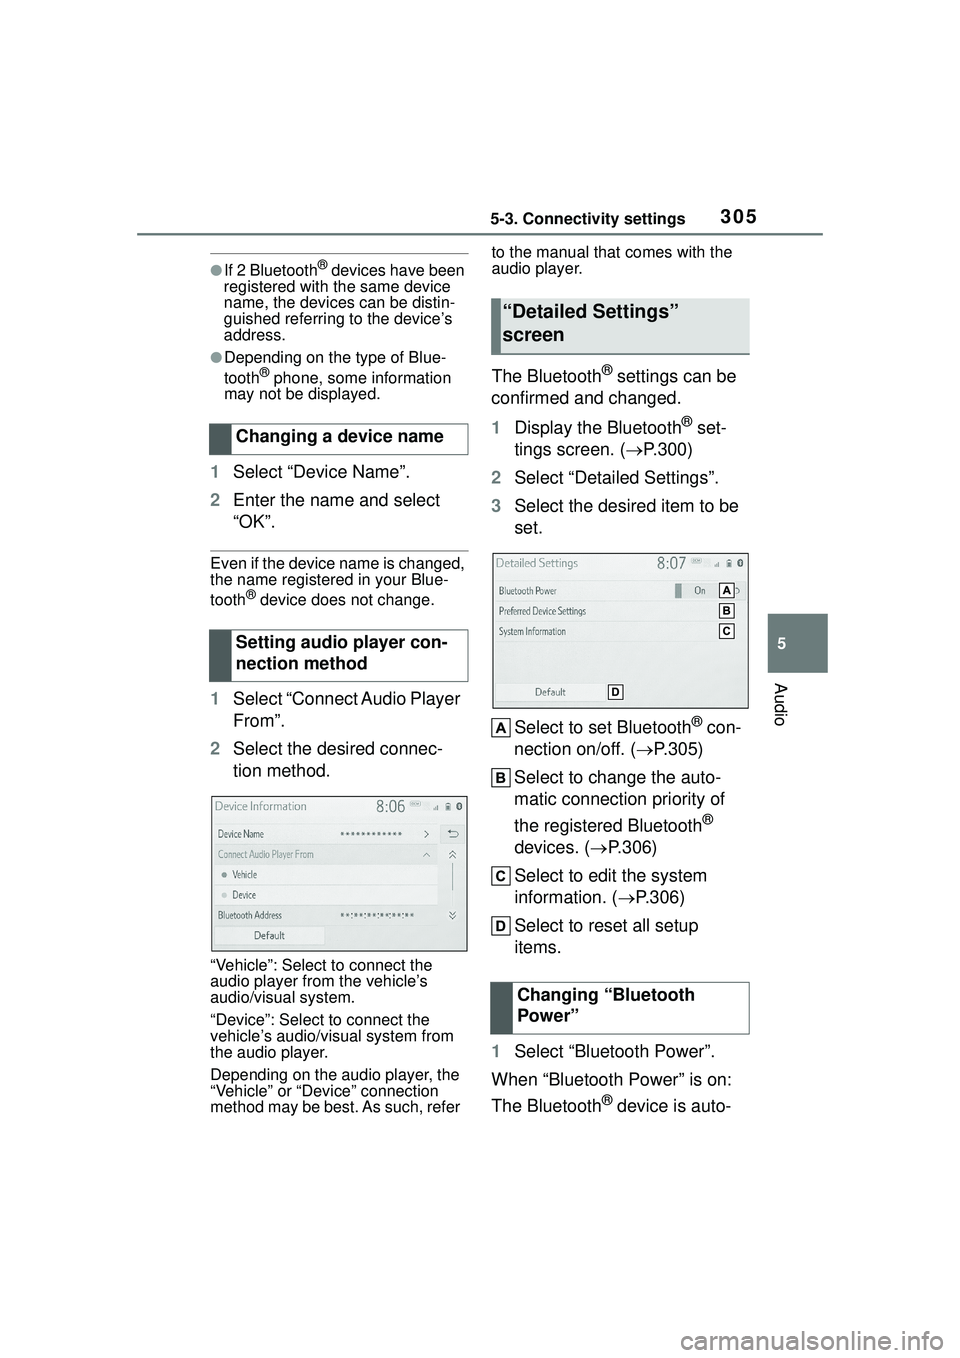
1Select “Connect Audio Player
From”.
2 Select the desired connec-
tion method.
“Vehicle”: Select to connect the
audio player from the vehicle’s
audio/visual system.
“Device”: Select to connect the
vehicle’s audio/visual system from
the audio player.
Depending on the audio player, the
“Vehicle” or “Device” connection
method may be best. As such, refer to the manual that comes with the
audio player.
The Bluetooth® settings can be
confirmed and changed.
1 Display the Bluetooth
® set-
tings screen. ( P.300)
2 Select “Detailed Settings”.
3 Select the desired item to be
set.
Select to set Bluetooth
® con-
nection on/off. ( P.305)
Select to change the auto-
matic connection priority of
the registered Bluetooth
®
devices. ( P.306)
Select to edit the system
information. ( P.306)
Select to reset all setup
items.
1 Select “Bluetooth Power”.
When “Bluetooth Power” is on:
The Bluetooth
® device is auto-
Changing a device name
Setting audio player con-
nection method
“Detailed Settings”
screen
Changing “Bluetooth
Power”
Page 306 of 612
3065-3. Connectivity settings
matically connected when the
engine switch is in ACC or ON.
When “Bluetooth Power” is off:
The Bluetooth
® device is dis-
connected, and the system will
not connect to it next time.
While driving, the auto connection
state can be changed from off to on,
but cannot be changed from on to
off.
The automatic connection prior-
ity of the registered Bluetooth
®
devices can be changed.
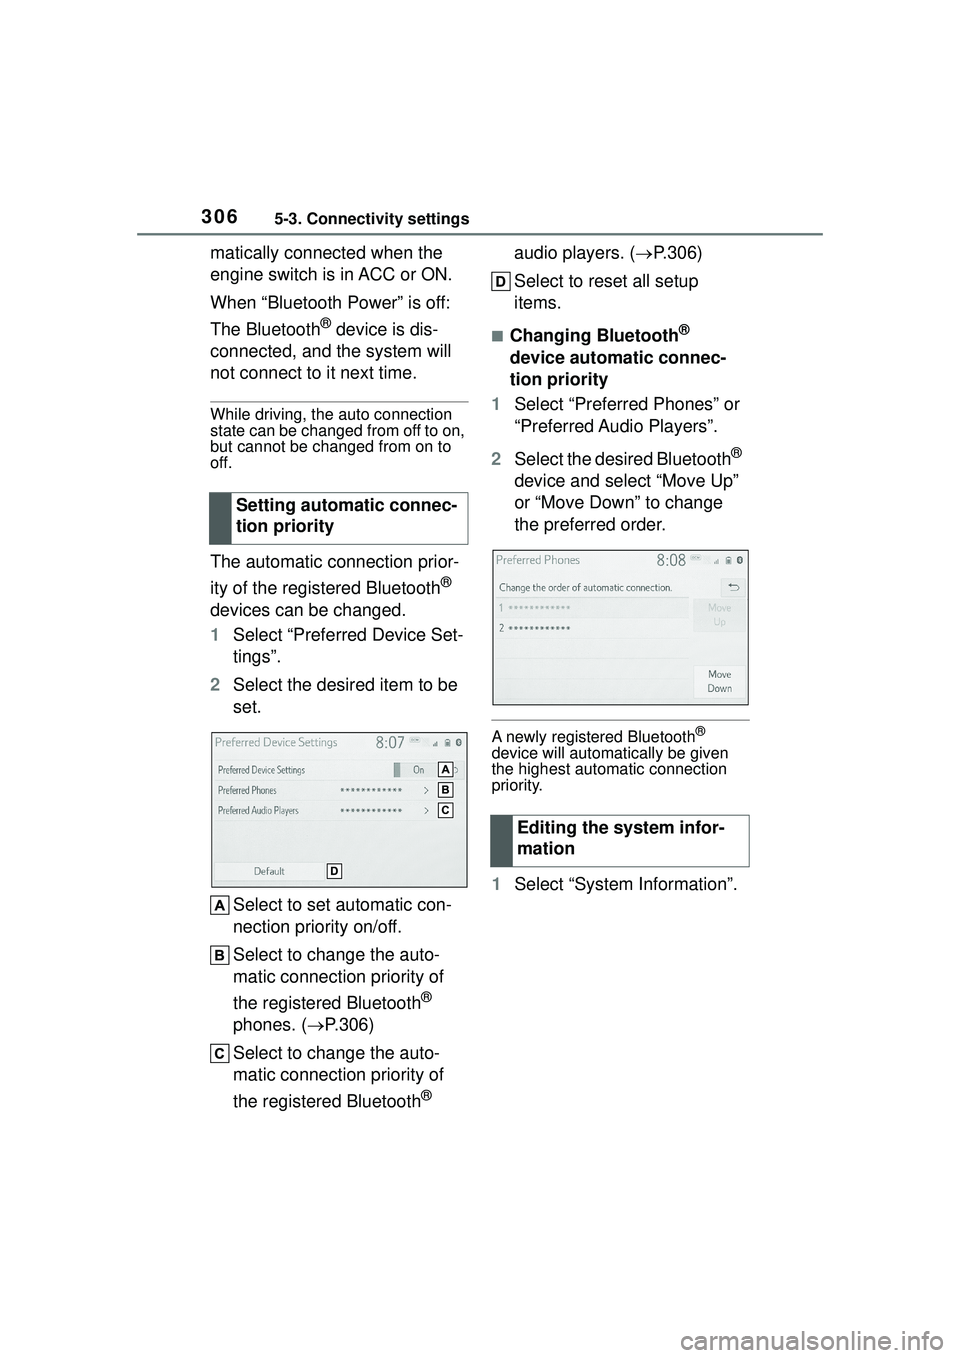
1 Select “Preferred Device Set-
tings”.
2 Select the desired item to be
set.
Select to set automatic con-
nection priority on/off.
Select to change the auto-
matic connection priority of
the registered Bluetooth
®
phones. ( P.306)
Select to change the auto-
matic connection priority of
the registered Bluetooth
® audio players. (
P.306)
Select to reset all setup
items.
■Changing Bluetooth®
device automatic connec-
tion priority
1 Select “Preferred Phones” or
“Preferred Audio Players”.
2 Select the desired Bluetooth
®
device and select “Move Up”
or “Move Down” to change
the preferred order.
A newly registered Bluetooth®
device will automatically be given
the highest automatic connection
priority.
1 Select “System Information”.
Setting automatic connec-
tion priority
Editing the system infor-
mation
Page 307 of 612
3075-3. Connectivity settings
5
Audio
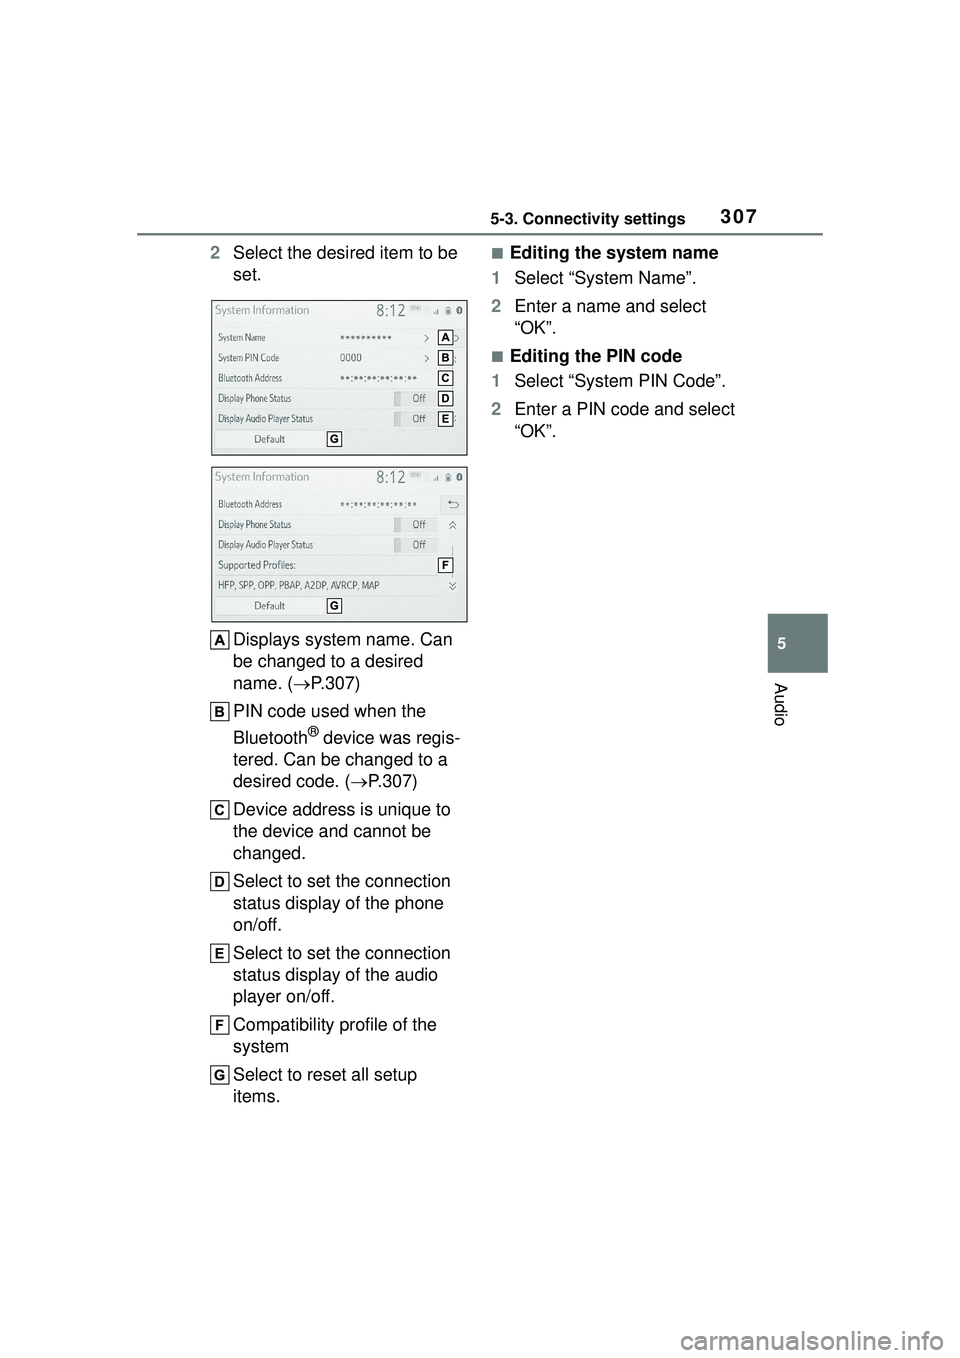
2Select the desired item to be
set.
Displays system name. Can
be changed to a desired
name. ( P.307)
PIN code used when the
Bluetooth
® device was regis-
tered. Can be changed to a
desired code. ( P.307)
Device address is unique to
the device and cannot be
changed.
Select to set the connection
status display of the phone
on/off.
Select to set the connection
status display of the audio
player on/off.
Compatibility profile of the
system
Select to reset all setup
items.
■Editing the system name
1 Select “System Name”.
2 Enter a name and select
“OK”.
■Editing the PIN code
1 Select “System PIN Code”.
2 Enter a PIN code and select
“OK”.