TOYOTA COROLLA CROSS HYBRID 2023 Workshop Manual
Manufacturer: TOYOTA, Model Year: 2023, Model line: COROLLA CROSS HYBRID, Model: TOYOTA COROLLA CROSS HYBRID 2023Pages: 516, PDF Size: 15.96 MB
Page 51 of 516

511-2. Child safety
1
For safety and security
■Recommended child restraint systems and Compatibility
table
When securing some types of
child restraint systems in rear
seat, it may not be possible to
properly use the seat belts in
positions next to the child
restraint without interfering with
it or affecting seat belt effective-
ness. Be sure your seat belt fits
snugly across your shoulder and
low on your hips. If it does not, or if it interferes with the child
restraint, move to a different
position. Failure to do so may
result in death or serious injury.
When installing a child
restraint in the rear seats,
adjust the front seat so that it
does not interfere with the
child or child restraint system.
When installing a child seat
F2XReduced-height forward-faci ng child restraint systems
R3Full-size, rearward-facing child restraint systems
R2Reduced-size, rearward-facing child restraint systems
R2XReduced-size, rearward-facing child restraint systems
R1Rearward-facing infant seat
L1Left lateral-facing (carrycot) infant seat
L2Right lateral-facing ( carrycot) infant seat
B2Junior seat
B3Junior seat
Recom-
mended Child
Restraint System
Seating position
Vehicle with front pas- senger occupant
detection system
Passenger airbag indi- cator light
ONOFF
i-Size child
Restraint
systemsi-Size MIDI
(Yes/No)NoNoYe sNoYe s
FixtureDescription
Page 52 of 516
521-2. Child safety
with support base, if the child
seat interferes with the seat-
back when latching it into the
support base, adjust the seat-
back rearward until there is no
interference.
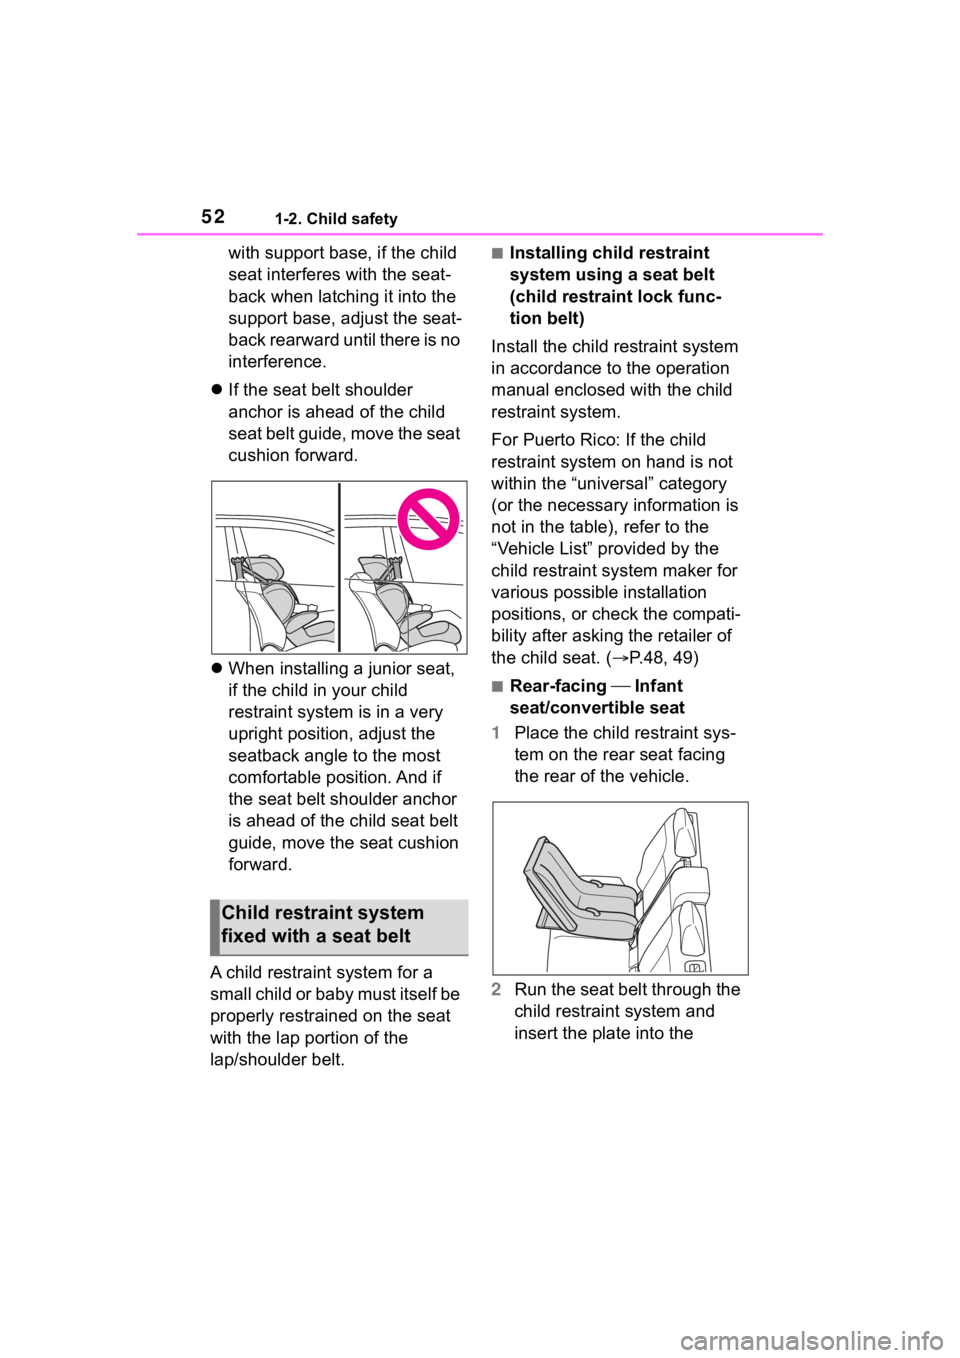
If the seat belt shoulder
anchor is ahead of the child
seat belt guide, move the seat
cushion forward.
When installing a junior seat,
if the child in your child
restraint system is in a very
upright position, adjust the
seatback angle to the most
comfortable position. And if
the seat belt shoulder anchor
is ahead of the child seat belt
guide, move the seat cushion
forward.
A child restraint system for a
small child or baby must itself be
properly restrained on the seat
with the lap portion of the
lap/shoulder belt.■Installing child restraint
system using a seat belt
(child restraint lock func-
tion belt)
Install the child restraint system
in accordance to the operation
manual enclosed with the child
restraint system.
For Puerto Rico: If the child
restraint system on hand is not
within the “universal” category
(or the necessary information is
not in the table), refer to the
“Vehicle List” provided by the
child restraint system maker for
various possible installation
positions, or check the compati-
bility after asking the retailer of
the child seat. ( P.48, 49)
■Rear-facing Infant
seat/convertible seat
1 Place the child restraint sys-
tem on the rear seat facing
the rear of the vehicle.
2 Run the seat belt through the
child restraint system and
insert the plate into the
Child restraint system
fixed with a seat belt
Page 53 of 516
531-2. Child safety
1
For safety and security
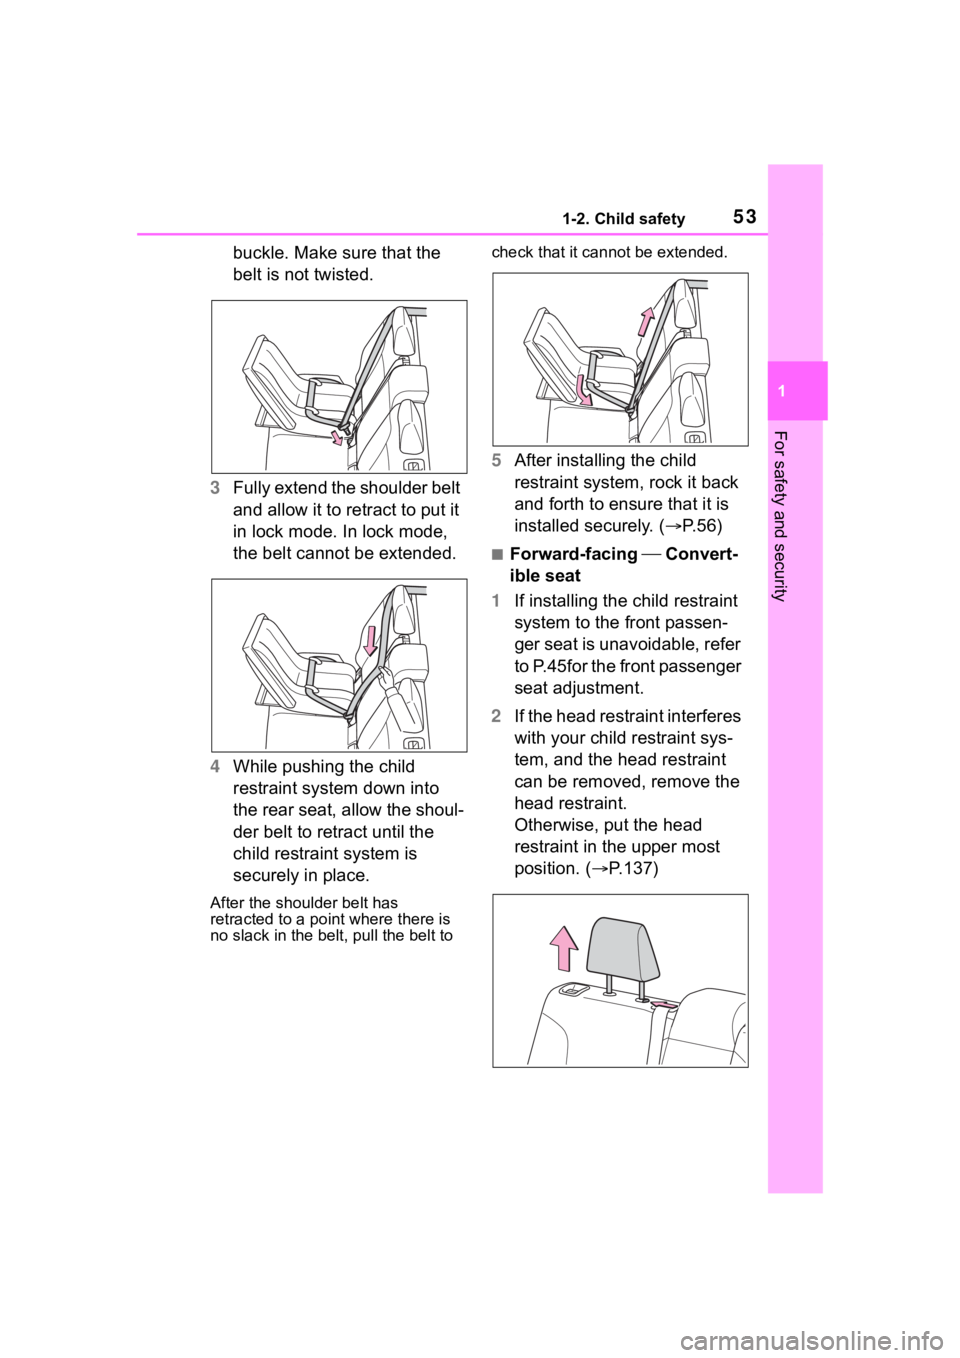
buckle. Make sure that the
belt is not twisted.
3 Fully extend the shoulder belt
and allow it to retract to put it
in lock mode. In lock mode,
the belt cannot be extended.
4 While pushing the child
restraint system down into
the rear seat, allow the shoul-
der belt to retract until the
child restraint system is
securely in place.
After the shoulder belt has
retracted to a point where there is
no slack in the belt, pull the belt to check that it cannot be extended.
5
After installing the child
restraint system, rock it back
and forth to ensure that it is
installed securely. ( P.56)
■Forward-facing Convert-
ible seat
1 If installing the child restraint
system to the front passen-
ger seat is unavoidable, refer
to P.45for the front passenger
seat adjustment.
2 If the head restraint interferes
with your child restraint sys-
tem, and the head restraint
can be removed, remove the
head restraint.
Otherwise, put the head
restraint in the upper most
position. ( P.137)
Page 54 of 516
541-2. Child safety
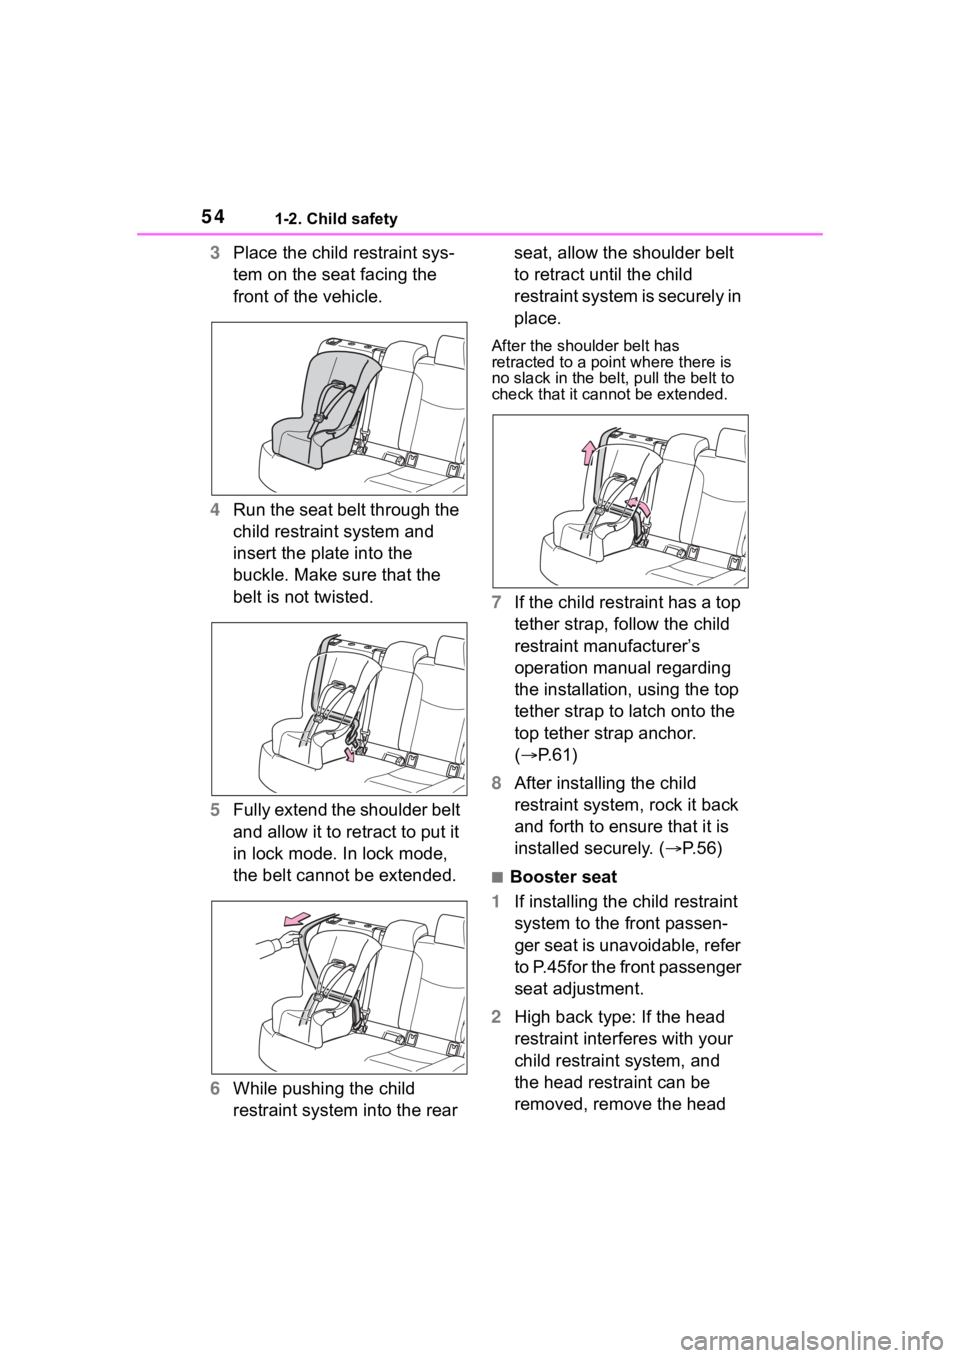
3Place the child restraint sys-
tem on the seat facing the
front of the vehicle.
4 Run the seat belt through the
child restraint system and
insert the plate into the
buckle. Make sure that the
belt is not twisted.
5 Fully extend the shoulder belt
and allow it to retract to put it
in lock mode. In lock mode,
the belt cannot be extended.
6 While pushing the child
restraint system into the rear seat, allow the shoulder belt
to retract until the child
restraint system is securely in
place.
After the shoulder belt has
retracted to a poi
nt where there is
no slack in the belt, pull the belt to
check that it cannot be extended.
7 If the child restraint has a top
tether strap, follow the child
restraint manufacturer’s
operation manual regarding
the installation, using the top
tether strap to latch onto the
top tether strap anchor.
( P.61)
8 After installing the child
restraint system, rock it back
and forth to ensure that it is
installed securely. ( P.56)
■Booster seat
1 If installing the child restraint
system to the front passen-
ger seat is unavoidable, refer
to P.45for the front passenger
seat adjustment.
2 High back type: If the head
restraint interferes with your
child restraint system, and
the head restraint can be
removed, remove the head
Page 55 of 516
551-2. Child safety
1
For safety and security
restraint.
Otherwise, put the head
restraint in the upper most
position. (P.137)
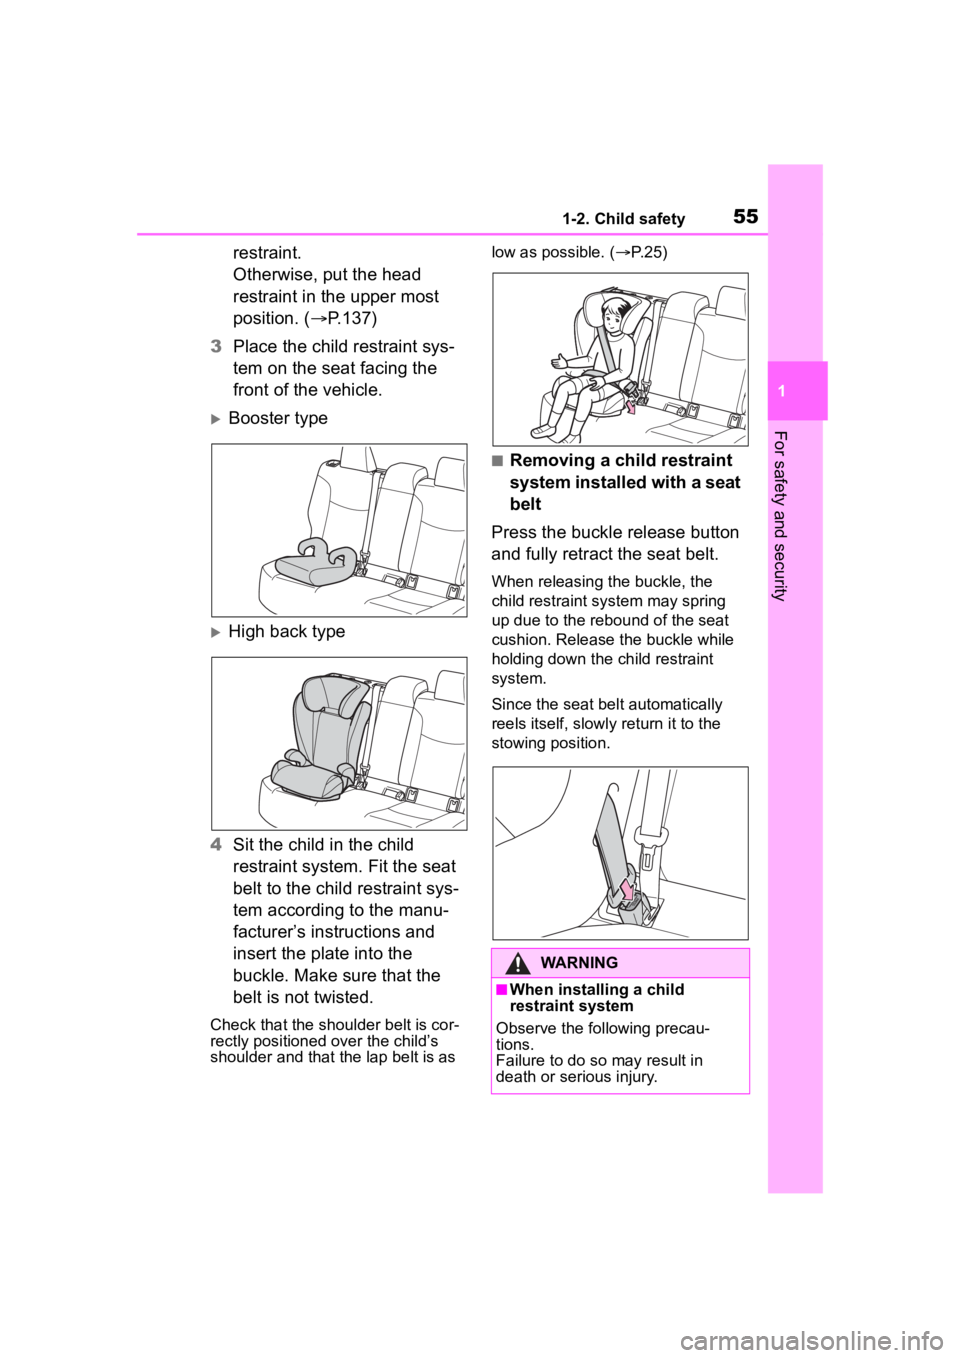
3 Place the child restraint sys-
tem on the seat facing the
front of the vehicle.
Booster type
High back type
4 Sit the child in the child
restraint system. Fit the seat
belt to the child restraint sys-
tem according to the manu-
facturer’s instructions and
insert the plate into the
buckle. Make sure that the
belt is not twisted.
Check that the shoulder belt is cor-
rectly positioned over the child’s
shoulder and that the lap belt is as low as possible. (
P. 2 5 )
■Removing a child restraint
system installed with a seat
belt
Press the buckle release button
and fully retract the seat belt.
When releasing the buckle, the
child restraint system may spring
up due to the rebound of the seat
cushion. Release the buckle while
holding down the child restraint
system.
Since the seat belt automatically
reels itself, slowly return it to the
stowing position.
WARNING
■When installing a child
restraint system
Observe the following precau-
tions.
Failure to do so may result in
death or serious injury.
Page 56 of 516
561-2. Child safety
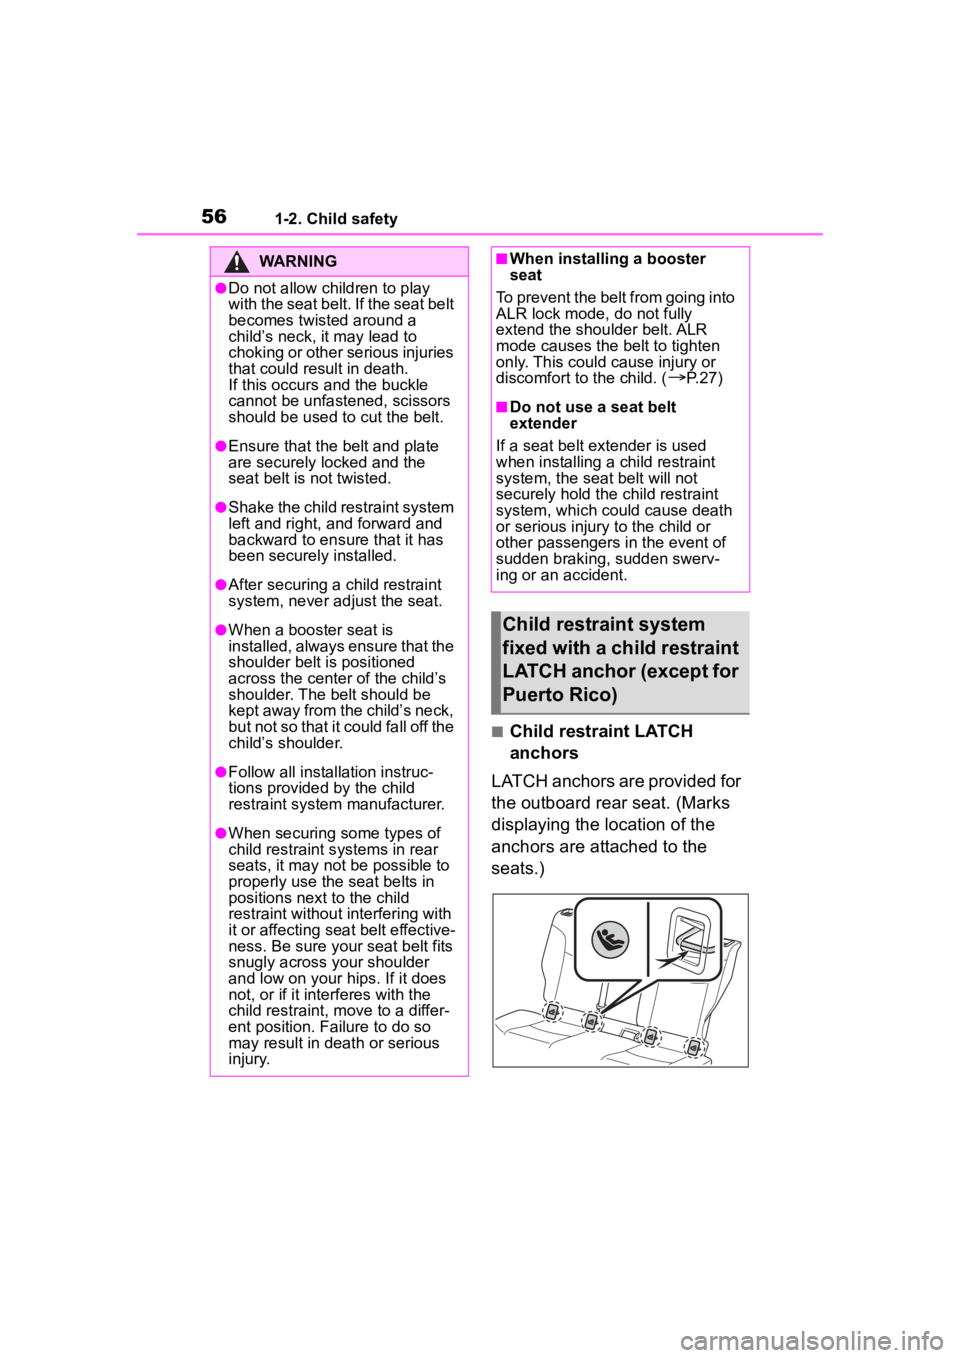
■Child restraint LATCH
anchors
LATCH anchors are provided for
the outboard rear seat. (Marks
displaying the location of the
anchors are attached to the
seats.)
WARNING
●Do not allow children to play
with the seat belt. If the seat belt
becomes twisted around a
child’s neck, it may lead to
choking or other serious injuries
that could result in death.
If this occurs and the buckle
cannot be unfastened, scissors
should be used to cut the belt.
●Ensure that the belt and plate
are securely locked and the
seat belt is not twisted.
●Shake the child restraint system
left and right, and forward and
backward to ensure that it has
been securely installed.
●After securing a child restraint
system, never adjust the seat.
●When a booster seat is
installed, always ensure that the
shoulder belt is positioned
across the center of the child’s
shoulder. The belt should be
kept away from the child’s neck,
but not so that it could fall off the
child’s shoulder.
●Follow all installation instruc-
tions provided by the child
restraint system manufacturer.
●When securing some types of
child restraint s ystems in rear
seats, it may not be possible to
properly use the seat belts in
positions next to the child
restraint without interfering with
it or affecting seat belt effective-
ness. Be sure your seat belt fits
snugly across your shoulder
and low on your hips. If it does
not, or if it interferes with the
child restraint, move to a differ-
ent position. Failure to do so
may result in death or serious
injury.
■When installing a booster
seat
To prevent the belt from going into
ALR lock mode, do not fully
extend the shoulder belt. ALR
mode causes the belt to tighten
only. This could cause injury or
discomfort to the child. (
P. 2 7 )
■Do not use a seat belt
extender
If a seat belt extender is used
when installing a child restraint
system, the seat belt will not
securely hold the child restraint
system, which could cause death
or serious injury to the child or
other passengers in the event of
sudden braking, sudden swerv-
ing or an accident.
Child restraint system
fixed with a child restraint
LATCH anchor (except for
Puerto Rico)
Page 57 of 516
571-2. Child safety
1
For safety and security
■When installing in the rear
outboard seats
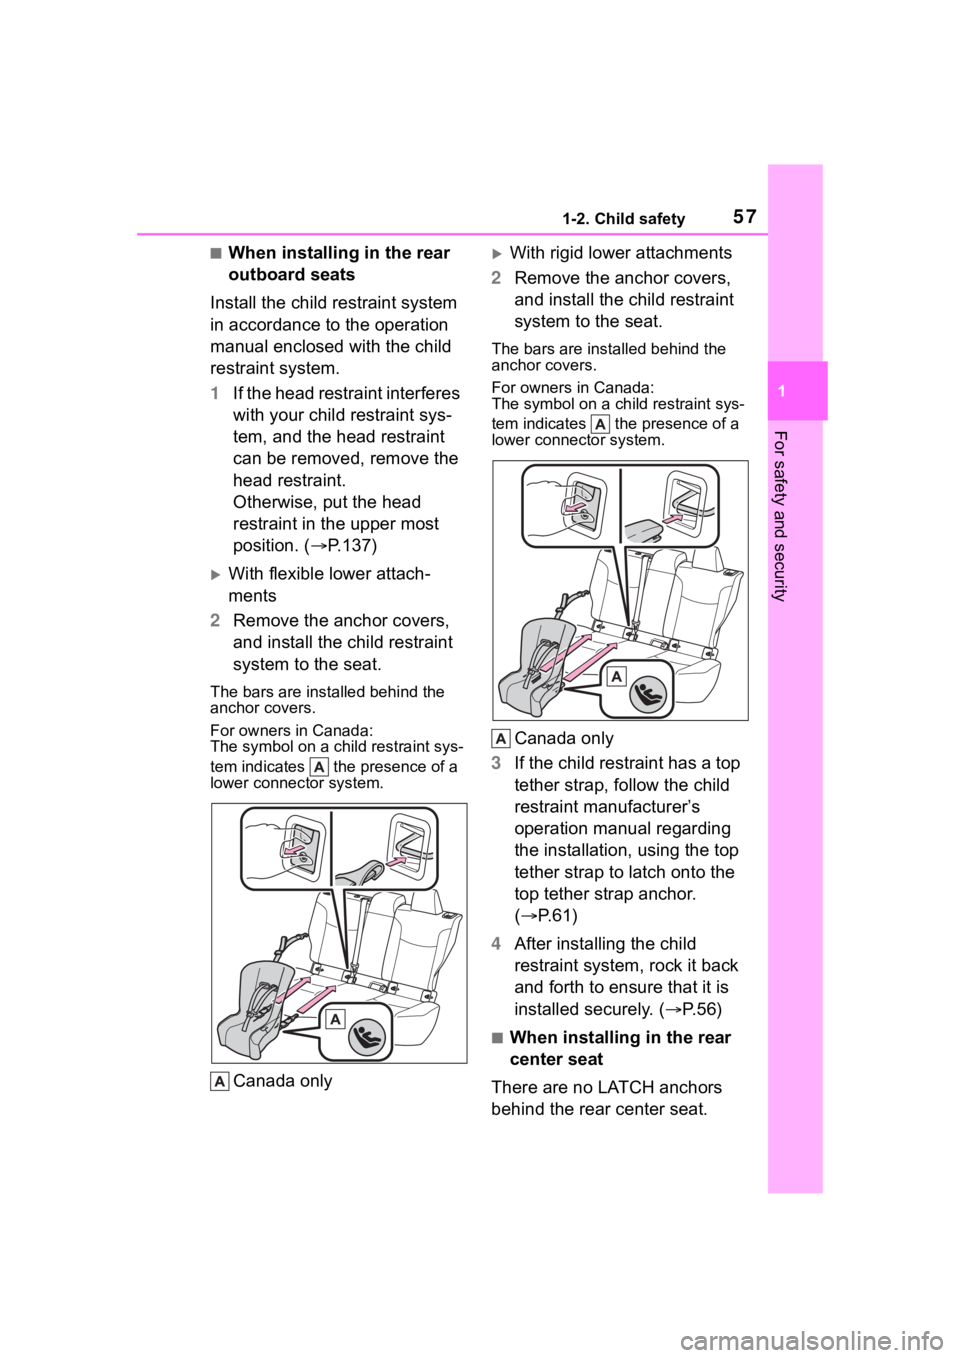
Install the child restraint system
in accordance to the operation
manual enclosed with the child
restraint system.
1 If the head restraint interferes
with your child restraint sys-
tem, and the head restraint
can be removed, remove the
head restraint.
Otherwise, put the head
restraint in the upper most
position. ( P.137)
With flexible lower attach-
ments
2 Remove the anchor covers,
and install the child restraint
system to the seat.
The bars are ins talled behind the
anchor covers.
For owners in Canada:
The symbol on a child restraint sys-
tem indicates the presence of a
lower connec tor system.
Canada only
With rigid lower attachments
2 Remove the anchor covers,
and install the child restraint
system to the seat.
The bars are installed behind the
anchor covers.
For owners in Canada:
The symbol on a child restraint sys-
tem indicates the presence of a
lower connector system.
Canada only
3 If the child restraint has a top
tether strap, follow the child
restraint manufacturer’s
operation manual regarding
the installation, using the top
tether strap to latch onto the
top tether strap anchor.
( P.61)
4 After installing the child
restraint system, rock it back
and forth to ensure that it is
installed securely. ( P.56)
■When installing in the rear
center seat
There are no LATCH anchors
behind the rear center seat.
Page 58 of 516
581-2. Child safety
However, the inboard LATCH
anchors of the outboard seats,
which are 16.1 in. (410 mm)
apart, can be used if the child
restraint system manufacturer’s
instructions permit use of those
anchors with the anchor spacing
stated.
Child restraint systems with rigid
lower attachments cannot be
installed in the center seat. This
type of child restraint system
can only be installed in the out-
board seat.
■Laws and regulations pertain-
ing to anchors
The LATCH system conforms to
FMVSS225 or CMVSS210.2.
Child restraint systems conforming
to FMVSS213 or CMVSS213 speci-
fications can be used.
This vehicle is designed to conform
to SAE J1819.
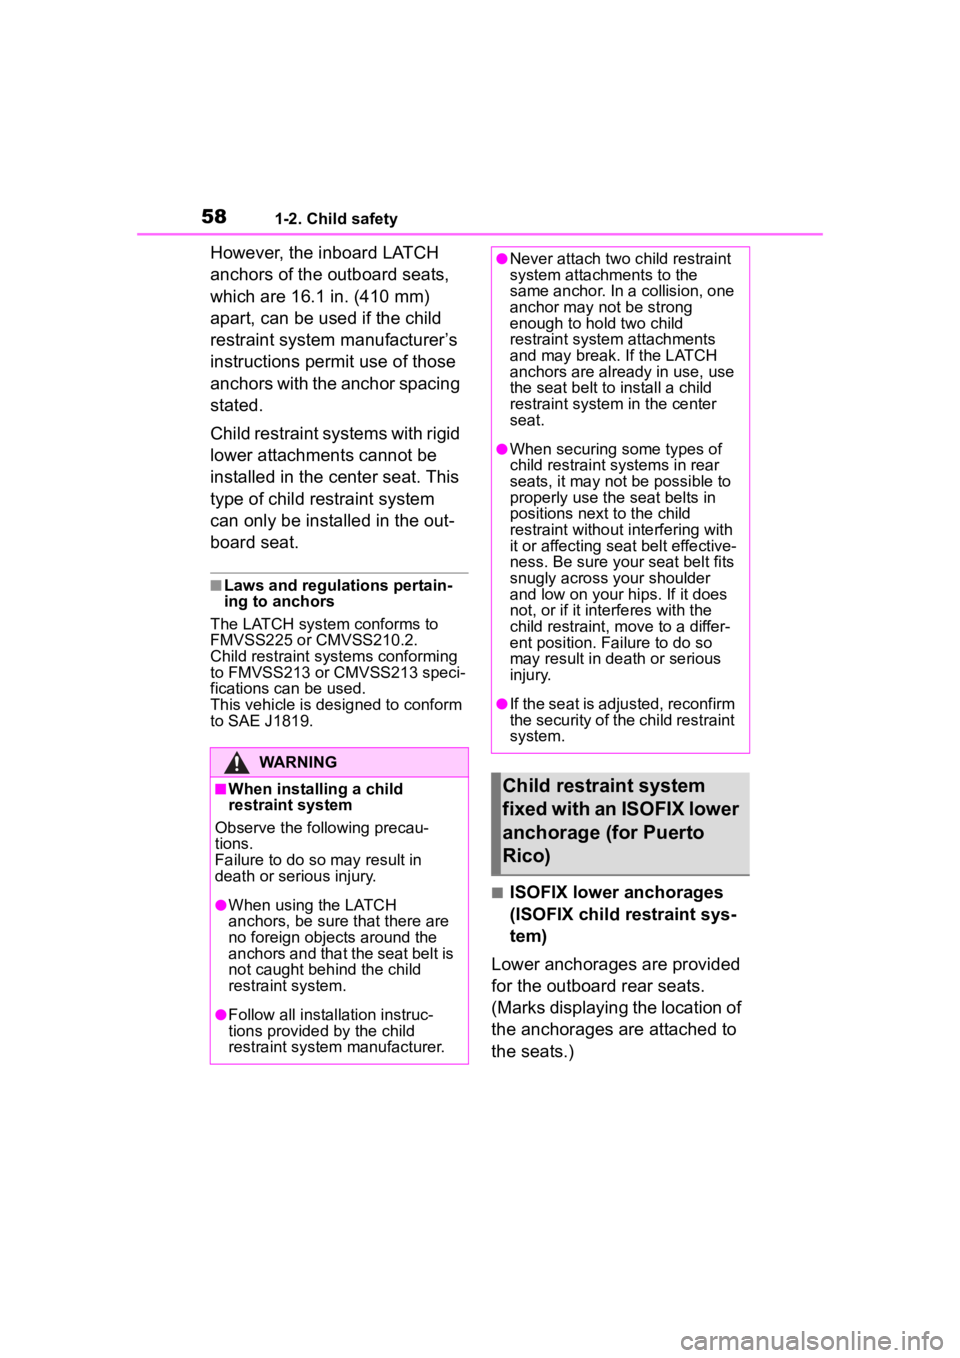
■ISOFIX lower anchorages
(ISOFIX child restraint sys-
tem)
Lower anchorages are provided
for the outboard rear seats.
(Marks displaying the location of
the anchorages are attached to
the seats.)
WARNING
■When installing a child
restraint system
Observe the following precau-
tions.
Failure to do so m ay result in
death or serious injury.
●When using the LATCH
anchors, be sure that there are
no foreign objects around the
anchors and that the seat belt is
not caught behind the child
restraint system.
●Follow all installation instruc-
tions provided by the child
restraint system manufacturer.
●Never attach two c hild restraint
system attachments to the
same anchor. In a collision, one
anchor may not be strong
enough to hold two child
restraint system attachments
and may break. If the LATCH
anchors are already in use, use
the seat belt to install a child
restraint system in the center
seat.
●When securing some types of
child restraint systems in rear
seats, it may not be possible to
properly use the seat belts in
positions next to the child
restraint without interfering with
it or affecting seat belt effective-
ness. Be sure your seat belt fits
snugly across your shoulder
and low on your hips. If it does
not, or if it interferes with the
child restraint, move to a differ-
ent position. Fa ilure to do so
may result in death or serious
injury.
●If the seat is adjusted, reconfirm
the security of the child restraint
system.
Child restraint system
fixed with an ISOFIX lower
anchorage (for Puerto
Rico)
Page 59 of 516
591-2. Child safety
1
For safety and security■When installing in the rear
outboard seats
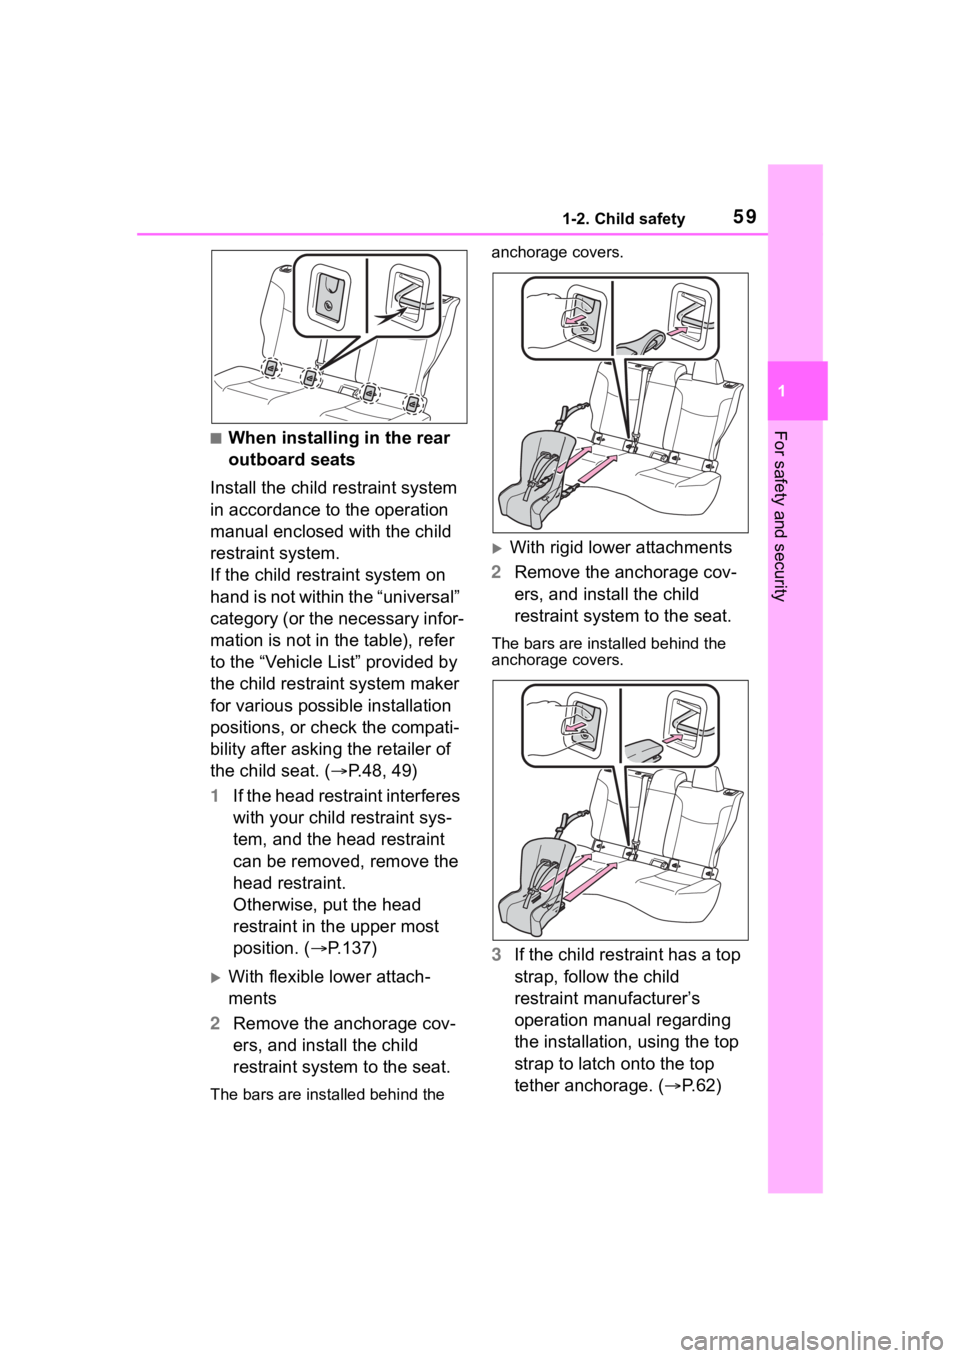
Install the child restraint system
in accordance to the operation
manual enclosed with the child
restraint system.
If the child restraint system on
hand is not within the “universal”
category (or the necessary infor-
mation is not in the table), refer
to the “Vehicle List” provided by
the child restraint system maker
for various possible installation
positions, or check the compati-
bility after asking the retailer of
the child seat. ( P.48, 49)
1 If the head restraint interferes
with your child restraint sys-
tem, and the head restraint
can be removed, remove the
head restraint.
Otherwise, put the head
restraint in the upper most
position. ( P.137)
With flexible lower attach-
ments
2 Remove the anchorage cov-
ers, and install the child
restraint system to the seat.
The bars are ins talled behind the anchorage covers.
With rigid lower attachments
2 Remove the anchorage cov-
ers, and install the child
restraint system to the seat.
The bars are installed behind the
anchorage covers.
3If the child restraint has a top
strap, follow the child
restraint manufacturer’s
operation manual regarding
the installation, using the top
strap to latch onto the top
tether anchorage. ( P. 6 2 )
Page 60 of 516
601-2. Child safety
4After installing the child
restraint system, rock it back
and forth to ensure that it is
installed securely. ( P.56)
■When installing in the rear
center seat
There are no lower anchorages
behind the rear center seat.
However, the inboard lower
anchorages of the outboard
seats, which are 16.1 in. (410
mm) apart, can be used if the
child restraint system manufac-
turer’s instructions permit use of
those anchorages with the
anchorage spacing stated.
Child restraint systems with rigid
lower attachments cannot be
installed in the center seat. This
type of child restraint system
can only be installed in the out-
board seat.
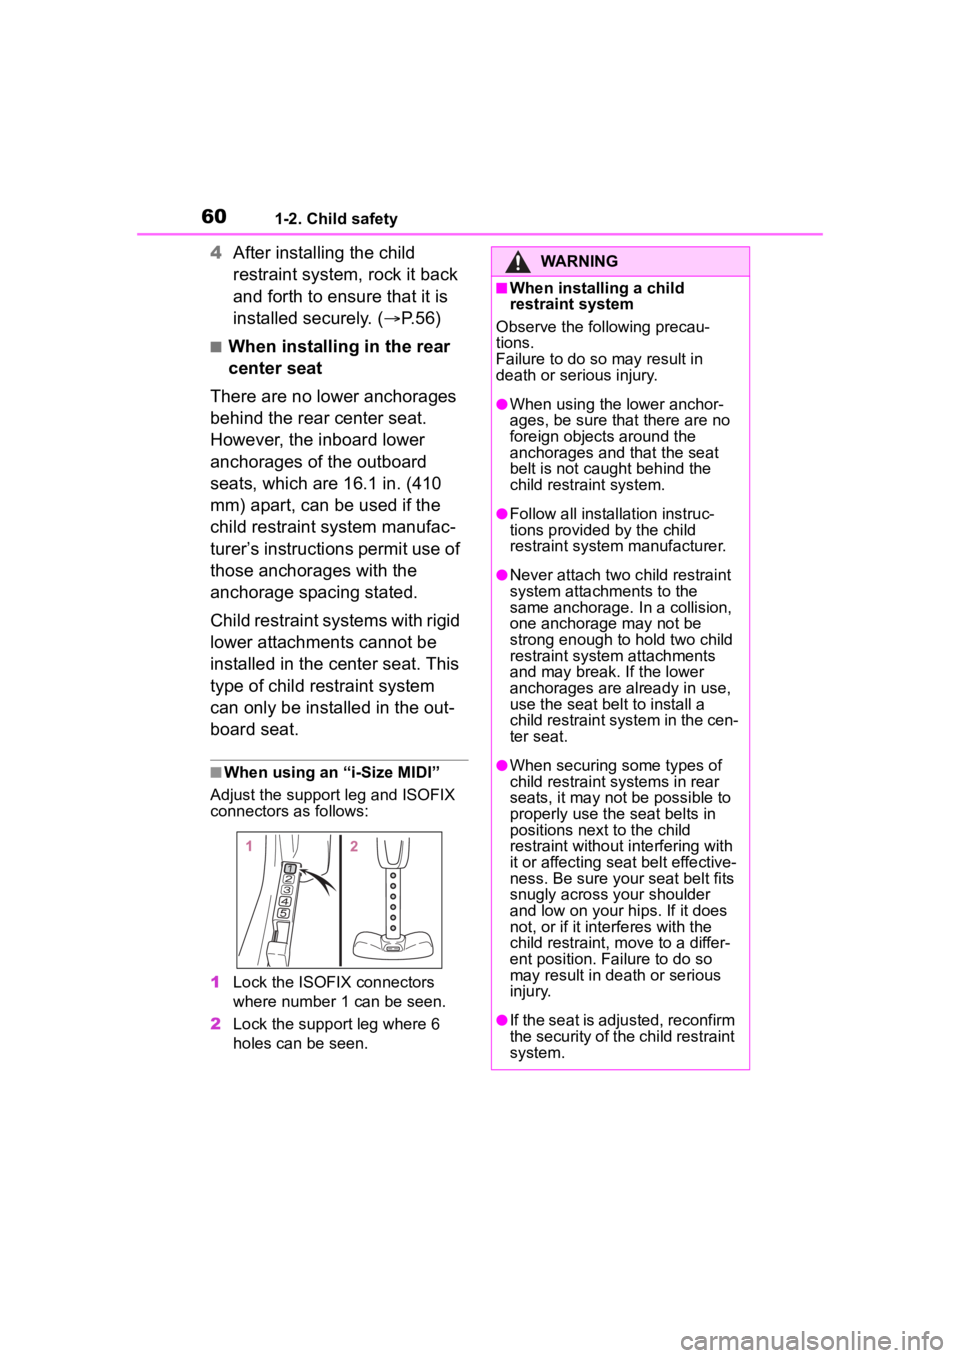
■When using an “i-Size MIDI”
Adjust the support leg and ISOFIX
connectors as follows:
1 Lock the ISOFIX connectors
where number 1 can be seen.
2 Lock the support leg where 6
holes can be seen.
WARNING
■When installing a child
restraint system
Observe the following precau-
tions.
Failure to do so may result in
death or serious injury.
●When using the lower anchor-
ages, be sure that there are no
foreign objects around the
anchorages and that the seat
belt is not caught behind the
child restraint system.
●Follow all installation instruc-
tions provided by the child
restraint system manufacturer.
●Never attach two c hild restraint
system attachments to the
same anchorage. In a collision,
one anchorage may not be
strong enough to hold two child
restraint system attachments
and may break. If the lower
anchorages are already in use,
use the seat belt to install a
child restraint system in the cen-
ter seat.
●When securing some types of
child restraint systems in rear
seats, it may not be possible to
properly use the seat belts in
positions next to the child
restraint without interfering with
it or affecting seat belt effective-
ness. Be sure your seat belt fits
snugly across your shoulder
and low on your hips. If it does
not, or if it interferes with the
child restraint, move to a differ-
ent position. Fa ilure to do so
may result in death or serious
injury.
●If the seat is adjusted, reconfirm
the security of the child restraint
system.