USB TOYOTA COROLLA HATCHBACK 2019 Accessories, Audio & Navigation (in English)
[x] Cancel search | Manufacturer: TOYOTA, Model Year: 2019, Model line: COROLLA HATCHBACK, Model: TOYOTA COROLLA HATCHBACK 2019Pages: 254, PDF Size: 6.72 MB
Page 3 of 254
3TABLE OF CONTENTS
COROLLA_H/B_Navi_U
1
2
3
4
5
6
7
8
9
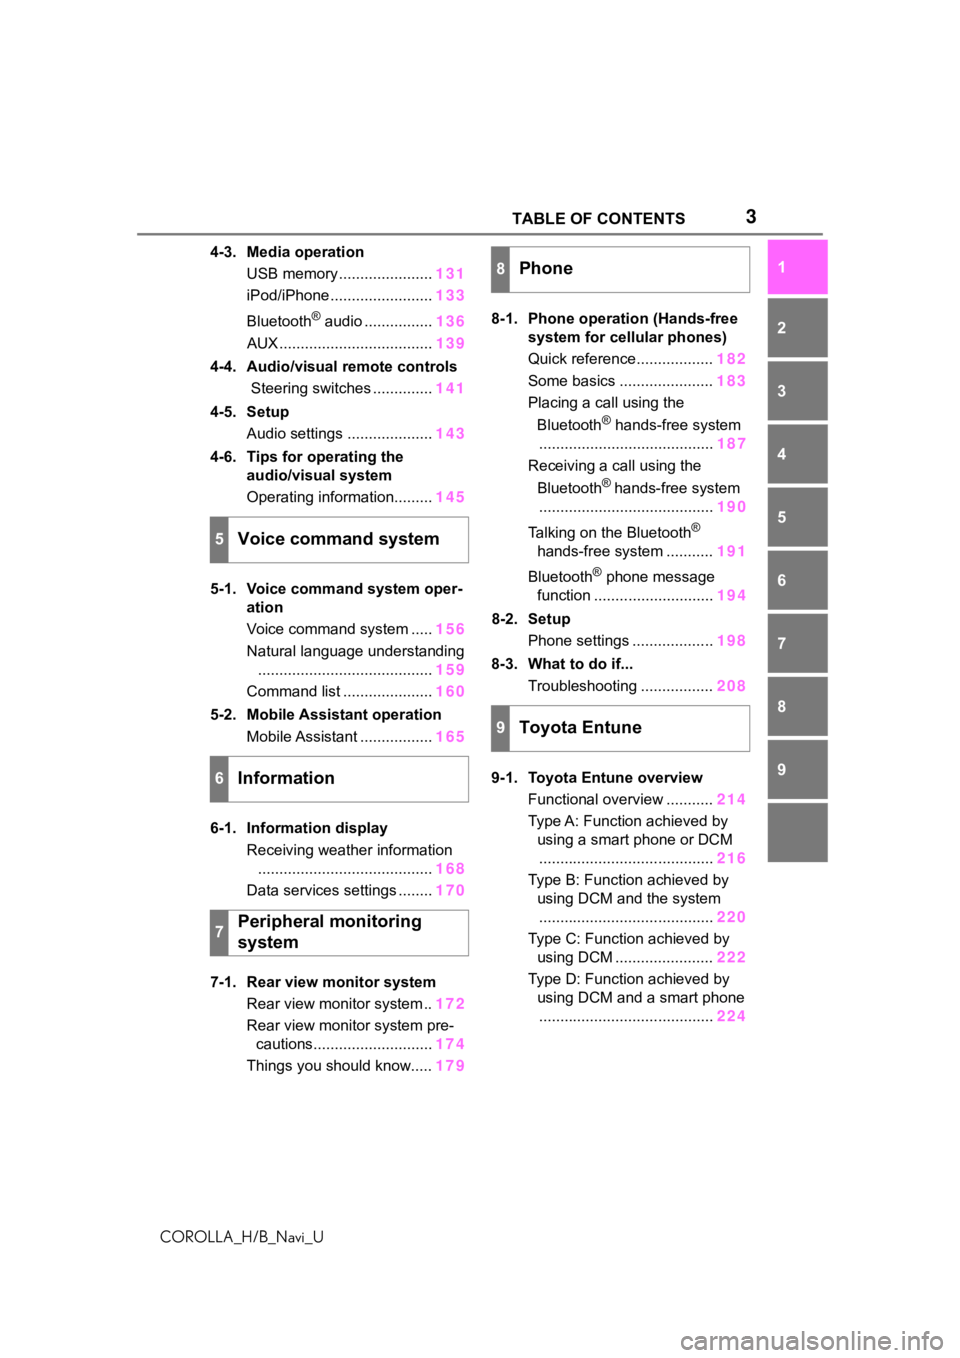
4-3. Media operation USB memory ...................... 131
iPod/iPhone ........................ 133
Bluetooth
® audio ................ 136
AUX .................................... 139
4-4. Audio/visual remote controls Steering switches .............. 141
4-5. Setup Audio settings .................... 143
4-6. Tips for operating the audio/visual system
Operating information......... 145
5-1. Voice command system oper- ation
Voice command system ..... 156
Natural language understanding ......................................... 159
Command list ..................... 160
5-2. Mobile Assistant operation Mobile Assistant ................. 165
6-1. Information display Receiving weather information......................................... 168
Data services settings ........ 170
7-1. Rear view monitor system Rear view monitor system .. 172
Rear view monitor system pre- cautions............................ 174
Things you should know..... 1798-1. Phone operation (Hands-free
system for cellular phones)
Quick reference.................. 182
Some basics ...................... 183
Placing a call using the
Bluetooth
® hands-free system
......................................... 187
Receiving a call using the
Bluetooth
® hands-free system
......................................... 190
Talking on the Bluetooth
®
hands-free system ........... 191
Bluetooth
® phone message
function ............................ 194
8-2. Setup Phone settings ................... 198
8-3. What to do if... Troubleshooting ................. 208
9-1. Toyota Entune overview Functional overview ........... 214
Type A: Function achieved by using a smart phone or DCM......................................... 216
Type B: Function achieved by using DCM and the system......................................... 220
Type C: Function achieved by using DCM ....................... 222
Type D: Function achieved by using DCM and a smart phone......................................... 224
5Voice command system
6Information
7Peripheral monitoring
system
8Phone
9Toyota Entune
Page 52 of 254
522-2. Connectivity settings
COROLLA_H/B_Navi_U
*: This function is not made avail-able in some countries or areas.
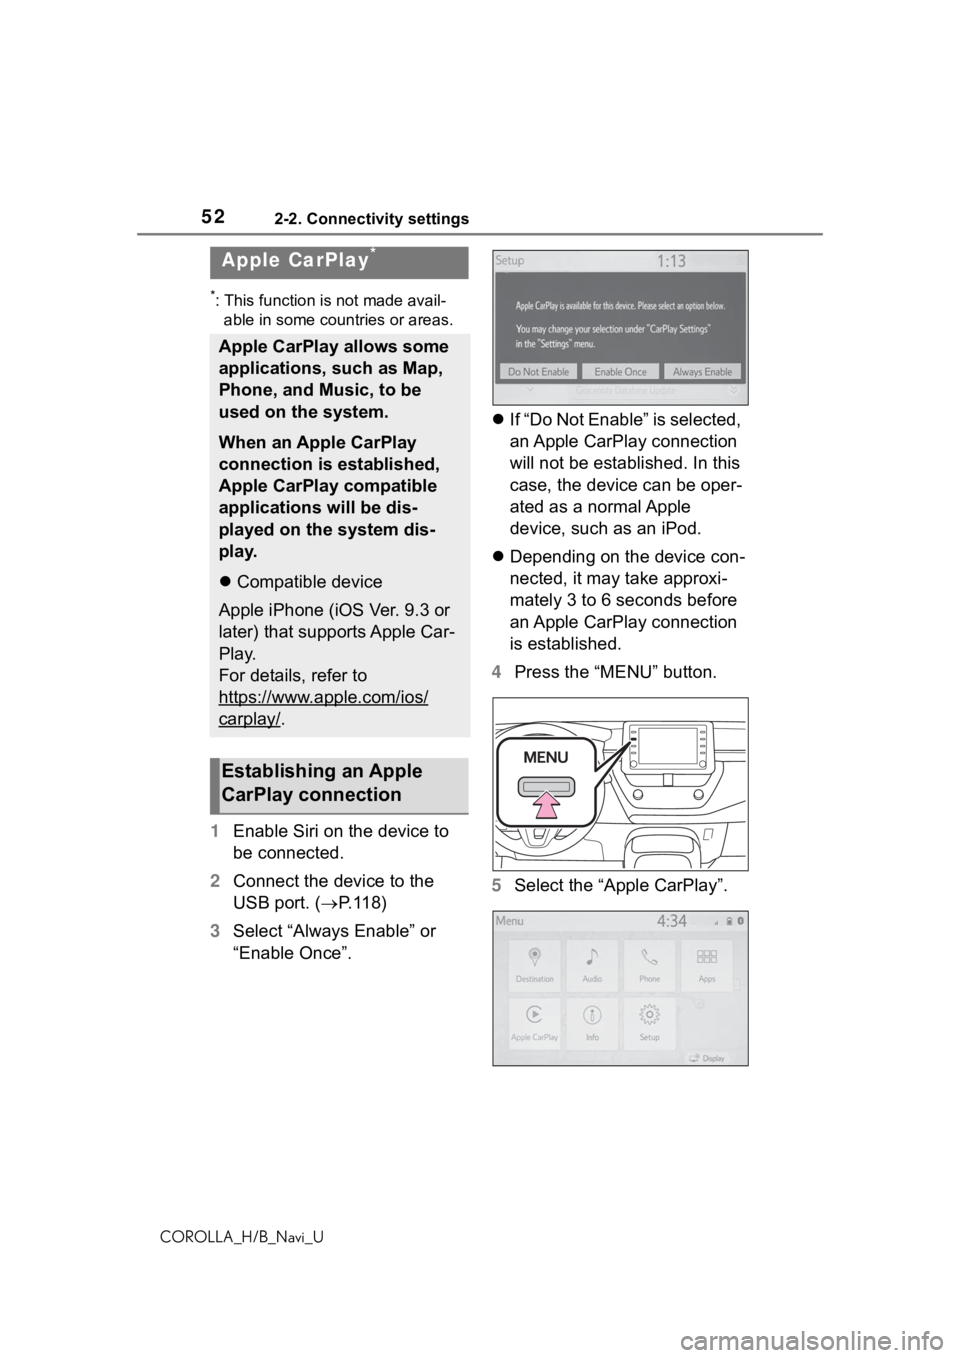
1 Enable Siri on the device to
be connected.
2 Connect the device to the
USB port. ( P. 1 1 8 )
3 Select “Always Enable” or
“Enable Once”.
If “Do Not Enable” is selected,
an Apple CarPlay connection
will not be established. In this
case, the device can be oper-
ated as a normal Apple
device, such as an iPod.
Depending on the device con-
nected, it may take approxi-
mately 3 to 6 seconds before
an Apple CarPlay connection
is established.
4 Press the “MENU” button.
5 Select the “Apple CarPlay”.
Apple CarPlay*
Apple CarPlay allows some
applications, such as Map,
Phone, and Music, to be
used on the system.
When an Apple CarPlay
connection is established,
Apple CarPlay compatible
applications will be dis-
played on the system dis-
play.
Compatible device
Apple iPhone (iOS Ver. 9.3 or
later) that supports Apple Car-
Play.
For details, refer to
https://www.apple.com/ios/
carplay/.
Establishing an Apple
CarPlay connection
Page 53 of 254

532-2. Connectivity settings
COROLLA_H/B_Navi_U
2
Basic function
6 Check that home screen of
Apple CarPlay is displayed.
Select to display the home
screen of Apple CarPlay.
Touch and hold to activate
Siri.
Select to start the application.
User can use any iPhone
application supported by
Apple CarPlay.
Select to display the system
screen.
●When an Apple CarPlay connec-
tion is established, the function of
some system butt ons will change.
●When an Apple CarPlay connec-
tion is established, some system
functions, such as the following,
will be replaced by similar Apple
CarPlay functions or will become
unavailable:
• iPod (Audio Playback)
• Hands-free Phone
• USB audio/USB video
• Bluetooth
® audio
• Bluetooth® phone
• Toyota Entune A pp Suite Connect
●The guidance volume can be
changed on the voice settings
screen. (P. 6 0 )
●To disable Apple CarPlay while a
device is connected, set “Apple
CarPlay” on the general settings
screen to off. ( P.56)
●Apple CarPlay is an application
developed by Apple Inc. Its func-
tions and services may be termi-
nated or changed without notice
depending on the connected
device’s operation system, hard-
ware and softwar e, or due to
changes in Apple CarPlay specifi-
cations.
●If the vehicle’s navigation system
is being used for route guidance
and a route is set using the Apple
CarPlay Maps app, route guid-
ance will be performed through
Apple CarPlay.
If the Apple CarP lay Maps app is
being used for route guidance and
a route is set using the vehicle’s
navigation system, route guidance
will be performed by the vehicle’s
navigation system.
●Use of the Apple CarPlay logo
means that a vehicle user inter-
face meets Apple performance
standards. Apple is not responsi-
ble for the operation of this vehicle
or its compliance with safety and
regulatory standards. Please note
that the use of this product with
iPhone or iPod may affect wire-
less performance.
●Apple, iPad, iPhone, iPod, and
iPod touch are t rademarks of
Apple Inc., registered in the U.S.
and other countries. Apple Car-
Play is a trademark of Apple Inc.
A
B
C
WA R N I N G
●Do not connect iPhone or oper-
ate the controls while driving.
Page 54 of 254

542-2. Connectivity settings
COROLLA_H/B_Navi_U
If you are experiencing difficulties with Apple CarPlay, check the fol-
lowing table.
NOTICE
●Do not leave your iPhone in the
vehicle. In particular, high tem-
peratures inside the vehicle
may damage the iPhone.
●Do not push down on or apply
unnecessary pressure to the
iPhone while it is connected as
this may damage the iPhone or
its terminal.
●Do not insert foreign objects into
the port as this may damage the
iPhone or its terminal.
Troubleshooting
SymptomSolution
An Apple CarPlay connec-
tion cannot be estab-
lished.
Check if the device supports Apple CarPlay.
Check if Apple CarPlay is enabled on the con-
nected device.
For details, refer to
https://www.apple.com/ios/carplay/
.
Check if “Apple CarPlay” on the general set-
tings screen is set to on on. (P. 5 6 )
Check if the Lightning cable being used is certi-
fied by Apple Inc., and i f it is securely con-
nected to the devic e and USB port.
After checking all of the above, try to establish
an Apple CarPlay connection. ( P. 4 7 )
When an Apple CarPlay
connection is established
and a video is being
played, the video is not
displayed, but audio is
output through the sys-
tem.
As the system is not designed to play video
through Apple CarPlay, this is not a malfunc-
tion.
Although an Apple Car-
Play connection is estab-
lished, audio is not output
through the system.
The system may muted or the volume may be
low. Increase the system volume.
Page 57 of 254
572-3. Other settings
COROLLA_H/B_Navi_U
2
Basic function
Select to delete the keyboard his-
tory.
“Memorize Keyboard History”
Select to set the memorize key-
board history on/off.
“Animation”
Select to turn the a nimations on/off.
“Apple CarPlay”*2
Select to turn automatic Apple Car-
Play connection establishment
on/off when a compatible iPhone is
connected to the system via USB.
( P.52)
This setting cannot be changed
when a device is c onnected to the
system via USB. Disconnect the
device before attempting to change
the setting.
“Driver Setting”
Select to change the driver set-
tings. ( P. 5 8 )
“Delete Personal Data”
Select to delete personal data.
( P.59)
“Software Update”
Select to update software versions.
For details, contact your Toyota
dealer.
“Software Update Setting”*2,3
Select to set software update set-
ting. ( P. 5 9 )
“Gracenote Database
Update”
Select to update Gracenote® data-
base versions. For details, contact
your Toyota dealer.
“Software Information”
Select to display th e software infor-
mation. Notices related to third
party software used in this product
are enlisted. (This includes instruc-
tions for obtaining such software,
where applicable.)
“SW Sensitivity Level”
Select to change the capacitive
touch screen button sensitivity to 1
(low), 2 (medium), or 3 (high).
*1: Entune Premium Audio only
*2: This function is not made avail- able in some countries or areas.
*3: Vehicles with DCM
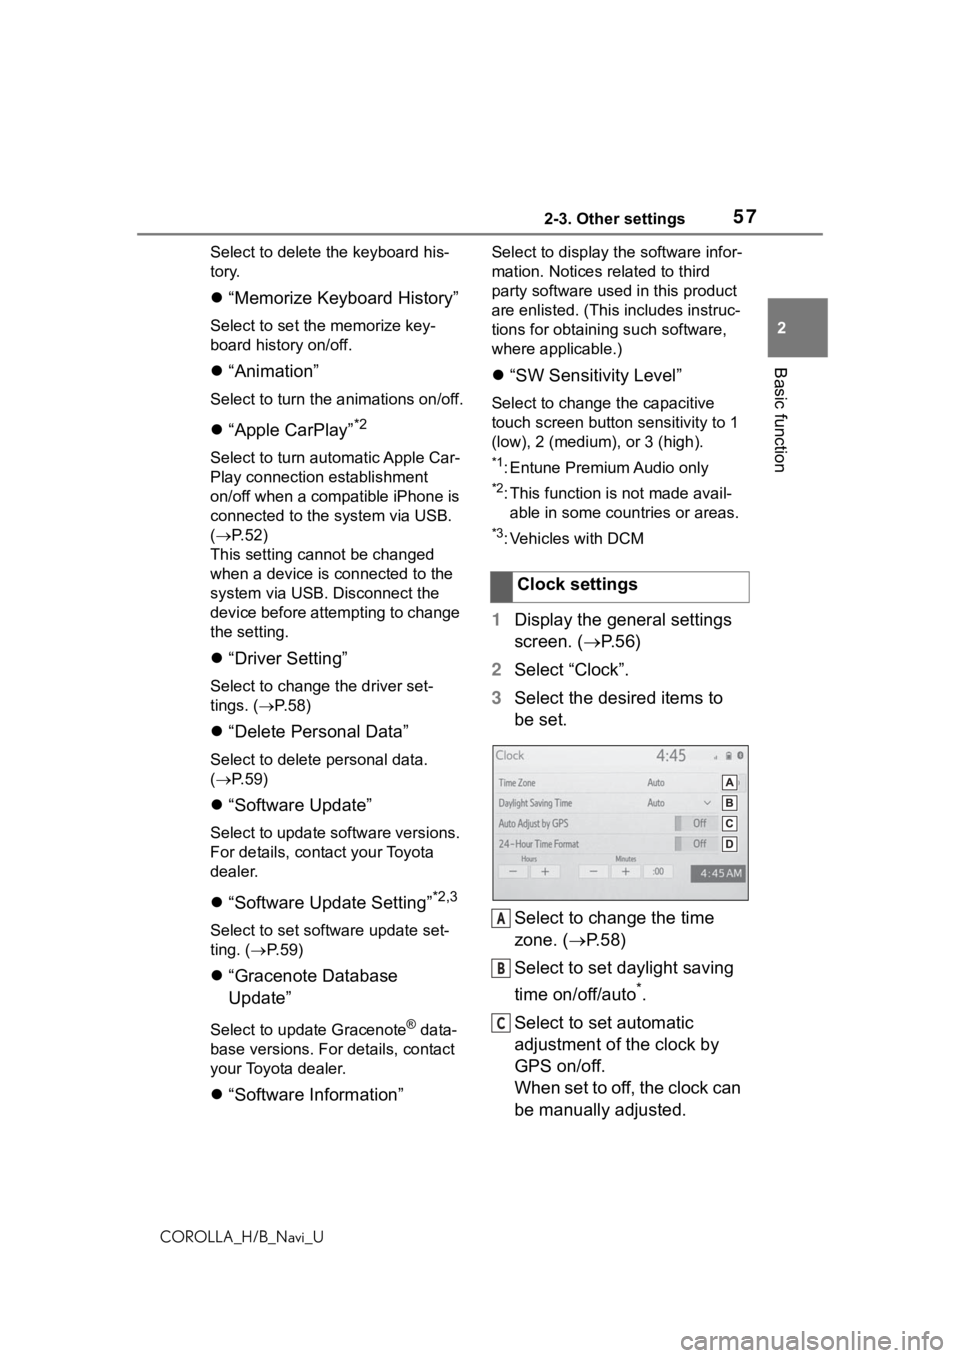
1 Display the general settings
screen. ( P. 5 6 )
2 Select “Clock”.
3 Select the desired items to
be set.
Select to change the time
zone. ( P.58)
Select to set daylight saving
time on/off/auto
*.
Select to set automatic
adjustment of the clock by
GPS on/off.
When set to off, the clock can
be manually adjusted. Clock settings
A
B
C
Page 115 of 254
115
COROLLA_H/B_Navi_U
4
4
Audio/visual system
Audio/visual system
.4-1. Basic operationQuick reference........... 116
Some basics ............... 117
4-2. Radio operation AM/FM/SiriusXM (SXM) radio .......................... 122
Internet radio ............... 130
4-3. Media operation USB memory............... 131
iPod/iPhone................. 133
Bluetooth
® audio ......... 136
AUX............................. 139
4-4. Audio/visual remote con- trols
Steering switches ....... 141
4-5. Setup Audio settings ............. 143
4-6. Tips for operating the audio/visual system
Operating information . 145
Page 116 of 254
1164-1. Basic operation
COROLLA_H/B_Navi_U
4-1.Basic operation
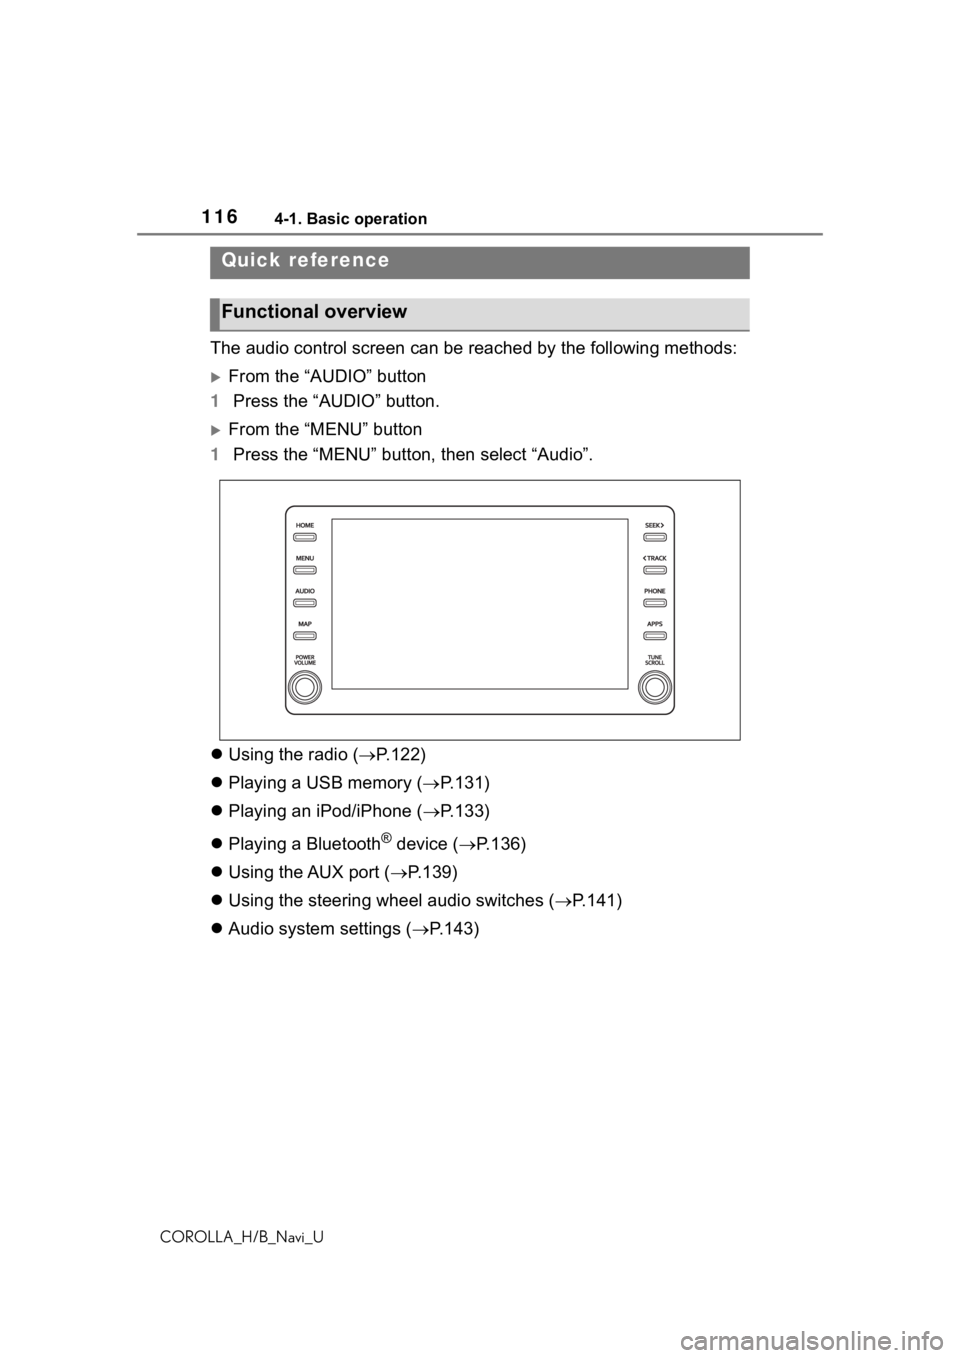
The audio control screen can be reached by the following methods:
From the “AUDIO” button
1 Press the “AUDIO” button.
From the “MENU” button
1 Press the “MENU” button, then select “Audio”.
Using the radio ( P.122)
Playing a USB memory ( P.131)
Playing an iPod/iPhone ( P.133)
Playing a Bluetooth
® device ( P.136)
Using the AUX port ( P.139)
Using the steering wheel audio switches ( P.141)
Audio system settings ( P.143)
Quick reference
Functional overview
Page 117 of 254
1174-1. Basic operation
COROLLA_H/B_Navi_U
4
Audio/visual system
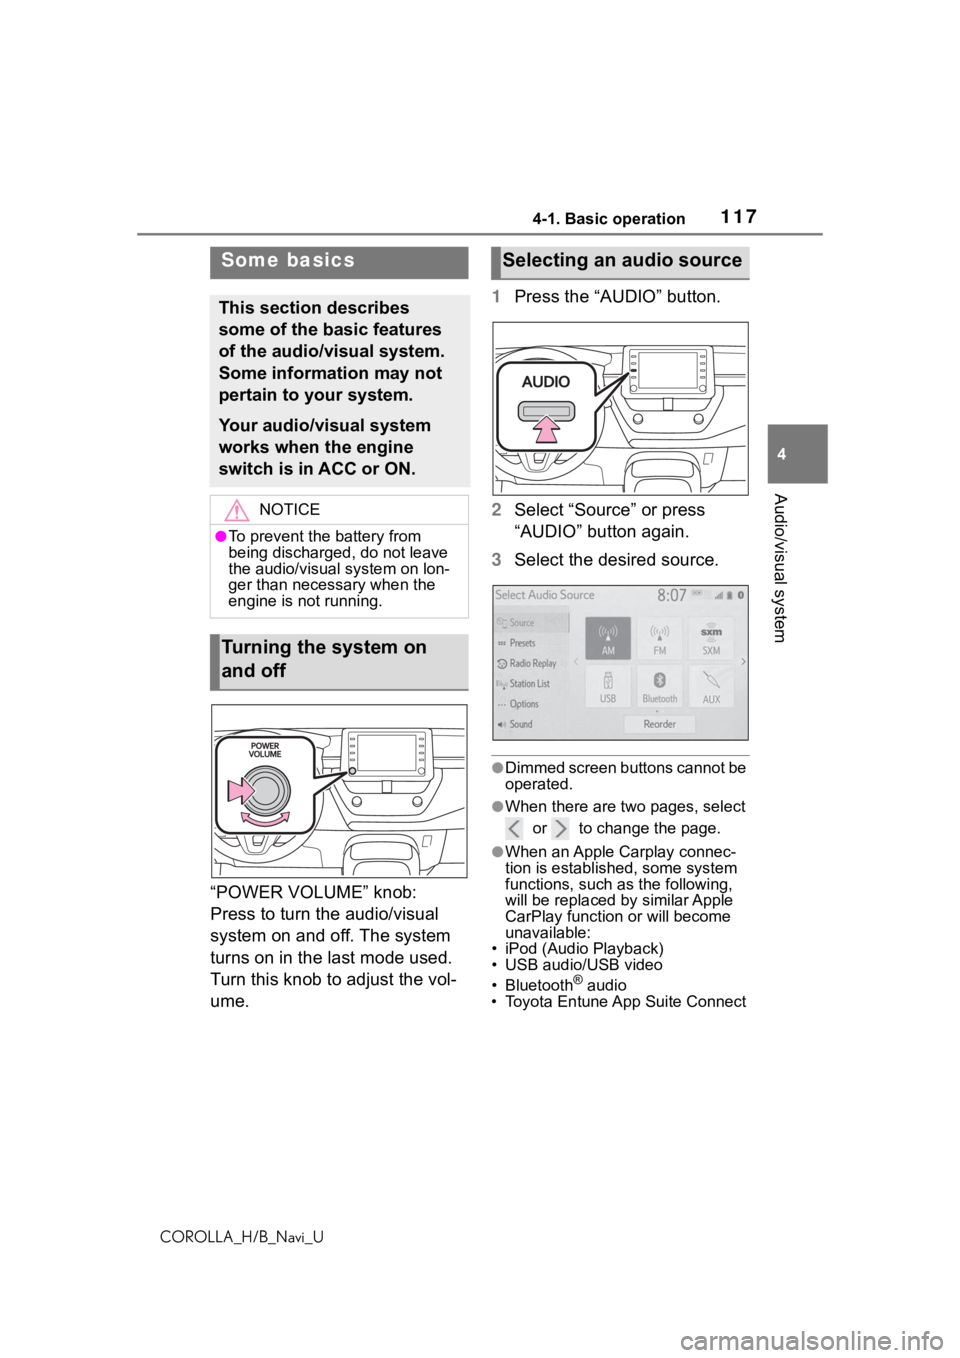
“POWER VOLUME” knob:
Press to turn the audio/visual
system on and off. The system
turns on in the last mode used.
Turn this knob to adjust the vol-
ume. 1
Press the “AUDIO” button.
2 Select “Source” or press
“AUDIO” button again.
3 Select the desired source.
●Dimmed screen buttons cannot be
operated.
●When there are tw o pages, select
or to change the page.
●When an Apple Carplay connec-
tion is established, some system
functions, such as the following,
will be replaced by similar Apple
CarPlay function or will become
unavailable:
• iPod (Audio Playback)
• USB audio/USB video
• Bluetooth
® audio
• Toyota Entune App Suite Connect
Some basics
This section describes
some of the basic features
of the audio/visual system.
Some information may not
pertain to your system.
Your audio/visual system
works when the engine
switch is in ACC or ON.
NOTICE
●To prevent the battery from
being discharged, do not leave
the audio/visual system on lon-
ger than necessary when the
engine is not running.
Turning the system on
and off
Selecting an audio source
Page 118 of 254
1184-1. Basic operation
COROLLA_H/B_Navi_U
1Display the audio source
selection screen. ( P.117)
2 Select “Reorder”.
3 Select the desired audio
source then or to reor-
der.
4 Select “OK”.
1 Connect a device.
Turn on the power of the
device if it is not turned on.
●The AUX port only supports audio
input.
●If a USB hub is plugged-in, two
devices can be connected at a
time.
●Even if a USB hub is used to con-
nect more than two USB devices,
only the first two connected
devices will be recognized.
●If a USB hub that has more than
two ports is connected to the USB
port, devices connected to the
USB hub may not charge or be
operable, as the supply of current
may be insufficient.
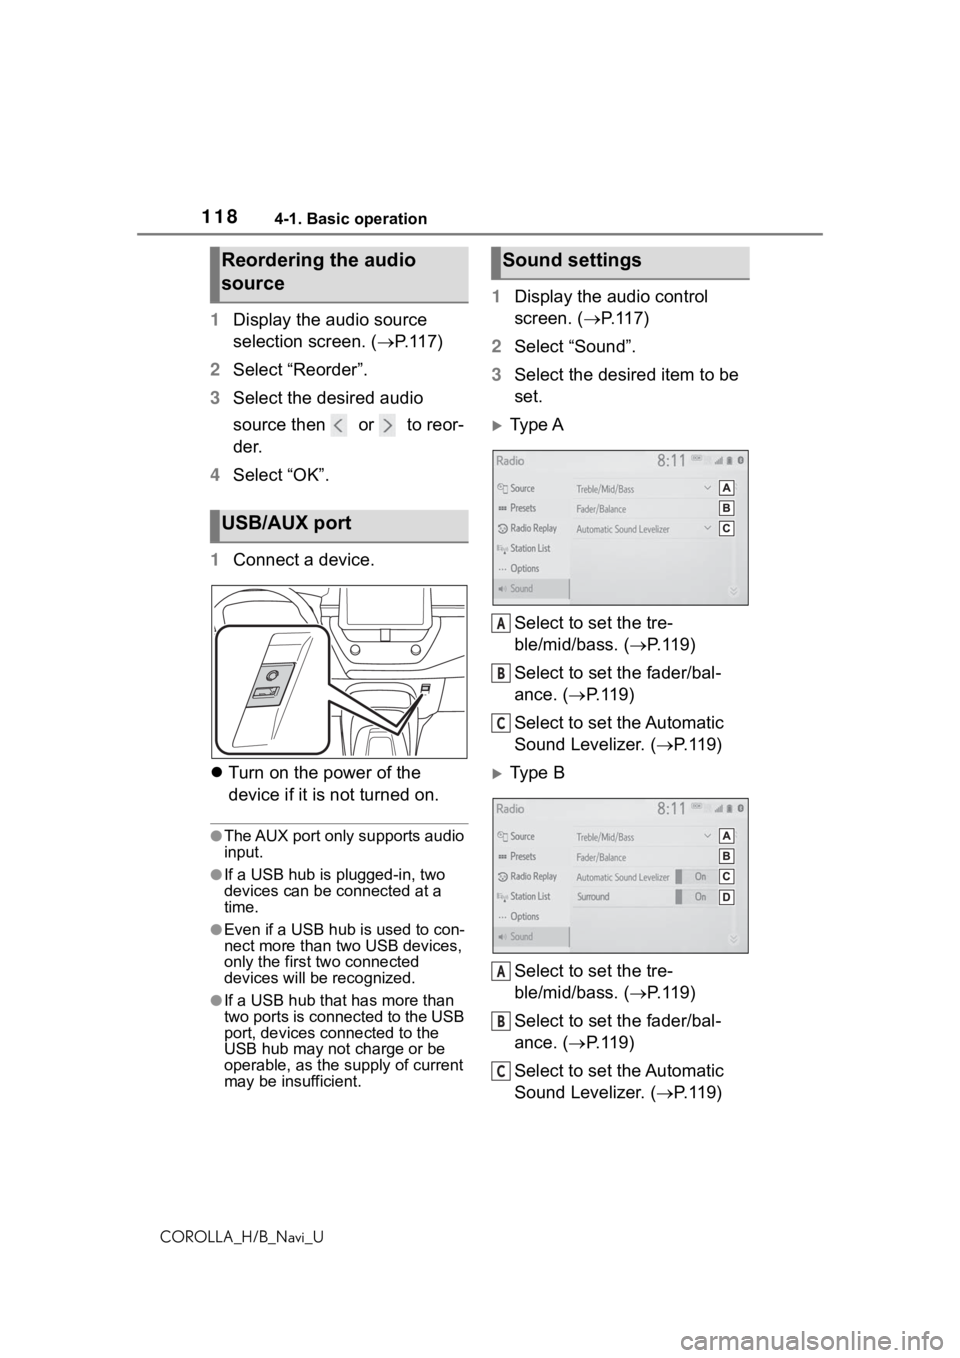
1 Display the audio control
screen. ( P.117)
2 Select “Sound”.
3 Select the desired item to be
set.
Type A
Select to set the tre-
ble/mid/bass. ( P.119)
Select to set the fader/bal-
ance. ( P.119)
Select to set the Automatic
Sound Levelizer. ( P.119)
Type B
Select to set the tre-
ble/mid/bass. ( P.119)
Select to set the fader/bal-
ance. ( P.119)
Select to set the Automatic
Sound Levelizer. ( P.119)
Reordering the audio
source
USB/AUX port
Sound settings
A
B
C
A
B
C
Page 120 of 254
1204-1. Basic operation
COROLLA_H/B_Navi_U
Ty p e B
1 Select “Automatic Sound
Levelizer”.
2 Select to set the Automatic
Sound Levelizer on/off.
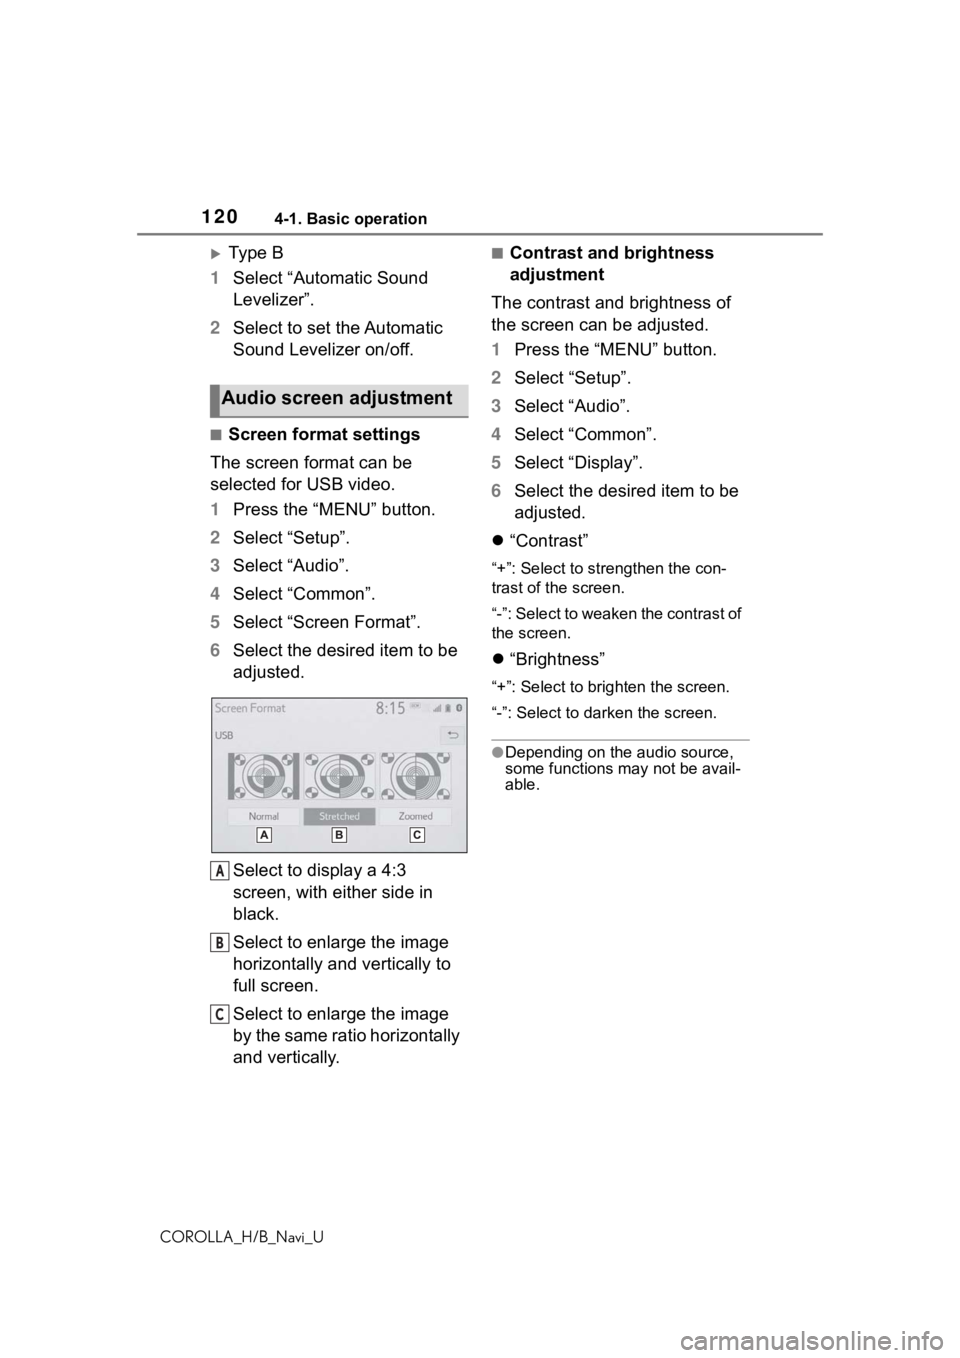
■Screen format settings
The screen format can be
selected for USB video.
1 Press the “MENU” button.
2 Select “Setup”.
3 Select “Audio”.
4 Select “Common”.
5 Select “Screen Format”.
6 Select the desired item to be
adjusted.
Select to display a 4:3
screen, with either side in
black.
Select to enlarge the image
horizontally and vertically to
full screen.
Select to enlarge the image
by the same ratio horizontally
and vertically.
■Contrast and brightness
adjustment
The contrast and brightness of
the screen can be adjusted.
1 Press the “MENU” button.
2 Select “Setup”.
3 Select “Audio”.
4 Select “Common”.
5 Select “Display”.
6 Select the desired item to be
adjusted.
“Contrast”
“+”: Select to strengthen the con-
trast of the screen.
“-”: Select to weaken the contrast of
the screen.
“Brightness”
“+”: Select to brighten the screen.
“-”: Select to darken the screen.
●Depending on the audio source,
some functions m ay not be avail-
able.
Audio screen adjustment
A
B
C