lock TOYOTA COROLLA HATCHBACK 2020 (in English) User Guide
[x] Cancel search | Manufacturer: TOYOTA, Model Year: 2020, Model line: COROLLA HATCHBACK, Model: TOYOTA COROLLA HATCHBACK 2020Pages: 572, PDF Size: 13.8 MB
Page 44 of 572
441-2. Child safety
COROLLA H/B_U
1-2.Child safety
Riding with children
Observe the following pre-
cautions when children are
in the vehicle.
Use a child restraint system
appropriate for the child,
until the child becomes
large enough to properly
wear the vehicle’s seat belt.
It is recommended that chil-
dren sit in th
e rear seats to
avoid a
ccidental
contact
with
the shift lever
, wiper
switch, e
tc.
Use the rear door child-pro-
tector lock or the
window
lo
ck switch to avoid childr
en
o
pening the door while driv-
ing or operating the p
ower
wind
ow accidentally
.
(
P.104, 127)
Do not let small
children
ope
rate eq
uipment which
ma
y catch or pinch b
ody
part
s, such as the power
window, hood, back door
,
se
ats, etc.
WARNING
■When children are in the vehi-
cle
Never leave children unattended
in the vehicle, and never allow
children to have or use the key.
Children may be able to start the
vehicle or shift the vehicle into
neutral. There is also a danger
that children ma y injure them-
selves by playing with the win-
dows or other features of the
vehicle. In addition, heat build-up
or extremely cold temperatures
inside the vehicle can be fatal to
children.
Page 49 of 572
491-2. Child safety
COROLLA H/B_U
1
For safety and security
A child restraint system for a
small child or baby must itself be
properly restrained on the seat
with the lap portion of the
lap/shoulder belt.
■Installing child restraint
system using a seat belt
(child restraint lock func-
tion belt)
Install the child restraint system
in accordance to the operation
manual enclosed with the child
restraint system.
WARNING
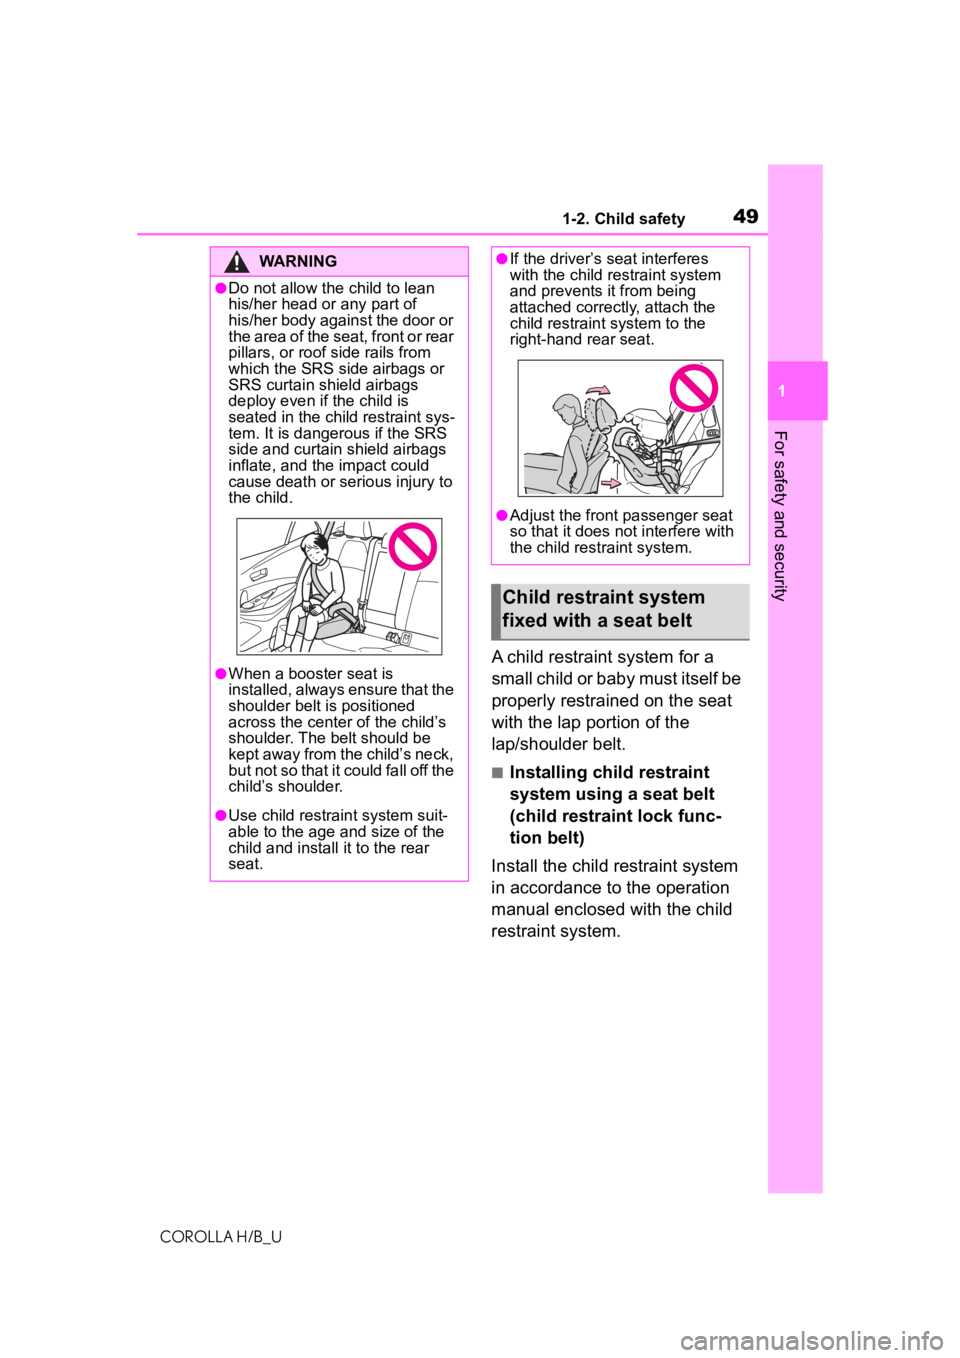
●Do not allow the child to lean
his/her head or any part of
his/her body against the door or
the area of the seat, front or rear
pillars, or roof side rails from
which the SRS side airbags or
SRS curtain shield airbags
deploy even if the child is
seated in the child restraint sys-
tem. It is dangerous if the SRS
side and curtain shield airbags
inflate, and the impact could
cause death or serious injury to
the child.
●When a booster seat is
installed, always ensure that the
shoulder belt is positioned
across the center of the child’s
shoulder. The belt should be
kept away from the child’s neck,
but not so that it could fall off the
child’s shoulder.
●Use child restraint system suit-
able to the age and size of the
child and install it to the rear
seat.
●If the driver’s seat interferes
with the child restraint system
and prevents it from being
attached correct ly, attach the
child restraint system to the
right-hand rear seat.
●Adjust the front passenger seat
so that it does not interfere with
the child restraint system.
Child restraint system
fixed with a seat belt
Page 50 of 572
501-2. Child safety
COROLLA H/B_U
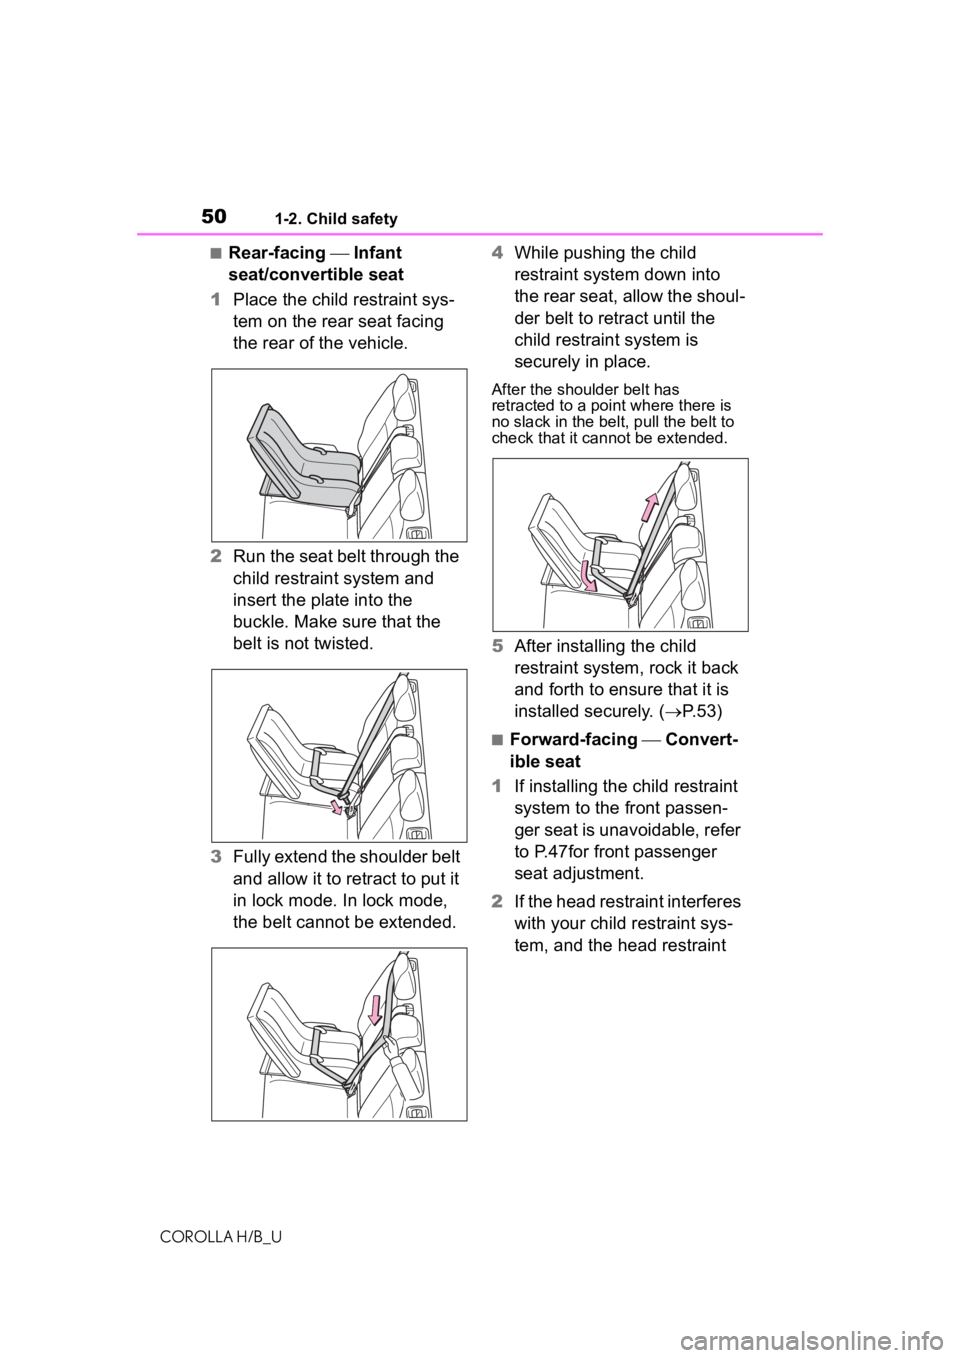
■Rear-facing Infant
seat/convertible seat
1 Place the child restraint sys-
tem on the rear seat facing
the rear of the vehicle.
2 Run the seat belt through the
child restraint system and
insert the plate into the
buckle. Make sure that the
belt is not twisted.
3 Fully extend the shoulder belt
and allow it to retract to put it
in lock mode. In lock mode,
the belt cannot be extended. 4
While pushing the child
restraint system down into
the rear seat, allow the shoul-
der belt to retract until the
child restraint system is
securely in place.
After the shoulder belt has
retracted to a poi nt where there is
no slack in the belt, pull the belt to
check that it cannot be extended.
5 After installing the child
restraint system, rock it back
and forth to ensure that it is
installed securely. ( P.53)
■Forward-facing Convert-
ible seat
1 If installing the child restraint
system to the front passen-
ger seat is unavoidable, refer
to P.47for front passenger
seat adjustment.
2 If the head restraint interferes
with your child restraint sys-
tem, and the head restraint
Page 51 of 572
511-2. Child safety
COROLLA H/B_U
1
For safety and security
can be removed, remove the
head restraint. ( P.118)
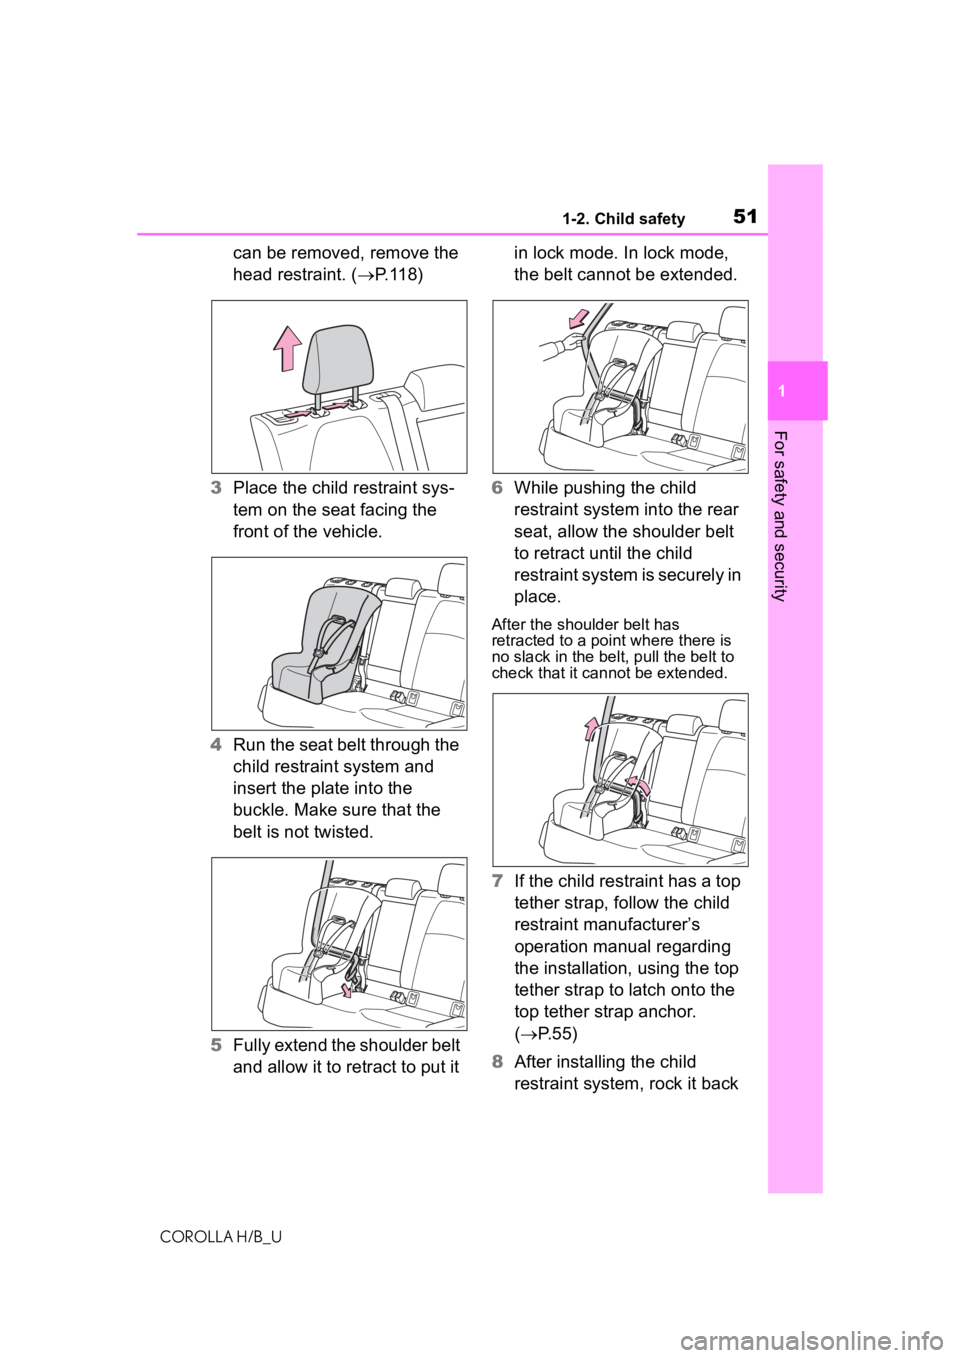
3 Place the child restraint sys-
tem on the seat facing the
front of the vehicle.
4 Run the seat belt through the
child restraint system and
insert the plate into the
buckle. Make sure that the
belt is not twisted.
5 Fully extend the shoulder belt
and allow it to retract to put it in lock mode. In lock mode,
the belt cannot be extended.
6 While pushing the child
restraint system into the rear
seat, allow the shoulder belt
to retract until the child
restraint system is securely in
place.
After the shoulder belt has
retracted to a poi nt where there is
no slack in the belt, pull the belt to
check that it cannot be extended.
7 If the child restraint has a top
tether strap, follow the child
restraint manufacturer’s
operation manual regarding
the installation, using the top
tether strap to latch onto the
top tether strap anchor.
( P.55)
8 After installing the child
restraint system, rock it back
Page 53 of 572
531-2. Child safety
COROLLA H/B_U
1
For safety and security
WARNING
■When installing a child
restraint system
Observe the following precau-
tions.
Failure to do so m ay result in
death or serious injury.
●Do not allow children to play
with the seat belt. If the seat belt
becomes twisted around a
child’s neck, it may lead to
choking or other serious injuries
that could result in death.
If this occurs and the buckle
cannot be unfastened, scissors
should be used to cut the belt.
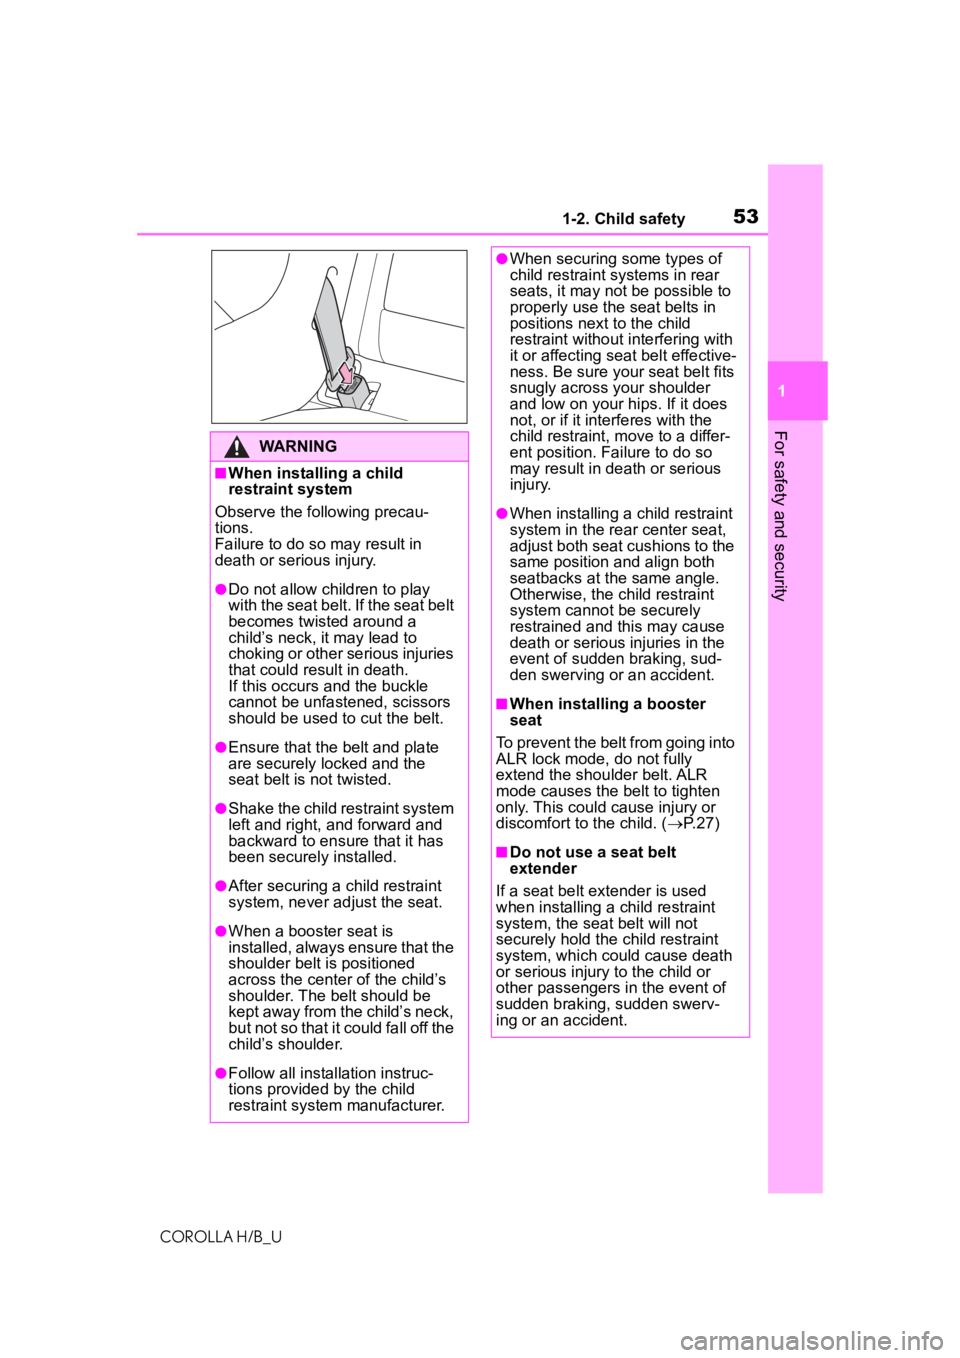
●Ensure that the belt and plate
are securely locked and the
seat belt is not twisted.
●Shake the child restraint system
left and right, and forward and
backward to ensure that it has
been securely installed.
●After securing a child restraint
system, never adjust the seat.
●When a booster seat is
installed, always ensure that the
shoulder belt is positioned
across the center of the child’s
shoulder. The belt should be
kept away from the child’s neck,
but not so that it could fall off the
child’s shoulder.
●Follow all installation instruc-
tions provided by the child
restraint system manufacturer.
●When securing some types of
child restraint systems in rear
seats, it may not be possible to
properly use the seat belts in
positions next to the child
restraint without interfering with
it or affecting seat belt effective-
ness. Be sure your seat belt fits
snugly across your shoulder
and low on your hips. If it does
not, or if it interferes with the
child restraint, move to a differ-
ent position. Fa ilure to do so
may result in death or serious
injury.
●When installing a child restraint
system in the rear center seat,
adjust both seat cushions to the
same position and align both
seatbacks at the same angle.
Otherwise, the child restraint
system cannot be securely
restrained and this may cause
death or serious injuries in the
event of sudden braking, sud-
den swerving or an accident.
■When installing a booster
seat
To prevent the belt from going into
ALR lock mode, do not fully
extend the shoulder belt. ALR
mode causes the belt to tighten
only. This could cause injury or
discomfort to the child. ( P. 2 7 )
■Do not use a seat belt
extender
If a seat belt extender is used
when installing a child restraint
system, the seat belt will not
securely hold the child restraint
system, which could cause death
or serious injury to the child or
other passengers in the event of
sudden braking, sudden swerv-
ing or an accident.
Page 66 of 572
661-4. Theft deterrent system
COROLLA H/B_U
*: If equipped
■Items to check before lock-
ing the vehicle
To prevent unexpected trigger-
ing of the alarm and vehicle
theft, make sure of the following:
Nobody is in the vehicle.
The windows are closed
before the alarm is set.
No valuables or other per-
sonal items are left in the
vehicle.
■Setting
Close the doors, back door and
hood, and lock all the doors.
The system will set automati-
cally after 30 seconds.
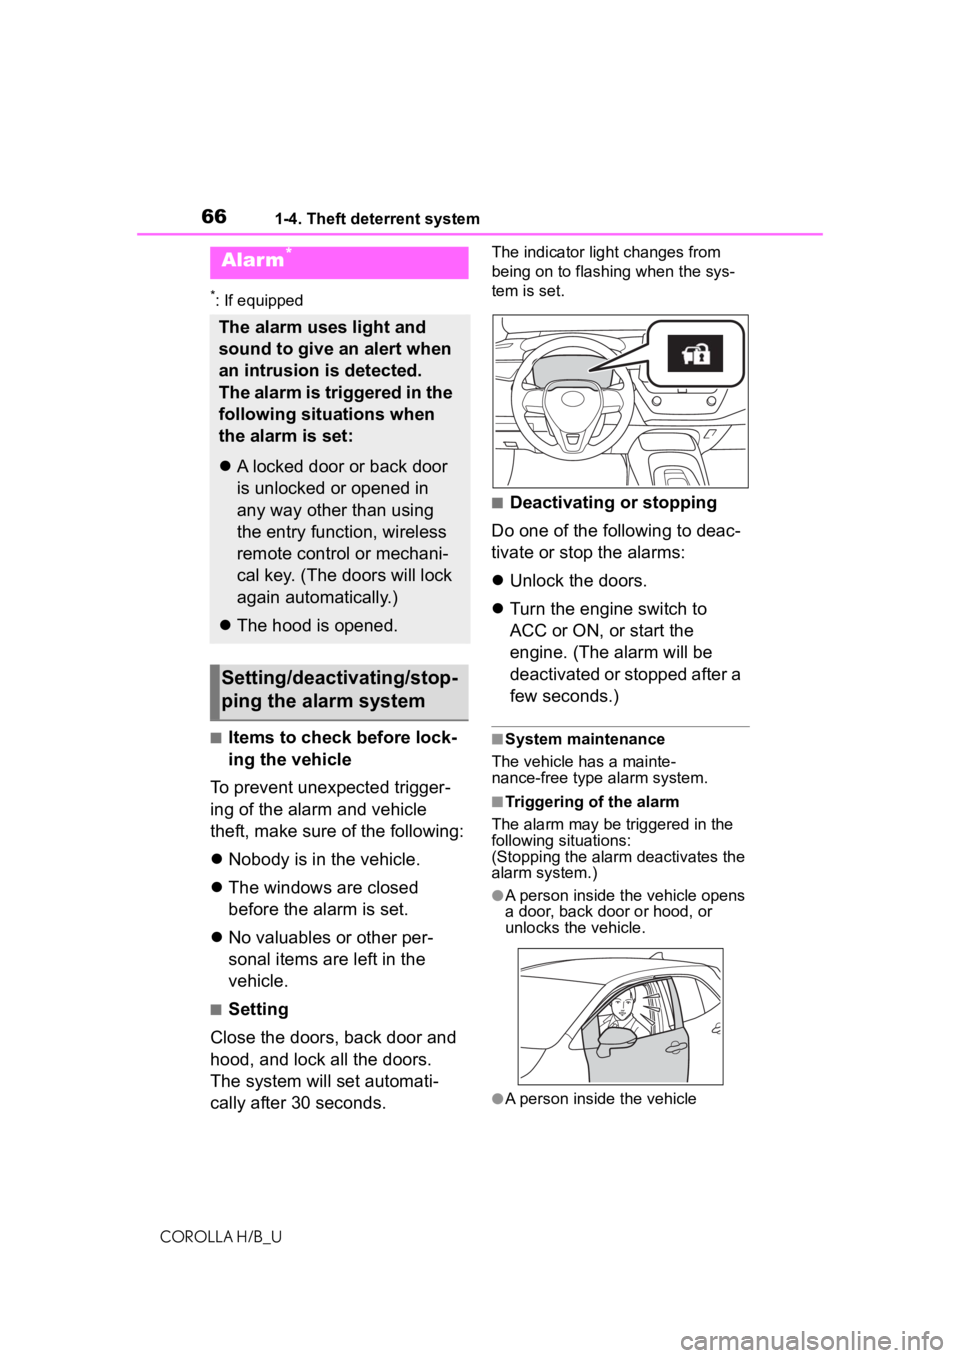
The indicator light changes from
being on to flashing when the sys-
tem is set.
■Deactivating or stopping
Do one of the following to deac-
tivate or stop the alarms:
Unlock the doors.
Turn the engine switch to
ACC or ON, or start the
engine. (The alarm will be
deactivated or stopped after a
few seconds.)
■System maintenance
The vehicle has a mainte-
nance-free type alarm system.
■Triggering of the alarm
The alarm may be triggered in the
following situations:
(Stopping the alarm deactivates the
alarm system.)
●A person inside the vehicle opens
a door, back door or hood, or
unlocks the vehicle.
●A person inside the vehicle
Alarm*
The alarm uses light and
sound to give an alert when
an intrusion is detected.
The alarm is triggered in the
following situations when
the alarm is set:
A locked door or back door
is unlocked or opened in
any way other than using
the entry function, wireless
remote control or mechani-
cal key. (The doors will lock
again automatically.)
The hood is opened.
Setting/deactivating/stop-
ping the alarm system
Page 67 of 572
671-4. Theft deterrent system
COROLLA H/B_U
1
For safety and security
unlocks the door using the inside
lock buttons.
●The battery is recharged or
replaced when the vehicle is
locked. ( P.504)
■Alarm-operated door lock
In the following cases, depending
on the situation, th e door may auto-
matically lock to p revent improper
entry into the vehicle:
●When a person remaining in the
vehicle unlocks the door and the
alarm is activated.
●While the alarm is activated, a
person remaining in the vehicle
unlocks the door.
●When recharging or replacing the
battery
NOTICE
■To ensure the system oper-
ates correctly
Do not modify or remove the sys-
tem. If modified or removed, the
proper operation of the system
cannot be guaranteed.
Theft prevention
labels (U.S.A.)
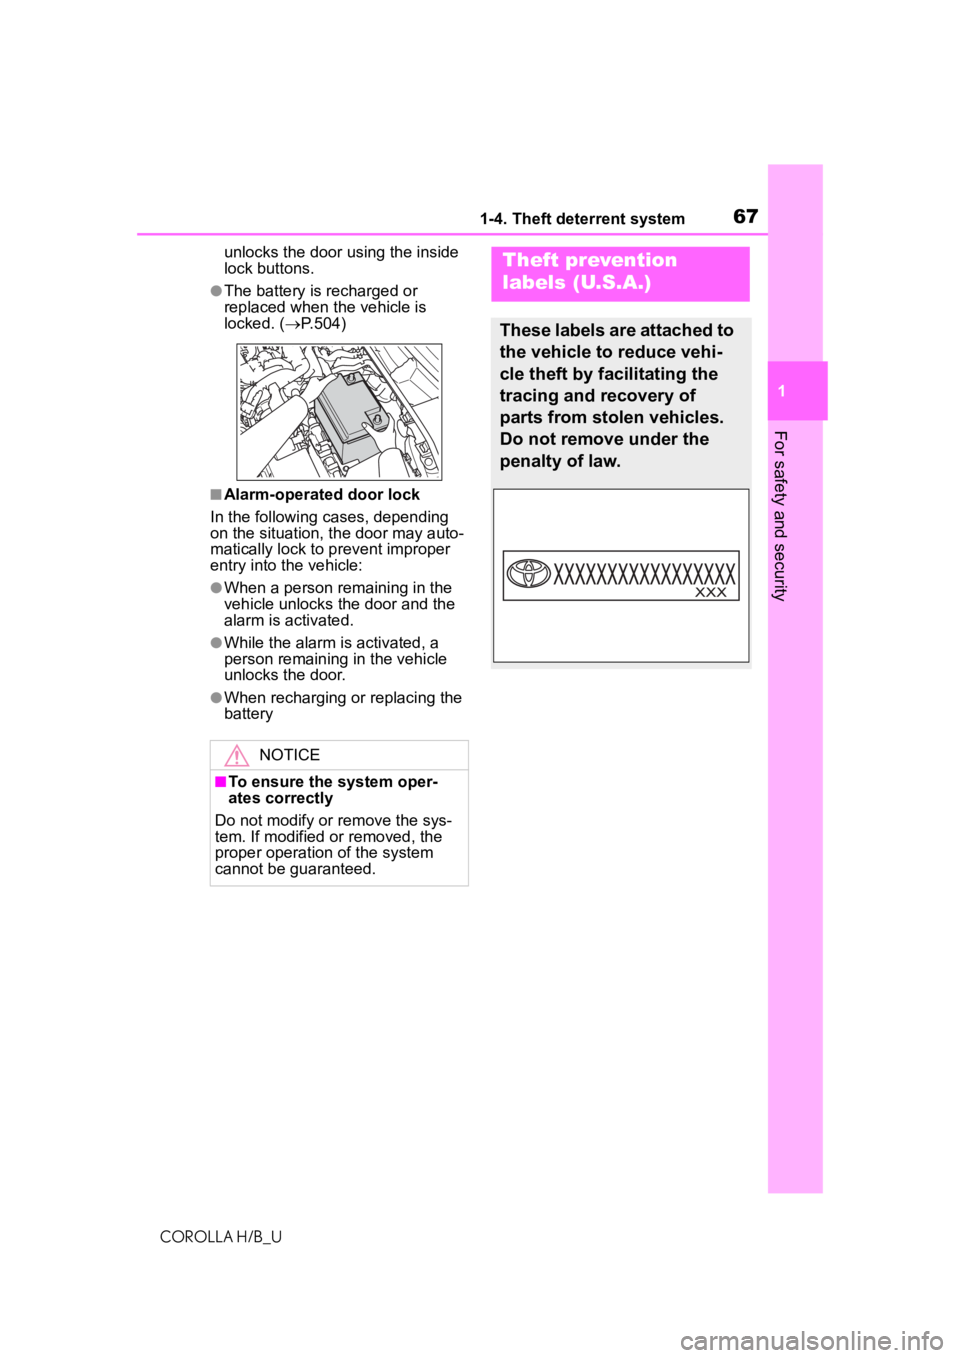
These labels are attached to
the vehicle to reduce vehi-
cle theft by facilitating the
tracing and recovery of
parts from stolen vehicles.
Do not remove under the
penalty of law.
Page 74 of 572
742-1. Instrument cluster
COROLLA H/B_U
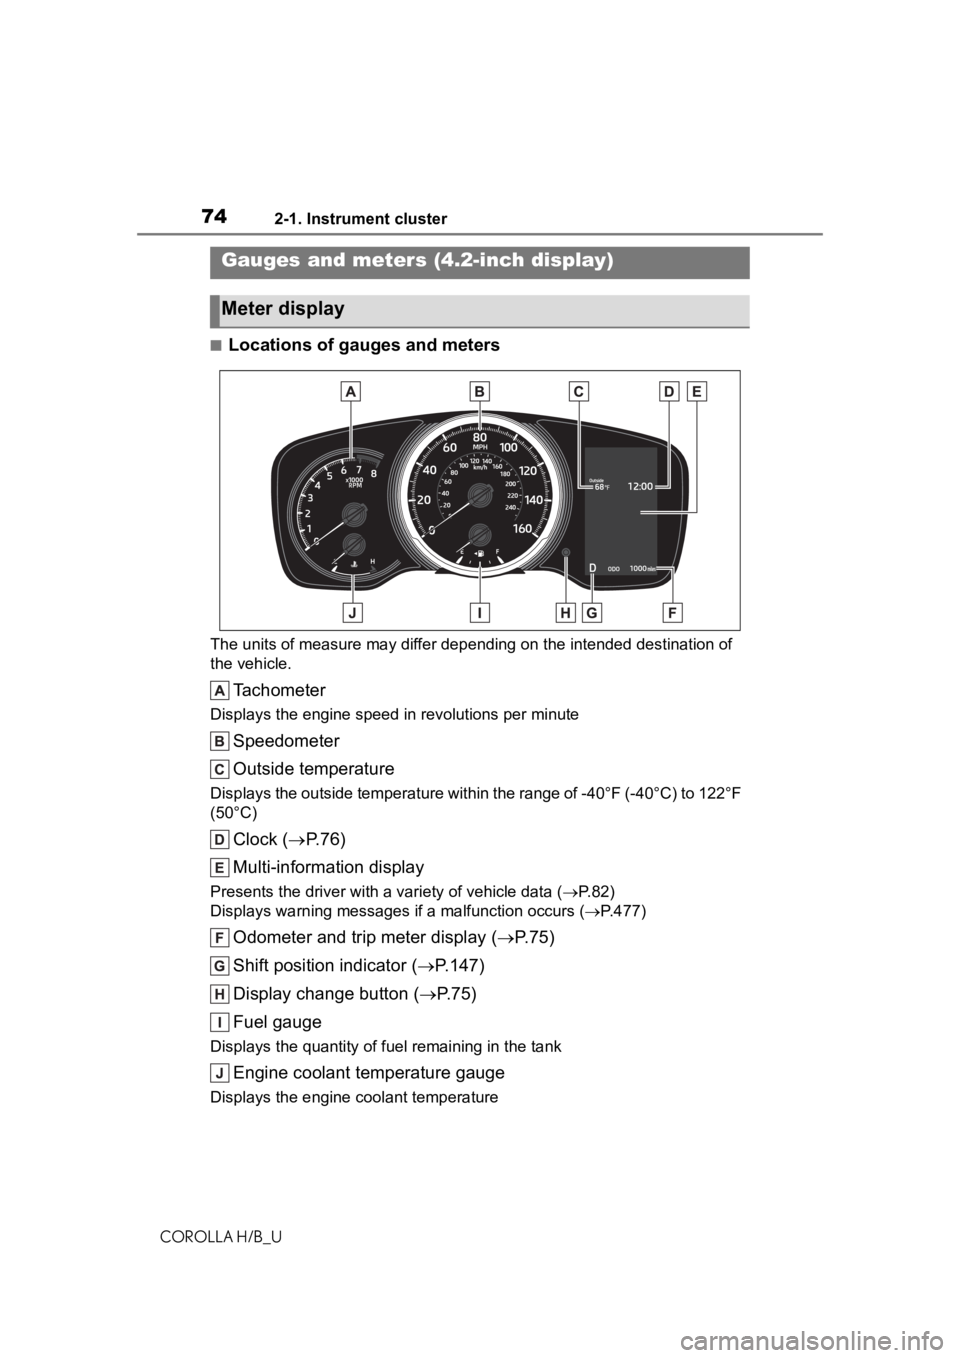
■Locations of gauges and meters
The units of measure may differ depending on the intended destination of
the vehicle.
Tachometer
Displays the engine speed in revolutions per minute
Speedometer
Outside temperature
Displays the outside temperature within the range of -40°F (-40 °C) to 122°F
(50°C)
Clock ( P. 7 6 )
Multi-information display
Presents the driver with a variety of vehicle data (P.82)
Displays warning messages if a malfunction occurs (P.477)
Odometer and trip meter display ( P.75)
Shift position indicator ( P.147)
Display change button ( P.75)
Fuel gauge
Displays the quantity of fu el remaining in the tank
Engine coolant temperature gauge
Displays the engine coolant temperature
Gauges and meters (4.2-inch display)
Meter display
Page 76 of 572
762-1. Instrument cluster
COROLLA H/B_Udifferent distances independently.
To reset, display the desired trip
meter and press and hold the dis-
play change button.
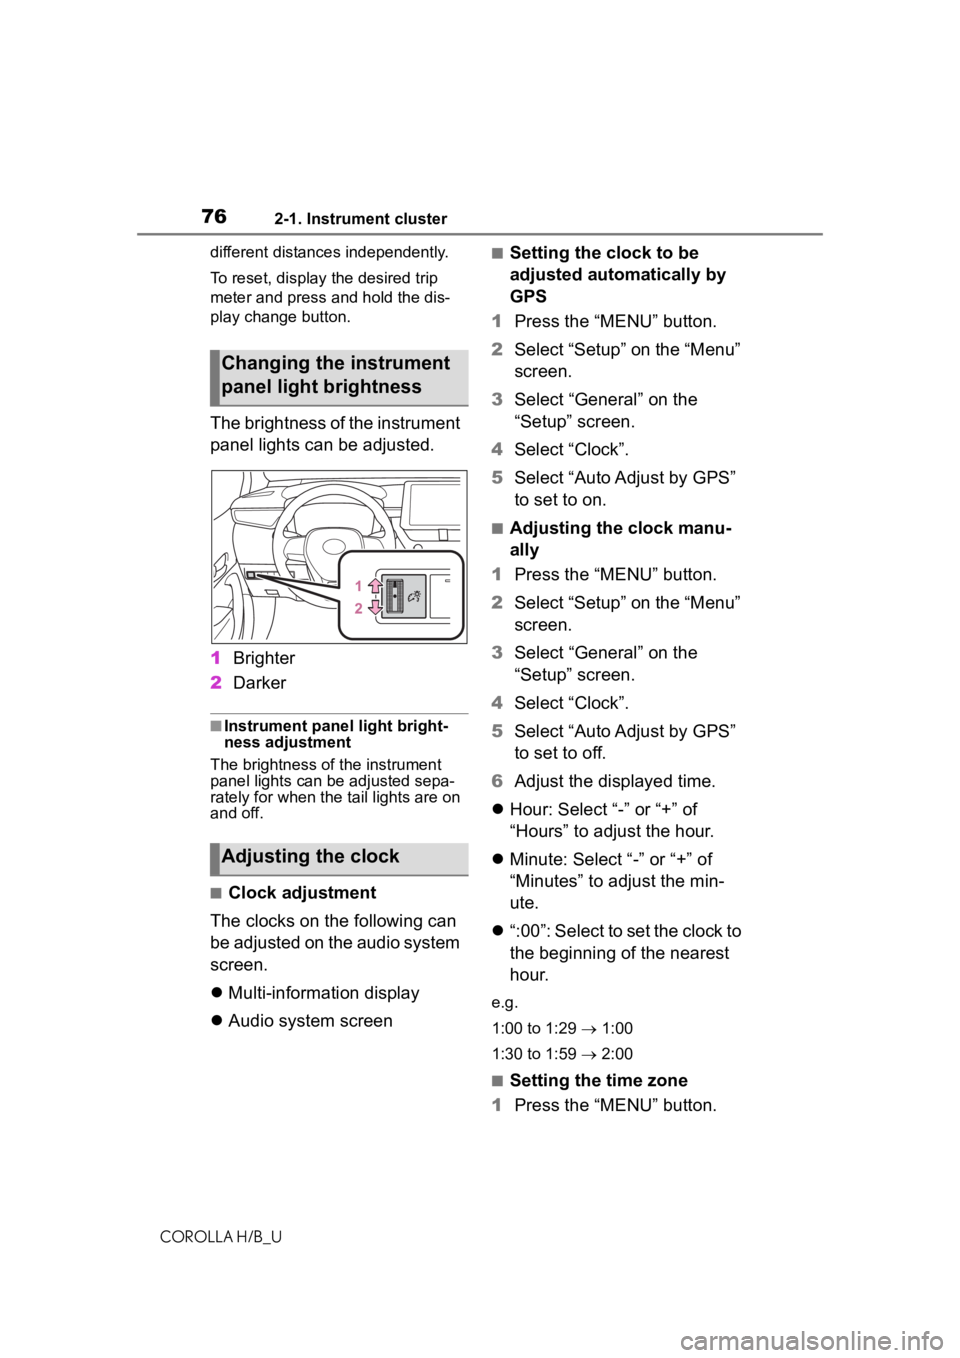
The brightness of the instrument
panel lights can be adjusted.
1
Brighter
2 Darker
■Instrument panel light bright-
ness adjustment
The brightness of the instrument
panel lights can be adjusted sepa-
rately for when the tail lights are on
and off.
■Clock adjustment
The clocks on the following can
be adjusted on the audio system
screen.
Multi-information display
Audio system screen
■Setting the clock to be
adjusted automatically by
GPS
1 Press the “MENU” button.
2 Select “Setup” on the “Menu”
screen.
3 Select “General” on the
“Setup” screen.
4 Select “Clock”.
5 Select “Auto Adjust by GPS”
to set to on.
■Adjusting the clock manu-
ally
1 Press the “MENU” button.
2 Select “Setup” on the “Menu”
screen.
3 Select “General” on the
“Setup” screen.
4 Select “Clock”.
5 Select “Auto Adjust by GPS”
to set to off.
6 Adjust the displayed time.
Hour: Select “-” or “+” of
“Hours” to adjust the hour.
Minute: Select “-” or “+” of
“Minutes” to adjust the min-
ute.
“:00”: Select to set the clock to
the beginning of the nearest
hour.
e.g.
1:00 to 1:29 1:00
1:30 to 1:59 2:00
■Setting the time zone
1 Press the “MENU” button.
Changing the instrument
panel light brightness
Adjusting the clock
Page 77 of 572
772-1. Instrument cluster
COROLLA H/B_U
2
Vehicle status information and indicators
2 Select “Setup” on the “Menu”
screen.
3 Select “General” on the
“Setup” screen.
4 Select “Clock”.
5 Select “Time Zone”.
Select the desired time zone.
Premium Audio only:
If “Auto” is selected, the time zone
is selected automatically by current
vehicle position.
■Setting daylight saving time
1 Press the “MENU” button.
2 Select “Setup” on the “Menu”
screen.
3 Select “General” on the
“Setup” screen.
4 Select “Clock”.
5 Select “Daylight Saving
Time” then on/off/auto
*.
*: Premium Audio only
■Changing the clock
between 12-hour/24-hour
format
1 Press the “MENU” button.
2 Select “Setup” on the “Menu”
screen.
3 Select “General” on the
“Setup” screen.
4 Select “Clock”.
5 Select “24-Hour Time For-
mat” and then on/off.
When set to off, the clock is dis-
played in 12 hour time format.
■Clock settings screen
If “Clock : 00” is displayed when
is selected on the multi-information
display, the system may be malfunc-
tioning. Have the vehicle inspected
by your Toyota dealer.