lock TOYOTA COROLLA HATCHBACK 2020 (in English) Service Manual
[x] Cancel search | Manufacturer: TOYOTA, Model Year: 2020, Model line: COROLLA HATCHBACK, Model: TOYOTA COROLLA HATCHBACK 2020Pages: 572, PDF Size: 13.8 MB
Page 113 of 572
1133-2. Opening, closing and locking the doors
COROLLA H/B_U
3
Before driving
For vehicles sold in Canada
Page 114 of 572
1143-2. Opening, closing and locking the doors
COROLLA H/B_U
WARNING
■Caution regarding interfer-
ence with electronic devices
●People with implantable car-
diac pacemakers, cardiac
resynchroniz
ation ther-
apy-pacemakers or implantable
cardioverter defib rillators s
houldk
eep away from the smart ke
y
syste
m antennas. ( P.108)
The radio waves may affect the
operation of such devices. If
necessary, the entry fu
nction
ca
n be disabled. Ask your Toy-
ota dealer for details, suc
h as
th
e frequency of rad
io waves
and
timing of the emitted radio
waves. Then, consult your doc-
tor to see if you should disab
le
th
e entry function.
●Users of any electrical medical
de
vice other than implantabl
ecar
diac pacemakers, car
diac
r
esynchronization ther-
apy-pacemakers or implantabl
ecardioverter
defibrillators s
hould
consul
t the manufacturer of the
device for information abou
t itsop
eration under the influence o
f
ra
dio waves.
Radio waves could have unex-
pected effects on the operation
of such medical devices.
Ask your Toyota dealer for details
on disabling the entry function.
Page 116 of 572
1163-3. Adjusting the seats
COROLLA H/B_U
1Move the front seats forward.
( P.115)
2 Stow the rear armrest.
( P.411)
3 Lower the rear center seat
head restraint to the lowest
position. (P.118)
4 Fold the rear outside seat
head restraints. ( P.118)
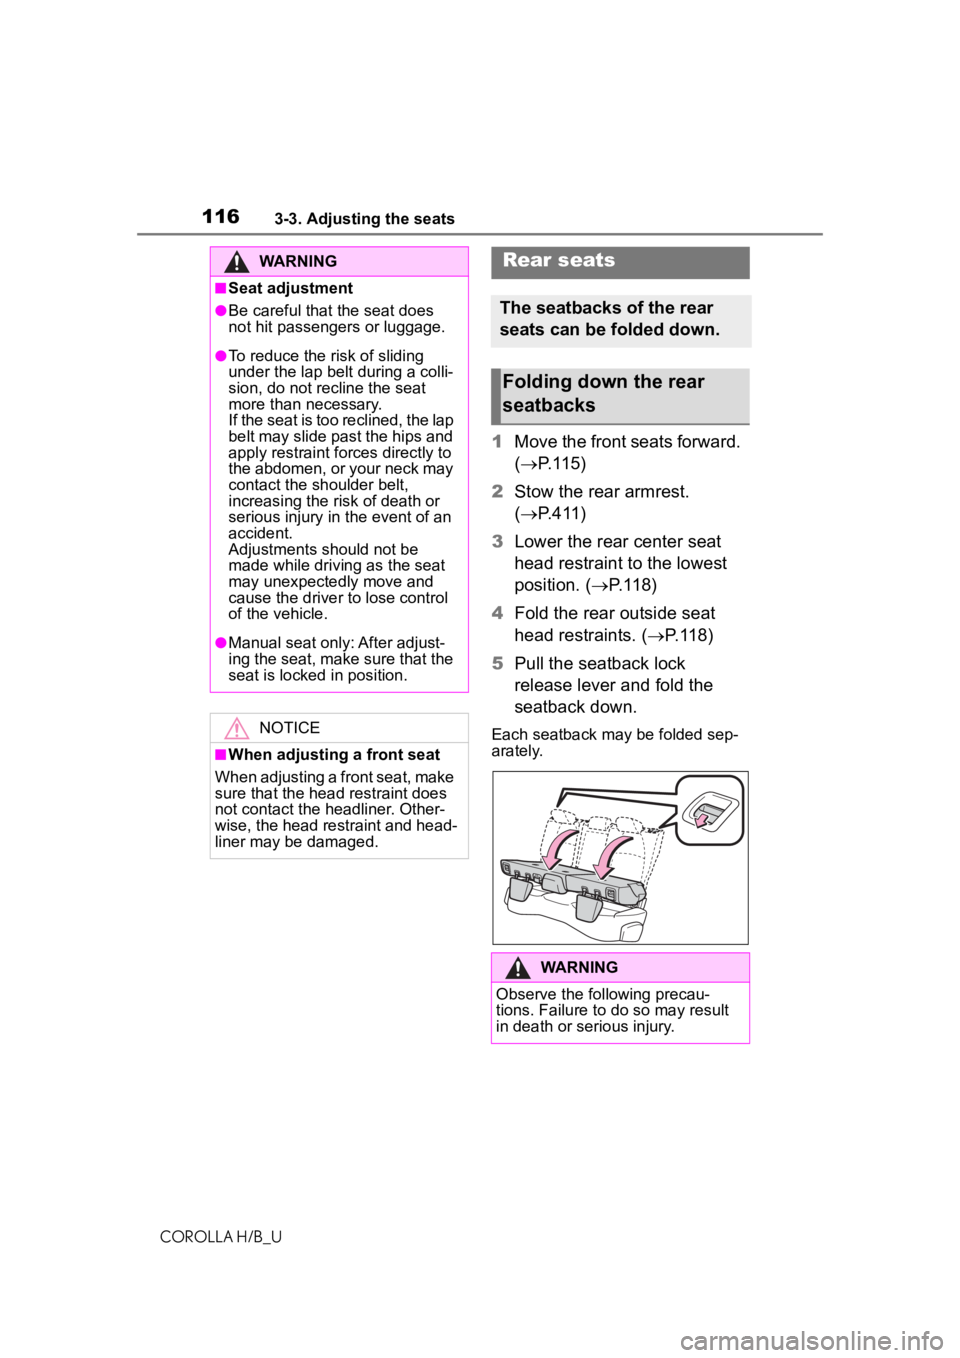
5 Pull the seatback lock
release lever and fold the
seatback down.
Each seatback may be folded sep-
arately.
WARNING
■Seat adjustment
●Be careful that the seat does
not hit passengers or luggage.
●To reduce the risk of sliding
under the lap belt during a colli-
sion, do not recline the seat
more than necessary.
If the seat is too reclined, the lap
belt may slide past the hips and
apply restraint forces directly to
the abdomen, or your neck may
contact the shoulder belt,
increasing the risk of death or
serious injury in the event of an
accident.
Adjustments should not be
made while driving as the seat
may unexpectedly move and
cause the driver to lose control
of the vehicle.
●Manual seat only: After adjust-
ing the seat, make sure that the
seat is locked in position.
NOTICE
■When adjusting a front seat
When adjusting a front seat, make
sure that the head restraint does
not contact the headliner. Other-
wise, the head restraint and head-
liner may be damaged.
Rear seats
The seatbacks of the rear
seats can be folded down.
Folding down the rear
seatbacks
WARNING
Observe the following precau-
tions. Failure to do so may result
in death or serious injury.
Page 117 of 572
1173-3. Adjusting the seats
COROLLA H/B_U
3
Before driving
WARNING
■When folding the rear seat-
backs down
●Do not fold the seatbacks down
while driving.
●Stop the vehicle on level
ground, set the parking brake
and shift the shift lever to P
(continuously variable transmis-
sion) or N (manual transmis-
sion).
●Do not allow anyo ne to sit on a
folded seatback or in the lug-
gage compartment while driv-
ing.
●Do not allow child ren to enter
the luggage compartment.
●Do not allow any one to sit on
the rear center seat if the rear
right seat is folded down, as the
seat belt buckle for the rear cen-
ter seat belt is then concealed
under the folded seat and can-
not be used.
●Be careful not to get your hand
caught when folding the rear
seatbacks.
●Adjust the position of the front
seats before folding down the
rear seatbacks so that the front
seats do not interfere with the
rear seatbacks when folding
down the rear seatbacks.
■After returning the rear seat-
back to the upright position
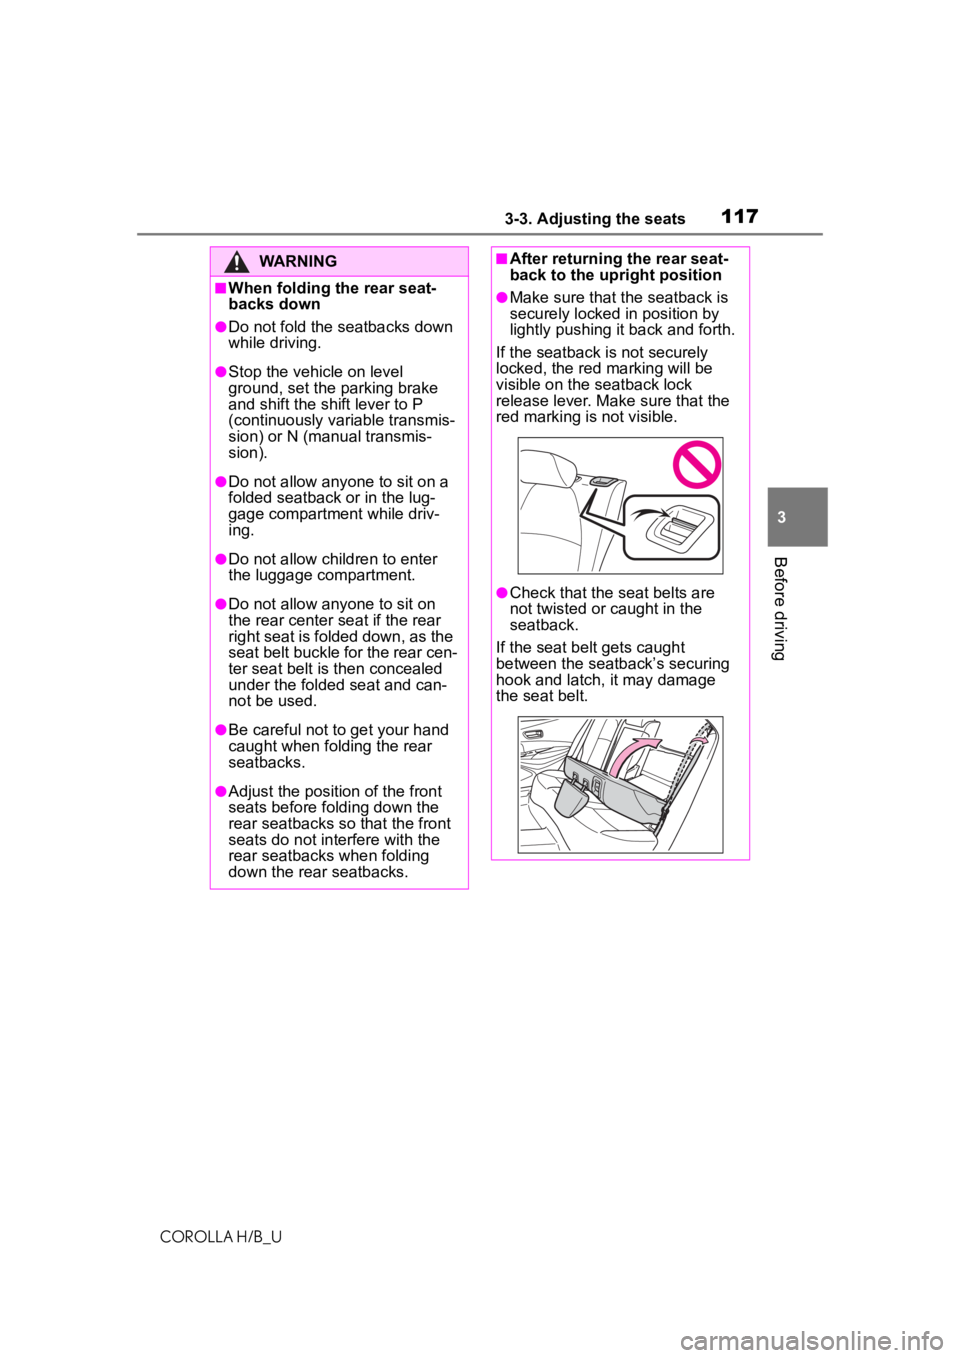
●Make sure that the seatback is
securely locked in position by
lightly pushing it back and forth.
If the seatback is not securely
locked, the red marking will be
visible on the seatback lock
release lever. Make sure that the
red marking is not visible.
●Check that the seat belts are
not twisted or caught in the
seatback.
If the seat belt gets caught
between the seatback’s securing
hook and latch, it may damage
the seat belt.
Page 118 of 572
1183-3. Adjusting the seats
COROLLA H/B_U
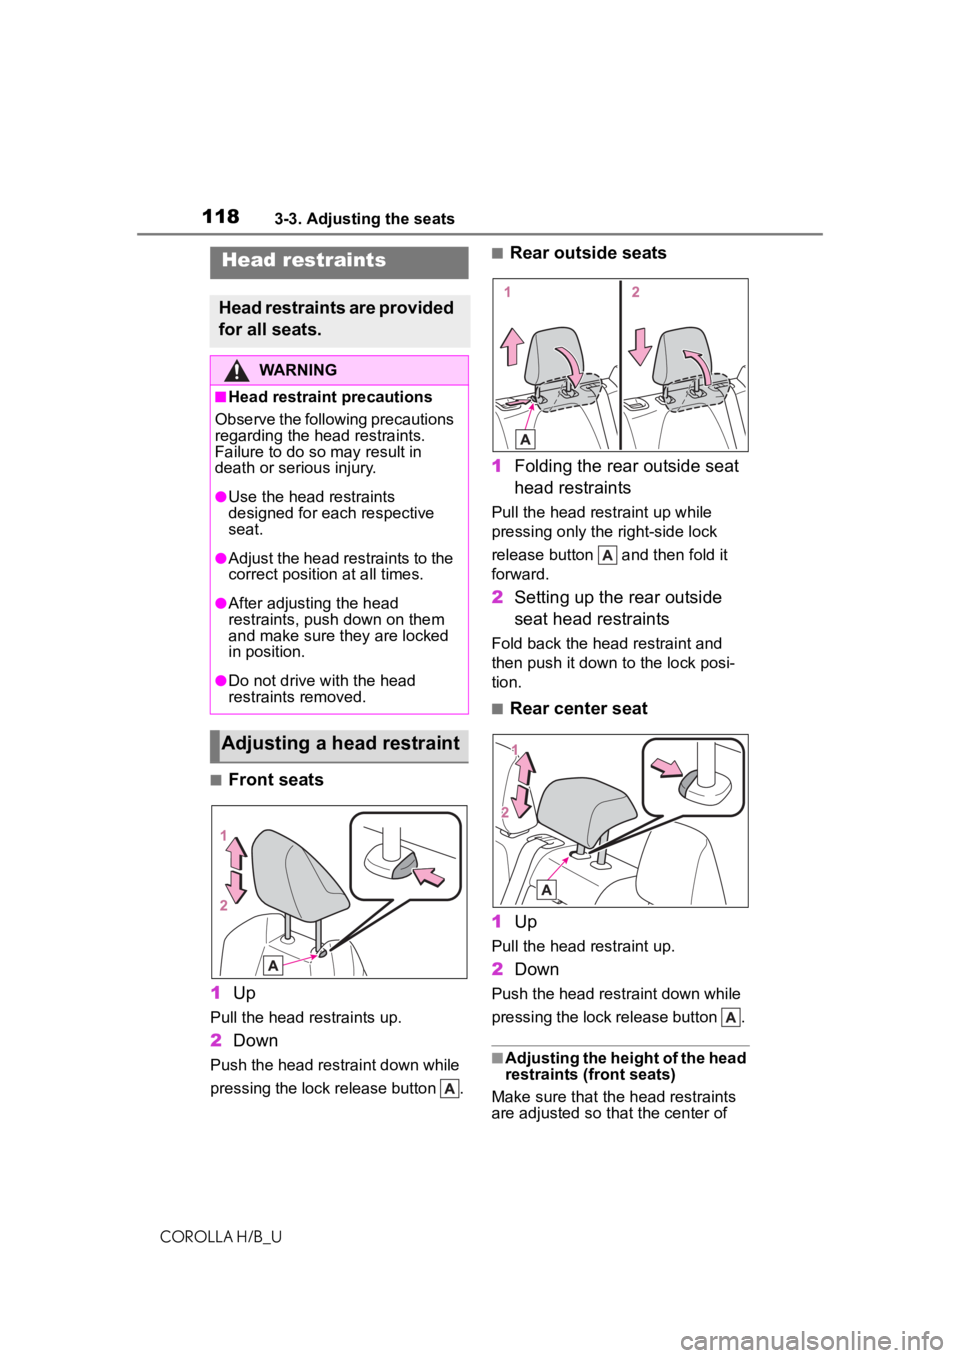
■Front seats
1 Up
Pull the head restraints up.
2Down
Push the head restraint down while
pressing the lock release button .
■Rear outside seats
1 Folding the rear outside seat
head restraints
Pull the head restraint up while
pressing only the right-side lock
release button and then fold it
forward.
2Setting up the rear outside
seat head restraints
Fold back the head restraint and
then push it down to the lock posi-
tion.
■Rear center seat
1 Up
Pull the head restraint up.
2Down
Push the head restraint down while
pressing the lock release button .
■Adjusting the height of the head
restraints (front seats)
Make sure that the head restraints
are adjusted so that the center of
Head restraints
Head restraints are provided
for all seats.
WARNING
■Head restraint precautions
Observe the following precautions
regarding the head restraints.
Failure to do so m ay result in
death or serious injury.
●Use the head restraints
designed for each respective
seat.
●Adjust the head restraints to the
correct position at all times.
●After adjusting the head
restraints, push down on them
and make sure they are locked
in position.
●Do not drive with the head
restraints removed.
Adjusting a head restraint
Page 119 of 572
1193-3. Adjusting the seats
COROLLA H/B_U
3
Before driving
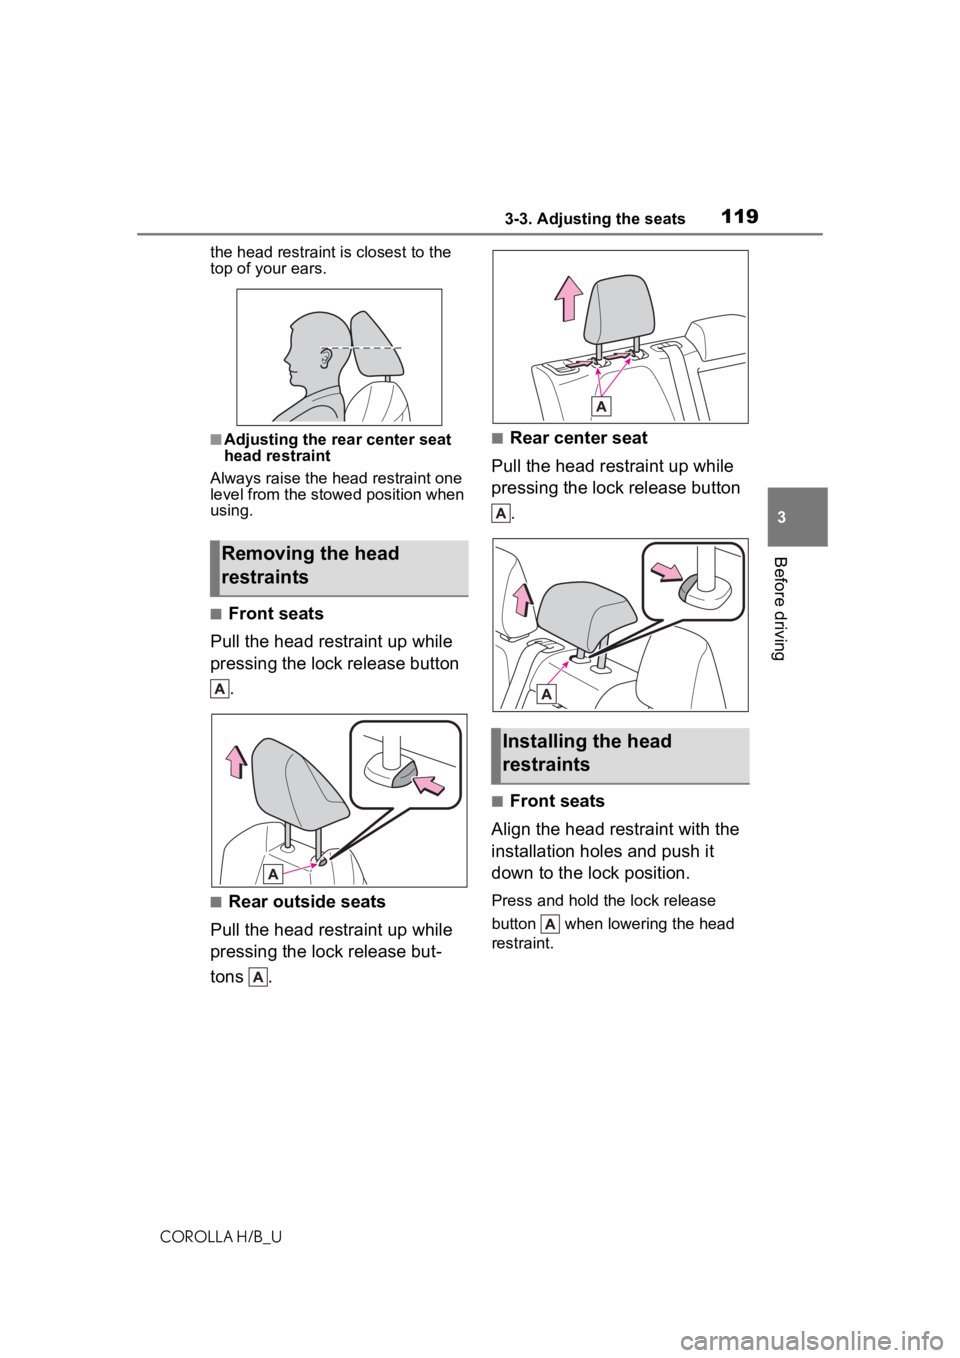
the head restraint is closest to the
top of your ears.
■Adjusting the rear center seat
head restraint
Always raise the head restraint one
level from the stowed position when
using.
■Front seats
Pull the head restraint up while
pressing the lock release button .
■Rear outside seats
Pull the head restraint up while
pressing the lock release but-
tons .
■Rear center seat
Pull the head restraint up while
pressing the lock release button .
■Front seats
Align the head restraint with the
installation holes and push it
down to the lock position.
Press and hold the lock release
button when lowering the head
restraint.
Removing the head
restraints
Installing the head
restraints
Page 120 of 572
1203-3. Adjusting the seats
COROLLA H/B_U
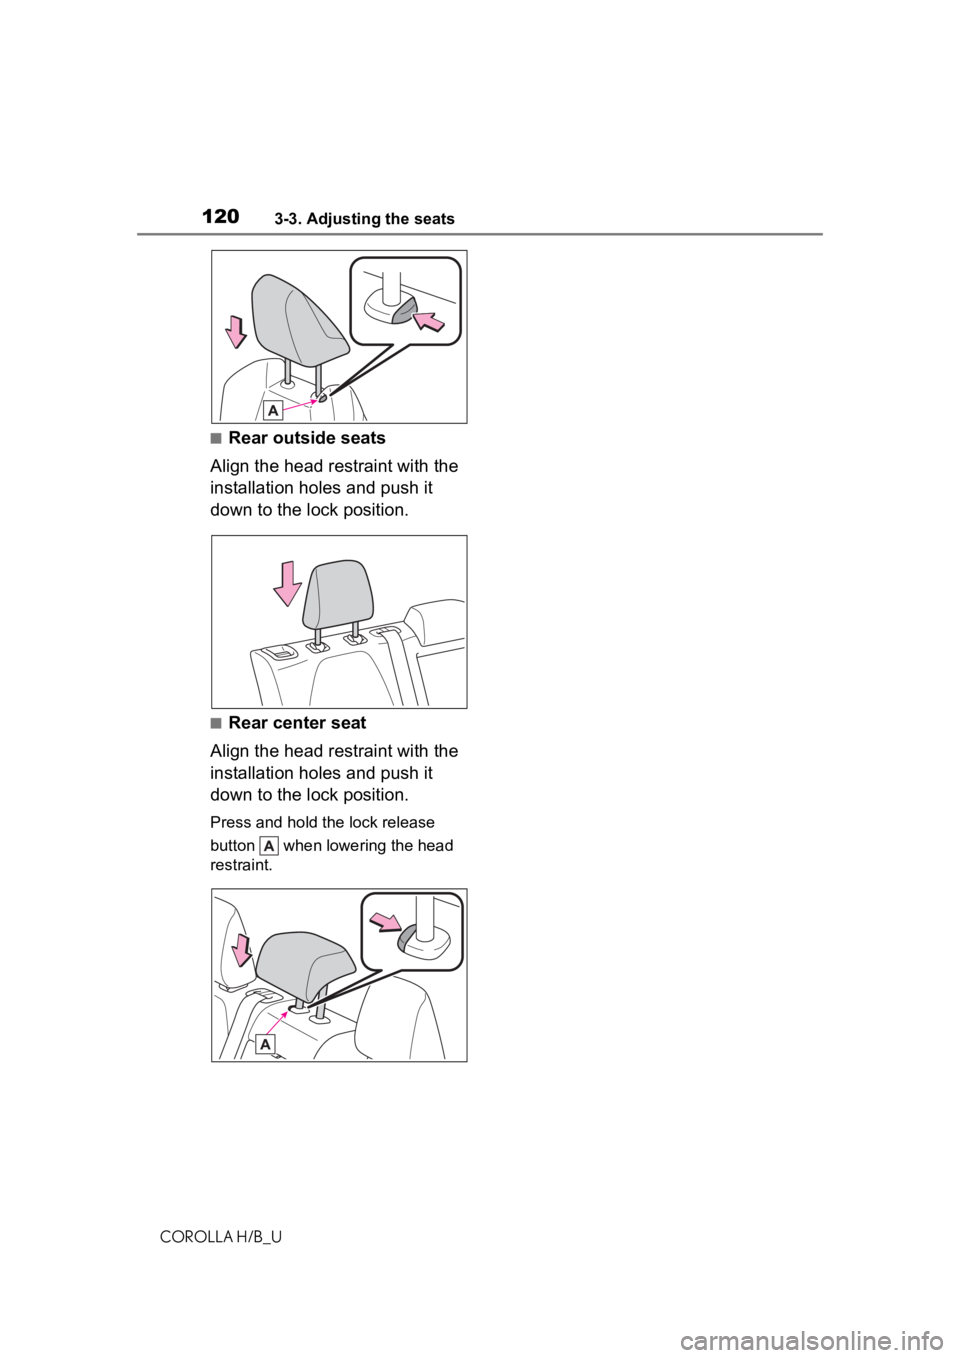
■Rear outside seats
Align the head restraint with the
installation holes and push it
down to the lock position.
■Rear center seat
Align the head restraint with the
installation holes and push it
down to the lock position.
Press and hold the lock release
button when lowering the head
restraint.
Page 121 of 572
1213-4. Adjusting the steering wheel and mirrors
COROLLA H/B_U
3
Before driving
3-4.Adjusting the steering wheel and mirrors
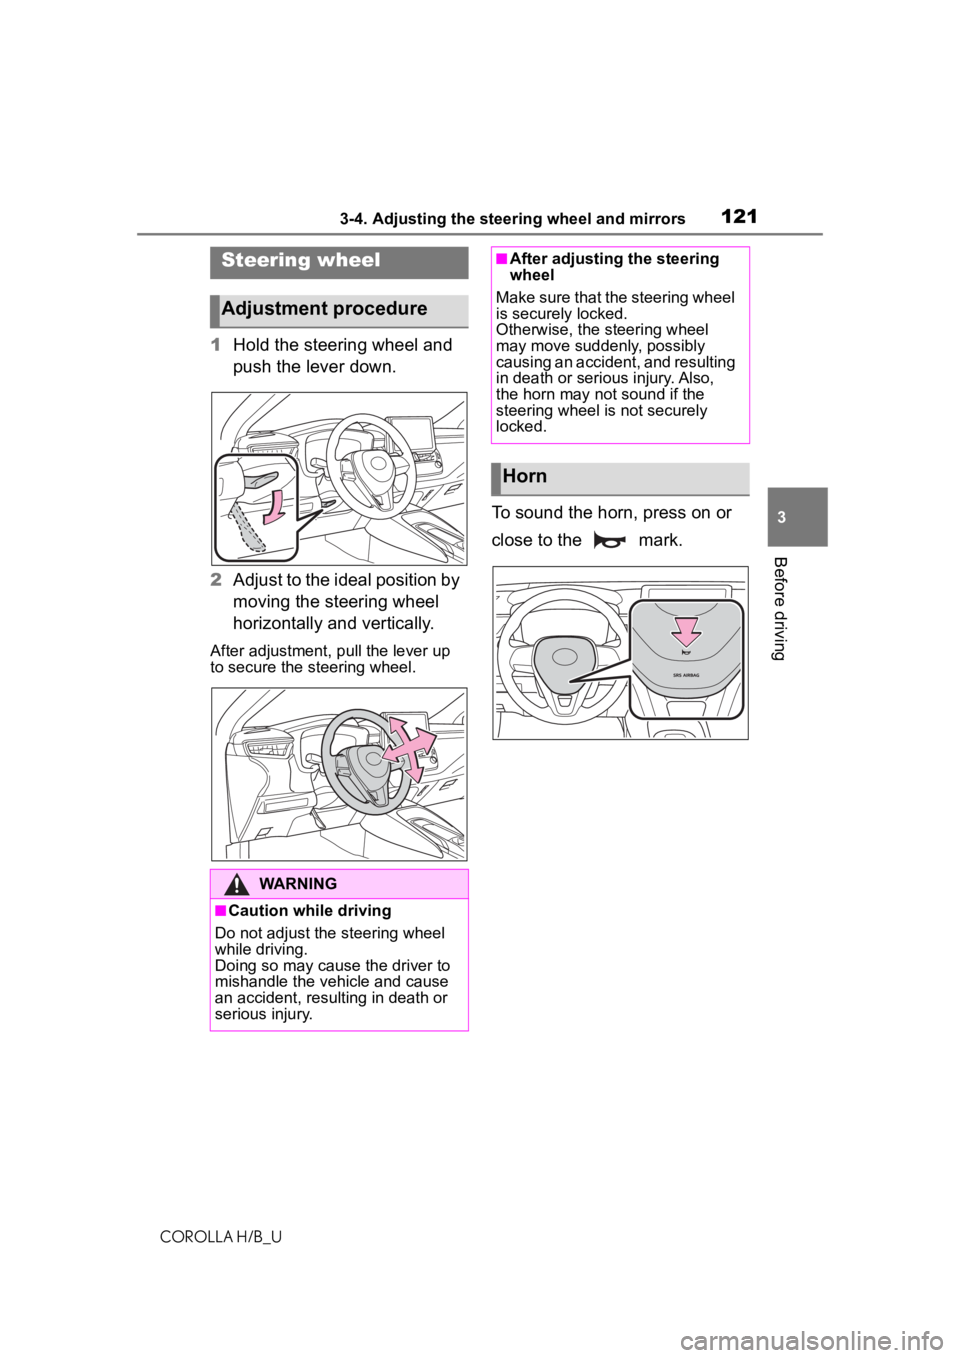
1 Hold the steering wheel and
push the lever down.
2 Adjust to the ideal position by
moving the steering wheel
horizontally and vertically.
After adjustment, pull the lever up
to secure the steering wheel.
To sound the horn, press on or
close to the mark.
Steering wheel
Adjustment procedure
WARNING
■Caution while driving
Do not adjust the steering wheel
while driving.
Doing so may cause the driver to
mishandle the vehicle and cause
an accident, resul ting in death or
serious injury.
■After adjusting the steeringw heel
Make sure that the steering wheel
is securely locked.
Otherwise, the steering wheel
may move suddenly, possibly
causing an accident, and resulting
in death or serious injury. Also,
the horn may not sound if the
steering wheel is not securely
locked.
Horn
Page 126 of 572
1263-5. Opening and closing the windows
COROLLA H/B_Upushing the switch in the
one-touch opening direction, and
hold it there for a
pproximately 4
seconds or more.
6 Pull and hold the power window
switch in the one-touch closing
direction again. After the door
window is completely closed,
continue holding the switch for a
further 1 second or more.
If you release the switch while the
window is moving, start again from
the beginning.
If the window reverses and cannot
be fully closed or opened, have the
vehicle inspected by your Toyota
dealer.
■Door lock linked window opera-
tion
●The power windows can be
opened and closed using the
mechanical key.
* ( P.501)
●The power windows can be
opened using the wireless remote
control.
* ( P.101)*: These settings must be custom-
ized at your Toyota dealer.
■Power windows open warning
buzzer
A buzzer sounds and a message is
shown on the multi -information dis-
play in the instrument cluster when
the engine switch is turned off and
the driver’s door is opened with the
power windows open.
■Customization
Some functions can be customized.
( P.531)
WARNING
Observe the following precau-
tions. Failure to do so may result
in death or serious injury.
■Closing the windows
●The driver is responsible for all
the power window operations,
including the operation for the
passengers. In order to prevent
accidental operation, especially
by a child, do not let a child
operate the power windows. It is
possible for children and other
passengers to have body parts
caught in the power window.
Also, when ridin g with a child, it
is recommended to use the win-
dow lock switch. (
P.127)
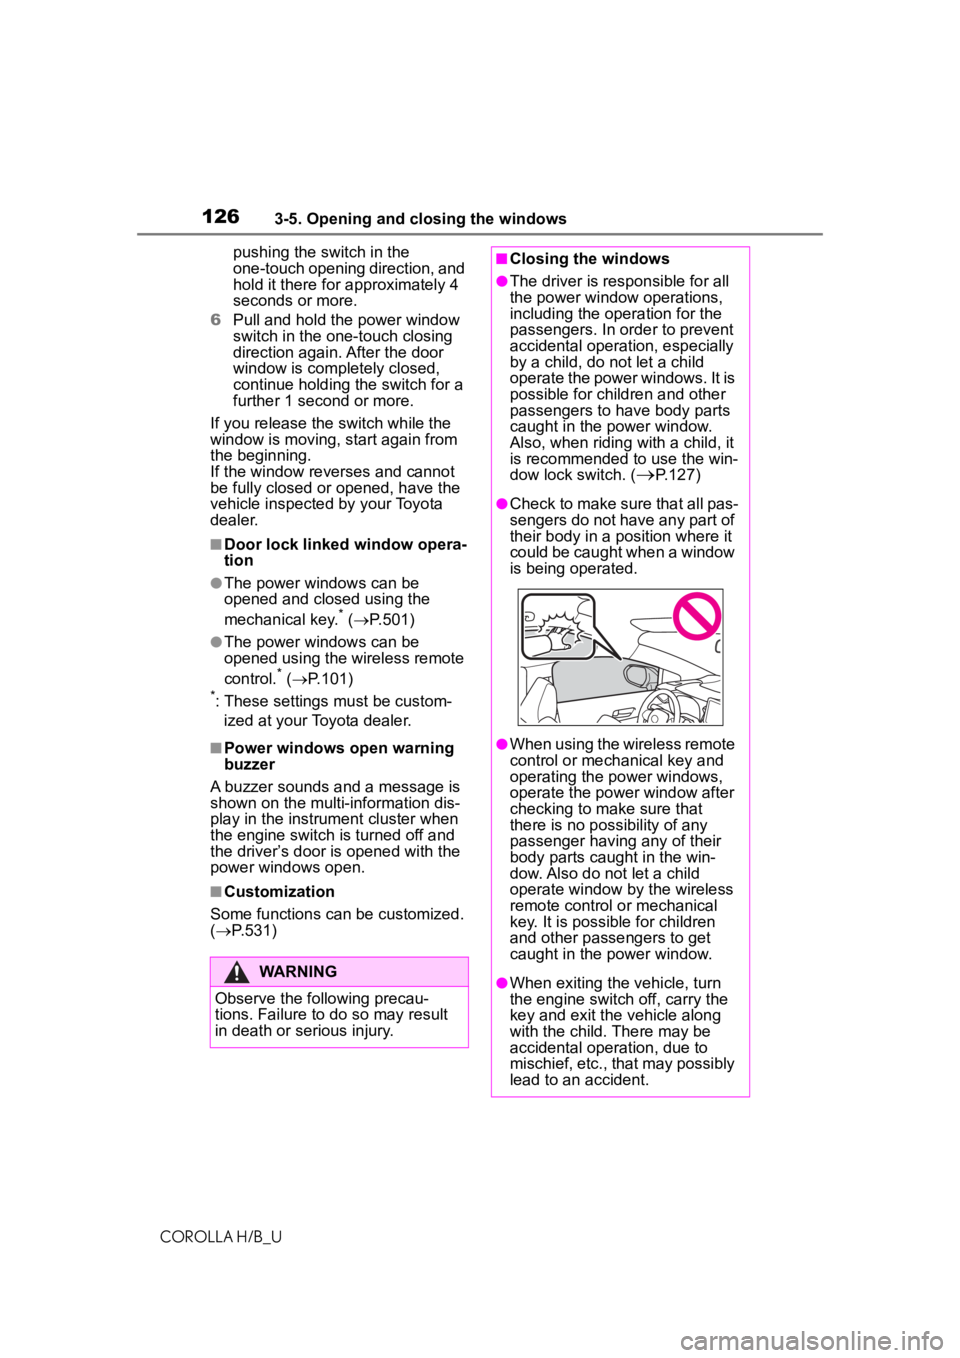
●Check to make sure that all pas-
sengers do not have any part of
their body in a pos ition where it
could be caught when a window
is being operated.
●When using the wireless remote
control or mechanical key and
operating the power windows,
operate the power window after
checking to make sure that
there is no possibility of any
passenger having any of their
body parts caug ht in the win-
dow. Also do not let a child
operate window by the wireless
remote control or mechanical
key. It is possib le for children
and other passengers to get
caught in the power window.
●When exiting the vehicle, turn
the engine switch off, carry the
key and exit the vehicle along
with the child. There may be
accidental operation, due to
mischief, etc., that may possibly
lead to an accident.
Page 127 of 572
1273-5. Opening and closing the windows
COROLLA H/B_U
3
Before driving
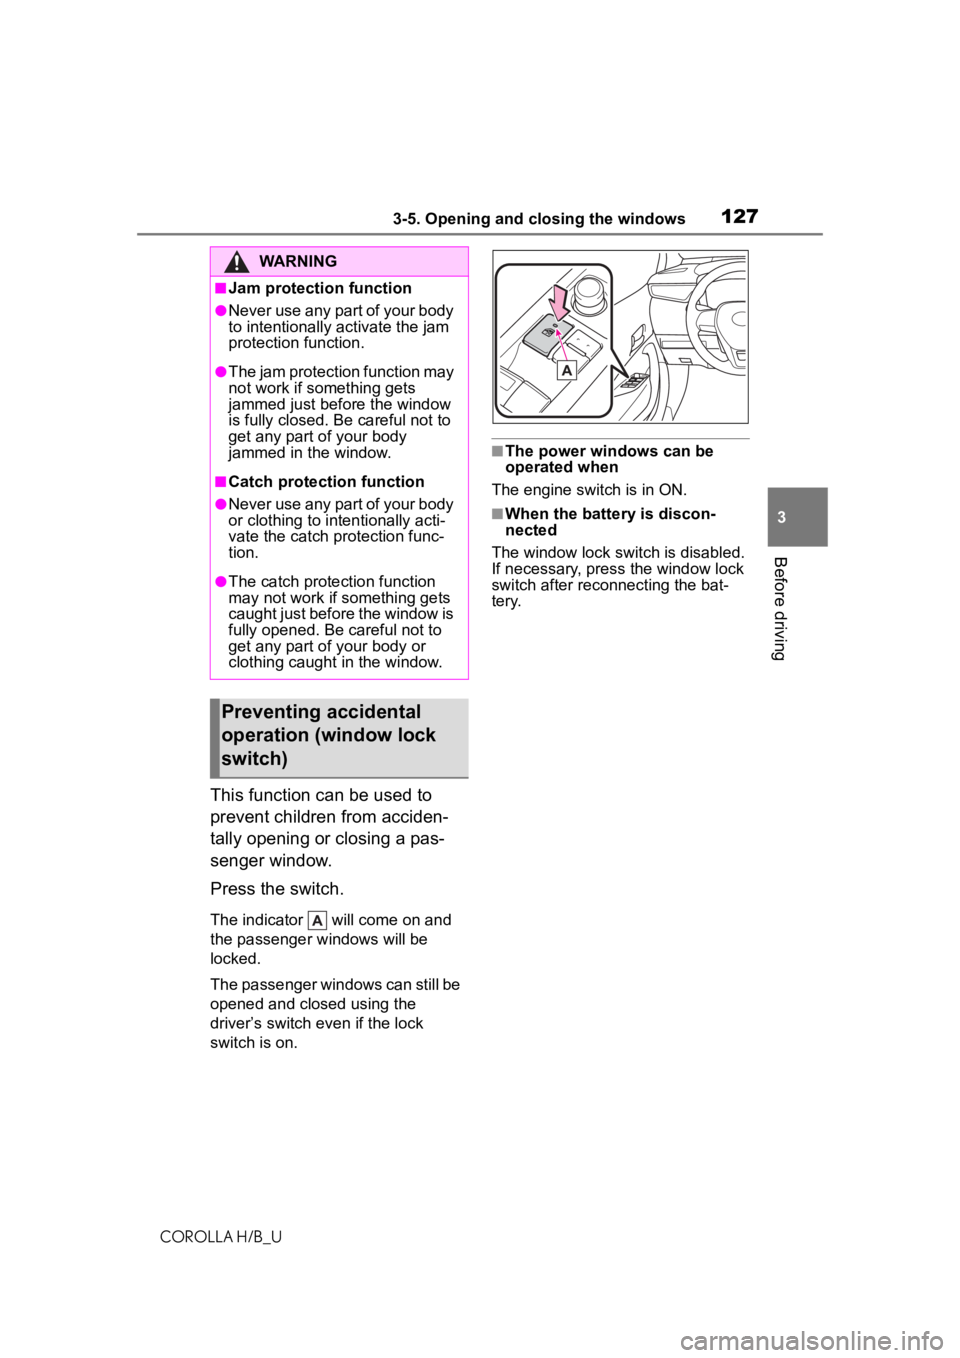
This function can be used to
prevent children from acciden-
tally opening or closing a pas-
senger window.
Press the switch.
The indicator will come on and
the passenger windows will be
locked.
The passenger windows can still be
opened and closed using the
driver’s switch even if the lock
switch is on.
■The power windows can be
operated when
The engine switch is in ON.
■When the battery is discon-
nected
The window lock switch is disabled.
If necessary, press the window lock
switch after reconnecting the bat-
tery.
WARNING
■Jam protection function
●Never use any part of your body
to intentionally a ctivate the jam
protection function.
●The jam protection function may
not work if something gets
jammed just before the window
is fully closed. Be careful not to
get any part of your body
jammed in the window.
■Catch protection function
●Never use any part of your body
or clothing to intentionally acti-
vate the catch p rotection func-
tion.
●The catch protection function
may not work if something gets
caught just before the window is
fully opened. Be careful not to
get any part of your body or
clothing caught in the window.
Preventing accidental
operation (window lock
switch)