seats TOYOTA COROLLA HATCHBACK 2020 (in English) Owner's Manual
[x] Cancel search | Manufacturer: TOYOTA, Model Year: 2020, Model line: COROLLA HATCHBACK, Model: TOYOTA COROLLA HATCHBACK 2020Pages: 572, PDF Size: 13.8 MB
Page 103 of 572
1033-2. Opening, closing and locking the doors
COROLLA H/B_U
3
Before driving
tem or wireless remote control. Lock
or unlock the doors using the
mechanical key. ( P.500)
■Customization
Some functions can be customized.
( P.531)
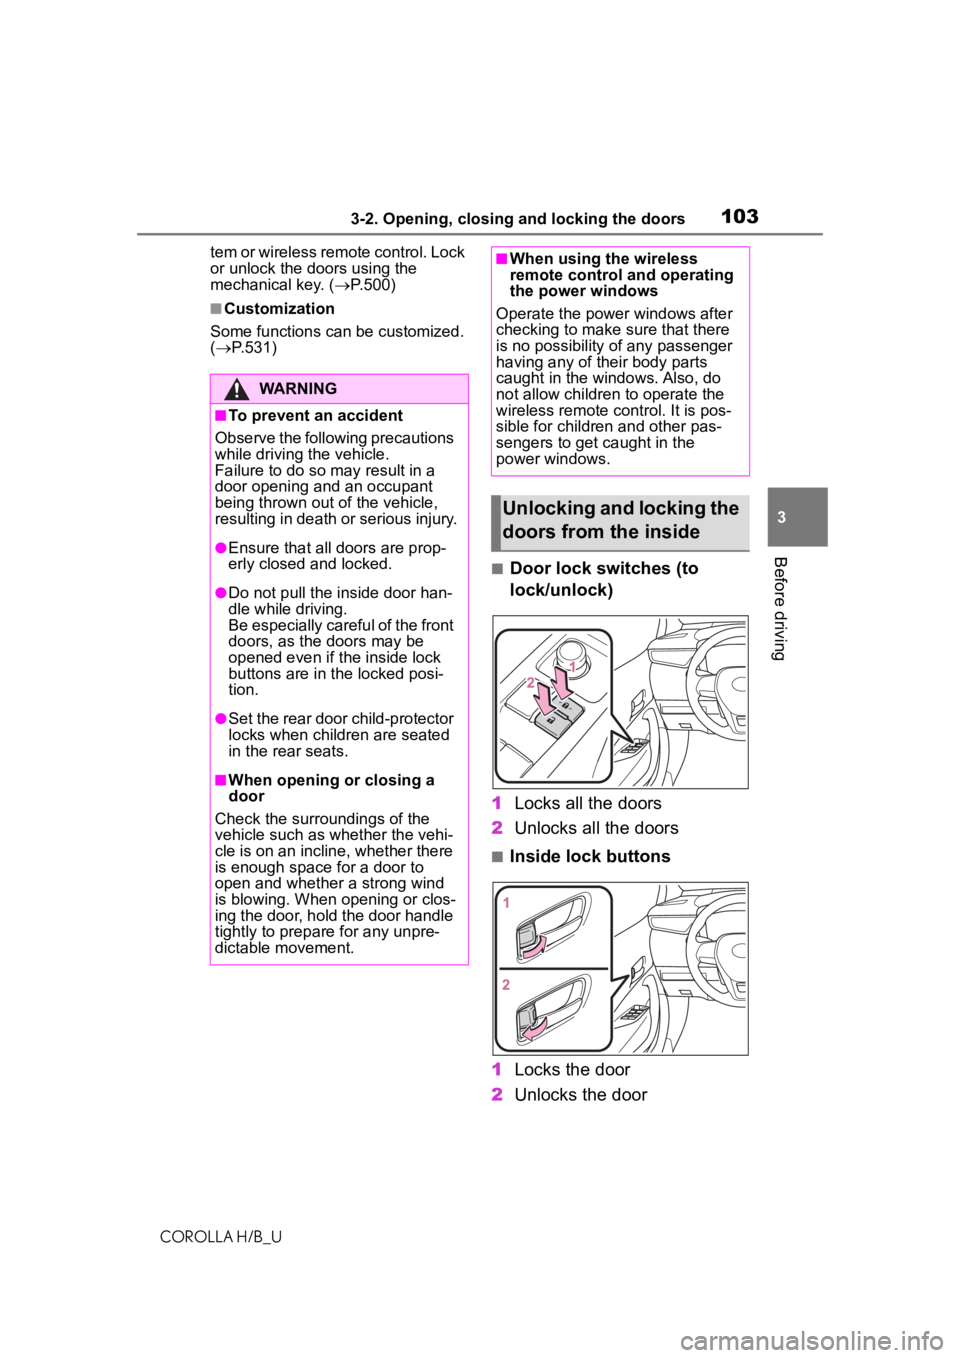
■Door lock switches (to
lock/unlock)
1 Locks all the doors
2 Unlocks all the doors
■Inside lock buttons
1 Locks the door
2 Unlocks the door
WARNING
■To prevent an accident
Observe the following precautions
while driving t he vehicle.
Failure to do so m ay result in a
door opening and an occupant
being thrown out of the vehicle,
resulting in death or serious injury.
●Ensure that all doors are prop-
erly closed and locked.
●Do not pull the inside door han-
dle while driving.
Be especially careful of the front
doors, as the doors may be
opened even if the inside lock
buttons are in the locked posi-
tion.
●Set the rear door child-protector
locks when children are seated
in the rear seats.
■When opening or closing a
door
Check the surroundings of the
vehicle such as whether the vehi-
cle is on an incline, whether there
is enough space for a door to
open and whether a strong wind
is blowing. When opening or clos-
ing the door, hold the door handle
tightly to prepare for any unpre-
dictable movement.
■When using the wireless
remote control and operating
the power windows
Operate the power windows after
checking to make sure that there
is no possibility of any passenger
having any of their body parts
caught in the windows. Also, do
not allow children to operate the
wireless remote control. It is pos-
sible for children and other pas-
sengers to get caught in the
power windows.
Unlocking and locking the
doors from the inside
Page 115 of 572
1153-3. Adjusting the seats
COROLLA H/B_U
3
Before driving
3-3.Adjusting the seats
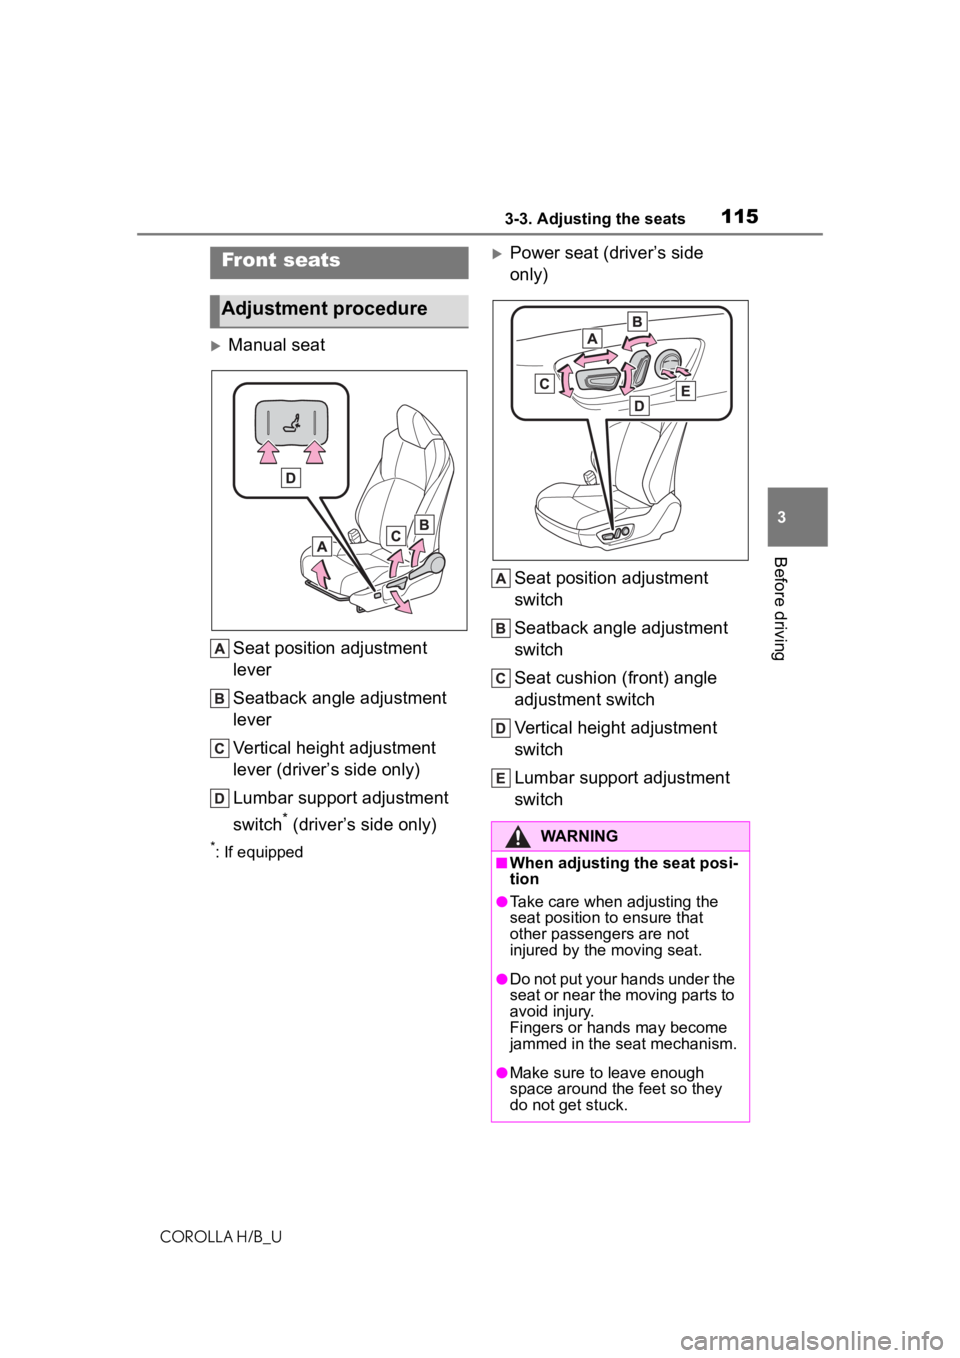
Manual seat Seat position adjustment
lever
Seatback angle adjustment
lever
Vertical height adjustment
lever (driver’s side only)
Lumbar support adjustment
switch
* (driver’s side only)
*: If equipped
Power seat (driver’s side
only)Seat po
sition adjustment
switch
Seatback angle adjustment
switch
Seat cushion (front) angle
adjustment switch
Vertical height adjustment
switch
Lumbar support adjustment
switchFront seats
Adjustment procedure
WARNING
■When adjusting the seat posi-
tion
●Take care when adjusting the
seat position to ensure that
othe
r passengers are
not
inju
red by the moving seat.
●Do not put your hands under theseat or near the moving parts to
avoid injury.
Fingers or hands may become
jammed in the seat mechanism.
●Make sure to leave enough
space around the feet so they
do not get stuck.
Page 116 of 572
1163-3. Adjusting the seats
COROLLA H/B_U
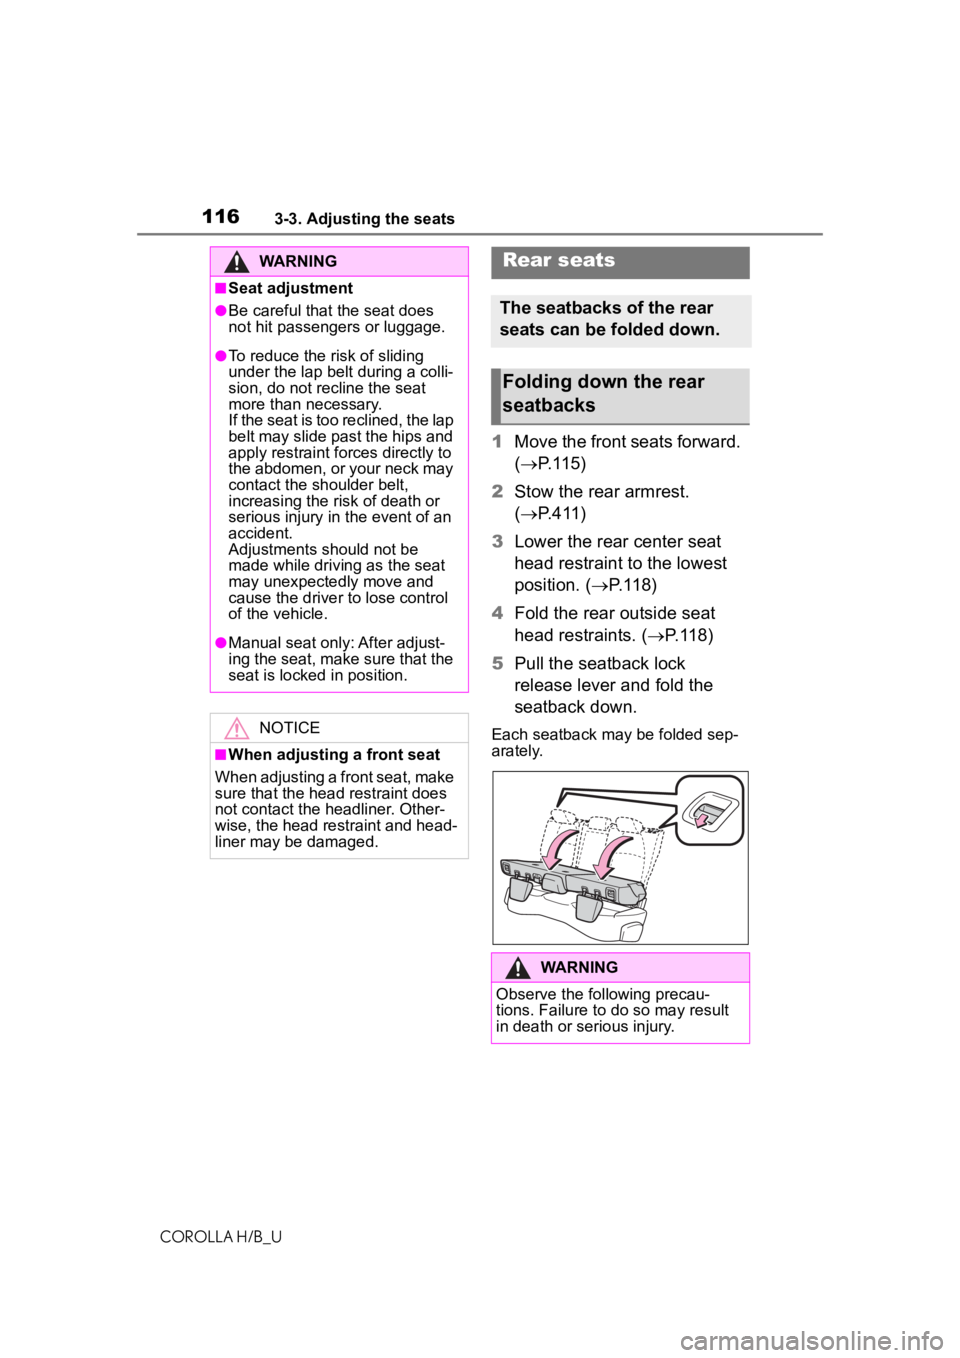
1Move the front seats forward.
( P.115)
2 Stow the rear armrest.
( P.411)
3 Lower the rear center seat
head restraint to the lowest
position. (P.118)
4 Fold the rear outside seat
head restraints. ( P.118)
5 Pull the seatback lock
release lever and fold the
seatback down.
Each seatback may be folded sep-
arately.
WARNING
■Seat adjustment
●Be careful that the seat does
not hit passengers or luggage.
●To reduce the risk of sliding
under the lap belt during a colli-
sion, do not recline the seat
more than necessary.
If the seat is too reclined, the lap
belt may slide past the hips and
apply restraint forces directly to
the abdomen, or your neck may
contact the shoulder belt,
increasing the risk of death or
serious injury in the event of an
accident.
Adjustments should not be
made while driving as the seat
may unexpectedly move and
cause the driver to lose control
of the vehicle.
●Manual seat only: After adjust-
ing the seat, make sure that the
seat is locked in position.
NOTICE
■When adjusting a front seat
When adjusting a front seat, make
sure that the head restraint does
not contact the headliner. Other-
wise, the head restraint and head-
liner may be damaged.
Rear seats
The seatbacks of the rear
seats can be folded down.
Folding down the rear
seatbacks
WARNING
Observe the following precau-
tions. Failure to do so may result
in death or serious injury.
Page 117 of 572
1173-3. Adjusting the seats
COROLLA H/B_U
3
Before driving
WARNING
■When folding the rear seat-
backs down
●Do not fold the seatbacks down
while driving.
●Stop the vehicle on level
ground, set the parking brake
and shift the shift lever to P
(continuously variable transmis-
sion) or N (manual transmis-
sion).
●Do not allow anyo ne to sit on a
folded seatback or in the lug-
gage compartment while driv-
ing.
●Do not allow child ren to enter
the luggage compartment.
●Do not allow any one to sit on
the rear center seat if the rear
right seat is folded down, as the
seat belt buckle for the rear cen-
ter seat belt is then concealed
under the folded seat and can-
not be used.
●Be careful not to get your hand
caught when folding the rear
seatbacks.
●Adjust the position of the front
seats before folding down the
rear seatbacks so that the front
seats do not interfere with the
rear seatbacks when folding
down the rear seatbacks.
■After returning the rear seat-
back to the upright position
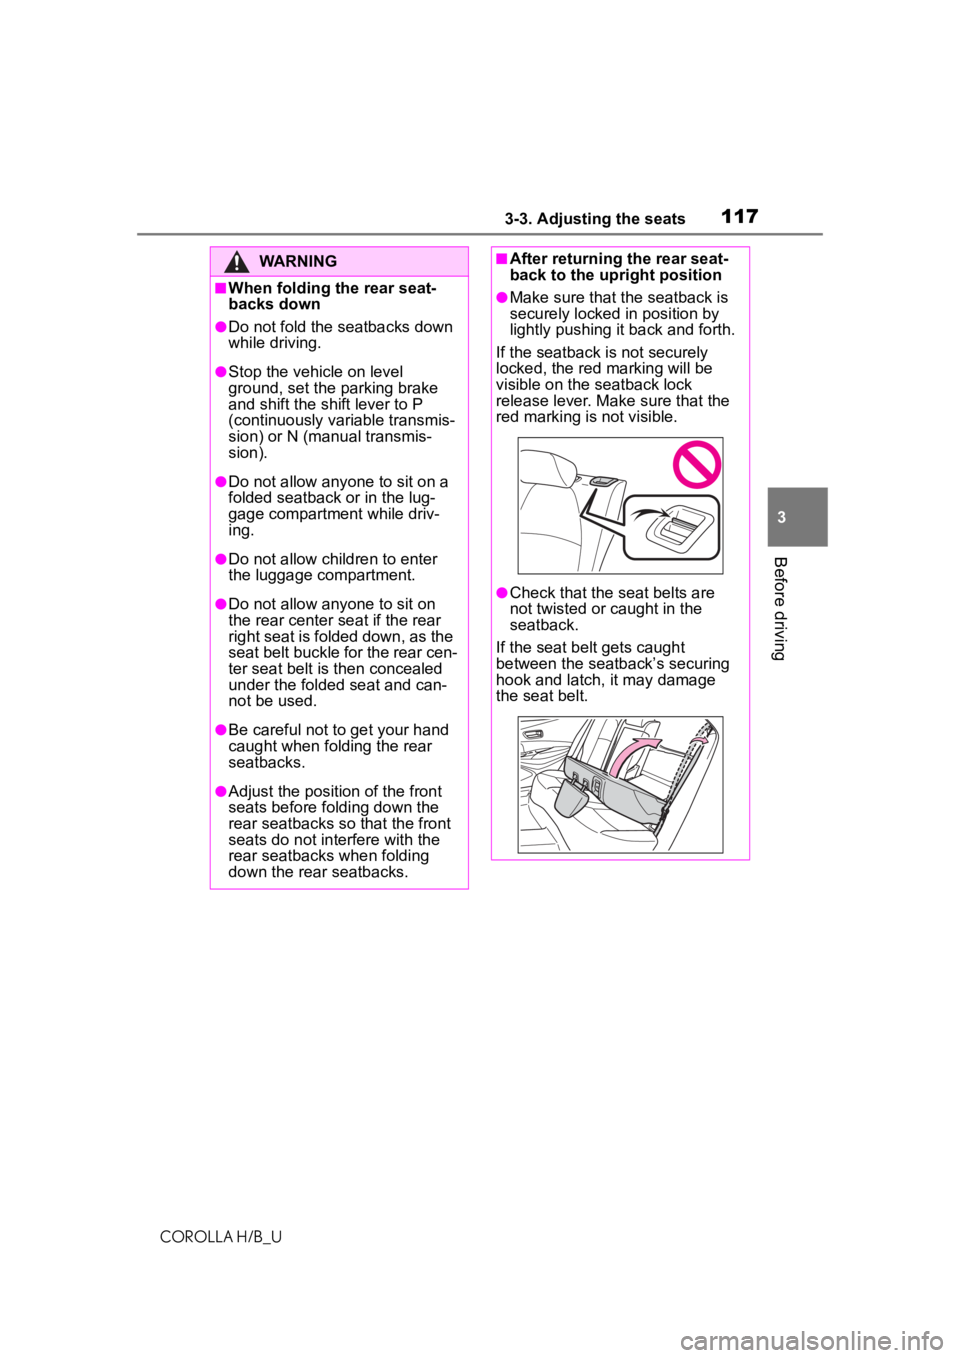
●Make sure that the seatback is
securely locked in position by
lightly pushing it back and forth.
If the seatback is not securely
locked, the red marking will be
visible on the seatback lock
release lever. Make sure that the
red marking is not visible.
●Check that the seat belts are
not twisted or caught in the
seatback.
If the seat belt gets caught
between the seatback’s securing
hook and latch, it may damage
the seat belt.
Page 118 of 572
1183-3. Adjusting the seats
COROLLA H/B_U
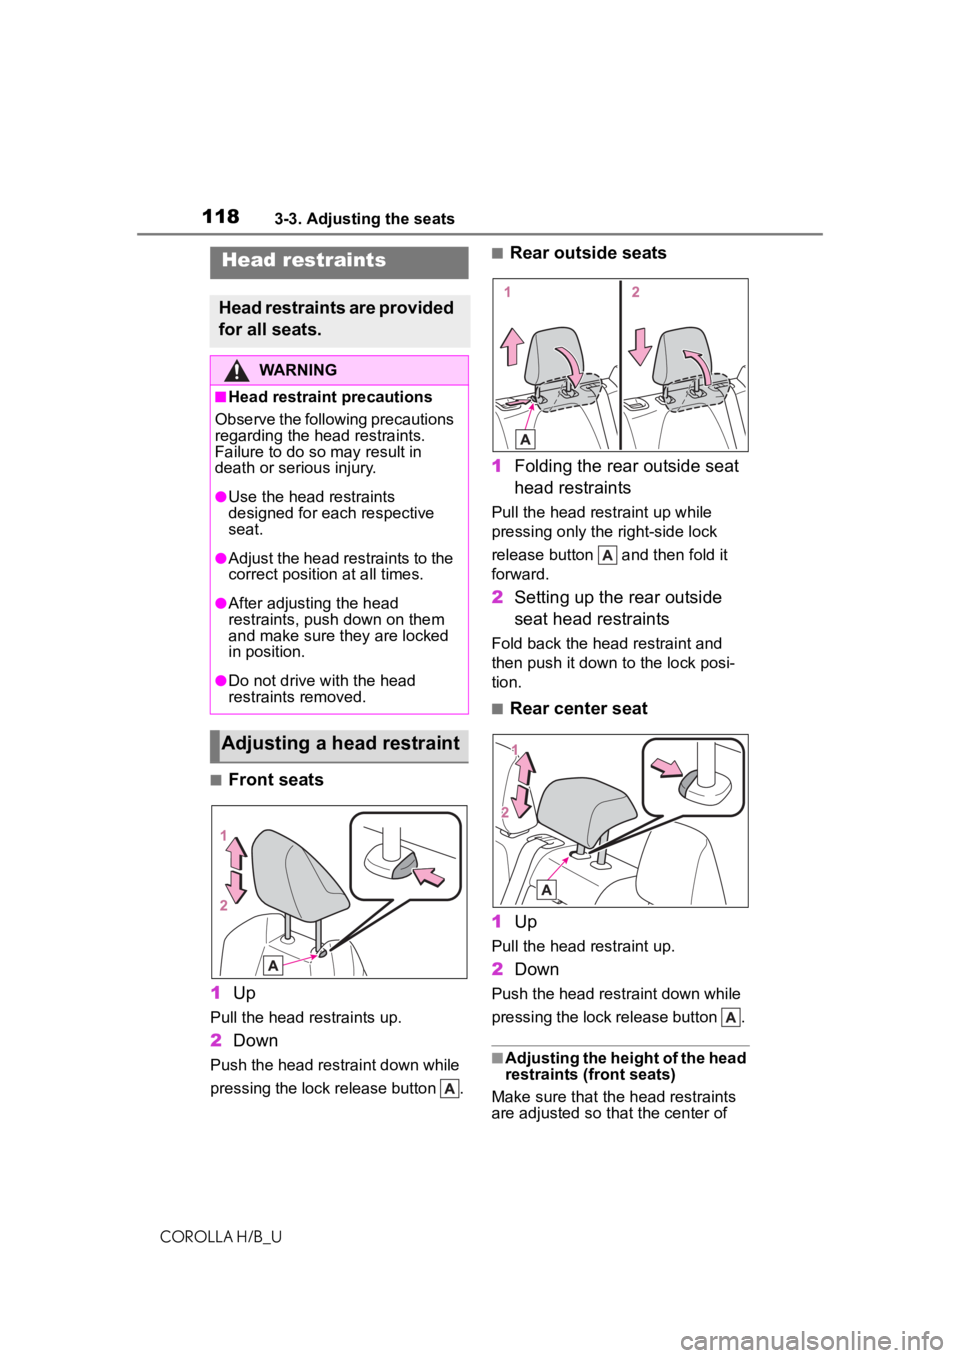
■Front seats
1 Up
Pull the head restraints up.
2Down
Push the head restraint down while
pressing the lock release button .
■Rear outside seats
1 Folding the rear outside seat
head restraints
Pull the head restraint up while
pressing only the right-side lock
release button and then fold it
forward.
2Setting up the rear outside
seat head restraints
Fold back the head restraint and
then push it down to the lock posi-
tion.
■Rear center seat
1 Up
Pull the head restraint up.
2Down
Push the head restraint down while
pressing the lock release button .
■Adjusting the height of the head
restraints (front seats)
Make sure that the head restraints
are adjusted so that the center of
Head restraints
Head restraints are provided
for all seats.
WARNING
■Head restraint precautions
Observe the following precautions
regarding the head restraints.
Failure to do so m ay result in
death or serious injury.
●Use the head restraints
designed for each respective
seat.
●Adjust the head restraints to the
correct position at all times.
●After adjusting the head
restraints, push down on them
and make sure they are locked
in position.
●Do not drive with the head
restraints removed.
Adjusting a head restraint
Page 119 of 572
1193-3. Adjusting the seats
COROLLA H/B_U
3
Before driving
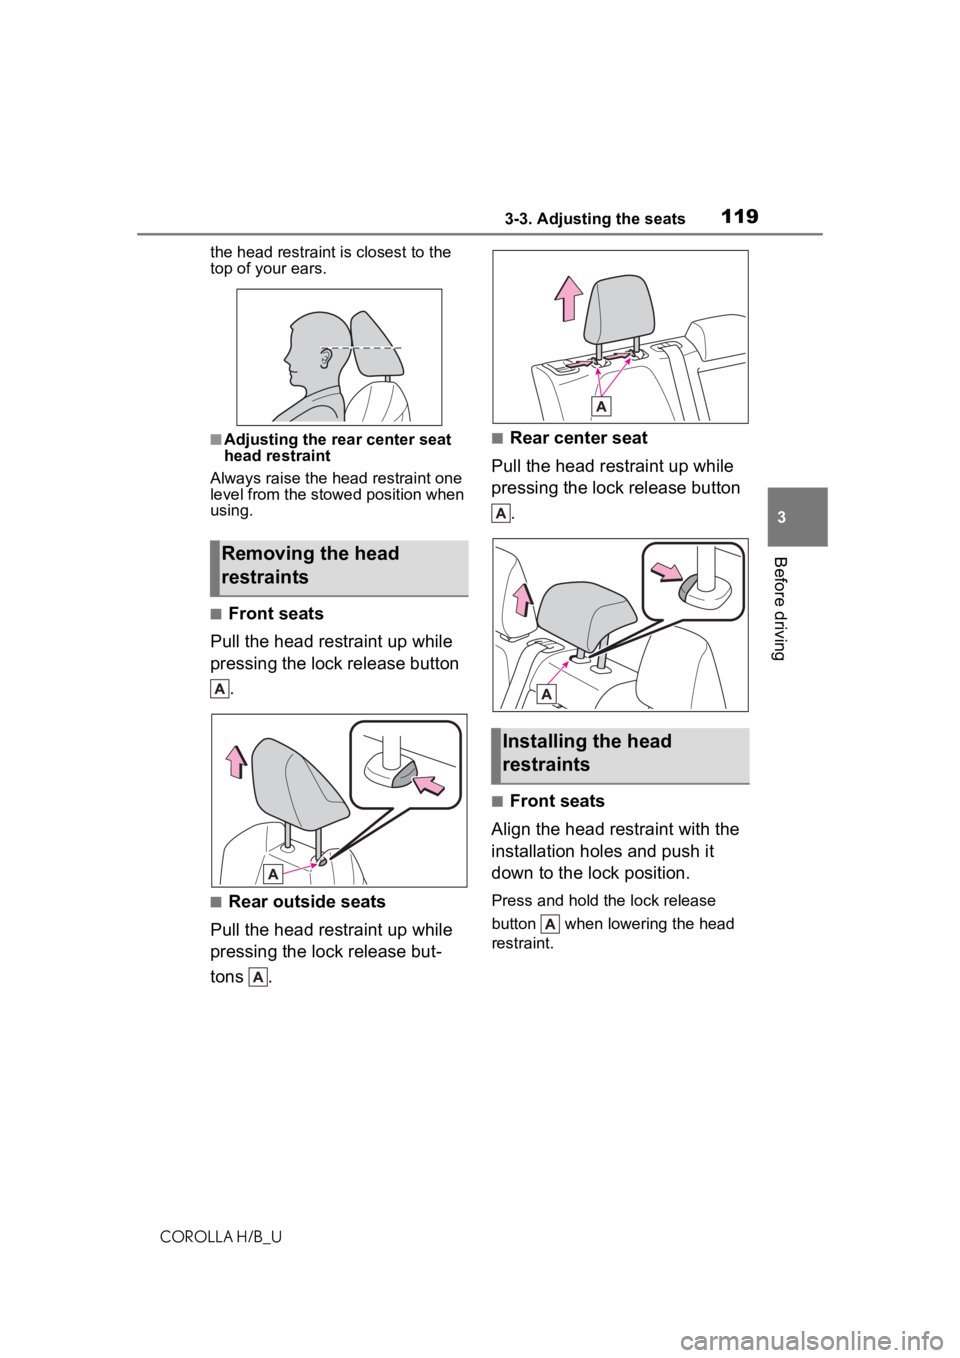
the head restraint is closest to the
top of your ears.
■Adjusting the rear center seat
head restraint
Always raise the head restraint one
level from the stowed position when
using.
■Front seats
Pull the head restraint up while
pressing the lock release button .
■Rear outside seats
Pull the head restraint up while
pressing the lock release but-
tons .
■Rear center seat
Pull the head restraint up while
pressing the lock release button .
■Front seats
Align the head restraint with the
installation holes and push it
down to the lock position.
Press and hold the lock release
button when lowering the head
restraint.
Removing the head
restraints
Installing the head
restraints
Page 120 of 572
1203-3. Adjusting the seats
COROLLA H/B_U
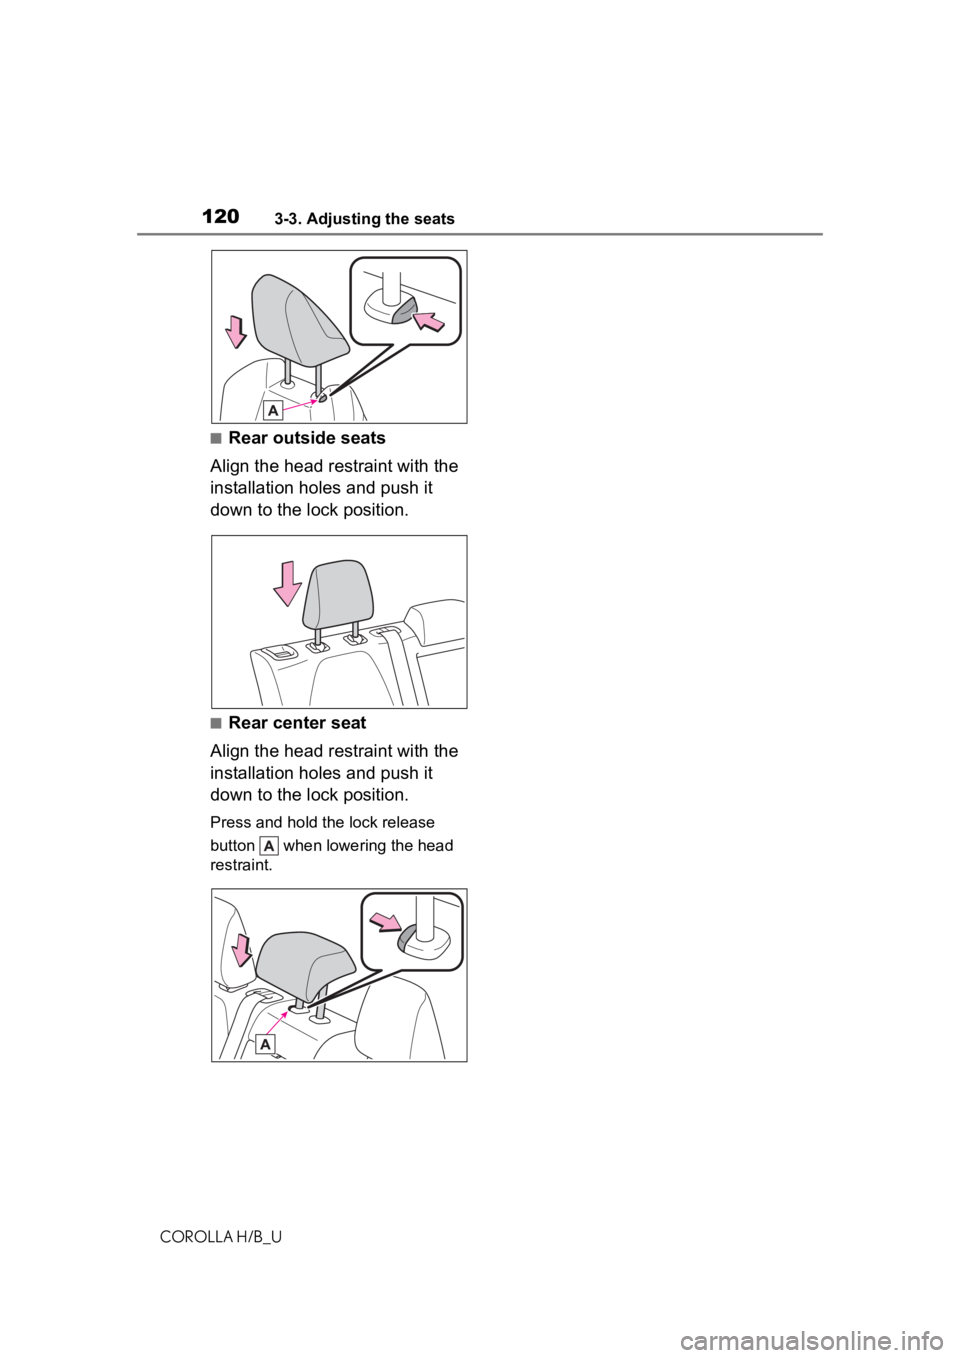
■Rear outside seats
Align the head restraint with the
installation holes and push it
down to the lock position.
■Rear center seat
Align the head restraint with the
installation holes and push it
down to the lock position.
Press and hold the lock release
button when lowering the head
restraint.
Page 139 of 572
1394-1. Before driving
COROLLA H/B_U
4
Driving
total load capacity (vehicle
capacity weight) of B lb. (kg),
the available amount of cargo
and luggage load capacity will
be C lb. (kg) as follows:
B
*2 lb. (kg) - A*1 lb. (kg) = C*3 lb.
(kg)
*1: A =Weight of people
*2: B =Total load capacity
*3: C =Available cargo and luggage load
In this condition, if 3 more passen-
gers with the combined weight of D
lb. (kg) get on, the available cargo
and luggage load will be reduced E
lb. (kg) as follows:
C lb. (kg) - D*4 lb. (kg) = E*5 lb.
(kg)
*4: D =Additional weight of people
*5: E =Available cargo and luggage load
As shown in the example above,
if the number of occupants
increases, the cargo and lug-
gage load will be reduced by an
amount that equals the
increased weight due to the
additional occupants. In other
words, if an increase in the num-
ber of occupants causes an
excess of the total load capacity
(combined weight of occupants
plus cargo and luggage load),
you must reduce the cargo and
luggage on your vehicle.
WARNING
■Things that must not be car-
ried in the luggage compart-
ment
The following things may cause a
fire if loaded in the luggage com-
partment:
●Receptacles containing gaso-
line
●Aerosol cans
■Storage precautions
Observe the following precau-
tions.
Failure to do so may prevent the
pedals from being depressed
properly, may block the driver’s
vision, or may res ult in items hit-
ting the driver or passengers, pos-
sibly causing an accident.
●Stow cargo and luggage in the
luggage compartment when-
ever possible.
●Do not place cargo or luggage
in or on the follo wing locations.
• At the feet of the driver
• On the front passenger or rear seats (when stacking items)
• On the luggage cover
• On the instrument panel
• On the dashboard
●Secure all items in the occupant
compartment.
■Capacity and distribution
●Do not exceed the maximum
axle weight rating or the total
vehicle weight rating.
Page 393 of 572
3936-1. Using the air conditioning system and defogger
COROLLA H/B_U
6
Interior features
*: If equipped
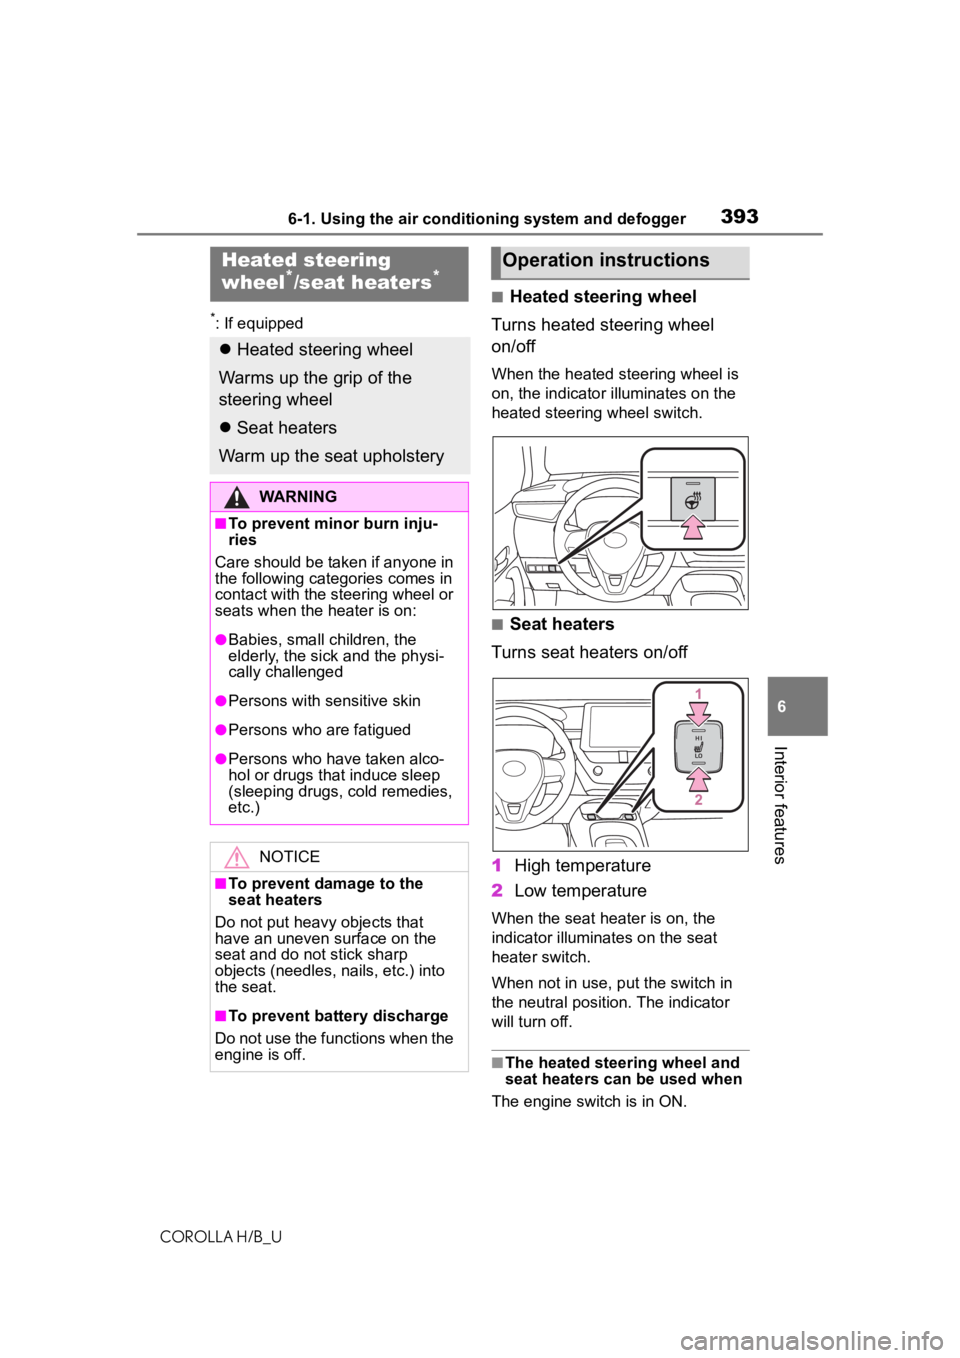
■Heated steering wheel
Turns heated steering wheel
on/off
When the heated steering wheel is
on, the indicator illuminates on the
heated steering wheel switch.
■Seat heaters
Turns seat heaters on/off
1 High temperature
2 Low temperature
When the seat heater is on, the
indicator illuminates on the seat
heater switch.
When not in use, put the switch in
the neutral position. The indicator
will turn off.
■The heated steering wheel and
seat heaters can be used when
The engine switch is in ON.
Heated steering
wheel*/seat heaters*
Heated steering wheel
Warms up the grip of the
steering wheel
Seat heaters
Warm up the seat upholstery
WARNING
■To prevent minor burn inju-
ries
Care should be taken if anyone in
the following categories comes in
contact with the steering wheel or
seats when the heater is on:
●Babies, small children, the
elderly, the sick and the physi-
cally challenged
●Persons with sensitive skin
●Persons who are fatigued
●Persons who have taken alco-
hol or drugs that induce sleep
(sleeping drugs, cold remedies,
etc.)
NOTICE
■To prevent damage to the
seat heaters
Do not put heavy objects that
have an uneven surface on the
seat and do not stick sharp
objects (needles, nails, etc.) into
the seat.
■To prevent battery discharge
Do not use the functions when the
engine is off.
Operation instructions
Page 417 of 572
4177-1. Maintenance and care
COROLLA H/B_U
7
Maintenance and care
WARNING
■Water in the vehicle
●Do not splash or spill liquid in
the vehicle.
Doing so may cause electrical
components, etc. to malfunc-
tion or catch fire.
●Do not get any of the SRS com-
ponents or wiring in the vehicle
interior wet.
( P.29)
An electrical malfunction may
cause the airbags to deploy or
not function properly, resulting
in death or serious injury.
●Vehicles with wireless charger:
Do not let the wireless charger
( P.403) get wet. Failure to do
so may cause the charger to
become hot and cause burns or
could cause electric shock
resulting in death or serious
injury.
■Cleaning the interior (espe-
cially instrument panel)
Do not use polish wax or polish
cleaner. The instrument panel
may reflect off the windshield,
obstructing the dr iver’s view and
leading to an accident, resulting in
death or serious injury.
NOTICE
■Cleaning detergents
●Do not use the following types
of detergent, as they may dis-
color the vehicle interior or
cause streaks or damage to
painted surfaces:
• Non-seat portions: Organic sub- stances such as benzene or
gasoline, alkaline or acidic solu-
tions, dye, and bleach
• Seats: Alkaline or acidic solu- tions, such as thinner, benzene,
and alcohol
●Do not use polish wax or polish
cleaner. The instrument panel’s
or other interior part’s painted
surface may be damaged.
■Preventing damage to leather
surfaces
Observe the following precautions
to avoid damage to and deteriora-
tion of leather surfaces:
●Remove any dust or dirt from
leather surfaces immediately.
●Do not expose the vehicle to
direct sunlight for extended peri-
ods of time. Park the vehicle in
the shade, especially during
summer.
●Do not place items made of
vinyl, plastic, or containing wax
on the upholstery, as they may
stick to the leather surface if the
vehicle interior heats up signifi-
cantly.
■Water on the floor
Do not wash the v ehicle floor with
water.
Vehicle systems such as the
audio system may be damaged if
water comes into contact with
electrical components such as the
audio system above or under the
floor of the vehicle. Water may
also cause the body to rust.
■When cleaning the inside of
the windshield
Do not allow glass cleaner to con-
tact the lens. Also, do not touch
the lens. ( P.172)