tire pressure reset TOYOTA COROLLA HATCHBACK 2020 Owners Manual (in English)
[x] Cancel search | Manufacturer: TOYOTA, Model Year: 2020, Model line: COROLLA HATCHBACK, Model: TOYOTA COROLLA HATCHBACK 2020Pages: 572, PDF Size: 13.8 MB
Page 443 of 572

4437-3. Do-it-yourself maintenance
COROLLA H/B_U
7
Maintenance and care
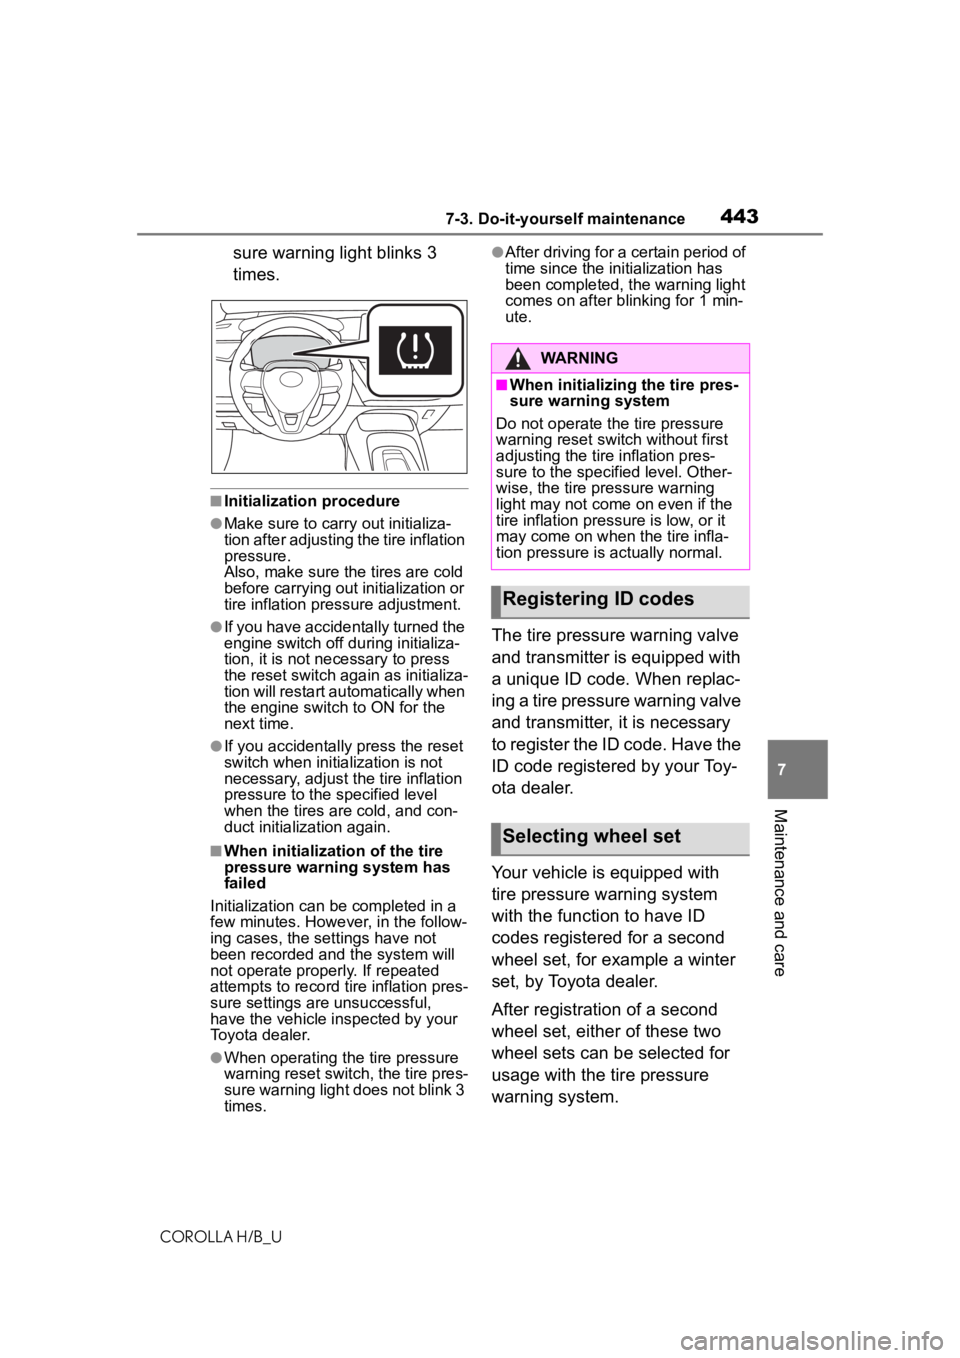
sure warning light blinks 3
times.
■Initialization procedure
●Make sure to carry out initializa-
tion after adjusting the tire inflation
pressure.
Also, make sure the tires are cold
before carrying out initialization or
tire inflation pressure adjustment.
●If you have accidentally turned the
engine switch off during initializa-
tion, it is not necessary to press
the reset switch again as initializa-
tion will restart aut omatically when
the engine switch to ON for the
next time.
●If you accidentally press the reset
switch when initialization is not
necessary, adjust the tire inflation
pressure to the specified level
when the tires are cold, and con-
duct initialization again.
■When initialization of the tire
pressure warning system has
failed
Initialization can be completed in a
few minutes. However, in the follow-
ing cases, the set tings have not
been recorded an d the system will
not operate properly. If repeated
attempts to record tire inflation pres-
sure settings are unsuccessful,
have the vehicle inspected by your
Toyota dealer.
●When operating the tire pressure
warning reset swit ch, the tire pres-
sure warning light does not blink 3
times.
●After driving for a certain period of
time since the initialization has
been completed, the warning light
comes on after bl inking for 1 min-
ute.
The tire pressure warning valve
and transmitter is equipped with
a unique ID code. When replac-
ing a tire pressure warning valve
and transmitter, it is necessary
to register the ID code. Have the
ID code registered by your Toy-
ota dealer.
Your vehicle is equipped with
tire pressure warning system
with the function to have ID
codes registered for a second
wheel set, for example a winter
set, by Toyota dealer.
After registration of a second
wheel set, either of these two
wheel sets can be selected for
usage with the tire pressure
warning system.
WARNING
■When initializing the tire pres-
sure warning system
Do not operate the tire pressure
warning reset switch without first
adjusting the tire inflation pres-
sure to the specif ied level. Other-
wise, the tire pressure warning
light may not come on even if the
tire inflation press ure is low, or it
may come on when the tire infla-
tion pressure is actually normal.
Registering ID codes
Selecting wheel set
Page 479 of 572

4798-2. Steps to take in an emergency
COROLLA H/B_U
8
When trouble arises
reset the message after the mainte-
nance is performed. ( P.420)
*: Refer to the separate “Scheduled
Maintenance” or “Owner’s Man-
ual Supplement” for the mainte-
nance interval applicable to your
vehicle.
■If a message that indicates the
need for visiting your Toyota
dealer is displayed
The system or part shown on the
multi-information display is malfunc-
tioning. Have the vehicle inspected
by your Toyota dealer immediately.
■If a message that indicates the
need for referring to Owner’s
Manual is displayed
●If “Engine Coolant Temp High” is
displayed, follow the instructions
accordingly. ( P.506)
●If any of the following messages
are displayed on the multi-infor-
mation display, it may indicate a
malfunction. Have the vehicle
inspected by you r Toyota dealer
immediately.
• “Smart Key System Malfunction”
●If any of the following messages
are displayed on the multi-infor-
mation display, it may indicate a
malfunction. Immediately stop the
vehicle and contact your Toyota
dealer.
• “Braking Power Low”
• “Charging System Malfunction”
• “Oil Pressure Low”
Stop the vehicle in a safe
place on a hard, flat surface.
Set the parking brake.
Shift the shift lever to P (con-
NOTICE
■If “High Power Consumption
Partial Limit on AC/Heater
Operation” is displayed fre-
quently
There is a possible malfunction
relating to the charging system or
the battery may be deteriorating.
Have the vehicle inspected by
your Toyota dealer.
If you have a flat tire
(vehicles without
spare tire)
Your vehicle is not equipped
with a spare tire, but instead
is equipped with an emer-
gency tire puncture repair
kit.
A puncture caused by a nail
or screw passing through
the tire tread can be
repaired temporarily using
the emergency tire puncture
repair kit. (The kit contains a
bottle of sealant. The seal-
ant can be used only once
to temporarily repair one
tire without removing the
nail or screw from the tire.)
After temporarily repairing
the tire with the kit, have the
tire repaired or replaced by
your Toyota dealer.
WARNING
■If you have a flat tire
Do not continue driving with a flat
tire.
Driving even a short distance with
a flat tire can damage the tire and
the wheel beyond repair, which
could result in an accident.
Before repairing the tire
Page 496 of 572

4968-2. Steps to take in an emergency
COROLLA H/B_Uthe disc wheel seat .
3
Lower the vehicle.
4 Firmly tighten each wheel nut
two or three times in the
order shown in the illustra-
tion.
Tightening torque:
76 ft•lbf (103 N•m, 10.5 kgf•m)
5Stow the flat tire, tire jack and
all tools.
■The compact spare tire
●The compact spare tire is identi-
fied by the label “TEMPORARY USE ONLY” on the tire sidewall.
Use the compact spare tire tempo-
rarily, and only in an emergency.
●Make sure to check the tire infla-
tion pressure of the compact
spare tire. (
P.515)
■When the compact spare tire is
equipped
The vehicle becomes lower when
driving with the compact spare tire
compared to when driving with stan-
dard tires.
■After completing the tire
change
The tire pressure warning system
must be reset. ( P.442)
■When using the compact spare
tire
As the compact spare tire is not
equipped with a tire pressure warn-
ing valve and transm itter, low infla-
tion pressure of t he spare tire will
not be indicated by the tire pressure
warning system. Also , if you replace
the compact spare ti re after the tire
pressure warning light comes on,
the light remains on.
■If you have a flat front tire on a
road covered wit h snow or ice
(vehicles with a compact spare
tire)
Install the compact spare tire on one
of the rear wheels of the vehicle.
Perform the following steps and fit
tire chains to the front tires:
1 Replace a rear tire with the com-
pact spare tire.
2 Replace the flat front tire with the
tire removed from the rear of the
vehicle.
3 Fit tire chains to the front tires.
■When reinstalling the wheel
ornament (steel wheels except
compact spare tire)
Align the cutout of the wheel orna-
ment with the valve stem as shown
in the illustration.
Page 565 of 572

565Alphabetical Index
COROLLA H/B_U
Wattage ................................ 516
Side mirrors Adjustment ........................... 123
BSM (Blind Spot Monitor)..... 227
Folding ................................. 123
Side turn signal lights Replacing light bulbs ............ 455
Turn signal lever ................... 153
Side windows ...... ................... 125
SiriusXM (SXM) ....................... 302
Smart key system Antenna location .................. 108
Entry functions ............. 101, 106
Starting the engine ............... 142
Snow tires ............................... 246
Spare tire Inflation pressure.................. 515
Storage location ................... 491
Spark plug ............................... 513
Specifications ......................... 510
Speedometer ...................... 74, 78
Status icon .............................. 254 Status icon explanation ........ 254
Steering lock Column lock release............. 142
Steering lock system warning message............................. 142
Steering switch ............... 318, 334 Audio switch ......................... 318
Talk switch ............................ 334
Steering wheel Adjustment ........................... 121
Heated steering wheel ......... 393
Meter control switches ........... 83
Stop lights Replacing light bulbs ............ 455
Storage features ..................... 397
Stuck If the vehicle becomes stuck 508
Sun visors ............................... 410 Switches
Automatic High Beam system...........................................163
Brake Hold switch .................157
Display change button ......75, 80
Door lock switches ...............103
Driving mode select switch ...240
Dynamic radar cruise control switch .................................215
Dynamic radar cruise control with full-speed range switch205
Emergency flashers switch...460
Engine switch .......................142
Heated steering wheel switch ...........................................393
Ignition switch .......................142
Instrument panel light control switches..........................76, 81
Light switches .......................160
LTA (Lane-Tracing Assist) switch ...........................................191
Meter control switches............83
Outside rear v iew mirror
switches..............................123
Paddle shift switches ....149, 150
Parking brake switch ............154
PCS OFF switch ...................180
Power door lock switch.........103
Power window switches .......125
Rear window and outside rear view mirror defoggers switch...........................................386
Seat heater switches ............393
“SOS” button ..........................58
Tire pressure warning reset switch .................................442
Vehicle-to-vehicle distance switch .........................205, 215
VSC OFF switch ...................242
Window lock switch ..............127
Windshield wiper and washer switch .................................166